Goodyear GY120 User manual

Models, Modelos, Modèles: GY120, GY130, GY135, GY140, GY145
N A V I G AT I O N S Y S T E M U S E R G U I D E
SISTEMA DE NAVEGACIÓN MANUAL DEL USUARIO
GUIDE DE L’UTILISATEUR DU SYSTÈME DE NAVIGATION

SAVE THESE INSTRUCTIONS FOR FUTURE REFERENCE
GUARDE ESTAS INSTRUCCIONES PARA FUTURA REFERENCIA
CONSERVEZ CES INSTRUCTIONS DANS VOS DOSSIERS DE RÉFÉRENCE

Contents
In the Box 2
Charging your GPS 2
Quick Start Guide 3
The GPS Unit 4-5
What’s On Screen 6
Destination Menu 7-8
Enter New Destination 7
Entering an Address 7
Points of Interest 7
Favorites 7
Route Information 8
Stop / Start Navigation 8
Home 8
Navigation Settings 8-10
Route Settings 8
Regional Settings 8-9
Display Settings 9-10
Device Settings 10
Display Brightness 10
Volume Control 10
Calibration 10
Troubleshooting 11
Warning Information 12
Warning 12
Battery Warnings 12
Important Information 12
FCC Compliance 13
Industry Canada Compliance 13
Limited Warranty 14

In The Box
Your Goodyear GPS box contains the following items :
(1) Navigation Unit
(1) Instruction Manual
(1) Car Charger
(1) USB Cable
(1) Windshield Mount
(1) GPS Bracket
(1) Dashboard Disc
(1) GPS Case ( GY130, GY135, GY140, and GY145 )
Note : The USB Cable is used for software upgrades to your GPS unit. It can also be used to
charge your GPS when not in a vehicle – simply turn the GPS to the O position, and
connect the USB cable to the GPS and to a computer to charge.
Charging your GPS
To charge your GPS, plug it into the car charger included with the device. You may also use
the included USB Cable to charge the GPS by connecting it to any computer. For faster
charging, be sure that the GPS unit is switched to the O position. Fully charge for 6 hours
before rst use. The LED indicator on the front of the GPS unit will show Red for charging,
or Green for charging complete.
WARNING : This product contains a non-user-replaceable lithium-ion battery.
See the Battery Warnings section for important battery safety information.
2

Quick Start Guide
•Step 1 : Prepare the GPS Mount
Select a suitable location to mount your GPS unit. Clean and dry the suction
cup and the selected area of your windshield.
Fit the bracket onto the windshield mount, making sure that it locks into place.
Hold the windshield mount at against the windshield (or onto the dashboard disc),
and push the lever back to secure the mount.
•Step 2 : Turn the GPS On
Plug the power cable into the GPS, and the other end into your vehicle’s power outlet.
Activate the unit using the On/O power switch on the back.
Place the GPS onto the mount by tting the bottom of the GPS onto the bracket,
then gently pushing the top of the GPS back until it snaps into the bracket.
Adjust the mount until you have a comfortable viewing angle.
•Step 3 : Set Regional Settings
When your GPS starts for the rst time, you will be presented with the Regional Settings screen.
From here, you should choose your preferences – Language, Time Format, Units, and Time Zone.
Press the check mark when complete to go to the Navigation Menu.
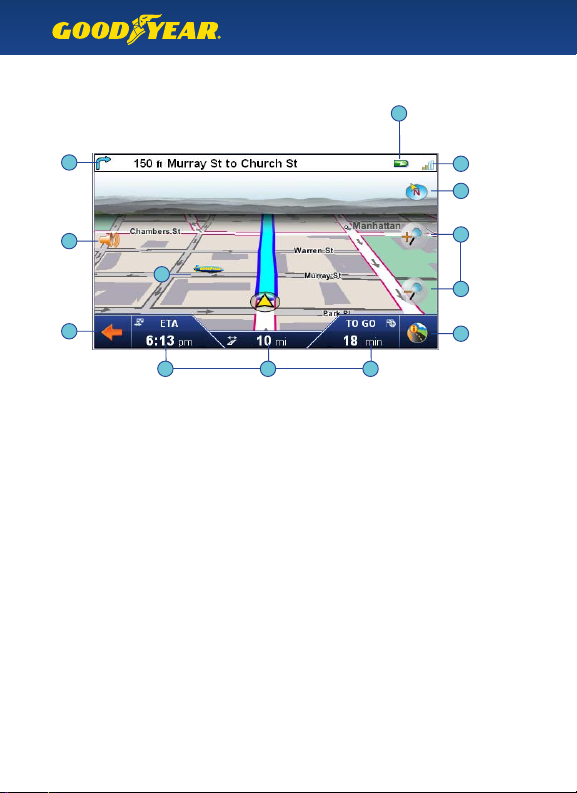
• Step 4 : Acquire Satellite Signal
Before the GPS can nd your current location and navigate a route, it must nd a signal. Be sure
that your GPS is mounted in a place that is visible to the sky, and that you are not parked indoors
or in any location where the sky is obscured. On the map screen, the satellite signal is indicated
on the top right, by the signal bars. When you have at least 1 green signal bar, the GPS has
acquired a sucient signal to navigate.
Note : The rst time you use your GPS in a new location, it can take several minutes to acquire a
signal. To speed up signal acquisition, be sure to use the Sleep / Resume button on the
top of the GPS rather than the On/O switch on the back.
•Step 5 : Select your Destination
From the Navigation Menu, choose“Enter a new Destination,”“Points of Interest,”or Favorites.
Follow the prompts to select the exact address or location for your selection.
•Step 6 : Drive!
The GPS will give you audio prompts and turn-by-turn navigation. It will automatically reroute
if you go o-course, so there’s no need to touch the screen again once your course is set.
3

The GPS Unit - GY120, GY130, GY135
Sleep / Resume Button
LCD Touchscreen
Audio Out
SD Card and Slot
Mini USB Port for Charging and
Upgrades
Port for External Antenna
(sold seperately)
On / O SwitchSpeaker
4

The GPS Unit - GY140, GY145
Mini USB Port for Charging and Upgrades
(on bottom)
Sleep / Resume Button
LCD Touchscreen
SD Card and Slot
Port for External Antenna
(sold seperately)
On / O SwitchSpeaker
Audio Out
A / C Charging Port
5

What’s On Screen
Explanation of GPS map screen
6
The top bar shows the upcoming turn direction, distance, and road name.
When there is no immediate upcoming turn, it also shows the current road name.
Tip : Tap the top bar to repeat the last spoken command.
GPS Satellite strength – Red means weak or no signal. You can tap this icon to see a
larger compass, number of satellites present, and your current latitude and longitude.
Battery Indicator – shows current battery strength, or if the GPS unit is plugged
into a power source.
Tap here to go to the Navigation Menu.
Tap here for the Route Information screen, and to set a detour.
The compass icon shows your current direction.
Tap this icon to cycle the map direction between Car Up, North Up, or 3D View.
Tap the + or – icons to zoom in or out of the map.
Tap the auto-zoom icon to return to automatic zoom.
Note : The map automatically zooms based on location and speed, and auto-zoom
settings can be changed in the Display Settings menu.
Volume Settings – tap this icon to raise or lower the speech volume and button volume.
Local Points of Interest icons show selected locations nearby.
The bottom bar shows your Estimated Time of Arrival, Distance to Arrival,
and Time to Go. When not on a route, the display shows the Current Time and Speed.
1 •
2 •
3 •
4 •
5 •
6 •
7 •
8 •
9 •
10 •
12
3
45
6
7
7
8
9
10
10 10

Tip : Your most recent entries are shown on top of this menu. Tap any of them to
route to that address instantly.
Enter New Destination
Tap“Enter new dest”to enter a new address. Select the Region, State/Province, City,
Street, and house number as prompted.
Entering an Address
When you enter the State or City name, the previous choices are shown on top. You can tap
these to select or type a new choice. As you type, the letters that are no longer applicable will
be grayed out. When you see your selection on top, tap the button. Hit the X on the top right to
backspace, and hit the Arrow on the bottom left to cancel and return to the previous menu.
Tip : When entering the state, you can also use the state’s abbreviation, i.e.“NY”for New York.
When you have completed entering an address, the GPS will show you the full address and
its location on a map. From here, you can :
• Tap the Check mark to navigate to this address
• Tap “Place as favorite”to add this location to your Favorites
• Tap “As home address”to set this location as the Home button on the Destination Menu
• Tap “Route Options” to change the type of vehicle, route type, or to use/avoid Ferries,
Highways, or Toll Roads
Points of Interest
Select “Points of Interest”( POI ) to choose the type of location to navigate to.
After choosing the category, you can choose :
At a certain place - enter the nearby location for the POI
Nearby - Find a POI near your current location
Along the route - nd a POI along your current route
(This option will only be available if currently on a route)
At destination - nd a POI near your destination
(This option will only be available if currently on a route)
Favorites
Select “Favorites”to choose a destination from your Favorites, Delete Favorites,
or Add a New Favorite location.
Destination Menu
This menu allows you to choose a new address, point of interest,
or select from your Favorites.
7
Points of Interest
Favorites
Enter New Destination

Route Information
While on a route, this menu allows you to choose a manual detour (for example, to avoid
upcoming construction or trac on your current road). You can also select “Road List” to
see a route itinerary, or“Overview”to see the entire route on a map.
Tip : You can quickly access this menu from the map screen by tapping on the icon on the
bottom right of the screen.
Stop / Start Navigation
Tap this button to Stop or Start your current route.
Home
Tap“Home”to quickly navigate to your home address. Your home address can be set by
entering a new destination and choosing“As home address.” See“Entering an Address”
above for more information.
Route Settings
Type of Vehicle
Choose from Car (Default), Pedestrian, or Bicycle. The vehicle selection will aect the zoom level,
estimated time to arrival, and navigation – for example, if you select Pedestrian, the GPS will know
that it is okay to navigate down a one-way street facing oncoming trac.
Route Type
Choose from Short, Quick (Default), or Economical.
Short - select the shortest route by distance
Quick - navigate the fastest route, choosing more highways and fewer turns
Economical - combine the two above options and create a route that is a mix
of both choices
Avoid/Use - Ferries, Highways, Toll Roads. Select your preferred choices for routing
Regional Settings
Language
Select the spoken and on-screen language of your choice.
Navigation Settings
This menu provides settings for your route, the map display, and the regional
and language settings.
8
Route Information
Stop / Start Navigation
Home
Route Settings
Regional Settings

Keyboard Selection
Choose from an Alphabetical keyboard layout, or a QWERTY keyboard layout
(similar to a computer).
Time Format
Select from 12-hour (AM/PM) or 24-hour display.
Units
Choose from Imperial (Miles & Feet) or Metric (Kilometers and Meters) units of distance.
Time Zone
Choose your current time zone – be sure to select the “DST+1” option if currently
in Daylight Savings Time.
Active Map
If using a map outside of North America, choose it here.
Display Settings
Map Display
The GPS map has the option to display large turn icons when upcoming to an intersection.
This can be helpful when viewing the GPS at a disatance. Choose from the following :
Map Only - use the default map view
Dynamic - use the map when driving, and change to large turn icons at intersections
Turn Icons - use the large turn icons exclusively
Map Colors
The GPS can automatically change the map colors at night to reduce the brightness and allow
the screen to be viewed easier in low light. Choose from :
Automatic - change from Day colors to Night colors automatically
Day Design - always show the Day colors
Night Design - always show the Night colors
Auto Zoom
The map automatically zooms in when upcoming to an intersection, or when travelling on a local
road. It automatically zooms out on the highway and other times to show a larger distance on
the map. Choose from :
Nearby - keep the map at a closer auto-zoom level
Medium (default) - use the default auto-zoom level
Far - select a farther distance for auto-zoom
9
Display Settings

2D Map Orientation
This setting allows you to choose the orientation, or direction, of the map on screen while
you are on a route. This menu is only available when Display is set to “2D View.”Choose from :
Align map to North - the map will always be oriented towards North
Map in driving direction - the map will automatically rotate to be oriented in the same
direction in which your vehicle is driving
Smart - the map will align map to North while driving, but will automatically switch
orientation to Driving Direction when upcoming to an intersection. After the intersection
is complete, the map will return to North Orientation
Display
Choose the map perspective 2D (overhead) view, or 3D view.
Tip : You can change this directly from the map screen by tapping the compass
icon on the top right.
POI Icons
When driving in an area that has many local points of interest, it can be helpful to turn the POI
icons o temporarily, in order to see the map more clearly. Choose here to turn O or On the
Point of Interest icons on the map.
Display Brightness
Change your preferred screen brightness here.
Volume Control
Select the Speech volume and Button volume here.
Tip : You can quickly access the Volume Control from the map screen by tapping the
volume icon on the left.
Calibration
If the buttons on screen are not responding correctly to your touch, use Calibration to reset
the touch screen and follow the on-screen prompts.
Device Settings
This menu allows you to change settings pertaining to the function of the GPS unit.
10

Problem :
The GPS does not turn on.
Solution :
Turn the On/O switch to the O position. Make sure that your GPS is fully charged or
currently plugged into an approved car charger or A/C charger. When the GPS is fully charged,
the LED will turn green. Turn your GPS on by pushing the On/O switch to the On position.
Problem :
The GPS does not get a signal.
Solution :
Your GPS needs a clear view of the sky in order to get a signal. You may need to move to an
area with an unobstructed view of the sky.
The rst time you use your GPS in a new area, it may take up to 5 minutes to acquire a satellite
signal. To speed up satellite acquisition, use the Sleep/Resume button on top of the GPS
whenever your GPS is not in use. Use the On/O switch when traveling, or when your GPS
will not be used for a long period of time.
Problem :
Goodyear Navigator cannot nd my address.
Solution :
Goodyear Navigator uses the latest maps from NAVTEQ, a leading provider of digital maps.
If your address is not found, it is likely that the address is listed in a dierent way.
Try the following steps :
• Is there a dierent name for the city/town?
• Is there an alternate way to write the street? For example,“Route 17”might be listed
as “State Route 17.”
• Visit an online map site, such as Mapquest or Google Maps. Enter the address and see
if it is listed as you typed, or if there is an alternate way to enter the address.
• If you are in a new area that is not yet covered by our maps, please let us know! We will
add the address to our database for future upgrades.
Troubleshooting
11

Warning Information
WARNING : Failure to avoid the following potentially hazardous situations could result in an
accident or collision resulting in death or serious injury.
•When installing the unit in a vehicle, place the unit securely so it does not obstruct the
driver’s view of the road or interfere with vehicle operating controls, such as the steering
wheel, foot pedals, or transmission levers. Do not place in front of or above any airbag.
•When navigating, carefully compare information displayed on the unit to all available
navigation sources, including information from street signs, visual sightings, and maps.
For safety, always resolve any discrepancies or questions in your routes before continuing
navigation and always defer to posted road signs.
• Always operate the vehicle in a safe manner. Do not become distracted by the unit while
driving, and always be fully aware of all driving conditions. Minimize the amount of time
spent viewing the unit’s screen and use the voice prompts when possible. Do not input
destinations, change settings, or access any functions requiring prolonged use of the unit’s
controls while driving. Pull over in a safe and legal manner before attempting such operations.
•This unit is designed to provide route suggestions. It is not designed to replace the need for
driver attentiveness regarding road closures or road conditions, trac congestion, weather
conditions, or other factors that may aect safety while driving.
Battery Warnings
If these guidelines are not followed, the internal lithium-ion battery may experience a
shortened life span or may present a risk of damage to the GPS unit, re, chemical burn,
electrolyte leak, and/or injury.
•Do not leave the unit exposed to a heat source or in a high temperature location, such as in
the sun in an unattended vehicle. To prevent damage, remove the unit from the vehicle or
store it out of direct sunlight, such as in the glove box.
•Do not puncture or incinerate.
•When storing the unit for an extended time, store within the following temperature range :
32° to 77°F (0° to 25° C).
•Do not operate the unit outside of the following temperature range: -4° to 131°F (-20° to 55°C).
• Contact your local waste disposal department to properly recycle/dispose of the unit/battery.
•Do not remove or attempt to remove the non-user-replaceable battery.
•When disposing of the unit, take it to a professional service, such as a waste electronics
treatment facility, to have the battery removed and recycled.
Important Information
The California Electronic Waste Recycling Act of 2003 requires the recycling of certain electronics.
For more information on the applicability to this product, see www.erecycle.org.
12

NOTICE REGARDING WINDSHEILD MOUNTING LEGAL RESTRICTIONS :
State law in Minnesota and California prohibits or restricts drivers from using
suction mounts on their windshields while operating motor vehicles. (See California
Vehicle Code 26708(a); Minnesota Statutes Section 169.71) The unit includes a dashboard
disc – this or another dashboard or friction mount option should be used when driving in
those states. Many other states have enacted restrictions against placing “non-transparent
material”upon the windshield that obstruct the driver’s vision. Check your state/province and
local laws and ordinances where you drive before using the suction cup mount on your
windshield. IT IS THE USER’S RESPONSIBILITY TO USE THE GOODYEAR NAVIGATION UNIT AND
MOUNTING OPTIONS IN SUCH A MANNER THAT THE USER IS IN COMPLIANCE WITH ALL
APPLICABLE LAWS AND ORDINANCES. The manufacturer does not assume any responsibility for
any nes, penalties, or damages that may be incurred as a result of disregarding this notice or as a
result of any state or local law or ordinance relating to the use of your GPS unit.
Entering an Address
This device complies with part 15 of the FCC Rules.
Operation is subject to the followingtwo conditions :
(1) this device may not cause harmful interference, and
(2) this device must accept any interference received, including interference that may
cause undesired operation.
This equipment has been tested and found to comply with the limits for a Class B digital device,
pursuant to part 15 of the FCC rules. These limits are designed to provide reasonable interference
in a residential installation. This equipment generates, uses, and can radiate radio frequency
energy and may cause harmful interference to radio communications if not installed and used in
accordance with the instructions. However, there is no guarantee that interference will not occur
in a particular installation. If this equipment does cause harmful interference to radio or television
reception, which can be determined by turning the equipment o and on, the user is encouraged
to try to correct the interference by one of the following measures :
•Reorient or relocate the receiving antenna.
•Increase the separation between the equipment and the receiver.
•Connect the equipment into an outlet that is on a dierent circuit from the GPS unit.
•Consult the dealer or an experienced radio/TV technician for help.
This product does not contain any user-serviceable parts. Repairs should only be made by an
authorized service center. Unauthorized repairs or modications could result in permanent
damage to the equipment, and void your warranty and your authority to operate this device
under Part 15 regulations.
Industry Canada Compliance
Category I radiocommunication devices comply with Industry Canada Standard RSS-210.
Category II radiocommunication devices comply with Industry Canada Standard RSS-310.
“Changes or modications not expressly approved by the party responsible for compliance
could void the user’s authority to operate the equipment.”
13

Limited Warranty
This product is warranted to be free from defects in materials or workmanship for one year
from the date of purchase. Within this period, the manufacturer will, at its sole option, repair
or replace any components that fail in normal use. Such repairs or replacement will be made
at no charge to the customer for parts or labor, provided that the customer will be responsible
for any transportation cost. This warranty does not cover failures due to abuse, misuse,
accident, or unauthorized alteration or repairs.
This product is intended to be used only as a travel aid and must not be used for any purpose
requiring precise measurement of direction, distance, location or topography. The manufacturer
makes no warranty as to the accuracy or completeness of map data in this product.
THE WARRANTIES AND REMEDIES CONTAINED HEREIN ARE EXPLUSIVE AND IN
LIEU OF ALL OTHER WARRANTIES EXPRESSED, IMPLIED, OR STATUTORY, INCLUDING
ANY LIABILITY ARISING UNDER ANY WARRANTY OF MERCHANTABILITY OR FITNESS
FOR A PARTICULAR PURPOSE, STATUTORY OR OTHERWISE. THIS WARRANTY GIVES
YOU SPECIFIC LEGAL RIGHTS, WHICH MAY VARY FROM STATE TO STATE. IN NO
EVENT SHALL THE NCC BE LIABLE FOR ANY INCIDENTAL, SPECIAL, INDIRECT, OR
CONSEQUENTIAL DAMAGES, WHETHER RESULTING FROM THE USE, MISUSE, OR
INABILITY TO USE THIS PRODUCT OR FROM DEFECTS IN THE PRODUCT. SOME
STATES DO NOT ALLOW THE EXCLUSION OF INCIDENTAL OR CONSEQUENTIAL
DAMAGES, SO THE ABOVE LIMITATIONS MAY NOT APPLY TO YOU.
The NCC retains the exclusive right to repair or replace the unit or software or oer a full refund
of the purchase price at its sole discretion. SUCH REMEDY SHALL BE YOUR SOLE AND
EXCLUSIVE REMEDY FOR ANY BREACH OF WARRANTY.
To obtain warranty service, call The NCC customer support for shipping instructions and an RMA
tracking number. Securely pack the unit and a copy of the original sales receipt, which is required
as the proof of purchase for warranty repairs. Write the tracking number clearly on the outside of
the package. Send the unit, freight charges prepaid, to The NCC’s service center address as will be
indicated to you by customer service.
Online Auction Purchases : Products sold through online auctions are not eligible for rebates
or other special oers. Online auction conrmations are not accepted for warranty verication.
To obtain warranty service, an original or copy of the sales receipt from the original retailer is
required. The NCC will not replace missing components from any package purchased through
an online auction.
14

Contenidos
En la Caja 2
Cargando su GPS 2
Guía de Inicio Rápido 2-3
La Unidad GPS 4-5
¿Qué Hay en la Pantalla? 6
Menú de Destino 7-8
Introduzca Nuevo Destino 7
Introduzca Dirección 7
Puntos de Interés 8
Favoritos 8
Información de Ruta 8
Detenga e Inicie la Navegación 8
Inicio 8
Configuración de Navegación 9-11
Configuración de Ruta 9
Configuración Regional 9
Configuración de Pantalla 10-11
Configuración de Dispositivo 11
Brillo de Pantalla 11
Control de Volumen 11
Calibración 11
Resolución de Problemas 12
Información de Advertencia 13-14
Advertencia 13
Advertencias Sobre la Batería 13
Información Importante 14
Conformidad con la FCC 14-15
Conformidad con las leyes de la Industria de Canadá 15
Garantía limitada 16

En la Caja
Su caja del GPS de Goodyear contiene los siguientes elementos :
(1) Unidad de Navegación
(1) Manual de Instrucciones
(1) Cargador para Automóvil
(1) Cable USB
(1) Soporte de Montaje para poner en el Parabrisas
(1) Ménsula de Montaje para GPS
(1) Disco para Tablero de Instrumentos
(1) Funda para GPS ( GY130, GY135, GY140 y GY145 )
Nota : El cable USB se utiliza para realizar actualizaciones de software en la unidad GPS.
Además, puede utilizarse para cargar el GPS cuando no se encuentra en un vehículo.
Para cargarlo fuera del vehículo, simplemente coloque el GPS en la posición
O (apagado) y conecte el cable USB al GPS y a una computadora.
Cargando su GPS
Para cargar el GPS, conéctelo al cargador para automóvil que se incluye con el dispositivo.
También puede cargar el GPS al conectar el cable USB que viene con la unidad a la computadora.
Para que la carga se produzca de manera más rápida, asegúrese de que la unidad GPS esté en la
posición O (apagado). Antes de utilizar por primera vez el aparato, realice una carga completa
durante 6 horas. El indicador de luz LED que se encuentra en la parte anterior de la unidad GPS
se mostrará en rojo durante el proceso de carga y en verde cuando ésta haya nalizado.
ADVERTENCIA : Este producto contiene una batería de iones de litio no reemplazable por el
usuario. Consulte la sección Advertencias sobre la batería para obtener
información importante sobre la seguridad de la batería.
Guía de Inicio Rápido
•Paso 1 : Prepare el Montaje del GPS
Seleccione un lugar adecuado para montar la unidad GPS. Limpie y seque la ventosa y el área
del parabrisas que haya seleccionado.
2

Coloque la ménsula en el soporte de montaje para poner en el parabrisas
y asegúrese de que quede en su lugar. Sujete el soporte de montaje contra
el parabrisas (o sobre el disco para tablero de instrumentos) y empuje la palanca
hacia atrás para asegurar el ensamblaje.
•Paso 2 : Encienda el GPS
Conecte un extremo del cable de alimentación al GPS y el otro extremo al tomacorriente
de su vehículo.
Active la unidad a través del interruptor On/O (encendido/apagado) ubicado en la parte
posterior del GPS.
Coloque el GPS en el soporte de montaje. Primero introduzca la parte inferior de la unidad en la
ménsula y luego empuje con suavidad la parte superior hasta escuchar un sonido que indica que
el GPS quedó acoplado a la ménsula del soporte.
Realice ajustes en el soporte de montaje hasta obtener un ángulo de visión confortable.
•Paso 3 : Establezca la Conguración Regional
Cuando el GPS se inicia por primera vez, aparecerá la pantalla Regional Settings (conguración
regional). En esta pantalla, debe escoger sus preferencias de Language (idioma), Time Format
(formato de hora), Units (unidades) y Time Zone (zona horaria). Cuando haya nalizado,
presione la marca de vericación para ir a Navigation Menu (menú de navegación).
• Paso 4 : Encuentre Señal Satelital
Para que el GPS pueda encontrar su ubicación actual y navegar por una ruta, debe encontrar una
señal. Asegúrese de que el GPS esté montado en un lugar con visibilidad al cielo y de que usted
no esté estacionado bajo techo o en algún otro espacio que impida esta visibilidad. La señal
satelital se indica a través de las barras de señal ubicadas en el extremo derecho de la pantalla de
mapa. Cuando tenga al menos 1 barra de señal verde, el GPS habrá recibido señal suciente para
navegar.
Nota : Es posible que el GPS demore algunos minutos en encontrar señal cuando se lo utiliza
por primera vez en una zona nueva. Para acelerar la captación de señal, asegúrese de
utilizar el botón Sleep/Resume (suspender/reanudar) ubicado en la parte superior del GPS
en vez del interruptor On/O (encendido/apagado) de la parte posterior de la unidad.
•Paso 5 : Seleccione Destino
En Navigation Menu (menú de navegación), escoja“Enter a new Destination”(introducir nuevo
destino),“Points of Interest” (puntos de interés) o“Favorites”(favoritos). Siga las instrucciones para
seleccionar la dirección exacta o la ubicación de su elección.
•Paso 6 : ¡Conduzca su Vehículo!
El GPS le proporcionará instrucciones de voz y navegación vuelta a vuelta. Se redireccionará
automáticamente, si usted se desvía; por lo tanto, no es necesario tocar nuevamente la pantalla
una vez establecido el rumbo.
3

La Unidad GPS - GY120, GY130, GY135
Botón Sleep/Resume (suspender/reanudar)
Pantalla Táctil LCD
Salida de Audio
Ranura y Tarjeta SD
Minipuerto USB para Carga y
Actualizaciones
Puerto para Antena Externa
(se vende por separado)
Interruptor On/O (encendido/apagado)Altavoz
4
This manual suits for next models
5
Table of contents
Languages:
Other Goodyear Car Navigation System manuals