Goodyear GY500X User manual

Model, Modelo : GY500X
n a v i g at i o n s y s t e m u s e r g u i d e
sistema de navegaCiÓn manuaL deL usuario

SAVE THESE INSTRUCTIONS FOR FUTURE REFERENCE
GUARDE ESTAS INSTRUCCIONES PARA FUTURA REFERENCIA

Contents
In the Box 2
Charging your GPS 2
Quick Start Guide 3
The GPS Unit 4
What’s in the Box 5
What’s On Screen 6
Common Tasks 7-10
Set up Vehicle Profiles 7
Plan a Simple Route 7
Plan a Multi-Stop Route 8
Find a Point of Interest near your Current Location 8
Find a Point of Interest near a Specific Location 8
Add/Manage your Favorites 9
Set up your Bluetooth Hands Free Connection 9
Sync your Mobile Phone’s Phonebook to the GPS 9-10
GPS Setup 10
Troubleshooting 11
Warning Information 12
Warning 12
Battery Warnings 12
Important Information 12
FCC Compliance 13
Industry Canada Compliance 13
Limited Warranty 14

In The Box
Your Goodyear GY500X box contains the following items :
(1) Navigation Unit
(1) Instruction Manual
(1) Car Charger
(1) USB Cable
(1) Windshield Mount and Bracket
(1) External Antenna
(1) Dashboard Disc
(1) Home Charger A/C
Note : The USB Cable is used for software upgrades to your GPS unit. It can also be used to
charge your GPS when not in a vehicle – simply turn the GPS to the O position, and connect
the USB cable to the GPS and to a computer to charge.
Charging your GPS
To charge your GPS, plug it into the car charger included with the device. You may also use
the included USB Cable to charge the GPS by connecting it to any computer. For faster
charging, be sure that the GPS unit is switched to the O position. Fully charge for 6 hours
before rst use. The LED indicator on the front of the GPS unit will show Red for charging,
or Green for charging complete.
WARNING : This product contains a non-user-replaceable lithium-ion battery.
See the Battery Warnings section for important battery safety information.
2

Quick Start Guide
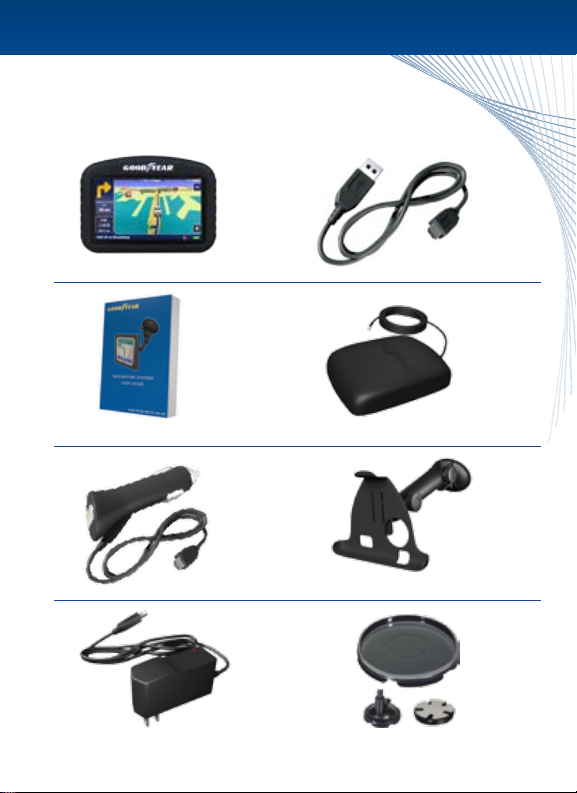
•Step 1 : Prepare the GPS Mount
Select a suitable location to mount your GPS unit. Clean and dry the suction
cup and the selected area of your windshield.
Fit the bracket onto the windshield mount, making sure that it locks into place.
Hold the windshield mount at against the windshield (or onto the dashboard disc),
and push the lever back to secure the mount.
•Step 2 : Turn the GPS On
Plug the power cable into the GPS, and the other end into your vehicle’s power outlet.
Activate the unit using the On/O power switch on the back.
Place the GPS onto the mount by tting the bottom of the GPS onto the bracket,
then gently pushing the top of the GPS back until it snaps into the bracket.
Adjust the mount until you have a comfortable viewing angle.
•Step 3 : Software License Agreement
When your GPS starts for the rst time, you will be presented with license agreement.
You must accept the Agreement to continue.
• Step 4 : Vehicle Details
On this page, you can enter your vehicle dimensions, weight, hazardous material levels, and
choose on-screen icons to display, Select each vehicle attribute that you wish the GY500X
to consider for commercial navigation. To save your Vehicle Details for future routes, click
Save/Load Settings.
Note : TO DISABLE COMMERICAL VEHICLE ROUTING and to use the GY500X as a regular
passenger vehicle GPS, click Enabled – the icon will change to“Enabled: No.”
Click the left arrow icon on the bottom right of the screen to continue.
•Step 5 : Goodyear Disclaimer
You must read and accept the Disclaimer to continue.
•Step 6 : Select your Destination
The GY500X comes with two modes – Easy Navigation mode and Full Navigation mode. The unit
starts in Easy Navigation mode by default, and from here you can select An Address, a Point of
Interest, or Just Drive (display map). See“Common Tasks”for a guide on entering your address,
nding a point of interest, or planning a multi-stop route.
•Step 7 : Drive!
The GPS will give you audio prompts and turn-by-turn navigation. It will automatically reroute
if you go o-course, so there’s no need to touch the screen again once your course is set.
Questions? Call customer service toll-free at 1-800-730-3707.
We are available to help Mon-Fri 10am to 6pm EST. 3

The GPS Unit - GY500X
SD Slot
Port for External Antenna
On / O Switch
Speaker
Stylus
Audio Out
4
Sleep / Resume Button
LCD Touchscreen
Mini USB Port for Charging
(on bottom)
Power Indicator
Bluetooth Indicator

What’s In The Box
5
GY500X Unit USB Cable
Windshield Mount and Bracket
A/C Home Charger
Product Manual
Premium Dash Mounting Disc
25Ft. External Antenna
12V Car Charger
Sleep / Resume Button
Power Indicator

What’s On Screen
Explanation of GPS map screen
6
The top left bar shows the upcoming turn direction and distance.
The on-screen compass at the top shows your current direction.
Tap the + or – icons to zoom in or out of the map.
The left Info. box shows your Estimated Time of Arrival, Journey Time, Distance to Go,
Speed and Direction, or GPS Signal Strength (Tap any box to change).
Tap to change Current / Next Road.
Bluetooth icon.
Volume Settings – tap this icon to raise or lower the speech volume and button volume.
GPS Satellite Strength – Red means weak or no signal. You can tap this icon to see a
larger compass, number of satellites present, and your current latitude and longitude.
Battery Indicator – shows current battery strength, or if the GPS unit is plugged
into a power source.
Local Points of Interest icons show selected locations nearby.
1 •
2 •
3 •
4 •
5 •
6 •
7 •
8 •
9 •
10 •
1
4
1
2
3
3
567
10
9
8

Set up Vehicle Proles
1) When your GPS rst starts, change the options that are applicable for your vehicle.
For example, if you are driving a large commercial truck, you may select “Favor preferred
truck routes”to select specic routes that are rated for commercial vehicles.
2) Select “Gross Weight,”“Axle Weight,”and “Height,”“Length”and“Width”to set the correct
parameters for your vehicle.
3) Select “Hazardous Materials”to change the HazMat categories applicable to your vehicle load.
4) When done setting up the vehicle, select“Save/Load Settings”and then“Save Current” to
save this prole.
5) Type a name for the prole (i.e.“Truck 1 No Load”) and tap“Go”when nished.
6) The next time you want to select this prole, select“Save/Load Settings”and choose
your named prole..
Tip : You may save up to 50 vehicle proles.
Plan a Simple Route
In Easy Navigation Mode:
1) Select “An Address”.
2) Follow the on-screen guide to enter the Zip Code, City, or State of the address.
3) Continue with #3 below.
In Full Navigation Mode:
1) Select“Drive To”.
2) Select “Recent” to choose a recent address, or select“Enter Address”for a new address.
Note : You may wish to“Select State”to choose a dierent state than the one listed.
3) Begin typing the City or Zip Code for your address, and tap GO when you see it appear
on screen.
4) Begin typing the Street name for your address, and tap GO when you see it appear on screen.
Tip : If your street name is not listed, try entering it in a dierent manner. For example, streets
with directionals in them (East, West) might be listed with just the street name. For“East Main St,”
try typing “Main St.” If your street name does not appear, select“Try Wider Search” to look for the
street in surrounding areas. Some streets are listed dierently in dierent maps – for example,
“Route 25”might be listed at“Rt 25”or“US Route 25.” When in doubt, you should consult an online
map site to see how the street is ocially listed.
5) Type the house number and tap GO when it is complete.
Common Tasks
This section deals with the most common tasks when using your GY500X.
Some of the tasks have dierent directions depending on whether you are
currently in Easy Navigation or Full Navigation modes.
7

8
Plan a Multi-Stop Route (Full Navigation Mode only)
1) Select “Plan Route”.
2) By default, the route will begin from your current location. To change this, select “Start”
and Enter the Address from your start point.
3) Select “End” and select “Enter Address”to input your nal destination.
4) Select “Add Via”to enter any stops along the route – you may select a recent address,
enter a new address, a point of interest, or choose from your favorites.
5) When ready, tap“Options.” From here you can see a full Route Map, view a Demo of the
actual drive, see the Route Text (including all turns, distances per turn, and estimated time),
or hit“Drive”to start your route.
Find a Point of Interest near your Current Location
In Easy Navigation Mode:
1) Where would you like to go - Click“A Point of Interest”.
2) Find your POI by starting with - Click “Your Current Location”.
3) Choose a POI category.
4) The closest POI in your category is listed – you may start typing to nd a specic business,
or hit the down arrow to see a full list sorted by distance.
5) Tap your selected POI to navigate to that location.
In Full Navigation Mode:
1) Select“Drive To”.
2) Select “POI”.
3) Choose a POI category.
4) The closest POI in your category is listed – you may start typing to nd a specic business,
or hit the down arrow to see a full list sorted by distance.
5) Tap your selected POI to navigate to that location.
Tip : If you do not have a good GPS signal, the GPS will ask you for your start address to
nd a nearby POI.
Tip : You can also select a POI while on route – simply tap the map screen, then tap POI.
Find a Point of Interest near a Specic Location (Full Navigation Mode only)
1) Select “Enter Address”.
2) Enter your City or Zip code.
3) You may select “POI near town”to nd all POIs in that area, or continue entering a street
name and/or a house number.
4) At any time during the address input, you may select “POI near…”to choose a POI near
your selected city, street, or exact address.

9
1) Select“Drive To”.
2) Select “Favorites”.
3) Select “Change”.
4) Select the address for your favorite by choosing from Recent, look for a POI, or enter a new
address by selecting“Town, Street”.
5) Once you nish entering the address, you will see it on the Favorites menu. Tap the Edit icon
on the end of the favorite listing and enter a name of your choice.
Set up your Bluetooth Hands Free Connection
Tip : See the full phone compatibility list at www.thencc.com.
1) Tap the Bluetooth icon on the menu screen or on the map screen.
2) Select “Settings”.
3) On your Bluetooth-enabled phone, be sure that the Bluetooth function is enabled. Depending
on your phone, you may need to select the option that allows other Bluetooth devices to
connect. This may be called“Discovery Mode”or “Allow other Devices to Find Me”or similar.
Consult your phone manufacturer or documentation for assistance.
4) While your phone’s discovery mode is on, select “Search Phone”.
5) When you see your phone model, tap it to select, and then click the Connect icon – this is the
3rd icon from the left on the bottom row.
6) Enter a 4 digit numeric passcode to secure the connection, and tap OK.
7) The screen will show“Pairing mobile phone.” During this time, your phone might ask for the
same numeric passcode that you entered on the GY500X. Enter it to allow the connection
to continue.
8) Your phone may ask you“Do you want to accept this connection?”or“Allow Connections” –
enter Yes to any similar questions.
9) Upon a successful connection, you will now be at the phone menu. You may tap the arrow
at the top left to exit back to navigation.
Tip : You can pair your GPS with multiple phones. Each time it is turned on, the GY500X will
automatically connect with the phone that is in the vicinity.
Sync your Mobile Phone’s Phonebook to the GPS
You can load the phonebook from your mobile phone onto the GPS. This will allow you to dial
any of your contacts directly from the GPS, and will also show the caller’s name in the Caller ID
screen for incoming calls (if available).
1) Be sure that your phone is paired with the GPS (see Set up your Bluetooth Hands
Free Connection).
2) If you are currently in the navigation system, Tap the Bluetooth Icon to enter the Phone Menu.
3) In the Phone Menu, tap Phone Book.
Add/Manage your Favorites
You can easily add your commonly used locations, such as Home, Oce,
or favorite coee bar, to your favorites list for easy access.

4) Tap the “synchronize”button on the bottom left.
Tip : You can load multiple phonebooks onto the GPS. The phonebook will only show the
phonebook and contacts of the phone that it is currently paired with.
GPS Setup
To enter the GPS Setup screen, tap the Setup icon on the bottom left while in Easy
Navigation Mode, or on the top right in Full Navigation Mode.
GPS: View the current GPS signal strength, your current latitude and longitude, speed,
and heading.
Current Position: View your current latitude, longitude, and the closest road.
POI: Choose to Enable or Disable the POI icon on-screen display, and choose which POI
categories should appear on the map screen as icons and on the top of the POI category list.
Bluetooth: Edit your mobile phone settings, pair with a new phone.
Vehicle Details: Change the commercial vehicle settings for navigation.
Time: Set your time zone, manually edit the time (default is to use the GPS time).
Language: Change the system language and localization.
About: System and map information.
Route Type: Choose your route navigation preference:
• Fastest (default) – shortest time
• Prefer Main – use main roads and highways whenever possible
• Avoid Motorway – avoid highways whenever possible
• Shortest – shortest route by miles/kilometers
Interface Mode: Select Easy Navigation Mode (default) or switch to Full Navigation
Mode for all options.
Route Options: Choose to Avoid all Tolls, Ignore allTolls, or Warn when the route includes
toll roads (default).
Map/Drive Options: Choose various display options – 3D or 2D overhead driving mode,
Miles or Kilometers, Route name or number (when applicable), and show/hide help tips.
Favorites: Add, edit, or delete your favorite locations.
Color Scheme: Choose from dierent map color schemes.
Voice: Select a voice for spoken navigation.
Volume: Change the system volume.
Screen Settings: Change the LCD screen brightness and calibrate the touchscreen.
10

Problem :
The GPS does not turn on.
Solution :
Turn the On/O switch to the O position. Make sure that your GPS is fully charged or
currently plugged into an approved car charger or A/C charger. When the GPS is fully charged,
the LED will turn green. Turn your GPS on by pushing the On/O switch to the On position.
Problem :
The GPS does not get a signal.
Solution :
Your GPS needs a clear view of the sky in order to get a signal. You may need to move to an
area with an unobstructed view of the sky.
The rst time you use your GPS in a new area, it may take up to 5 minutes to acquire a satellite
signal. To speed up satellite acquisition, use the Sleep/Resume button on top of the GPS
whenever your GPS is not in use. Use the On/O switch when traveling, or when your GPS
will not be used for a long period of time.
Problem :
Goodyear GY500X cannot nd my address.
Solution :
Goodyear GY500X uses the latest maps from NAVTEQ, a leading provider of digital maps.
If your address is not found, it is likely that the address is listed in a dierent way.
Try the following steps :
• Is there a dierent name for the city/town?
• Is there an alternate way to write the street? For example,“Route 17”might be listed
as “State Route 17.”
• Visit an online map site, such as Mapquest or Google Maps. Enter the address and see
if it is listed as you typed, or if there is an alternate way to enter the address.
• If you are in a new area that is not yet covered by our maps, please let us know! We will
add the address to our database for future upgrades.
Troubleshooting
11

Warning Information
WARNING : Failure to avoid the following potentially hazardous situations could result in an
accident or collision resulting in death or serious injury.
•When installing the unit in a vehicle, place the unit securely so it does not obstruct the
driver’s view of the road or interfere with vehicle operating controls, such as the steering
wheel, foot pedals, or transmission levers. Do not place in front of or above any airbag.
•When navigating, carefully compare information displayed on the unit to all available
navigation sources, including information from street signs, visual sightings, and maps.
For safety, always resolve any discrepancies or questions in your routes before continuing
navigation and always defer to posted road signs.
• Always operate the vehicle in a safe manner. Do not become distracted by the unit while
driving, and always be fully aware of all driving conditions. Minimize the amount of time
spent viewing the unit’s screen and use the voice prompts when possible. Do not input
destinations, change settings, or access any functions requiring prolonged use of the unit’s
controls while driving. Pull over in a safe and legal manner before attempting such operations.
•This unit is designed to provide route suggestions. It is not designed to replace the need for
driver attentiveness regarding road closures or road conditions, trac congestion, weather
conditions, or other factors that may aect safety while driving.
Battery Warnings
If these guidelines are not followed, the internal lithium-ion battery may experience a
shortened life span or may present a risk of damage to the GPS unit, re, chemical burn,
electrolyte leak, and/or injury.
•Do not leave the unit exposed to a heat source or in a high temperature location, such as in
the sun in an unattended vehicle. To prevent damage, remove the unit from the vehicle or
store it out of direct sunlight, such as in the glove box.
•Do not puncture or incinerate.
•When storing the unit for an extended time, store within the following temperature range :
32° to 77°F (0° to 25° C).
•Do not operate the unit outside of the following temperature range: -4° to 131°F (-20° to 55°C).
• Contact your local waste disposal department to properly recycle/dispose of the unit/battery.
•Do not remove or attempt to remove the non-user-replaceable battery.
•When disposing of the unit, take it to a professional service, such as a waste electronics
treatment facility, to have the battery removed and recycled.
Important Information
The California Electronic Waste Recycling Act of 2003 requires the recycling of certain electronics.
For more information on the applicability to this product, see www.erecycle.org.
12

NOTICE REGARDING WINDSHEILD MOUNTING LEGAL RESTRICTIONS :
State law in Minnesota and California prohibits or restricts drivers from using
suction mounts on their windshields while operating motor vehicles. (See California
Vehicle Code 26708(a); Minnesota Statutes Section 169.71) The unit includes a dashboard
disc – this or another dashboard or friction mount option should be used when driving in
those states. Many other states have enacted restrictions against placing “non-transparent
material”upon the windshield that obstruct the driver’s vision. Check your state/province and
local laws and ordinances where you drive before using the suction cup mount on your
windshield. IT IS THE USER’S RESPONSIBILITY TO USE THE GOODYEAR NAVIGATION UNIT AND
MOUNTING OPTIONS IN SUCH A MANNER THAT THE USER IS IN COMPLIANCE WITH ALL
APPLICABLE LAWS AND ORDINANCES. The manufacturer does not assume any responsibility for
any nes, penalties, or damages that may be incurred as a result of disregarding this notice or as a
result of any state or local law or ordinance relating to the use of your GPS unit.
Entering an Address
This device complies with part 15 of the FCC Rules.
Operation is subject to the followingtwo conditions :
(1) this device may not cause harmful interference, and
(2) this device must accept any interference received, including interference that may
cause undesired operation.
This equipment has been tested and found to comply with the limits for a Class B digital device,
pursuant to part 15 of the FCC rules. These limits are designed to provide reasonable interference
in a residential installation. This equipment generates, uses, and can radiate radio frequency
energy and may cause harmful interference to radio communications if not installed and used in
accordance with the instructions. However, there is no guarantee that interference will not occur
in a particular installation. If this equipment does cause harmful interference to radio or television
reception, which can be determined by turning the equipment o and on, the user is encouraged
to try to correct the interference by one of the following measures :
•Reorient or relocate the receiving antenna.
•Increase the separation between the equipment and the receiver.
•Connect the equipment into an outlet that is on a dierent circuit from the GPS unit.
•Consult the dealer or an experienced radio/TV technician for help.
This product does not contain any user-serviceable parts. Repairs should only be made by an
authorized service center. Unauthorized repairs or modications could result in permanent
damage to the equipment, and void your warranty and your authority to operate this device
under Part 15 regulations.
Industry Canada Compliance
Category I radiocommunication devices comply with Industry Canada Standard RSS-210.
Category II radiocommunication devices comply with Industry Canada Standard RSS-310.
“Changes or modications not expressly approved by the party responsible for compliance
could void the user’s authority to operate the equipment.”
13

Limited Warranty
This product (the“Product”) is warranted by The NCC (the“Manufacturer” or “The NCC”) to the
original retail purchaser (“Purchaser”) to be free from defects in materials or workmanship for one
year from the date of purchase. Within this period, the Manufacturer will, at its sole option, repair
or replace any components of the Product that fail in normal use. Such repairs or replacement
will be made at no charge to the Purchaser for parts or labor, provided that the Purchaser will be
responsible for any transportation and insurance costs to ship the Product to the Manufacturer.
This warranty does not cover failures due to abuse, misuse, accident, or unauthorized alteration
or repairs. Any repair or replacement of the Product by The NCC shall not extend the original
warranty period. This warranty is exclusive to the Purchaser and is not assignable. This warranty
applies to the Product only and not any accessories (including batteries), attachments or other
products used in conjunction with this Product.
This Product is intended to be used only as a travel aid and must not be used for any purpose
requiring precise measurement of direction, distance, location or topography. The Manufacturer
makes no warranty as to the accuracy or completeness of map data in this Product.
THE WARRANTIES AND REMEDIES CONTAINED HEREIN ARE EXCLUSIVE AND IN
LIEU OF ALL OTHER WARRANTIES WHETHER WRITTEN, ORAL, EXPRESSED, IMPLIED,
OR STATUTORY, INCLUDING ANY LIABILITY ARISING UNDER ANY WARRANTY OF
MERCHANTABILITY OR FITNESS FOR A PARTICULAR PURPOSE, STATUTORY OR
OTHERWISE. THIS WARRANTY GIVES YOU SPECIFIC LEGAL RIGHTS, WHICH MAY VARY
FROM STATE TO STATE. IN NO EVENT SHALL THE NCC BE LIABLE TO ANYONE FOR
ANY INCIDENTAL, SPECIAL, INDIRECT, OR CONSEQUENTIAL DAMAGES, WHETHER
RESULTING FROM THE USE, MISUSE, OR INABILITY TO USE THIS PRODUCT OR FROM
DEFECTS IN THE PRODUCT. SOME STATES DO NOT ALLOW THE EXCLUSION OF
INCIDENTAL OR CONSEQUENTIAL DAMAGES, SO THE ABOVE LIMITATIONS MAY
NOT APPLY TO YOU.
The NCC retains the exclusive right to repair or replace the Product or software or oer a full
refund of the purchase price at its sole discretion. SUCH REMEDY SHALL BE YOUR SOLE
AND EXCLUSIVE REMEDY FOR ANY BREACH OF WARRANTY AND THE LIABILITY OF
THE NCC SHALL IN NO EVENT EXCEED AN AMOUNT EQUIVALENT TO THE PURCHASE
PRICE PAID BY THE PURCHASER FOR THE PRODUCT. THIS WARRANTY SHALL NOT BE
EXTENDED, ALTERED OR VARIED EXCEPT BY A WRITTEN INSTRUMENT DULY SIGNED
BY THE NCC.
To obtain warranty service, call The NCC customer support at (1-800-730-3707) for shipping
instructions and an RMA tracking number. Securely pack the Product and a copy of the original
sales receipt, which is required as the proof of purchase for warranty repairs. Write the tracking
number clearly on the outside of the package. Send the Product, freight and insurance charges
prepaid, to The NCC’s service center address as will be indicated to you by customer service.
Online Auction Purchases : Products sold through online auctions are not eligible for rebates
or other special oers. Online auction conrmations are not accepted for warranty verication.
To obtain warranty service, an original or copy of the sales receipt from the original retailer is
required. The NCC will not replace missing components from any package purchased through
an online auction.
14

Contenidos
En la Caja 2
Cargando su GPS 2
Guía de Inicio Rápido 2-3
La Unidad GPS 4
Qué Hay en la Caja 5
¿Qué Hay en la Pantalla? 6
Tareas Comunes 7-10
Establecer Perfiles de Vehículos 7
Planificar una Ruta Sencilla 7-8
Planificar una Rutas de Paradas Múltiples 8
Encuentre Punto de Interés Cerca de su Ubicación Actual 8-9
Encuentre Punto de Interés Cerca de un Lugar Específico 9
Añadir / Gestionar tus Favoritos 9
Configurar su Conexión Manos Libres de Bluetooth 9 - 10
Sincroniza tu Agenda de la Teléfono Móvil Para el GPS 10
Configuración del GPS 11
Resolución de Problemas 12
Información de Advertencia 13-15
Advertencia 13
Advertencias Sobre la Batería 13
Información Importante 14
Conformidad con la FCC 14-15
Conformidad con las leyes de la Industria de Canadá 15
Garantía limitada 15-16

En la Caja
Su caja del GPS de Goodyear contiene los siguientes elementos :
(1) Unidad de Navegación
(1) Manual de Instrucciones
(1) Cargador para Automóvil
(1) Cable USB
(1) Soporte de Montaje para poner en el Parabrisas y el Ménsula de Montaje
(1) Antena Externa
(1) Disco para Tablero de Instrumentos
(1) Cargador de Casa A/C
Nota : El cable USB se utiliza para realizar actualizaciones de software en la unidad GPS.
Además, puede utilizarse para cargar el GPS cuando no se encuentra en un vehículo. Para
cargarlo fuera del vehículo, simplemente coloque el GPS en la posición O (apagado) y conecte
el cable USB al GPS y a una computadora.
Cargando su GPS
Para cargar el GPS, conéctelo al cargador para automóvil que se incluye con el dispositivo.
También puede cargar el GPS al conectar el cable USB que viene con la unidad a la computadora.
Para que la carga se produzca de manera más rápida, asegúrese de que la unidad GPS estás en la
posición O (apagado). Antes de utilizar por primera vez el aparato, realice una carga completa
durante 6 horas. El indicador de luz LED que se encuentra en la parte anterior de la unidad GPS
se mostrará en rojo durante el proceso de carga y en verde cuando estás haya nalizado.
ADVERTENCIA : Este producto contiene una batería de iones de litio no reemplazable por el
usuario. Consulte la sección Advertencias sobre la batería para obtener información importante
sobre la seguridad de la batería.
Guía de Inicio Rápido
•Paso 1 : Prepare el Montaje del GPS
Seleccione un lugar adecuado para montar la unidad GPS. Limpie y seque la ventosa y el área
del parabrisas que haya seleccionado.
Coloque la ménsula en el soporte de montaje para poner en el parabrisas y asegúrese de que
quede en su lugar. Sujete el soporte de montaje contra el parabrisas (o sobre el disco para tablero
de instrumentos) y empuje la palanca hacia atrás para asegurar el ensamblaje.
2

•Paso 2 : Encienda el GPS
Conecte un extremo del cable de alimentación al GPS y el otro extremo al
tomacorriente de su vehículo.
Active la unidad a través del interruptor On/O (encendido/apagado) ubicado en la parte
posterior del GPS.
Coloque el GPS en el soporte de montaje. Primero introduzca la parte inferior de la unidad en la
ménsula y luego empuje con suavidad la parte superior hasta escuchar un sonido que indica que
el GPS quedó acoplado a la ménsula del soporte.
Realice ajustes en el soporte de montaje hasta obtener un ángulo de visión confortable.
•Paso 3 : Acuerdo de Licencia del Software
Cuando el GPS se inicia por primera vez, se le presentará con el acuerdo de licencia.
Debe aceptar el acuerdo para continuar.
• Paso 4 : Detalles del Vehículo
En esta página, usted puede ingresar su vehículo dimensiones, peso, niveles de materiales
peligrosos, y elegir los iconos que aparecen en pantalla para mostrar, seleccione cada vehículo
atributo que desea que el GY500X se considera para la navegación comercial. Para guardar los
detalles del vehículo para las futuras rutas, haga clic en Guardar / Cargar ajustes.
Nota : PARA DESACTIVAR RUTEO DE VEHÍCULOS COMERCIALES y utilizar el GY500X como un
vehículo de pasajeros GPS, haga clic en Enabled (Activado) - el icono cambiará a“Enabled: No.”
(“Numero:Activado”) Haga clic en el icono de echa izquierda en la parte inferior derecha de la
pantalla para continuar.
•Step 5 : Exención de la Responsabilidad Goodyear
Usted debe leer y aceptar la Responsabilidad para continuar.
•Paso 6 : Seleccione Destino
El GY500X viene con dos modos - el modo de navegación fácil y el modo de navegación completa.
La unidad se inicia en el modo de navegación fácil por defecto, y desde aquí se puede seleccionar
una dirección, un punto de interés, o simplemente conducir (mostrar el mapa). Consulte“Tareas
comunes”para una guía sobre la entrada de su dirección, la búsqueda de un punto de interés,
o la planicación de una ruta multi-parada.
•Paso 7 : ¡Conduzca su Vehículo!
El GPS le proporcionará instrucciones de voz y navegación vuelta a vuelta. Se redireccionará
automáticamente, si usted se desvía; por lo tanto, no es necesario tocar nuevamente la pantalla
una vez establecido el rumbo.
¿Preguntas? Llame al servicio al cliente al teléfono gratuito 1-800-730-3707.
Estamos disponibles para ayudarle de lunes a viernes 10am a 6pm EST.
3

La Unidad GPS - GY500X
Ranura SD
Puerto para Antena Externa
Interruptor On/O
(encendido/apagado)
Altavoz
Lápiz
Salida de Audio
4
Botón Sleep/Resume (suspender/reanudar)
Pantalla Táctil LCD
Minipuerto USB para Cargar
(el la parte inferior)
Indicador de Poder
Indicador Bluetooth
Table of contents
Languages:
Other Goodyear Car Navigation System manuals