GoPlus SP37825 User manual

SP37825
If you're having difficulty, our friendly
customer team is always here to help.
THIS INSTRUCTION BOOKLET CONTAINS IMPORTANT SAFETY INFORMATION. PLEASE READ AND KEEP FOR FUTURE REFERENCE.
Speed Punching Bag with Stand
Sac de Frappe avec Support
USA office: Fontana AUS office: Truganina
GBR office: Ipswich FRA office: Saint Vigor d'Ymonville
AUS:cs.au@costway.com
GBR:cs.uk@costway.com
FRA:cs.fr@costway.com

Speed Punching Bag with Stand
Sac de Frappe avec Support
EN
Before You Start
Please read all instructions carefully.
Retain instructions for future reference.
Separate and count all parts and hardware.
Read through each step carefully and follow the proper order.
We recommend that, where possible, all items are assembled near to the area in
which they will be placed in use, to avoid moving the product unnecessarily once
assembled.
Always place the product on a flat, steady and stable surface.
Keep all small parts and packaging materials for this product away from babies
and children as they potentially pose a serious choking hazard.
FR
Veuillez lire attentivement toutes les instructions.
Conservez les instructions pour vous y référer ultérieurement.
Vérifiez toutes les pièces et les accessoires.
Lisez attentivement chaque étape et suivez l’ordre correct.
Nous recommandons que, dans la mesure du possible, tous les produits
soient assemblés à proximité de la zone où ils seront utilisés, afin d’éviter tout
déplacement inutile du produit une fois assemblé.
Placez toujours le produit sur une surface plane et stable.
Conservez toutes les petites pièces de ce produit et les matériaux d’emballage
hors de portée des bébés et des enfants, car ils pourraient présenter un risque
d’étouffement.
Avant de Commencer
02 03

1. The product includes two packages.
2. Unpack, take out 1 sandbag, 1 bottom tray, 2 PVC mats, 12 suction
cups, 4 springs, 4 bolts (10x120mm), 15 bolts (8x25mm), 3 spanners,
15 washers (8x22mm), 2 boxing balls, 1 curved connector, 1 hand
pump, 1 rotating reaction bar, 1 weight base.
3. Insert four 10x120mm bolts into the middle holes of bottom tray.
- EN -
1. Le produit comprend deux paquets.
2. Déballez, sortez 1 sac de sable, 1 plateau inférieur, 2 tapis en PVC,
12 ventouses, 4 ressorts, 4 boulons (10x120mm), 15 boulons
(8x25mm), 3 clés, 15 rondelles (8x22mm), 2 balles de boxe, 1
connecteur courbé, 1 pompe à main, 1 barre de réaction rotative, 1
base de poids.
3. Insérez quatre boulons 10x120mm dans les trous du milieu du
plateau inférieur.
- FR -
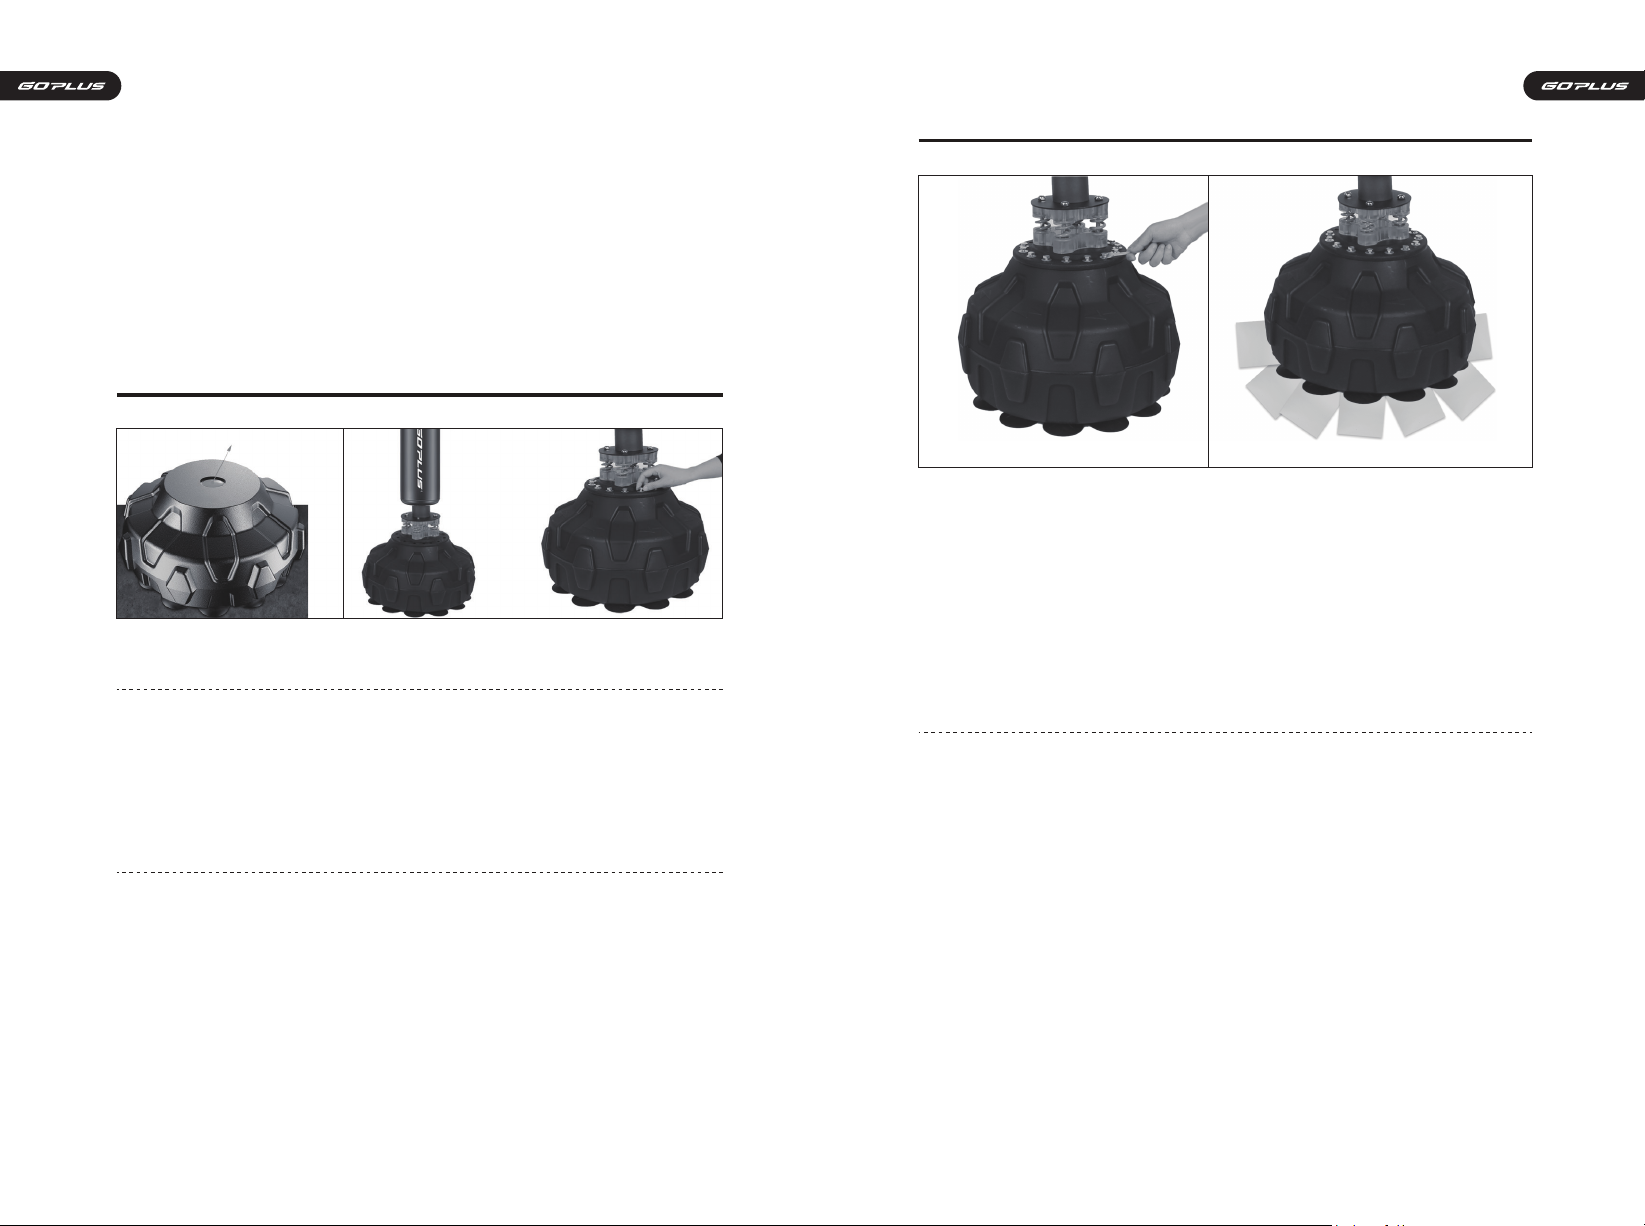
4. Put a rubber mat on the bottom tray (Note that the rubber mat’s
concave side faces up), the holes of the rubber mat should be aligned
with the holes of the bottom tray.
5. Insert 4 springs in sequence, pay attention to put the springs into
the grooves of the rubber mat.
6. Put another rubber mat on top of the springs (Note that the rubber
mat’s concave side faces down).
- EN -
4. Placez un tapis en caoutchouc sur le plateau inférieur (notez que le
côté concave du tapis en caoutchouc est orienté vers le haut), les trous
du tapis en caoutchouc doivent être alignés avec les trous du plateau
inférieur.
5. Insérez 4 ressorts dans l'ordre, faites attention à mettre les ressorts
dans les rainures du tapis en caoutchouc.
6. Placez un autre tapis en caoutchouc sur le dessus des ressorts (notez
que le côté concave du tapis en caoutchouc est orienté vers le bas).
- FR -
- EN -
7. Align 4 holes of the sandbag base plate with the 4 long bolts of the
bottom tray. And install the sandbag on the assembled bottom tray
c o nn e c t or.
8. Slightly fix the screw cap by hand.
9. Put the sandbag down, use a 17mm spanner to fix the nut firmly,
and expose the bolt by 2 cm.
04 05

7. Alignez les 4 trous de la plaque de base du sac de sable avec les 4
longs boulons du plateau inférieur. Et installez le sac de sable sur le
connecteur du plateau inférieur assemblé.
8. Fixez légèrement le bouchon à vis à la main.
9. Posez le sac de sable, utilisez une clé de 17 mm pour fixer
fermement l'écrou et exposez le boulon de 2 cm.
- FR -
10. Insert the extension rod into the steel tube above the sandbag.
11. Attach the rotating reaction bar to the extension rod.
12. Install the curved connector on the extension rod and fix it firmly
with an 18mm spanner.
Extension
rod
Extension rod / Tige d'extension
- EN -
10. Insérez la tige d'extension dans le tube en acier au-dessus du sac
de sable.
11. Fixez la barre de réaction rotative à la tige d'extension.
12. Installez le connecteur incurvé sur la tige d'extension et fixez-le
fermement avec une clé de 18 mm.
- FR -
13. Take out the hand pump, take the needle out of the pull rod and
install it on the front end.
14. Dip the needle with water, (inflating directly without dipping the
needle in water may cause air leakage).
15. Insert the needle of the hand pump into the air valve of the boxing
ball to inflate. It is advisable to inflate it until it is full and elastic (do not
inflate too much to prevent the boxing ball from breaking).
Front end
Front end / Éxtrémité avant
Needle
Needle / Aiguille
- EN -
13. Retirez la pompe à main, retirez l'aiguille de la tige de traction et
installez-la sur l'extrémité avant.
14. Trempez l'aiguille dans de l'eau (gonfler directement sans tremper
l'aiguille dans l'eau peut provoquer une fuite d'air).
15. Insérez l'aiguille de la pompe à main dans la valve à air de la balle
de boxe pour gonfler. Il est conseillé de la gonfler jusqu'à ce qu'il soit
plein et élastique (ne pas trop gonfler pour éviter que la balle de boxe
ne casse).
- FR -
06 07

16. Install the boxing ball on the curved connector.
17. Use a 14mm spanner to fix the nut, which must be securely
fastened to avoid damage to the screw and the ball falling off when
hitting.
18. Install another boxing ball on the black spring.
Boxing ball
Boxing ball / Balle de boxe
Black spring
Black spring / Ressort noir
- EN -
16. Installez la balle de boxe sur le connecteur incurvé.
17. Utilisez une clé de 14 mm pour fixer l'écrou, qui doit être
solidement fixé pour éviter d'endommager la vis et la chute de la balle
lors de la frappe.
18. Installez une autre balle de boxe sur le ressort noir.
- FR -
19. Utilisez une clé de 14 mm pour fixer l'écrou, qui doit être solidement fixé
pour éviter d'endommager la vis et la chute de la balle lors de la frappe.
20. Installez le ressort sur la balle de boxe dans le trou de vis au-dessus de
la barre de réaction rotative et serrez-le fermement.
21. Posez la base de poids et installez les ventouses (Notez que la ventouse
ne peut pas être utilisée dans des endroits avec de l'eau, uniquement sur un
sol lisse et sec).
- FR -
19. Use a 14mm spanner to fix the nut, which must be securely fastened to
avoid damage to the screw and the ball falling off when hitting.
20. Install the spring on the boxing ball into the screw hole over the
rotating reaction bar, and tighten it firmly.
21. Lay down the weight base and install the suction cups (Note that the
suction cup cannot be used in places with water, only on smooth and dry
ground).
- EN -
22. Choose the location to place the weight base, and keep the ground
and suction cups clean. (Note that the suction cup cannot be placed in
gaps).
23. Remove the cover above the weight base.
24. Pour the sand into the weight base, preferably dry sand. Do not fill
water. Water will easily deteriorate and stink after a long time.
Sand/Water Inlet
EN: Sand/Water Inlet FR: Entrée de sable/d'eau
- EN -
08 09

22. Choisissez l'emplacement où placer la base de poids et gardez le
sol et les ventouses propres. (Notez que la ventouse ne peut pas être
placée dans les interstices).
23. Retirez le couvercle au-dessus de la base de poids.
24. Versez le sable dans la base de poids, de préférence du sable sec.
Ne remplissez pas d'eau. L'eau se détériorera facilement et puera
après une longue période.
- FR -
25. After filling with sand, close the cover of the weight base.
26. Put the assembled sandbag on top of the weight base, and align
the bolt holes of the base tray with the nut holes on the weight base.
27. Put the 15 washers and bolts in the corresponding bolt holes.
Cover
Cover / Couvercle
- EN -
25. Après avoir rempli de sable, fermez le couvercle de la base de poids.
26. Placez le sac de sable assemblé sur le dessus de la base de poids et
alignez les trous de boulon du plateau de base avec les trous d'écrou sur la
base de poids.
27. Placez les 15 rondelles et boulons dans les trous de boulon
correspondants.
- FR -
28. Fix the 15 bolts with a 14mm spanner.
29. If you need to move the it, you need to put cardboard under the
suction cup to make the suction cup lose its suction before it can be
moved. It is forbidden to pull hard, because the product may be
damaged due to movement.
- EN -
28. Fixez les 15 boulons avec une clé de 14 mm.
29. Si vous devez le déplacer, vous devez mettre du carton sous la
ventouse pour que la ventouse perde son aspiration avant de pouvoir
être déplacée. Il est interdit de tirer fort, car le produit peut être
endommagé en raison du mouvement.
- FR -
10 11

Instructions De Retour / Réclamation De Dommages
Dans le cas où un retour est requis, l'article doit être retourné dans sa boîte
d'origine. Sans cela, votre retour ne sera pas accepté.
NE PAS jeter la boîte/l'emballage d'origine.
Prenez une photo des marquages de la boîte.
Prenez une photo des dommages (le cas échéant).
Envoyez-nous un e-mail avec les images demandées.
Une photo des marquages (texte) sur le côté de la boîte est requise au cas où
une pièce serait nécessaire pour le remplacement. Cela aide notre personnel à
identifier votre numéro de produit pour s'assurer que vous recevez les bonnes
pièces.
Une photo des dommages est toujours requise pour déposer une réclamation et
obtenir rapidement votre remplacement ou votre remboursement. Assurez-vous
d'avoir la boîte même si elle est endommagée.
Envoyez-nous un e-mail directement depuis le marché où votre article a été
acheté avec les images ci-jointes et une description de votre réclamation.
FR
In case a return is required, the item must be returned in original box. Without this
your return will not be accepted.
DO NOT discard the box / original packaging.
Take a photo of the box markings.
Take a photo of the damaged part (if applicable).
Send us an email with the images requested.
A photo of the markings (text) on the side of the box is required in case a part is
needed for replacement. This helps our staff identify your product number to
ensure you receive the correct parts.
A photo of the damage is always required to file a claim and get your replacement
or refund processed quickly. Please make sure you have the box even if it is
damaged.
Email us directly from marketplace where your item was purchased with the
attached images and a description of your claim.
EN
Return / Damage Claim Instructions
Instructions De Retour / Réclamation De Dommages
12
Table of contents
Other GoPlus Patio Furniture manuals
Popular Patio Furniture manuals by other brands

Allegro Classics
Allegro Classics FLEX UMBRELLA Instructions for assembly

LAZBOY
LAZBOY Lucie D71 M34958 owner's manual

Style selections
Style selections TB-15S124X Quick reference guide

Festival Depot
Festival Depot PF19103 Assembly instructions

Kettler
Kettler CIRRUS operating instructions

Umbrosa
Umbrosa MULTIPOLE 2015 quick guide