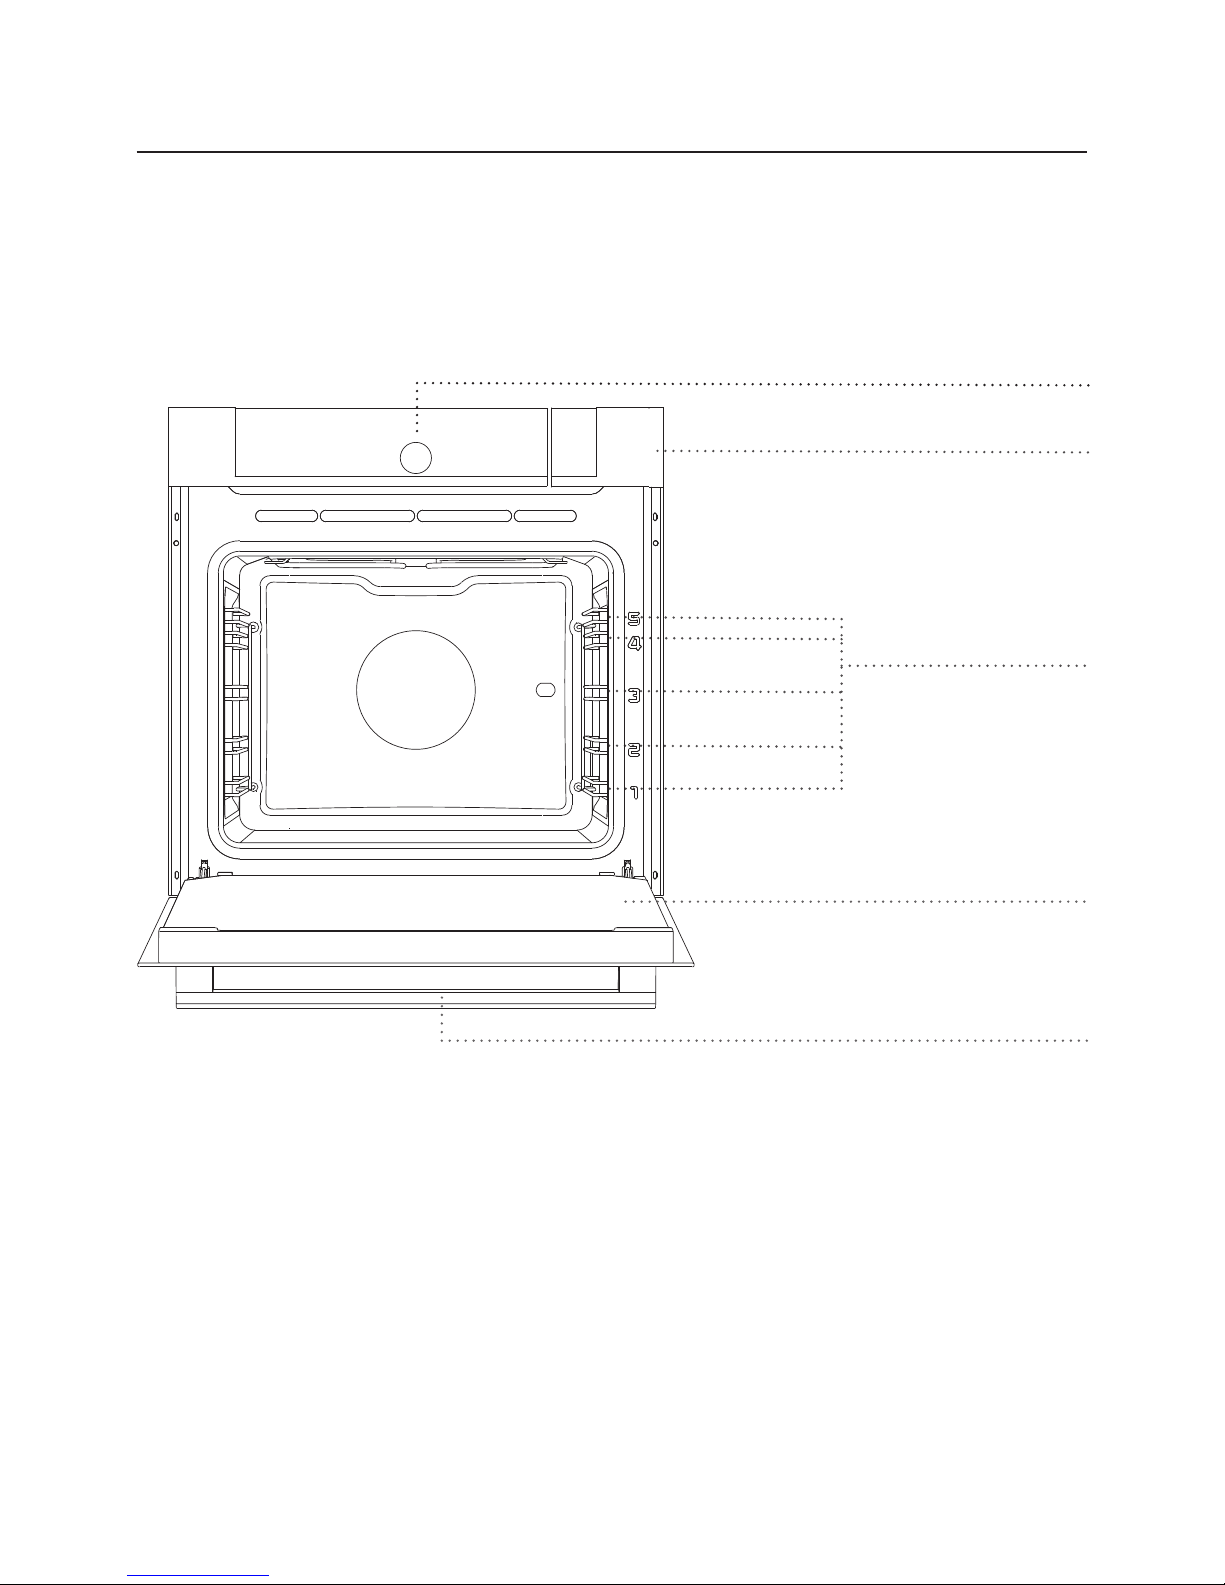
Gorenje Plus GS778X Operating and maintenance manual

DETAILED INSTRUCTIONS
FOR USE OF A COMBINED
STEAM OVEN

We thank you for your
trust and the purchase of our
appliance.
This detailed instruction manual is
supplied to make the use of this
product easier. The instructions
should allow you to learn about your
new appliance as quickly as possible.
Make sure you have received an
undamaged appliance. If you do find
transport damage, please contact the
seller from which you purchased the
appliance, or the regional warehouse
from which it was supplied. The
telephone number can be found on
the invoice or on the delivery note.
Instructions for installation and
connection are supplied on a
separate sheet.
Instructions for use are also available
at our website:
www.gorenje.com / < http://www.
gorenje.com />
Important information
Tip, note

3
CONTENTS
489558
INTRODUCTION
PREPARING THE
APPLIANCE FOR
THE FIRST USE
COOKING STEPS
MAINTENANCE
& CLEANING
TROUBLE-
SHOOTING
4 COMBINED STEAM OVEN
8 Control unit
10 Technical specifications
11 IMPORTANT SAFETY INSTRUCTIONS
13 Before connecting the oven:
14 BEFORE USING THE APPLIANCE FOR THE FIRST TIME
14 Steam cooking
16 Filling the water tank
17 SWITCHING ON THE APPLIANCE FOR THE FIRST TIME
18 STEPS OF THE COOKING PROCESS (1–7)
18 Step 1: CHOOSING THE BASIC COOKING MENUS AND SETTINGS
24 Step 2: TIMER FUNCTIONS – DURATION
25 Step 3: STEP COOKING
28 Step 4: START THE COOKING PROCESS
28 Step 5: END THE COOKING PROCESS AND SWITCHING OFF THE
OVEN
30 Step 6: SELECTING ADDITIONAL FUNCTIONS
33 Step 7: CHOOSING THE GENERAL SETTINGS
35 DESCRIPTIONS OF SYSTEMS (COOKING MODES) AND COOKING
TABLES
52 MAINTENANCE & CLEANING
53 Conventional oven cleaning
53 Using the aqua clean function to clean the oven
54 Cleaning the water tank
55 Removing and cleaning the wire guides
56 Removing and inserting the oven door
58 Removing and inserting the oven door glass pane
59 Replacing the bulb
60 TROUBLESHOOTING TABLE
61 DISPOSAL
62 COOKING TEST
OTHER

4
COMBINED STEAM OVEN
(DESCRIPTION OF THE OVEN AND EQUIPMENT – DEPENDING ON
THE MODEL)
Guides
– Cooking levels
4
3
2
1
5
Water tank door
WIRE GUIDES
The wire guides allow preparation of the food on five levels (please note that the levels/
guides are counted from the bottom up).
Guides 4 and 5 are intended for grilling.
TELESCOPIC PULL-OUT GUIDES
Telescopic pull-out guides may be fitted for the 2nd, 3rd, and 4th level. Pull-out guides
can be partly or fully extendible.
489558
The figure represents one of the built-in appliance models. Since the appliances for which
these instructions were drawn up may have different equipment, some functions or
equipment may be described in the manual that may not be present in your appliances.
Control unit
Oven door
Oven handle

5
OVEN DOOR SWITCH
The switches deactivate oven heating and the fan when the oven door is opened during
the cooking process. When the door is closed, the switches turn the heaters back on.
COOLING FAN
The appliance is fitted with a cooling fan that cools the housing and the appliance control
panel.
EXTENDED OPERATION OF THE COOLING FAN
After the oven is switched off, the cooling fan continues to operate for a short while in
order to cool the oven. (Extended cooling fan operation depends on the temperature in
the center of the oven).
489558
OVEN EQUIPMENT AND ACCESSORIES (Depending on the model)
GLASS BAKING DISH is used for cooking
with all oven systems. It can also be used as
a serving tray.
The GRID is used for grilling or as support
for a pan, baking tray or baking dish with
the food.
There is a safety latch on the grid.
Therefore, lift the grid slightly at the front
when pulling it out from the oven.
The SHALLOW BAKING SHEET is used for
baking pastry and cakes.
The DEEP BAKING TRAY is used for roasting
meat and baking moist pastry. It can also be
used as a drip tray.
Never place the deep baking tray in the
first guide during the cooking process, except
when grilling food or using the roasting spit
and you are only using the deep tray as a drip
tray.

6
489558
STEAM SET (INOX) is used for cooking
vegetables, potatoes, fish or meat. The tray
prevents contact between the food and
condensate collected in the deep tray.
Always use the entire steam set (only for
steam cooking) on the 2nd guide.
The grid or the tray should always be
inserted into the groove between the two
wire profiles.
With telescopic extendible guides, first pull
out the guides of one level and place the
grid or the baking tray onto them. Then,
push them in with your hand as far as they
will go.
Close the oven door when the
telescopic guides are retracted all the way
into the oven.
SYNCHRONIZATION BAR
The bar can be installed or removed on the
fully retractable telescopic guides. First,
completely pull out both guides of the desired
level. Insert the bar into the two slots on the
guides and push the guides in with your hand
until they stop.
BAKING PAN SUPPORT allows easy
removal of baking pans from the oven while
they are still hot.
2
3
4

7
489558
The appliance and some of the accessible parts tend to heat up
during cooking. Use oven mitts.
PROBE for roasting larger chunks of meat.
DESCALING AGENT for cleaning the steam
system.
TEST PAPER STRIP for testing water
hardness.
MECHANICAL DOOR LOCK prevents
the opening of oven door until the lock is
released.
To open it, gently push your thumb to the
right while pulling the door outwards.

8
CONTROL UNIT
(Depending on the model)
AUTOMATIC
QUICK ACCESS
TO STEAM
PROGRAMS
PROFESSIONAL MODE
489558
1ON/OFF KEY 2OVEN
LIGHTING ON/
OFF KEY 3BACK KEY
Touch briefly to
return to previous
menu.
Touch and hold to
return to main menu.
4Selection and
CONFIRMATION
KNOB
Select the setting by
rotating the knob.
Confirm your
selection by pressing
the knob.

9
MY RECIPES
EXTRA
FUNCTIONS
GENERAL
SETTINGS
489558
5MINUTE
MINDER/
ALARM 6CHILD LOCK
KEY
Locking the control
unit
7START/STOP
KEY
Long touch: START
Long touch during
operation: STOP
8DISPLAY –
displays all
settings
NOTE:
The keys will respond better if you touch them with a larger area of your fingertip. Each
time you press a key, this will be acknowledged by a short acoustic signal.

10
TECHNICAL SPECIFICATIONS
(DEPENDING ON THE MODEL)
489558
The rating plate indicating the
basic information about the
appliance is located at the edge
of the oven and it is visible when
the oven door is opened.
ASerial number
BCode/ID
CType
DBrand
EModel
FTechnical data
GCompliance symbols

11
489558
IMPORTANT SAFETY
INSTRUCTIONS
CAREFULLY READ THE INSTRUCTIONS AND SAVE THEM
FOR FUTURE REFERENCE.
This appliance may only be used by children aged 8 years
and above and persons with reduced physical, sensory or
mental capabilities or lack of experience and knowledge if
supervision or instructions are provided to them concerning
use of the appliance in a safe way and if they understand
the hazards involved. Do not let the children play with the
appliance. Cleaning and user maintenance shall not be made
by children without supervision.
WARNING: The appliance and some of its accessible parts
may become very hot during use. Be careful not to touch
the heaters. Children younger than 8 years should be
constantly supervised.
The appliance becomes very hot during use. Be careful not
to touch the oven heaters.
WARNING: The accessible parts of the appliance may
become hot during use. Children should be kept away from
the oven.
Only use the temperature probe recommended for use in
this oven.
WARNING: Before replacing the light bulb, make sure the
appliance has been disconnected from the power mains, in
order to prevent the hazard of an electric shock.

12
489558
Do not use abrasive cleaners or sharp metal scrapers to clean
the oven as they may damage the finish or the protective enamel
coating. Such damages may lead to cracking of the glass.
Do not use steam cleaners or high pressure cleaners to clean the
appliance as this may result in an electric shock.
The appliance is not intended to be controlled with external
timers or special control systems.
The appliance is intended for household
use. Do not use it for any other purpose,
such as room heating, drying of pets or
other animals, paper, fabrics, herbs etc. as
this may lead to injury or fire hazard.
The appliance may only be connected to
the power mains by an authorized service
technician or expert.
Tampering with the appliance or non-
professional repair thereof may result
in risk of severe injury or damage to the
product.
If the power cords of other appliances
located near this appliance are caught
in the oven door, they may be damaged,
which may in turn result in a short circuit.
Therefore, keep the power cords of other
appliances at a safe distance.
If the power cord is damaged, it should
be replaced by the manufacturer or an
authorized service technician, in order to
avoid hazard.
Do not line the oven walls with aluminium
foil and do not place baking trays or other
cookware on the oven bottom. Aluminium
foil would prevent air circulation in the
oven, hinder the cooking process, and ruin
the enamel coating.
Oven door become very hot during
operation. A third glass is installed for extra
protection, reducing the temperature of the
outside surface (only with some models).
Oven door hinges may be damaged when
under excessive load. Do not place heavy
pans on open oven door and do not lean
against open oven door when cleaning the
oven cavity. Never stand on the open oven
door and do not let children to sit on it.
Make sure the vents are never covered or
obstructed in any other way.

13
Safe and correct use of the steam oven
Leave the appliance at room temperature for
some time before connecting it to the power
mains to allow all components to adapt to
room temperature. If the oven is stored at a
temperature near or below freezing point,
there is a danger for some components,
especially the pumps.
The appliance should not operate in an
environment with a temperature below 5
°C. Below this temperature, the water that
remains in the pumps could freeze. If the
appliance is turned on in such conditions, the
pumps could be damaged.
If the appliance does not work correctly,
disconnect it from the power mains.
Do not store items in the oven, which could
cause danger when the oven is switched on.
Do not use distilled water that is not suitable
for ingestion.
After the steam cooking is completed, there
is some residual steam in the oven. Open
the oven door carefully, as there is danger of
scalding with steam.
Clean the oven once it has cooled down to
room temperature.
After the cooking process, the remaining
water in the steam system is pumped back
into the water tank. Therefore, the water
there could be hot. Be careful when emptying
the water tank.
To prevent the build-up of limescale, leave
the oven door open after cooking to allow
the oven cavity to cool down to room
temperature.
489558
BEFORE CONNECTING THE OVEN:
Carefully read the instructions for use before connecting the
appliance. Repair or any warranty claim resulting from incorrect
connection or use of the appliance shall not be covered by the
warranty.

14
489558
BEFORE USING THE APPLIANCE
FOR THE FIRST TIME
After receiving the appliance remove all parts, including any transport equipment
(cardboard and polystyrene inserts), from the oven.
Clean all accessories and utensils with warm water and regular detergent. Do not use any
abrasive cleaners.
Before using the oven for the first time, heat it with the upper and lower heater system
at 200 °C for approximately one hour. The characteristic "new appliance" scent will be
released; make sure the room is well ventilated.
STEAM COOKING
Healthy and natural, steam cooking preserves the full flavour of foods. This cooking
method releases no odours. There is no need to add salt to the water or to add herbs and
spices.
Following are the advantages of steam cooking:
Cooking (braising, roasting) starts before the temperature inside the oven reaches 100 °C.
Slow cooking (braising, roasting) is also possible at lower temperatures.
It is healthy: vitamins and minerals are well preserved because only a small share of them
is dissolved in the condensation water that touches the food.
There is no need to add any fat during the cooking process. The steam maintains the taste
of food. It does not add odours, nor the taste of the grill or the pan. Furthermore, it takes
nothing away because the food is not diluted in the water. Steam does not spread the
flavour or smell; therefore, meat or fish can be cooked together with vegetables. Steam is
also suitable for blanching, defrosting and reheating or keeping the food warm.

15
489558
TESTING WATER HARDNESS
Water hardness test should be carried out before first use.
A warning will appear on the display: "Use the test paper to measure water hardness."
Soak the test paper
strip (supplied with
the appliance) in
water for one (1)
second.
Wait one minute
and observe the
number of stripes on
the paper. Enter the
information on the
number of stripes
into the appliance.
Rotate the KNOB
and confirm the
selection with the
CHECK MARK.
The highest water hardness is set as a factory default.
CHANGING THE WATER HARDNESS SETTING
Water hardness can also be set in the menu CHOOSING THE GENERAL SETTINGS.
If the correct water hardness level is not set, this could affect
appliance operation and its useful life.
4 green stripes Soft
1 red stripe Slightly hard
2 red stripes Medium hard
3 red stripes Hard
4 red stripes Very hard

16
489558
FILLING THE WATER TANK
The tank allows for independent water supply to the steamer. The tank volume amounts
to approx. 1.3 litres (maximum water level – see marking). This amount of water allows
approximately 3 hours of cooking time with max. steam cycle (hot air with steam on "high"
system).
Clean the water tank before the first use.
Always fill the water tank with clean and cool water from the pipeline,
bottled water without additives, or distilled water suitable for use
in cooking. Water that is poured into the water tank should be at a
temperature of 20 °C +/- 10 °C.
1Press on the spot with the sticker to
open the tank door.
The sticker can be later removed.
2Remove the water tank from the
housing by grabbing the notch.
3Open the lid. Wash the tank with water.
Re-assemble the tank. Before use, add
fresh water up to the MAX marking on the
tank.
4Push the water tank back into the housing
to the final position (until the short click).
Then, press the tank door to close it.
After the cooking process, the remaining
water in the steam system is pumped back into
the water tank. The lid and the water tank can
be washed with standard non-abrasive liquid
cleaners or in a dishwasher.

17
489558
SWITCHING ON THE APPLIANCE
FOR THE FIRST TIME
SETTING THE CLOCK
After connecting your appliance or after an extended power outage, 12:00 will flash on
the display.
Set the time of day.
Confirm each setting by pressing the KNOB.
The oven will also work if the clock is not set. However, timer functions are not
available in this case (see chapter SETTING THE TIMER FUNCTIONS). After a few minutes
of idling, the appliance will switch to standby mode.
CHANGING THE CLOCK SETTING
Clock settings may be changed when no timer function is activated (see chapter
CHOOSING THE GENERAL SETTINGS).
SELECTING THE LANGUAGE
If you are not happy with the language in which the messages on the display are
presented, select another one. English is the preset language.
Rotate the KNOB
and select your
language from the
list. CONFIRM the
selection.
The main menu will
appear.
Press the KNOB to
set the time.
Turn the KNOB and
first set the TICK.

18
489558
STEPS OF THE COOKING
PROCESS (1–7)
STEP 1: CHOOSING THE BASIC COOKING
MENUS AND SETTINGS
The process of preparing food in your oven can be controlled in several ways:
Rotate the KNOB and
select the symbol.
The symbol will turn
white. The NAME of
the selected menu
will appear at the top.
Automatic mode
In this mode, first select the type of food. This is followed by
automatic setting of the quantity, level of doneness, and cooking
end time.
The program offers a large choice of preset recipes reviewed by
professional chefs and nutrition experts.
Quick access to steam programs
This is a natural cooking mode that preserves the full flavour of the
food.
Professional mode
Use this mode when you wish to prepare any type and amount of
food. All settings are selected by the user.
Confirm each setting by pressing the KNOB.

19
489558
A) COOKING BY SELECTING THE TYPE OF FOOD
(Auto mode)
Confirm each setting by pressing the KNOB.
Rotate the KNOB
and select the Auto
mode. Confirm the
setting by pressing
on the KNOB.
Select the type
of food and the
dish. Confirm the
selection.
Preset values will
appear. Rotate the
KNOB and confirm
by pressing the
KNOB to change
these settings.
1 Amount
2 Doneness
3 Delayed start
4 Cooking duration
5 Cooking system and recommended level
When in the Auto mode, choose the duration or system symbol to open the
Professional mode (see section on COOKING BY SELECTING THE OPERATING MODE).
Touch the START/STOP key to start oven operation.
All selected settings are indicated on the display.
1234 5

20
489558
PREHEAT
Some dishes in the Auto mode also include the preheat function .
When you select the food, the following note will appear: "Selected program includes
preheating." Preheating started. Do not insert the food yet. The symbol °C will flash on
the display.
When the selected temperature is reached, the preheating process stops and an acoustic
signal is emitted.
The following note will appear on the display: "Preheating complete". Please insert the
food. Open the door or confirm by pressing the KNOB. The program then resumes the
cooking process with selected settings.
When the preheat function is set, delayed start function cannot be used.
Table of contents
Other Gorenje Plus Oven manuals
Popular Oven manuals by other brands

Nerf
Nerf B5ACH7AH0B User manual and installation instructions

Gram
Gram KIP 17266 N instruction manual

Viking
Viking VCSO244 Series installation guide

Whirlpool
Whirlpool GBD307PRY Use and care guide

Aroma
Aroma ABT-208S Instruction manual & recipe guide

Angelo Po
Angelo Po FX 82 E3T Use and installation manual