Grace m900 User manual

m900 Headphone Amp / DAC / Preamp
Owner’s Manual Revision A
05/06/2017
Grace Design / Lunatec LLC
4689 Ute Highway, Longmont, CO 80503
info@gracedesign.com
www.gracedesign.com
1.303.823.8100

PAGE 1
1 Welcome
The m900 represents a new level of performance for
compact, personal audio playback devices. With zero
Ohm output impedance headphone outputs and a
remarkable USB power supply design, the m900 delivers
incredible playback performance with compact, stylish
ergonomics.
Setup and operation is of the m900 simple. While
mostly plug and play, there are a few operational con-
cepts that are helpful to understand. We encourage you
to read this manual thoroughly to familiarize yourself
with the unit so you can use and enjoy it to its fullest
extent.
If you have any questions, please visit our website for
more information: www.gracedesign.com, or feel free to
call us directly at 1.303.823.8100. We’d love to hear from
you!
2 Connections and Controls
2.1 REAR PANEL
1 32 4 5
1 - Line Outputs
Unbalanced, level controlled line outputs via a pair
of gold plated RCA phono jacks. These outputs are
designed to connect to a power amp, powered speakers,
preamps, or headphone amps. When headphones are
connected to the right hand front panel jack, the line
output signal is muted.
2 - S/PDIF Input
Accepts up to 192kHz, 24 bit PCM digital audio signal.
Automatic de-emphasis equalization. The m900 setup
menu contains an input select option that toggles be-
tween the USB, S/PDIF or TOSLINK input. See the Setup
Menu section in this manual for more setup information.
3 - TOSLINK Optical Input
Accepts up to 96kHz, 24 bit PCM digital audio signal.
Automatic de-emphasis equalization. The m900 setup
menu contains an input select option that toggles be-
tween the USB, S/PDIF or TOSLINK input. See the Setup
Menu section in this manual for more setup information.
4 - USB Connector #2 - High Power Input
Use this power connection to operate the m900 in
High Power mode. This connector carries only DC power
and no USB data. Once the included low noise 2A USB
power supply is plugged into this input, the m900 will
enter High Power mode (indicated by “HP” on the 7-seg-
ment display).
5 - USB Connector #1 - Data / Signal / Bus Power Input
Asynchronous USB 2 interface for bit perfect, zero
interface induced jitter DAC operation. Accommodates
44.1kHz to 384kHz PCM and 64X - 256X DSD. Driverless
Contents
1 Welcome 1
2 Connections and Controls 1
2.1 REAR PANEL 1
2.2 FRONT PANEL 2
2.3 TOP PANEL 2
3 Operation 2
4 Using the Setup Menu 8
5 Specications 10
6 Cleaning and Maintenance 11
7 Warranty Information 11

PAGE 2
operation with MAC OS. USB Class 2 operation with
Windows up to 384kHz with free driver download from
Grace Design. When nothing is connected to the USB
connector #2, the m900 is bus powered through this
interface and operates in Low Power mode.
2.2 FRONT PANEL
12
1 - Headphone Outputs
Parallel headphone outputs wired to high quality TRS
jacks. When headphones are connected to the right
hand jack, the line output signal is muted.
2 - 7 Segment LED
Displays level setting from 0 - 99. This display is also
used for navigating the m900 setup menu. The volume
control step size is 0.5dB. The right hand decimal point
comes on to indicate the 0.5dB value. For instance, “65.“
indicates a volume setting of 65.5dB.
2.3 TOP PANEL
1
1 - Volume Control
The top mounted rotary encoder provides precise,
stepped level control. Its push-button feature is used to
mute all signals (single push and release) or access the
setup menu (push and hold).
3 Operation
Unpacking Your m900
The m900 arrives in simple but protective Korrvu™
packaging. We recommend that you save this box in the
event you wish to store or ship your unit in the future.
The box will contain the m900, printed owner’s manual,
a 2A USB wall power supply and 2 USB type B mini ca-
bles – one 6’ and one 10’. If you are missing any of these
items, please contact us at 1.303.823.8100.
Setting Up Your m900
The m900 is designed to sit on your desktop or atop
your audio center. Its small, low profile stature easily
fits on any desk or media center furniture. Put your unit
wherever you like, as long as it’s within reach. The top
mounted volume control will sit comfortably under your
hand whenever you need to control your system volume,
quickly mute or change settings.
Headphone jacks are on the front and inputs and line
outs are on the back, so your cabling can remain clean
and simple.
Powering Up Your m900
There is no power switch. Power is automatically ap-
plied when either of the USB jacks are connected. If you
wish to power off the m900, simply disconnect the USB
connection.
The m900 can be powered from the your computer’s
USB Bus in Low Power mode via the #1 USB connector. In
this mode the internal supplies operate at lower voltage
to conserve power. This is useful if you are traveling and
do not have access to AC wall outlet.
If you connect the included 2A USB power supply
to the #2 USB connector, the m900 switches into High
Power mode. The #1 USB 2 port will maintain an active
connection to your computer, but no power will be
drawn from the computer port. If running in High Power
mode and the power supply is disconnected, the m900
will reboot.

PAGE 3
The following is a summary of all of the powering and
signal input configurations:
1. LOW POWER, USB INPUT One USB cable
from the computer to the m900 #1 USB input.
m900 receives power and audio from the comput-
er.
2. HIGH POWER, USB INPUT One USB cable
from the computer to the m900 #1 USB input and
one USB cable from the external 2A DC power sup-
ply to the m900 #2 high power DC input connec-
tor. The m900 receives audio from the computer
and receives power from the external DC supply.
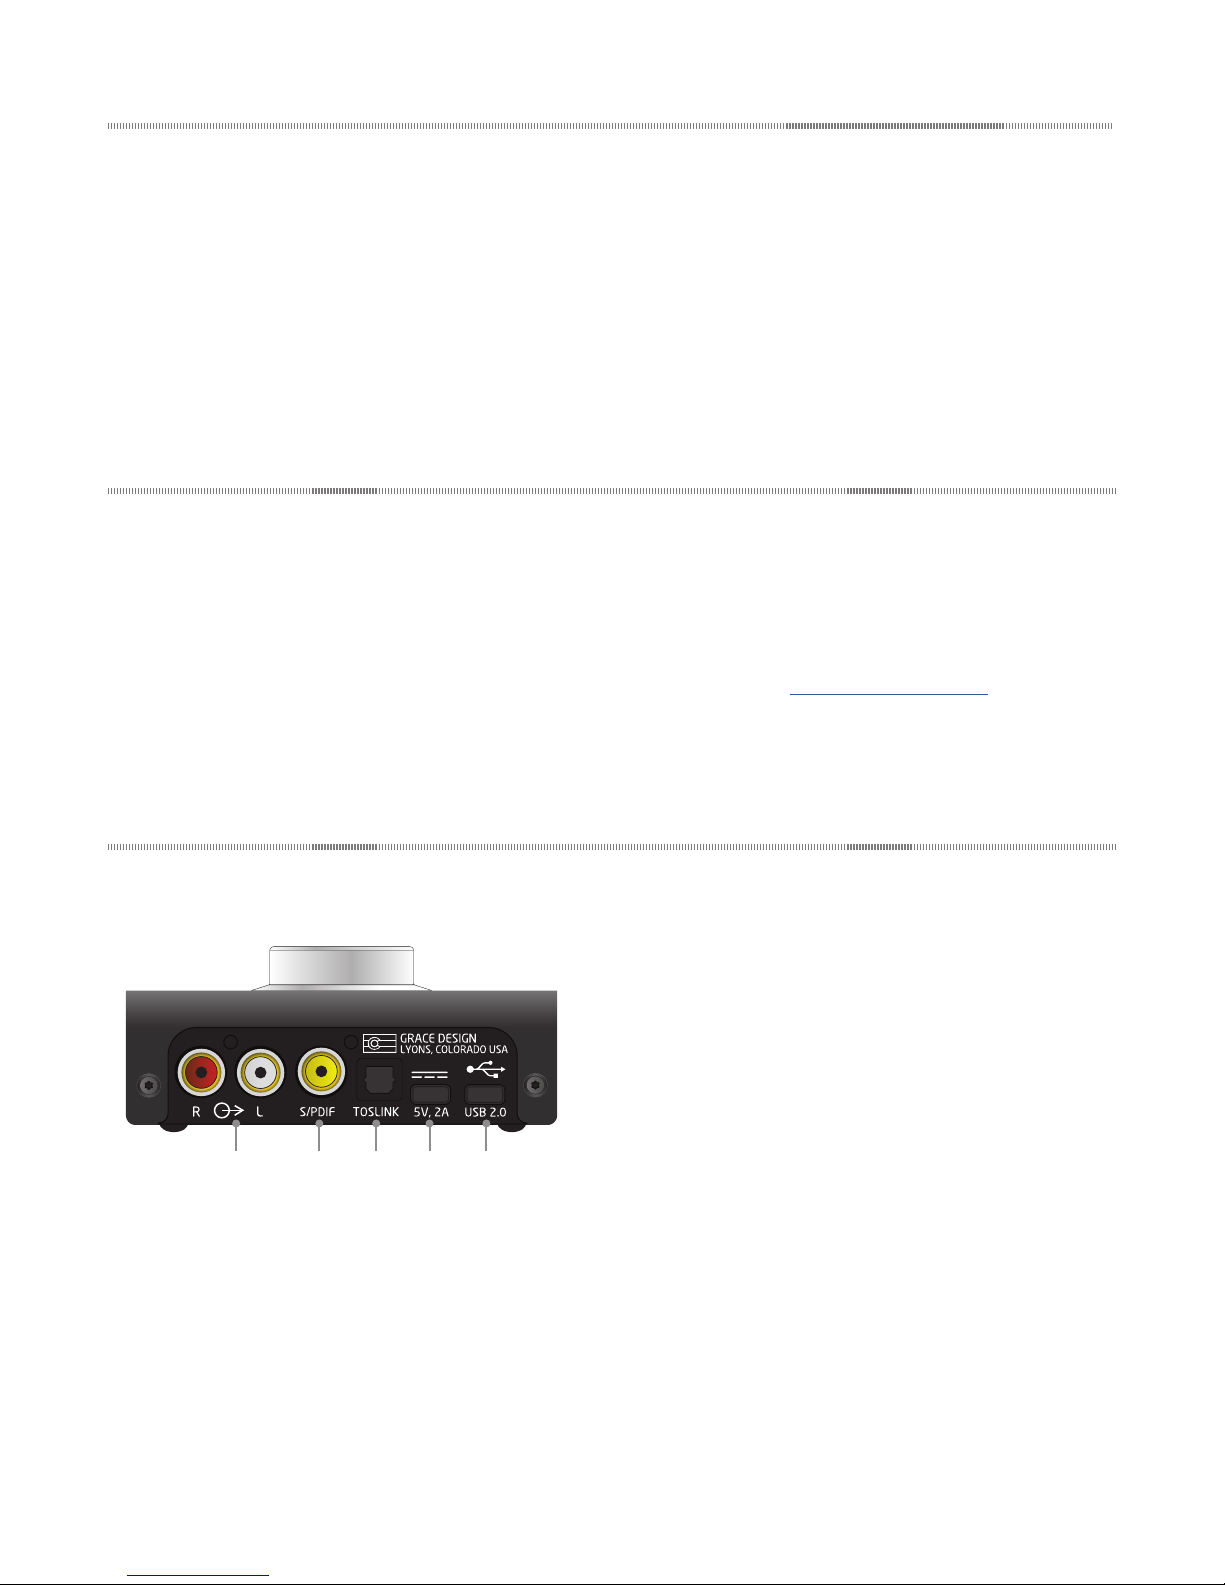
3. LOW POWER, S/PDIF OR TOSLINK IN
PUT One USB cable from a standard USB power
source (computer or 0.5A USB power supply)
connected to the m900 #1 USB input. TOSLINK or
S/PDIF input source connected. (This would be an
unusual setup where you don’t have access to a
high power DC power supply.)
4. HIGH POWER, S/PDIF OR TOSLINK IN
PUT One USB cable from the 2A DC power supply
to the m900 #2 high power DC input connector.
TOSLINK or S/PDIF input source connected. m900
receives audio from TOSLINK or S/PDIF and power
from the external DC supply.
5. SELF POWERED MODE This mode is for con-
necting your mobile device (iOS, android) to the
m900. Mobile devices generally cannot provide
any power. In this mode the m900 will report that
it is self powered. To enter self powered mode, first
connect the USB cable from the external 2A DC
power supply to the m900 #2 high power DC input
connector, then connect your device to the m900
#1 USB input. For iOS, you will need the ‘Apple
Lightning to USB Camera Adapter’, for supported
Android devices you will need an ‘On The Go’ USB
cable.
Connecting Headphones
There are 2 ¼” headphone output jacks on the front,
which are wired in parallel. The second jack on the right
is a switched type. If you have the line outputs connect-
ed to a power amp or powered monitors, connecting
headphones to this jack will automatically mute the line
outputs, allowing you to effectively‘toggle’ between the
headphone and speaker outputs.
IMPORTANT NOTE: The m900 has very low output
impedance, measuring around 0.08 Ohms. Ohm’s law
states that as the load impedance approaches 0 Ohms,
even a small voltage will result in high current flow.
When a headphone plug is inserted in to the headphone
jack of any headphone amplifier, there is a brief moment
when the output of the amplifier gets shorted to ground.
If there is music playing when this happens, there will
be high current flow which will likely cause the supply
current to the m900 to rapidly rise above the maximum
current which a computer or external USB power supply
can deliver.
If an over-current condition occurs, the m900’s proces-
sor will detect it, immediately mute the audio and turn
off the internal audio power supplies. This will protect
the m900 from damage and prevent it from drawing ex-
cess current from your computer or power supply. When
this happens the LED display will indicate OC (Over
Current) momentarily. Once the over-current condition is
removed, the m900 audio power supplies will be turned
back on and music will resume.
While this does not hurt the m900, it is good practice
nonetheless to mute the audio (push down once on the
volume knob) or pause your playback source while plug-
ging or unplugging headphones.
Line Output Operation
The RCA phono line output jacks are provided to con-
nect the m900 to an amplifier, powered speaker system,
or preamplifier. Use RCA interconnects to connect from
the m900 to the unbalanced line inputs of your external
device. These outputs follow the volume / mute control.
A volume level of 90 is“unity gain”and will allow the
m900 to produce a 2V output signal for a 0dBFS digital
input signal.
The signal feeding the rear panel line out jacks is
“normalled”through the right hand headphone jack.
This is so that if you have speakers connected to the line
outputs, they will mute when you plug headphones into
the right hand jack. If you want to hear speakers and
headphones at the same time, simply use the left hand
jack. Note that the crossfeed circuit feeds these connec-
tors. When listening to loudspeakers you may want to
turn crossfeed off.
Volume and Mute Control
A high quality, light action stepped rotary encoder
is used for volume and mute functions. Turn the knob
clockwise to increase volume, counterclockwise to
decrease the volume. A single push and release will
mute all outputs. When the unit is muted, the 7 segment
LED will dim and pulsate to indicate mute is active.
Another single push and release de-activates mute. The
m900 attenuator is a hybrid design. Most of the volume

PAGE 4
control duties are handled in the digital domain with
32 bit processing but there are two analog gain ranges
as well. This allows a full 99dB of volume control range,
preserves a very low noise floor for IEMs, and allows high
peak output voltage for low efficiency planar magnetic
phones.
Crossfeed Circuitry
A completely analog crossfeed circuit electronically
simulates the signal crossfeed that occurs in a natural
acoustic space. The crossfeed function can be switched
on or off from the Setup Menu.
How does crossfeed work? When listening to loud-
speakers in a room, your left ear hears sound primarily
from the left speaker (and vice versa) but also receives
a signal from the right speaker at a lower level and with
some time delay compared to the right ear. As well, the
right speaker sound that reaches the left ear does not
have a flat frequency response as the sound waves have
traveled around the shape of your head before reaching
your left ear. The brain uses delay, level and frequency re-
sponse characteristics to process the location of a sound
and hence, create an aural image.
However, when listening through headphones, each
ear only hears the sound from one transducer and the
mixing of signals between the ears does not exist. In this
situation the brain is left without many of the psycho
acoustic clues required to generate a properly distrib-
uted image and an accurate sound stage. The result is
that instruments seem to cluster in the far left, far right
or center of your head. Since the vital clues are absent,
the brain has a difficult time deciding how to process the
sounds coming from the headphone, which can result in
listening fatigue when listening for extended periods of
time. The m900 contains crossfeed circuitry which elec-
tronically simulates the signal crossfeed that occurs in a
real acoustic space and helps the brain establish instru-
ment locations across the entire sound stage. While it is
difficult to perfectly model the very complex level, delay
and frequency response characteristics of the head, the
crossfeed circuitry in the m900 gives the brain some of
the basic clues it needs and the result is a very pleasing
simulation of an acoustic space while maintaining the
tonality and balance of the original source.
Computer Conguration
The m900 computer audio connection is an asyn-
chronous USB interface. With asynchronous mode
USB operation, the m900 USB DAC becomes the clock
master to which the computer’s USB bus is synced. The
computer is synced to a crystal-based audio clock signal
and the system works with dramatically lower jitter. No
phase-lock loop or sample rate conversion is necessary,
which means bit-perfect playback from a computer with
effectively zero interface induced jitter.
Regardless of the type of computer you will use to
playback audio, it must have at least one available USB 2
(or 3) port. The m900 ships with 2 standard USB type A to
USB type B micro cables, one 6’and one 10’. The type A
connector plugs into the computer and the type B micro
connector to the #1 USB m900 input.
The m900 can operate as a USB Audio Class 1 or Audio
Class 2 device. In USB 1 mode the m900 supports driver-
less operation on Mac OS and Windows at sample rates
up to 96kHz. In Audio Class 2 mode the m900 supports
driverless operation on Mac OS at sample rates up to
384kHz. On Windows, Audio Class 2 operation requires
downloading and installing a free driver, which can be
found on our website – http://www.gracedesign.com/
support/support.htm.
Driverless operation on Mac OS basically means ‘plug
and play’. The m900 will automatically show up in your
computer’s list of supported audio devices as ‘m900’. In
most cases, simply choose that as your audio playback
device.
Different operating systems and audio players will
pose their own set of configurations in setting up the
m900 as the audio playback device. We will direct you to
a very well written and comprehensive document by our
friend and colleague Charles Hansen from Ayre Acous-
tics. http://www.ayre.com/usb.htm. This is an invaluable
resource for computer/USB audio setup information for
most current operating systems, and we strongly urge
you to familiarize yourself with the information pertain-
ing to your specific OS.
In the event that you have any setup issues which
aren’t addressed by these resources, feel from to contact
us directly at 303.823.8100 M - Friday 9 – 5 MST, or you
can email our service department -
service@gracedesign.com.
Table of contents