Greater Goods SOUS VIDE User manual

1
SOUS VIDE USER MANUAL
一、INTRODUCTION:
A: “+”and”-” adjustment buttons
B: Working indicator light
C: ON/OFF Button
D: Clip
E: Max and Min water level
F: Stainless steel skirt
G: Water pump cap
Temp Units:℉/ ℃
Temperature Range:0.0-90.0 ℃/ 32-194 ℉
TimeAdjust Range:0:00 –99 hours 59 seconds
Product Dimensions :30.5×5 ×8.5 (cm) / 12×2×
3.3 inches
二、Function Keys
:Time and temperature increase adjusting button. In
setting status,long press it can increase temperature or time
quickly, short press for increasing temperature or time slowly.
:Time and temperature decrease adjusting button. In
setting status,long press can decrease temperature or time
quickly, short press for decreasing temperature or time slowly.
:Setting Button
: Power ON/OFF
Note:
①The temperature/time display area displays the temperature mode before the last
shutdown,Fahrenheit or Centigrade,If you want to switch the temperature mode, please

2
short press the or button once the machine powered on.
②The function key on touch panel will flash if there’s no operation in 3 seconds after
each setting step,reminding next step operation, tap the blinking key to go to next step
operation.
③Under working status, press and hold the “ ” button for 3 seconds to stop the device.
④Under working status, long press the “ ” button to reset the cooking temperature and
time.
三、Operation Methods
(一). Manual operation
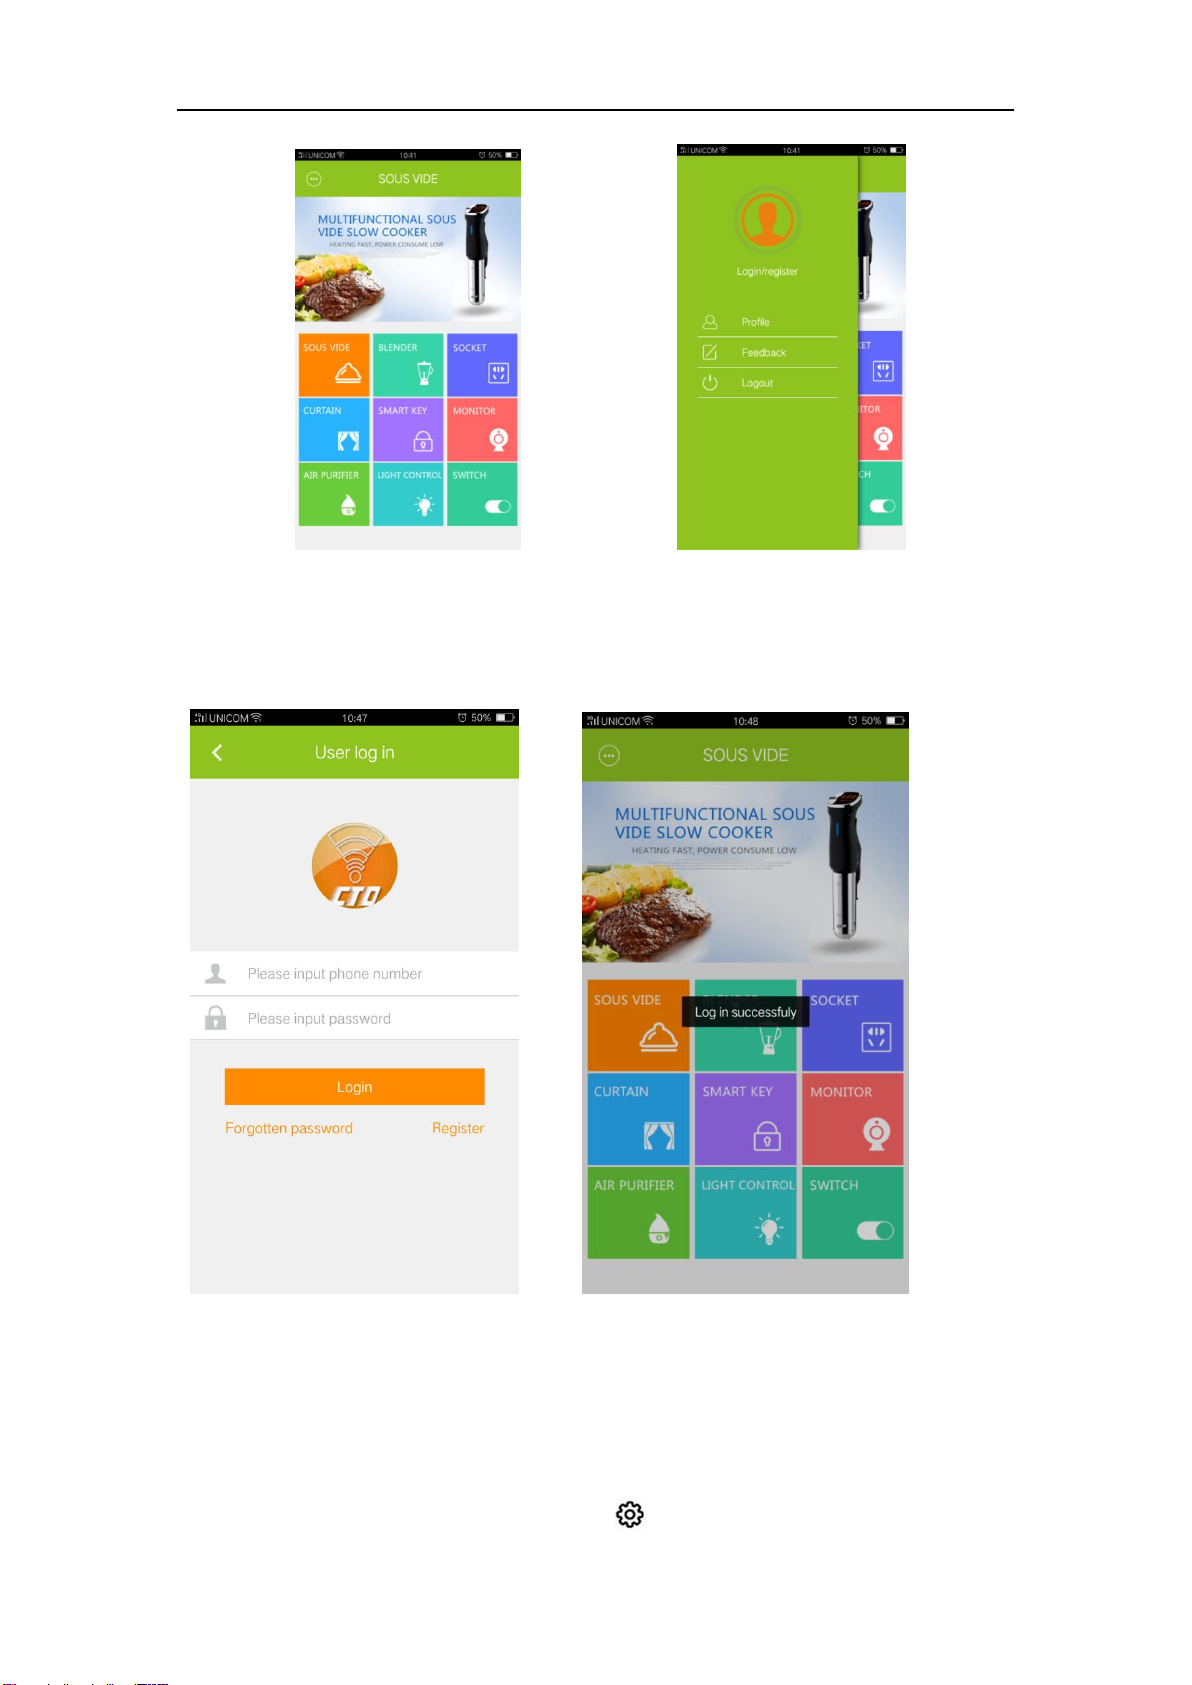
Easy to operate .Simply connect the device to power, press the ON button for 3 seconds
until you hear a beep and the display turns on. Use the Setting button to switch between
time and temperature. Press the Setting button for 3 seconds to quickly adjust the
temperature or time limit you want.
Below are the operation details :
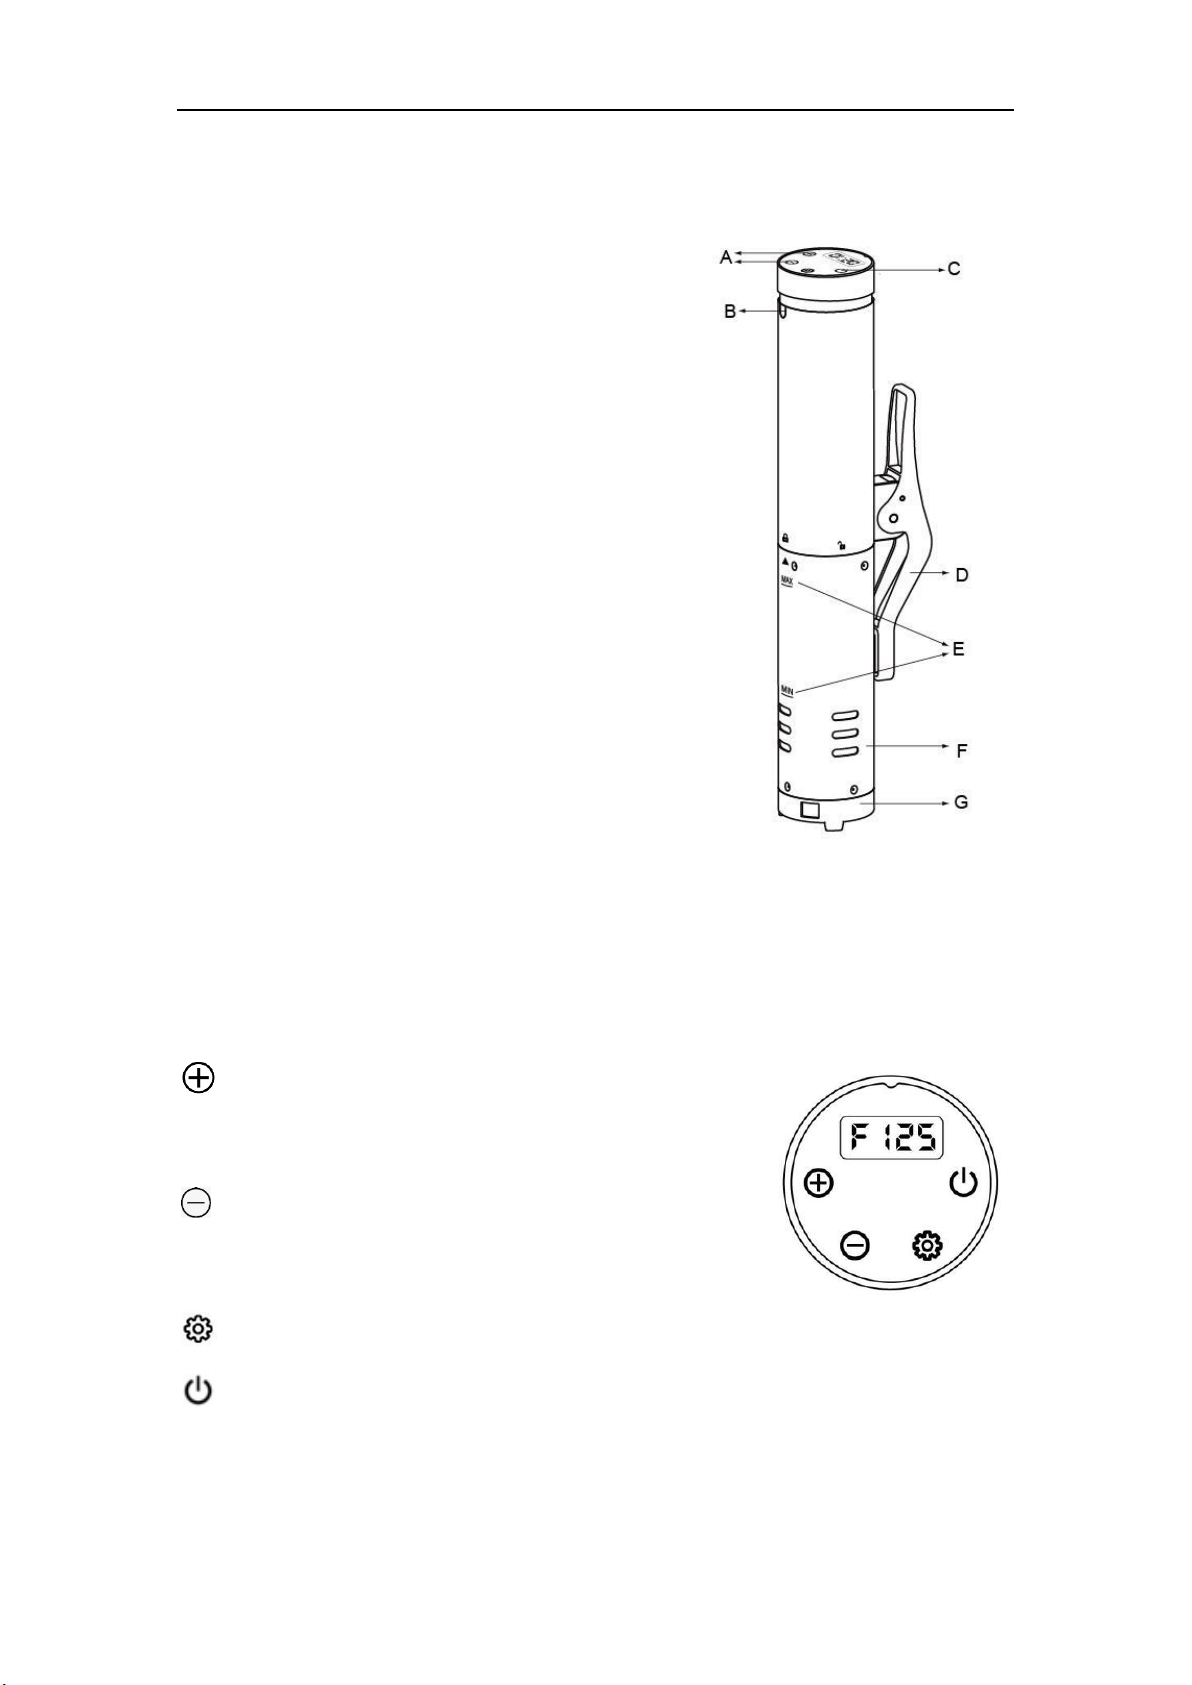
Step 1. Power on
Plug it into the outlet. The “ ” icon and working lamp will be on in red and it will enter the
standby mode. Press the “ ” icon to enter the setting mode.You will hear a sound of
beep for every pressing.
Step 2. Set cooking temperature and time
1. Choose the temperature unit. After the sous vide machine is powered on, the “ ” icon
will turn blue and flicker,short press “ ” or “ ” to switch the temperature unit to ℃or ℉
as you like.
2. Temperature setting. Short press the “ ” icon and then press “ ” or “ ” to set the
cooking temperature.
3. Time setting.When the temperature setting is finished,short press the “ ” and begin to
set your cooking time. First press the + or –adjust button to set hour, then press “ ”
again to set the minute.
Step3. Start to cook
While above setting is done,short press the “ ” to start the cooking .

3
NOTE:
1.The working indicator light turns blue while the machine is working. If you want to
change the setting,press and hold the“ ” icon for 3 seconds,then repeat the setting as
above instruction.The unit will stop automatically when it runs out of time and an “END”
icon will show on the screen.
2.During heating up,the control interface will show the current temperature.When reaching
setting temperature and starting to count down the set time, the control interface will show
the countdown time. The temperature and count down time will appear on the interface
every 5 seconds alternately.
(二).WIFI operation instructions
Step (1). Download the APP
Android system smart phone can search and download the “CTO sous vide”app in Google Play ,
and IOS phone can search and download that in APP Store. Or you can directly download and
install the APP by scanning below QR code.
Android IOS
Step(2).Set up the device
1). Registration -The first time set up requires mobile phone registration, the registration method
is as follows:
Click the APP icon on your mobile phone to open the "CTO sous vide" APP and enter the
main interface and click the icon in the upper left corner . ( FIG. 1 )
Click the icon to enter your account login. If there is no account, please register with your
mobile phone number first. ( FIG. 2 )

4
FIG. 1 FIG. 2
2). Login your account - After the registration is successful, return to the account login interface
and enter the registered account and password ( FIG. 3 ). After login, you will be prompted with
“Log in successfully”. (FIG. 4)
FIG. 3 FIG. 4
3).Add the device to the APP as below :
①.Make your phone connect with your 2.4GHz WI-FI .( NOTE : The device does not
support 5GHz Wi-Fi network currently ) .
②.After the product is powered on, hold the “ ” button, the WiFi indicator on the

5
product will flicker rapidly, and the product will make a “DI-DI” sound, indicating that the
WiFi is in waiting connection status.
③.Open the “CTO sous vide” app on your mobile phone, click the “ SOUS VIDE “ icon
to enter the device interface ( FIG.5 )and tap “ ” in the upper right corner to
enter the configuration prompt interface (FIG.6 ) and click “Next step” to enter the WiFi
connection interface (FIG.7) .
FIG.5 FIG.6 FIG.7
The WIFI connection interface displays the name of the WIFI which your mobile phone connected.
Please enter the correct WiFi password and click “Next step” to enter the configuration
state(FIG.8) . Please wait patiently during the configuration (FIG.9) (NOTE: Due to the network
reason,if it is configurating too long time,for example have passed 1 minute but still not
configurate sucessful,please exit the current configuration and try again). In the configuration
process,please make sure the distance of WIFI router and the product within 10 meters. Also the
phone and the product must be in contact with the control panel of the product. After the
configuration is successful, it will prompt "Configuration completed" ( FIG.10 ).

6
FIG.8 FIG.9 FIG.10
After the configuration is successful ,enter the APP, click “sous vide” to see the successfully
configured device. If multiple sous vide machines need to configured to the same phone, please
tap “ ” in the upper right corner and follow the②and③steps above to configure.( FIG.11) .
FIG.11
Important Note :
1.During cooking in WiFi operation, please make sure the sous vide cooker always
connect the wifi,so that you can remote control the cooker.
2. In configuration process,please make sure your mobile phone and the sous vide app connect
with the same wifi .
3. After configuration is successful,your phone can be disconnected the wifi (But the cooker must
not disconnect it ) and use your mobile data,that means you can go anywhere and control the
cooking by your mobile phone.

7
4. NOTE: Next time no need to add the sous vide in app again,just plug in,press the
gear icon to turn on the wifi function,the cooker will detect and connect the wifi
auto in about 30s.Enter the APP, Click refresh ,the sous vide you ever used will
appear on the interface.
Your smartphone can use the wifi or your mobile Internet data to operate the
cooker.
Please note that White Background of the SOUS VIDE name means the machine is on
line,just click it to the recipe page.If the background is grey,it means the machine is
Off line .(Check the image below ).
If it always in " loading " status,just logout the “CTO APP”and re-enter .This will
happen due to the wifi signal not good enough at that moment.
(3) Choose recipe
Click the icon of the configured sous vide ,enter the recipes interface as bellow
(FIG.12) .There are three modes to get your receipes : DIY, Automatic, Scanning
DIY: Setting the cooking temperature and time base on your taste and ingredients. Set the
recipe, click “” to add to your favorite, click “ ” to delete the favorite (FIG.13).

8
FIG.12 FIG.13 DIY recipes
Automatic: In this mode there are many proper recipes for different food, cooking in
specified cooking temperature and time can keep their original taste and max nutritional
value. You can choose the ripeness mode you like and the thickness of the ingredient,the
cooking temperature and time are fixed in this mode.Take the below steak recipe for
reference.

9
Scanning: Users usually have a cooking recipe introduction and cooking recipe QR code
on the package of the purchased food. Users can scan and save it in your mobile phone.
(4) Start Cooking
When finish setting or choosing the recipe, click “pre-heat” to enter the following interface,
click “Begin”, the sous vide start working and send a “DI” beep, the working indicator is
flashing .When the temperature reach the specified temperature, the product will send a
“DI” beep again, then the calculation of the cooking time will be started. The following
figures are the status of the temperature and time before and while the sous vide goes to
work with the APP. Please take for reference.
FIG. 14 Before Working FIG.15 Start Working
NOTE: Please note that the device does not support 5GHz Wi-Fi network so far. Please
choose 2.4GHz WIFI network, due to the home router general have 5G and 2.4Ghz WIFI,
the signals may switch to each other. Please ask the relevant technicians to disable the
switching functions between 5GHz and 2.4GHz. In additional, please confirm that the
WIFI is not hidden. If WIFI is hidden, your mobile phone can recognize the WI-FI but the
device cannot, then the WIFI network cannot be identified. Please turn off the WIFI hidden
function, and confirm that the WIFI network of the mobile phone connected is the same
one with the sous vide.

10
Assembling of stainless steel skirt
Hold the Sous Vide Stick with the heating element upwards and open the clamp.
Slide the stainless steel skirt over the heating rods so that the arrow points
to the opened lock symbol
Make sure that the propeller does not get caught.
It must be positioned in the center of the hole in the clear plastic cover.
Rotate the stainless steel skirt until the arrow points to the closed lock symbol:
For disassembling turn the stainless steel skirt counterclockwise.
Make sure that the propeller does not get caught. It must be positioned in the middle.
Please note
►Make sure that the propeller does not touch the stainless steel skirt as it can easily
be deformed.
Install the skirt
Hold and press the clamp, align the unlocking symbol and the arrow,
rotate the skirt in clockwise direction until you can see the arrow and
locking symbol are in the same horizontal position. Be cautious with the
stainless steel propeller when it crosses over the hole of the stainless
steel skirt.
Uninstall the skirt
Hold and press the clamp,rotate the skirt in anticlockwise direction to
take off the skirt. Be cautious with the propeller in case it hits the
stainless steel skirt.

11
Cleaning
After long time use, some scale may occur to the heating element and the
housing,to remove the scale, it is suggested to clean with mixture of vinegar and
water.
(Caution: rinse quickly and thoroughly with water when chemical burn is caused
by vinegar. If the eye is still red, painful, tears and is sensitive to light, medical
advice is required.)
Maintenance
• Always turn off and unplug the unit.
• Internal service work must be performed by certified personnel only.
• Make sure system is at room temperature.
• Don’t disassemble the water pump cap.
Check for signs of damage including pulled cord or physical damage to system or heaters.
If any signs of physical damage are found, please send back to factory for replacement
parts.
OPERATION WARNING
This section explains the potential dangers that may arise when operating the sous vide
circulator and notes many important safety precautions.
1. Counter tops such as marble and corian cannot withstand the heat generated by the
circulator. Place cooking container on other different surface to prevent damage.
2. Do not use extension cords. Never operate with a damaged cord or plug. Use properly
grounded electrical outlets only.
3. Do not immerse the machine beyond the top MAX water level mark or below MIN water
level mark on stainless steel skirt. Only the stainless steel skirt and the pump housing are
dishwasher safe. Unplug from outlet when not in use and before the cleaning process.
4. Burn Hazard - the cooking container, the stainless steel portion of circulator, and food
pouches all get hot when used. Use oven mitts or tongs when handling. Allow machine to
cool before emptying the water bath.

12
5. This machine is an indoor appliance and is not a toy.
6. Do not disassemble. Observe all warning labels. Do not remove warning labels.
7. Do not use this appliance for anything other than intended use. (Like laboratory work or
heating a hot tub) .
8. Firmly lock the product by clamping it on the side of your pot or container . Place the
container on an flat surface to prevent spills and tipping over. Do not place the unit on a
stove, or in an oven.
9. Do not use deionized water (DI water).
10. Before plugging into a socket, check whether your voltage corresponds to the rating
label of the appliance. The appliance only works with 120 V outlets.
11. Don’t let children use and play with this appliance. Keep the appliance and its cord out
of reach of children.
12. Never use a damaged appliance. If it has been damaged, please get it to approved
service center, checked or repaired.
13. If the supply cord is damaged, it must be replaced by the manufacturer, its service
agent or similarly qualified person in order to avoid a hazard.
14. Don’t let excess cord hang over the edge of the table or worktop or touch hot surface.
15. Please switch off the appliance and disconnected the power before changing
accessories or moving the item while using.
16. When the appliance works under an abnormal mains disturbance it may lose
performance and maybe it is needed to be unplugged to recover the normal operation.
17. This appliance can be used by children aged from 8 years and above if they have
been given supervision or instruction concerning use of the appliance in a safe way and if
they understand the hazards involved. Cleaning and maintaining the appliance could not
be made by children unless they are older than 8 and supervised. Keep the appliance and
it’s cord out of reach of children aged less than 8 years.
Appliance can be used by persons with reduced physical, sensory, or mental capacities,
or lack of experience and knowledge if they have been given supervision or instruction
concerning use of the appliance in a safe way and if they understand the hazard involved.
18. Children shall not play with the appliance.
19. This appliance is intended to be used in household and similar applications such as:

13
- staff kitchen areas in shops, offices and other working environments.
- farm house
- hotels, motel and other residential type environments
20. If the appliance falls down into water tank by careless operation, unplug it first ,
then remove it out of the tank , wipe up the water on the appliance surface , placing
it in airy place. It would be ok for use after complete dry up.
Sous Vide circulators are designed to be used only with water.
Trouble Shooting FAQ
Noise:
Under normal operation the system will hum due to the motor, impeller and cooling fan in
operation.
Slurping noise :
Your pump has formed a water vortex like when you are emptying out a bathroom sink or
tub. Add more water or gently disturb water with a spoon. There is no sure way to
eliminate a vortex from forming due to the pump rotation but usually will go away on its
own.
Gurgling + Woosh noise :
The pump is sucking air - add more water. You should also see small bubbles in your tank.
Food damage :
The pump’s water jet is cracking eggs or damaging fish fillets: Turn the pump outlet to face
the container wall,this will greatly temper the flow of the pump output. It is also good
practice to bag eggs to prevent them from being “blown” around in certain containers.
System will not turn on:
Check power plug and breakers.
Low water level alarm:
Add more water –the water level can be dropped during operation by the pump due to
water turbulence.

14
Low water level alarm turns on after a few seconds of operation :
Add more water –The pump generates “waves” – sometimes these waves will cause the
water level at the sensors to fluctuate up and down. The waves sometimes drop the water
level right under the sensor and will cause a low water alarm. This is normal and you just
need to add more water.
Temperature read does not match thermometer:
Sous Vide circulators are calibrated to a scientific platinum primary standard which is far
more accurate than store thermometers.
Lights in house are slightly flickering when system is on :
This is normal as the circulator is modulating power.
Error code EE1 will be appeared in below situation with alarm sound:
1. No water in tank
2. Water below minimum level
3. Appliance in situation of short circuit
TECHNICAL SPECIFICATIONS
Power rate: 120V, 60Hz, 1000W
Temperature range: 0°C~90 °C
Temperature Stability : ±0.1ºC min
( 40°C-70°C: 0.1°C - 0.2°C ;Below 40°C & above 90°C: 0.2°C - 0.5°C )
Circulation pump: 10 LMP max
Do not dispose of the device in normal domestic waste
Dispose of the device over a registered waste disposal firm or through your communal
waste disposal facility. Observe the currently valid regulations. In case of doubt, consult
your waste disposal facility.
Table of contents