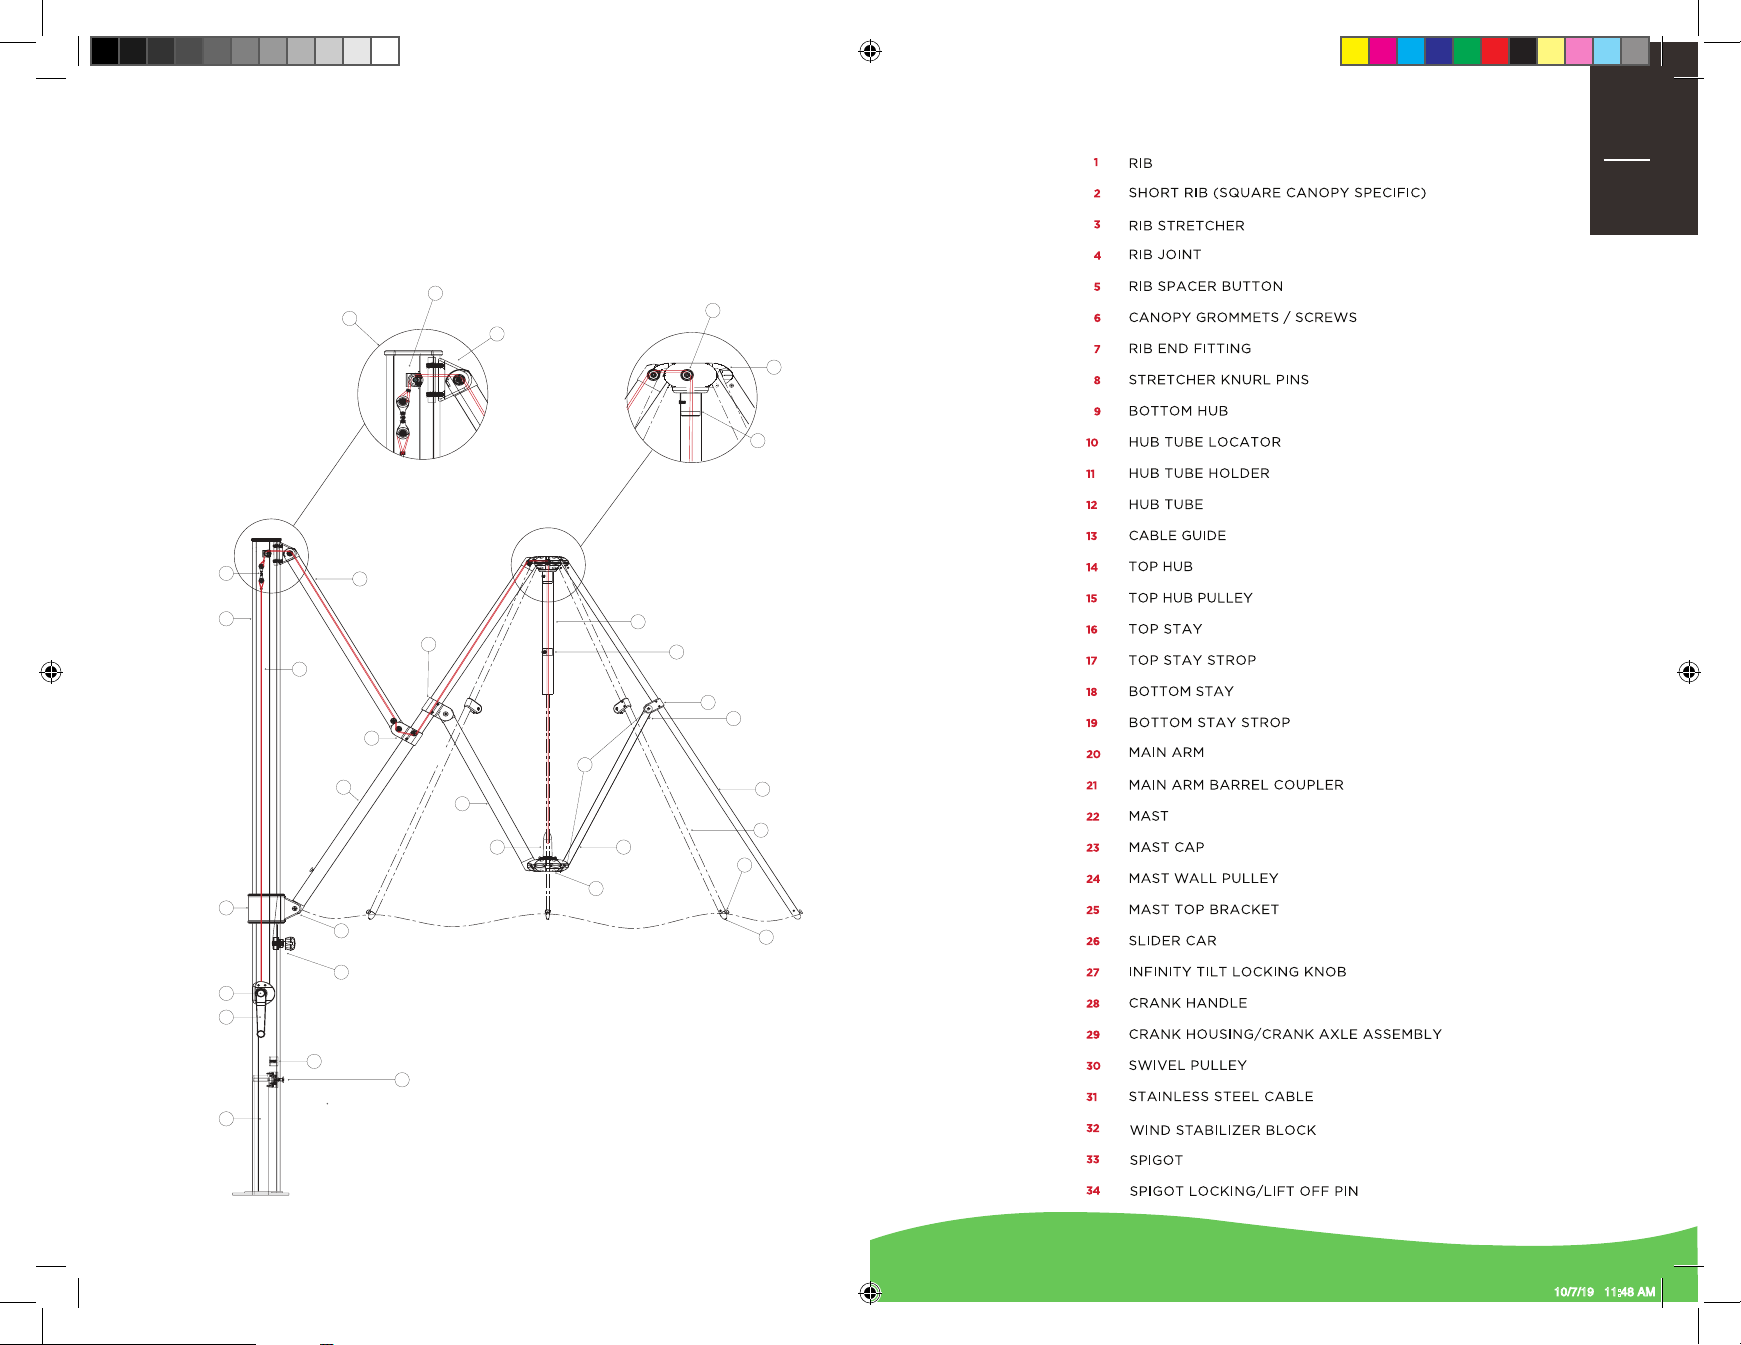
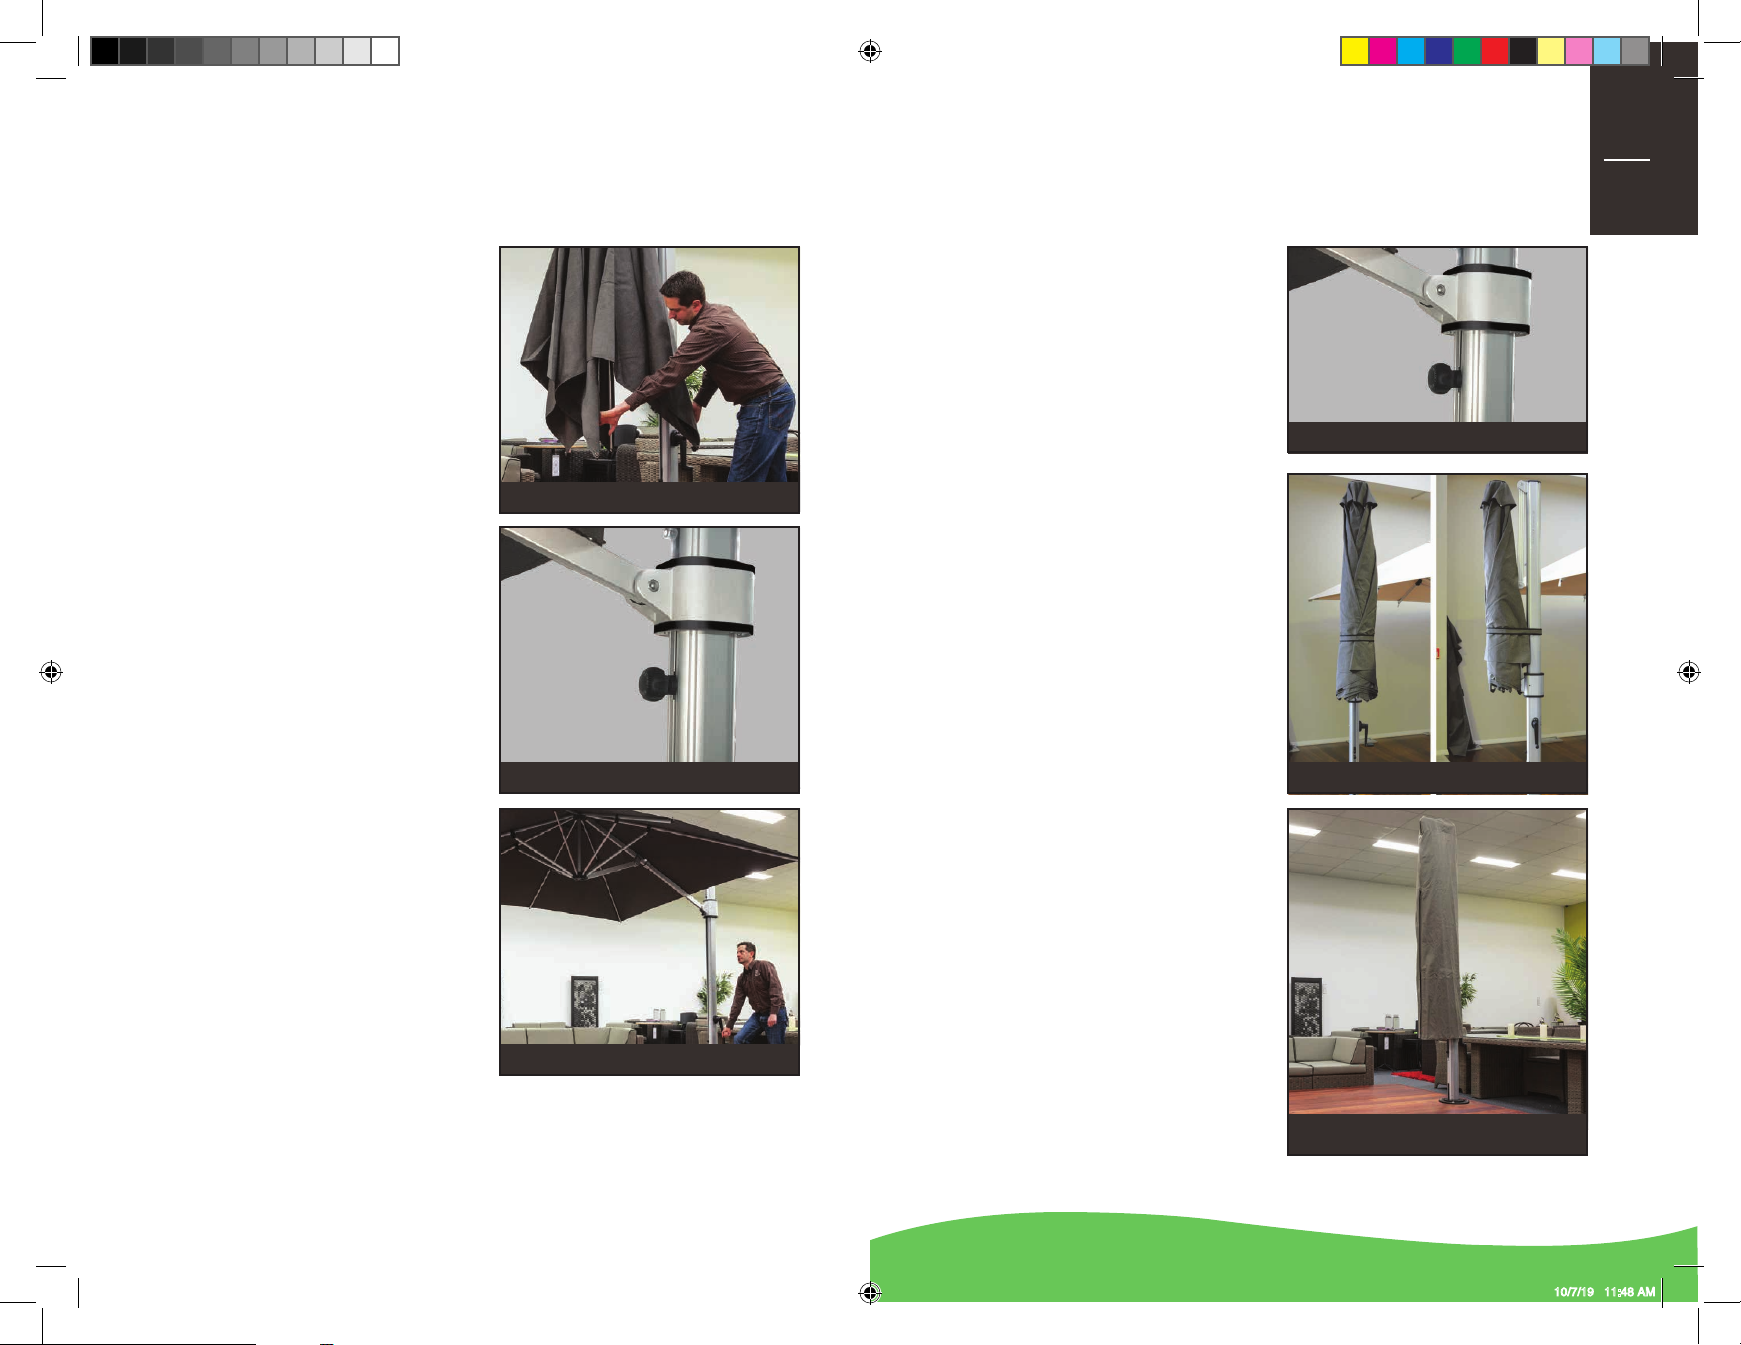
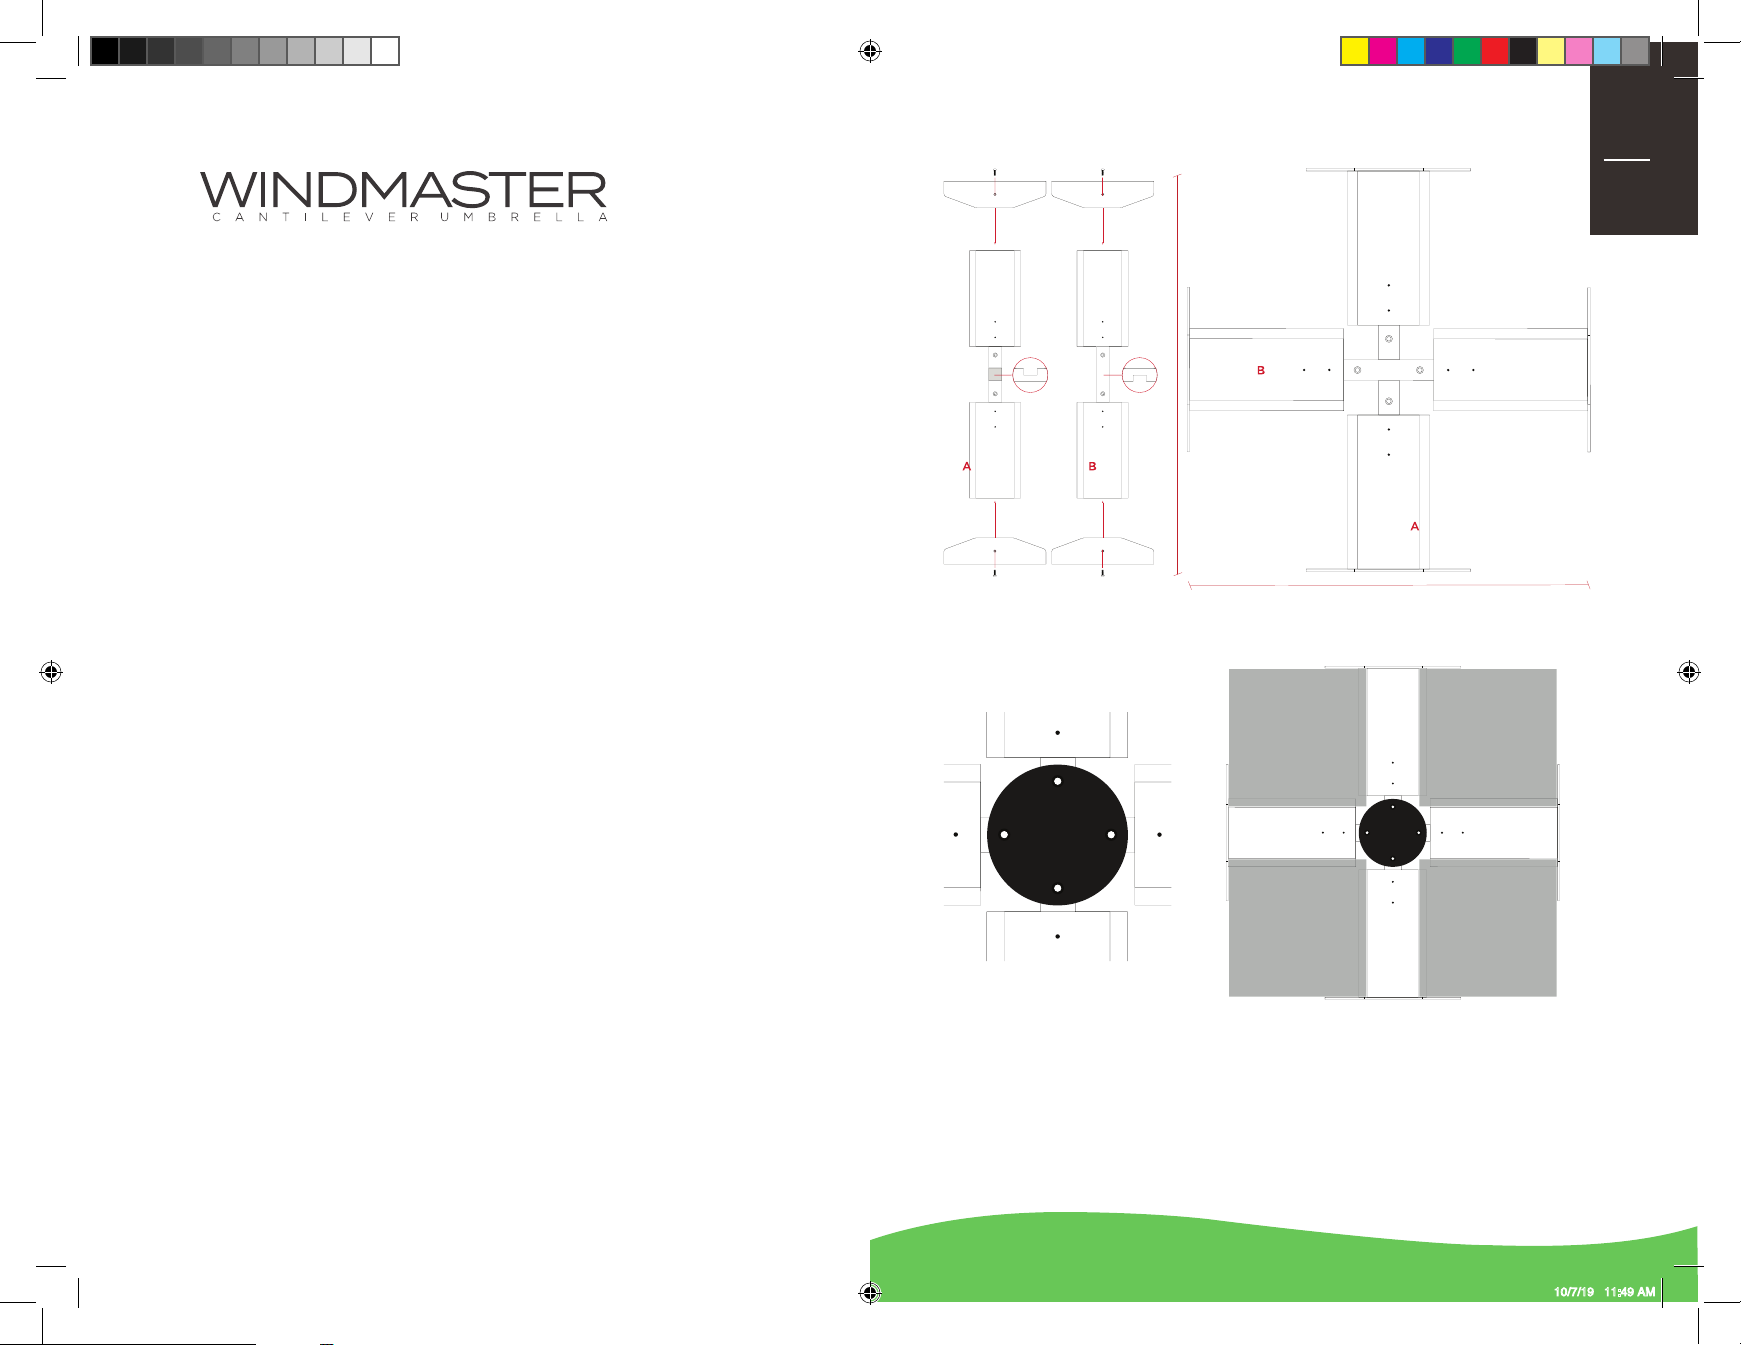
Grosfillex WINDMASTER User manual

OWNERS MANUAL
GROSFILLEX North America
230 Old West Penn Ave, Robesonia, PA 19551
(800) 233-3186
www.grosfillexfurniture.com
WM10_Owner_Manual_2020.indd 1 10/7/19 11:48 AM

Congratulations on purchasing your Windmaster 10 Cantilever Umbrella. The Windmaster
is manufactured using the highest standard materials and fabrics on the market, and is
perfectly designed to give you many years of enjoyment. The following information is to
inform you how to operate your Windmaster 10 Cantilever Umbrella to ensure trouble free
use and ease of operation. Please follow these instructions as they are designed to assist
operation and prolong the life of your umbrella.
Your Windmaster Umbrella is principally intended for use in low to moderate wind condi-
tions and will provide you with many hours of protection from sun and light rain. You will
get maximum benefit from your umbrella when you use it in accordance with our instruc-
tions and in the weather condition for which it was designed.
GENERAL INFORMATION
• Do not leave umbrella open when unattended, particularly in windy conditions.
• Your Windmaster Umbrella should be closed and securely strapped in strong winds
and adverse weather conditions.
• Always secure your umbrella to a Grosfillex Cross-base.
• Please avoid any modifications to your umbrella, except those made by an
authorized GROSFILLEX customer service agent. Unauthorized modifications will
void the warranty.
• Make sure your Windmaster is dry and clean prior to storing away for extended
periods of time to prevent mold from developing.
• Be careful when closing to ensure the canopy does not get caught or “pinched” by
the umbrella arms. This is particularly important before storing the umbrella away
for extended periods of time or if the umbrella is to be laid horizontally for storage.
Damage to the fabric caused by “pinching” is not covered by the warranty. Follow all
manufacturer’s assembly instructions.
• Inspect the installation fitting/base on a regular basis and tighten as necessary.
SIMPLE MAINTENANCE PROCEDURES
• In coastal or metropolitan environments, frequent washing of the complete unit is
very beneficial. Particularly the slider car, slider car guide tracks.
• Silicon spray in the slider car wheels will assist operation if required.
• Fold the acrylic canvas as mentioned in “Closing The Windmaster” (Page 8). This
will prolong the new look of the canvas and prevent marking caused by “pinching”
in the alloy frame.
• All parts are virtually maintenance free (e.g. aluminum, stainless steel, etc.) However,
it is recommended that if the umbrella is not to be used for an extended period of
time (winter months), to place the umbrella in storage. You may even remove the
spigot when the umbrella is not in use, as it can be a tripping hazard.
• The included protective cover should be when the umbrella will not be operated for
an extended period of time.
• The acrylic canvas may be cleaned or mold removed by using a mild mixture of an
approved mold remover and warm soapy water with a soft bristle brush. Test first
on the securing strap to ensure no damage will be caused to the umbrella canopy
fabric.
• DO NOT USE BLEACH BASED DETERGENTS TO CLEAN THE UMBRELLA CANOPY.
01
02
WM10_Owner_Manual_2020.indd 2 10/7/19 11:48 AM

03
04
RECacril Marine Grade Acrylic Fabric Infinity Process is a highly technological finish,
providing RECacril with long lasting protection against mold and mildew, excellent
water and oil repellency and protection from both sun and water. However, the
accumulation of dust, pollution particles, foreign organic materials and general dirt
can damage this protection, shortening the life of the RECacril, so they should be
removed. The most effective method for maintaining RECacril is to clean the canvas
once a month with water using a low pressure hose. It is very important that after
cleaning with water, the canvas be allowed to completely dry before rolling or storing
your umbrella. If for any reason you have to roll and/or store a wet umbrella, it must be
unrolled and opened as soon as possible to let it dry. In times of continuous rain, it is
advisable to keep the umbrella rolled and stored.
If periodic washing with water is done, in most environments, you should only need
to do a thorough cleaning every 2-3 years.
FABRIC CARE
RECacril® is highly resistant to the growth of fungus, mold, and mildew, however
these can grow on embedded dirt. To clean these stains, follow these more intensive
cleaning procedures.
• Brush off dust and dirt with a soft brush. NEVER brush with stiff brushes as this
can damage the fabric finish.
• Prepare a solution with 10% household bleach, 20% solvent-free neutral detergent
(Free & Clear detergents) and 70% water.
• Apply the solution to the fabric, allowing to remain between 15 and 20 minutes
maximum.
• Rinse with clean water several times. Any singular bleach residues remaining on
the canvas, combined with the sun, could damage the fabric and stitching.
• Let air dry and do not close the umbrella until the canvas is completely dry.
• Repeat the process if necessary.
• Brush off dust and dirt with a soft brush. NEVER brush with stiff brushes since this
can damage the fabric finish.
• Spray the umbrella with clean water. If a hose is used, avoid high pressure.
• Prepare a solution of solvent-free soap in warm water (no more than 100°F) and
apply it to the fabric and stitching.
• Scrub with a soft brush, allowing the solution to penetrate the fabric.
• Rinse with water to remove all traces of soap.
• Let air dry and do not close the umbrella until the canvas is completely dry.
CASUAL CARE & CLEANING
INTENSIVE CARE & CLEANING
WM10_Owner_Manual_2020.indd 3 10/7/19 11:48 AM

05
06
WINDMASTER10 PARTS IDENTIFICATION
NOTE:
When the Windmaster is closed, the swivel connection is near the top of the mast.
When the Windmaster is open, the swivel connection is near the bottom of the mast.
HARDWARE INCLUDED WITH UMBRELLA
Galvanized Steel Spigot (29)
Spigot Mounting Hardware: 4x 1/2” (1.38mm) Stainless Steel Countersunk Bolt
1x 5/16” (8mm) Allen Wrench
NOTE:
Hardware listed above is not installation hardware for use on surface or
deck mounting.
Customer must supply hardware as suggest in the installation procedures.
RIB
1
4RIB JOINT
7RIB END FITTING
CANOPY GROMMET/SCREWS
6
SHORT RIB
(SQUARE FRAME SPECIFIC)
2
STRETCHERS
3
BOTTOM HUB
9
MAIN ARM COUPLER
21
INFINITY TILT LOCKING KNOB
27
HUB TUBE LOCATOR10
STAINLESS
STEEL CABLE
31
HUB TUBE
12
TOP STAY
16
11 HUB TUBE HOLDER
TOP HUB
14
TOP HUB PULLEY
15
MAST WALL PULLEY
24
MAIN ARM 20
TOP STAY STROP 17
BOTTOM STAY 18
BOTTOM STAY STROP 19
CABLE GUIDE
13
RIB SPACER BUTTON
5
STRETCHER KNURL PINS 8
MAST TOP BRACKET
25
MAST CAP 23
MAST 22
SLIDER CAR 26
CRANK HOUSING/
AXLE ASSEMBLY 29
SWIVEL PULLEY
(UP TOP WHEN CLOSED) 30
CRANK HANDLE 28
SPIGOT33
WIND STABILIZER BLOCK
32
SPIGOT LOCKING / LIFT-OFF PIN
34
WM10_Owner_Manual_2020.indd 4 10/7/19 11:48 AM

07
08
FIGURE C
FIGURE A
FIGURE B
OPENING THE WINDMASTER CANTILEVER
NOTE: The Winder Handle will become a little
harder to wind as the umbrella nears fully
open. This is normal particularly when the
acrylic canvas is new.
• Remove the strap from the canopy.
• Gently spread the canopy arms open
with your hand. (Figure A)
• Ensure the slider car knob (18) is loose
and slider car can move freely (Figure
B). Insert the winder handle (26) into the
hole on the side of the mast and rotate in
a clockwise direction.
• Continue winding until the canopy is fully
open. The bottom hub (6) will be seated
into the hub tube (9) and the edge of the
canopy should be tight (Figure C).
• The tilt angle of the canopy can be
adjusted as required at any time by
loosening the slider car knob (18) and
sliding the slider car up and down the
mast.
IMPORTANT: The slider car knob (18) must be
securely tightened, especially when used in
higher winds.
NOTE: The optimum strength of the umbrella
is reached only when the slider car is at its
maximum height and the umbrella canopy
edge is horizontal to the ground. The strength
of the umbrella is lessened when the canopy
is in an angled position and wind damage is
more likely.
• Once the canopy is fully opened hold the
slider car knob (18) and push the slider
car up until the canopy is at the desired
tilt angle. Tighten slider car knob (18)
clockwise to secure the umbrella at that
angle.
FIGURE C
FIGURE A
FIGURE B
CLOSING THE WINDMASTER CANTILEVER
• Turn the slider car tilt knob (18) count-
er-clockwise (Figure A) until loose.
Rotate the winder handle (26) in a
counter-clockwise direction. The canopy
will begin to collapse. Continue winding
in a counter-clockwise direction until the
canopy is mostly closed and the canopy
arms are pointing almost vertically down
to the ground.
• Hold the slider car tilt knob and pull the
slider car down the mast towards the
ground. The canopy should now be fully
closed. Reach around with one arm and
pull the canopy back towards the mast to
complete closing.
• FOLDING THE CANOPY NEATLY: Stand
in front of the canopy and find the front
four panels of fabric. Pull these together
towards your body and alternate folding
over remaining panels from left to right
with the sixth, seventh and eighth panel.
(Figure B)
• FITTING THE PROTECTIVE COVER:
Stand in front of the folded canopy
and open the cover bag zip completely.
Use the handle rod to lift the protective
cover behind the mast and up as high as
possible to clear the top of the umbrella.
Pull the protective cover down over the
top of the mast and canopy. Zip the
cover closed. The zipper should be on the
front side of the canopy, not at the back
of the mast.
WM10_Owner_Manual_2020.indd 5 10/7/19 11:48 AM

09
10
FIGURE C
FIGURE A
FIGURE B
INSTALLING YOUR WIND STABILIZER KIT
Your Windmaster 10 Cantilever Umbrella
comes with a Wind Stabilizer Kit to assist
its performance in a wider range of wind
conditions. This Stabilizer Kit consists of two
(joined) stabilizer bars.
To Install Stabilizer Kit:
• Slide the stay block (32) up the internal
mast housing to a height roughly the
same as the length of the stabilizer bars
when standing vertically (Figure A).
NOTE: The Windmaster 10 Cantilever Umbrella
does not need to be fitted with the Stabilizer
Kit for normal everyday operation in calm to
moderate wind conditions. It is only advised
for use in higher winds or commercial
applications.
• Attach the threaded stainless steel screw
with the two aluminum stays attached
to the stay block and tighten the screw
sufficiently for the stay block to remain
in position without sliding down the mast
(Figure B).
• Swing either aluminum stay arm off the
ground and attach to the umbrella using
the “T-Lock” or “Star Screw”. Position
the “T-Lock” vertically and slide the hole
in the plastic fitting at the end of the
stabilizer bar through (Figure C). Set the
“T-Lock” to horizontal to lock the bar in
place (Figure C).
DISCLAIMER: The Wind Stabilizer kit should
only be used when the Windmaster 10
Cantilever Umbrella is positioned at a 90°
angle (most stable position).
WM10_Owner_Manual_2020.indd 6 10/7/19 11:49 AM

11
12
INSTALLATION PROCEDURE
PREFERRED STARTING
POSITIONS
WINDMASTER 10 TO POINT
DECK PLATE
IN-GROUND MOUNT
Your Windmaster 10 Cantilever Umbrella is delivered fully assembled. There are three different ways to install
your Windmaster 10 Cantilever Umbrella:
1. Installing on a wooden deck using a Deck Plate.
2. Installing on an existing concrete slab or pavers using a Deck Plate.
3. Installing into the ground (i.e. into a lawn, garden or paved patio) using the In-Ground mount.
4. Installing on a free-standing base.
Prior to installing your installation fittings please read the important information below.
There is a locking hole in line with each of the 4 spigot bolt holes in the spigot plate. There are also three
intermediate holes between each of the spigot bolt holes, all of the available locking points are marked by a
notch/indicator mark on the top surface of the spigot plate.
To point your umbrella in the perfect direction or to have a symmetrical installation (especially when
installing square umbrellas) it is very important to make sure you install the Base Plate or In-Ground fitting
square to the direction that you predominantly want the umbrella to point.
WM10_Owner_Manual_2020.indd 7 10/7/19 11:49 AM

SURFACE INSTALLATIONS
Your umbrella comes with a spigot. Once you have installed the Deck Plate mount according to the
instructions below, attach the spigot to the Deck Plate mount using the supplied Allen key and bolts.
This is recommended as a two-person operation.
INSTALLING ON A WOOD DECK USING A BASE PLATE: To install your Windmaster 10 umbrella onto
a wood deck the following instructions should be followed. Installing your Windmaster 10 umbrella
onto a wood deck you will need the following:
• Deck Plate and deck bolts (purchased by you or supplied by your hired professional contractor)
• A decently amp rated corded or cordless power drill.
• A scrap piece of wood (to make a reinforcing brace/blocking) and suitable hardware to secure
the blocking to the deck joists.
• IMPORTANT: Your umbrella must be bolted down into a reinforced brace/blocking that is
fixed under the deck planks to the deck joist. The umbrella must not only be fixed to the deck
planking as this will likely result in the deck planks “pulling up” and the umbrella falling over in
high winds.
Once you have decided on the location of the Windmaster 10/Deck Plate, use the four outer holes
in the deck plate as a template to start drilling each of the holes in the deck. Make sure each of the
four holes go through decking and miss the joists. Using the four holes drilled in the deck as a guide,
you now need to install a reinforcing brace/blocking hard up under the decking for the deck plate
bolts to be fixed into. It is recommended that two wood brace/blocking be secured between the deck
joists or bearers that form the structural frame of the deck. Ideally the brace/blocking should be two
short lengths of 4”x4” wood posts side by side, or alternatively two pieces of 2”x8” wood joists joined
together for the umbrella deck plate to bolt through. The brace/blocking must then be securely fixed
to the deck frame/joists using suitable hardware. These may be large galvanized nails, coach screws
or builders brackets etc. If the installation is in a sea spray zone or coastal environment, then stainless
steel hardware is recommended.
You can now use the four holes already drilled in your decking and drill them all the way through the
newly installed brace/blocking under the decking. Put the deck plate in place and install purchased
through the plate, decking and blocking. Use a washer and nut on the underside of the bolt under the
deck and torque down tight. After the deck plate has been securely fixed to the deck you should now
remove the four “grub bolts” that are installed in the four spigot-bolt holes. (The purpose of these
grub bolts is to keep dirt out of the threaded holes when not in use). Attach the spigot to the deck
plate using the supplied hardware and tighten down with the supplied Allen key. Lift the Windmaster
10 umbrella onto the spigot on top of the base plate. Now you can carefully open your umbrella for
the first time.
WOOD DECKING
SUPPLIED STAINLESS STEEL (4x 1/2”)
COUNTERSUNK BOLTS
RECOMMENDED
(1/2”x6”STAINLESS STEEL WOOD FASTNERS)
SPIGOT
12.5” DECK PLATE
DECK PANELS (BOARDS)
DECK JOISTS
BRACE/BLOCKING
INSTALLATION HARDWARE NOT INCLUDED.
HARDWARE INCLUDED WITH UMBRELLA
Galvanized Steel Spigot (29)
Spigot Mounting Hardware: 4x 1/2” (1.38mm) Stainless Steel Countersunk Bolts
1x 5/16” (8mm) Allen Wrench
13
14
WM10_Owner_Manual_2020.indd 8 10/7/19 11:49 AM

SURFACE INSTALLATIONS
CONCRETE SLAB/PAVER
SUPPLIED STAINLESS STEEL (4x 1/2”)
COUNTERSUNK BOLTS
12.5” DECK PLATE
INSTALLATION HARDWARE NOT INCLUDED.
HARDWARE INCLUDED WITH UMBRELLA
Galvanized Steel Spigot (29)
Spigot Mounting Hardware: 4x 1/2” (1.38mm) Stainless Steel Countersunk Bolts
1x 5/16” (8mm) Allen Wrench
M10 CONCRETE SCREW OR DYNA
BOLT CONCRETE ANCHORS.
RECOMMENDED MINIMUM LENGTH 4”
INSTALLING ON A NEW CONCRETE SLAB: To install your Windmaster 10 umbrella onto an existing
concrete slab you will need the following: base plate, suitable concrete bolts (we recommend
concrete bolts approximately .5” x 4”)
• Concrete screw or DYNA bolt concrete anchors (1/2” x 4” Minimum Recommended)
NOTE: Countersunk is not necessary if unable to source.
• A hammer drill with masonry bits.
• A socket set
• A trusted level.
• IMPORTANT: Your umbrella must be bolted down into concrete at least 4” deep. Keep a cushion
of 6-8” from edge of concrete slab.
Once you have decided on the location of the Windmaster 10/Deck Plate then use the four outer
holes in the deck plate as a template to start drilling each of the holes in to the concrete. Drill each of
the four holes using a hammer drill, down to about .5” deeper than the concrete bolt being used. This
allows space for the bolt if dust falls to the bottom of the hole. Drill the holes at the correct diameter
for the bolts provided. Use a level to ensure the base plate is level once all four holes have been
drilled. If the deck plate is not level, use galvanized or stainless steel washers to level the deck plate
on the concrete. Torque down the four bolts through the base plate with washers (if needed) until
they are fully wound in and are tightly holding the deck plate.
After the deck plate has been securely fixed to the deck you should now remove the four “grub bolts”
that are installed in the four spigot-bolt holes. (The purpose of these grub bolts is to keep dirt out of
the threaded holes when not in use). Attach the spigot to the deck plate using the supplied hardware
and tighten down with the supplied Allen key. Lift the Windmaster 10 umbrella onto the spigot on top
of the base plate. Now you can carefully open your umbrella for the first time.
15
16
WM10_Owner_Manual_2020.indd 9 10/7/19 11:49 AM

NOTE: Your Cross Base is shipped disassembled.
Once you have decided on the location of the Windmaster 10 cantilever umbrella, make sure you
have an area of at least 40” in diameter for the base to rest, then place your assembled Cross Base
into position. Locate the four threaded holes on the legs at the crossing point. (This patter can be
identified on the below drawing).
1. Place the Windmaster Deck plate on the crossing section of the legs (A/B)
2. Remove the spigot from your Windmaster mast and place it on the deck plate lining up the
corresponding holes. Bolt the spigot to and through to the cross base legs with the supplied
hardware.
3. Once a location is determined and your Cross Base is assembled, you can now start placing in
the 16”x16”x2” concrete pavers. You want to make sure the pavers are a minimum of 35 lbs. and
a minimum of 8 pavers (2 per quadrant) are used.
• IMPORTANT: You will need to place the Windmaster deck plate at the cross section of the legs.
16” x 16” x 2” CONCRETE PAVERS.
NOTE: You can stack a maximum of 12 pavers (3 per quadrant) within your Cross Base to create a
heavier footprint.
Before you pair the legs,
attach the retaining plates to
each side of the legs.
LEG “A” should be placed down first. LEG “B” will then
nestle into the notch of “A” creating the sturdy frame.
PAVERS NOT INCLUDED.
HARDWARE INCLUDED WITH UMBRELLA
Galvanized Steel Spigot (29)
Spigot Mounting Hardware: 4x 1” (25mm) Stainless Steel Countersunk Bolts
1x 5/16” (8mm) Allen Wrench
4x Paver Retaining Plates / Bolts
1x 5/32 (4mm) Allen Wrench
NOTE: Before weighing down your base, please choose a location for your Windmaster 10 umbrella.
SURFACE INSTALLATIONS
Your umbrella comes with a spigot. Once you have installed the Deck Plate mount according to the
instructions below, attach the spigot to the Deck Plate mount using the supplied Allen key and bolts.
This is recommended as a two-person operation.
17
18
39”
WM10_Owner_Manual_2020.indd 10 10/7/19 11:49 AM

19
20
7 YEAR WARRANTY
GROSFILLEX offers MARINE GRADE 9 OZ. SOLUTION DYED
ACRYLIC FABRIC from several mills, including Sunbrella, Outdura,
and Recasens. All marine grade acrylic fabrics we use carry a
warranty of seven (7) years from the original date of purchase.
All furniture grade fabrics we use carry a warranty of five (5)
years from the original date of purchase.
The warranty protects against the loss of characteristics, rot,
mildew, and color fastness typical in normal atmospheric
conditions. The product must be properly installed and
maintained, and under normal use and environment. This
warranty does not cover damage caused by: abuse, negligence,
vandalism, burns or fire of any kind, improper cleaning
techniques, normal wear, perforations; weather soiling;
environmental pollution stains; natural disasters; or acts of
nature. Damage caused by the storage method or location used
by clients is also not covered.
Replacement fabric canopy is covered for the time remaining
in the original warranty and does not activate a new 7 or 5 year
warranty.
COMMERCIAL WARRANTIES
GROSFILLEX warrants the FRAME STRUCTURE OF THE
Windmaster 10 for a period of three (3) years from the original
date of purchase. This warranty includes manufacturer defects
to the notch, runner, center pole and skeleton structure. The
warranty, if applicable, does not cover labor, frames, systems and
installation supplied by the dealer or reseller.
GROSFILLEX warrants all FINISHES ON WINDMASTER 10 for a
period of three (3) years from the original date of purchase. This
warranty includes chipping, peeling, flaking, bubbling, and fading
of the finish on the aluminum center poles only.
Rust is a natural part of the aging process of all steel or iron
based materials and is therefore not considered a defect and
is not covered under any GROSFILLEX’ warranties. Steel bases
and mounts are designed to require minimum maintenance, and
should be kept clean and well maintained.
GROSFILLEX’s umbrellas are all thoroughly tested and built to
ensure durability and longevity, however we do not recommend
the use of any non-permanent umbrella structure in winds
that exceed 25 MPH. Umbrellas should ALWAYS be closed and
secured when not in use, and taken down when winds reach
unsafe conditions.
The WINDMASTER 10 PREMIUM CANTILEVER UMBRELLA is
engineered to withstand 35 MPH sustained winds, and has been
tested at 35 MPH sustained winds. The addition of the included
wind stabilizer bars increases this wind stability by 5 MPH.
NOTE: Wind stabilizer kit should ONLY be used when the
WINDMASTER is at a 90 degree angle.
IMPORTANT: Wind ratings do NOT form part of, nor fall under,
any GROSFILLEX’ warranties. Wind ratings are intended as
guide to the relative strength of the umbrellas only. Wind can be
extremely variable, depending on surroundings, elevation, angle
of gusts, etc., and in any high wind ALL umbrellas should be
closed and secured immediately.
DISCLAIMER: GROSFILLEX’ warranties DO NOT COVER damage
to any umbrellas or umbrella bases related to extreme weather,
abuse, or misuse; or any damage which occurs as a result of
contact with the ground or any other foreign object due to
sudden and severe weather events or other extreme acts of
nature.
GROSFILLEXs’ warranties are only applicable to products that
are properly secured to a weighted adequate base or anchoring
system equal to or greater than recommended by GROSFILLEX.
Failure to properly secure umbrellas equal to or greater than
recommended will VOID all warranties.
If warrantable damage occurs, GROSFILLEX will refinish, replace
or repair any item in this category at its own discretion.
WIND DISCLAIMER
3 YEAR WARRANTY
3 YEAR WARRANTY
RUST DISCLAIMER
PURCHASE/INSTALLATION WARRANTY
This warranty applies to the original purchaser only. In the case of installations, the
owner is to ascertain the position of all underground pipes, electrical wires and gas
lines, and notify the installer of any obstacles. Although all care will be taken, no
responsibility can be accepted for any damage during installation.
All warranties are only valid if the umbrella is opened and closed as per the instructions
in this manual. It is highly recommended to close and tie the umbrella when strong
winds are expected. If strong winds are expected for a long period of time, it is
recommended that the umbrella be removed from its base and stored. When closing
the umbrella for extended periods of time, the canopy must be folded in such a way as
to avoid “pinching” of the fabric in the umbrella ribs/arms (refer to page 2 & 8). Wear
and tear caused by “pinching” of the fabric by the umbrella framework is not covered
under any warranty.
If the umbrella is to be transported without the original packaging, then the canopy
should be removed from the frame to avoid damage during transit.
GROSFILLEX reserves the right to determine whether or not fault is caused by faulty
workmanship, material or a defective part. Where fault is determined, we reserve the
right to repair parts or replace products at our own discretion.
WM10_Owner_Manual_2020.indd 11 10/7/19 11:49 AM

GROSFILLEX USA
230 Old W Penn Ave, Robesonia, PA 19551 (800) 233-3186
www.grosfillexfurniture.com
WIND RATING
Engineered to withstand 25 MPH sustained winds. The addition of
the wind stabilizer bars increases this tolerance by 5 MPH.
WINDMASTER 10
Grosfillex USA have been tested successfully in extreme weather and winds,
however, we strongly recommend closing your umbrella when not in use,
or in moderate sustained winds.
Wind ratings do NOT form part of, nor fall under, any Grosfillex USA warranties. Wind ratings
are intended as a guide to the relative strength of the umbrellas only and tested at their
optimal positions. Umbrellas with any degree of tilt added should not follow the above wind
ratings. Wind can be extremely variable, depending on the surroundings, elevation, angle of
gusts, etc. In any high wind or sudden extreme weather conditions, all umbrellas should be
closed and secured immediately.
Grosfillex can recommend specific bases and anchoring systems for specific umbrella types.
However, these are only recommended weights, as different environments may require
different base options. Please contact us for assistance in choosing the proper umbrella base
or anchoring system.
In the event Grosfillex shade products are left open and/or unattended in harsh weather
conditions, our customer service department is here to help you and promptly assist with
parts for repairs. Our shade products offer modular, self-repairable components which allow
customers to service the umbrellas to keep them in perfect working condition.
WM10_Owner_Manual_2020.indd 12 10/7/19 11:49 AM
Table of contents
Other Grosfillex Patio Furniture manuals
Popular Patio Furniture manuals by other brands

Patioflare
Patioflare PF10024 Assembly instruction

InstaShade
InstaShade Nova installation manual

Safavieh
Safavieh PAT7007 quick start guide

for Living
for Living A702000500 Assembly instructions

EAST OAK
EAST OAK PPS23001 owner's manual

Outdoor GreatRoom Company
Outdoor GreatRoom Company LYNDALE SWIVEL ROCKER LSR-CA Assembly instructions