GTEN INNOVATIONS UPAIR PLUS V1.5 User manual


GPS
lf you have questions,please contact us:www.upairdrone.com lf you have questions,please contact us:www.upairdrone.com
3
3
4
4
4
4
6
6
Match MAC Code for UPair One Plus
………………………………………………
6
7
7
8
One-Key RTH
Low Voltage RTH
Unsafe RTH
Flight RTH
……………
……………………………
Propellers ……………………………………
The lntelligent Battery ………………………………………………………………
8
8
8
8
9
9
16
Campass calibration ………… 17
Flight Environment Requirements
FAQ ……………………………………………………………………………………19
…………
Upair One Plus includes a smart aircraft, a matching controller,an integral gimbal
camera, and is compatible with the UPair one app for mobile phones. The digital
images transmission component, designed for generating HD images, lies inside
the fuselage.
………………………………
………
Intelligent Return to Home … ………………………………………………………… 6
Linking the Upair controller and the aircraft
:
:
:

h
lf you have questions,please contact us:www.upairdrone.com lf you have questions,please contact us:www.upairdrone.com
this
Weight 826g Battery Voltage 11.1V
Channels 10 Battery Capacity 1500mAh
Controller Antenna Frequency 2.4GHz Communication range of RC About 1km
FPV Frequency 5.8GHz Communication range of FPV About 800m
Upair one plus remote controller works in 2.4Ghz, it exports HD images to the
mobile device,with a function key that controls both the camera and the gimbal. The
controller is already pairedwith the built-in 2.4G receivers of the aircraft in the factory.
(The drone
are not suggested to take off in mode)
(Only in this mode the drone are
)
suggested
take off

lf you have questions,please contact us:www.upairdrone.com lf you have questions,please contact us:www.upairdrone.com
Linking the Upair controller and the aircraft:
*Keep the Remote controller and Aircraft power off,remove 4 propellers for -
safety.
1.Toggle the left switch down to"Return to Home"mode.
2.Pull the left throttle stick to the bottom right,hold it and turn on the contr-
oller at the same time,
You will hear a beeping sound when remote controller is trying to link to the
aircraft.
3.Power on the aircraft,within few minutes the“beepbeep”sound will stop,
which indicates
you have now finished linking the remote controller and the aircraft.
4.Toggle the left switch up to the"Normal-mode",now you can successfully
unlock the motors.
Teaching video link:https://www.youtube.com/watch?v=_ic1zNAjBsg
Toggle the left switch (Flight mode switch) down to turn on the Return to Home
M ode.The user can still use the remote controller to alter the aircraft's orientation
during the RTH process.Toggle the left switch upper to regain control of the aircraft.
original
Match MAC Code for UPair One Plus:
* Keep the aircraft,Remote controller and Android phone power on.(Only do the
following steps with Android phone,because iphone has MFI limitations.)
1.Connect the remote controller and Android phone with the original USB data
Cable,Choose "MTP mode"in your phone,
then enter Setting--Network--More--Open the USB tethering.Now you have successfully
connected to the App.
2.Open the UPair App--Setting--Controller Setting--Code Matching ,Match the
Mac code on your drone with the code
in the APP,make sure they are the same with each other.
3.After matching code for about 30 Secs,the data and picture would be display in
the App interface.If matching fails,repeat the above listed steps.

When the smart flight battery power arrives at a danger low point(10.6V,
Power below 35%) that may effect aircraft safety of return. That means the RTH
will be triggered automatically. Users should land the aircraft as soon as possible,
otherwise the vehicle will fall directly, resulting in damage. When the RTH is
triggered automatically, users can push the RTH joggle switch forward to regain
control right of aircraft if needed. Low voltage RTH warning only appears once in
a flight process.
c
lf you have questions,please contact us:www.upairdrone.com lf you have questions,please contact us:www.upairdrone.com
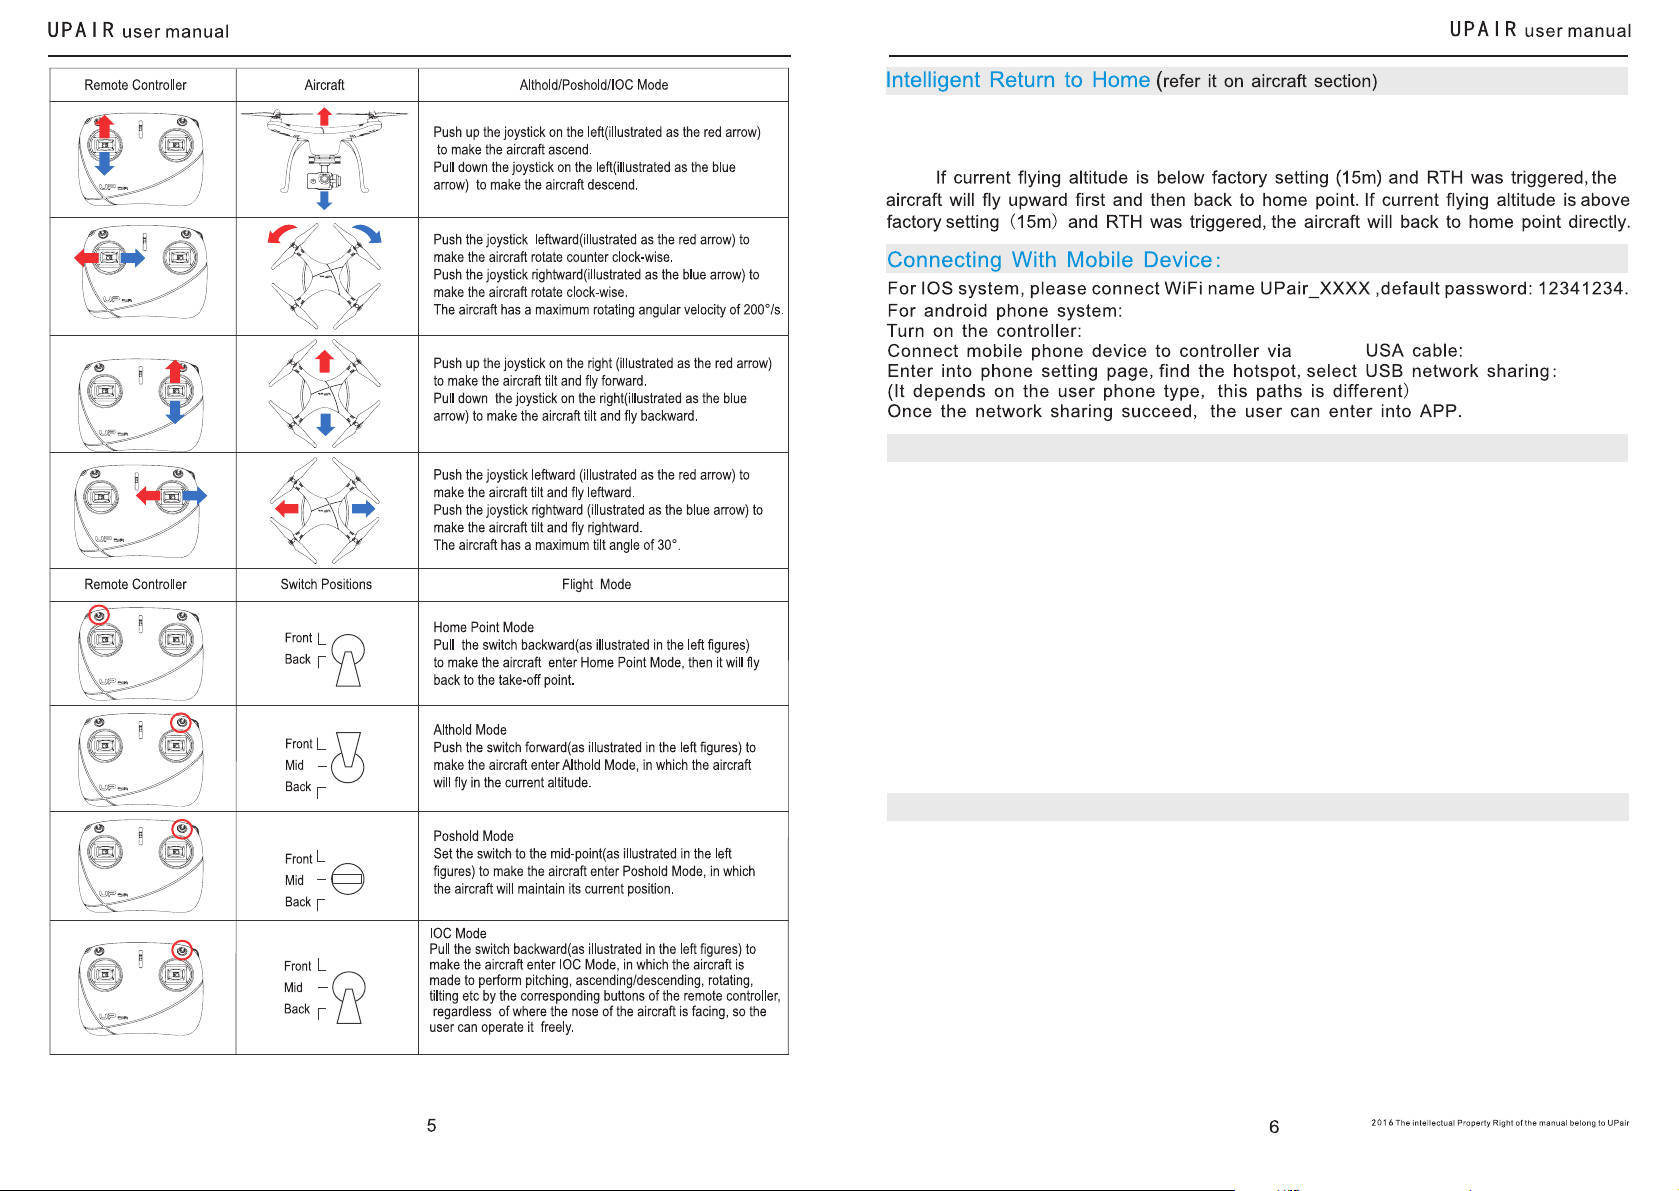
The place where the aircraft takes off will be recorded as home
point. In order to get that, GPS must up to at least 9 stars.
Therefore, a good GPS signal is needed for recording the home
point, otherwise the RTH mode will fail to work.
1.If you have no idea whether your home point is already recorded, you can try the following two steps to
make sure. 1. You can switch one-key-return joggle to see whither the status of flying mode on the screen
can change If can, the home point is recorded. If not, you still need to wait for searching signal. 2. or not.
You can can fly. If not, still need to waiting. also check the altitude figure is “0”or not. If it’s 0, then you
Weight (full load) 1350g Maximum Vertical Velocity 4.5m/s
Height 220mm Maximum Tilt Angle 45°
Wheelbase 355m Maximum Horizontal Speed 14m/s
Propeller 9450 Hovering horizontal accuracy 50cm
Motor 2212 Hovering vertical accuracy 50cm
Hovering time Full load(1350g)19 mins;aircraft only(1085g )25 mins
GPS Description
Home
Point
9
Aircraft indicator:The red indicators indicate the front of the aircraft.The green indicators
indicate the tail of the aircraft.
*
of
a
a
2. The RTH system does not support obstacles recognition, but the user can operate the controller to avoid
minutes is obstacles.
3. There is time difference in searching GPS signals according to user’s location. It will takes about 2 mimutes
to search the signal at the first time
4.During auto-flight, like auto-return, auto-landing, route planning, or follow-up mode, etc., the user can
switch the flight mode between altitude hold, position hold, and headless by using the right top joggle switch
on the controller to avoid bad situation like crashing into barriers, or falling into river, etc.

a
u
lf you have questions,please contact us:www.upairdrone.com lf you have questions,please contact us:www.upairdrone.com
Type Lithium Battery Charging Time 1~1.5 hour
Capacity 5400mAH Charging Environment Temperature 0℃~40℃
Voltage 12.5V Discharging Environment Temperature -10℃~40℃
Propellers Silver Black
Image
Attaching place Attaching on motors without red hole.Attaching on motors with red hole
Legends Lock:Spin the propellers in this direction to tight it
Unlock:Spin the propellers in this direction to loosen it
not
safe
12.5V
nb tton.u
must

r
sw
lf you have questions,please contact us:www.upairdrone.com lf you have questions,please contact us:www.upairdrone.com
at
*Please choose C10 sd-card.
*Stop recording before turn off the drone’s
battery. Otherwise, the files will be damaged.
2.7k
or 2.7k at 30 FPS
“
AngleControl Precision ±0.2° Working Voltage 11.1V
Rotational Range Pitching -10°~90° MaximumControl Speed Pitching 15°/s
Function Parameters Function Parameters
4K Video
Resolution
ratio
4K@25FPS
Shooting images
resolution
16M(4608*3456)
8M(3264*2448)
2.7K Video
Resolution
ratio
2. K@30FPS7
Shooting images
resolution
Voltage USB 5V Working Temperature -10~+100 Celsius
Video Format MP4/MOV Working Humidity 30%~80%
video compression H.264,4K2K MJPG Storage Temperature -40~+150 Celsius
image sensor 16 megapixel stills Storage Humidity 30%-90%
picture format JPG TVOUT No need
Power consumption 2-3W CMOS sensors 1/2.3”
HDMI No need lens field angle 100 degrees small distortion lens
U disk function No need PC Camera No need
Display screen No need Charging 5V voltage
focus digital zoom image-stabilization Digital anti shake
Shooting when recording video supported Camera system update TF card

t
APP
lf you have questions,please contact us:www.upairdrone.com lf you have questions,please contact us:www.upairdrone.com
The password:12341234
.
d
:
:
: go back to home page
:
:
:
:
:
Enter "setting "in the app interface, it shows compass calibration,level calibration
and otherparam eters inform ation.(it varies on the app version)

lf you have questions,please contact us:www.upairdrone.com lf you have questions,please contact us:www.upairdrone.com
www.upairdrone.com.
When you make enough task points, then you can click the setting button at the
bottom of the list to set the corresponding task point. In the middle of the screen, a
setting menu will show with the following items: 1. No. of task point, 2. stay time after
reaching the task point, 3. action after reaching the task point, 4. flight altitude after
reaching the task point. You can click the left/right arrow on the top of the screen to
switch among different items, refer to the below image:
ing
Task point expected Height 1-250meters 30m
Task
1,Departure point
2,Landing point
3,Hover
4,Start Recording
5,Finish Recording
6,Shooting images
Hover
Item Range Default
Task point stime 1-250 s 30s
Item Parameters Range Default
Task point time 1-250 s 30s
Click the location icon on the left bottom of app to start Flight Route Planning.
ITEM Default Limits
Camera Settings 4k/30fps 4k/30fps,2.7K30fps
Shooting Mode 16M 16M(4608*3456)

ing
r
s
exposing
CAUTLINS BEFORE/DURING A FLIGHT
lf you have questions,please contact us:www.upairdrone.com lf you have questions,please contact us:www.upairdrone.com
Iif the drone works well
Calibrate the compass before each flight.
The steps to calibrate the compass are as follows:
1.Remove the propellers before you start the compass calibration and power
on both the aircraft and the RC.
2.Open UPAir app—Setting—General—Compass calibrate—Confirm
3.Hold the aircraft horizontally and ready to change its direction according to
the pictures shown in the app.
4.Make sure you have put it in the right position as picture(Please note the
direction of battery, gimbal camera,landing gear etc.)Then horizontally rotate
360 degrees counter clockwise several times until you see the blue arrow in
the app,which indicates that you have finished first position calibration.
5.Continue to do calibration for other positions following the sames teps
above until positions are all calibrated.
If calibration fails,exit the APP and re-enter,repeat the above listed steps.
Teaching video:https://www.youtube.com/watch?v=jWrcl2-NM1A&t=4s
https://youtu.be/GBkUWV1mmAg

’
s
lf you have questions,please contact us:www.upairdrone.com lf you have questions,please contact us:www.upairdrone.com
e.
C
.
’
problems that what occur during the
norwal usage.
are .
t
sare
Flight test:
1.Place the aircraft in an open,flat area with the battery level indicators facing towards
you.
2.Turn on the remote controller and your mobile device ,then turn onthe Intelligent
Flight Battery.
3.Launch the “UPair” app ,connect the mobile device and the
aircraft ,enter the “camera”interface.
4.When the GPS satellites lock for over 9,pull both controlsticks to the bottom inside
corners to start motors.
5.Slowly push the left throttle stick up to take-off.
6.Gently pull down the left throttle stick to descend.After landing,execute the CSC
command or hold the leftthrottle stick at its lowest position until the motors stop.
7. Turn off the intelligent flight battery and then the Remote controller.
: 1.contact@g10dr.com; 2.001 888-853-2218
3.www.upairdrone.com
How to connect to UPair APP
1.Turn on the remote controller and the aircraft, wait 30 seconds.
2.For iPhone:
Open Wifi and choose UPair XXX. Password: 12341234
3.For Android phone: Connect your android phone and RC via USB data cable,
then choose MTP, select Setting--NETWORK--More--open the USB tethering
(Note:For different Android mobile phone models,selections may varies)
Upair app support IOS8.0 and Android 4.4 or above system.

lf you have questions,please contact us:www.upairdrone.com lf you have questions,please contact us:www.upairdrone.com
6.
“0”, and the satellite is over “9”). Otherwise the aircraft cannot use position
hold or auto-return function. (GPS signals can not be searched in-door)
After self-calibration, you can pull both control sticks to the bottom inside
comers to start the motors. Release the sticks once the motors are unlocked.
Place your mobile device into the clamp
and adjust it so that the mobile device is
held securely in place
Unfold
......
When the aircraft is unlocked, please firstly display the self-examining
process of
flying altitude. Then you can combine stick command to unlock the motors. Let
the throttle raise slowly.
[1]H:Altitude “0” [2]D:Home distance“0”
[3]GPS signal should be over 9 satellites [4]H.S:Horizontal velocity "0"m/s
[5]V.S:Vertical velocity "0"m/s[6]V.C: Controller voltage "12.6V"
* It can take off when it achieves the above conditions (espicially the Altitude is
7.Manual Take off
Display on APP

9
etc.
etc.
etc.
lf you have questions,please contact us:www.upairdrone.com lf you have questions,please contact us:www.upairdrone.com
www.upairdrone.com
Always
fly under
basic flight guidelines,for the
Click to bring the aircraft back to the home
Table of contents