Gtran Wireless DotSurfer User manual

GTRAN Wireless, Inc.
CDMA 1X 1900MHz
User Manual
Version: 0.1
Do not insert the DotSurfer modem card into your laptop before you insert
the software CD!!
GPC-4000
1

GTRAN Wireless, Inc.
2001 GTRAN Wireless Inc. All rights reserved No reproduction in whole or in part is permitted,
without prior written approval.
GTRAN Wireless Inc. and DotSurfer are registered trademarks of GTRAN Wireless Inc.
2

GTRAN Wireless, Inc.
1. DOTSURFER® 1X-1900 INTRODUCTION.......................................................................................4
2. INSTALLATION FOR WINDOWS 98, 2000, AND ME.....................................................................4
3. USING GT DIALER ..............................................................................................................................6
3.1 MAIN SCREEN AND ICONS..................................................................................................................6
3.2 NETWORK CONNECTION ...................................................................................................................8
3.3 INTERNET CONNECTION....................................................................................................................8
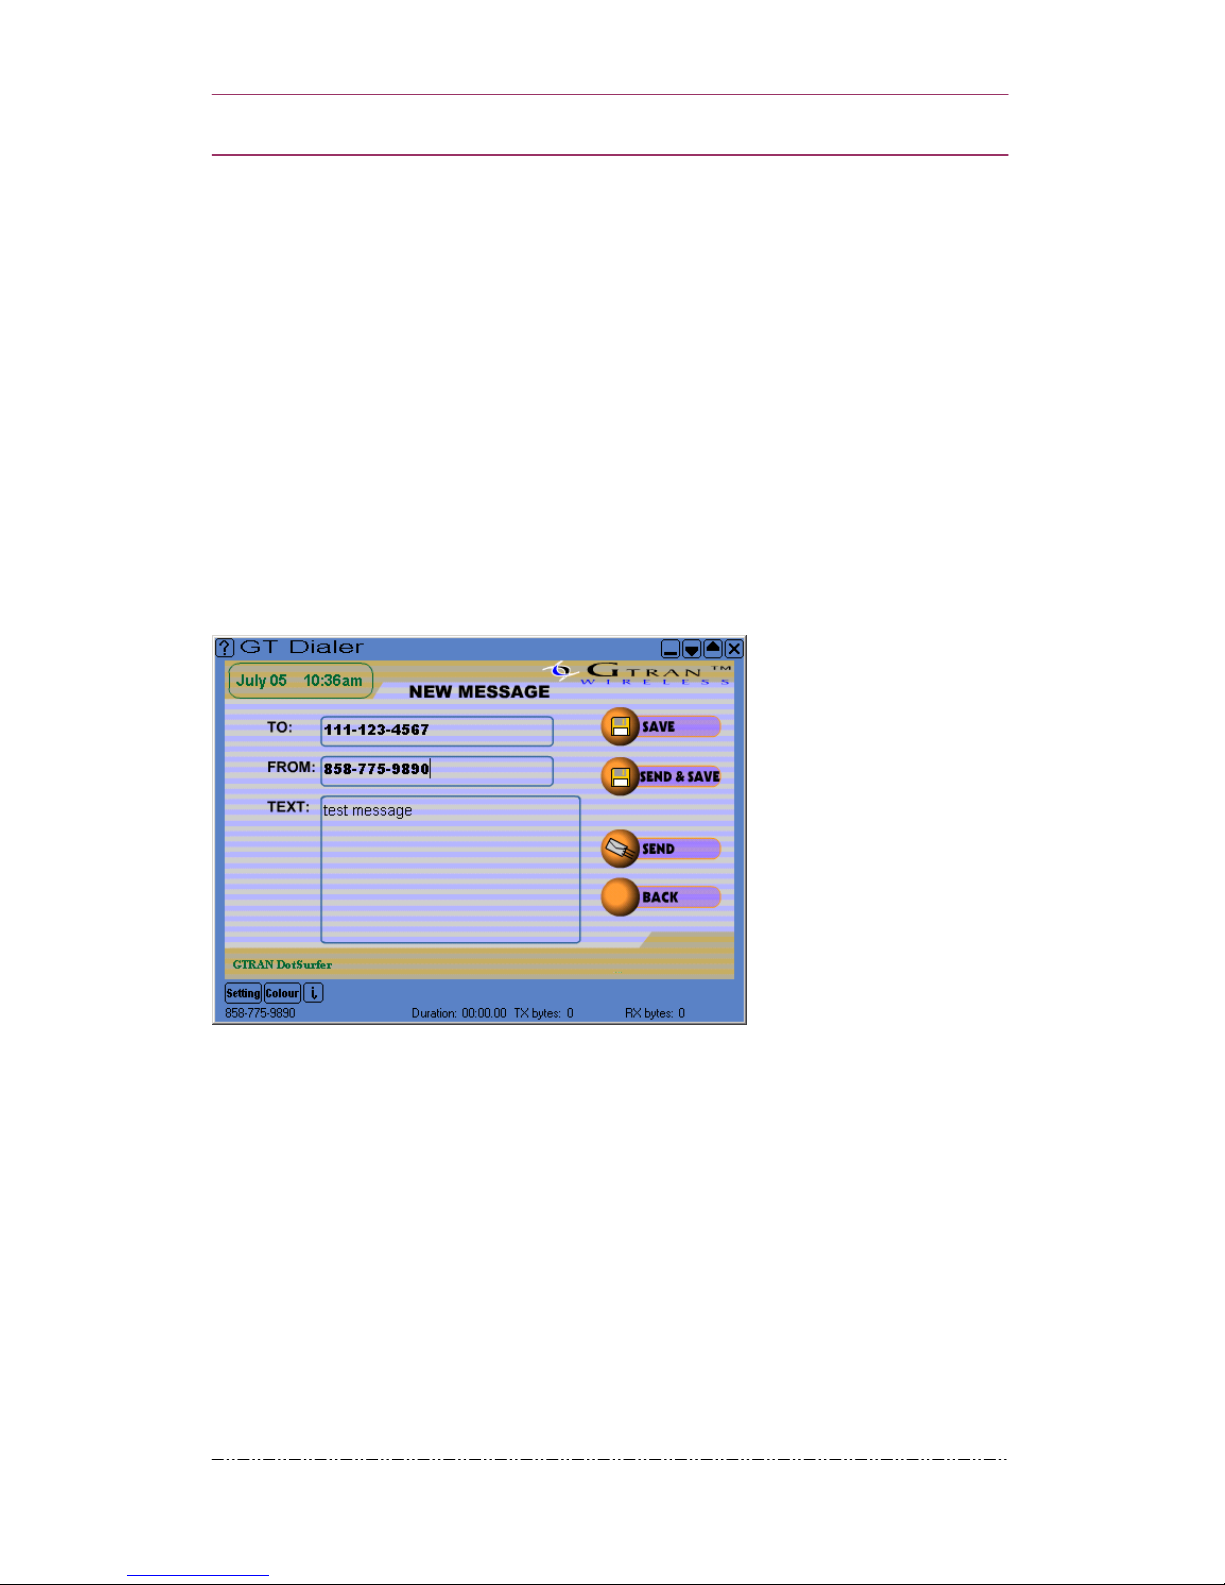
3.4 SMS....................................................................................................................................................8
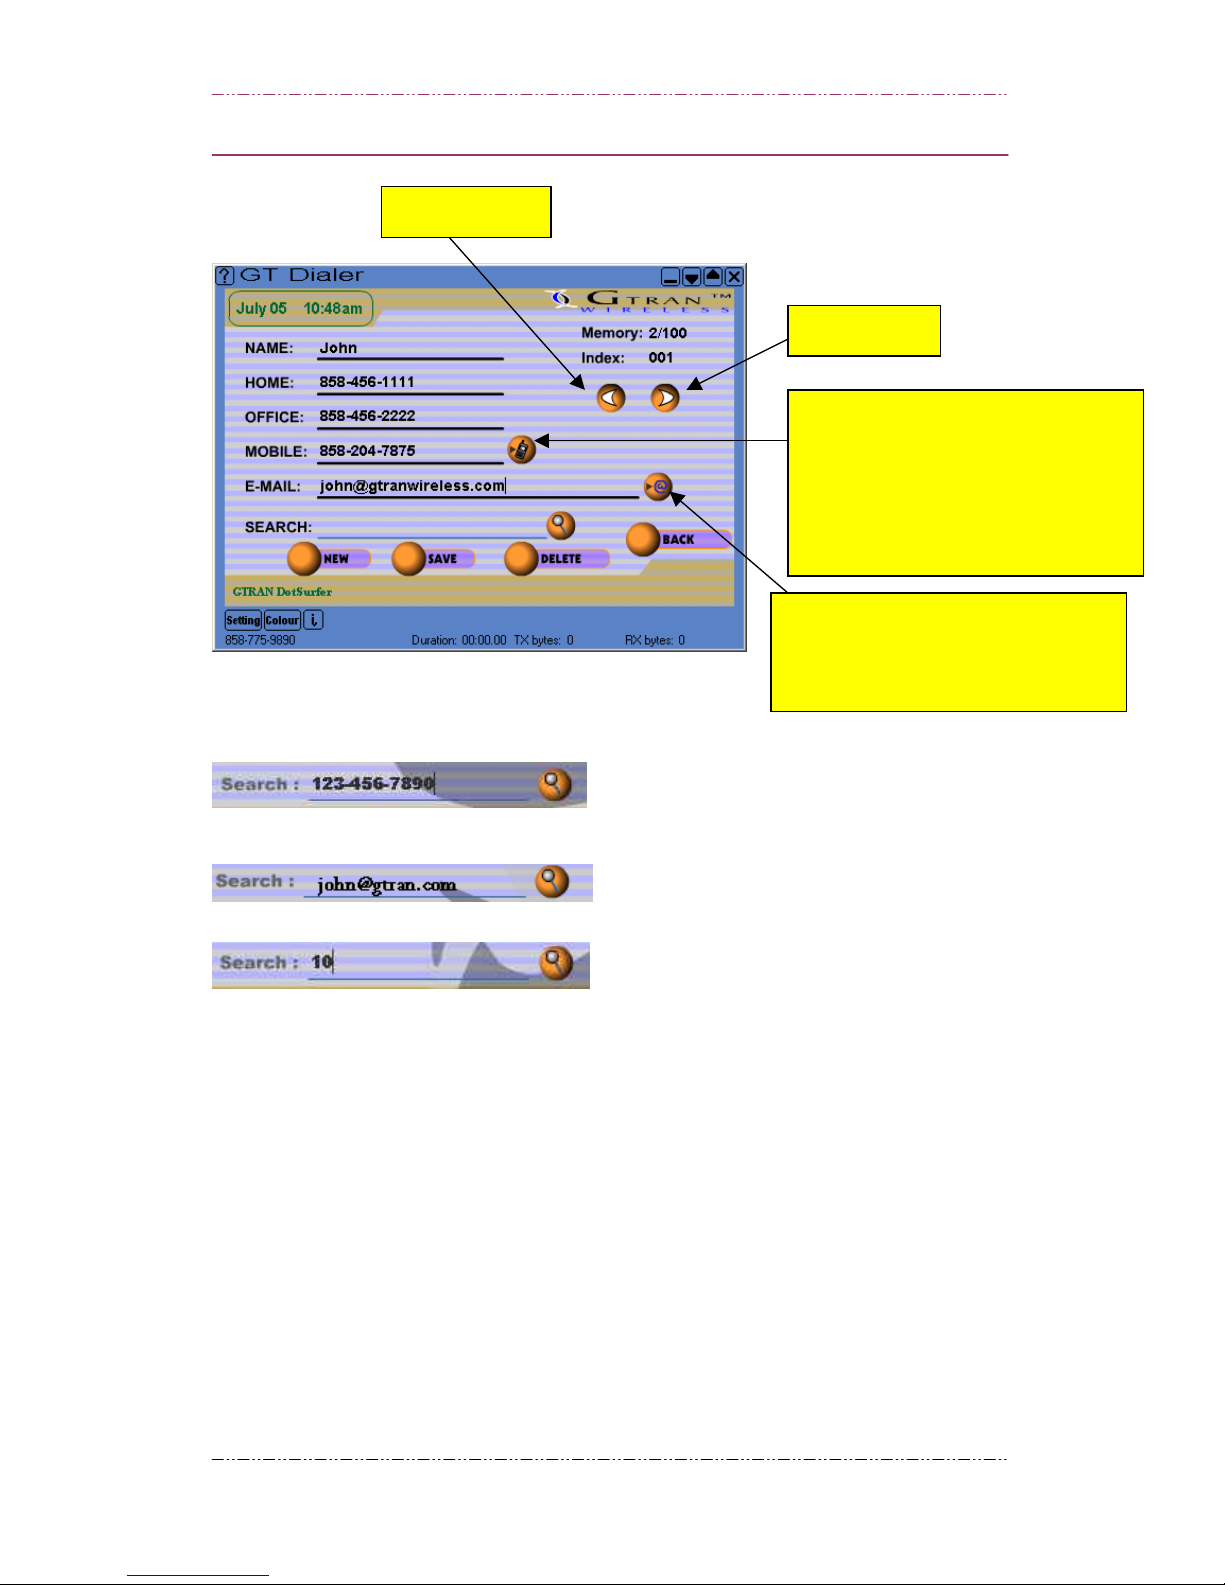
3.5 ADDRESS BOOK MANAGEMENT ........................................................................................................9
3.6 SCREEN GRAPHIC, SOUND, SMS POP-UP WINDOW, AND CONNECTION SET UP........................... 11
3.7 COLOR SET UP.................................................................................................................................12
3.8 DETAILED CONNECTION INFORMATION .........................................................................................12
4. GT INDICATOR ..................................................................................................................................13
4.1 GT INDICATOR USER MANUAL .......................................................................................................13
4.2 GT INDICATOR ICONS .....................................................................................................................15
5. WINDOWS CE (POCKET PC PROCEDURES)..............................................................................15
5.1 INSTALLATION FOR COMPAQ IPAQ .............................................................................................15
5.2 CONNECTING TO INTERNET.............................................................................................................17
5.3 GT DIALER USER MANUAL.............................................................................................................18
6. LINUX PROCEDURES.......................................................................................................................25
APPENDIX A: UPDATING THE GT DIALER (GT UPDATER) .......................................................25
APPENDIX B: PRODUCT SPECIFICATIONS ...................................................................................26
APPENDIX C: SAFETY AND REGULATORY INFORMATION .....................................................27
3

GTRAN Wireless, Inc.
1. DotSurfer® 1X-1900 Introduction
GTRAN Wireless DotSurfer® 1X-1900 is a high-speed wireless Type II PCMCIA modem card that fits
into major laptops and PDAs. Allowing for wireless Internet connectivity under CDMA2000 network,
DotSurfer 1X-1900 delivers unmatched speed at up to 153Kkbps. At 86 mm in length, DotSurfer is small,
compact and inserts perfectly into a laptop or PDA and has a flexible antenna applicable for all mobile
users.
All DotSurfer modem card packages include the following components:
- DotSurfer 1X-1900 PCMCIA modem card with the flexible antenna
- User Manual
- Quick Start Guide
- CD-ROM containing the GT Dialer software
Product Features
►Flexible antenna
►Supports wireless data connection speeds up to 153Kbps
►Minimizes laptop battery power consumption through Self Power Control
►Compact, lightweight 86 x 54 x 5 mm and only 35 grams
►Sends and receives SMS messages on networks that support 2-Way SMS
►Real time card status indicators while on-line
►Supports Windows 95, 98, 2000, ME, NT, CE 3.0 and Linux
2. Installation for Windows 98, 2000, and ME
Do not insert the DotSurfer modem card into your laptop before you insert
the software CD!!
a. Close all the other programs that are running before starting the application.
b. Insert the installation software CD into your CD-ROM drive. The InstallShield Wizard should run
automatically. If it does not, click Start-> Run and enter d:\Setup.exe. Replace d: with the drive
letter for your CD ROM drive, if necessary.
c. The InstallShield Wizard will guide you through the installation.
d. From the Setup screen, choose Typical and click Next> and follow the rest of the instructions.
4

GTRAN Wireless, Inc.
e. Select your choice under the System Reboot screen.
f. Insert the DotSurfer 1X-1900 modem card into the PC slot of your laptop. Make sure that the
installation CD is still in the laptop. Your Windows will automatically search for and load a device
driver for the DotSurfer modem card and you will see the screen below. Once the device driver is
loaded, the screen will disappear.
* For WINDOWS 2000,you’ll see the following Digital Signature Not Found screen. Click the Yes
button.
5

GTRAN Wireless, Inc.
g. Now the DotSurfer 1X-1900 modem card is ready for use!
3. Using GT Dialer
Insert the DotSurfer 1X-1900 modem card into your notebook computer. To run GT Dialer, double-click
GT Dialer icon from the desktop or go to Start and select Program-> GTRAN-> GT Dialer.
3.1 Main Screen and Icons
Main screen shown below will appear once the GT Dialer is opened.
Icons and their features
Icon Description Icon Description
Local date and time
No new message
6

GTRAN Wireless, Inc.
Connect to Internet
New message arrived
Phone directory
Roaming off
Read SMS messages
Roaming
Send SMS message
Exit GT Dialer
Screen graphic, SMS tone,
default homepage set up
Sent box
Screen color set up
Network connect or
disconnect
Modem diagnostic
information and
call history
Signal strength
Close application
No service
Help
Card is inserted in the
notebook
Display phone number,
connection time and bytes
sent and received
Connected to network
Minimize screen
Dormant state
Decrease screen size one
step
TX bytes:
RX bytes:
Once connected,
transfer/receive byte
size
Increase screen size one step
7

GTRAN Wireless, Inc.
3.2 Network Connection
To connect to network, open the GT Dialer and click the Connect/Disconnect button.
To disconnect, simply click the Connect/Disconnect button again.
3.3 Internet Connection
Establish network connection by clicking Connect/Disconnect from the main screen. By clicking the
Internet icon, you will go to a web browser. To change the default website which is set up under the
Internet icon, click Setting and enter the desired website URL.
3.4 SMS
3.4.1 Sending SMS Messages
a. From the main screen, click Write Messages icon. NEW MESSAGE screen will appear.
b. Input receiver’s phone number and text.
c. Once finished inputting, click one of the three buttons: SEND, SAVE, or SEND & SAVE.
SEND Sends new message without saving in Sent box
SEND & SAVE Sends new message and saves in Sent box
SAVE Saves new message in Sent box without sending
3.4.2 Reading SMS Messages
From the main screen, click Read Messages icon. RECEIVED MESSAGES screen will appear.
8

GTRAN Wireless, Inc.
Previous Message
N
ew Message
Old Message
N
ext Message
REPLY Replies to sender
DELETE Deletes the message
BACK Goes back to the main window
4.4.3 Sent Messages (Sent Box)
Click Sent Messages button from the main screen.
N
ext Message
Previous Message
SEND Sends or resends a message
DELETE Deletes a sent message
DELETE ALL Deletes all sent messages in the Sent Box
BACK Goes back to the main window
3.5 Address Book Management
On the main screen, click Address Book icon and Address Book screen will appear as shown below.
9

GTRAN Wireless, Inc.
3.5.1 Search Address Book
N
ext Address
Click to send email from Address Book.
Clicking the icon will take you to the new
message in Outlook Express.
Click to send SMS from Address Book.
This screen is the same screen as the one
you ge
t
from clicking Write Messages
from the main screen. The method of
sending messages is also same.
Previous Address
You may search by name, by phone number,
by e-mail,
by index number,
3.5.2 Add to Address Book
a. From Address Book screen, click NEW. If you enter the address information without first clicking
NEW, the information you input will NOT be saved.
b. Input name, home number, office number, mobile number, and e-mail address. Click SAVE and the
inputted data will be stored.
3.5.3 Edit Address Book
a. Select the address to edit and update information.
b. When editing is finished, click SAVE.
3.5.4 Delete from Address Book
10

GTRAN Wireless, Inc.
Select the address to delete and click DELETE.
3.6 Screen Graphic, Sound, SMS Pop-up Window, and Connection Set Up
a. From the main screen, click which is at the bottom of the screen. Screen shown below
will appear. Enter the appropriate information to customize your settings.
Visual appearance of the GT Dialer
Default URL when you click to
connect to the Internet.
b. If you do not know your User ID and Password, please consult your wireless service provider. Most
systems use Dynamic DNS Server IP. If you encounter network problems and you do not know the
DNS addresses, please consult your wireless service provider.
c. SMS Received Sound Alert ÆTo have sound when you receive a new SMS, put a check mark as
shown and select the sound. To remove the SMS received sound, remove the
check mark.
d. SMS Received Pop-Up Window ÆTo have a pop-up window alert when you receive a new SMS,
put a check mark as shown .
e. To connect to network Æinput the user ID, password, and DNS Server IP. Generally, use ‘set
default value’ (User ID, Password, Dynamic DNS Server IP).
f. Once the set up is finished, click OK.
11

GTRAN Wireless, Inc.
3.7 Color Set Up
This feature is to change the outline color of your GT Dialer.
a. Click which is at the bottom of the main GT Dialer screen.
b. Click Change color… and select the color you want
Do not set the color to black. You won’t see some of the buttons on the screen.
c. Click OK. The outline color of the GT Dialer screen will change.
3.8 Detailed Connection Information
Click at the bottom of the main GT Dialer screen and you will see a screen as shown below.
12

GTRAN Wireless, Inc.
Click here to reset and star
t
a new tracking session.
OUT: Transferred packet size from the last connection
IN: Received packet size from the last connection
Tot al Time: Total time connected since last tracking
session
This Month: Total time connected this month
Last Month: Total time connected last month
Usage information is an estimate only and may vary depending on your
carrier’s billing policies.
4. GT Indicator
GT Indicator Program is a supplemental program for GT Dialer. When surfing the web by using
Internet Explorer, the GT Indicator shows features of GT Dialer on top of the Explorer screen. Basic
user setting should be IE 5.01 or higher and GT Dialer should be running properly.
4.1 GT Indicator User Manual
a. Open Internet Explorer.
b. Go to View -> Toolbars and select GT Indicator. You should see the GT Indicator on Explorer as
shown below.
13

GTRAN Wireless, Inc.
c. To read SMS, Click and you’ll see a screen shown below.
14

GTRAN Wireless, Inc.
4.2 GT Indicator Icons
RSSI Status Indicator Icon
No service
Signal strength (RSSI)
CONNECTION Status Indicator Icon
Modem is connected to network
Modem is disconnected from network
Modem is in dormant mode
ROAMING Status Icon
Roaming off
Roaming
SMS Dialog Box Viewer Icon
No new SMS message
New SMS message
Click the icon to read SMS messages
GO to Web Page Search Icon
Goes to selected URL page
5. Windows CE (Pocket PC Procedures)
5.1 Installation for COMPAQ iPAQ
a. In addition to your iPAQ, you need the following:
- USB cradle
- Desktop or laptop PC
- PC card expansion pack
b. Insert Microsoft ActiveSync3.1 CD into your computer to synchronize your PC and iPAQ PDA. For
help with this procedure, please look at the user manual for iPAQ. Once the computer and the iPAQ
15

GTRAN Wireless, Inc.
are synchronized, you should see the screen shown below on your PC.
c. Insert DotSurfer installation CD into your PC. Click Cancel on the following screen.
d. Go to Start -> Programs -> Windows Explorer -> D:\ -> WinCE -> Sa1110 -> setup.exe, where D
is the driver for CD-ROM.
e. Follow the on-screen instructions.
f. On the screen asking to install Default Installation Folder, click Yes .
16

GTRAN Wireless, Inc.
g. When installation is complete, screen will appear as shown below. Click OK and the installation
automatically will run in iPAQ PDA.
h. When the synchronization is complete, take out the iPAQ from the cradle. Attach the PC card
expansion pack onto the PDA and insert the DotSurfer® CDMA 1X card into the PC card slot.
i. Using iPAQ’s stylus, press the reset button on the right bottom of the PDA.
5.2 Connecting to Internet
a. Go to Start -> Programs -> Connections ->DotSurfer®1X.
17

GTRAN Wireless, Inc.
b. When you see the screen below, input user ID, password, etc. and click Connect.
c. Once connected, go to Start –> Internet Explorer and start surfing the web.
5.3 GT Dialer User Manual
Go to Start –> Programs -> GT Dialer. Screen showing DotSurfer® 1X status will appear.
18

GTRAN Wireless, Inc.
<Beforeconnection> <Afterconnection>
Receiving signal strength
New SMS message received
Card connection status
5.3.1 Send and Read SMS Messages
a. Click Message tab on the bottom of GT Dialer main screen.
b. To send an SMS message, click New button on the bottom and create a message.
19

GTRAN Wireless, Inc.
c. Input the destination number and text message and click Send button.
d. To read an SMS message, double-click the message.
5.3.2 Delete, Reply, Forward SMS Messages
a. To delete an SMS message, select the message. Using the Stylus, tap and hold, which will display
the pop-up menu. Select Delete from the pop-up menu.
b. To reply to the received message, select the message and with the Stylus, tap and hold. Select Reply
from the pop-up menu.
c. To forward a message to others, using the Stylus, tap and hold. Select Forward from the menu.
5.3.3 Phone Book
a. Click Phone Book tab, which is located at the bottom of GT Dialer.
20
Table of contents
Other Gtran Wireless Network Card manuals
Popular Network Card manuals by other brands

Silicon Laboratories
Silicon Laboratories QSG145: WGM110 SLEXP4320 Quick Start Guideline

Dialogic
Dialogic PBX Integration Board D/82JCT-U Quick install card

Gbord
Gbord EN-101 user manual

Eazix
Eazix EZWFDI01 user manual

Cisco
Cisco Linksys WUSB600N user guide

Sun Microsystems
Sun Microsystems Interface Adapter user guide

Texas Instruments
Texas Instruments TMS320C6000 DSP user guide

Spectec
Spectec SDIO user manual

Riello UPS
Riello UPS NetMan 204 Installation and user manual

Altinex
Altinex CABLE-NOOK JR CNK221 user guide

ZyXEL Communications
ZyXEL Communications Comet 3356P user manual

Omega Engineering
Omega Engineering PCI-DAS1001 user guide