Guangzhou Rigal Electronics RD-850-5896008 User manual

INSTRUCTION
MANUAL
Note: As the product system is updated from time to time, the
VSHFLȰFRSHUDWLRQFRQWHQWLVEDVHGRQWKHDFWXDOVLWXDWLRQ

Contents
Important Safeguards..................................................................................................................1
Accessories List............................................................................................................................1
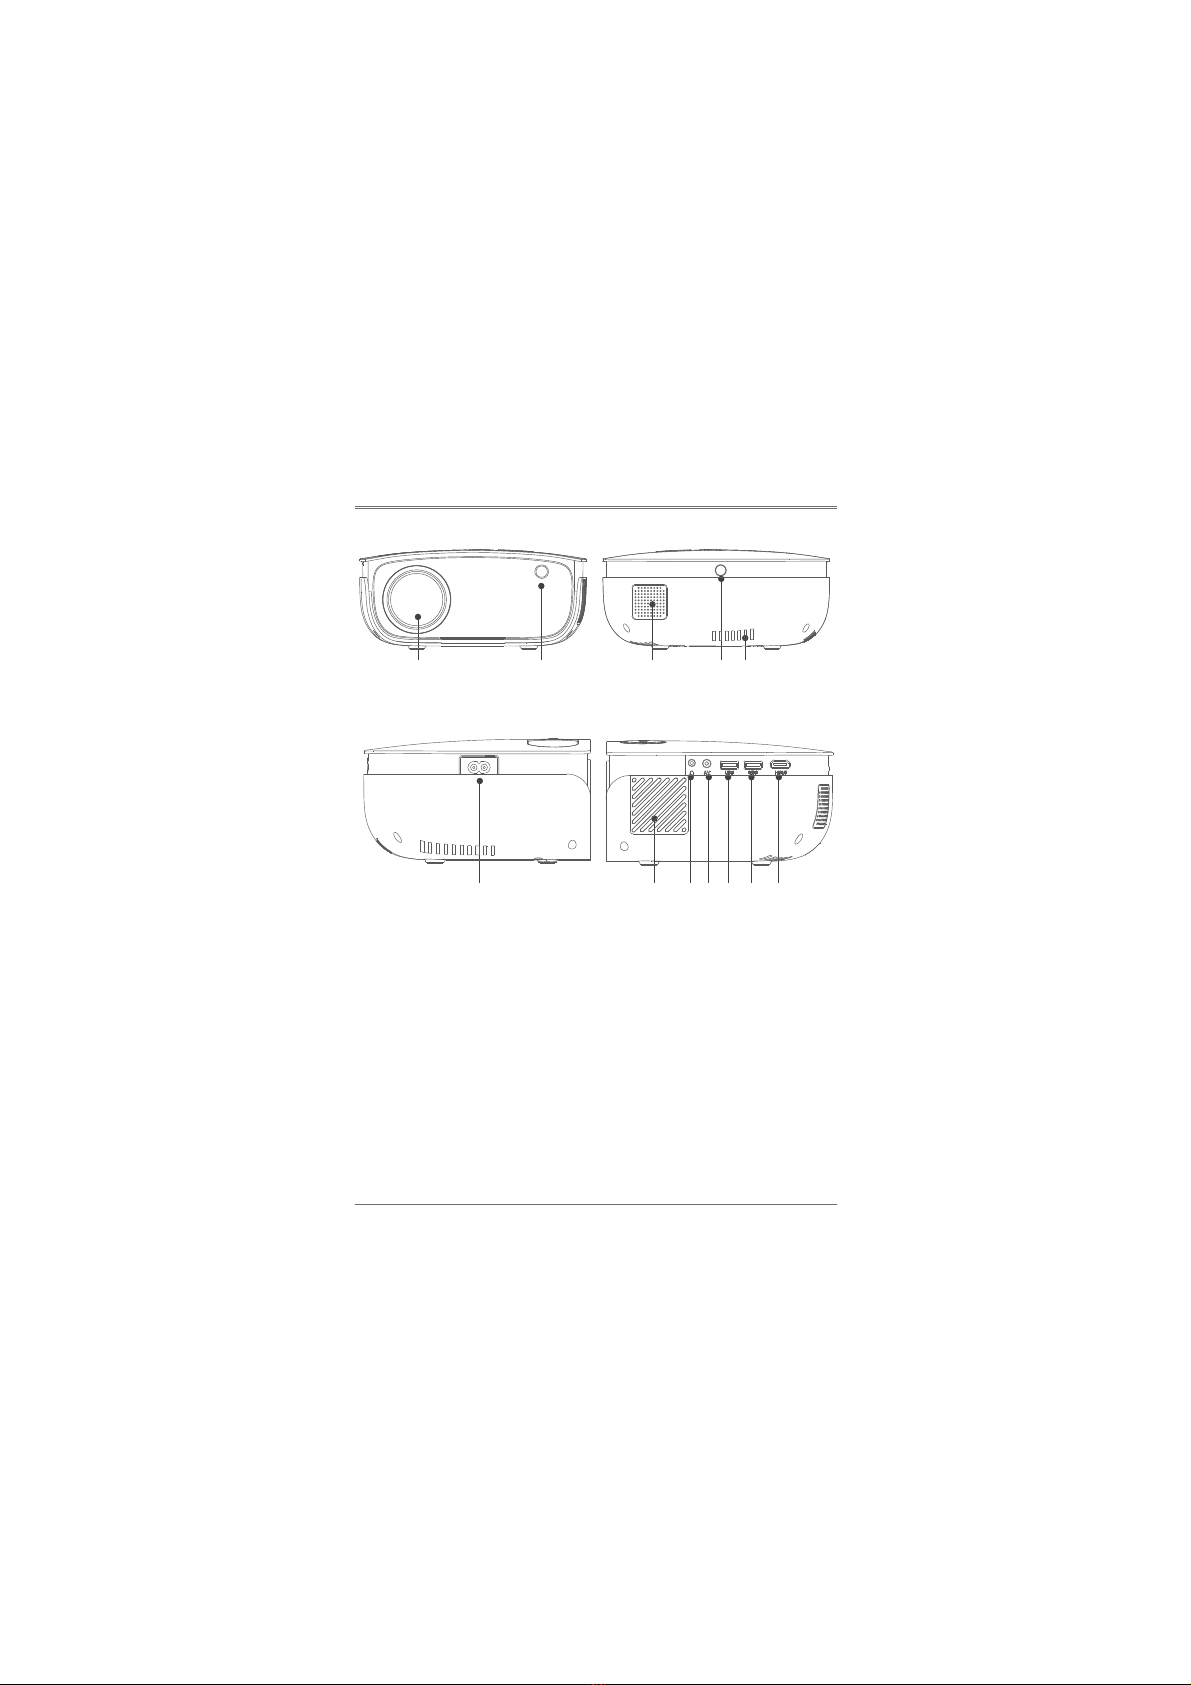
Projector Overview.......................................................................................................................2
2ODBHɫB@SHNMR
,TKSHLDCH@É2TOONQSDCÉ%NQL@SR
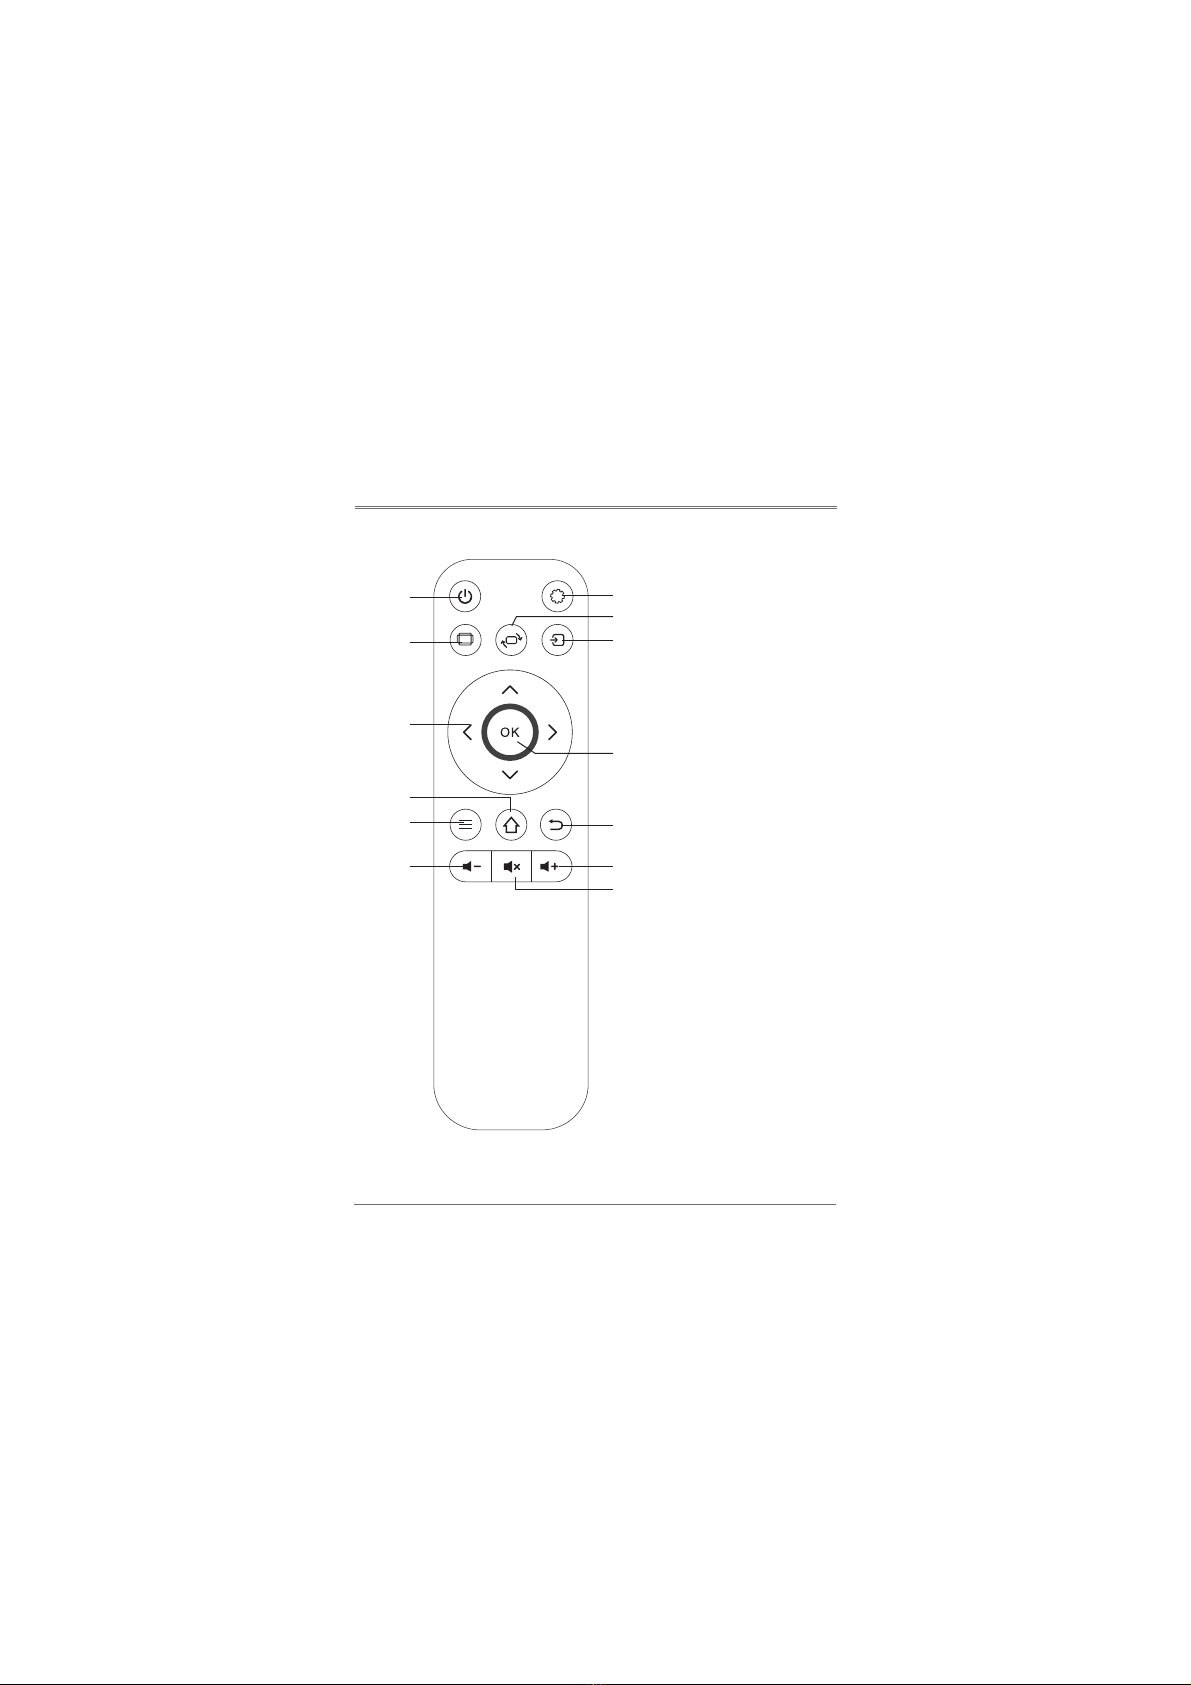
Remote Control .............................................................................................................................5
Switching Machine Operation....................................................................................................6
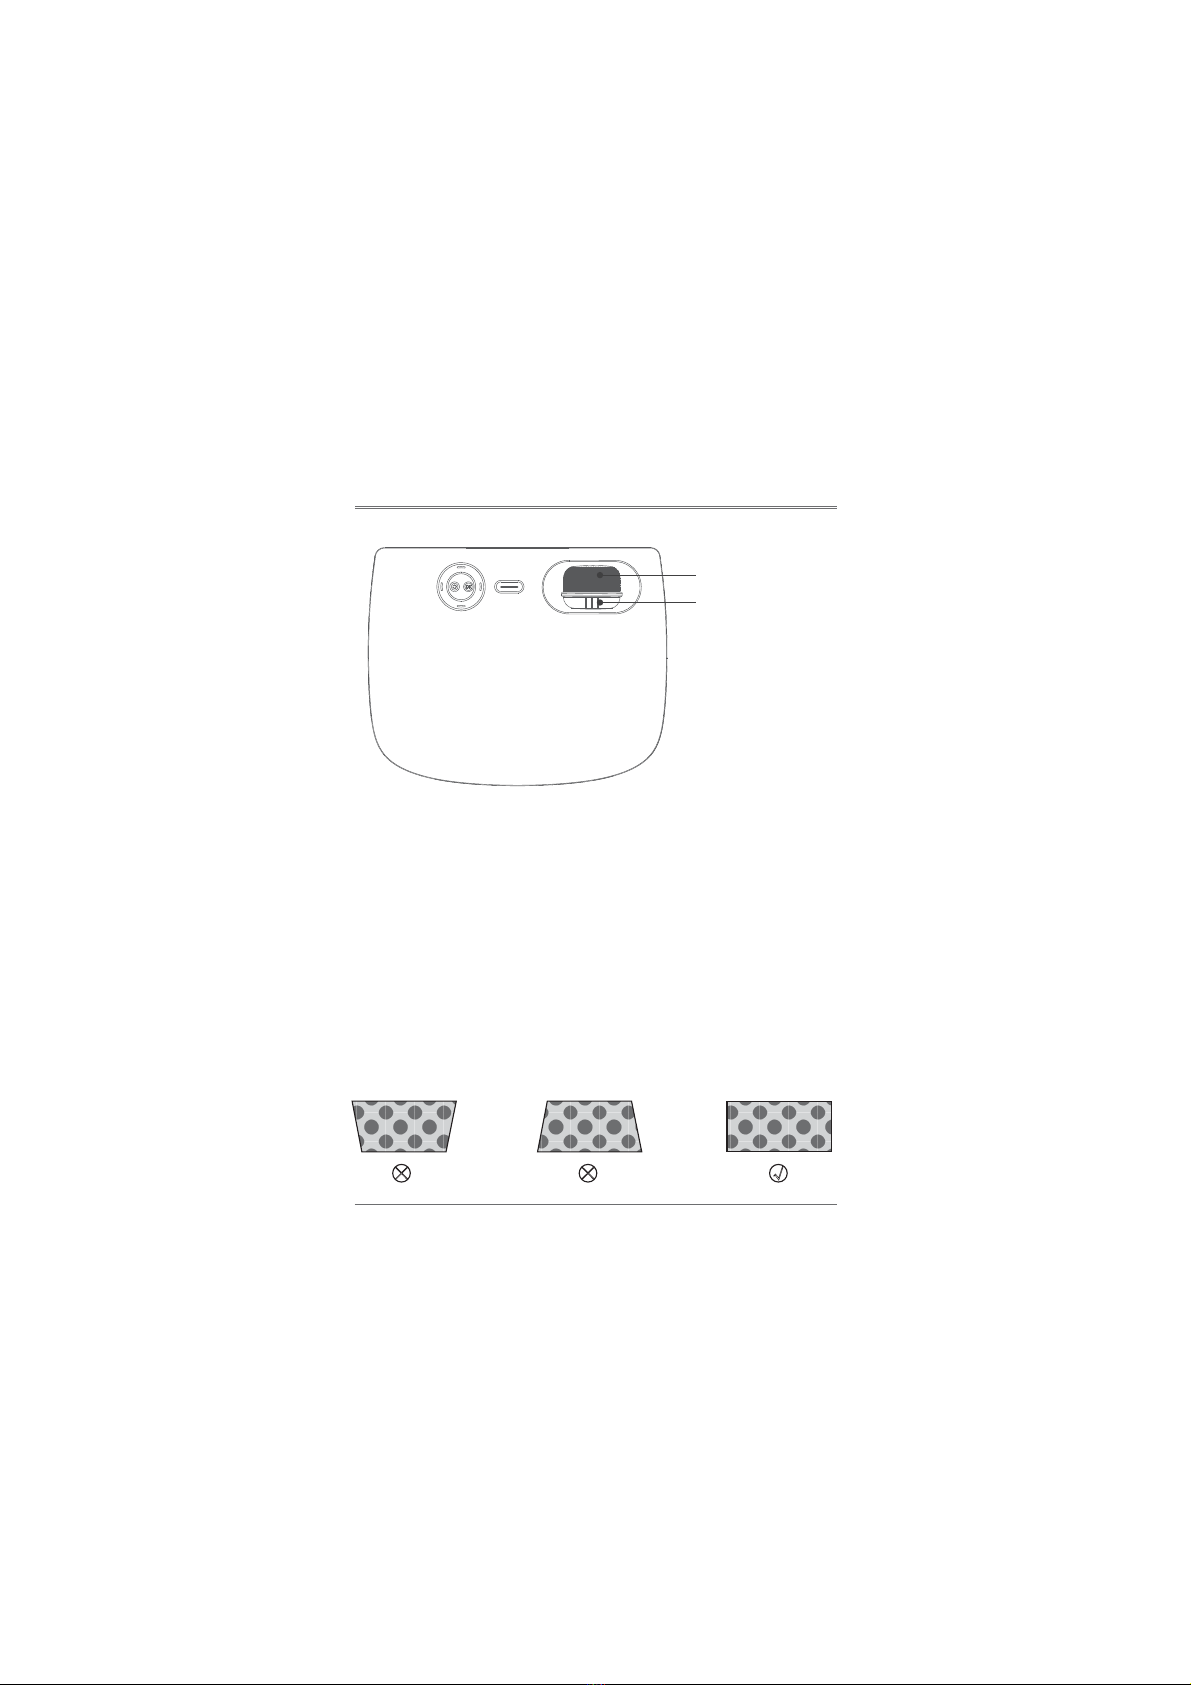
Focus / Keystone Correction .....................................................................................................7
Standard Setting ...........................................................................................................................8
Use of the Projector .....................................................................................................................9
Multimedia............................................................................................................................9
Source Settings...................................................................................................................10
Menu Settings......................................................................................................................11
Miracast ................................................................................................................................12
iOS Cast.................................................................................................................................13
ÉÉÉÉÉÉÉÉÉ6H%HÉ2DSSHMF
System Setting ....................................................................................................................15
Projector Setting .................................................................................................................15

Important Safeguards
Accessories List
1. Please read the manual carefully before operating projector. To ensure stable
power supply, please use standard power cord.
2. Please use the power supply and cable indicated on the rating label. The
projector should be kept away from cloths, sofas and anything that may block the
ventilation scoop. Please keep the unit away from flammable and explosive materials.
3. Please do not disassemble the unit by yourself as this will invalidate the
warranty service. To protect your eyes, do not stare directly at the lens when the
projector is on. The projector must be kept away from water and any other liquids.
4. To prevent electric shock, please keep the projector out of the rain and away
from moisture. It is recommended to switch off the projector after it has run for 6
hours non-stop. Please use the original foam and other cushioning materials
when transporting the projector.
5. If the projector does not work, please contact the authorized service agent.
AV Signal Cable ×1
Remote Control ×1
Power Cable ×1
User Manual ×1
- 1 -

Projector Overview
1. Lens
2. IR for Remote Control
3. Speaker
4. IR for Remote Control
5. Air Intake
6. Power Input
7. Cooling Window
8. Headphone Jack
9. AV Port
10. USB Port
11. USB Port / Wired SyncScreen Port
12. HDMI Port
- 2 -
ɠ
ɥ ɦ ɧɨɩ ꋻ ꋼ
ɡ ɢ ɣ ɤ

Projector Overview
1. Arrow Keys
2. Return
3. Enter
4. Power Key
5. Power Indicator:
Standby: red
Power On: blue
6. Focusing
7. Keystone Correction
8.Bottom Label
(Tear off the bottom sticker, you can remove
the bottom dust cover to clean up the dust)
9.Machine Foot Pad
10.Hole for Stand(1/4 inch)
11.Height Adjustment Machine Feet
- 3 -
ꋻ
ɠ
ɡɢ ɣ ɥ ɦ
ɧɨɩ
ɤ

Mini projector
LED
LCD
English, 23 languages
1280×720, support 1080P
AC100V-240V
1 KG
0-35°C
HDMI / USB / AV
Headphone
16:9 / 4:3
218×174×96mm
Manual / Remote control
Specifications
Model
Lamp
Image System
Language
Resolution
Input Voltage
Weight
Working Temp
Input Port
Output Port
Aspect Ratio
Size
Operation Mode
- 4 -
Multimedia Supported Formats
Image Format
Video Format
Audio Format
File Format
BMP / JPG / PNG / JPEG
MP4 / MKV / WMV / RMVB /RM / AVI / FLV / TRP / VOB /
3GP / DIVX / TP / TS / MPG / M2TS / F4V / DAT
MP3 / AAC / FLAC / MAV / WMA / M4A
TXT

Remote Control
ɠ
ɡ
ɢ
ɣ
ɤ
ɥ
ɦ
ɧ
ɨ
ɩ
ꋻ
ꋼ
ꋽ
1. Power
2. Aspect Ratio
3. Arrow Keys
4. Home
5. Menu
6. Volume Down
7. Menu
8. Screen Flip
9. Source
10. Enter
11. Return
12. Volume Up
13. Mute
- 5 -

Switching Machine Operation
Power On:
Step 1: Press the power button on the body or the power button on the
remote control, the indicator light will turn blue and steady.
Step 2: After 2 seconds, the projector starts to start, the image appears on
the screen, and the unit enters the normal working state.
Step3 : If the projector is newly installed, the image may be blurred or
trapezoidal distortion when it is turned on for the first time. Please refer to
the “Focus/Keystone Correction” section for calibration.
Step 4: After the image is adjusted clearly, it can be viewed normally.
Power Off:
Step 1: In the working state, press the power button of the body or the
power button on the remote control to switch the projector to the standby state.
Step 2: After the projector enters the standby state, the machine is in the
process of automatic heat dissipation, and the indicator light changes from
blue to red.
Connect the power cord to the projector before connecting the power cord to an
electrical outlet.
- 6 -
Power Key
Power Indicator

Focus / Keystone Correction
Image Focusing
Place the projector lens perpendicularly to the projection screen or curtain
wall, and adjust the focus dial until the image is clear, that means the image
focusing is finished.
During the focusing process, you can play the programs or pick up the
product menu images to match the focusing adjustment.
Keystone Correction
Please turn the trapezoidal adjustment dial until the image is displayed normally.
Note: The projector has only mechanical trapezoidal correction in the vertical
direction and there is no horizontal correction. Make sure the projector is
level with the projected image.
h h ĜĜ
Focusing
Keystone Correction
- 7 -

Standard Setting
Aspect Ratio
Picture Size(inch)
50
70
100
120
16:9
Projection Distance(m)
1.55
2.17
3.10
3.72
Refer to the data in the table below to place the projector away from the
projection screen according to the preset graphic size. When installing,
place the projector on a solid, stable countertop . The airframe should be
well ventilated. Do not cover or block the vents. There should be no obstruc-
tions within 30cm of the vents.
Note: The above data is for reference only, please refer to the physical measurement.
- 8 -
50
(m)
LQFK
70 100
120

- 9 -
Use of the Projector
Multimedia
Step 1: Insert the U disk into the USB port of the projector.
Step 2: Select Multimedia, and then press the OK key to enter.
Step 3: Select the file to be played.
Multimedia
Miracast iOS Cast
Setting
Source
MOVIE MUSIC PHOTO TEXT

- 10 -
Source Settings
Step 1: Select the signal source in the main interface (or press the remote
control source key);
Step 2: Press the OK key to enter the options.
Signal Source: HDMI / AV.
Multimedia
Miracast iOS Cast
Setting
Source
Pop-up source box
+20(
0HGLD
+'0,
$9
Use of the Projector

- 11 -
Menu Settings
Step 1: In the Multimedia interface, press the menu key of the remote
control to enter the menu setting options.
Step 2: After entering the interface, adjust the parameters as needed, and
then press the "OK" key to verify.
Picture Mode
&RQWUDVW
%ULJKWQHVV
&RORU
7LQW
6KDUSQHVV
Aspect Ratio
&RORU7HPSHUDWXUH
1RLVH5HGXFWLRQ
6WDQGDUG
50
50
50
50
50
16:9
Medium
0LGGOH
PICTUPE
MOVIE MUSIC PHOTO TEXT
Use of the Projector

- 12 -
Miracast
Step 1: Select Miracast on the main interface.
Step 2: Turn on the Wireless Display function of the Android device.
Note: Different Android devices have different names and opening
methods for the Wireless Display function. For details, please refer to the
manual of the Android device you are using.
Step 3: Select the corresponding projector device name.
Note: The projector and the Android device cannot be connected to
different WiFi, otherwise the corresponding projector device will not be
found on the Android device.
1. On your Android Mobile/Pad, open the settings menu.
2. Access your display settings or screen-mirroring.
3. Select your Miracast receiver: NETLINK-XXXX
Miracast
To connect Android Mobile/Pad Device with Projetor Based on
WiFi-Display Techenology
0RELOH
Projector
Pad
Multimedia
Miracast iOS Cast
Setting
Source
Note: The last 4 digits of the device name are randomly generated.
Use of the Projector

- 13 -
iOS Cast
Step 1: Select iOS Cast on the main interface.
Step 2: The iOS device and the projector must be connected to the same
network, or the iOS device must be connected to the wireless access point
(AP) from the projector.
Step 3: Select Screen Mirroring on the control center of the iOS device.
Step 4: Select the corresponding projector device name.
Mirror your iPhone, iPad or iPod touch
0DNHVXUHWKDW\RXUL26GHYLFHLVFRQQHFWHGWRWKHVDPHQHWZRUNDV\RXU
SURMHFWRURUFRQQHFWL26GHYLFHZLWK$3E\3URMHFWRU
NEWAP-XXXX
2Q\RXUL26GHYLFHRSHQ
&RQWURO&HQWHUDQGWDSVFUHHQ
0LUURULQJ
/RRNLQJIRUGHYLFHVWKDWFDQ
EHPLUURUHGRQ
6HOHFWNETLINK-XXXX-(icast)
IURPWKHOLVW
Screen
Mirroring
Music
6FUHHQ0LUURULQJ 6FUHHQ0LUURULQJ
ZY-XXXX/RRNLQJIRU$SSOH79
Multimedia
Miracast iOS Cast
Setting
Source
Note: The last 4 digits of the device name are randomly generated.
Use of the Projector

- 14 -
WiFi Setting System Setting Projector Setting
WiFi Setting IP
TP
00
GZRIGAL-C
HUAWEI-3VUKT
WiFi Setting
Step 1: Select Setting in the main interface and press OK key to enter
setting interface.
Step 2: Select WiFi Setting.
Step 3: Turn on the WiFi, find the WiFi you need to connect to, enter the
password through the virtual keyboard, and confirm the connection.
Use of the Projector

- 15 -
System Setting
Select the system setting, you can check the language and software version;
Version upgrade: local update and online update;
Local update: Insert the U Disk and follow the prompts to find the file
upgrade version.
Online update: Connect to WiFi, upgrade the version according to the
prompts (recommended to update from time to time) Restore factory
default: Choose carefully.
Projector Setting
Select the projection setting and select the corresponding settings accord-
ing to the installation method of the projector.
System Setting
Language
Local Update
Online Update
Software Version
Restore Factory Default
English
Please press OK
Please press OK
Please press OK
<
<
3URMHFWRU6HWWLQJ
Projection Mode
Focus
FrontDesktop
0
<
<
Use of the Projector

FCC Statement
This equipment has been tested and found to comply with the limits for a Class
B digital device, pursuant to part 15 of the FCC rules. These limits are
designed to provide reasonable protection against harmful interference in a
residential installation. This equipment generates, uses and can radiate radio
frequency energy and, if not installed and used in accordance with the
instructions, may cause harmful interference to radio communications.
However, there is no guarantee that interference will not occur in a particular
installation. If this equipment does cause harmful interference to radio or
television reception, which can be determined by turning the equipment off and
on, the user is encouraged to try to correct the interference by one or more of
the following measures:
-Reorient or relocate the receiving antenna.
-Increase the separation between the equipment and receiver.
-Connect the equipment into an outlet on a circuit different from that to which
the receiver is connected.
-Consult the dealer or an experienced radio/TV technician for help.
To assure continued compliance, any changes or modifications not expressly
approved by the party.
Responsible for compliance could void the user’s authority to operate this
equipment. (Example- use only shielded interface cables when connecting to
computer or peripheral devices).
This equipment complies with Part 15 of the FCC Rules. Operation is subject
to the following two conditions:
(1) This device may not cause harmful interference, and
(2) This device must accept any interference received, including interference
that may cause undesired operation.
FCC Radiation Exposure Statement:
The equipment complies with FCC Radiation exposure limits set forth for
uncontrolled enviroment. This equipment should be installed and operated with
minimum distance 20cm between the radiator and your body.
.

The terms HDMI and HDMI High-Definition Multimedia Interface, and the HDMI Logo are trademarks or registered trademarks of HDMI Licensing
Administrator, Inc. in the United States and other countries.
Table of contents
Other Guangzhou Rigal Electronics Projector manuals
Popular Projector manuals by other brands

Samsung
Samsung SP-M206 Owner's instructions

InFocus
InFocus CEILING MOUNT LP 1000 SERIES reference guide

Linear Technologie
Linear Technologie LINEARLEDS LTL.LYA200 Operation manual

Acer
Acer H5360 Series Specification sheet

Epson
Epson 7900p - PowerLite XGA LCD Projector Product information

Ricoh
Ricoh PJ X5580 user manual