GVA G5FLWW15 User manual

5kg Front Load
Washing Machine
G5FLWW15
Instruction Manual

1
Contents
Guide to the Appliance 2
Caring for the Environment 3
Safety Information and Warnings 4
Items in the Box 6
Getting Started 7
Basic Set Up 9
Operation Instructions 11
Troubleshooting 16
Care and Maintenance 19
Technical Specifications 22

2
Guide to the Appliance
NOTE: Due to production improvements, the appliance may differ slightly from the
diagram shown. Diagrams in this instruction manual are for reference only.
Power
Plug
Service
Panel
Detergent
Drawer Control
Panel Drain
Hose
Door
400
800
No Spin
1200
20
Control Panel

3
Caring for the Environment
Responsible disposal of the packaging
The packaging of your appliance has been selected from environmentally friendly
materials and can usually be recycled. Please ensure these are disposed of correctly.
Plastic wrapping can be a suffocation hazard for babies and young children, please
ensure all packaging materials are out of reach and are safely disposed of. Please
ensure they are offered for recycling rather than throwing these materials away.
Responsible disposal of the appliance
At the end of its working life, do not throw this appliance out with your household
rubbish. An environmentally friendly method of disposal will ensure that valuable raw
materials can be recovered and used again.
Electrical and electronic appliances contain materials and substances which, if handled
or disposed of incorrectly, could be potentially hazardous on the environment and
human health.
Observe any local regulations regarding the disposal of electrical consumer goods and
dispose of it appropriately. Contact your local authorities for advice on recycling facilities
in your area.
The plug must be rendered useless and the cable cut off directly behind the appliance or
the machine to prevent misuse.

4
Safety Information and Warnings
For your continued safety and to reduce the risk of injury or electric shock, please follow all
the safety precautions listed below.
WARNING!
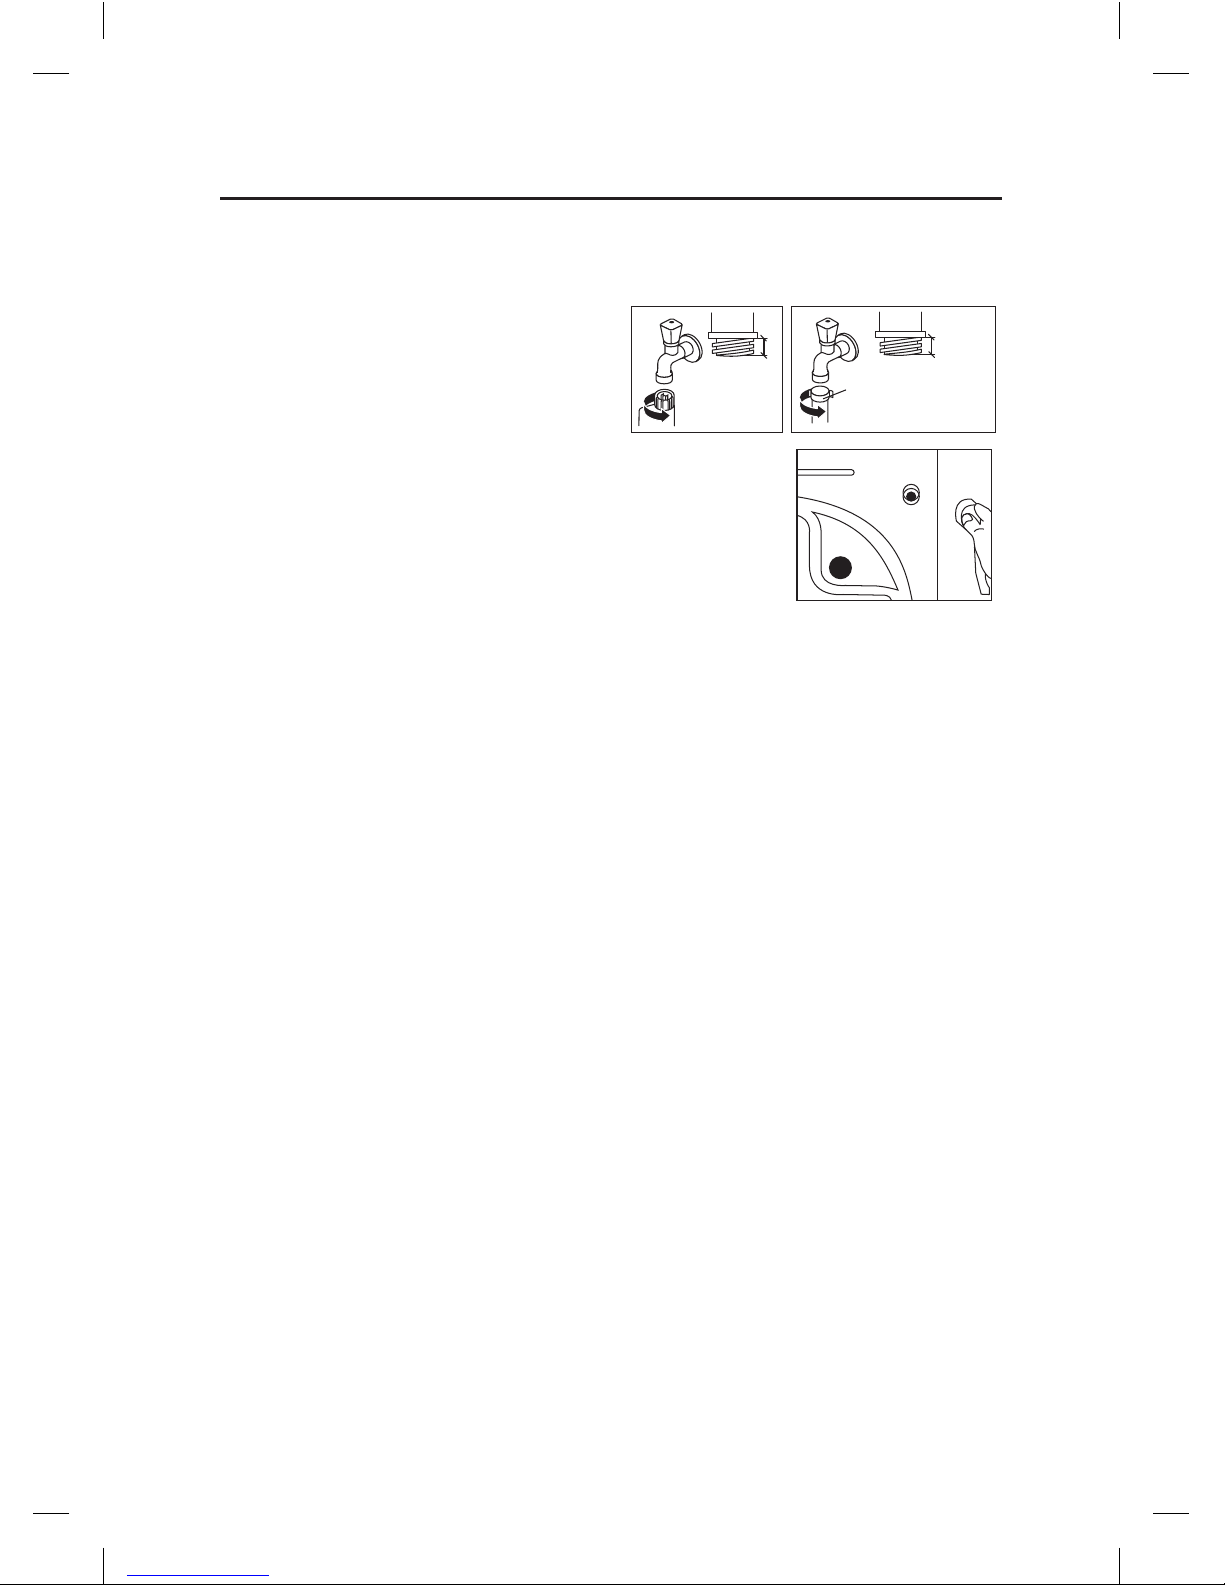
•If you will not be using the washing machine for a while such as when you go on holiday,
disconnect the plug from the mains supply and turn off the water supply to the washing
machine. This is particularly important if there is no drainage around the washing
machine.
•If the water supply is left on, water pressure may build up and cause a leak.
General Use
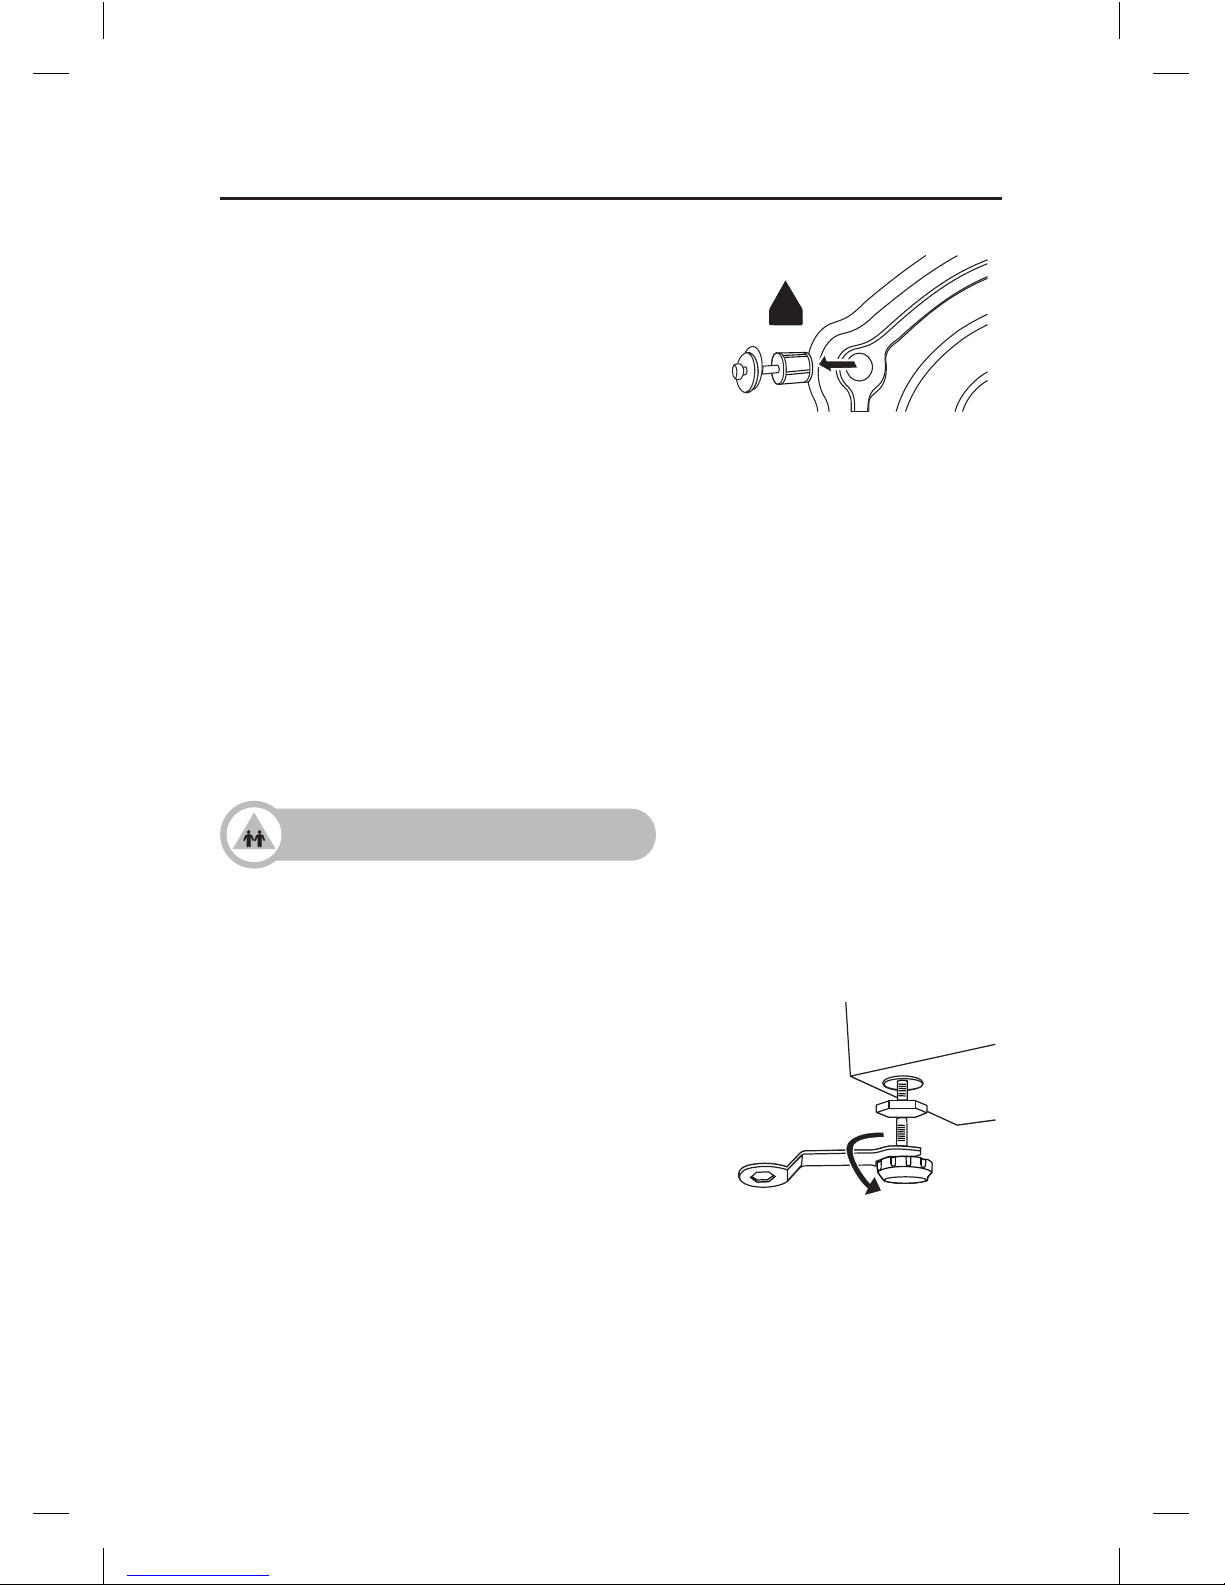
•Transit bolts are used to transport the washing machine. You should remove these using a
spanner or similar tool before you install the washing machine. If you do not, it will cause
strong vibrations when the washing machine is spinning.
•Do not install your washing machine anywhere that is damp or exposed to the weather. If
you do, it may cause an electric shock, fire, failure or deterioration.
•Do not pour water directly onto any part of the washing machine. It may cause a short
circuit or electric shock.
•Keep burning objects such as candles or cigarettes, away from the washing machine. They
may cause a fire or damage.
•Keep flammable substances well away from the washing machine – for example
kerosene, gasoline, benzene, paint thinner and alcohol, or clothing soaked with these.
They may cause an explosion or a fire.
•This washing machine is only suitable for washing textiles labelled ‘washing machine
washable’.
•CAUTION: Do not connect the washing machine to hot water. The washing machine
works with cold water only.
•Before you start using the washing machine, turn the tap on to check that the hose is
properly connected. If it’s not, there may be a water leak.
•Do not put too much laundry or detergent into the washing machine. It may cause issues
with the washing machine or laundry.
•Be careful not to get your laundry caught in the door when you close it. This could cause a
water leak or damage your laundry.
•This washing machine is for household (domestic) use only.
Power Source and Cable
•Use an independent household dedicated mains socket, rated at 10 Amp 220V to 240V
AC. If the washing machine is plugged in with other appliances, it may overheat and
cause a fire.
•Make sure the mains plug is pushed firmly into the socket. A loose connection may
overheat and cause electrical shock or a fire.
•Check the mains lead and mains plug for any damage. If the mains cable is damaged,
it must be replaced by the manufacturer, its service agent or similarly qualified persons in
order to avoid a hazard.
•Unplug the mains lead when cleaning the washing machine.
•Do not touch the mains lead or mains plug with wet hands. It may cause an electric shock.
•Check the mains plug regularly for dirt. If dirt accumulates on the mains plug, it could
cause a fire. To prevent this, unplug the cable and clean the mains plug with a dry rag.

5
Safety Information and Warnings
•If you disconnect the mains plug, hold onto the mains plug not the cable. Pulling the cable
may cause an electric shock or a fire.
•Do not use a mains plug adapter or extension cable. It may overheat and cause a fire.
•Make sure your home voltage matches the voltage displayed on the washing machine. If
you are not sure, contact an electrician.
•The mains plug must remain accessible to allow disconnection or an all pole switch must
be incorporated in the fixed wiring in accordance with the wiring regulations.
To Prevent Injury / Damage
•Do not climb on the washing machine. You may hurt yourself or damage the washing
machine.
•When opening and closing the door ensure you keep fingers away from the door hinge,
or this could lead to injury.
•Check your washing for objects such as nails, pins, coins, clips etc. They could damage
your laundry or the washing machine.
•To prevent any large, heavy objects (e.g., buckles, large buttons, etc.) from hitting the
glass door, turn your clothing inside out or remove the heavy objects. They could damage
your laundry or the washing machine.
•Do not wash, rinse or spin water-proof sheets or clothing. These may cause vibration or
washing machine failure during spin-drying, which could lead to injury, damage to the
washing machine or damage due to water leaking.
•Be careful when draining hot water or any detergent from the drum.
•Do not dismantle, repair or modify the washing machine. The washing machine could
malfunction and cause a fire or injury.
•This appliance is not to be used by persons (including children) with reduced physical,
sensory or mental capabilities, or lack of experience and knowledge, unless they have
been given supervision or instruction concerning use of the appliance by a person
responsible for their safety. Keep the appliance and its cord out of reach of children.
•Children should be supervised to ensure that they do not play with the appliance.
•The appliance is to be connected to the water mains using the new hose-set supplied. Old
hose-sets should not be reused.
•The ventilation openings in the base of the washing machine must not be obstructed by a
carpet.
WARNING
IT IS HAZARDOUS FOR ANYONE OTHER THAN AUTHORISED SERVICE
PERSONNEL TO CARRY OUT SERVICING OF REPAIRS WHICH INVOLVE THE
REMOVAL OF COVERS.
TO AVOID THE RISK OF AN ELECTRICAL SHOCK DO NOT ATTEMPT REPAIRS
YOURSELF.

6
Items in the Box
Remove all items from the packaging. Retain the packaging. If you dispose of it please
do so according to local regulations.
The following items are included:
Water
Supply
Hose
Main unit
Transport Hole Plug
Instruction Manual
Instruction
Manual
Drain Hose
Support

7
Getting Started
Please Read And Follow The Instructions Carefully.
•In addition to the instructions mentioned here, special regulations of the relevant
water and power supply companies may apply. If in doubt, have the washing machine
connected by a qualified technician.
•The washing machine is heavy - caution when lifting it. Do not lift by projecting
components (e.g. washing machine door).
•Warning: Frozen hoses may tear/burst. Do not install washing machine in outdoor
areas or where there is a risk of frost.
•Lay hoses and cables in such a way that there is no risk of tripping over them.
NOTE: An additional space (approximately 120mm) is required at the rear of the washing
machine. This is to allow enough space for the water hose and drain hose connections.
Choosing the right location for your washing machine
•Make sure there’s enough space for your washing machine.
•Install your washing machine on a flat, stable surface to avoid excessive vibrations
and noise.
•Don’t install your washing machine in direct sunlight or in a place where temperatures
can reach freezing.
•The ventilation openings in the base of the washing machine must not be obstructed
by carpet.
•Start by tilting the washing machine backwards.
•One person should stand behind it, holding the rear of the top panel. The other
person should grip the bottom feet at the front.
•Check that you have all the required accessories for installation.
•We recommend that you entrust the installation of the washing machine to a qualified
technician.
Removing the transport bolts
Transport bolts keep the interior of the washing machine in place while it’s being
moved.
They need to be removed before installation. Use a spanner (not supplied) and follow
the instructions detailed below.
NOTE: Don’t run the washing machine without removing the transport bolts, as this can
cause excessive vibrations and may damage your machine.

8
Getting Started
To remove the transport bolts:
1. Use a spanner to loosen the bolts. They are located
at the rear of the washing machine.
2. Pull the bolts out horizontally. Make sure the entire
bolt is removed.
3. Push the transport hole plugs (included with your
accessories) into the respective bolt holes.
You’ll need the transport bolts again if you move the washing machine, so make sure
you keep them in a safe place.
Moving the washing machine from one location to another
Before you move the washing machine:
•Shut off the tap and run the washing machine to drain the water. Drain any remaining
water from the pump hose.
•Disconnect the mains cable.
•Attach the transport bolts.
NOTE: Make sure to fix the transport bolts prior to moving the washing machine.
Two or more people are required to move
the washing machine.
Levelling the washing machine
There are levelling feet on the underside of the washing machine. They must be adjusted
to make sure the washing machine is level.
1. On each foot, loosen the lock ring by turning it
clockwise.
2. Adjust all feet by rotating each upwards or
downwards.
3. Use a spirit level to ensure the washing machine is
level.
4. Tighten each lock ring by turning them anti-clockwise
(towards the washing machine body).
Ensure all lock rings are tightened securely. Check that the feet are still bolted to the
washing machine - if they’re unbolted, the washing machine will move around.

9
Basic Set Up
Connecting the water supply hose
1. To prevent leakage from the
connection joints, ensure the rubber
washer seals are fitted to each end
of the water supply hose. Do not use
without the seals in place.
2. Fit the straight end of the water supply
hose to the cold water tap.
3. Connect the angled end of the hose to the water inlet valve on
the machine. Hand tighten the plastic parts of the connections.
If you are unsure, please call a qualified plumber for safer
connections.
4. Open the tap slowly and check that there are no leaks around
the connection joints.
Points to remember
•Follow the instructions in this section to avoid water leaks.
•Don’t connect the hose to a combination tap.
•Don’t twist, squash, modify or cut the hose.
•This machine is designed to connect to the cold water supply. Do not connect to the
hot water supply.
•Use only the new water supply hose supplied. Old hose sets should not be reused.
Water drain hose
Points to remember:
•Don’t twist, pull out or bend the drain hose.
•Your washing machine should be no more than 85 cm from the drain outlet.
•The water drain hose should be mounted at a height of minimum 60 cm, maximum
100 cm from the ground.
•Before connecting to the waste pipe, make sure to check the waste pipe and remove
any stopper or blockage inside, otherwise the unit may not be able to expel the waste
water properly.
3/4”
3/4”

10
Basic Set Up
Draining to a sink or wash-basin
•Secure the drain hose in position, so it can’t drop
out of the basin.
•Don’t block the basin’s drain outlet, and make
sure that the drainage through it is sufficient to
prevent overflowing.
•Don’t let the tip of the drain hose dip into the
drained water, as this can cause the water to flow
back into the washing machine.
Connecting to the power supply
For your safety:
•Make sure the power supply system (current, power voltage and wire) at your home
can meet the normal loading requirements of the unit.
•Connect the power to a socket which is correctly installed and properly earthed.
•Make sure the power voltage at your place is same to that in the machine’s rating
label.
•Do not use a power plug adapter or extension cable.
•Do not connect and pull out plug with wet hand.
•When connecting and pulling out the plug, hold the plug tightly and then pull it out.
Do not pull power cord forcibly.
•If the power cable or power plug is damaged, stop using them and call a qualified
technician for assistance.
•The power plug must remain accessible to allow disconnection or an all pole switch
must be incorporated in the fixed wiring in accordance with the wiring rules.
Drain Hose
Support
Draining to a wash-
basin
Draining to a drain hose

11
Operation Instructions
Organising laundry
•Read the washing label on each garment to help you sort your washing into different
loads.
•Sort the laundry by colour, type of fabric and by how soiled it is. This will help you
choose the correct program and temperature for each wash.
•Do not exceed the maximum load!
See the program selection table for
the maximum load for the program
you require.
Preparing laundry
•Treat stains before washing.
•Some items should be put into a cleaning net before going into the washing machine,
i.e. bras with metal wires, tights and lace clothing to prevent damage.
•Check that pockets do not contain any objects which may damage your clothes and
the washing machine.
•Tie up any loose strings on laundry, close zippers and reverse clothing with zips inside
out.
•To prevent any large, heavy objects (e.g., buckles, large buttons, etc.) from hitting the
glass door, turn your clothing inside out, or remove the heavy objects. These could
damage your laundry or the washing machine.
•Remove any surplus hair, animal fur, sand, and other materials with a brush before
washing.
•If clothes have raised fabric turn them inside out.
•Clothes that are not colour fast should be washed separately.
•Insert your clothes into the washing machine. Close the washing machine door.
Ensure that you do not trap any items of clothing between the loading door and the
rubber seal.
•Don’t overload the drum as it may cause excessive vibrations or damage the washing
machine.
Fibre Type Maximum Dry Loading
Capacity (kg)
Cotton 5.0
Synthetic 2.5
Wool 1.5

12
Operation Instructions
II
I
Main wash
detergent
Softener
Pre-wash
detergent
Detergent
Detergent
Softener
Adding detergent and softener
•Add detergent into compartment (II) of the
detergent drawer.
•Add softener into the softener compartment
before you start washing.
•Apply detergent and softener according to the
washing amount, the soiling level, the water
hardness in your area and the manufacturer’s
instructions of these products.
•Do not use the washing machine when the detergent drawer is removed. It may cause
water leak or it may not work normally.
•To prevent powder detergent staying in the drawer, dry the inside of the drawer with a
cloth. Make sure the powder isn’t lumpy when you add it into the drawer.
•If the rinse cycle isn’t removing all the detergent from your wash, use less detergent.
•Softener and liquid detergent should not exceed the maximum level in the
compartment.
•Wash out unused softener with a splash of water or a damp cloth after the program
has finished.
•You can use liquid detergents in all programs.
•Dilute viscous liquid detergent, fabric softener and fabric conditioner with water.
Prevent blockage of the overflow.
•For woolen items, use a mild liquid detergent. Other detergents may damage your
woolen clothes.
•With wool or silk, you may need to use an extra rinse cycle to remove excess detergent
from your clothes. This depends on the amount of detergent you use, and the amount
of foam that develops in the main wash cycle.
NOTE: Compartment (I) is not applicable for this model.

13
Operation Instructions
Before first use
Before washing your clothes for the first time, run a full wash program first:
1. Connect the machine to the mains power supply and the water supply.
2. Put a small amount of detergent in the detergent drawer. Close the drawer.
3. Press the POWER button.
4. Select a wash program.
5. Press the START / PAUSE button.
NOTE: Water is poured into the washing machine to perform an inspection at the time
of shipment from the factory, so there may be drops of water or condensation in the
washing machine. This is not an indication of a malfunction.
Standard washing
1. Pull the door handle and put the laundry in the drum. Make sure no washing gets
caught in the door. Close the door.
2. Press the POWER button and turn the PROGRAM SELECTION DIAL to select your
wash program according to the type of fabric.
3. Select the temperature according to the dirtiness and care label of clothes. Higher
temperature for dirtier laundry.
4. Select the spin speed. The higher the speed, the drier the laundry. Take care of delicate
laundry as higher spin speed will cause delicate laundry to wrinkle.
5. Add detergent into the detergent drawer. The quantity of detergent will depend on the
amount of laundry, the degree of soiling and the water hardness. Use the amount of
detergent suggested on the packaging.
6. Press the START / PAUSE button to start the washing. If you need to change a setting
after the wash has started, turn the power off then on again. Re-select the program,
spin speed and optional functions, and then press the START / PAUSE button.
7. The washing machine will sound when the program is complete.
NOTE:
•During initial start-up and use of the unit, there may be a slight smell while the motor
is settling in. This is not a fault; this is normal operation.
•If the door is locked and you switched the washing machine off and then on - or if
there’s a power cut - it will stay locked for 1 minute.

14
Operation Instructions
Selecting the program
Program Description Max.
load
(kg)
Water temperature
(°C)
Default
spin
speed
(rpm)
Program
time(1)
(minutes)
Default Optional(4)
Cotton For daily
washable items
5.0 60 20, 40,
60, 90,
Cold
1200 130
Cotton
Intensive
For daily
washable items
with additional
washing time
5.0 40 20, 40,
90, Cold
1200 140
- 60(2) 300(3)
Quick For few and
light soiled
items
1.5 Cold 20, 40,
Cold
1200 15
Synthetic For delicate
items in gentle
washing and
shorter washing
time
2.5 40 20, 40,
60, Cold
800 105
Wool For wool
items labeled
“Machine
washable”
1.5 40 20, 40,
Cold
400 85
Underwear With additional
rinsing cycle
5.0 40 20, 40,
60, 90,
Cold
1200 108
Spin For draining
water in drum
and spinning
5.0 N/A N/A 1200 15
Drum
Clean
For drum
cleaning
with high
temperature
water
N/A 90 N/A 400 90

15
Operation Instructions
NOTE:
(1) For reference only; the actual program time may vary, depending on the different
parameters such as the water temperature selected and the weight of load.
(2) Cotton Intensive with 60°C water temperature and spin speed 1200 rpm selected
is the recommended for 5.0 kg normally soiled cotton load, which is the energy and
water rating label program tested to AS/NZS 2040.1 requirements.
(3) This specific program time is the average value measured in energy efficiency
testing; actual time may vary.
(4) Cold (cold water) can be selected by pressing the TEMP button continuously until all
indicators of Temp (20, 40, 60, and 90) are off.
AS/NZS 2040.1 additional testing parameters:
Voltage 230 V~
Water Supply Cold water (Pressure: 320 kPa)
Detergent Drum type
Dry detergent dissolved in 1 L of warm water.
Anti-sudsing Agent Silicon based, 10 g
Drain Height 900 mm
Muting and turning on the sound
The machine will beep when buttons are pressed.
•To mute the sound, press the TEMP button for 3 seconds after starting the wash
program.
•To turn on the sound, press the TEMP button again for 3 seconds.
NOTE: The setting will be kept until the next reset.

16
Troubleshooting
Issues Reasons Solutions
Washing machine
cannot start up
•Check if the door is closed tightly.
•Check if the power plug is inserted
well.
•Check if the water supply tap is
opened.
•Check if the START/PAUSE button is
pressed.
•Check if the POWER button is
pressed.
Door cannot be
opened
•Machine’s safety
protection design is
working.
•Disconnect the power.
Heating fault
•NTC is damaged
and heating pipe is
aging.
•Can normally wash the clothes.
•Contact GVA customer care.
Water leakage
•The connection
between inlet pipe
or outlet hose and
tap or washing
machine is not
tight.
•Drain pipe in the
room is blocked.
•Check and fasten water pipes.
•Clean up outlet hose and ask a
specialized person to repair it when
necessary.
Water is
overflowed from
the bottom of the
machine
•The inlet pipe is
not connected
firmly.
•Outlet hose has
water leakage.
•Fix the inlet pipe.
•Replace the drain hose.
Indicator or
display does not
light
•Power is
disconnected.
•PC board has
problems.
•Harness has
connection
problem.
•Check if the power is shut down and
power plug is connected correctly.
•If not, contact GVA customer care.

17
Troubleshooting
Issues Reasons Solutions
Detergent
residues in the
box
•Washing powder
is dampened and
agglomerated.
•Too much
detergent was
used.
•Liquid detergent is
too viscous.
•Clean and wipe the box.
•Use liquid detergents or change
detergent.
•Use less detergent.
•Dilute liquid detergent.
Washing effects
are not good
•The clothes are too
dirty.
•Insufficient
detergent quantity.
•Select a proper procedure.
•Add the proper detergent quantity
according to the instructions in the
detergent package.
Abnormal noise
Great vibration
•Check if the fixing (bolts) have been
removed.
•Check if it is installed on solid and
level floor.
•Check if there are any metal articles
inside.
•Check if the legs of the unit are
adjusted levelly.

18
Error codes
Display
LED Description Solution
Temp40˚
flashing
Water supply problem
while washing
•Open the water tap, to check if the
supply hose is squashed or kinked.
•Check if the filter in the inlet valve is
blocked or not.
•Check if the water pressure is too
low.
Temp20˚
and40˚
flashing
Drain water problem
while washing
•Check if the drain pump is blocked.
•Wash the drain pump filter.
•Wash the drain hose.
Temp20˚
flashing Door lock problem
•Check if the door of the washing
machine is closed.
•Check if the clothes are pinned by
the door.
Others •Call GVA customer care if there are still problems with the
machine.
Troubleshooting

19
Care and Maintenance
IMPORTANT: Always unplug the washing machine before cleaning.
Cleaning the drum
•Any rust left inside the drum by metal articles must be removed immediately with
chlorine-free detergent.
•Never use steel wool.
Cleaning the exterior of your washing machine
•Clean the outside of your washing machine with a soft cloth and mild detergent such
as kitchen detergent.
•Don’t splash water over the washing machine.
•Do not use cream cleansers, thinners or products containing alcohol or kerosene.
Cleaning the detergent drawer
1. Remove the detergent drawer by pulling and pressing
gently on the rear centre part of the softener compartment.
2. Wash out old detergent from the drawer with water. (Use
a cloth to clean the washing machine.) Residue detergent
soon builds up if you don’t clean the drawer regularly, and
can develop mould.
3. Return drawer to original position.
4. Pull out the detergent drawer. Remove the siphon plug and clean
any residual softener thoroughly. Fit the cleaned siphon plug in
its location. Check if it is fitted properly.
Pull out at the
same time
Press
Table of contents