Consignes de sécurité importantes :
Veillez à lire et à suivre l’ensemble des instructions suivantes avant de
mettre le produit en service ! Ces avertissements, consignes et règles de
sécurité visent à couvrir un certain nombre de risques généraux
susceptibles de survenir lors de la baignade, mais ne prétendent en
aucun cas couvrir l’intégralité des dangers et risques potentiels. Veillez à
rester vigilant, le bon sens et la capacité d’anticipation sont en effet des
valeurs capitales lors de la baignade. Il convient de conserver la
présente notice pour pouvoir vous y référer ultérieurement.
Généralités
● Veillez à vérifier régulièrement la présence éventuelle de rouille sur les
pointes, boulons et vis, et à contrôler l’absence de débris ou d’arêtes
tranchantes, afin d’éviter tout risque de blessure (surtout au niveau
des surfaces susceptibles d’entrer en contact avec les baigneurs).
Sécurité des personnes ne sachant pas nager
● La surveillance continue, active et attentive des nageurs
inexpérimentés ou des personnes ne sachant pas nager par un adulte
compétent est obligatoire à tout instant (en gardant à l’esprit que le
risque de noyade est le plus élevé auprès des enfants de moins de
cinq ans).
● Veillez à désigner un adulte compétent, qui sera chargé de surveiller
les baigneurs à chaque utilisation de la piscine.
● Les nageurs inexpérimentés et personnes ne sachant pas nager
doivent porter des équipements de protection individuelle à chaque
utilisation de la piscine.
Dispositifs de sécurité
● Il est conseillé d’installer une barrière de sécurité (et – dans la mesure
du possible – de sécuriser l’intégralité de vos portes et fenêtres) afin
d’éviter tout accès non autorisé à la piscine.
● Si les barrières de sécurité, bâches, systèmes d’alarme ou autres
dispositifs de sécurité similaires sont de bons moyens d’assurer la
sécurité, ils ne sauraient en aucun cas remplacer la surveillance
continue et éclairée des baigneurs par des adultes.
Équipements de sécurité
FR
Introduction:
Nous tenons à vous féliciter pour votre achat d’une piscine en kit issue de
notre gamme de produits. Veuillez prendre quelques minutes afin de
prendre connaissance de la présente notice de montage avant de
commencer à installer votre piscine. Vous y trouverez l’ensemble des
informations nécessaires afin d’optimiser la durée de vie de votre piscine,
de même que votre sécurité, et pourrez ainsi profiter pleinement de vos
instants de baignade.
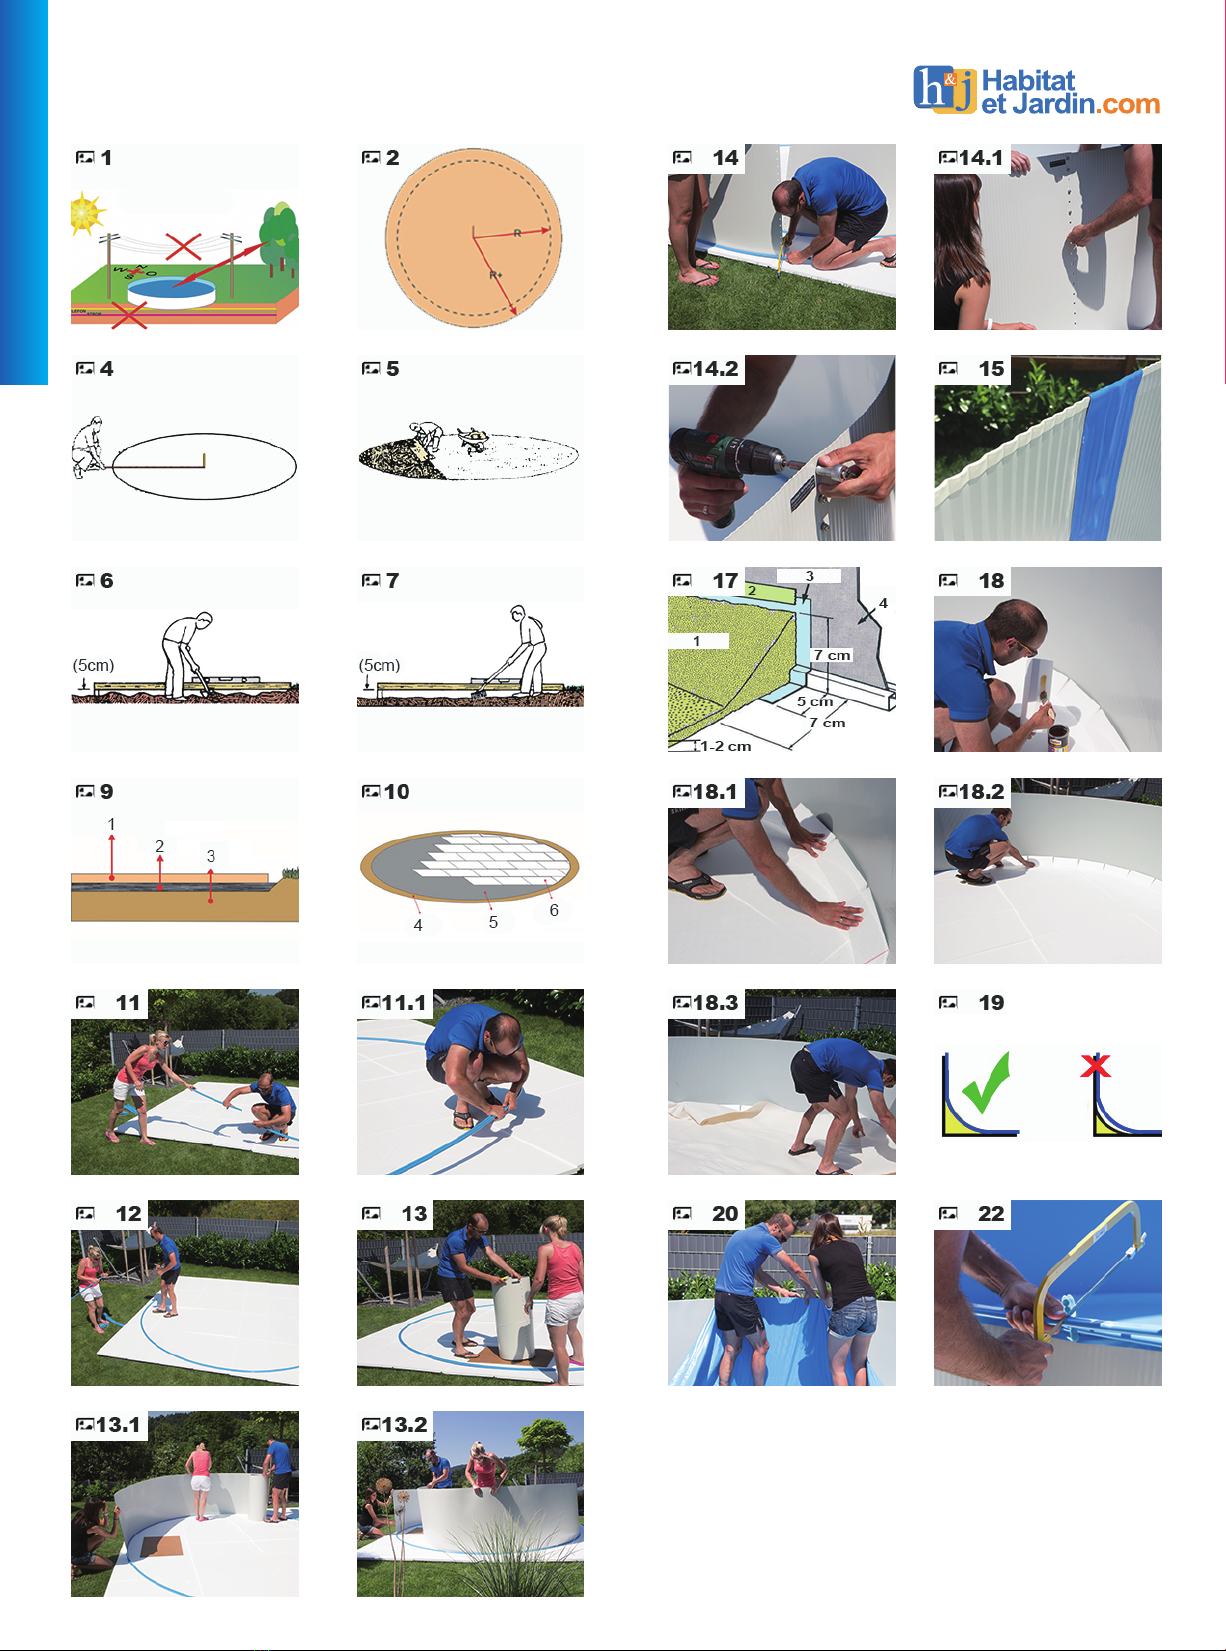
Si la présence de 2 personnes est nécessaire pour le montage, la présence
d’une personne supplémentaire permettra bien évidemment de gagner du
temps. Durée de montage, sans préparation du support de pose et sans
remplissage : environ 3 heures
Certains outils ou matériaux supplémentaires sont nécessaires au
montage (non compris dans la livraison) :
● Tournevis
● Ruban isolant
● Longue planche de bois (droit!)
● Ruban à mesurer
● Scie à métaux
● Gants de sécurité
● Niveau à bulle
● Non-tissé de piscine
Important information:
Veillez à lire et à suivre l’ensemble des instructions suivantes avant de
mettre le produit en service !
Il est important de veiller à ce que les enfants et personnes présentant
un handicap soient soumis à la surveillance permanente d’adultes.
Veillez à prendre les mesures de sécurité adéquates afin d’éviter toute
utilisation inappropriée de la piscine.
Veillez à prendre également des mesures préventives de sécurité afin
d’assurer la protection des enfants et, le cas échéant, des animaux
domestiques.
La piscine et ses accessoires peuvent seulement être montés et
démontés par des adultes.
Veillez à ne jamais sauter ou plonger dans la piscine.
Afin d’assurer un montage sûr, veillez à installer la piscine sur un support
stable et compact. Dans le cas contraire, la piscine pourrait se replier,
entraînant ainsi la « noyade » d’une personne alors présente dans le
bassin, voire certains risques de blessures.
N’autorisez personne à rester assis ou à monter sur le bord de la piscine.
Veillez à retirer l’ensemble de vos jouets aquatiques présents dans la
piscine, ou à proximité de celle-ci, dès lors qu’elle n’est plus utilisée ; ces
jouets sont en effet susceptibles d’attirer les enfants en bas âge.
Veillez à retirer l’ensemble des sièges, tables ou accessoires permettant
de grimper dans la piscine après utilisation.
Veillez à ce que les équipements de sécurité nécessaires soient toujours
présents à proximité de la piscine, et à ce que les numéros d’urgence
soient notés à côté du téléphone le plus proche. Exemple d’équipement
de secours :
Bouée circulaire, dotée d’une corde et homologuée par les garde-côtés,
avec perche de sauvetage d’une longueur minimum de 366 cm.
Veillez à ce que votre piscine reste toujours propre et bien entretenue. Le
fond du bassin doit toujours rester visible de l’extérieur.
Si vous souhaitez utiliser votre piscine de nuit, veillez à ce que
l’ensemble des avertissements de sécurité et des échelles, ainsi que le
fond du bassin, soient suffisamment éclairés.
Veillez à ne jamais utiliser votre piscine sous l’emprise de drogues ou
d’alcool !
Attention : maintenez les enfants à l’écart de la piscine, dès lors que
celle-ci est couverte, ceux-ci étant susceptibles de rester bloqués dans
la bâche, ce qui entraîne un risque de blessures graves, voire de
noyade.
L’ensemble des bâches doivent être retirées avant toute utilisation de la
piscine. Veillez ainsi à ce que personne, que ce soit adultes ou enfants,
ne se retrouve sous la bâche, celle-ci ne permettant aucune visibilité.
Veillez à ne pas recouvrir la piscine lorsque celle-ci est en cours
d’utilisation.
Veillez à maintenir les abords de la piscine toujours propres afin
d’éviter toute blessure liée aux glissades et aux chutes.
Veillez à maintenir la propreté de l’eau présente dans le bassin afin de
protéger les utilisateurs de la piscine des maladies.
La piscine est un objet d’usage quotidien. Veillez à entretenir
convenablement votre piscine. Toute dégradation excessive ou rapide
de la qualité de l’eau peut en effet entraîner une détérioration de la
piscine elle-même.
Cette piscine est exclusivement destinée à une utilisation en extérieur.
Afin d’assurer que l’eau est bien renouvelée, au moins, une fois par
jour, il est conseillé de maintenir la pompe de filtration allumée, y
compris lorsque la piscine est en cours d’utilisation. Vous retrouverez
des informations plus détaillées concernant le calcul de la durée de
fonctionnement nécessaire de la pompe de filtration dans le mode
d’emploi.
La piscine doit être remplie d’eau en permanence. Dans le cas où
vous devriez vider intégralement votre bassin de son eau, veillez à ce
que la paroi en acier reste stable, celle-ci étant alors susceptible de se
renverser.
LA PRÉSENCE DE BARRIÈRES DE SÉCURITÉ OU DE BÂCHES NE
SAURAIT EN AUCUN CAS REMPLACER UNE SURVEILLANCE
CONTINUE ET ADAPTÉE, ASSURÉE PAR DES ADULTES. LES
ADULTES ASSURENT LA FONCTION DE MAÎTRE NAGEUR ET SONT
AINSI RESPONSABLES DE LA SÉCURITÉ DES PERSONNES EN
TRAIN DE SE BAIGNER, EN PARTICULIER CELLE DES ENFANTS SE
TROUVANT À L’INTÉRIEUR ET À PROXIMITÉ DU BASSIN.
TOUT NON-RESPECT DE CES AVERTISSEMENTS DE SÉCURITÉ
EST SUSCEPTIBLE D’ENTRAÎNER DES DOMMAGES MATÉRIELS,
DES BLESSURES GRAVES, VOIRE UN DANGER DE MORT !
●
●
●
●
●
●
●
●
●
●
●
●
●
●
●
●
●
●
●
●
●
●
i