Haier 29F3A User manual

Please read this manual carefully before using this
TV set and keep it for future reference.
COLOUR TV RECEIVER
OWNER'S MANUAL
29F3A
MAIN FUNCTIONS
Multiple picture & audio modes
Child lock, sleep timer
Surround stereo, treble and bass boost
Program scan & program swap
Noise reduce
Black stretch
Fastext


CONTENTS
Before Operation
Basic operation
Warning and cautions...........................................................................2
Installation..............................................................................................3
Aerial connection...................................................................................3
Preparation of the remote control unit...................................................3
Function buttons and external sockets...............................................4
Front and side panel of the TV set........................................................4
Rear panel of the TV set.......................................................................4
Buttons on the remote control.............................................................5
Switching on/off the TV set...................................................................6
Watching TV program............................................................................7
Watching TV program..........................................................................7
Program swap and auto scan functions...............................................8
Searching channel.................................................................................9
Full automatic search mode.................................................................9
Semi-automatic search......................................................................10
Program skip .....................................................................................12
Convenient picture and sound control functions............................
........................................................................26
Specifications......................................................................................27
Manual fine tune.................................................................................11
Position exchange function...............................................................22
Others
Multiple picture modes .....................................................................13
Black stretch and noise reduce..........................................................14
Multiple audio modes.......................................................................15
Surround and mute functions.............................................................16
Time functions.....................................................................................17
Clock setting and timer on/off functions..........................................17
Sleep timer and program preset .....................................................18
Setup function ...................................................................................19
Screen saver and child lock functions...............................................19
AVL and calendar functions...............................................................20
Fade and select language.................................................................21
TELETEXT
Teletext..............................................................................................23
Connection to the external audio and video equipment..................25
Troubleshooting guide
13
Warning and cautions
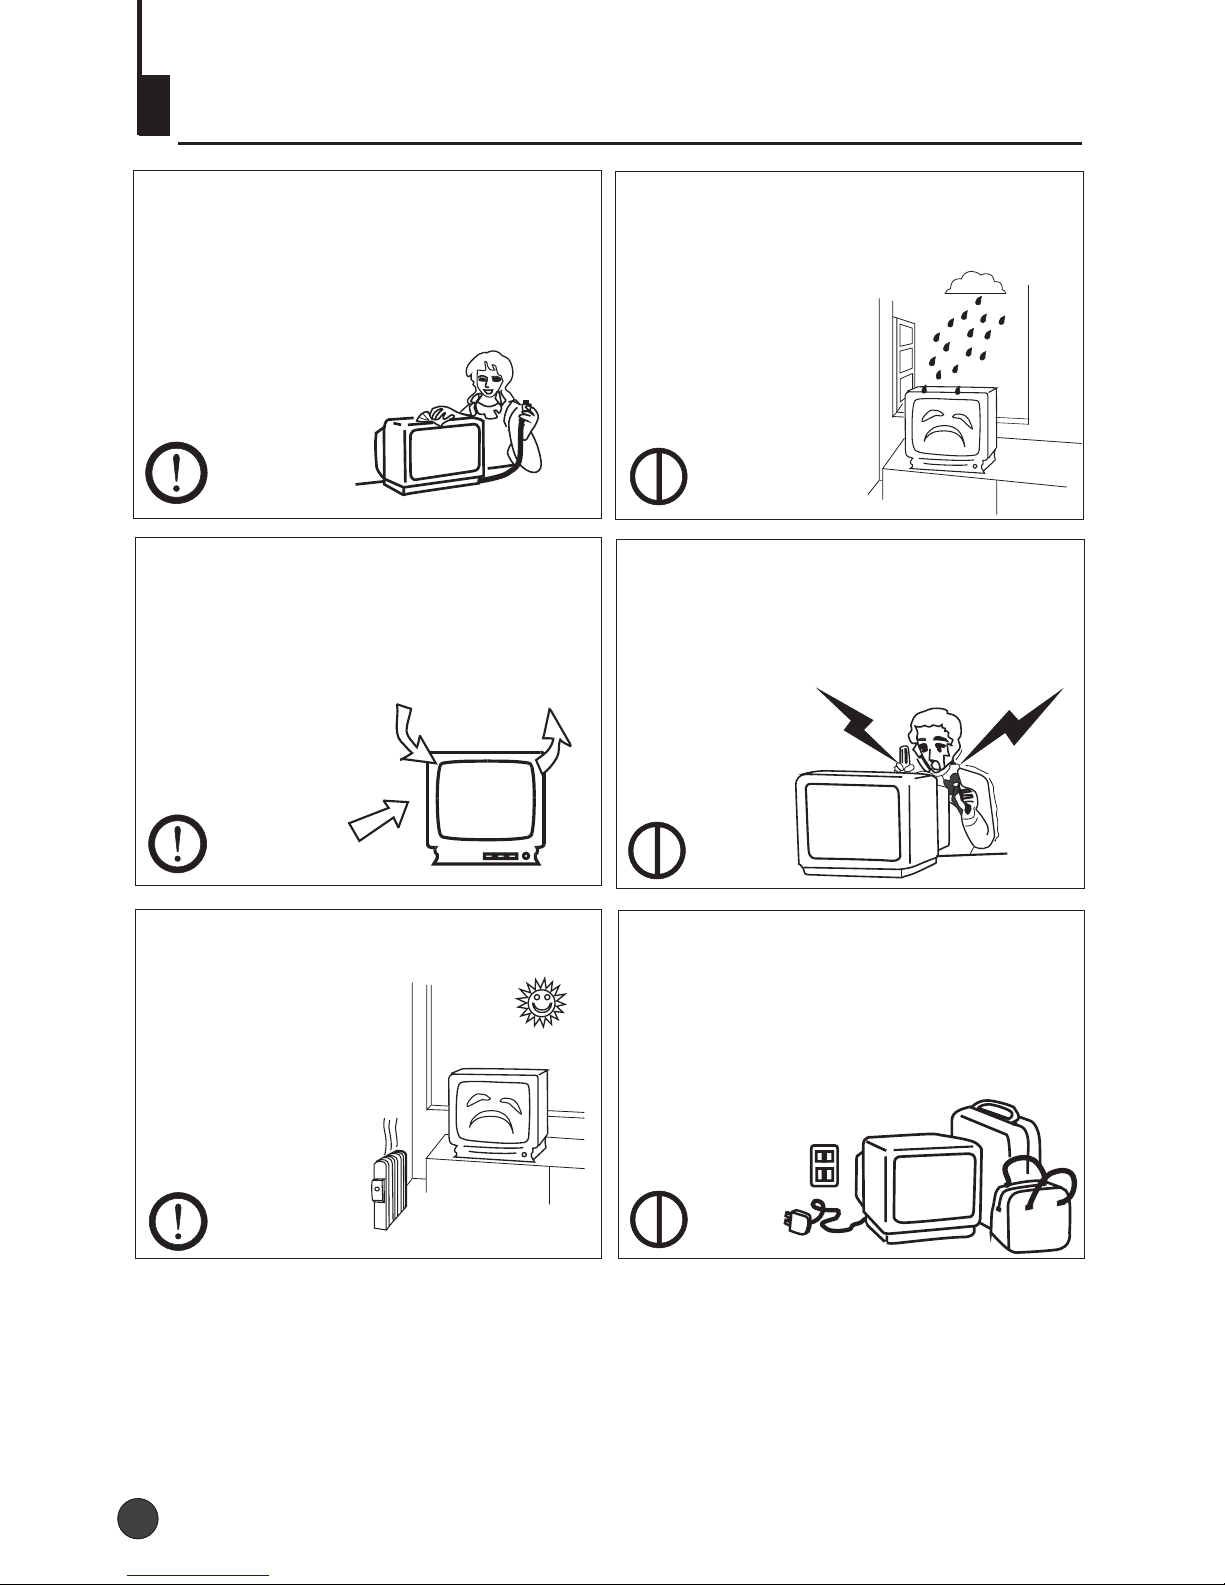
1. When you clean the TV set, please
pull out the power plug from AC outlet.
Don't clean the cabinet and the
screen with benzene, petrol and other
chemicals.
4. Do not place the TV set near rain or
moisture as it may cause an electric
shock, or the TV set to catch fire. The
TV set must only
be used in dry in
door locations.
2. In order to prolong the using life of
the TV set, please place it in a well
ventilated location.
5. The back cover must only be
removed by a registered electrical
service person. Removing the back
cover may result in electric shock, fire
or damage to
the TV set.
3. Don't place the
TV set in direct
sunlight or near a
heat source.
6. If the TV set is not going to be used
for a long time, or there is a severe
thunder & Lighting storm, it is
recommended that the TV set be
disconnected from the AC power outlet
and the aerial plug removed.
Explanation on the display tube
Should the picture tube require cleaning, disconnect the power and use a dry
soft cotton cloth. Do not use any cleaner or abrasive cloths.
2
2
Battery installation
Take off the battery compartment cover. Place two AA batteries, make sure that battery
polarity matches with the +/- mark inside the battery compartment.
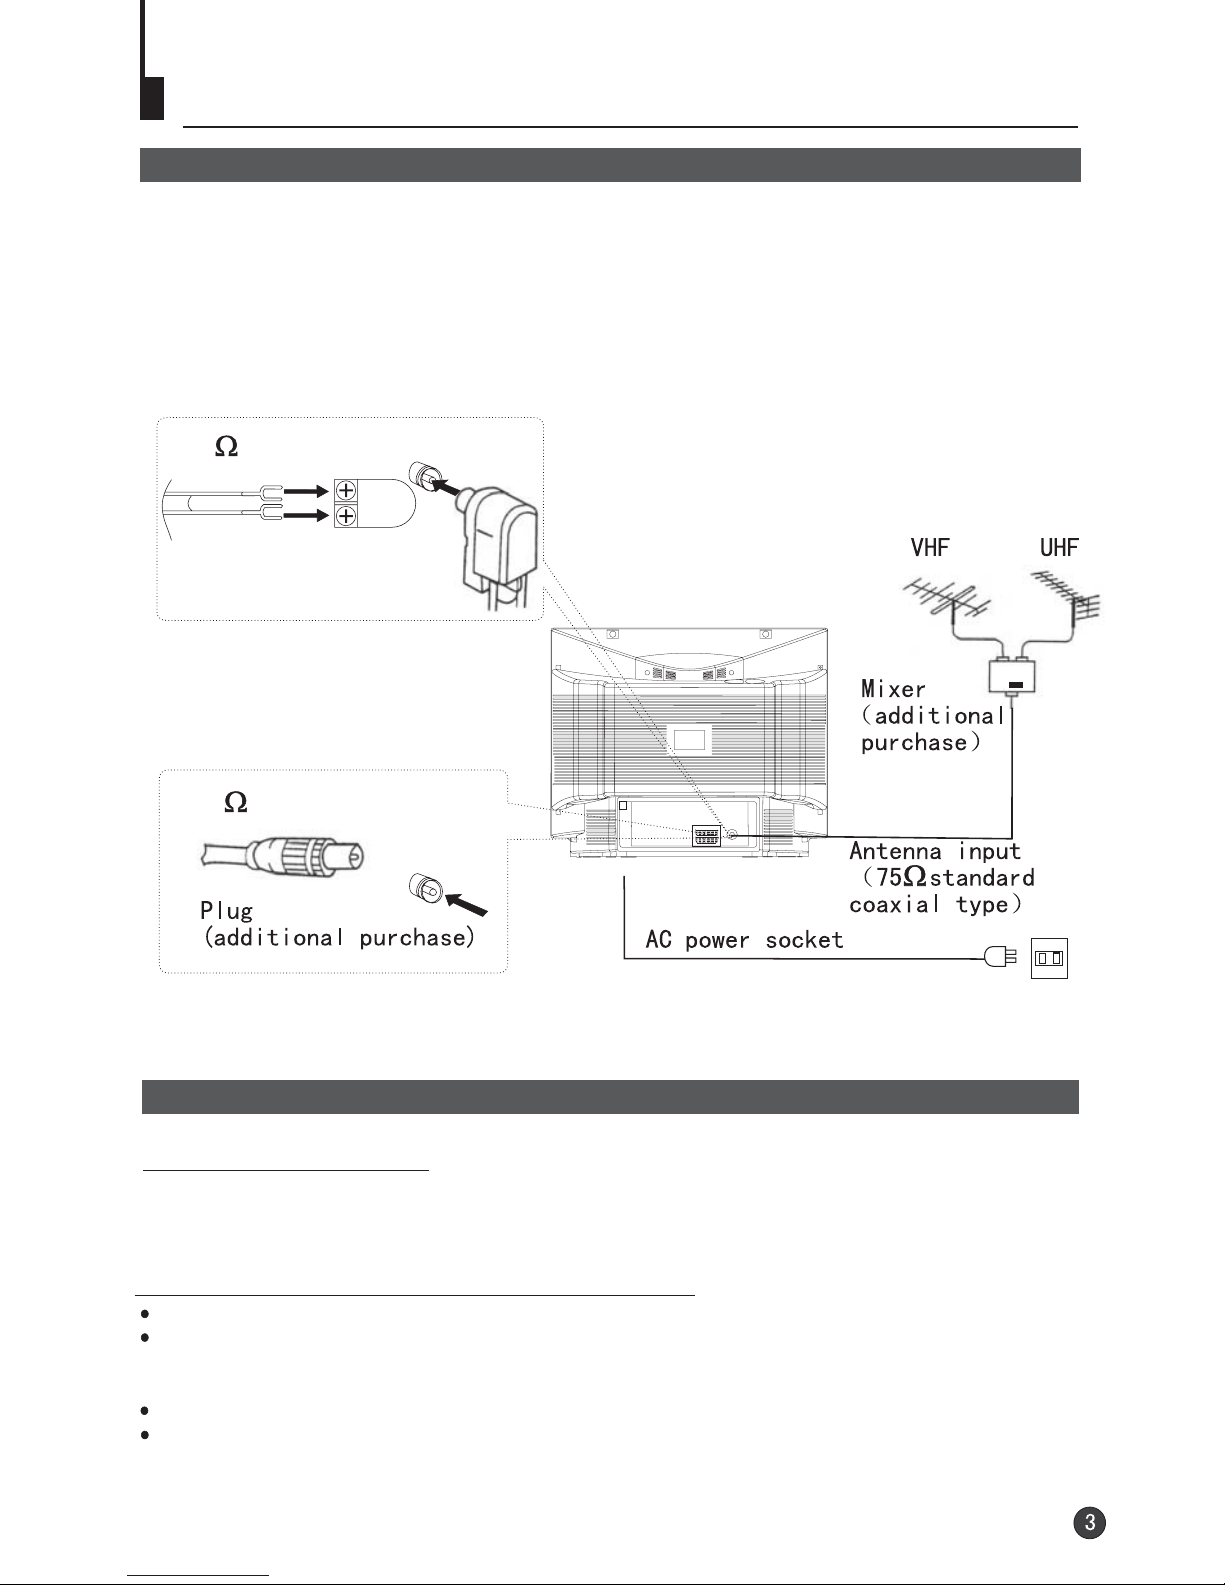
Installation
Aerial connection
For an optimum high quality picture, it is strongly advised that the TV set connect to an
external aerial(s) using high quality coax cable. When connecting to HiFi VCRs, satellite
(or cable) set top boxes, that the AV terminals are used to allow the stereo sound to be
transferred. For optimum picture performance with satellite decodes' use a RGB ready
SCART cable and set the decoder to an RGB output.
Preparation of the remote control unit
Operation notes for the remote control unit
Under normal conditions, the life time of batteries is one year.
If you don't intend to use the unit for a long period or the electricity of the batteries is
used up, remove the batteries to prevent batteries acid from leaking into the battery
compartment.
Avoid dropping the remote control and/or getting it wet.
Never place batteries in a fire.
300 twin-lead cable
Antenna adapter
(additional purchase)
75 coaxial cable
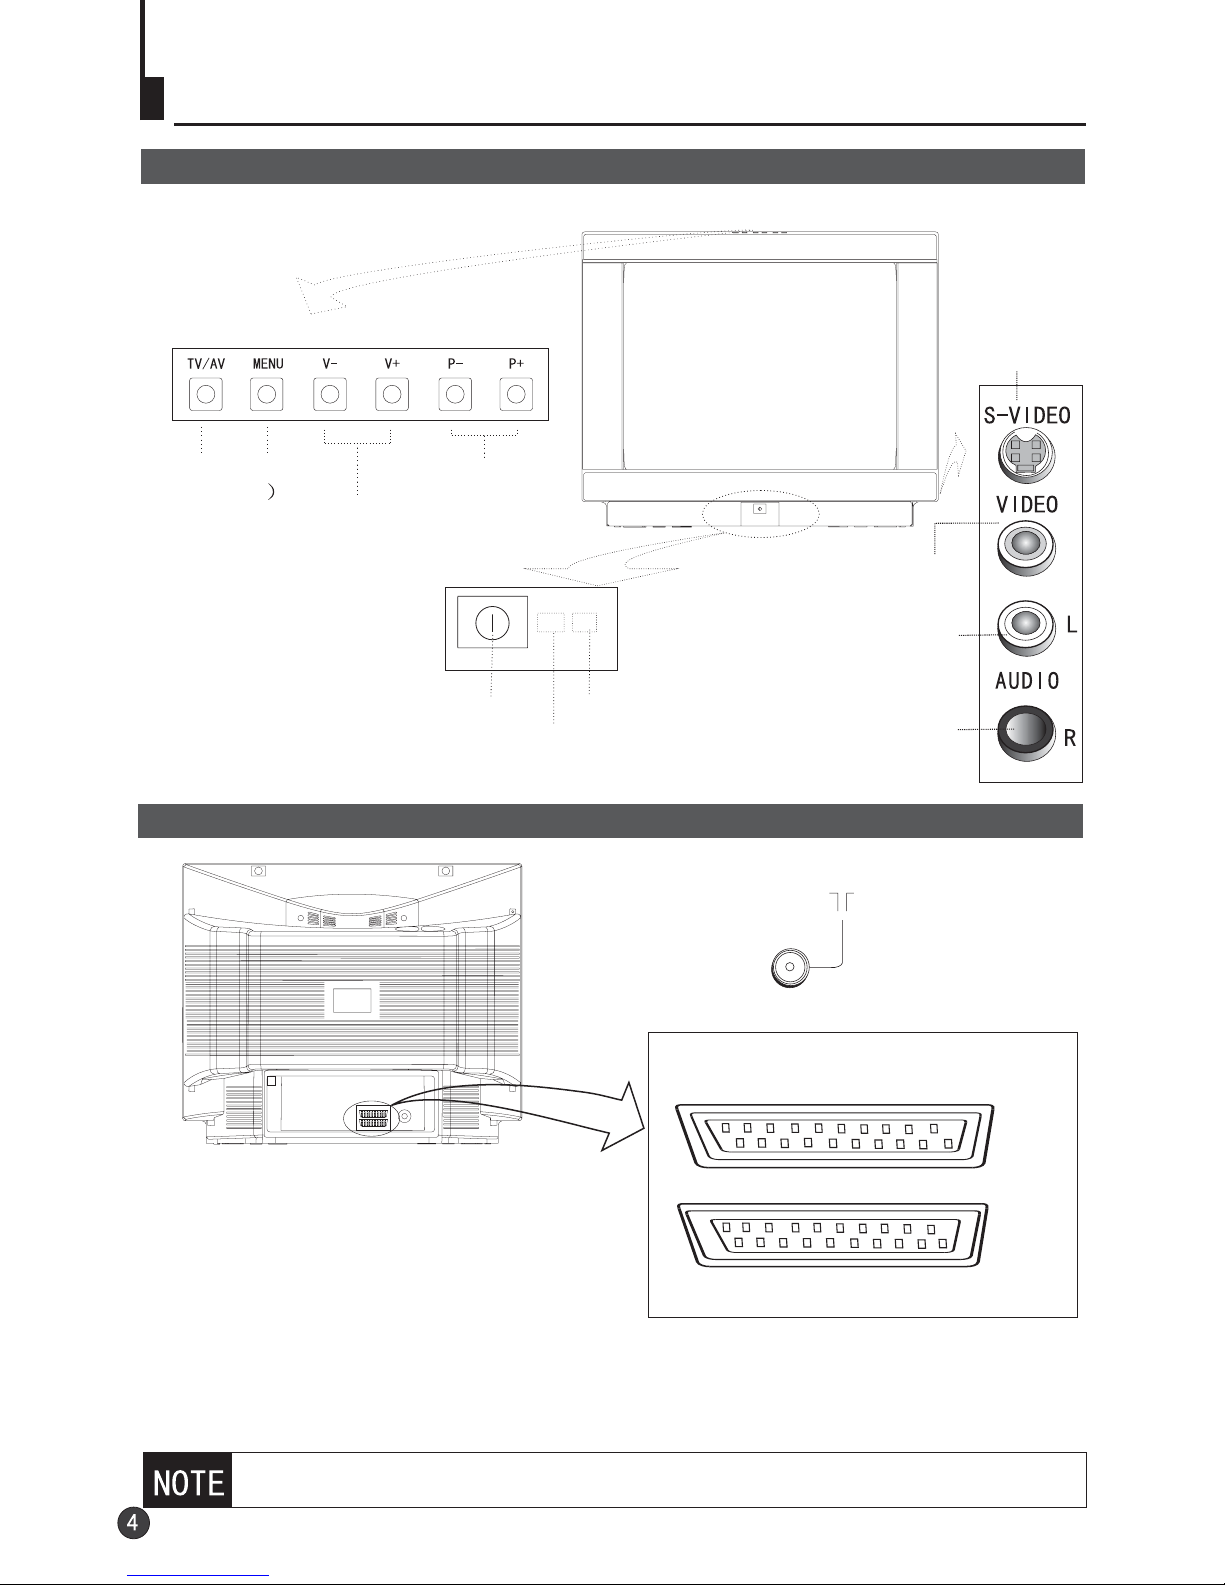
Function buttons and external sockets
Front and side panel of the TV set
Rear panel of the TV set
If you want to connect the TV set to the other audio/video equipment, please
refer to P25.
Antenna input
EXT 1
EXT 2
Channel selector
Volume up/ down
MENU
TV/Video
(input selector
Power switch
Infrared sensor window
Power indicator
S terminal
Video1 input terminal
Left sound track
Right sound track
The TV has 2 external sockets situated at
the back of the set (EXT1 and EXT2).
The EXT1 socket has audio and video inputs/
outputs.
The EXT2 socket has audio and video inputs.
*Connect either the S-terminal input terminal, VIDEO input terminal or the external socket,
whichever is used. Do not connect both of these terminals.

Buttons on the remote control
TV/AV exchange
Channel selection
(Page up/down)
Volume selection
Exit screen display/
Teletext
Call screen display
Mute
Program number
Digital selector
Zoom function
Stand by
Program scan Swap function
Picture mode
selection
Picture menu (Red)
Sound menu (Green)
Function menu (cyan)
Tune menu (Index)
Time menu (Yellow)
Sound mode selection
Menu selection /
adjustment
E/W change
Text display
Teletext/TV mix mode
Reveal
Cancel mode
Size
Teletext page hold
Subcode/Time
(Subtitle)
Mono/stereo
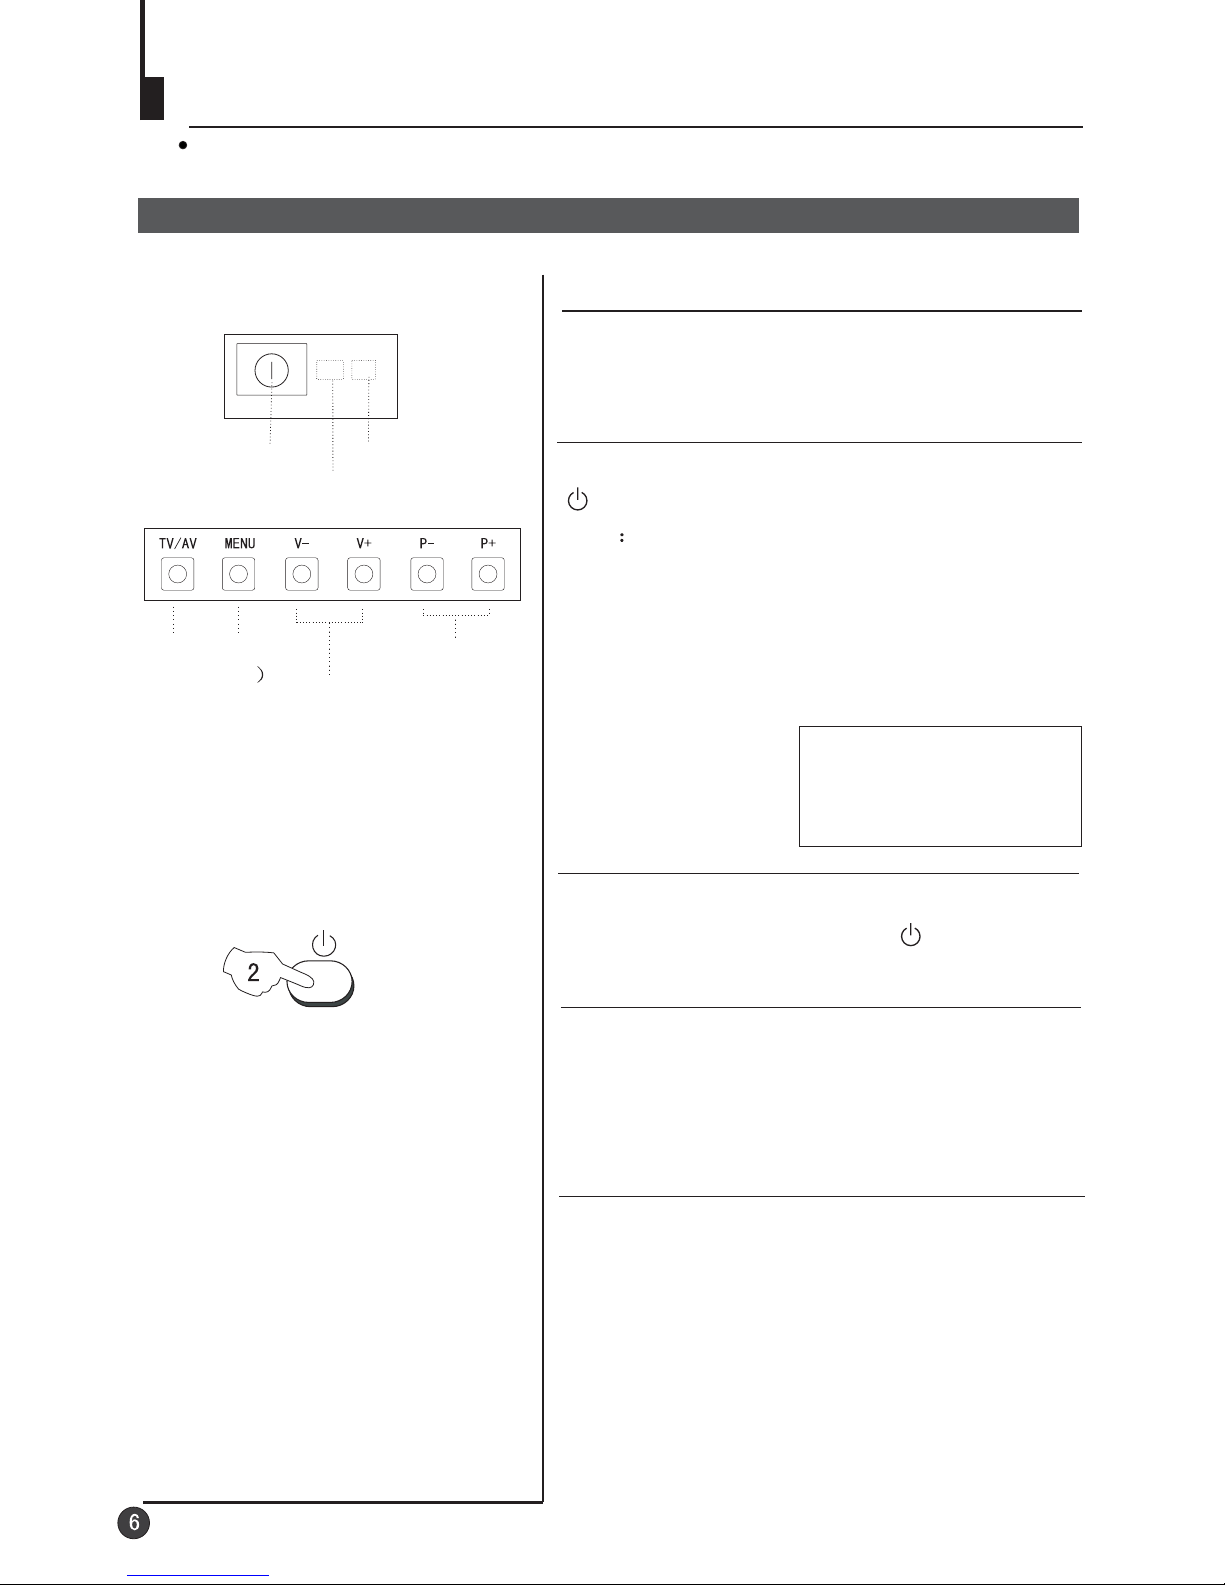
Switching on/ off the TV set
In the following, the methods of using power switch and remote controller to switch
on/off power supply for the TV set will be explained.
Switching on/ off the TV set
Switching on/ off the TV set
1 Please press the power switch to switch on AC
power supply and the power indicator will light.
2 If the indicator is lighting in red, press the button
on the remote control again.
Note
1 When you don't operate the TV set with a
remote control, you can turn on it directly
through pressing the P / on the TV set
(Child Lock must be turned off).
+ - buttons
2 If you want to exchange to standby status,
please press down the button on the remote
control.
3 If you want to fully switch off the power supply
for the TV set, please press the power switch
button on the TV set.
Auto switch-off function
When the "Back" function is on, if an empty
channel is selected or the TV programs are
ended for the day, the power will be switched off 5
minutes later automatically. If the "OFF TIME" is
on, it will be switched off according to the
presetting time. The auto power off function does
not work under video input or when the
background is off.
(Note: If the "off timer" is less than 5 minutes, it
will be switched off automatically to the preset
Time. )
Channel selector
Volume up/ down
MENU
TV/Video
(input selector
Power switch
Infrared sensor window
Power indicator
4
AUTO
DK
144.25MHz
Watching TV
Watching TV program
You can watch TV program in a preset channel.
TUNE
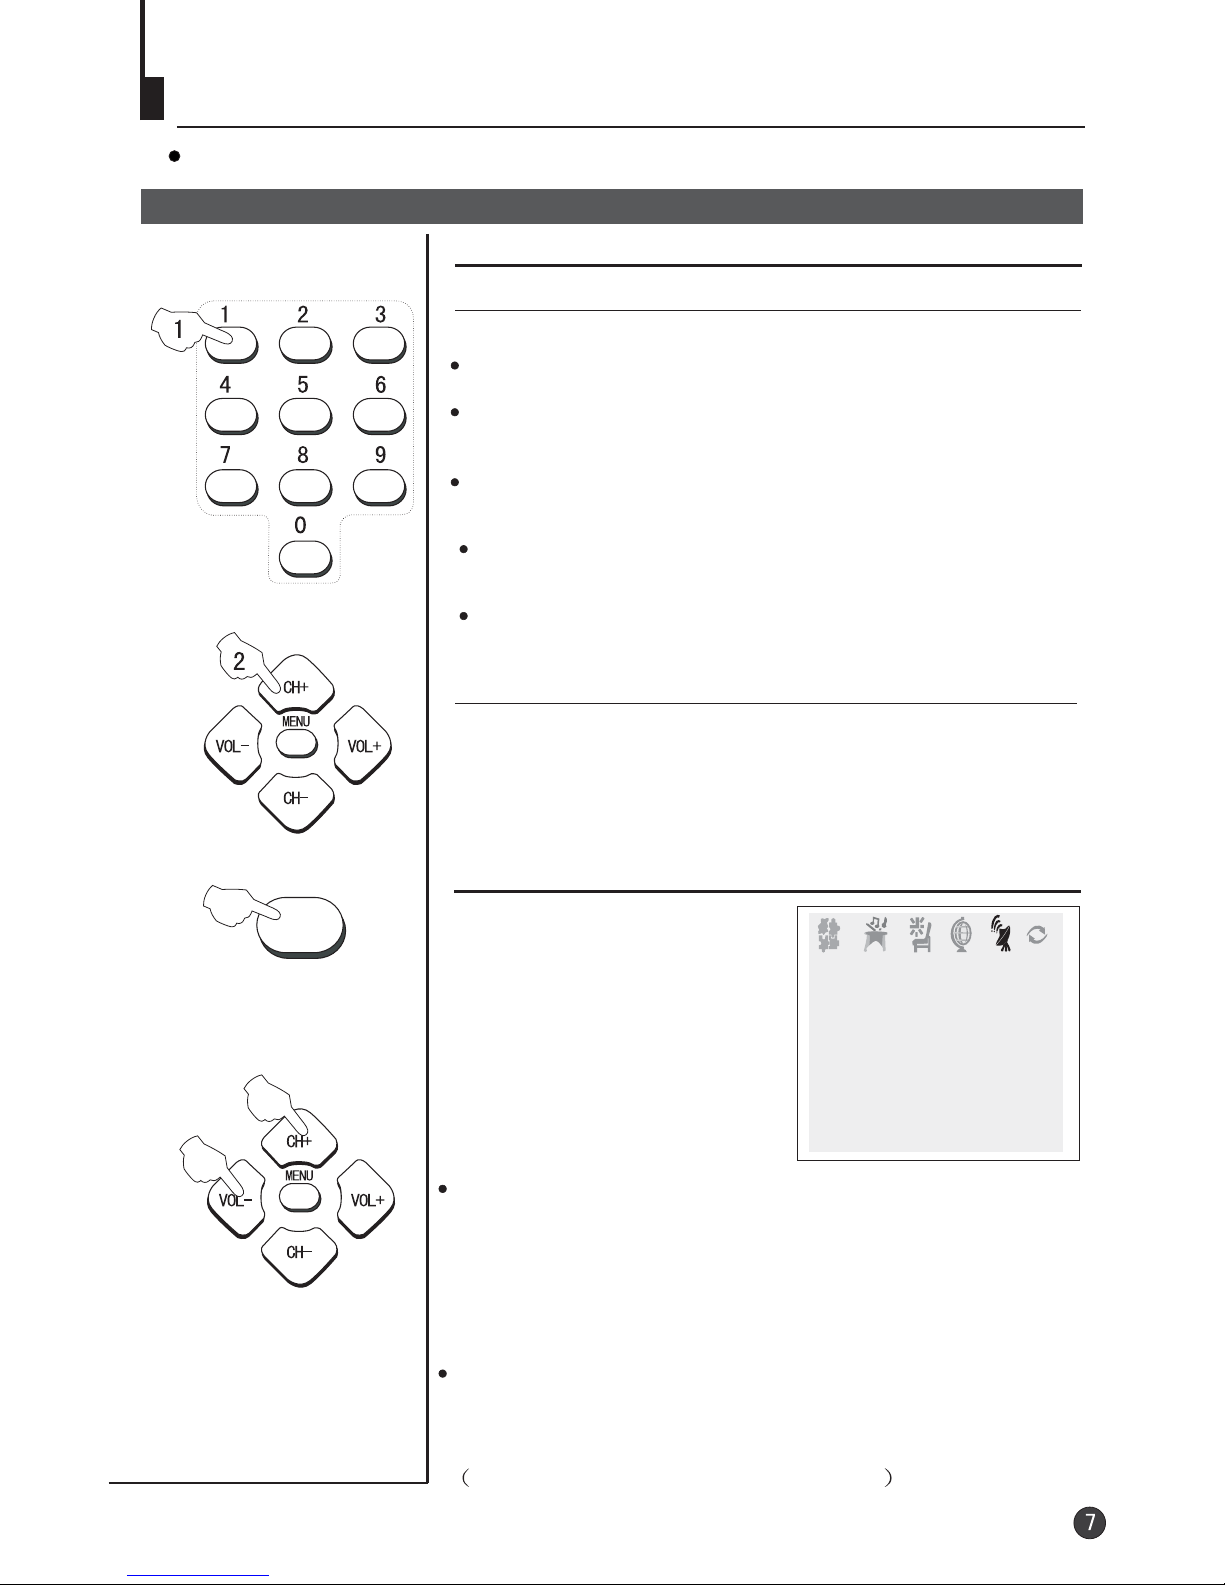
How to select TV program
Select the desired program
Select the desired sound
1 Using "Program number" buttons
2 Using the CH+/- buttons
Press the CH+ button to select a channel number in number
direction.
Press the CH- button to select a channel number in number
direction.
increasing
decreasing
Press the VOL-/+ buttons on the remote or the front of the
TV set to adjust the volume level. The range is 0~99. When
the volume buttons are pressed the volume level is
displayed automatically on the TV screen.
If picture colo r is abnormalu
Use the CH+/- buttons to select Colour then the
VOL-/+ buttons to change between Auto,
. Press the EXIT button to save
the setting.
PAL, NTSC,
SECAM and NTSC443
If the colour or sound of a channel is abnormal
Usually this shouldbe set inthe
Auto position. Howeverif the
colours displayed onthe screen
are incorrect youcan manually
select the correctcolour system.
When finish rememberto turn it
back to autoagain so thatother
programs will stillwork correctly.
Toselect the colourchange
option press theTUNE button
on the remotecontrol.
TUNE
BAND VHFL
SKIP OFF
PROGRAM 0
SEARCH
FINE TUNE
AUTO SEARCH
COLOUR AUTO
SOUND DK
Directly enter thechannel number withthe numeric keypad
on the remotecontrol.
Toselect channel numbersfrom 10 ~99 press [-/--]button
and enter thetwo digit channelnumber
Toselect channel numbersfrom 100 ~218 press [-/--]button
twice and enterthe 3 digitchannel number
If the picture sound is abnormal
Use the CH+/- buttons to select Sound then press the
VOL-/+ buttons to select the sound system.
In general, BG will display in turn.
DK,

Watching TV continued
Swap function enables quick swap to the last watched program.
Auto scan function enables automatic successive scanning of all the programs in
memory with (each channel will last about 2 seconds)."OFF" skip status
Program swap and auto scan functions
Program swap
1 Suppose the channel number
you used just now is 8 and the
channel number you are using
is 18 (as shown in the figure).
2 If you want to return to the
last watched program channel
8, you can simply press the
SWAP button.
3 If you want to return to
channel 18, press the button
again. Through this function,
you can easily change
between the channel you are
using and the channel you
used last time.
Auto program scan
1 If you want to select a
desirable program, you may
scan all the TV programs in
memory. You can simply press
the SCAN button to do this. The
program numbers will appear
one after another from
beginning to end (each channel
number will last about 2
seconds).
2 If you want to stop the function
during auto scanning, simply
press the SCAN button again.
SWAP
SCAN
18
AUTO
DK
695.25MHz
8
AUTO
DK
199.25MHz
18
AUTO
DK
695.25MHz
1
AUTO
DK
62.25MHz
2
BROWSE
3
BROWSE
1
AUTO
DK
62.25MHz
Other manuals for 29F3A
2
This manual suits for next models
1
Table of contents
Other Haier TV manuals

Haier
Haier 29T9D User manual

Haier
Haier 19T51 User manual

Haier
Haier LE32F32200 User manual

Haier
Haier 29F3A User manual

Haier
Haier HL42E - 42" LCD TV User manual

Haier
Haier 21FV6H-A8 User manual

Haier
Haier 25FV6H User manual

Haier
Haier 34F9B-T Manual

Haier
Haier L26A9A User manual

Haier
Haier L32F1120 Assembly instructions

Haier
Haier HTN13G11F User manual

Haier
Haier HL19D2a User manual

Haier
Haier 29FV6 User manual

Haier
Haier HL32R1 - R-Series - 31.5" LCD TV User manual

Haier
Haier CV1311B User manual

Haier
Haier 21FA12 User manual

Haier
Haier LE55B1381a User manual

Haier
Haier 29FA10 User manual

Haier
Haier BH1304D User manual

Haier
Haier HL42R - 42" LCD TV User manual


