Haier D29FA9 User manual

Please READ this manual carefully
before operating the unit, and keep
it for future reference.
COLOR TV RECEIVER
OWNER'S MANUAL
The Owner`s Manual for the Follow Models:
D29FA9, D29FA9-A, D34FA9,
D34FA9-A
D29FA9-AK,
, D34FA9-AK

* For your enjoyment of this TV set, please read this manual carefully and
keep it good for future reference.
CONTENTS
Before Operation
Basic Operation
Technical operation
Warning and cautions............................................................................................2
Installation..........................................................................................................3
Antenna connection...........................................................................................3
Preparation for the remote control........................................................................3
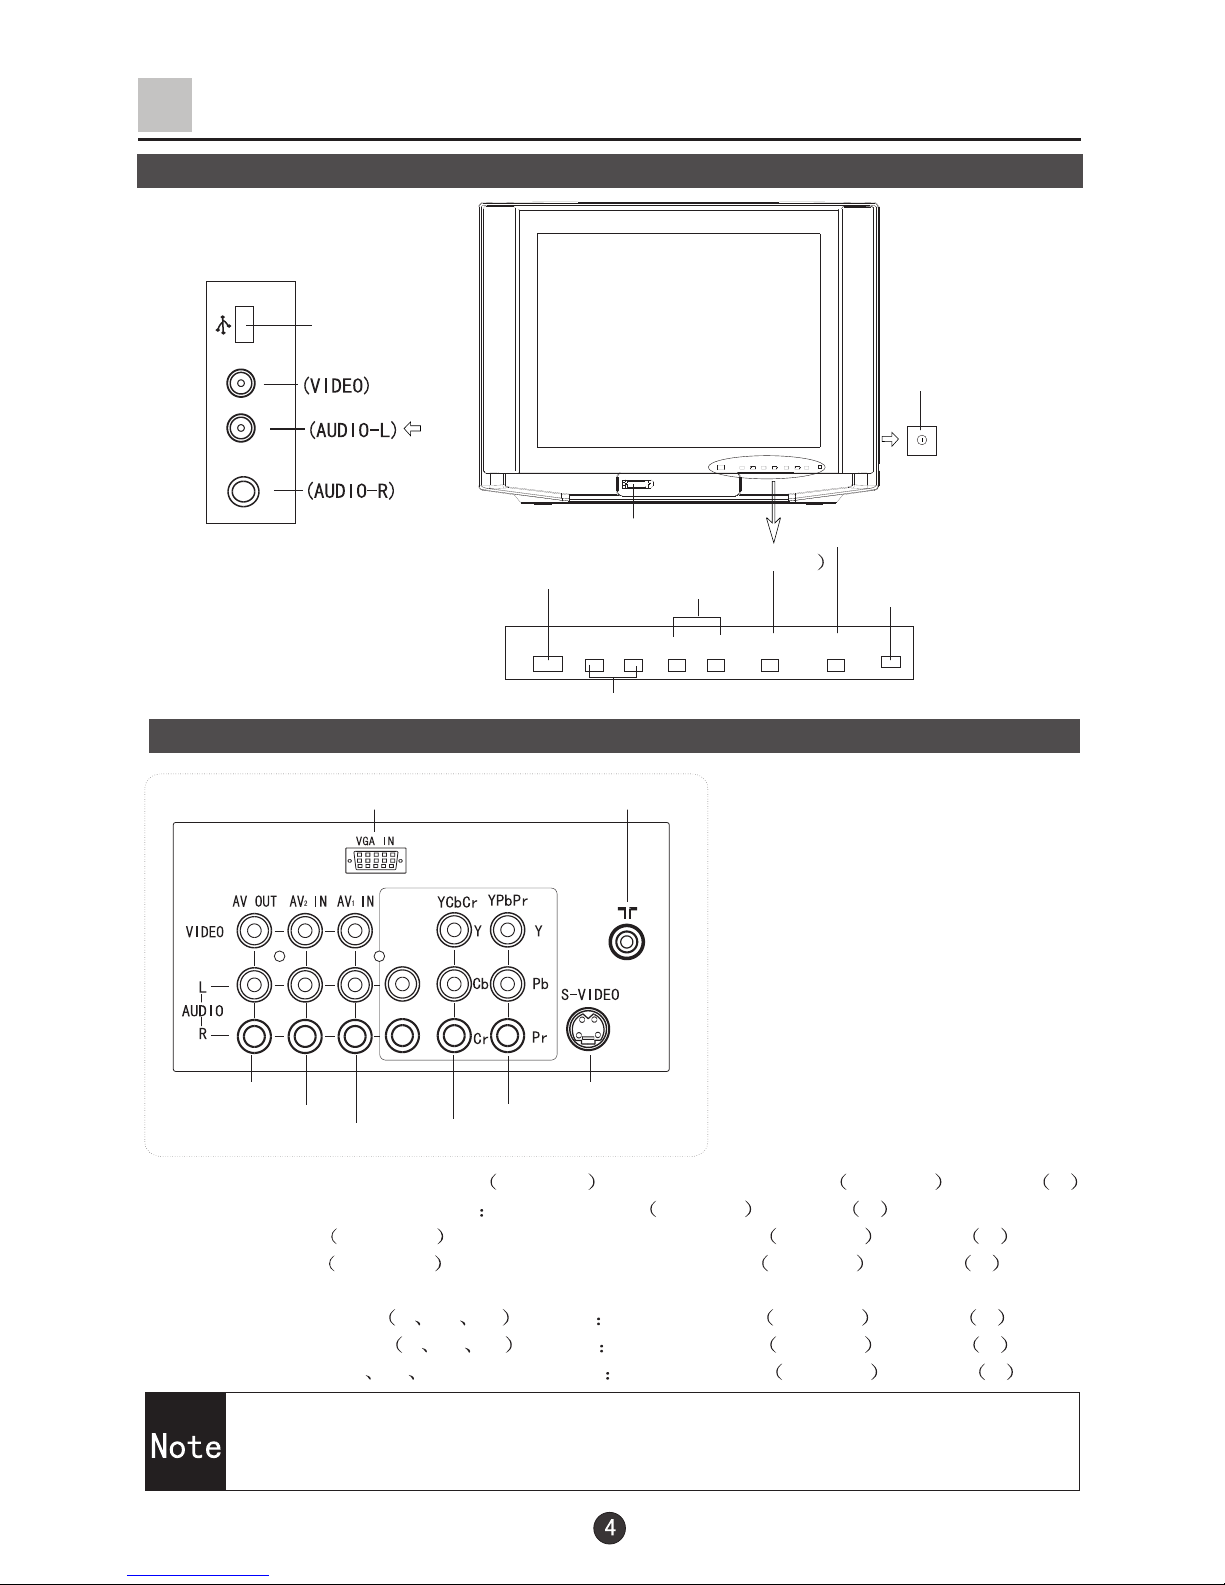
Position of Buttonand Plug-ins................................................................................4
Front and side panel ..........................................................................................4
Back panel.......................................................................................................4
Function button ofthe remote control........................................................................5
The screen displaymenu........................................................................................6
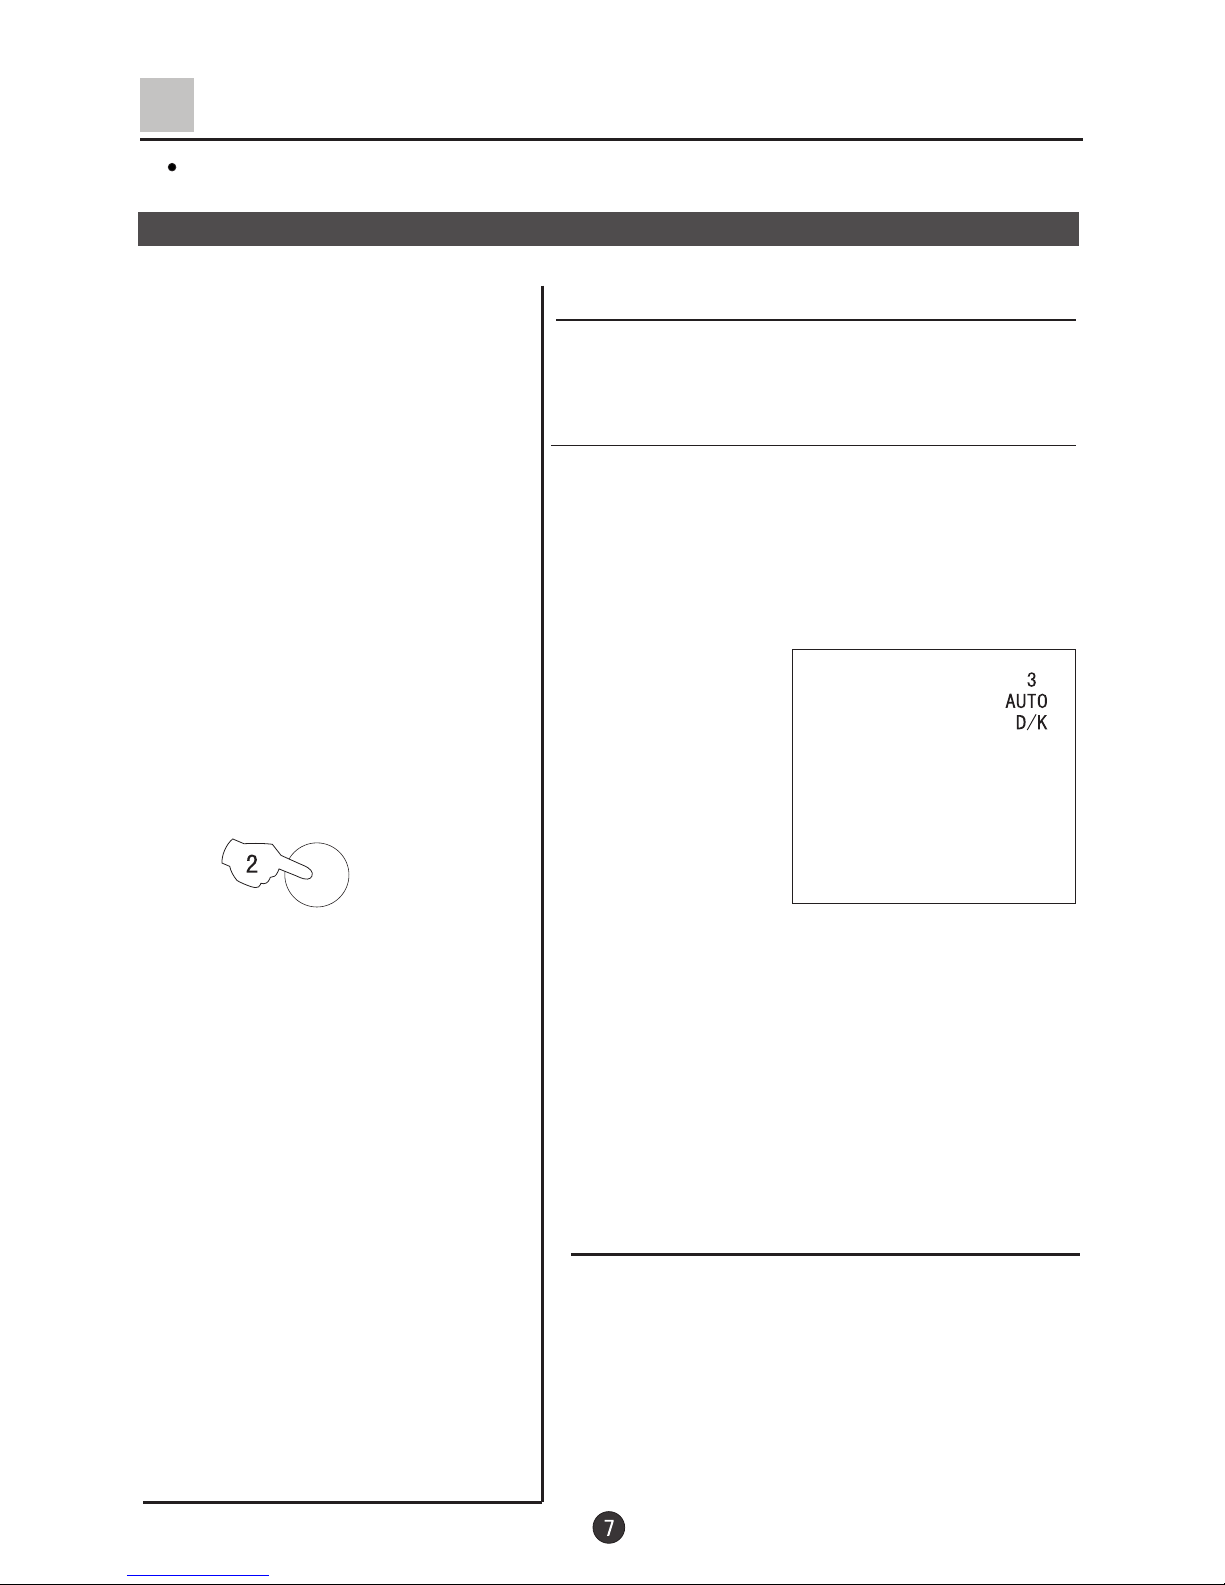
Switch on/off the TV set..........................................................................................7
Watching TVprograms...........................................................................................8
Watching TV program.........................................................................................8
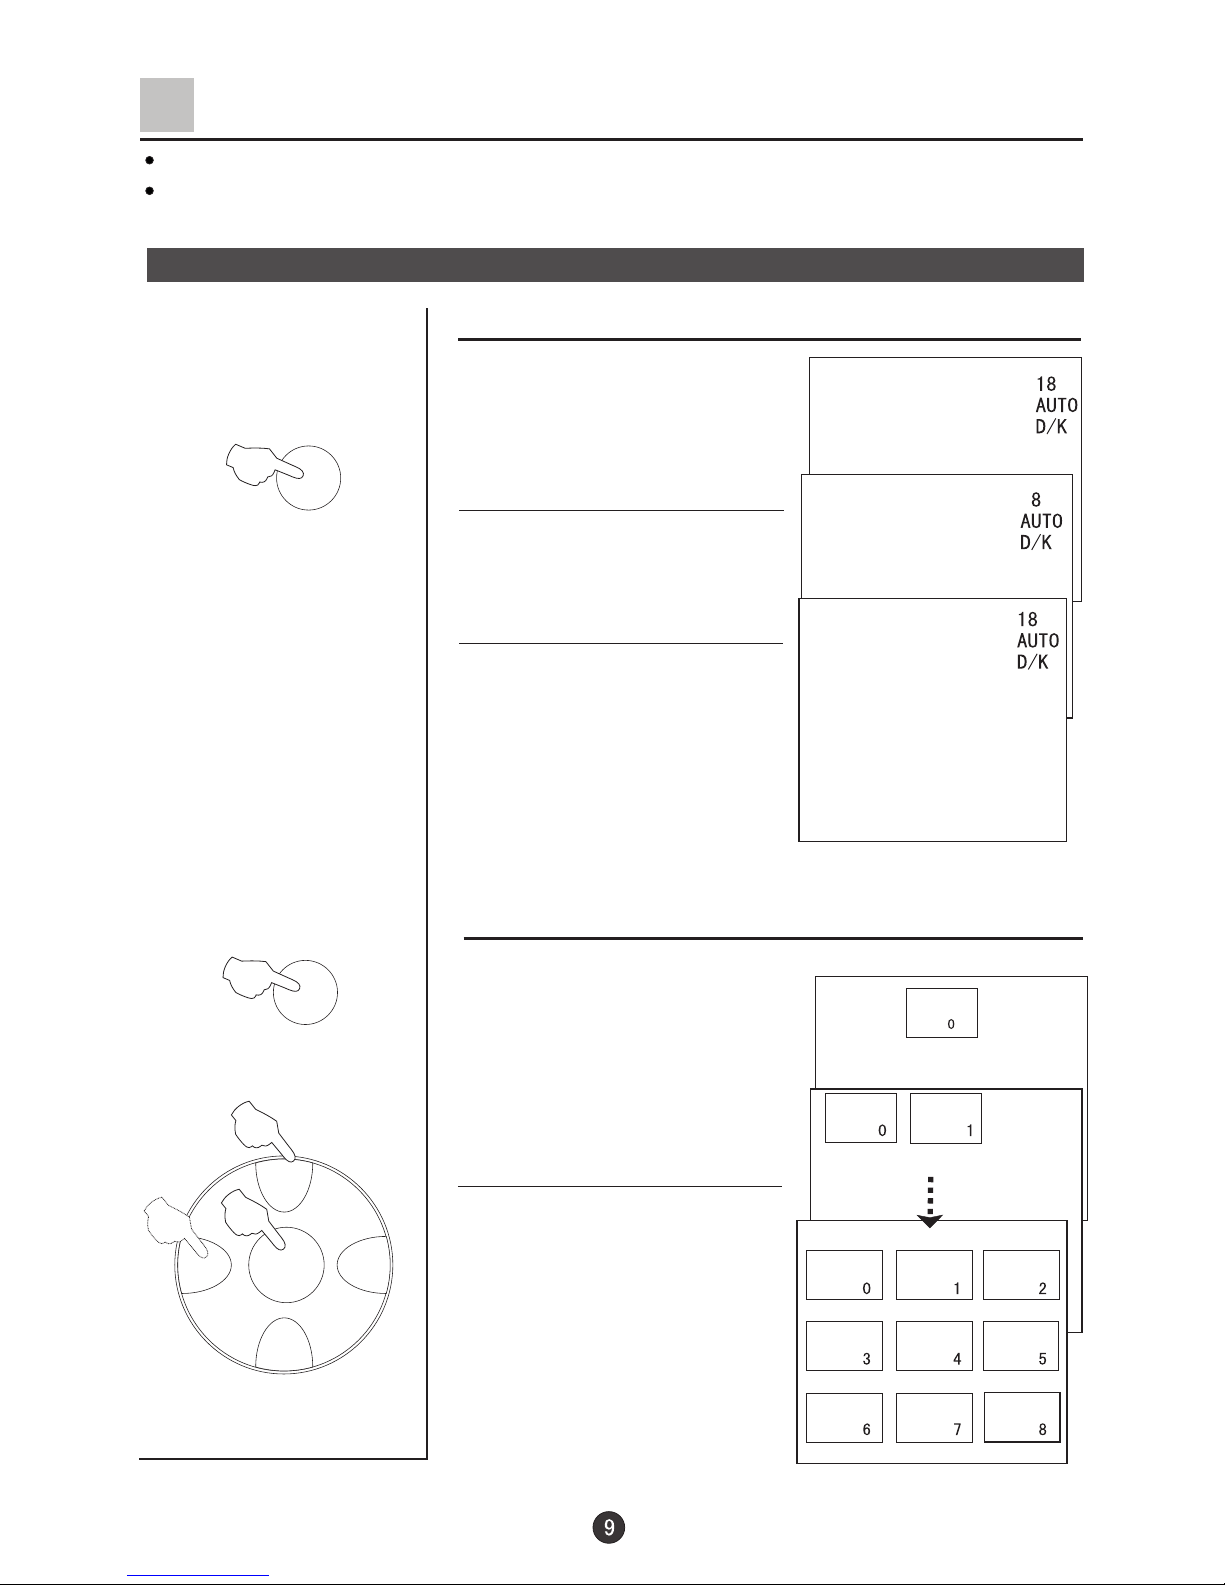
Program swap and auto scan functions..................................................................9
Tuning...............................................................................................................10
Auto search....................................................................................................10
Search...........................................................................................................11
Fine tune........................................................................................................12
Skip unnecessary channel.................................................................................13
Exchange programs.........................................................................................14
Picture controls.................................................................................................15
Select the picture modes and set the picture quality...........................................15
Sound controls..................................................................................................16
Select the sound modes and set the sound quality.............................................16
Surround and mute functions...........................................................................17
Time setup function...........................................................................................18
Clock and on/off time functions........................................................................18
Remind Prog. Function...................................................................................19
Set up function..................................................................................................20
Time skip and Screen saver functions..............................................................20
Color enlarge and blue/black stretch functions.................................................21
Comb filter function and DNR function..............................................................22
SVM function and digital bass function.............................................................23
HDM scan function.........................................................................................24
Others functions.................................................................................................25
Calendar,picture still and zoom functions.........................................................25
Shuttle and favorite functions..........................................................................26
VGA input adjustment.......................................................................................27
Multi-Media Player system.................................................................................28
Multi-Media Player Preparation........................................................................28
To operate themenu........................................................................................30
Multi-Media player...........................................................................................31
Copy file function............................................................................................35
Set up functions..............................................................................................36
External connections...........................................................................................37
Video/Audio output connection,VGAinput............................................................37
Video/Audio input connection............................................................................38
Others
Trouble shooting.................................................................................................39
Specifications....................................................................................................40

Warning and Cautions
1. When you clean the TV set, please
pull out the power plug from AC outlet.
Don't clean the cabinet and the
screen with benzene, petrol and other
chemicals.
4. Do not place the TV set near rain or
moisture as it may cause an electric
shock, or the TV set to catch fire. The
TV set must only
be used in dry in
door locations.
2. In order to prolong the using life of
the TV set, please place it in a well
ventilated location.
5. The back cover must only be
removed by a registered electrical
service person. Removing the back
cover may result in electric shock, fire
or damage to
the TV set.
3. Don't place the
TV set in direct
sunlight or near a
heat source.
6. If the TV set is not going to be used
for a long time, or there is a severe
thunder & Lighting storm, it is
recommended that the TV set be
disconnected from the AC power outlet
and the aerial plug removed.
Explanation on the display tube
Should the picture tube require cleaning, disconnect the power and use a dry
soft cotton cloth. Do not use any cleanser or abrasive cloths.

Installation
Antenna connection
General speaking, to enjoy a clearer picture, we recommend that you use a CATV
system or an outdoor antenna .In different places, the suitable antenna type and position
are different.
300 twin-lead cable
Antenna adapter
(additional purchase)
75 coaxial cable
Plug
(additional purchase)
Mixer
additional
purchase
Antenna input
75 standard
coaxial type
AC power socket
Note
It is recommended that you'd better use 75
Don't bind antenna cable and electric wire together.
coaxial cable to remove the
disturbance caused by airwave.
Preparation for the remote control
* the plug type may vary
depending on the model.
Battery installation
Take off the battery compartment cover. Place two AAbatteries, make sure that battery
polarity matches with the +/- mark inside the battery compartment.
Operation notes for the remote control unit
Under normal conditions, the life time of batteries is one year.
If you don't intend to use the unit for a long period or the electricity of the batteries is
used up, remove the batteries to prevent batteries acid from leaking into the battery
compartment.
Avoid dropping the remote control and/or getting it wet.
Never place batteries in a fire.

Position of Buttons and Plug-ins
Front and Side panel
Back panel
+-CH +-VOL TV/AV MENU
VIDEO
AUDIO
R
L
USB
Side AV terminal
Power switch
USB Terminal
Cards Jack
Infrared receiver
Channel position up/down
Volume up/ down
TV/Video (input selector
MENU
Power indicator
Note:
The cabinet and buttons of TV is
only for reference.
VGA input terminal Antenna input
S-video input terminal: Special video S-VIDEO AUDIO: L/MONO Track L/MONO ,R Track R
AV output terminals: VIDEO AUDIO L/MONO Track L/MONO ,R Track R
AV2 input terminals MONITOR : VIDEO AUDIO :L/MONO Track L/MONO ,R Track R
Av1 input terminals MONITOR :VIDEO AUDIO :L/MONO Track L/MONO ,R Track R
DVD component terminals:
Interleaved signal Y CbCr AUDIO L/MONO Track L/MONO ,R Track R
Progressive signal YPbPr AUDIO L/MONO Track L/MONO ,R Track R
HDTV input terminals: YPbPr terminal AUDIO L/MONO Track L/MONO ,R Track R
AV output terminals
AV2 input terminals
AV1 input terminals DVD component terminals
HDTV input terminals
S-video input terminal
1.When the AV2 terminal, the side AV terminal can not be
connected at the same time
USB terminal or
.
2.When the side AV is connected, please select the AV 1 terminal.

Mute button
I/II select button
Picture still button
Screen call button
HDM select button
Program scan button
Direct
Digital
Program swap button
Picture mode selection button
Sound mode selection button
Program
Menu call/select button
Select menu, call and exit
Picture menu call
Sound menu call
Favorite program button
Shuttle button
Function menu call
QSET No available
Zoom select button
Time skip button
Time menu call button
Calendar
No available
3A demonstrating button
To eliminate the sound of the programs
DC standby and power button
TV and AV exchange button
A changeover between TV and other
input signals like AV
select button
Select a TV channel directly
selection button
Changeover from one digital, two
digital and three digital
Volume adjustment button
adjustment button
ZOOM
CAL./EXIT
MUTE TV/AV POWER
HDM SCAN CALL/HELP
P.STD S.STD
CH+
CH-
VOL- VOL+
MENU
PICTURE
FUNCTION QSET
SHUTTLE
FAVORITE
SOUND
STILL
SWAP
T.SKIP
TIME H.LOCK D.ALBUM
Function Buttons of the Remote Control
Function buttons of the remote control

The Screen Display Menu
For your convenienceof operation, herelists the screendisplay menus ofthis model
as your reference.
Picture menu Sound menu
Function menu Time menu
Tuning menu
Note:
When the TV set is powered on, there might be different from what have been
illustrated above. Pleasedo some adjustmentas follows to meet your needs.
1. Press the MENU buttonto select the menu in themain menu: PICTURE,
SOUND, FUNCTION, TIME and TUNING . Off course, you may select these menus
directly by pressing the PICTURE, SOUND, TIME and FUNCTION buttons on the
remote control.
2. If it is in sub-menu, press the VOL-/+ buttons to enter the sub-menu.
3.Then press theCH+/- to selectthe desired item, press the VOL-/+buttons to
adjust the numerical value. After that, press the MENU button twice to return the
main menu.
4. If you want exitthe menu, pressthe MENU button repetitiously.
PICT
SND
FUNC
TIME
CHNL
BRIGHTNESS 50
CONTRAST 50
COLOR 50
SHARPNESS 50
TEMP NORM
VOLUME 20
TREBLE 50
BASS 50
BALANCE 50
SURROUND On
SPECIAL FUNC.
DIG ENHEN
HDM SCAN
CLOCK 12:27
OFF TIME --:--
ON TIME --:--
ON CHANNEL ---
APP.TIME --:--
CHANNEL 10
COLOR AUTO
SND SYS D/K
SKIP Off
POS.EX
PICT
SND
FUNC
TIME
CHNL
PICT
SND
FUNC
TIME
CHNL
PICT
SND
FUNC
TIME
CHNL
PICT
SND
FUNC
TIME
CHNL

Switch on/ off the TV set
In the following, the methods of using power switch and remote control to switch on/off
power supply for the TV set will be explained.
POWER
Switch on/ off the TV set
1.Connect the power supply wire. Then press the power
switch button, the power indicator will light, in several
seconds the picture will display on the screen.
2. If the TV is in the state of standby, press the POWER
button or the CH+/- buttons on the remote control.
Note:
1. Press the P+/- buttons which is on the TV set to get
out of the standby state when the remote control is not
in use.
2. Press the POWER button onthe remote control
to the standbymode.
3. Press the power button onthe TV set to
completely power off the TV.
4. To eliminate the magnetization completely, the
TV set degaussesautomatically. There is the
sound ofPENG, itis natural.
Automatic stand by function
When the SCREEN SAVER is ON, If no signal has
been received, and after five minutes, it will stand by
automatically.

CH+
CH-
VOL- VOL+
MENU
CH+
CH-
VOL- VOL+
MENU
CH+
CH-
VOL- VOL+
MENU
Watching TV Programs
Watching TV programs
How to select the TV program
Select the desired program
1. Use thedirect number selection button
2. Use the CH+/- buttons
Press the CH+ button to select the channel of the larger number.
Press the CH- button to select the channel of the smaller number.
Press the button from 0-9 to select a one-figure channel.
If you want to select a double figures channel, press the
figure-selection button and change it into two-figure mode, then
press the number of the channel.
If you want to select a three figures channel, press the figure-selection
button and change it into three-figure mode, then press the number
of the channel.
TIP: When the channel is stored, then the program number
is green. When the channel is empty, then the program
number is red.
Select the desired sound
Press the VOL+/- buttons to adjust the volume to your need.
If the colour or sound of a certain channel is
abnormal
If the TV set youbought is
abnormal in colouror sound in a
certain channel, itmight be
because the colouror sound
system has beenset improperly.
You may follow the instruction
below to adjustit. Press the
MENU button, andthen press
the CH+/- buttonsto select the
TUNE MENU, youcan see the
form.Press the VOL+button to
entersub-menu.
If the colourof the picture is abnormal
Press the CH+/- buttons to move the indicator to "COLOR", and
press the VOL+/- buttons to select the proper colour.
If the soundis abnormal
Press the CH+/- buttons to move
the indicator to "SOND SYS", and
press the VOL+/- buttons to select
the proper sound. (If the TV set you
bought had multi-system, then
will appear alternately.)
D/K,
B/G, M and I
CHANNEL 10
COLOR AUTO
SND SYS D/K
SKIP Off
POS.EX
PICT
SND
FUNC
TIME
CHNL
CHANNEL 10
COLOR AUTO
SND SYS D/K
SKIP Off
POS.EX
PICT
SND
FUNC
TIME
CHNL

CH+
CH-
VOL- VOL+
MENU
SCAN
SWAP
1. Press the SCAN button to
scan through all the memorized
TV channels. The TV set screen
displays 9 pictures at the same
time.
2.When it is the program that
you desired, and press the
MENU button to confirm.
Watching TV Programs (continued)
Swap function enables quick swap to the last watched program.
Auto scan function enables automatic successive scanning of the programs in memory
with (There are 9 pictures display on the screen at the same time)."OFF" skip status
Program swap and auto scan functions
Program swap
1.
Suppose the channel number
you used just now is 8 and the
channel number you are using
is 18 (as shown in the figure).
2. If you want to return to the
last watched program channel
8, you can simply press the
SWAP button.
3. If you want to return to
channel 18, press the button
again. Through this function,
you can easily change
between the channel you are
using and the channel you
used last time.
Auto program scan

CH+
CH-
VOL- VOL+
MENU
The TV set has three methods to set the channels, which are Auto search, Search and Fine tune.
In this section, how to use the remote control to set the channel is explained. You can also use the buttons
on the TV set to set channel.
Auto search
Tuning
Auto Search
1. Press the MENU button, and then
press the CH+/- buttons to select the
tuning menu. Press the VOL+ button
to enter the tuning menu.
2. Press the CH+/- buttons to move
the indicator to " AUTO".
3. Press the VOL+ button, and
"AUTO" Search mode will work.
The TV set will search
automatically all available programs,
after search is finished, all available
programs will be stored in turn.
MANUAL
AUTO
FINE 144.25M
If you wantto stop the search,
just press theMENU button.
The order ofthe automatic search is due to the frequency of
the program, generallyspeaking, it is used only the first time
you search theprogram, and after the order of the program
has been made,you don't have to use this function,
otherwise the orderof the program will be mixed.
After searching (Continued)
Press the CH+/- buttons to check channels.
If the colour or sound is abnormal in a certain channel, it may be
because that the colour or sound system has not been set
properly, then, you may adjust it to proper system (Refer to
page 8).
CHANNEL 10
COLOR AUTO
SND SYS D/K
SKIP Off
POS.EX
PICT
SND
FUNC
TIME
CHNL
PICT
SND
FUNC
TIME
CHNL

CH+
CH-
VOL- VOL+
MENU
CALL/HELP
Tuning (Continued)
Search
1. Press the CH+/- buttons or Direct
select button to select the desired
channel number.
Search
2. Press the MENU button, and then
press the CH+/- buttons to select the
tuning menu. Press the VOL+ button
to enter the tuning menu.
. Press the CH+/- buttons to
move the indicator to "MANUAL".
4. Press the VOL+ or VOL- buttons,
the TV set will begin to search up or
down, when the TV set has searched
a program, the TV set will stop
searching. If the program is not the
one you need, you can press the
button again, let the TV set continue
to search until it has searched the TV
signal you need.
Note:
Usually, five seconds after the channel has been changed, the
channel number will disappear automatically. If you want to know
which channel you are watching, just press the CALL/HELP button
once.
MANUAL
AUTO
FINE 144.25M
PICT
SND
FUNC
TIME
CHNL
MANUAL
AUTO
FINE 144.25M
PICT
SND
FUNC
TIME
CHNL

CH+
CH-
VOL- VOL+
MENU
CH+
CH-
VOL- VOL+
MENU
1. Press the CH+/- buttons or Direct
select button to select the desired
channel number.
2. Press the MENU button, and then
press the CH+/- buttons to select the
tuning menu. Press the VOL+ button
to enter the tuning menu.
. Press the CH+/- buttons to
move the indicator to "Fine".
Tuning (Continued)
Fine Tune
Fine Tune
If the pictureand/or sound are poor, try using the FINE
TUNE feature. Do not use this feature unless reception
is poor.
4. Press the VOL+ button to enter
the Fine Tune Menu, and then
until it has searched the
TV signal you need.
the
VOL- button to search downwards
or the VOL+ button to search
upwards
MANUAL
AUTO
FINE 144.25M
PICT
SND
FUNC
TIME
CHNL
MANUAL
AUTO
FINE 144.25M
PICT
SND
FUNC
TIME
CHNL

CH+
CH-
VOL- VOL+
MENU
CH+
CH-
VOL- VOL+
MENU
The Program skip feature enables you to skip/hide
programs that you do not wish to be displayed when
using the CH+/- buttons. These channels will still be
displayed by directly using the channel number
buttons on the remote control.
1. Press the CH+/- buttons or Direct
select button to select the desired
channel number. ( For example, the
channel 1.)
If you want to recover the skipped channel
1. Use the Channel Selection buttons to select the number of the
channel to be recovered.
2. Repeat those steps just now.
3. Press the VOL+/- buttons to turn the SKIP function OFF.
Tuning (Continued)
Skip unnecessary channel
2. Press the MENU button, and then
press the CH+/- buttons to select the
tuning menu. Press the VOL+ button
to enter the tuning menu.
. Press the CH+/- buttons to
move the indicator to "SKIP ".
. Press the VOL-/+ buttons to
turn the Skip function to "On ".
. Press the MENU button
repeatedly to exit the menu.
CHANNEL 10
COLOR AUTO
SND SYS D/K
SKIP Off
POS.EX
PICT
SND
FUNC
TIME
CHNL
CHANNEL 10
COLOR AUTO
SND SYS D/K
SKIP On
POS.EX
PICT
SND
FUNC
TIME
CHNL

CH+
CH-
VOL- VOL+
MENU
CH+
CH-
VOL- VOL+
MENU
Tuning (Continued)
Exchange Programs
Exchange Programs
This feature enables TV programmes that may be on a wrong
program number to be moved to another number.
This feature is very useful when Automatic Search Tuning has been
used because programmes are stored in the order they are found,
which is usually not the desired order.
When organising, it is best to start from the lowest programme
number first.
1. Press the MENU button, and then
press the CH+/- buttons to select the
tuning menu. Press the VOL+ button
to enter the tuning menu.
. Press the CH+/- buttons to
move the indicator to "POS.EX".
. Press the VOL-/+ buttons to
enter the sub-menu.
CHANNEL 1 6
CHANNEL 2 9
EXCHANGE
4. Press the VOL-/+ buttons to set
the CHANNEL 1 to 6, then the TV
set will turn to the channel 6.
5. Press the CH+/- buttons to move the indicator to " CHANNEL 2 ".
Press the VOL-/+ buttons to set the CHANNEL 2 to 9.
. Press the CH+/- buttons to move the indicator to " EXCHANGE ".
7. Press the VOL-/+ buttons to confirm.
CHANNEL 10
COLOR AUTO
SND SYS D/K
SKIP Off
POS.EX
PICT
SND
FUNC
TIME
CHNL
PICT
SND
FUNC
TIME
CHNL

CH+
CH-
VOL- VOL+
MENU
STANDARD
PERSONAL
BRIGHT
COLOR CLEAR
LISTEN
SOFT
Medium color and brightness
Set by yourself
Bright color
No pictures)
Low color and brightness
No Color Picture
(
P.STD
PICTURE
You can quickly select the desired picture mode from five
preset modes and one customized mode.
Picture Controls
Select the picture modes and set the picture quality
How to select the picture modes
Press the P.STD button to select the desired picture quality.
Six kinds of picture modes can be selected in turn.
MODE PICTURE QUALITY
Set the picture quality
1. Press the PICTURE button, the
Picture menu will appear on the
screen.
. Press the CH+/- buttons to
move the indicator to the desired
option (For example, Contrast), then
press VOL-/+ buttons to set the
desired quality. Press the PICTURE
button to exit the Picture menu.
BRIGHTNESS
CONTRAST
COLOR
SHARPNESS
TEMP
Press VOL- button
Option Press VOL+ button
Dark
Weak
Light
Soft
Warm
Bright
Strong
Thick
Sharp
Cold
Tip: HUE option is available only in N color system.
PICT
SND
FUNC
TIME
CHNL
BRIGHTNESS 50
CONTRAST 50
COLOR 50
SHARPNESS 50
TEMP NORM

CH+
CH-
VOL- VOL+
MENU
STANDARD
PERSONAL
NEWS
THEATER
MUSIC
Standard Sound
You can set it by yourself
Speech
Suitable for rich and full music
Musical
S.STD
SOUND
Sound Controls
Select the sound modes and set the sound quality
How to select the sound modes
You can quickly select the desired sound mode from four
preset modes and one customized mode.
Press the S.STD button to select the desired picture quality.
Five kinds of sound modes can be selected in turn.
Mode
Sound quality
Set the sound quality
1. Press the SOUND button, the
Sound menu will appear on the
screen.
. Press the CH+/- buttons to
move the indicator to the desired
option (For example, Bass), then
press VOL-/+ buttons to set the
desired quality. Press the SOUND
button to exit the Sound menu.
VOLUME
TREBLE
BALANCE
BASS
Option Press VOL- button Press VOL+ button
Weak
R track down
Weak
Weak
Strong
L track down
Strong
Strong
VOLUME 20
TREBLE 50
BASS 50
BALANCE 50
SURROUND On
PICT
SND
FUNC
TIME
CHNL

CH+
CH-
VOL- VOL+
MENU
Mute
SOUND
MUTE
CALL/HELP
Sound Controls (Continued)
Surround and Mute functions
Surround Function
Surround effect chip has beenemployed to forma vivid and real space surroundsound
effect.
How to use the Mute function
When you want to listen to the sound nearby, or when you are
answering the telephone, or talking with your friends, you may use
the mute function.
2. Press thevolume button or
press the MUTEbutton again,
and the soundwill be recovered.
1. Press the SOUND button, the
Sound menu will appear on the
screen.
. Press the CH+/- buttons to move
the indicator to " Surround ".
. Press the VOL-/+ buttons to turn
the " Surround " function ON.
1. Press the MUTE button once, the
sound will be eliminated.
On Screen Display
Press the CALL/HELP button
once, the channel number,
color system and sound system
will display on the screen.
VOLUME 20
TREBLE 50
BASS 50
BALANCE 50
SURROUND On
PICT
SND
FUNC
TIME
CHNL

CH+
CH-
VOL- VOL+
MENU
CH+
CH-
VOL- VOL+
MENU
TIME
TIME
This model hastime set functionsuch as On/Off Time, Sleep and RemindTime, etc.
. Press the CH+/- buttons to move
the indicator to "CLOCK", then press
the Digit buttons to input the value.
The white numbercan be adjusted.
Press the VOL+/-buttons to select
the desired number.
Time Set Up Function
Clock and On/Off Time functions
Note:
This function willonly be
available when theTV set
is in themode of standby.
Set clock
When this functionis used, please first check whether the
clock is inaccordance with your local time; if not, you can
follow the instructionsto adjust it.
1. Press the TIME button, the Time
menu will appear on the screen.
3. After setting up, press the MENU button to confirm.
On/Off Time function
The TV set can be powered on/off at a presettime and itcan
start with aprogram you havepreset.
Here take OnTime functionfor example. The Off Time function
is same withit.
1. Press the TIME button, the Time
menu will appear on the screen.
. Press the CH+/- buttons to move
the indicator to "ON TIME", then
press the DIGIT buttons to input
number (For example, 18:00).
. Press the CH+/- buttons to move
the indicator to " ON CHANNEL ",
then press the VOL-/+ buttons to
adjust (For example, 8).
4. Repeat step 1-2 to turn OFF
TIME.(take 23:00 as an example)
Press the -/-- button to select the
digital of the On Prog.
Press the Digit button input the
desired number.
CLOCK 12:27
OFF TIME --:--
ON TIME --:--
ON CHANNEL ---
APP.TIME --:--
PICT
SND
FUNC
TIME
CHNL
CLOCK 18:00
OFF TIME --:--
ON TIME 18:00
ON CHANNEL 10
APP.TIME --:--
PICT
SND
FUNC
TIME
CHNL
CLOCK 18:00
OFF TIME 23:00
ON TIME 18:00
ON CHANNEL 10
APP.TIME --:--
PICT
SND
FUNC
TIME
CHNL

CH+
CH-
VOL- VOL+
MENU
TIME
Time Set Up Function(continued)
Remind Prog. Function
With Remind Prog. function, the TV set can automatically
change a preset program in a preset time .
1. Press the TIME button, the
Time menu will appear on the
screen.
. Press the CH+/- buttons to move
the indicator to " APP. TIME ",
then press the VOL-/+ buttons to
adjust (For example, 19:00).
The white numbercan be adjusted.
Press the VOL+/-buttons to select
the desired number.
. Press the CH+/- buttons to move
the indicator to " APP. POS ",
then press the VOL-/+ buttons to
adjust (For example, 18).
Press the -/-- button to select the
digital of the On Prog.
Press the Digit button input the
desired number.
TIP:
The mix. Unit of CLOCK is minute.
CLOCK 18:00
OFF TIME 23:00
ON TIME 18:00
ON CHANNEL 10
APP.TIME --:--
PICT
SND
FUNC
TIME
CHNL
CLOCK 18:00
OFF TIME 23:00
ON TIME 18:00
ON CHANNEL 10
APP.TIME 19:00
PICT
SND
FUNC
TIME
CHNL
PICT
SND
FUNC
TIME
CHNL
APP. POS 1
Other manuals for D29FA9
1
This manual suits for next models
5
Table of contents
Other Haier TV manuals

Haier
Haier HTN13R12 User manual

Haier
Haier DX-RCRT20-09 User manual

Haier
Haier HT-2599 User manual

Haier
Haier 21T9G User manual

Haier
Haier HP-2999 User manual

Haier
Haier LET24T3CW User manual

Haier
Haier L22T3 User manual

Haier
Haier L26V6-A8 User manual

Haier
Haier LT26M1C User manual

Haier
Haier 21F9G User manual