Haier HL26B-A User manual

Please READ this manual carefully before
operating your TV, and retain it for future
reference.
TFT-LCD TV
OWNER S MANUAL'
MODEL :
S
HL26S
HL32S
HL26B
HL32B
HL26BG
HL32BG
A
A
A
A
A
A

2 TV LCD-TFT
THIS SYMBOL INDICATES THAT HIGH VOLTAGE IS PRESENT
INSIDE. IT IS DANGEROUS TO MAKE ANY KIND OF CONTACT
WITH ANY INSIDE PART OF THIS PRODUCT.
WARNING : To reduce the risk of electric shock do not remove cover or back.
No user-serviceable parts inside refer service to qualified service personnel.
This equipment has been tested and found to comply with the limits for a Class B digital device, pursuant to Part 15 of the
FCC Rule. These limits are designed to provide reasonable protection against harmful interference in a residential
installation. This equipment generates, use and can radiate radio frequency energy and, if not installed and used in
accordance with the instructions, may cause harmful interference to radio communications.
. If this equipment does cause harmful interference
to radio or television reception, which can be determined by turning the equipment off and on, the user is encourage to
try to correct the interference by one or more of the following measures:
*Reorient or relocate the receiving antenna.
*Increase the separation between the equipment and receiver.
*Connect the equipment into an outlet on a circuit different from that to which the receiver is connected.
*Consult the dealer or an experienced radio/TV technician for help.
This device compiles with Part 15 of the FCC Rules. Operation is subject to the following two conditions:
(1) This device may be not cause harmful interference.
(2) this device must accept any interference received, including interference that may cause undesired
operation.
FCC CAUTION:
To assure continued compliance and possible undesirable interference, the provided ferrite cores must be
used when connecting this display to video equipment; and maintain at least 40cm spacing to other
peripheral device.
CANADIAN NOTICE:
This Class B digital apparatus compiles with Canadian ICES-003.
However there is no
guarantee that interference will not occur in particular installation
LCD
RISK ELECTRIC SHOCK
DO NOT OPEN
WARNING
Operator Safety has been taken into consideration at the design and manufacture phase, but inappropriate operation may
cause electric shock or fire. To prevent the product from being damaged, the following rules should be observed for the
installation, use and maintenanceof th product. Read the following safety instruction before starting the operation.
The User Manual uses thefollowing symbols toensure a safeoperation and prevent any damage tooperators
or properties:
THIS SYMBOL INDICATES THAT THERE ARE IMPORTANT
OPERATING AND MAINTENANCE INSTRUCTIONS IN THE
LITERATURE ACCOMPANYING THE APPLIANCE.
FCC STATEMENT
Warning

Owner s Manual 3
IMPORTANT SAFETY INSTRUCTIONS
Read all of the instructions before using this appliance. When using this
appliance, always exercise basic safety precautions, including the following:
1) Read theseinstructions.
2) Keep theseinstructions.
3) Heed allwarnings.
4) Follow allinstructions.
5) Do not use this apparatus near water.
6) Clean only with dry cloth.
7) Do notblock any ventilation openings. Install in accordance with the manufacturer`s instructions.
8) Do not install near any heat sources such as radiators, heat registers, stoves, or other apparatus
(including amplifiers) thatproduce heat.
9) Do not defeat the safety purpose of the polarized or grounding-type plug. A polarized plug has two blades
with one wider than the other. A grounding type plug has two blades and a third grounding prong. The wide
blade or thethird prong are provided for yoursafety. If the provided plug doesnot fit into your outlet, consult
an electrician forreplacement of the obsolete outlet.
10) Protect the power cordfrom being walked on or pinchedparticularly at plugs, convenience receptacles,
and the pointwhere they exit from the apparatus.
11) Only use attachments/accessories specified bythe manufacturer.
12) Use onlywith the cart, stand, tripod, bracket, or table specified bythe manufacturer,
or sold withthe apparatus. When a cart isused, use caution when moving thecart/
apparatus combination to avoid injury from tip-over.
13) Unplug this apparatus during lightning storms or when unused for long periods of
time.
14) Refer all servicing to qualified service personnel. Servicing is required when the
apparatus has been damaged in any way, such as power-supply cord or plug is
damaged, liquid has been spilled or objects have fallen into the apparatus, the
apparatus has been exposed to rain or moisture, does not operate normally, or has been dropped.
15) WARNING-To Reduce The Risk OfFire Or Electric Shock, Do Not Expose This Apparatus To Rain OrMoisture.
Apparatus shallnot be exposed to dripping orsplashing and no objects filled withliquids, such as vases,
shall be placedon the apparatus.
The apparatus shallnot be exposed to dripping orsplashing and that no objects filled
with liquids, suchas vases, shall be placed onthe apparatus.
The mains plugis used as the disconnect device,remain it readily operable during the
apparatus normal use.
S3126A
PORTABLE CART WARNING
(symbol provided by RETAC)
Safety Instructions

SAVE THESE INSTRUCTIONS
Thank you forpurchasing the Haier product. This easy-to-use manual will guide you ingetting the best use of your
product. Remember torecord the model and serial number. They are on label in back of the unit.
Model number
serial number
Date of purchase
Staple your receipt to your manual. You will need it to obtain warrantyservice.
4 TV LCD-TFT
Safety Instructions

Introduction
Owner s Manual 5
War ning . . . . . . . . .... .... .. .. . . . . . . . . . . . . . . . . . . . . . .
Safe ty Ins truc ti on s . . . . . . . . . . . . . . . . . . . . . . . . . . .
Introduction
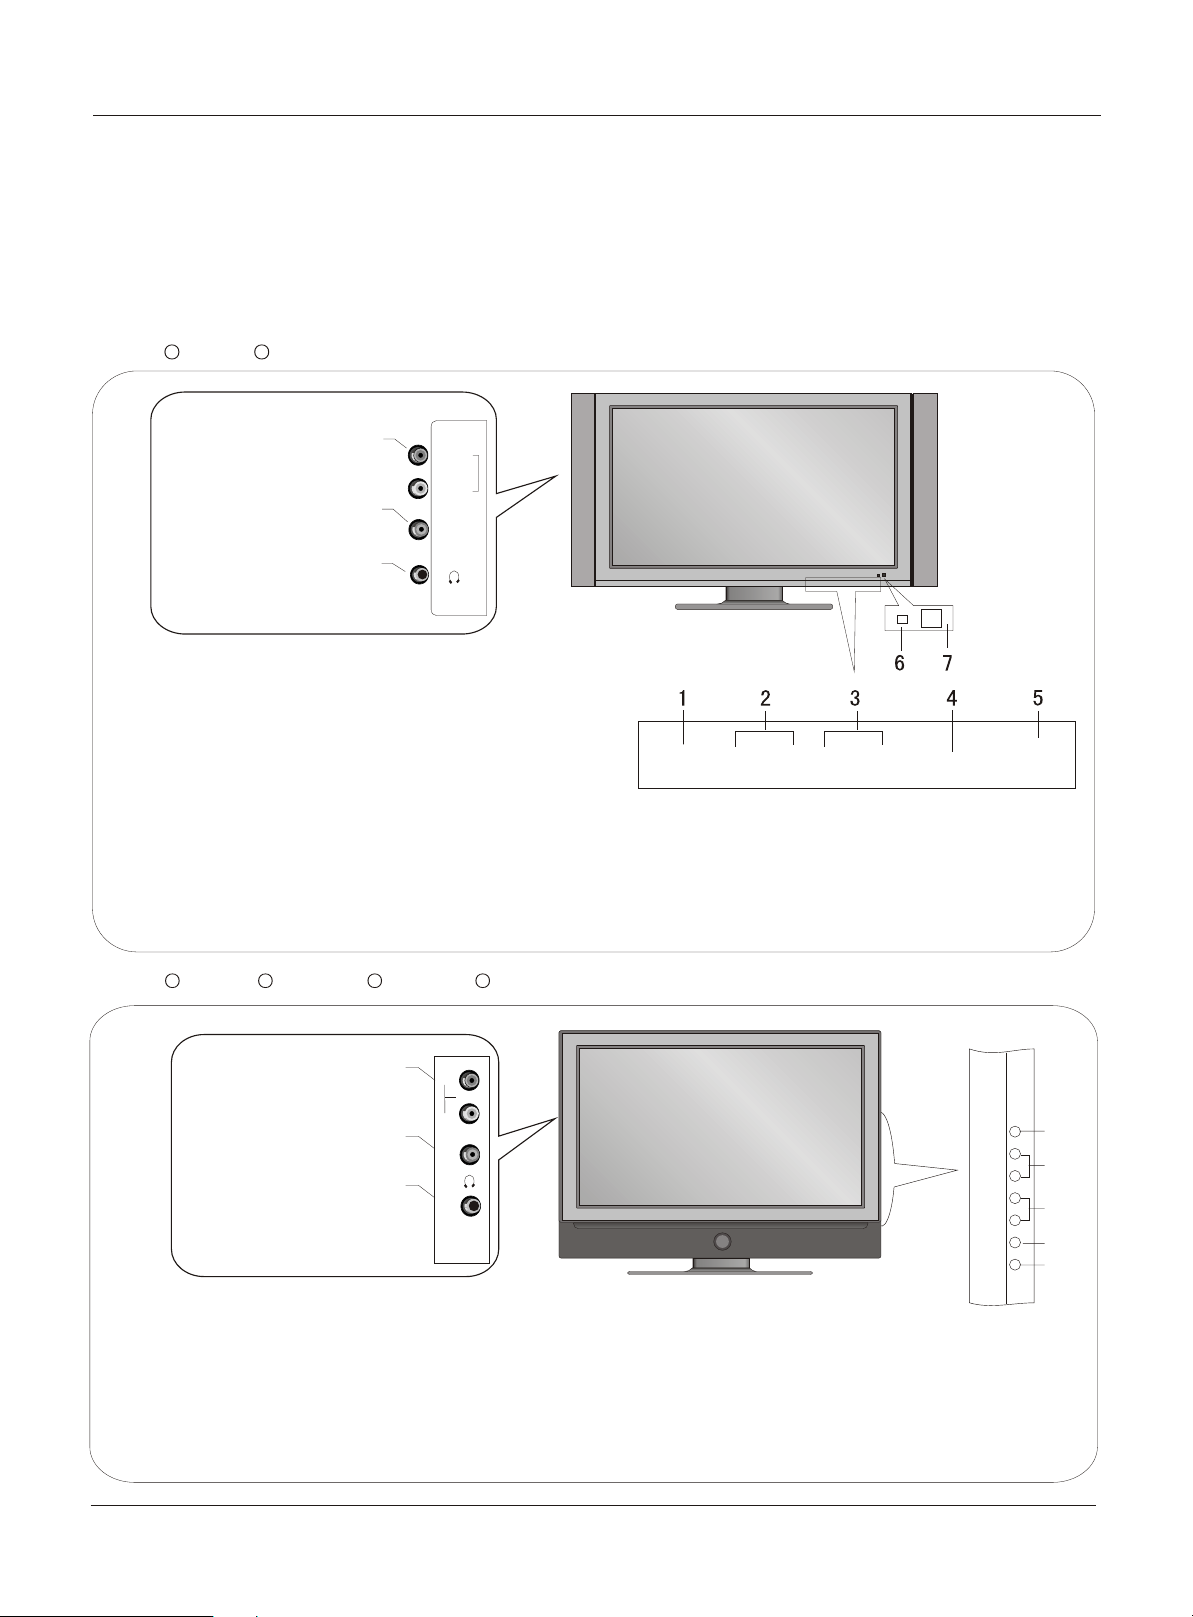
Cont rols . . . . . . . . . . . . . . . . . . . . . . . . . . . . . . . .... .. .. .
Conn ecti on Opt io ns . . . . . . . . . . . . . . . . . . . . . . .. .... ..
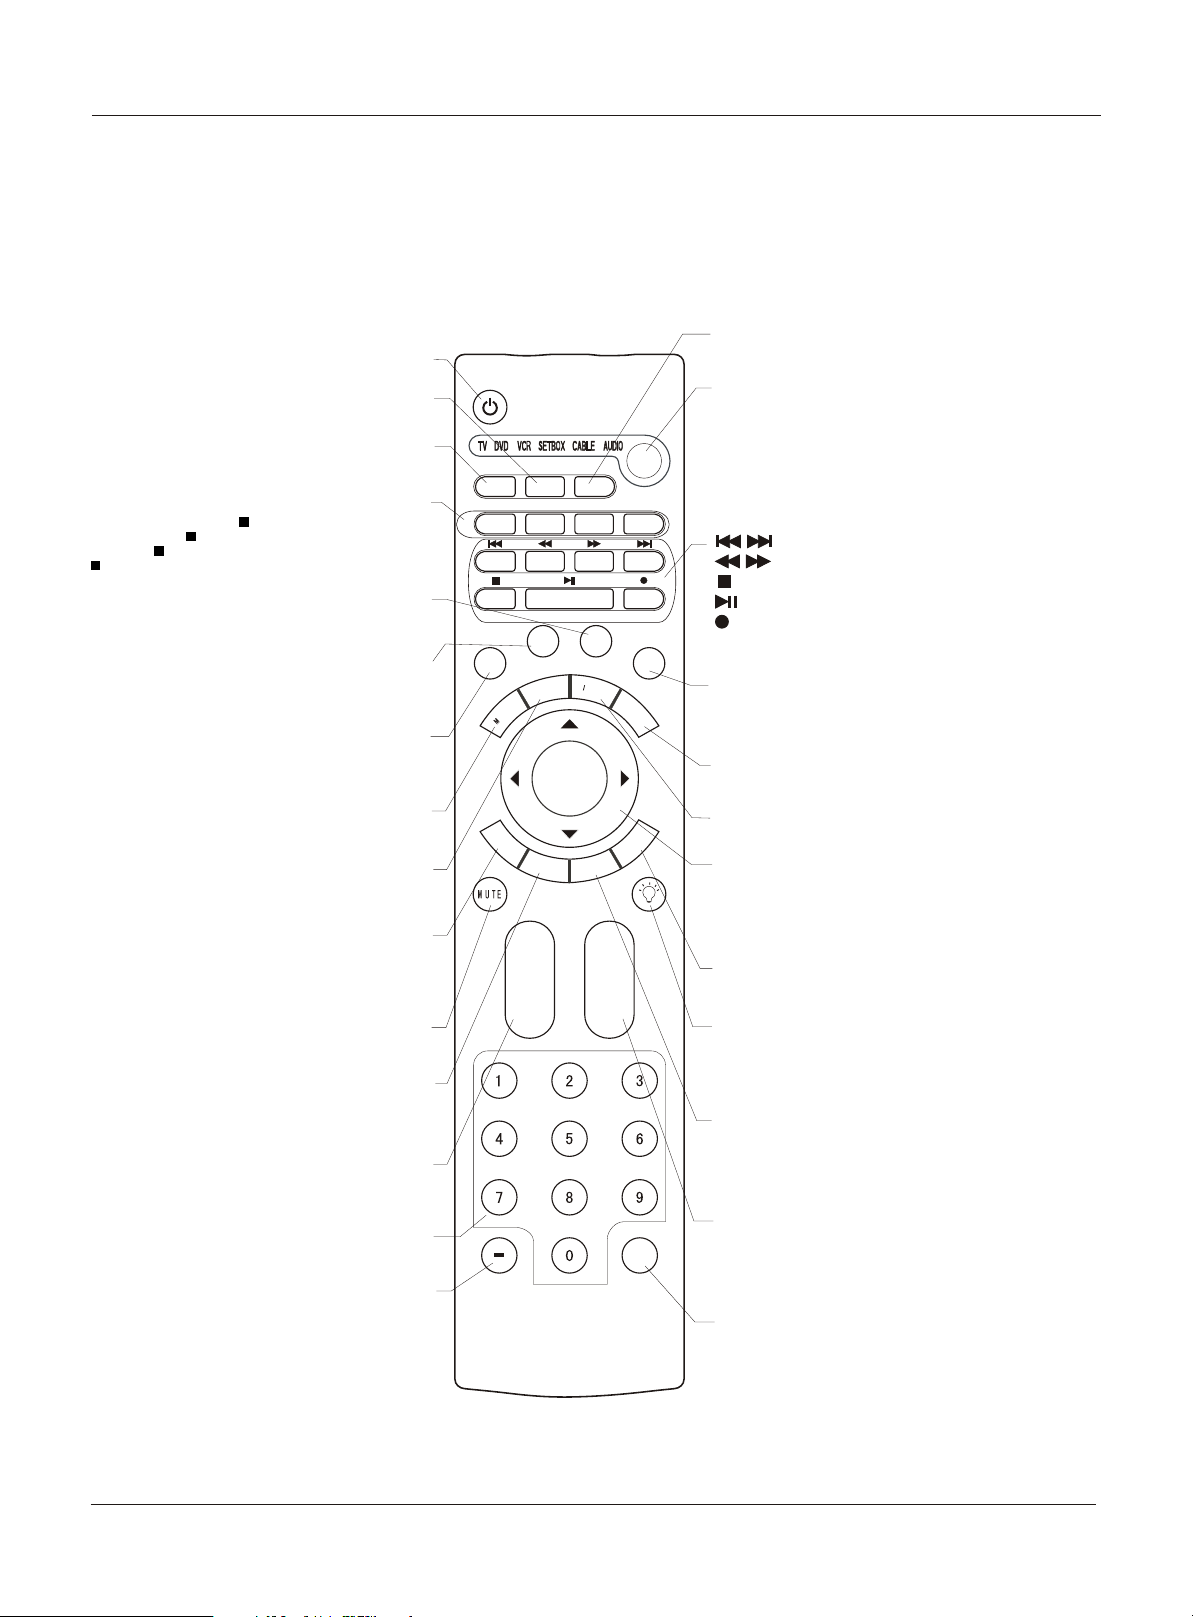
Universal Remote Control. ............ . . . .. . . . ........
Installation
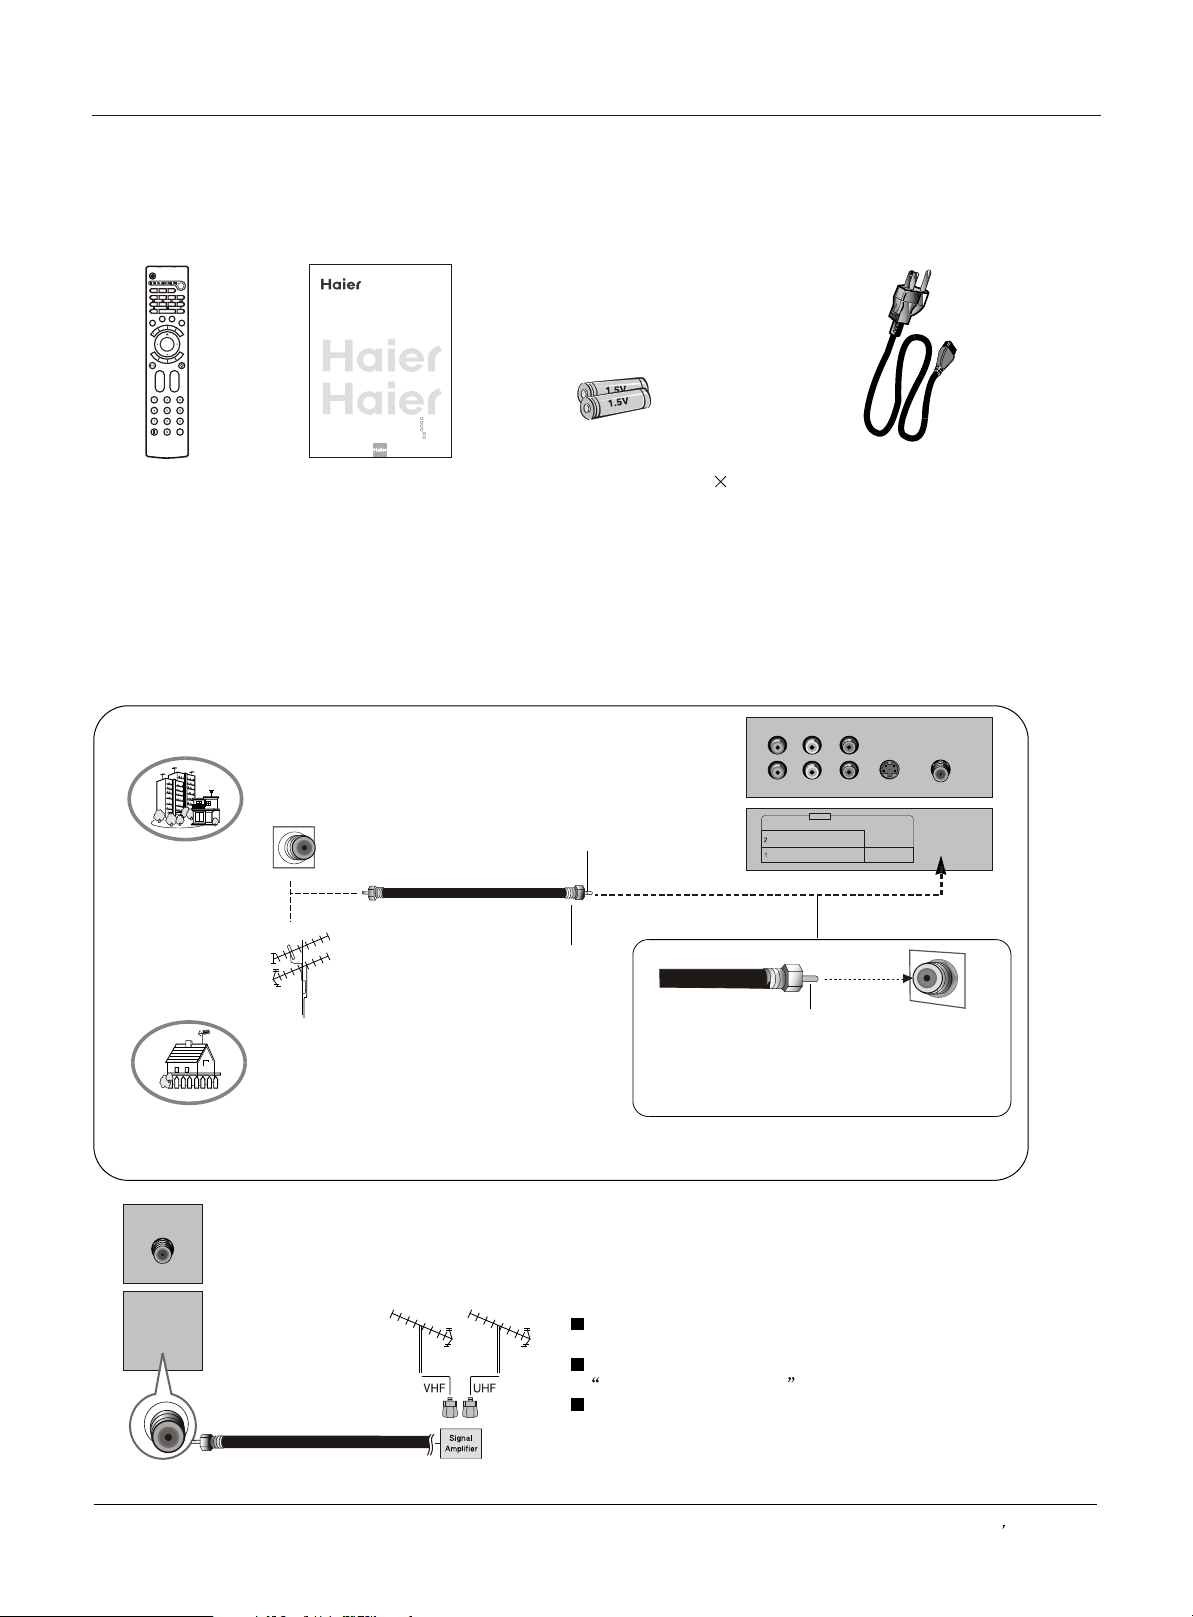
Acce ssor ies . . . . . . . . . . . . . . . . . . . . . . . . . . . . .. .. .. ..
Antenna Connection .. . . . . .. . . ..........................
VCR Connection. .. . . . . .. . . . . .. . . . . . . ..............
External A/VSource Setup . . . ... . . . . ..................
DVD Connection .. . . . ...... .. . . . . .. . . . . . ...........
DTV Connection..................................................
Digital AudioOutput . . . . .. . . . . .. . . . . .. . . ...........
PC Connection. .. . . . . .. . . . . . . . .. . . . . ..............
HDMI . . . . . . . . . . . . . . . . . . . . . . . . . . . . . . . .... .. .. .. ....
Cable sample.....................................................
Connecting Headphones .. . . . . .. . . . . .. . . . . ......
Power source................ .. . . . . .. . . . . .. . . . . . . . .
. . . . . . . . . . . . . . . . . . . . . . . .
Operation
Switching On/Off the TV set . .. . . ... . .. . . . . .. . ....
Choose the MenuLanguage . . . . ........................
Choose the inputsource......................................
Channel Menu
Auto mati c Scan . . . . .. .. .. . . . . . . . . . . . . . . . . . . . . . .. .
Add Channel Scan................ . . . . .. . . . . .. . . . . . .
Rena me ... .... .. .. .. . . . . . . . . . . . . . . . . . . . . . . . . . . . . .
. . . . . . . . . . . . . . . . . . . . .
. . . . . . . . . . . . . . . . . . .. . . .
. . . . . . . . . . . . . . . . . . . . . . . . . . . . . . . . . . . . . . .
Video Menu
Audio Menu
SAP Broadcasts Setup.........................................
Takethe table stand off
Select the desiredprogram
Select the desiredsound
Mute
How to selectpicture mode..................................
How to customizeyour own picture status .............
How to selectaudio mode.....................................
How to customizeyour own audio status ...............
Time Menu
Date /Time setting................................................
Time zone setting.................................................
Sleep Timersetting..............................................
Timer on setting...................................................
Timer offsetting...................................................
Function Menu
Menu Language...................................................
DTV Caption Style...............................................
OSD Timeout.......................................................
OSD Transparency...............................................
DNR...................................................................
Adjust Menu
Screen Setup forComponent or PC mode..............
Lock Menu
Parental Control ratingand categories...................
Lock setup...........................................................
Other Functions
Brie f Info . . . . . . . . . . . . . . . . . . . . . . . . . . . . . .... .. .... ..
Quick program view.............................................
Aspect Ratio Control. . . . . . . . . . . . . . . . . . . . .. . . .. . .
CC (Closed CaptionDisplay) . . . . .. . . . . .. . ... . .. .
Remote Control
Setting up yourremote control .............................
Remote Control Codes........................................
Maintenance . . .... .. . . . . . . . . . . . . . . . . . . . . . . . . . .
Product Specifications . . . . . . . . . . . . . . . . . . . . . . .
Troubleshooting . . . . . . . . . . . . . . . . . . . . . . . . . . . ..
Warranty ...........................................................
2
3
6
7
8
9
9
10
11
11
12
12
13
14
15
16
16
17
18
18
18
19
20
20
21
21
21
22
22
23
23
24
24
25
25
26
26
26
27
28
28
28
28
29
30
32
32
33
33
34
36
40
41
42
43
Contents

Front panel controls
This is a simplified representation of front panel.
Here shown maybe somewhat different from your TV.
1.INPUT: Press to show the input source mode. In the
MENU/INPUT screen, these buttons serve as
OK buttons.
2.CH : Press to scan through channels. To scan
quickly through channels, press and hold down
either +/- . In the MENU screen, these buttons
serve as up/down buttons.
3.VOL : Press to adjust the volume .In the MENU screen,
these buttons serve as left/right buttons.
4.MENU: Menu display.
5.POWER: Press toturn on and off the TV.
6.Power indicator: In red when standby mode,
in blue when display.
7.Remote control signal receive window.
-/+
-/+ (The buttons are on the bottom of the TV set)
INPUT CH- VOL- MENU
Introduction
6 TV LCD-TFT
Controls
CH+ VOL+ POWER
HL26S HL32S
VIDEO
AV3AUDIO Input
connect to hear
stereo sound from an
external device.
AV3 VIDEO Input
Connects the video signal
from a video device.
Headphone jack
Headphone audio
output terminal.
AUDIO-R
AUDIO-L
VIDEO
AUDIO
AV3AUDIO Input
connect to hear
stereo sound from an
external device.
AV3 VIDEO Input
Connects the video signal
from a video device.
Headphone jack
Headphone audio
output terminal.
R
L
1
INPUT
2
3
4
5
MENU
CH+
VOL+
HL26B HL32B HL26BG HL32BG
POWER
CH-
VOL-
1.INPUT: Press to show the input source mode. In the MENU/INPUT screen,
these buttons serve as OK buttons.
2.CH : Press to scan through channels. To scan quickly throughchannels,
press and hold down either +/- . In the MENU screen, these buttons
serve as up/down buttons.
3.VOL : Press to adjust the volume .In the MENU screen, these buttons
serve as left/right buttons.
4.MENU: Menu display.
5.POWER: Press toturn on and off the TV.
-/+
-/+
A A A A
A A

HDMI/DVI IN 1 HDMI/DVI IN 2
PC IN
AC IN
VIDEO
Pr
Pb
Y
Pr
Pb
YOPTICAL
PC/DVI
AUDIO IN
L R
AUDIO
S-VIDEO
ANT IN
COMPONENT IN AV IN
Video
L R
Video
L R
L R
Back panel controls
Introduction
Owner s Manual 7
Connection Options
Power Cord Socket
This TV operates on AC power.
The voltage is indicated on the
Specifications page. Never attempt
to operate the TV on DC power.
Antenna Input
Connect cable or
antenna signals to
the TV, either directly
or through your
cable box.
S-Video Input
Connect S-Video
out from anS-VIDEO
device to the
S-VIDEO input.
Digital Audio Output
Connect digital audio from
various types ofequipment.
Note: In standby mode,
these ports willnot work.
PC/DVI Audio Input
Connect the audio out from
the external device, used
while linking PC audio
frequency output terminals
or using a DVI to HDMI
connector.
DVD/DTV Input
(Component )
Connect a component
video device to these
jacks.
PC VIDEO Input
Connect the monitor
output connector from
a PC to the jack
HDMI
connect a
signal to
HDMI/DVI.
COMPONENT AUDIO Input
connect to hear
stereo sound from an
external device.
VIDEO Input
Connects the video
signal from a
video device.
AUDIO Input
connect to hear
stereo sound from an
external device.
HL26S HL32S HL26B HL32B HL26BG HL32BG
A A A A A A

CH.LIST
VIDEO
S-VIDEO
COMPONENT
CC
P.MODE
S.MODE
FREEZE
ENU
TIME
NPUT
INFO
EXIT
R
AC
SAP
SLEEP
VOL+
CH+
Q.VIEW
OK
VO
L
-
CH-
POWER
.Press to turnon and off the TV
The remote controlcannot be operated unless the batteriesare properly loaded.
Function introduction
When using theremote control, aim it at theremote control sensor on the TV.
SAP
Selects MTS sound: Mono, Stereo, and
SAP in Analog mode. Change the audio
language in DTV mode.
Introduction
HDMI
Press to enter HDMI signal
THUMBSTICK
(Up/Down/Left/Right/OK)
Allows you to navigate the on-screen menus
and adjust the system settings to your
preference.
CHANNEL UP/DOWN
Press to scan through channels. To scan
quickly through channels, press and hold
down either +/-.
P.MODE
Selects the picturemode appropriate
for the program's character.
FREEZE
Freezes the currently-viewed picture, but
audio continues. Press FREEZE button again
to resume the normal picture.
ARC
(Aspect Ratio Control)
Changes the aspect ratio.
S.MODE
Selects the soundmode appropriate
for the program's character.
VOLUME UP/DOWN
Press to adjust the volume.
Numeric buttons
Press to change the channel.
EXIT
Clears all on-screen displays and
returns toTV viewing from any menu.
INPUT
show the input source mode.
MUTE
Switches the sound on or off
CC(closed caption)
Select a closed caption
TIME
Shows time.
INFO
When you watch the TV,press the key,
the information displays on top of
the screen.
MENU
Brings up the main menu to the screen.
TV:Press to enter TV signal;
VIDEO:Press to enter VIDEO signal;
S-VIDEO: Press to enter S-VIDEO signal;
: Press to enterCOMPONENT signal.
COMPONENT
SLEEP button
Displays the Sleep Timer option.
Q.VIEW
Switch the currentchannel to the last
channel you have viewed.
CH.LIST
Open the channellist.
TV DVD VCR SETBOX CABLE AUDIO
Press the SELECT button repeatedly to select
one of the system modes inwhich the remote
control can beused. When the desired device is
selected, the correspondingLED lights on 5 seconds.
VCR/DVD Functions
Control some video cassette recorders or
DVD players.
/ Rewind / Fast
/ backward /Forward
Stop
Play/Pause
REC
PC
Press to enter PC signal.
- button
Press to select additional channels
(digital )
being broadcast by the same station.
For example, to select channel
“54-3”, press “54”,then press “-” and “3”.
LIGHT
Press the light button, white LED will be
ON, release thiskey, white LED willbe OFF.
HDMI
SELECT
TV
PC
Universal Remote Control
Shortcut Button of Input
8 TV LCD-TFT

AV IN
Video
L R
Video
L R S-VIDEO
ANT IN
ANT IN
Generally speaking, to enjoy a clearer picture, we recommend that you use a CATV system or an
outdoor antenna .
.
Over-the-air TV reception quality will depend on your antenna type, antenna
location and antenna positioning
External Equipment Connections
Antenna Connection
Multi-family Dwellings/Apartments
(Connect to wallantenna socket)
Wall Antenna
Socket
Single-family Dwellings /Houses
(Connect to wall jack for outdoor antenna)
Outdoor
Antenna
VHF Antenna
UHF Antenna
Turn clockwise to tighten
RF Coaxial Wire(75 ohm)
Bronze Wire
Be careful notto bend the bronze wire
when connecting the antenna.
Bronze Wire
To improve the picture quality in a poor signal area,
please purchase a signal amplifier and install properly.
If the antennaneeds to be split for twoTV`s, install
a 2-Way SignalSplitter in the connections.
To install theantenna properly please contact a
professional in your area.
Installation
Accessories
Remote control Owner`s manual Alkaline battery(AAA) 2 Power cable
Owner s Manual 9
Please READ this manual carefully before
operating your TV,and retain it for future
reference.
TFT-LCD TV
OWNER S MANUAL'
MODEL :
S
HL26S
HL32S
HL26B
HL32B
HL26BG
HL32BG
A
A
A
A
A
A
CH.LIST
VIDEO
S-VIDEO
COMPONENT
CC
P.MODE
S.MODE
FREEZE
ENU
TIME
NPUT
INFO
EXIT
R
AC
SAP
SLEEP
VOL+
CH+
Q.VIEW
OK
VO
L
-
CH-
HDMI
SELECT
TV
PC

L R
AUDIO
S-VIDEO
ANT IN
AV IN
Video
L R
Video
L R
L R
VCR connection
NOTE: All cables shownare not included with the TV.
There are severalways to connect your television, dependingon the components you want toconnect
and the qualityof the signal you want to achieve. The following areexamples of somedifferent ways
to connect yourTV with different input sources.
External Equipment Connections
Choose Your Connection
Toavoid picture noise (interference), leave an adequate distance between the VCR and TV
Connection Option 1
Set VCR output switch to channel 3 or 4 and
then tune the TV to the same channel number.
Connection Option 2
1. Connect the audio and video cables from the
VCR's output jacks to the TV input jacks, as
shown in the figure.
When connecting theTV to VCR, match the
jack colors (Video = yellow, Audio Left = white,
and AudioRight = red).
If you connectan S-VIDEO output from VCR to
the S-VIDEO input,the picture quality is
improved; compared to connecting a regular
VCR to theVideo input.
2. Insert a video tapeinto the VCR and press
PLAY on the VCR.(Refer to the VCR owner`s
manual.)
3. Select the input source with using the
INPUT button on the remote control, and
then press / button to select the source,
press theOK button to confirm.
Installation
10 TV LCD-TFT

VIDEO
Pr
Pb
Y
Pr
Pb
YOPTICAL
PC/DVI
AUDIO IN
L R
AUDIO
S-VIDEO
COMPONENT IN AV IN
Video
L R
Video
L R
L R
L R
AUDIO
S-VIDEO
ANT IN
AV IN
Video
L R
Video
L R
L R
How to connect
1. Connect theDVD video outputs(COMPONENT) to
the Y Pb Pr jacks on the TV and connect the DVD audio
outputs to the Y Pb Pr Audio IN jacks onthe TV, as
shown in the figure.
2. If your DVD only has an S-VIDEOoutput jack,
connect this to the S-VIDEO input on the TV. as shown
in the figure.
Note
If your DVD player does not have component video
output, use S-Video.
How to use
1. Turn on the DVD player, insert a DVD.
2. Use the INPUT button on the remote control to select
Y Pb Pr mode.
3. Press Play button on external equipment for program
play.
4. Refer to the DVD player's manual for operating
instructions.
External Equipment Connections
How to connect
Connect the audio and video cables from the external
equipment's output jacks to the TV input jacks, as shown
in the figure.When connecting the TV to external equipment,
match the jack colors (Video = yellow, Audio Left = white,
and AudioRight = red).
How to use
1. Select the input source with using the INPUT button on
the remote control.
2. Press the / button to select the desired source.
3. Press the OK button to confirm.
4. Operate thecorresponding external equipment.
Video Game Set
Camcorder
Component Input ports
To get better picture quality, connect a DVD player to the
component input ports as shown below.
Installation
Component ports
on the TV
Video output ports
on DVD player
Y Pb Pr
Y Pb Pr
Y B-Y R-Y
Y Cb Cr
Y P P
BR
Note
The audio inputterminal of AV IN 1 is compared with S-VIDEO.
External A/V Source Setup
DVD connection
Owner s Manual 11
DVD
or

OPTICAL
L R
AUDIO
L R
HDMI/DVI IN 2
PC IN
VIDEO
Pr
Pb
Y
Pr
Pb
YOPTICAL
PC/DVI
AUDIO IN
L R
AUDIO
COMPONENT IN
L R
L R
Digital Set-top Box
This TV can receive Digital Over-the-air/Cable signals withoutan external digital set-top box. However, ifyou do
receive Digital signalsfrom a digital set-top box or other digitalexternal device, refer to the figure as shownbelow.
This TV supports HDCP (High-bandwidth Digital ContentsProtection) protocol for Digital Contents (480p,720p,
1080i).
How to connect
Use the TV`s COMPONENT , PC or HDMI/DVI
jack for video connections, depending on
your set-top boxconnector. Then, make
the corresponding audioconnections.
How to use
1. Turn on the digital set-top box. (Refer to the
owner`s manual forthe digital set-top box.)
2. Use INPUT on the remote control to select
COMPONENT , PC or HDMI/DVI source.
Send the TV`s audio to external audio equipment (stereo system) via
the DigitalAudio Output (Optical) port.
How to connect
1. Connect one end of an optical cable to the TV Digital Audio
(Optical) Output port.
2. Connect the other end of the optical cable to the digital audio (optical)
input on theaudio equipment.
See the external audio equipment instruction manual for operation.
Note
When connecting with external audio equipments, such as amplifers or
speakers, please turnthe TV speakers off.
Digital Audio Output
Caution: Do notlook into the optical output port.
Looking at the laser beam may damage
your vision.
External Equipment Connections
DTV connection
Installation
Signal
480i
480p
720p
1080i
COMPONENT
HDMI/DVI
Yes
Yes
Yes
Yes
Yes
Yes
Yes
Yes
HDMI
12 TV LCD-TFT

HDMI/DVI IN 1 HDMI/DVI IN 2
PC IN
VIDEO
Pr
Pb
Y
Pr
Pb
Y
PC/DVI
AUDIO IN
How toconnect
1. To getthe bestpicture quality, adjustthe PCgraphics card to 1024
2. Use the TV`s PC or DVI (Digital Visual Interface)Audio IN port for video connections, depending on your PC
connector.
If the graphic card onthe PC doesnot output analogand digital RGBsimultaneously,connect only oneof either PC
r HDMI/DVI IN to displaythe PC onthe TV.
If the graphic card on the PC does output analog and digital RGB simultaneously, set the TV to eithe
DVI; (the othermode is setto Plug andPlay automatically bythe TV.)
3. Then,make thecorresponding audioconnection. Ifusing asound card,adjust thePC soundas required.
How touse
1. Turnon the PCand theTV.
2. Turn on thedisplay by pressingthe POWERbutton on theTV's remotecontrol.
3. UseINPUT onthe remote controlto selectPC or HDMI/DVI source.
4. Check the image on your TV. There may be noise associated with the resolution, vertical pattern, contrast or
brightness in PC mode. If noise is present, change the PC mode to another resolution, change the refresh rate to
another rate oradjust the brightness and contrast on the menu untilthe picture is clear. Ifthe refresh rateof the PC
graphic cardcan notbe changed,change thePC graphiccard orconsult themanufacturer ofthe PCgraphic card.
Note
1.Use a DVI cable.
2.Avoid keepinga fixed imageon theTV's screen fora long periodof time.The fixed image may becomepermanently
imprinted onthe screen.
3. Thesynchronization input formfor Horizontal andVertical frequenciesis separate.
x768 .
IN o
r PC or
HDMI/
Resolution
Frame
frequency
(Hz)
VGA
SVGA
XGA
640*480 60Hz
800*600 60Hz/75Hz
1024*768 60Hz
Mode Resolution
External Equipment Connections
Installation
75Hz
PC connection
Owner s Manual 13

When the source device(DVD player or Set Top Box) supports HDMI
How To Connect
1. Connect thesource device to HDMI port of this TV with an HDMI cable(not supplied with thisproduct).
2. No separatedaudio connection is necessary.
How To Use
If the source device supportsAuto HDMI function, the output resolution ofthe source device will be automatically
set to 1280x720p.
If the sourcedevice does not support AutoHDMI, you need to set theoutput resolution appropriately.
To get the best picture quality, adjust the output resolution of the source device to 1280x720p.
Select HDMI input source in input source option of Select Main source menu.
When the source device(DVD playeror Set Top Box) supports DVI
How To Connect
1. Connect thesource device to HDMI port of this TV with a HDMI-to-DVI cable(not supplied with this product).
2. Aseparated audio connectionis necessary.
3. If the source device has an analog audio output connector, connect the source device audio output to DVI Audio
In port locatedon the left side of HDMIport.
How To Use
If the source device supportsAuto DVI function, the output resolution ofthe source device will be automaticallyset
to 1280x720p.
If the sourcedevice does not support AutoDVI, you need to set theoutput resolution appropriately.
To get the best picture quality, adjust the output resolution of the source device to 1280x720p.
Press the INPUT button to select HDMI input sourcein input source option of SelectMain source menu.
Installation
HDMI
14 TV LCD-TFT

HDMI Cable
(not supplied with the product)
HDMI to DVICable
(not supplied with the product)
Analog Audio Cable
(Stereo to RCA type)
(not supplied with the product)
Installation
Cable sample
Owner s Manual 15

VIDEO
AUDIO-R
AUDIO-L
Power source
TO USE AC POWER SOURCE
Use the AC polarized line cord provided for
operation onAC. Insert the AC cord plug into
a standard polarizedAC outlet.
Note
Never connect the AC line cord plug to other
than the specifiedvoltage. Use the attached
power cord only.
If the polarized AC cord does not fit into a non-
polarized AC outlet, do not attempt to file or cut
the blade. Itis the user`s responsibility to have
an electrician replacethe obsolete outlet.
If you cause a static discharge when touching
the unit and the unit fails to function, simply
unplug the unitfrom the AC outlet and plug it back
in. The unit should return to normal operation.
Polarized AC Cord Plug
AC Outlet
Wider Hole
and Blade
You can connect aset of headphones to your set if you wish to watch a
TV programme withoutdisturbing the other people in the room.
Connecting Headphones
Note
Prolonged use ofheadphones at a high volume
may damage your hearing.
Youwill not receive sound from thespeakers
when you connectheadphones to the system.
Plug a setof headphones into the 3.5mm
mini-jack socket onthe side panel of the set.
Installation
External Equipment Connections
16 TV LCD-TFT

Installation
You can take off the tablestand if you don`t want to use the tablestand.
Take the table stand off
Please release the screws 6XM4,
see the picture.
HL26S HL32S
Please release the screws 6XM4,
see the picture.
HL26B HL32B HL26BG HL32BG
AA
A A A A
Owner s Manual 17
A

Choose the Menu Language
When you startusing your set for the first time, you must select the language whichwill be used for displaying menus
and indications.
In the manual,the OSD (on screen display) may be different from your TV`s, because it is just an example to help
you with the TV operation.
There are severaloptions you might need to setup in order for your TV to work properly. Read the instructionsthat
follow.
Note
If the TV in power on , the screen showinformation according the type of input signal .the information will disappear.
If there is no signal , No Signal will display on the screen.
1 Choose the TV Input and then Press the MENU button.
2 Press the / button to select the Function menu.
3 Press the or OK button and then select the Menu
Language.
4 Press the or OK button to select language.
English Spanish or French
5 When you are satisfied with your choice, press the EXIT button
to return to normal viewing or press the MENU button to returnto
the previous menu.
1. First, connect power cord correctly.
2. Select the viewing source by using INPUT button on the remote control.
3. When finished using the TV,press the POWER button on the remote control. The TV reverts to standby mode.
4. If you intend tobe away on vacation, disconnect the power plug fromthe wall power outlet.
Change the picture source so you can watch your TV, cable TV,VCR, DVD, or any
other devices thatare connected to your TV.
1. Press the INPUT button to enter the Select Main picture Source menu
and then use the / button to select the desired items TV, V , V ,
S-Video,Component1, Component2, PC, HDMI/DVI1, HDMI/DVI2 .
2. Press the OK button to confirm .
ideo1 ideo2
Video3,
Operation
Channel
Video
Audio
Time
Lock
Function
Menu Language English
DTV Caption Style
OSD Timeout Middle
OSD Transparency Middle
DNR Off
Move /OK: Select /EXIT/ MENU: Exit
Select Source
TV
Video1
Video2
Video3
S-Video
Component1
Component2
PC
HDMI/DVI1
HDMI/DVI2
Operation
Switching On/Off the TV set
Choose the Input source
18 TV LCD-TFT
Move OK: Select EXIT/ INPUT: Exit

This TV set has two methods to set channels, which are respectively Auto Scan, Add Channel Scan.
In this section, how to use the remote control to set channel is explained. You can also use buttons on the TV
set to set channel.
Automatic Scan
Note
The Channel menu will be only operated in normal TV mode.
Channel menu
Automatically finds all channels available through antenna or cable inputs, and
stores them inmemory on the All Channel List.
Operation
Video
Audio
Time
Lock
Function
Channel Tuner Antenna
Auto Scan
Add Channel Scan
Rename
NTSC Channel 55
Analog channels 19
Digital Channels 0
Progress(%)64
Auto Scan
1 Press the MENU button and then select the Channel menu.
2 Press the or OK button and thenuse / button to select
Tuner.
3 Press the or OK button Select Cable or Antenna mode.
4 Press the / button to select Auto Scan.
5 Press the or OK button to start searching.
6 To cancel searching, press the EXIT /MENU button.
Note
When Antenna is selected, the TV will detect antenna signals
and will search for antenna TV (NTSC and ATSC) channels
available in your local area.
When Cable is selected, the TV will detect cable company
supplied signals andwill search for cable TV (NTSC, QAM
modulated) channels available in your area.
The AutoScan function search for NTSC program first and then
search forATSC or QAM program.
Owner s Manual 19
Move /OK: Select /EXIT/ MENU: Exit

Channel menu
Add Channel Scan
Rename
1 Press the MENU button and then select the Channel menu.
2 Press the or OK button and thenuse / button to select
Rename.
3 Press the or OK button to enter the Submenu.
4 press / button to move the cursorand then use / button
to change.
5 When you aresatisfied with your choice, press OK button to
return to the previous menuor Press EXIT button to return to
TV viewing.
Operation
Video
Audio
Time
Lock
Function
Channel Tuner Antenna
Auto Scan
Add Channel Scan
Rename
Add Channel Scan
NTSC Channel 55
Analog channels 19
Digital Channels 0
Progress(%)64
Video
Audio
Time
Lock
Function
Channel Tuner Antenna
Auto Scan
Add Channel Scan
Rename
1 Press the MENU button and then select the Channel menu.
2 Press the or OK button and then use / button to select
Tuner.
3 Press the or OK button Select Cable or Antenna mode.
4 Press the / button to select .
5 Press the or OK button to start searching.
6 To cancel searching, press the EXIT/MENU button.
Add Channel Scan
Ch 16-0
Move Change EXIT: Exit
Rename
- - - - - - -
Only search the new channel ,so the old channel will not be cleared.
Note
When Antenna is selected, the TV will detect antenna signals
and will search for antenna TV (NTSC and ATSC) channels
available in your local area.
When Cable is selected, the TV will detect cable company
supplied signals andwill search for cable TV (NTSC,QAM
modulated) channels available in your area.
The function search forNTSC program first
and then searchfor ATSC or QAM program.
Add Channel Scan
20 TV LCD-TFT
Move /OK: Select /EXIT/ MENU: Exit
Other manuals for HL26B-A
1
This manual suits for next models
6
Table of contents
Other Haier TV manuals

Haier
Haier L26F6 User manual

Haier
Haier DTA-1496 User manual

Haier
Haier 21T9B-S User manual

Haier
Haier 25FV6H User manual

Haier
Haier TV-8888-34 User manual

Haier
Haier L32K60B User manual

Haier
Haier DX-LCDTV19 User manual

Haier
Haier MSD318 User manual

Haier
Haier HL40BG - 40" LCD TV User manual

Haier
Haier L52A18-A User manual

Haier
Haier 29FV6 User manual

Haier
Haier D29FA11-AM User manual

Haier
Haier HLH19BB User manual

Haier
Haier LT32R3A User manual

Haier
Haier DTA-2189 User manual

Haier
Haier K15PFCD2602TXT User manual

Haier
Haier 39G2000 User manual

Haier
Haier L39B2180 Assembly instructions

Haier
Haier L40A8A-A1 User manual

Haier
Haier TV-8888-35 User manual