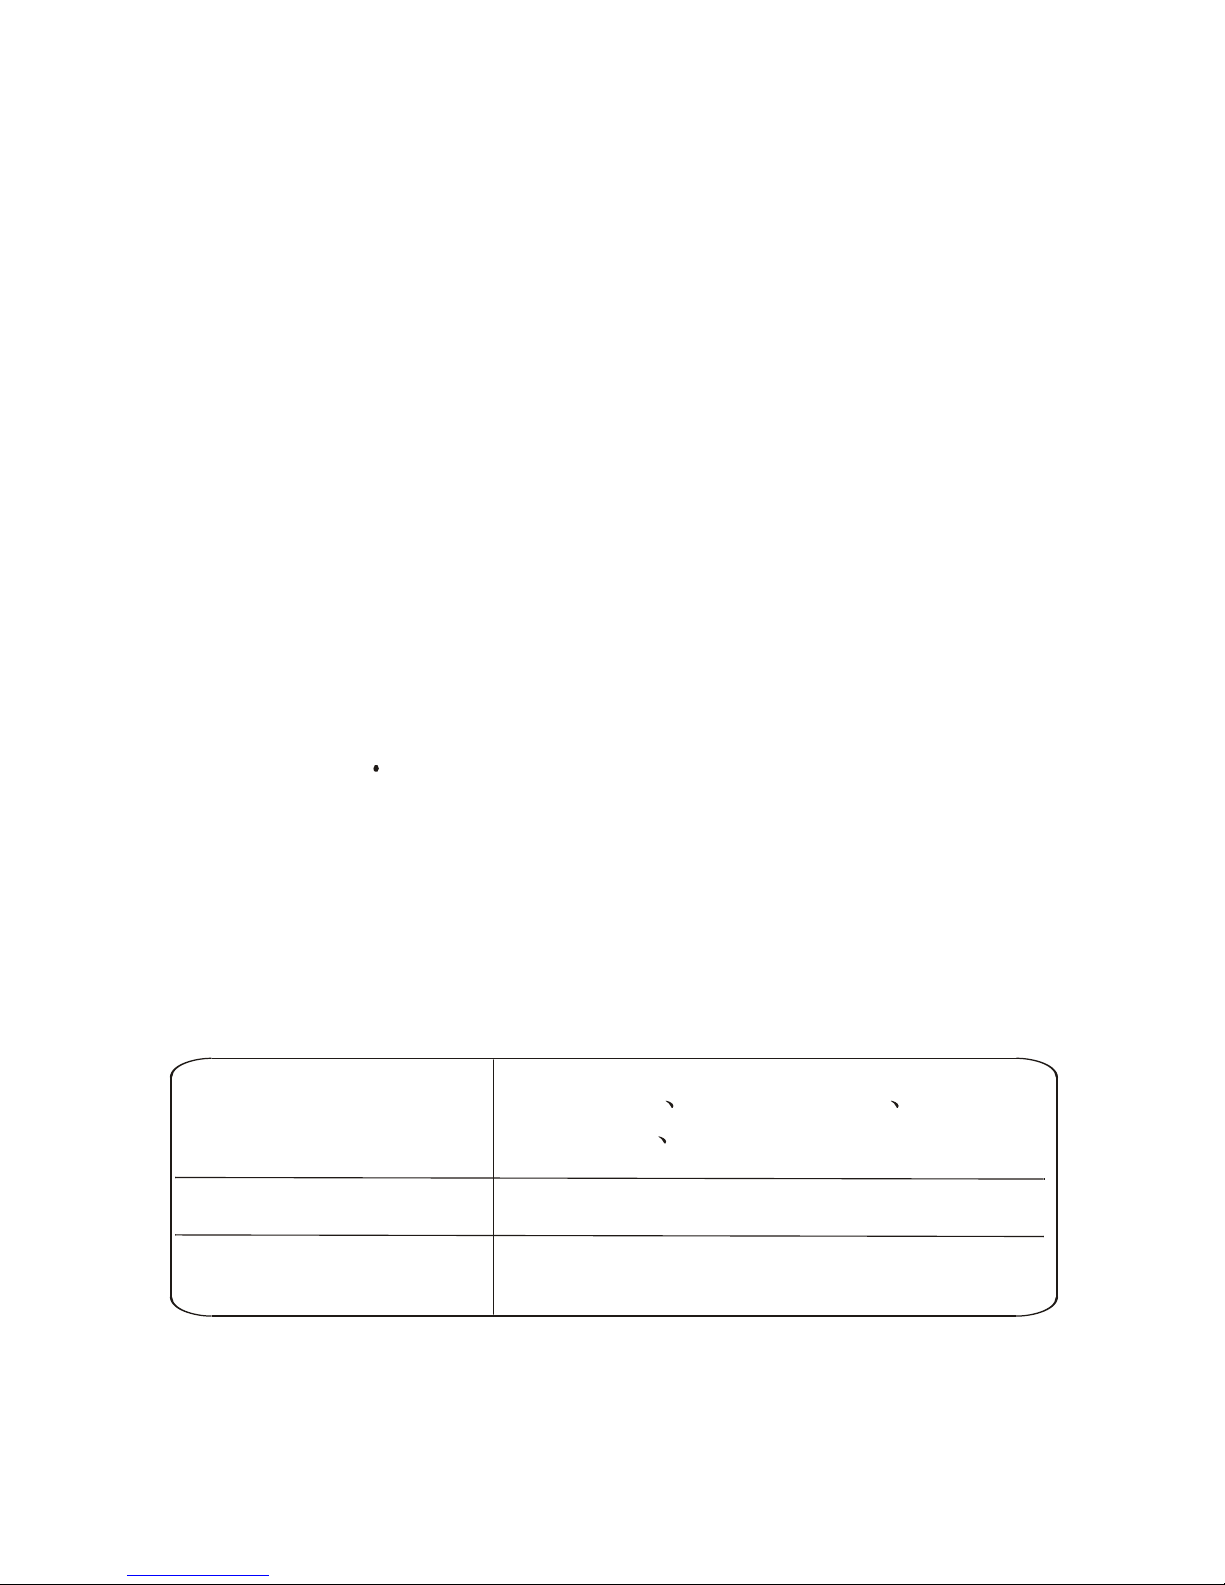
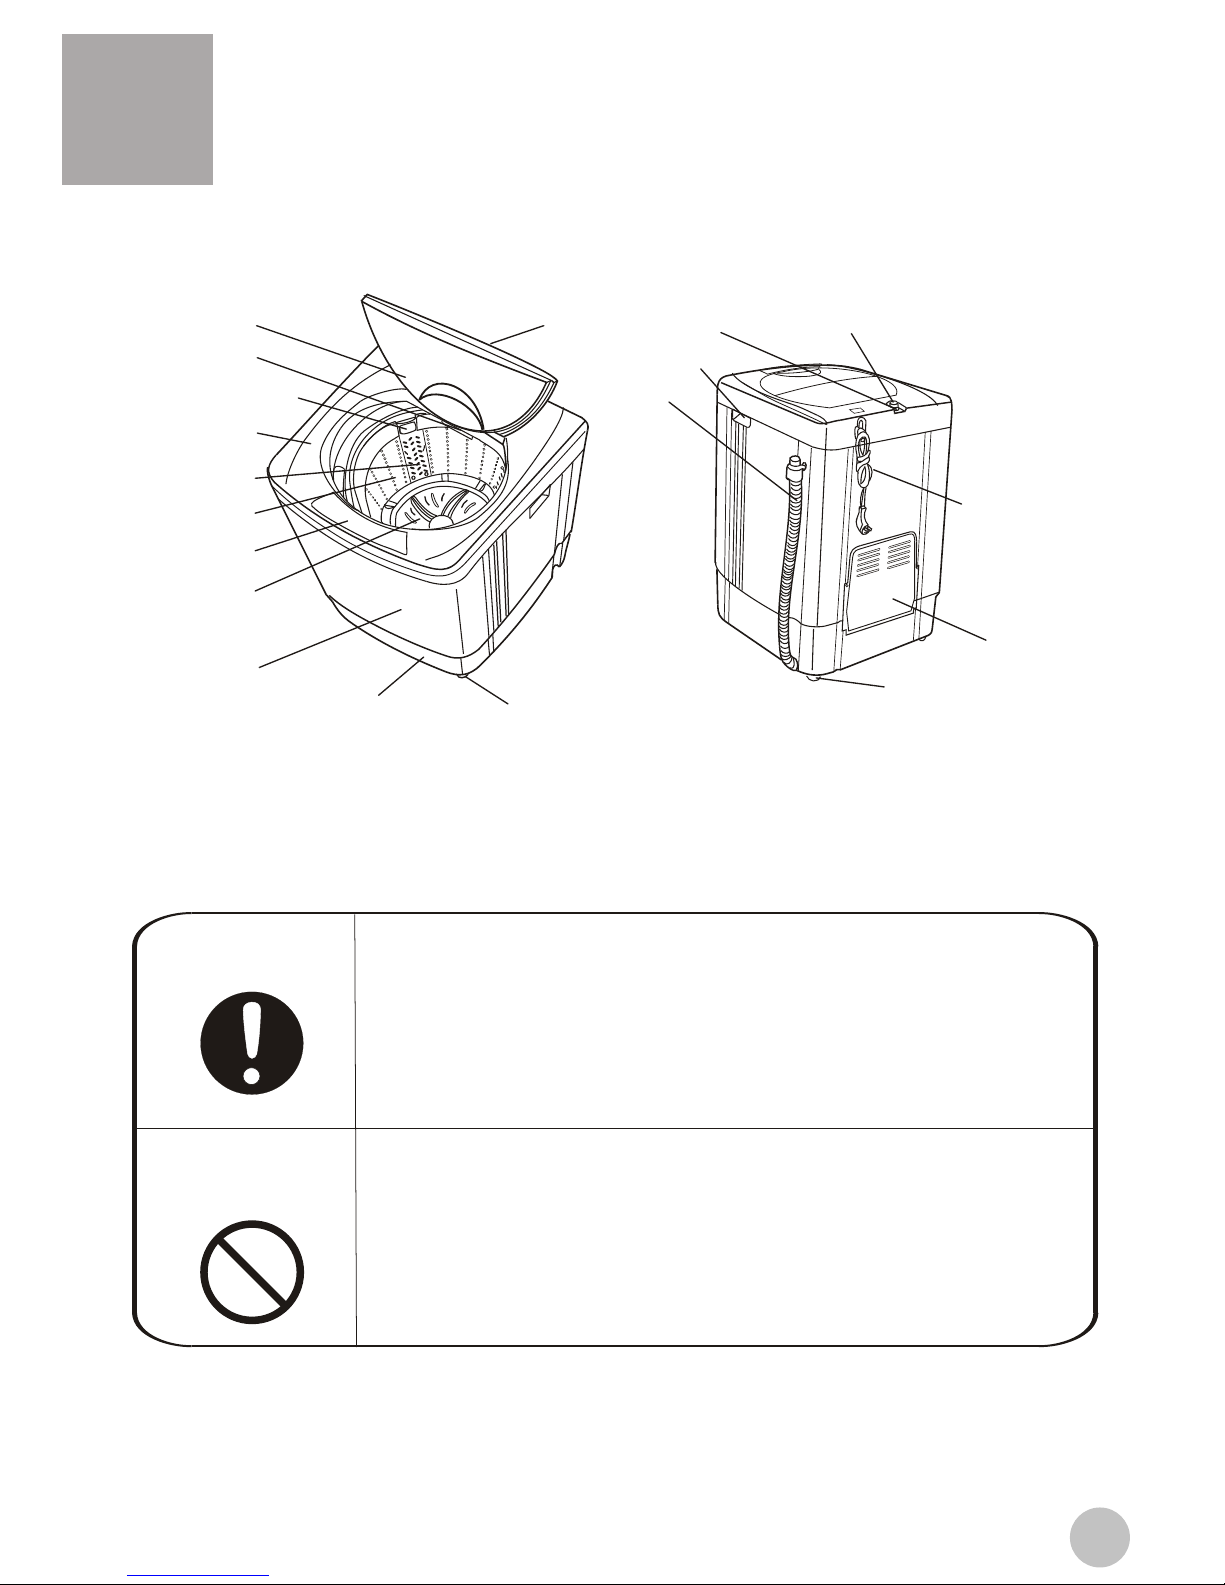
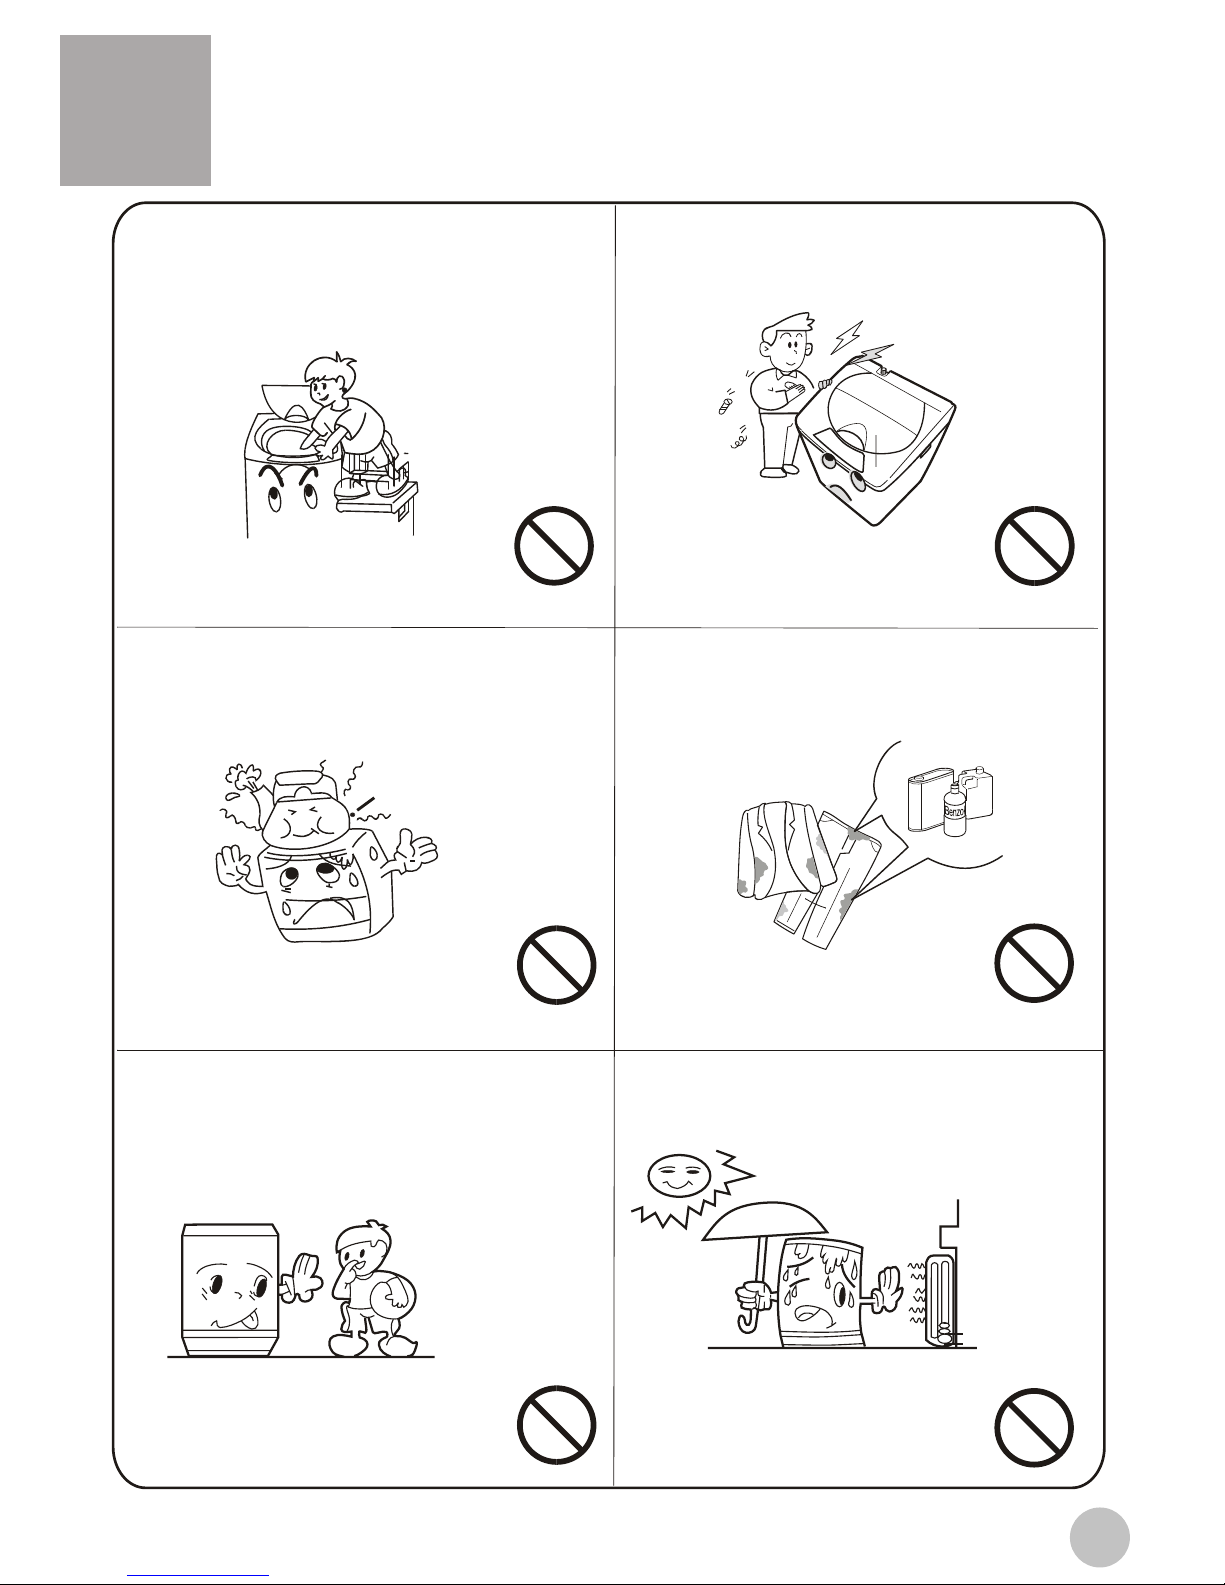
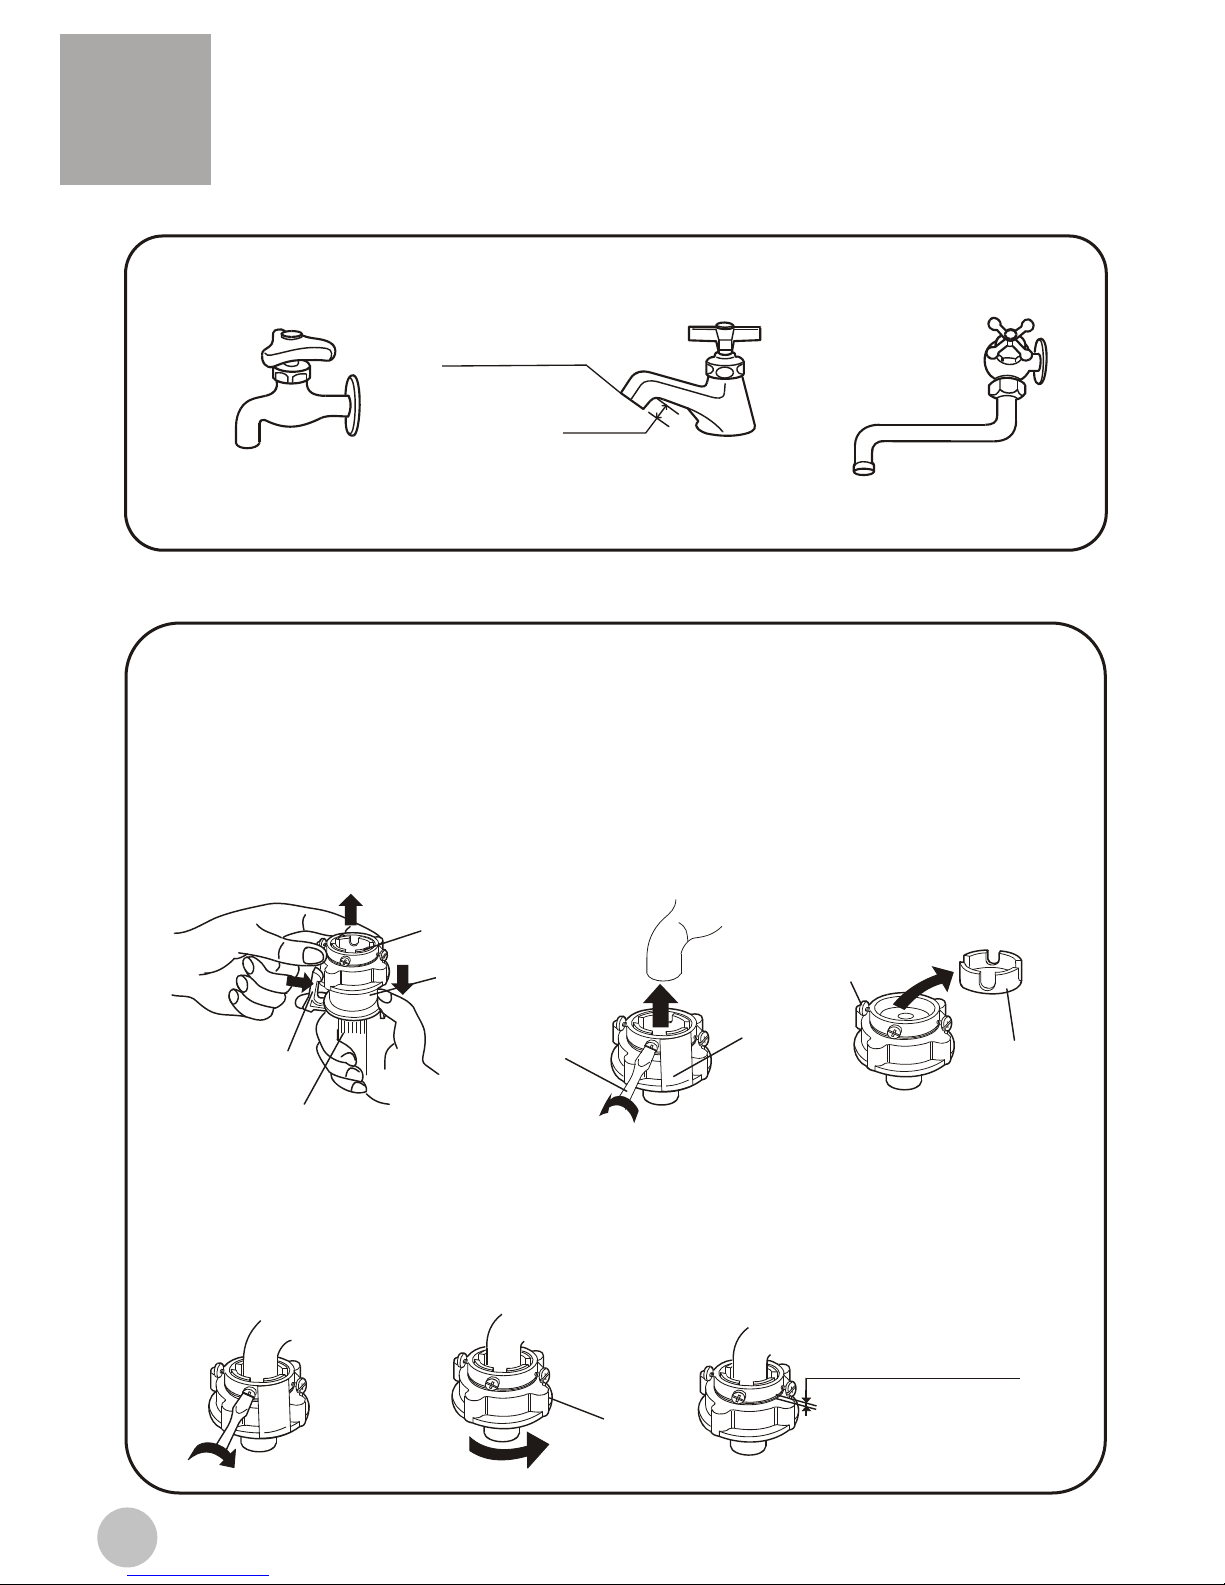
Haier HQM62-K User manual

Fully Automatic Washing Machine
User's manual
This manual is for
HQM62-K
Special number:0030506681
Please read this manual
carefully before using.
Retain it for future reference.

Specifications.....................................................................................the 2nd cover
Names of the parts................................................................................................1
Safety precautions .............................................................................................2
Installation and adjustment ...................................................................................4
Preparation before washing .................................................................................8
Put in the laundries ..............................................................................................9
Usage of the detergent ........................................................................................9
Use the operation buttons ..................................................................................10
Close the top lid .................................................................................................13
Finish washing ....................................................................................................13
Disposal after washing .......................................................................................14
Trouble shooting Answer to questions.............................................................15
Packing list .........................................................................................................16
Specification
Contents
Water level/Water
quantity (about)
Water inlet pressure 0.03MPa-0.78MPa
HIGH/48L MEDIUM/37L
LOW/30L VERY LOW/20L
Rated washing /
spinning capacity(kg)
6.2 (weight of standard dry cloth)

1
Meaning and description of the symbols
Names of the parts
Warning sign
Forbidden sign
Contents marked with that symbol are related to the safety
of the product and the personal safety of the users. Please
operate in strict conformity to the contents, otherwise it may
cause damage of the machine or injure the personal safety
of the user.
Contents marked with that symbol are actions forbidden to
perform. Performing of those actions may result in damage
of the machine or injure the personal safety of the user.
Adjustable foot
fixed foot (3)
back cover
Cabinet
base frame
Drain hose
Control panel
film
Control panel
Filter cover
Power line
Pulsator
Inner tub
Detergent box
Lint filter
Top lid B
Cabinet handle
water valve
Top lidA Sop mat
(Installed by user)
Before Using
Before Using

2
Safety precautions
Do not damage the power cord,bend ,extend,twist,bind or alter it by force.Do not press or
nip it with weight.If the power cord or the power plug is bad, or the power plug becomes
flexible,to avoid risk it is required to have it replaced by
the technicians of our special shop or the after-sale
service department. Keep the pin of the power plug
clean,if the power plug is polluted with dust,please
wipe with dry cloth carefully.
The power cord plug should be convenient
to be pluged in or pluged out with hand
while the washing machine runs normally.
Be sure to pull the plug out and close the
water tap when the machine is idle,when
moving the machine,or when cleaning
the machine.Do not use wet hand to ins-
ert or pull out the power plug.
In case the washing machine is installed
on ground with carpet, do not block the
ventilation hole with carpet.
Do not let the machine share one receptacle with other
electric appliances. If the power plug is damaged, or
the plugging into the receptacle is loose,
do not use the plug any more.
Do not wash water-proof laundries like
the raincoat, bike covers etc. to avoid
abnormal vibrations in spinning.
Do not use water hotter above 50 C .
Do not put the machine at damp place like
the bathroom. Never wash it with water.
Not put wet laundries on the control panel.
soft items
The ventilation holes
at the bottom
Please plug the plug on special 220V AC
receptacle.Be sure to use single-phase
tow pins receptacle.Ensurethe earthing
prong of the power receptacle is earthed
reliably.Use leakage protector if possible.
Before Using
Before Using

3
Safety precautions
Do not decompose, repair or alter the
machine by yourself.
Do not put any hot or heavy items (such
as the kettle with hot water ) on the
washing machine.
Do not wash laundries with volatile
materials (such as thinner, petrol etc.)
The handicapped or children without
care shall not use the machine.
Keep the machine away from direct
sunlight and heat source like the heater.
Do not stretch hands into the working
machine. It is dangerous even if the
rotation is slow. Take special care of
the children.Do not let the children
climb the washing machine.
Petrol
Thinner
Before Using
Before Using

4
Installation and adjustment
The largest allowed slope of the
shank base of the machine is 2 .
The slanting or rough ground will
result in unstable running or
stoppage of the machine. Please
adjust it with following methods:
Adjust the adjustable foot:
Install the bottom plate
After you open the package, please lean
the washing machine gently down on soft
items ( like the towel cloth,blanket, etc. ).
Install the bottom plate to the bottom of the
machine with the eight screws by a cross
screwdriver, then lift the machine up gently.
See to the figure:
Adjust the installation position
Please install and adjust the machine according to the requirement of the manual. It is
very important to your security and correct operating the machine.
1.Press downward to
assmble.
2.Pull upward to detach.
1.To twist the adjustable foot, please
first lift up the side of the foot slightly,
loosen the adjustable nut, and twist
the foot.
2.Fasten the nut after adjustment.
Loosen Fasten
High Low
adjustable nut
adjustable foot
Back
Front
Bottom plate
Screw
Soft items
Install the lint filter
Before Using
Before Using
Pull down Put up
Pull down Put up

5
1.The height of the drain hose shall be
less than 10cm, or the drainage will not
be smooth, and cost such long time that
the machine may stop at mid way.
2.Do not trample or press the drain hose.
If the drain hose is too long, cut it at mid
point. To make smooth drainage, cut the
front end of the hose slantingly.
4.If extra drain hose is needed, please
make separate purchase. The inner
diameter of the extra hose shall not
less than 30mm, and the length shall
not exceed 1.5m.
If the extra hose is too long, cut it
either atA orat B point.
1.Lean the machinedown gently with the front
surface facing theground. Loosen theeight
screws by across screwdriver.
3.Extend the drain hose from the left side. Push the
drain hose into the groove with hands.
4.Install the bottom plate (as per indicated
before), then lift the machine up gently.
2.Pull out the drain hose from the groove at the
right side.
Back
Front
Bottom plate
Soft item
Use groove at
this side after
direction changing
Page 4
Push the drain hose
into the groove with
hands at this point
How to change the direction of the drain hose
Usage of the drain hose
The drain hose shall drain smoothly
Before Using
Before Using

6
Water tap,suitable Water tap,not suitable
It is required that the front end shall belonger than 10mm.
The outlet endsurface of thetap shall beflat and smooth.If not please file itto
avoid leakage.
3.Loosen the screw till the water tap can be accessed. Put the jointer of the water
inlet hose on the tap. See to Figure 2. (If the tap diameter is too large and the jointer
can not be set on the water tap, please loosen the four screws and take out the
bushing in the jointer. See to the figure3.)
2.Press the lower end of the lock lever and push down the slider. Take off the water
inlet hose jointer from the water inlet hose component. See to Figure 1.
Remarks: Before twisting the fastening nut, the thread is 4mm above the
upper surface ofthe nut.After twisting the fastening nut, the thread is 2mm
above the upper surface of the nut. See to Figure 6.
5.Take off the nameplate. Twist the fastening nut as per the indication of the figure.
See to Figure 5.
4.Fasten the four screws evenly. See to Figure 4.
>10mm
Outlet end surface
Nut
About 4mm before twisting
About below 2mm after twisting
Screw
Screwdriver Mark label bushing
Figure 2
Figure 5
Figure 1
Figure 4
Figure 3
Figure 6
Slider
Water inlet pipe jointer
Water inlet pipe
Locking lever
Install the water inlet hose
Confirm the water tap
Connection between the water inlet hose jointer and
the water tap
1.Use the new water inlet hose provided with the machine to connect to the water
faucet.Old hose sets should not be reused.
Before Using
Before Using

7
1.Do not takeoff the water absorption
cushion. Please checkif the cushion
is dropped ordamaged before each
usage. If ithappens please contact
our after-sale departmentimmediately.
2.Put the nutof the waterinlet hose on
the valve jointer.
3.Fasten the nut.Swaying it gently to
confirm if it'ssuitable.
1.Close the water tap.
2.Press the locking lever. Push down the slider. Then
pull off the water inlet hose. If the machine is used
more than once every week, the jointer of the water
inlet hose can be kept on the tap to prevent
damaging the fixing screw.
1.Push down theslider. Insertthe
water inlet hoseinto the jointer.
2.Hang the locklever to thejointer.
Release the slidertill a click
sound is heard.
Locking lever
Slider
Water absorption cushion
Nut of the water inlet hose
Jointer of thewater inlet valve
Slider
Jointer of thewater
inlet hose
Locking lever
Connection between the water inlet hose and the
washing machine
Connection between the jointer of the water inlet
hose and the water inlet hose
Check the connection between the jointer of the
water inlet hose and the water tap
Take down the water inlet hose
1.Swaying the hose gently to confirm if it is fastened
stable.
2.After installation, openthe tap to check if it leaks.
3.Do not bend the hose with overstrain.
4.Before each usage please check if
the connection between the jointer
of the water inlet hose and the water
tap, and the installation of the
water inlet hoseare firm, soas to
prevent dropping from improper
Before Using
Before Using

8
Using process
Using process
Preparation before washing
Confirm if
there's special
requirment for
the laundries.
Clear the pocket.
Take out the
coins , sand,
hairpins etc.
Fasten the
buttons and
zippers.
When the pulsator
is running , the
buttons of the
laundries may
cause noise. For
the sake of
discretion,please
put the laundries
with buttons into
other laundries.
Preparation before washing
1.Connect the water inlet hose and open
the water tap .
2.Confirm that the washing machine is
earthed reliably . Then insert the power
plug into the receptacle. Do not connect
the earth terminal to the gas pipe and
tap water pipe.
3.Put down the drain hose.
The quantity of
the laundries
shall not exceed
the rated value.
The big laundries
like the jeans
shall be put in
loosely.
Pay attention to followings before washing the laundries
a.Please check if the laundries are applicable for washing.
b.Separate those not colorfast from other laundries.
c.For laundries not waterabsorbing,please put them into water with hands.
d.For laundries with much soil,please remove the soil first.You can add detergent on the
part with serious soil directly.It is much easier to remove the soil by that mean.
e.For laundries likely to get lint ball or with long fiber,please first turn the inside out before
putting them into the water.
f.Do not put the laundries polluted with chemicals directly into the washing machine.
g.For those small laundries ,laundries likely to be twisted or worn,and woolen laundries,
please put them into mesh bag before wasing.

9
Using process
Using process
The capacity ofwashing and spinningof the
machine refer tothe largest weightof the standard
laundries under drycondition that can be washed
or spinned inone time. Onetime washing quantity
shall be lowerthan the ratedcapacity.The largest
capacity of thismachine is 6.2kg.
The thickness, size,type of thecloth will influence
the actual washingcapacity. Itis suitable forone
time washing toput in reasonable amount of
laundries and thelaundries can be turned round in
washing.
Do not select"High" water level for laundries less
than 1.0kg, soas to avoid splashing of water.
Towash thin laundrieslike the stocking, silk etc.,
please first putthem into washing mesh bag (which
can be purchasedseparately) before wash.
Put in the laundries
How to usethe whitener
Fill water todecided level. Dilute
the whitener with container. Pour
it slowly into the washing tub.
Avoid using whitener on
laundries with color or pattern as
they are prone to lose color.
The whitener shall not touch the
laundries directly.
Refer to the user's manual for
the usage and quantity of the
whitener.
For powder whitener, please
dissolve it before use.
Inlet box of the detergent
How to use the washing
powder
Direct dissolved in the machine
1.Fill water to "Low" water level.
2.Add the power. Runfor 30 seconds
to dissolve it completely.
3.Put in thelaundries. Select
suitable water level.
The instant dissolving of the washing
powder:
1.Prepare warm water of 30 and a
container.
2.Add the powderwhile stirring to
fully dissolve it.
Put in the prorer quantities detergent
according to the water level and the
laundries quantities .
It is suggested not to use high
sudsing detergent.
Washing powder with poor quality or
long time storage maybe caked.
Please pay attention to cleaning the
detergent box intime
Usage of the detergent

10
Using process
Using process
Use the operation buttons
The user selects a suitable water level
depending on the load.
" WATER LEVEL"button
a. Description of the function of the buttons
HQM62-K
POWER
ON/OFF
START
PAUSE
PROGRAM
RESERVATION
WATER LEVEL
SOAK
WASH
RINSE
SPIN
PROCEDURE STATUSPROGRAM STATUS
JEANS
GENTLE
QUICK WASH
WASH
SPIN
STANDARD
"PROGRAM/ "buttonRESERVATION
To indicate -- during sensing.
To indicate remaining min. During
program running.
To indicate remaining reserved
time (hrs) during reservation period.
To indicate fault symbols for abnormal
conditions (see page 15)
SURPLUS(MIN)
Page 15
you can select one or several of
, , inse and Spin
Press
programs
.
"PROGRAM/RESERVATION " button
StandardJe ansG entle,Quick,R
you can select
of peservtion.
Press
over 2 seconds, the program
the N tube displays the
reserved hrs to the wash cycle end. The
indicator flashes to indicate in-reservation.
"PROGRAM/RESERVATION " button
ixie
Remarks: After pressing "POWER ON/OFF" to connect power supply, if the washing machine
lasts idle more than 10 min, it would automatically shut off the supply.
After the poweris switched on,press it to
start the machine
During working, pushit to pauseworking.
During pause, pushthis button torestart
and continue operation.
"START/PAUSE"button
Press "Power On/Off"button to connect
power supply.
After power isconnected, pressing this
button will cutoff the supply.
"POWER ON/OFF"button

11
Using process
Using process
Use the operation buttons
b. Operating procedure and explanations for the
buttons
HQM62-K
POWER
ON/OFF
START
PAUSE
PROGRAM
RESERVATION
WATER LEVEL
SOAK
WASH
RINSE
SPIN
PROCEDURE STATUSPROGRAM STATUS
JEANS
GENTLE
QUICK WASH
WASH
SPIN
STANDARD
After switching on, the "Standard" program will be the default. If other full-automatic program is
desired, you can press thebutton " " to getthe corresponding
indicator on. Refer to the "Button of ' '"
paragraph on page 10.
Example: Use the "Quick" program for slightly soiled articles.
PROGRAM/RESERVATION
PROGRAM/RESERVATION
When "standard" programis selected, thewashing
machine will performfull-automatically controlled fuzzy
program to setwater level, waterflow and wash duration
according to thecloth nature andweight
Page 10
1 Press the "POWER ON/OFF" button to switch on
the power supply
2 Press the button of" " to
select a suitable full-automatic program
PROGRAM/RESERVATION
POWER
ON/OFF
PROGRAM
RESERVATION

12
Using process
Using process
Even there's no water inthe tub, the
spinning will startafter a certain period.
Do not usesoak process forwoolen laundries.
Wash the laundries that are prone to lose
colors separately fromother laundries.
The pulsator willnot rotate unless the
water is filledto selected water level.
Selection method of the procedure programs
Attention
If you pushthe "PROCEDURE SELECTION" button for 6 times, it will resume the
original mode, andit will circulate like that.
If you selectthe"QUICK WASH" program, you haveto set thefull procedure of
wash, rinse andspin. The procedure can notbe selected.
Times of pushing
the"select"button
0
1
2
3
4
5
Applicable procedure Contents(t indicates
the programs about to run)
the nixie tube
Wash (bb) Rinse(cc) Spin(dd)
Soak (AA) Wash (bb)
Rinse (CC) Spin (dd)
Repeat using thewashing
liquid
For load below 1 Kg
When the laundriesneed only
spinning after manual
washing (first drainthen spin)
The laundry needn'tspin to
avoid wrinkles
Selected program
JEANS
GENTLE
QUICK WASH
WASH
SPIN
STANDARD
Normal wash
Large, thick or heavily soiled
laundry
Wash (bb) Rinse(cc) Spin(dd)
Wash (bb)
Wash (bb) Rinse(cc) Spin(dd)
Spin(dd)

13
Using process
Using process
After switching on,the washing machinereserved wash programwill be automatically set
inactive. If youdesire a washcycle to endat a reserved time, you can press the
""button over 2seconds to seta reserved wash program.
Refer to The button of ""on page 10.
PROGRAM/RESERVATION
PROGRAM/RESERVATION
When "Reservation"becomes active, thenixie tube
displays the timeto the endof the reserved wash cycle, and
the indicator turnson.
Tochange the runningprogram or cancel the reservation,
you should cutoff the supplyand reselect.
the washing willfinish
about 18 hourslater
Confirm the reserveprogram
START
PAUSE
5 Press the "start/pause" button
4 Push the " " button
to select suitable reserve program
PROGRAM/RESERVATION
Close the top lid
Finish washing
Except water filling and draining, if the
top cover is opened, the washing
machine will stop running and alarm.
The washing machinecuts off thepower supply
automatically when washcycle ends.
After switching on the power, press the button "WATER LEVEL" to select a water level according
to the load. Please refer to the button " Water level" on page 10.
Page 10
3 Press the "WATER LEVEL" button to select suitable
water level
WATER LEVEL
START
PAUSE
PROGRAM
RESERVATION
Page 10

14
Using process
Using process
Clean
Disposal after washing
After using, please clean the lint and foreign materials of the lint filter etc. in time.
Otherwise it may influence your using the machine.
When washing, lint filter must be used
After using, please clean it in time.
Lint filter:
1.Pull upward to detach
2.Clean the lint
Put it in water and clean while it is still wet.
(See to Figure 1).
3.Press downward to assemble.
1.After washing, close the water faucet. ( If needed, you can dismantle the water inlet hose).
Please first pull off the power plug from the receptacle before cleaning.
5.Wipe off the water drops on the surface of the machine and inside the tub. Open the top lid for some time
(about 1 hour), then close the top lid.
4.Hang up the power cord and drain hose.
3.Be sure to pull off the power plug before maintenance.
2.Do not store water in the washing machine for a long period. Drain the water completely after each using.
Figure 1
Figure 2
Pull down Put up
If the cabinetis dirty, wipe itwith wet cloth
Do not flush it directly with water.
Wipe it withneutral detergent.
Do not wipe it with thinner, petrol,
alcoholetc.
Thinner
Alcohol
Petrol
The filter screen of the water inlet
valve is likely to be blocked by
foreign materials andinfluence
the water inlet. Please clean it
Pull down Put up

15
(If there's breakdown,please pull off the power plug before checking)The following
phenomena are notbreakdowns sometimes. Please confirm again before sending it to
repair. Ifthere are real breakdowns, please cometo the special maintenance department or
after-sale service departmentof our company. Do notrepair it by yourself.
Phenomena The reason How to settle
The top lid is not closed
Is the drain hose put down?
Is the drain hose blocked by
foreign material?
Are the laundries put slantingly?
Are the laundries slanting in
spinning?
Is the machine slanting?
The water tap is not open
The water inlet valve is blocked
The water pressureis too
low and the current is
too small
Is there power failure?
Is the power plug loose?
Is the jointer screw of the water
inlet hose is loose or twisted
awry?
The water faucet leaks
There's abnormal sound inside the
machine
The machine does
not act
Close the top lid
Put down the drain hose. Open
and close the top lid once.
Clean the foreign material.
Open and close the top lid once.
Re-order the laundries. Closethe
top lid.Level the machinein right
position.
Open and close thetop lid once.
Open the water tap.Push
the "Start/Pause" button.
Clean the water inletvalve.
Push the "Start/Pause" button.
Wait for thenormal water pressure
Before use.
Use it when the power is on.
Insert the power plug tightly.
Level the machine properly.
Re-order the laundries.
Fasten the jointer screw
properly.
Trouble shooting Answer to question
Does the water level arrive at the
set water level?
Affusion to the set water level.
Is the power plug loose? Insert the power plug tightly.
Is the top lid closed? Close the top lid
Are the laundries put orderly?
Put the laundries orderly.
Not spin
Not wash
Buzzing upon reservation starts,
Nixie tube indicates "E0"
Safety switch actuates, not
spin, (after self-correction
twice), nixie tube displays
"E3", buzzing
No or slow water filling (not
reaching the level in 15 min),
nixie tube indicates
"E4",
buzzing
No or slow drain, nixie tube
indicates
"E1"
, buzzing.
If the nozzle is choked with
foreign bodies
Remove the foreign bodies
Poor or no waterfall flow
The top cover leaves open
Close the top lid
Running pauses during spin,
nixie tube indicates
"E2",
buzzing

16
User's manual
Name
Components of thewater
inlet hose
Bottom plate
Tapping screws ST4x16
One
One
One
Eight
One
Quantity
Inside the document bag
Storage position
Automatic washing machine
Inside the document bag
Inside the accessory bag
Between the upper cushion of the
washing machine package and the
upper seal of the package carton
Packing list
Lint filter
Two Inside the document bag


Table of contents
Other Haier Washer manuals

Haier
Haier HNS1000B User manual

Haier
Haier HU-HA501 User guide

Haier
Haier HWF5000AW Assembly instructions

Haier
Haier HW110-B14979EU1 User manual

Haier
Haier HWM65-828 User manual

Haier
Haier HLP21N User manual

Haier
Haier HNS1460TVE User manual

Haier
Haier HW100-BDV14979S8U1 User manual

Haier
Haier XQB50-10 User manual

Haier
Haier HD1405TXV User manual

Haier
Haier HWM85-1482 User manual

Haier
Haier Thermocool HWM110-287S User manual

Haier
Haier HWM70-98 User manual

Haier
Haier HWM65TLF User manual

Haier
Haier HWM60-728 User manual

Haier
Haier HA1000 User manual

Haier
Haier HW-F1481 ME User manual

Haier
Haier HW100-1211N User manual

Haier
Haier HWF80BW1 User manual

Haier
Haier HWM75TL User manual