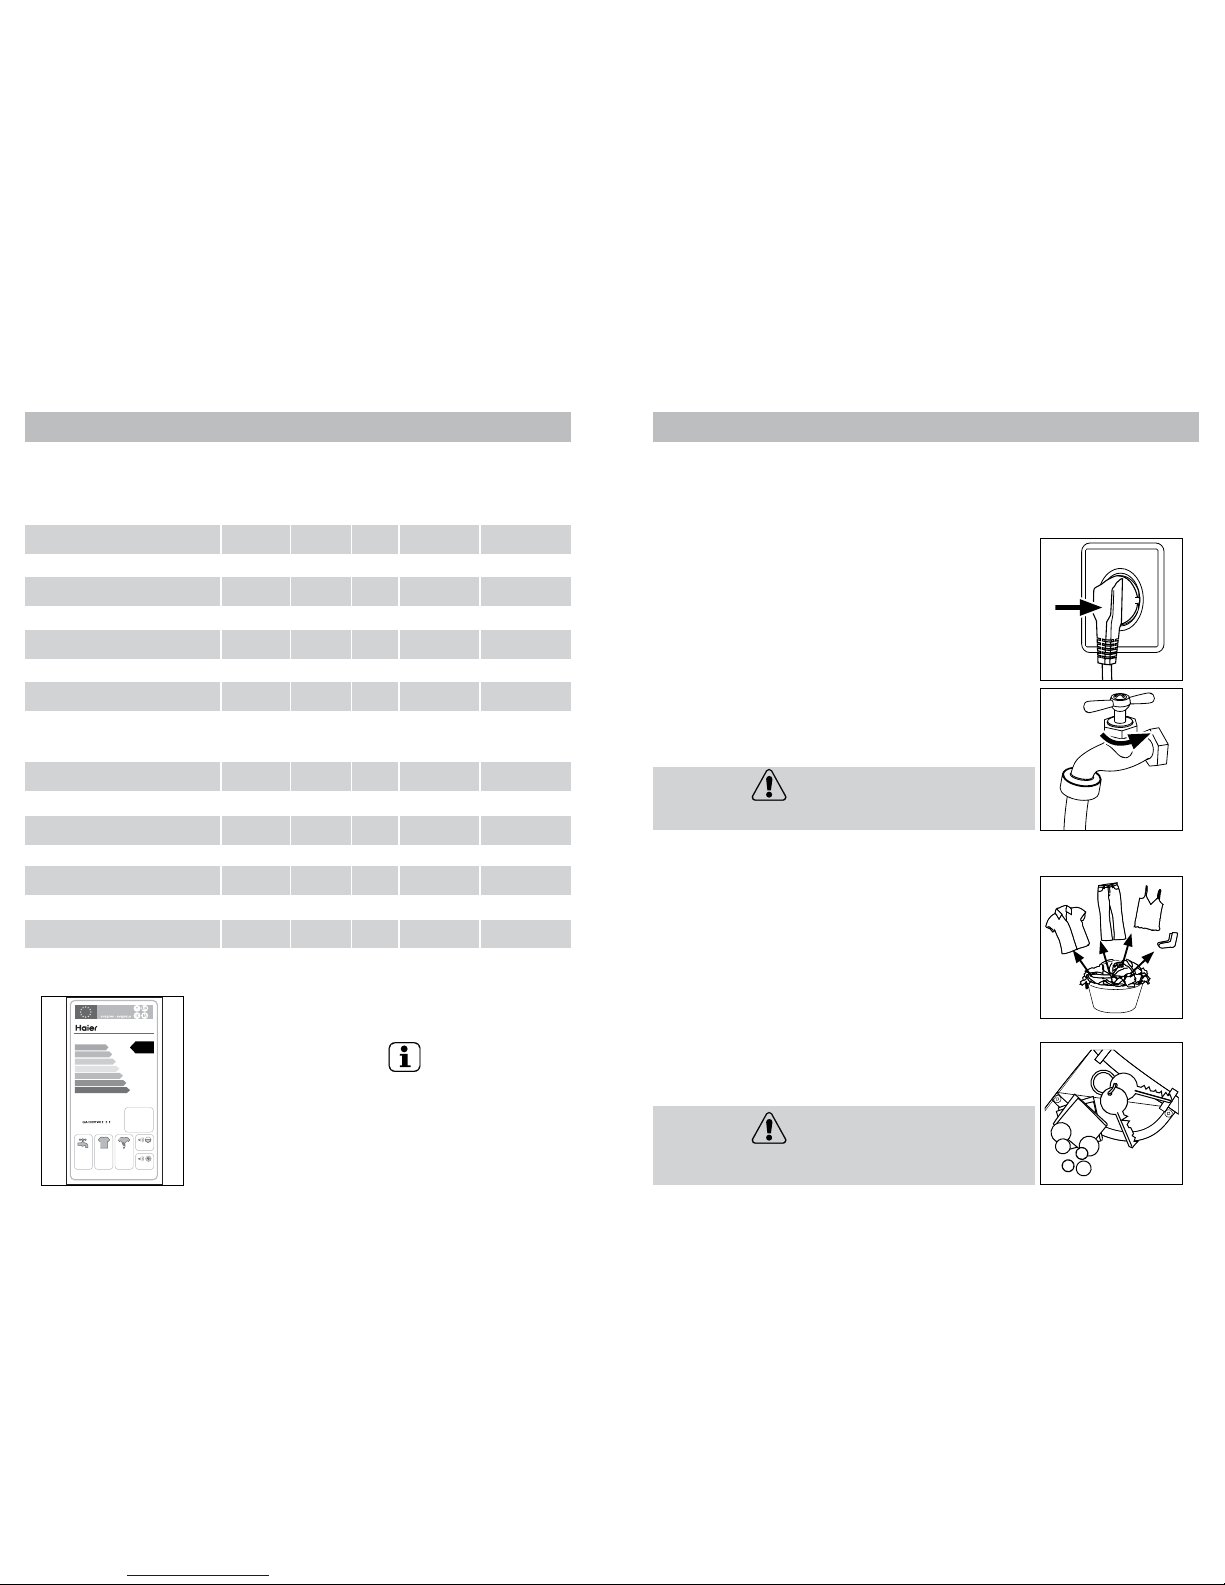
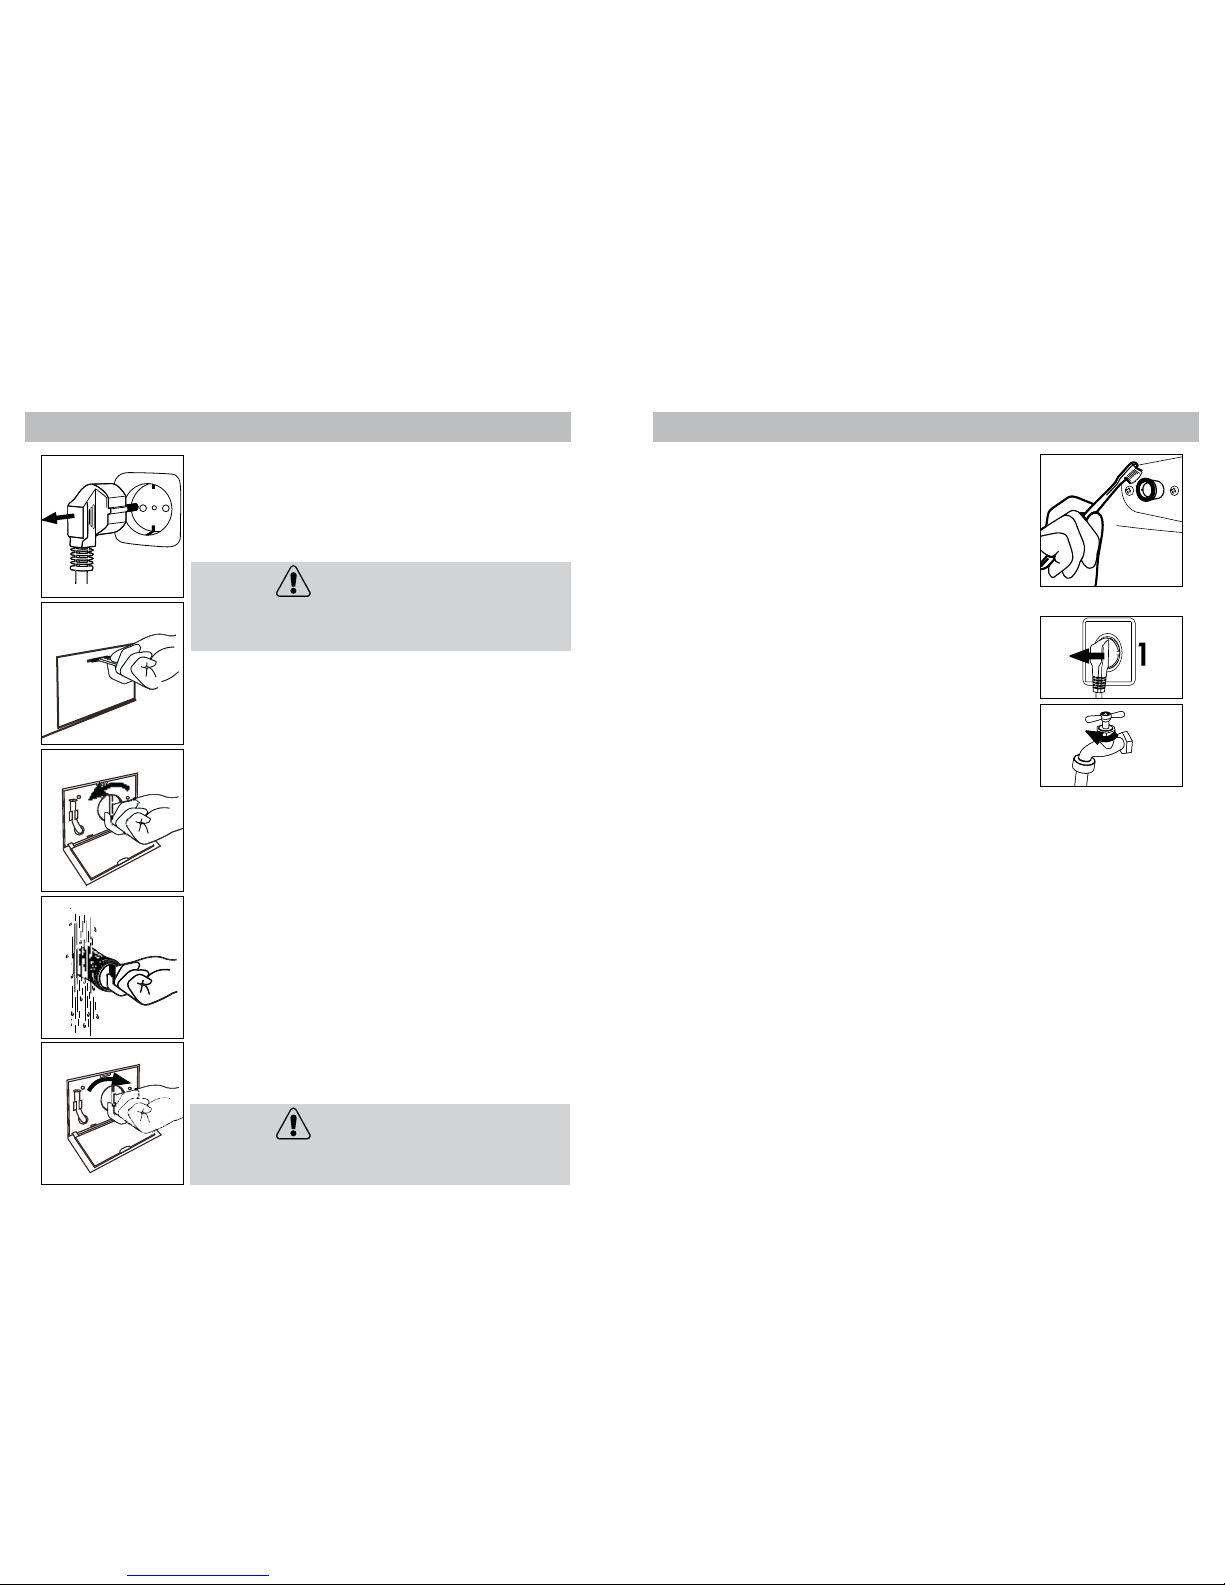
Haier HW80-BD1626 User manual

HW80-BD1626
6
Temp.
1 2 3
1 2 3
rpm
Wasch-
mittel
M
Mix
M2
M3
M1
Baumwolle
Synthetik
Express 15
Baby Care
Selbstreinigung
Schleudern/
Abpumpen
Hand-
wäsche
Fein-
wäsche
Ultra Weiß
Sport
Jeans
Unter-
wäsche
Hygiene 95°c
Wolle
AuswahlOptionen
Schleudern
Zeitvorwahl
Weich-
spüler
M emo
Tägliche Wäsche
Cotton DailyWash
UltraWhite
Express15
BabyCare
Delicate
HandWash
Spin/Drain
SelfClean
Synthetic
Mix
Wool
Underwear
Sport
Jeans
Hygenic95°c
M1
M2
M3
FunctionSelection Delay Temp.
Speed
Memo
12 3
12 3
rpm
DetergentSoftener
SmartFunction
M
User Manual
Washing Machine

3Index
Safety........................................................................................... 4-5
Product description..................................................................... 6
Control panel............................................................................ 7-10
Programmes................................................................................. 11
Consumption................................................................................ 12
Daily use................................................................................. 13-16
Care and cleaning.................................................................. 17-19
Troubleshooting.................................................................... 20-22
Installation............................................................................... 23-25
Technical data ............................................................................ 26
After sales service....................................................................... 27
2
Yes
No
General information and tips
Warning! Important safety information!
Environmental information
The presence of this symbol on the product,
accessories or materials that goes with this in-
formation indicates that at the end of its useful
life the product or its electronic accessories
(e.g. cable, Aqua Stop hose) should not be dis-
posed with other household waste. To prevent
possible damage to the environment or human
health from uncontrolled waste disposal, please
separate these items from other types of was-
te and recycle them.This will promote the sus-
tainable reuse of material resources. Household
users should contact either the retailer where
they purchased the product or relevant local
authorities to find out how they can take this
item for environmentally safe recycling and safety.
Business users should contact their supplier and
check the conditions of the purchase. This pro-
duct and its electronic accessories should not
be mixed with other commercial waste.
Disposal
Legend
Thank you for purchasing a Haier product
Please read these instructions carefully before using this appliance. It contains impor-
tant information which will help you get the best out of your appliance and ensure safe
and proper installation, use, care and cleaning.
Keep this manual in a convenient place so you can always refer to it for safe and
proper use.
If you sell the appliance, give it away, or leave it behind when you move, make sure you
also pass on this manual so that the new owner can become familiar with all features
and safety warnings.

5Safety
During daily use of the appliance...
...supervise children.
Ensure that they don’t play with the appliance and its packaging.
...ensure that appliance is not used by people with
reduced physical, sensory or mental capabilities, lack of
experience and knowledge.
...pull up zips, fix loose threads and take care for small items
to prevent laundry from being entangled. If necessary, use
an appropriate bag or net.
...switch off at the wall socket after each wash programme
to save electricity and for safety.
...keep the lower part of the porthole clean and open door
and detergent drawer if appliance is not in use to prevent
odours.
...a damaged power cord is only to be replaced by the
manufacturer, his service agent or other specifically
qualified people.
Do not ...
...touch the door during the washing process, it gets hot.
...place heavy objects or sources of heat or damp on top of
the appliance.
...hot wash from rubber or sponge-like materials.
...open detergent drawer during any wash cycle.
...force the door to open, it is fitted with a self-lock
device and will open shortly after wash cycle end.
...open the door if the water level is visibly over the
porthole.
...cover or encase the appliance during operation or after
wards to allow any moisture or dampness to evaporate..
4
Safety
Before switching on the appliance for
the first time...
...make sure all transport bolts are removed.
...make sure the power cord is not caught under or in
the appliance and there is no damage or risk for damaging.
...make sure the power circuit fuse is rated for15A.
...use a separate earthed socket for the power supply.
...make sure the plug is always accessible.
...hold the plug and not the electric cable when unplugging
the power supply.
...check that hose joints and connections are firm and
by opening tap check for any waterleakage.
...do not switch on the appliance until everything is properly
installed!
Do not …
...allow children or infirm persons to play with the appliance
or packing materials.
...install the appliance outdoors in a damp place, or in an
area which may be prone to water leaks such as under
or near a sink unit. In the event of a water leak cut power
supply and allow the machine to dry naturally.
...expose machine to any frost, heat or direct sunlight.
...touch or use the appliance when barefoot or with wet or
damp hands or feet.
...use flammable detergent or dry cleaning agent.
...use any flammable sprays in close vicinity to the appliance.
...remove or insert the plug in presence of flammable gas.
...place the appliance directly on a carpet, or close to
a wall or furniture.

7Control panel
1Detergent / Softener drawer
2Display
3Programme selector
4„Start/Pause “ button
5“On/Off“ button
6Function buttons (a-h)
a Function
bSelection
cDetergent
dSoftener
eDelay (Endtime delay)
fTemperature
gSpin (rpm)
hMemo
Detergent drawer
Compartment 3: Softener reservoir (Smart Dosing).
Compartment 2: Washing agent compartment.
For all washing agents if “Smart Dosing“
function is deactivated.
Compartment 1: Liquid detergent reservoir (“Smart Dosing“)
no gel, no concentrate.
The recommendation on the type of detergents is suitable for the various washing temperatu-
res, please refer to the manual of detergent.
Display
If the appliance is on display will light up the actual status on six different sections (see
next pages).During operation display will be deactivated after a while (Energy saving
mode) until programme selector is turned at random.
Programme selector
By turning the knob one of 16 programmes can be selected, related LED will light up
its default settings will be displayed
“Start/Pause” button
Press this button gently to start or interrupt the currently displayed programme. During
operation its symbol is shining, or if interrupted blinking
“On/Off” button
Press this button gently to switch on, the display is shining. Press again for about 2
seconds to switch off. If no panel element or programme is activated after a while
machine will shut down automatically.
M emo
1 2 3
1 2 3
rpm M
Weichspüler
Function Selection
Spin
Detergent Softener Delay Temp.
Cotton Daily Wash
Ultra White
Express 15
Baby Care
Delicate
Hand Wash
Spin/Drain
Self Clean
Synthetic
Mix
Wool
Sport
Jeans
Hygenic 95°c
M1
M2
M3
Under-
wear
6 a-h
6 a-h
12 3 4 5
6
Product description
1 Detergent / Softener drawer
2 Door
3 Worktop
4 Door handle
5 Control panel
6 On/Off
7 Service flap
1 Transportation bolts (T1-T4)
2 Back cover
3 Back cover screws (S1-S4)
4 Power cord
5 Water inlet valve
6 Drain hose
Accessories
1x Inlet hose
assembly 4x Blanking
plugs 1x Drain hose
bracket 1x User manual
This drawing may be slightly different from the layout of the washing machine you have just purchased.
Check the accessories and literature in accordance with this list.
6
Temp.
1 2 3
1 2 3
rpm
Wasch-
mittel
M
Mix
M2
M3
M1
Baumwolle
Synthetik
Express15
BabyCare
Selbstreinigung
Schleudern/
Abpumpen
Hand-
wäsche
Fein-
wäsche
UltraWeiß
Sport
Jeans
Unter-
wäsche
Hygiene95°c
Wolle
AuswahlOptionen
Schleudern
Zeitvorwahl
Weich-
spüler
Memo
Tägliche Wäsche
Cotton DailyWash
UltraWhite
Express15
BabyCare
Delicate
HandWash
Spin/Drain
SelfClean
Synthetic
Mix
Wool
Underwear
Sport
Jeans
Hygenic95°c
M1
M2
M3
FunctionSelection DelayTemp.
Speed
Memo
123
123
rpm
DetergentSoftener
SmartFunction
M
7
1 2 3 4 5 6
123
lever

9function buttons - Control panel
“Delay“ - End time delay (button e)
Touch it to light up related symbol and display present
programme end time.Accordingly to all programme settings
start of wash cycle will be delayed.
End time delay could be increased by turning programme
selector in steps of 30 minutes from 0,5-24h. For example,
display of “6:30” means end of programme cycle will be in 6
hours and 30 minutes.
It is not applicable to programme “Spin/Drain”.
Note: End time must always be longer than programme
cycle time. Otherwise operation will start immediately,
although chosen end time could not be reached.
“Temperature“ (button f)
Touch it to adapt maximum of water temperature.
Note: Display of “--“ stands for “no operational heating“.
“Spin” (button g)
Touch it to adapt speed of centrifugation.
“Memo” (button h)
Memory function is available in programme “Cotton“ (M1),
“Synthetic“ (M2),“Mix“ (M3).After selecting individual
options and related values touch “Memo“ button until
display shows related “M1”/”M2”/”M3“. Start programme,
memory is now activated for chosen programme.When that
programme will be chosen next, press “Memo“ button to
activate memorized setting and be at once ready to start.
General information and tips:
To cancel any actual setting change programme or press
”On/Off” about 3 seconds.To cancel a running program-
me touch “Start/Pause“ and then ”On/Off” for about 3
seconds.
8
Control panel - function buttons
“Function“ (button a)
Touch it to select sequentially required functions and set-
tings.The related symbol will shine.
“Selection“ (button b)
Touch it to confirm the current chosen „Function“, its
symbol is blinking.Additionally a “checkmark“, a “1“/“2“/“3“
symbol, or one of the stain symbols will light up. Function
will be activated after 3 seconds or if button a (“Function“)
is touched.
“Child lock“ - control panel lock function
(button a + b)
This option blocks all panel elements against activation.After
starting,press simultaneously “Function“+“Selection“ for
about 3 seconds. Panel lock symbol is now displayed. Next
repetition deblocks any function.
“Detergent“ (button c)
Touch it to deactivate or activate “Smart Dosing“ for liquid
detergent. If default setting liquid detergent (see “Smart
Dosing“) is deactivated detergent drawer compartment 2 is
to be used for all kinds of washing agent.
“Softener“ (button d)
Touch it to deactivate, or activate an additional dosage of
softener (see “Smart Dosing“).
“Smart Dosing “ (button c or button d)
“Smart Dosing“ is default setting. Means, due to programme,
laundry load and water hardness there will be an optimal au-
tomatic dosage of liquid detergent and softener using related
compartments 1 (1,3l) and 3 (0,5l) of the detergent drawer.
If activated according symbols will light up.This function
achieves optimal results, saves washing agent and protect our
environment.A charge lasts for up to 20 programme cycles.
If a reservoir is empty related symbol will be blinking.
To get best results in each programme Haier has well defined specific default settings.
If there is no special requirement default settings are recommended.Accordingly to
these factory settings many programme parameters and additional functions could be
individually changed (see “programmes“ and “function“ buttons).
rpm
M
e f g h
Time display
(related to current
operation)
1 2 3
1 2 3
Wasch-
mittel
SelectionFunction
Weich-
spüler
a b
c d
Detergent Softener

11 Programmes
1 Hygenic 95°c --- 95°C Cotton /Synth. 1000 rpm
2 Jeans 0-60°C 40°C Jeans 1000 rpm
3 Sport 0-40°C 30°C Sports Wear 1000 rpm
4 Underwear 0-60°C 40°C Underwear 1000 rpm
5 Wool 0-40°C ---- Woolen 600 rpm
fabrics
6 Mix 0-60°C 40°C Cotton /Synth. 1000 rpm
7 Synthetic 0-60°C 30°C Chemical 1200 rpm
fibre fabrics
8 Cotton 0-90°C 40°C Cotton /Synth 1600 rpm
9 Daily Wash 0-40°C 40°C Cotton fabrics 1400 rpm
10 Ultra White 0-60°C 40°C Cotton /Synth 1000 rpm
11 Express 15 0-30°C 20°C Cotton /Synth 1000 rpm
12 Baby Care 0-90°C 90°C Cotton /Synth 1000 rpm
13 Delicate 0-40°C 30°C Silk or wool 600 rpm
14 Hand Wash 0-40°C 30°C Cotton fabrics 800 rpm
15 Spin/Drain --- --- --- 1400 rpm
16 Self Clean 90°C 1000 rpm
Programme Temp. Preset Fibre type Preset
max. Spin speed
3 2 1
Programme table
1 Liquid detergent reservoir
2 Washing agent compartment
3 Softener reservoir
OptionalYes No
10
Control panel - display symbols
Reduced programme cycle time Default setting, no option
Anti wrinkling (after cycle end) Sport
Anti wrinkling (rinse cycle stop) Grass
Intensified main wash cycle (1 to 3) Wine
Additional rinse cycle (1 to 3) Coffee
Fruit
Door is locked (in operation) Running wash Liquid detergent
cycle Smart Dosing activated
Control panel locked Running rinse Softener
cycle Smart Dosing activated
No water supply Running spin/ Endtime delay activated
drainage cycle
Door is open Maximum wash-
temperatur setting
Water hardness Maximum speed of
(automatic detection) rotation setting
Liquid detergent Memo setting
- empty Reservoir
Softener - empty Reservoir
Function Function (Stains remover)
Basic status indication Programme cycle Programme settings
indication

13 Daily use
Power supply
Connect the washing machine to the power supply (220V to
240V~/50Hz).
Water connection
Turn on the tap.The water must be clean and clear.
Warning!
Before use, turn tap on and check for any leackage.
Preparing laundry
Sort out clothes according to fabric (cotton, synthetics, wool
or silk) and to how dirty they are.
Separate white clothes from coloured ones.Wash coloured
textiles first by hand to check if they fade or run.
Garments without hems, delicates and finely woven textile
such as fine curtains are to be put into a wash bag to care
for this delicate laundry (hand or dry cleaning would be
better). Close zippers and hooks, make sure the buttons are
sewn on tightly and place small items such as socks, belts,
bras, etc. in a wash bag.
Unfold large pieces of fabric such as bed sheets, bedspreads
etc.Turn clothes inside out. Empty pockets (keys, coins, etc.)
and remove harder decorative objects (e.g. brooches).
Warning!
Non-textile, as well as small, loose or sharp-edged items may cause
malfunctions and damage of clothes and appliance.
This appliance is only for domestic use inside the house. If it is used for commercial,
industrial or not intended purposes any Haier guarantee will not be valid anymore.
Consider anytime instructions of each garment label and wash only machine-washable
laundry.
12
Consumption
Programme Energy Water Washing
time Spin drying
performance
Temp.
Max. load
kg kWh L°C h:min %
*General information and tips:
Standard programme for the Energy Labelling according to
2010/30EU:
Cotton 60°C/40°C with max. spin speed setting and activated
intensive function (level 3) without “smart dosing“.
The standard 60°C and 40°C cotton programmes are suitable to clean
normally soiled cotton laundry.They are the most efficient programmes in
terms of combined energy and water consumption for cotton laundry.Used
water temperature may differ from declared cycle temperature.
118
48
dB
70
dB
A
B
CDEFG
kWh/annum
9856
HW80-BD1626
8,0
kg
2010/1061
A
+++
A
++
A
A
B
C
D
+
A
+++
ENERG
kg
ENER ·N P EIA
ENERGIJA·ENERGY·ENERGIE
ENERGI
L/annum
Hygenic 95°C 2 2,00 36,0 95 Auto ---
Jeans 4 0,56 40,0 40 Auto ---
Sport 2 0,26 35,0 30 0:25 ---
Underwear 4 0,50 40,0 40 1:19 ---
Wool 1 0,10 50,0 --- 0:42 ---
Mix 4 0,56 34,0 40 Auto ---
Synthetic 4 0,25 46,0 30 Auto ---
Cotton 40* 4 0,40 35,0 40 Auto <45
Cotton 60* 4 0,55 36,0 60 Auto <45
Cotton 60* 8 0,55 45,0 60 Auto <45
Daily Wash 4 0,58 46,0 40 1:20 ---
Ultra White 2 0,60 45,0 40 1:14 ---
Express 15’ 1 0,20 20,0 20 0:15 ---
Baby Care 4 2,00 67,5 90 2:05 ---
Delicate 1 0,25 50,0 30 0:56 ---
Hand Wash 2 0,25 36,0 30 0:57 ---
Spin/Drain 8 0,10 --- --- 0:06 ---
Self Clean --- 1,80 15,0 90 1:05 ---
The indicated consumption values may differ in addiction of local conditions.

15 Daily use
Select a programme
To get the best washing results, select a programme which
fits the degree of soiling and sort of laundry type. Please
turn the programme knob to select the right programme.
Select options
Select required options (refer to “Control Panel“).
Start wash programme
Touch “Start/Pause“ button to start.Appliance operates
according to present settings. Changes are only possible by
cancelling wash programme.At programme cycle end “End“
is displayed, afterwards machine will shut off automatically.
Interrupt - cancel wash programme
To interrupt a running programme press gently “Start/Pause“
button. Press it again to resume operation.
To cancel a running programme and all its individual settings
activate “Start/Pause“ and then for about 3 seconds “On/Off“.
General information and tips:
Choose programme settings carefully refering to icons on
each laundry label and “Care chart“.
Removing laundry promptly at cycle end will be gently and
minimize wrinkling.
After washing
Turn off the water supply and unplug the power cord.
Open the door to prevent formation of moisture and
odours. Let it open while not used.
Cotton Daily Wash
Ultra White
Express 15
Baby Care
Delicate
Hand Wash
Spin/Drain
Self Clean
Synthetic
Mix
Wool
Sport
Jeans
Hygenic 95°c
M1
M2
M3
Under-
wear
M emo
1 2 3
1 2 3
rpm M
Function Selection
Spin
Detergent Softener Delay Temp.
Cotton Daily Wash
Ultra White
Express 15
Baby Care
Delicate
Hand Wash
Spin/Drain
Self Clean
Synthetic
Mix
Wool
Sport
Jeans
Hygenic 95°c
M1
M2
M3
Under-
wear
Cotton Daily Wash
Ultra White
Express 15
Baby Care
Delicate
Hand Wash
Spin/Drain
Self Clean
Synthetic
Mix
Wool
Sport
Jeans
Hygenic 95°c
M1
M2
M3
Under-
wear
Memo
1 2 3
1 2 3
rpm M
Weichspüler
Function Selection
Spin
Detergent Softener Delay Temp.
Cotton DailyWash
UltraWhite
Express15
BabyCare
Delicate
HandWash
Spin/Drain
SelfClean
Synthetic
Mix
Wool
Sport
Jeans
Hygenic95°c
M1
M2
M3
Under-
wear
14
Daily use
Loading the appliance
Open the door and put in the laundry piece by piece.
Don‘t overload. Check if you can put a hand upright on top
of load. Close the door carefully.
General information and tips:
After each installation or longer down time run at first
programme “Self Clean“ with no load and added deter-
gent in washing agent compartment (2) to remove possib-
ly corruptive residues.
Selecting detergent
Washing efficiency and performance is determined by
used detergent quality. Use only machine wash approved
detergent and if needed specific detergents, e.g. for synthe-
tic and woolen fabric. Mind always detergent manufacturer
recommendations.
General information and tips:
Remove detergent residues before next wash cycle.
Please follow given detergent dosage recommendation
from detergent package.
Adding detergent - “Smart Dosing“
Slide out the detergent drawer and put the required washing
agents into the corresponding compartments.
Important information: “Smart Dosing“is default setting.
Accordingly to programme, load and water hardness an
optimal dosage of washing agent will be automatically applied
using reservoirs for liquid detergent (1,3l) and softener (0,5l).
To fill up open related flap of the detergent drawer and add
a non concentrated product until the “MAX limit line“ is
reached.At last push gently the drawer back.
Please note the
instructions on
the drawer!
6
Temp.
1 2 3
1 2 3
rpm
Wasch-
mittel
M
Mix
M2
M3
M1
Baumwolle
Synthetik
Express15
BabyCare
Selbstreinigung
Schleudern/
Abpumpen
Hand-
wäsche
Fein-
wäsche
UltraWeiß
Sport
Jeans
Unter-
wäsche
Hygiene95°c
Wolle
AuswahlOptionen
Schleudern
Zeitvorwahl
Weich-
spüler
Memo
TäglicheWäsche
Cotton DailyWash
UltraWhite
Express15
BabyCare
Delicate
HandWash
Spin/Drain
SelfClean
Synthetic
Mix
Wool
Underwear
Sport
Jeans
Hygenic95°c
M1
M2
M3
FunctionSelection DelayTemp.
Speed
Memo
123
123
rpm
DetergentSoftener
SmartFunction
M
MAX
MAX
limit line

17 Care and cleaning
Cleaning the detergent drawer
Clean the drawer from detergent residues regularly. Pull out
the drawer until it stops (1) and press the release button (2)
to remove the drawer.Then flush the drawer with water
until it is clean and insert the drawer back in the appliance.
Cleaning the machine
Unplug the machine during cleaning and maintenace. Use a
soft cloth with soap liquid to clean the machine case and
rubber components. Do not use organic chemicals or corro-
sive solvents.
General information and tips:
After each installation or longer downtime run at first pro-
gramme “Self Clean“ with no load and added detergent
in washing agent compartment (2) to remove possibly
corruptive residues.
Environmental information
To achieve best use of energy, water, detergent and time
you should use the recommended maximum load size.
Do not exceed indicated chemical dosages.
Choose always lowest washing temperature.
Modern detergents are cleaning efficiently below 60°C.
Only due to heavy soil raise accordingly default settings.
Using afterwards a domestic dryer max. spinning speed is
recommended.
Memo
1 2 3
1 2 3
rpm M
Weichspüler
Function Selection
Spin
Detergent Softener Delay Temp.
Cotton DailyWash
UltraWhite
Express15
BabyCare
Delicate
HandWash
Spin/Drain
SelfClean
Synthetic
Mix
Wool
Sport
Jeans
Hygenic95°c
M1
M2
M3
Under-
wear
1
2
16
Daily use
Care chart
Maximum washing Maximum washing Maximum washing
temperature 95°C - temperature 60°C - temperature 60°C
normal process normal process mild process
Maximum washing Maximum washing Maximum washing
temperature 40°C - temperature 40°C - temperature 40°C -
normal process mild process very mild process
Maximum washing Maximum washing Maximum washing
temperature 30°C - temperature 30°C - temperature 30°C -
normal process mild process very mild process
Wash by hand Do not wash
max. temp. 40° C
Any bleaching agent Only oxygen / Do not bleach
allowed non-chlorine
bleach allowed
Tumble drying possible Tumble drying possible Do not tumble dry
normal temperature lower temperature
Line drying Flat drying
Iron at a maximum Iron at a maximum Iron at a maximum
sole-plate temperature sole-plate temperature sole-plate temperature
of 200°C of 150°C of 110°C without steam
(steam ironing may cause
Do not iron irreversible damage)
Professional dry cleaning Professional dry cleaning Do not dry clean
in tetrachloroethene in hydrocarbons
Professional Do not professional
wet clean wet clean
Washing Process
Bleaching Process
Tumble Drying Process
Ironing Process
Professional Textile Care Process

19 Care and cleaning
Water inlet valve and inlet valve filter
To prevent blockage of water supply by foreign substances,
clean inlet valve filter regularly.
Period of disuse
If the appliance is left idle for a longer period, pull out
the electrical plug (1) and turn off water supply (2).
Open the door to prevent formation of moisture and
odours. Let door open while not used.
Before next usage check carefully power cord, water inlet
and drain hose. Make sure everything is properly installed
and without leackage.
18
Care and cleaning
Pump filter
Please check the pump filter regurarly and if the appliance
- doesn´t drain the water,
- doesn´t spin,
- cause unusual noise while running.
Warning!
Scalding Risk! Water in the pump filter can be very hot! Before any
action please ensure water has cooled down.
1. Turn off and unplug the machine.
2. Open service flap.You can either use a coin or a
screwdriver.
3. Provide a flat container to catch leach water.
There could be bigger amounts!
4. Pull the drainhose out and hold its end above the
container.
5. Take the sealing plug out of the drainhose.
6. After complete drainage, unscrew and remove counter
clockwise the pump filter.
7. Remove contaminants and dirt.
8. Clean carefully pump filter, e.g. using running water.
9. Refix it thoroughly.
10. Close drainhose and push it back into the machine.
11. Close service flap
Warning!
Pump filter sealing has to be clean and unhurt.
If the lid is not full tightened, water can escape.
2

21 Troubleshooting
Troubleshooting without display code
Problem Cause Solution
Washing machine Programme is not yet started. Press “Start/Pause“ button.
fails to operate. Door is not properly closed. Close the door properly.
Machine has not been switched on. Switch the machine on.
Power failure. Check power supply.
Washing machine No chosen programme. Set programme and start it.
will not be filled No water. Check water tap.
with water. Inlet hose is kniked. Check inlet hose.
Inlet hose filter is blocked. Unblock inlet hose filter.
Water pressure is less than Check water pressure.
0,03 MPa.
Water supply failure. Ensure the water supply.
Machine is draining Height of drain hose is Make sure that drain hose
while being filled below 80 cm. is properly installed.
Drain hose end could
reach into water.
lever
In case of power failure
The current programme and its setting will be saved only
for a short time. Probably a new programme cycle start is
needed.
If a power failure cuts an operating wash programme door
opening is mechanically blocked.To get out any laundry
water level should not be seen in the glassy porthole of the
door - danger of burns!
Water level has to be lowered as described in “Pump filter“.
Not till then pull lever beneath service flap until door is
unlocked by a gentle click.Afterwards refix all parts.
20
Troubleshooting
Display code
Code Cause Solution
Auto Automatic load detection. Wait until programme cycle time
is displayed
1:25 Remaining wash cycle time. Refer to additional symbol.
19:30 Remaining wash cycle time. End is likely delayed - refer to symbol.
Lock Automatic door locking. Wait until operation ends and
code disappear.
End End of wash cycle.
E1 Drainage error, water not emptied. Clean pump filter.
Check drain hose for blockage
and proper installation.
E2 Lock - error. Shut the door properly.
E4 Water level not reached after 8 minutes. Check if water supply
and water pressure is normal.
Drain hose is self-syphoning.
E8 Water protective level - error. Auto release.Otherwise contact the
After sales service.
F3 Temperature sensor - error. Contact the After sales service.
F4 Heating error (Appears at the end of a cycle). Contact theAfter sales service.
F7 Motor - error. Contact the After sales service.
Fb Water overflow. Close tap immediately.
Contact the After sales service.
FA Water level sensor error. Contact the After sales service.
FC Electronic control - error. Contact the After sales service.
Unb Unbalanced load - error. Cut power supply. Check and
balance laundry load.Try to run a
spinning programme.
Warning!
Code Fb: Water-overflow protection is placed on deepest part of appliance. In case of leacka-
ge all functions will be shut down automatically except drain pump which will be activated for
safety reasons.

23 Installation
Preparation
Remove all packaging material including polystyrene base.
While opening the package, water drops may be seen on
plastic bag and porthole.This normal phenomenon results
from water tests in the factory.
Dismantle the transportation bolts
The transportation bolts are designed for clamping anti-
vibration components inside the appliance during transpor-
tation.
1. Remove the back cover.
2. Remove bolts on the rear side and take out plastic spacers
from inner side of the machine.
General information and tips:
Keep the transportation bolts in a safe place for later use.
If the machine is to be moved to another location, replace
transportation bolts contrariwise to prevent damage.
3. Replace back cover by inserting it in the two gaps its con-
vexity is facing outside
4. Fill left holes with blanking plugs.
Adjusting the feet
Adjust all feets to achieve a complete level position.This will
minimize vibrations and thus noise during use. It will also
reduce wear and tear.We recommend to use a spirit level
for adjustment. Floor should be as stable and flat as possible.
22
Troubleshooting
Drainage failure. Pump filter is blocked. Clean pump filter.
Drain hose end is higher than Make sure that drain hose
100 cm above floor level. is properly installed.
Drain hose is blocked. Unblock drain hose.
Strong vibration Machine load is not correct.. Adapt amount of laundry.
while spinning. Washing machine is located Make sure that washing
on an uneven surface or is machine is on an even sur-
not levelled. face and levelled.
Not all transportation bolts Remove all transportation
have been removed. bolts.
Operation stops Water or electric failure. Check power
before completing and water supply.
wash cycle.
Operation stops No displayed “error code“? Activate display - see“.display“.
for a period of time. Programme performs Touch“Start/Pause“ to resume.
soaking cycle?
Programme break down. If it seems appropriate
cancel operation.
Excessive foam Detergent is not a appropriate. Check detergent
floats drum and/or recommendations.
detergent drawer. Excessive use of detergent. Reduce amount of detergent
Automatic adjustment Washing programme This is normal and doesn‘t
of washing time. duration will be adjusted. affect functionality.
Spinning fails. Unbalance of laundry. Check machine load and
laundry and run a spinning
programme again.
Problem Cause Solution
General information and tips:
If too much foam is inspected during spin cycle, motor stops and drain pump will be
activated for 90 seconds. If that elimination of foam fails up to 3 times, programme
ends without spinning.
2.
1.
3.
4.
3.
4.
3.
2.

25 Installation
3. Drain hose to sewage pipe
Use the drain hose bracket to keep drain hose end retained.
Fix the bracket sufficiently to avoid dropping down due to
operational movements.
Warning!
The drain hose should not be submerged in water and should be
securely fixed and leak-free. If the drain hose is placed on the
ground or if the pipe is at a height of less than 80cm, the washing
machine will continuously drain while being filled (self-siphoning).
Drain hose is not to be extended. If necessary contact after sales
service.
Power supply connection
Before each connection check if:
- socket is adequate for the maximum power of the
appliance (safety power circuit fuse should be
rated not less than 15A).
- voltage should meet the requirement.
- power outlet should be appropriate to appliance plug.
- used power socket has to be earthed.
Note - only UK:The fuse in a UK 13A plug must comply
to BS1362 standard.
24
Installation
Inlet hose - Aqua control System
The Aqua Stop inlet hose is an important element for safety
and over all control. Its valves are controlling water supply
and will interrupt it if the hose is leaking
1. Connect the nut on the inlet hose to the connector
on the water valve.
2. Apply inlet hose to a water tap.
Warning!
Appliance is only qualified for cold water supply!
Use the hose-set supplied with the appliance.
Old hose-sets should not be reused.
Drain hose
Drainage could be installed in different ways. Nevertheless,
level of drain hose has to reach at one point 80-100 cm.
If possible keep always drain hose fixed to the clip at the
appliance back.
1. Drain hose to sink
Use the drain hose bracket to keep drain hose end retained
and out of any water level.
Fix the bracket sufficiently to avoid dropping down due to
operational movements.
2. Drain hose to sink siphon
Connection has to be securely sealed and fixed to corres-
pondig adapter above the siphoning part!
80 - 100 cm

27 After sales service
In case of trouble, please check the trouble-shooting section of this manual. If required
please check your warranty card for after sales service information.
Country Phone number Costs
Haier Italy (IT) 199-100 912
Haier Spain (ES and PT) 902 509 123
Haier Germany (DE) 0180 5 39 39 99 -14 Ct/Min Landline
- max 42 Ct/Min Mobile
Haier Austria (AT) 0820 001 205 - 14,53 Ct/Min Landline
- max 20 Ct/Min all others
Haier United Kingdom (UK) 0845 025 30 25
Haier Republic of Ireland (IE) 01 431 1342
Haier France (FR) 0980 406 409
For other countries please refer to: www.haier.com service and support area.
You can find FAQs and can activate service claim.
26
Technical data
Basic technical information regarding the appliance
Power source 220 - 240V~/50Hz
Max. working current (A) 10
Water pressure (MPa) 0.03≤P ≤1
Nominal load (kg) 8
Spinning speed (rpm) 1600
Washing programmes 16
Max. power (W) 2000
Dimensions (HxDxW mm) 845 x 650 x 595
Net. weight (kg) 71
Power consumption of the off-mode (W) 0,2
Power consumption of the left-on mode (W) 0,2
HW80-BD1626

HW80-BD1626
6
Temp.
1 2 3
1 2 3
rpm
Wasch-
mittel
M
Mix
M2
M3
M1
Baumwolle
Synthetik
Express 15
Baby Care
Selbstreinigung
Schleudern/
Abpumpen
Hand-
wäsche
Fein-
wäsche
Ultra Weiß
Sport
Jeans
Unter-
wäsche
Hygiene 95°c
Wolle
AuswahlOptionen
Schleudern
Zeitvorwahl
Weich-
spüler
M emo
Tägliche Wäsche
Cotton DailyWash
UltraWhite
Express15
BabyCare
Delicate
HandWash
Spin/Drain
SelfClean
Synthetic
Mix
Wool
Underwear
Sport
Jeans
Hygenic95°c
M1
M2
M3
FunctionSelection Delay Temp.
Speed
Memo
123
123
rpm
DetergentSoftener
SmartFunction
M
Gebrauchsanleitung
Waschmaschine

2 3 Inhalt
Sicherheitshinweise.................................................................... 4-5
Produktbeschreibung.................................................................... 6
Bedienblende............................................................................ 7-10
Programme.................................................................................. 11
Verbrauch..................................................................................... 12
Täglicher Gebrauch................................................................13-16
Reinigung und Pflege..............................................................17-19
Fehlerbehebung...................................................................... 20-22
Installation............................................................................... 23-25
Technische Daten ....................................................................... 26
Kundendienst............................................................................... 27
Danke, dass Sie sich für ein Haier Produkt entschieden haben.
Bitte lesen Sie diese Gebrauchsanleitung sehr sorgfältig bevor Sie das Gerät in Betrieb
nehmen. Sie enthält wichtige Informationen, damit Sie viel Freude an Ihrem Gerät
haben und ein sicherer und sauberer Betrieb gewährleistet ist.
Bewahren Sie dieses Handbuch gut auf, damit Sie bei Bedarf immer wieder darauf
zurückgreifen können.
Wenn Sie die Maschine verkaufen, abgeben oder bei einem Umzug zurücklassen,
geben Sie bitte die Gebrauchsanleitung dazu, damit der neue Besitzer sich mit den
Anweisungen zur Benutzung und zum sicheren Betrieb vertraut machen kann.
Ja
Nein
Allgemeine Hinweise undTipps
Achtung! Unbedingt lesen!
Wichtige Hinweise zur Sicherheit von Personen
und zurVermeidung von Sachschäden.
Umwelt-Tipps
Legende
Elektrogeräte nicht in den Hausmüll geben, son-
dern getrennt entsorgen. Wenden Sie sich an
Ihren Abfallwirtschaftsbetrieb für genauere
Informationen über die Möglichkeiten zur Ent-
sorgung. Wenn Elektrogeräte auf Mülldeponien
oder Schuttabladeplätzen entsorgt werden, kön-
nen gefährliche Substanzen ins Grundwasser und
dadurch in die Nahrungskette gelangen, was zu
gesundheitlichen Beeinträchtigungen führen kann.
Wenn Sie ein altes Gerät durch ein neues erset-
zen, ist der Verkäufer rechtlich dazu verpflichtet,
das alte zur kostenlosen fachgerechten Entsor-
gung zurückzunehmen.
Entsorgung

4 5 Sicherheitshinweise
Im täglichen Gebrauch achten Sie darauf,
dass …
... Kinder nicht mit dem Gerät spielen!
... das Gerät nicht von Personen bedient wird, die dazu
körperlich oder geistig nicht in der Lage sind oder keine
Erfahrung damit haben.
... Reißverschlüsse geschlossen sind und loseTeile fixiert
werden, damit die Wäsche keinen Schaden nimmt.
Falls nötig, verwenden Sie einWäschenetz.
... Sie das Gerät nach jedem Waschgang ausschalten und den
Netzstecker ziehen. Dies dient sowohl Ihrer Sicherheit als
auch der Senkung Ihres Energie-Verbrauchs.
... Sie den unterenTeil der Tür trocken wischen.
... die Tür bei Nichtbenutzung leicht geöffnet bleibt, damit
sich keine unangenehmen Gerüche bilden.
... ein beschädigtes Stromkabel nur vom Hersteller, dem
Kundendienst oder einem entsprechenden Fachmann
ersetzt wird.
Denken Sie daran, dass Sie ...
... das Gerät nicht abdecken oder zustellen. Im Betrieb
entstehende Feuchtigkeit muss abtrocknen können!
... keine schweren, heißen oder feuchten Gegenstände oder
Hitzequellen auf das Gerät stellen.
... Schwämme oder Ähnliches nicht zu heiß waschen.
... nicht die Waschmittelschublade öffnen, während der
Waschvorgang läuft.
... nicht die Tür anfassen, solange der Waschvorgang läuft.
Die Tür wird heiß!
... nicht die Tür öffnen, solange der Wasserstand sichtbar
oberhalb der Türöffnung steht.
... die Tür des Geräts nicht mit Gewalt öffnen. Ein Sicher-
heitsmechanismus gibt die Tür erst eine gewisse Zeit
nach Beendigung des Waschvorgangs frei.
Sicherheitshinweise
Bevor Sie das Gerät zum ersten Mal
anschalten achten Sie darauf, dass...
... alle Transportsicherungen ordnungsgemäß entfernt sind.
... das Stromkabel nicht in oder unter dem Gerät
eingeklemmt oder sonstwie beschädigt wird.
... die Steckdose mit einer 16-Ampere-Sicherung
abgesichert ist.
...das Gerät eine separate geerdete Steckdose hat.
... die Steckdose stets zugänglich ist.
... man am Stecker und nicht am Kabel zieht, um das Gerät
vom Stromnetz zu trennen.
... die Wasserschläuche fest angeschlossen sind und bei
geöffnetem Wasserhahn nirgends Wasser austritt.
... Sie das Gerät nur benutzen, wenn alle Anschlüsse
ordnungsgemäß installiert sind.
Denken Sie daran, dass Sie …
... keine Kinder oder nicht zurechnungsfähige Personen mit
dem Gerät oder dem Verpackungsmaterial spielen lassen.
... das Gerät weder Frost noch Hitze oder direktem Sonnen-
licht aussetzen.
... das Gerät keiner Nässe oder Feuchtigkeit aussetzen.
Falls das Gerät aus irgendeinem Grund nass werden sollte,
unterbrechen Sie die Stromversorung und lassen Sie es
von selbst wieder trocknen.
... das Gerät nicht anfassen oder benutzen, wenn Sie barfuß
sind oder nasse oder feuchte Hände oder Füße haben.
... keine leicht entflammbaren Wasch- oder Reinigungsmittel,
oder mit entzündlichen Stoffen verunreinigteWäsche im
Umfeld der Maschine aufbewahren.
... keine entzündlichen Sprays in der Nähe des Geräts
benutzen.
... das Gerät nicht auf einen Teppich oder zu nah an eine
Wand oder ein Möbelstück stellen.

6 7 Bedienblende
Waschmittelschublade
Beim Öffnen der Waschmittelschublade werden
drei Kammern sichtbar:
Kammer 1: Flüssigwaschmittel Tank (s. „Smart Dosing“)
kein Gel, kein Konzentrat einfüllen
Kammer 2: Waschmittelfach
für alle Waschmittel geeignet, wenn
„Smart Dosing“ deaktiviert ist.
Kammer 3: Weichspüler Tank (s. „Smart Dosing“)
Die Empfehlung für die Waschmitteltypen sind nutzbar für unterschiedlicheWaschtemperaturen. Bitte
beachten Sie die Informationen auf der Waschmittelpackung.
Display
Ist das Gerät eingeschaltet, zeigt das Display zu jeder Zeit den aktuellen Gerätestatus
auf sechs unterschiedlichen Feldern an (s. nächste Seiten). Im Programmablauf erlischt
das Display nach einiger Zeit (Energiesparmodus). Ein Dreh am Programmwähler
reaktiviert es.
Programmwähler + Waschprogramme
Durch Drehen wird eines der 16 Programme (s. „Programme“) ausgewählt, die Pro-
gramm LED am Wähler und die Grundeinstellungen im Display leuchten auf.
„Start/Pause”
Drücken startet bzw. unterbricht das aktuell angezeigte Programm.Während des Pro-
grammablaufs leuchtet die Taste bzw. blinkt bei Unterbrechung.
„Ein/Aus”
Zum Einschalten Taste kurz betätigen, das Display leuchtet. Um Auszuschalten ist die
Taste länger (ca. 2 Sekunden) zu drücken. Läuft kein Programm, bzw. wird kein Pro-
gramm angewählt, schaltet sich das Gerät nach einiger Zeit automatisch ab.
1Waschmittelschublade
2Display
3Programmwähler
4Taste „Start/Pause“
5Taste „Ein/Aus“
6Funktionstasten a-h
aOption
bAuswahl (-Taste Optionen)
cWaschmittel
dWeichspüler
eZeitvorwahl (Endzeit)
fTemperatur
gSchleudern (Drehzahl)
hMemo
Produktbeschreibung
Zubehör
1x Einlaufschlauch 4x Abdeckkappen 1x Ablaufschlauch-
halterung 1x Bedienungs-
anleitung
Aufgrund technischer Änderungen kann diese Zeichnung ev. von dem von Ihnen erworbenen Modell abweichen.
1 Waschmittelschublade
2 Waschmaschinentür (Bullauge)
3 Abdeckplatte
4 Türgriff
5 Bedienblende
6 Ein/Aus
7 Serviceklappe
1 Transportsicherung (T1-T4)
2 Rückwand
3 Schrauben
hintere Abdeckung (S1-S4)
4 Stromkabel
5 Zulaufventil
6 Ablaufschlauch
Temp.
1 2 3
1 2 3
rpm
Wasch-
mittel
M
Mix
M2
M3
M1
Baumwolle
Synthetik
Express 15
Baby Care
Selbstreinigung
Schleudern/
Abpumpen
Hand-
wäsche
Fein-
wäsche
Ultra Weiß
Sport
Jeans
Unter-
wäsche
Hygiene 95°c
Wolle
AuswahlOptionen
Schleudern
Zeitvorwahl
Weichspüler
Weich-
spüler
M emo
Tägliche Wäsche
12
6 a-h
34 5
123
Hebel
6
Temp.
1 2 3
1 2 3
rpm
Wasch-
mittel
M
Mix
M2
M3
M1
Baumwolle
Synthetik
Express15
BabyCare
Selbstreinigung
Schleudern/
Abpumpen
Hand-
wäsche
Fein-
wäsche
UltraWeiß
Sport
Jeans
Unter-
wäsche
Hygiene95°c
Wolle
AuswahlOptionen
Schleudern
Zeitvorwahl
Weich-
spüler
Memo
Tägliche Wäsche
Cotton DailyWash
UltraWhite
Express15
BabyCare
Delicate
HandWash
Spin/Drain
SelfClean
Synthetic
Mix
Wool
Underwear
Sport
Jeans
Hygenic95°c
M1
M2
M3
FunctionSelection DelayTemp.
Speed
Memo
123
123
rpm
DetergentSoftener
SmartFunction
M
7
1 2 3 4 5 6

8 9 Funktionstasten - Bedienblende
„Zeitvorwahl“ - Endzeitvorwahl (Taste e)
Durch Drücken dieser Taste leuchtet das Tastensymbol und
die aktuelle Endzeit auf. Das gewählte Programm wird ent-
sprechend später gestartet. Durch Drehen des Programm-
wählers kann die Zeit in Schritten von 30 Minuten zwischen
0,5-24 Std. eingestellt werden. Z.B. bedeutet 6:30, dass das
Programm in 6 Stunden 30 Minuten beendet ist. Nicht ver-
fügbar im Programm „Schleudern/Abpumpen”.
Hinweis: Die gewählte Zeit muss immer länger als die Pro-
grammdauer sein, sonst wird das Waschprogramm sofort
gestartet, obwohl dieVorgabe verfehlt werden kann.
„Temperatur“ (Taste f)
Durch Drücken dieser Taste wird die angezeigte maximale
Waschtemperatur verändert.
Hinweis: Bei Anzeige „--“ ist der Kaltwaschgang aktiv.
„Schleudern” (Taste g)
Durch Drücken dieser Taste wird die angezeigte Schleuder-
drehzahl verändert.
„Memo” (Taste h)
Die „Memo“ Funktion ist für die Programme „Baumwolle“
(M1), „Synthetik“ (M2) und „Mix“ (M3) verfügbar. Durch
Drücken dieserTaste nach Auswahl aller Programmeinstel-
lungen, leuchtet die entsprechende Anzeige „M1”/„M2”/
„M3“ auf.Wird nun das Programm gestartet, werden die
individuellen Einstellungen gespeichert. Bei der nächsten
Programmwahl aktiviert die Taste „Memo“ diese, das Pro-
gramm kann sofort gestartet werden.
Hinweis:
Die aktuelle Einstellung ist gelöscht, wenn ein anderes
Programm gewählt, oder dieTaste „Ein/Aus” für ca. 3 Se-
kunden gedrückt wird. Im laufenden Betrieb muss vorher
„Start/Pause“ gedrückt werden.
Bedienblende - Funktionstasten
„Optionen“ (Taste a)
Durch Drücken dieser Taste können die Zusatzfunktionen
und ihre jeweiligen Einstellungen nacheinander angewählt
werden. Das entsprechende Symbol leuchtet auf.
„Auswahl“ (Taste b)
Durch Drücken dieser Taste wird die aktuell angewählte
Option für das Programm ausgewählt, das Symbol blinkt.
Zusätzlich leuchtet das „Häkchen“-Symbol, bzw. ein
„1“/„2“/„3“-Symbol, oder eines der Fleckensymbole.
Wird nun dieTaste a („Optionen“) oder für ca. 3 Sekunden
keineTaste betätigt, ist die Option im Programm aktiviert.
„Kindersicherung“ (Taste a + b)
Diese Funktion sperrt die Betätigung der Bedienblende.
Nach dem Start, nach Programmstart werden gleichzeitig
die Tasten „Optionen“ und „Auswahl“ für ca. 3 Sekunden
gedrückt, das Sperrsymbol leuchtet auf. Erneutes gleichzeiti-
ges Drücken hebt die Sperrung wieder auf.
„Waschmittel“ (Taste c)
Durch Drücken dieser Taste wird die Option „Smart Do-
sing™„ für Flüssigwaschmittel zu- oder abgewählt.
Ist die Grundeinstellung „Smart Dosing“ deaktiviert, ist
für alle Waschmittelarten die Waschmittelkammer 2 zu
verwenden.
„Weichspüler“ (Taste d)
Durch Drücken dieser Taste wird dieWeichspülerdosierung
(s. „Smart Dosing“) zu- oder abgewählt.
„Smart Dosing “ (Taste c oder Taste d)
„Smart Dosing“ ist stets voreingestellt.Abhängig von Pro-
gramm, Wäschemenge und Wasserhärte dosiert das Gerät
automatisch die optimale Menge aus den entsprechenden
Tanks in der Waschmittelschublade für Flüssigwaschmittel
(1,3l) und Weichspüler (0,5l). Es leuchten die entsprechen-
den Symbole. Dies gewährleistet ein optimales Waschresul-
tat, sparsamen Waschmitteleinsatz und schont die Umwelt.
Eine Füllung reicht für ca. 20 Waschgänge. Ist ein Tank leer,
blinkt das entsprechende Symbol im Feld „Gerätestatus“.
Für optimale Waschresultate hat jedes Programm von Haier empfohlene, eigeneVor-
einstellungen und Grenzwerte. Im Rahmen dieser Werkseinstellungen können einzelne
Programmparameter und zusätzliche Funktionen individuell verändert werden (s.
„Programme“ und „Funktionstasten“).
rpm M
e f g h
Zeitanzeige
(funktionsabhängig)
1 2 3
1 2 3
Wasch-
mittel
AuswahlOptionen
Weich-
spüler
a b
c d

10 11 Programme
1 Hygiene 95°C --- 95°C Baumw./ Synth. 1000 U/min
2 Jeans bis 60°C 40°C Jeans 1000 U/min
3 Sport bis 40°C 30°C Sportbekleidung 1000 U/min
4 Unterwäsche bis 60°C 40°C Unterwäsche 1000 U/min
5 Wolle bis 40°C --- Wolle 600 U/min
6 Mix bis 60°C 40°C Baumw./ Synth. 1000 U/min
7 Synthetik bis 60°C 30°C Synthetik 1200 U/min
8 Baumwolle bis 90°C 40°C Baumwolle 1600 U/min
9 Daily Wash bis 40°C 40°C Baumwolle 1400 U/min
10 Ultra White bis 60°C 40°C Baumw./ Synth. 1000 U/min
11 Express 15 bis 30°C 20°C Baumw./ Synth. 1000 U/min
12 Baby Care bis 90°C 90°C Baumw./ Synth. 1000 U/min
13 Feinwäsche bis 40°C 30°C Seide ,Wolle 600 U/min
14 Handwäsche bis 40°C 30°C Baumwolle 800 U/min
15 Schleudern --- --- --- 1400 U/min
Abpumpen
16 Selbst- --- 90°C --- 1000 U/min
reinigung
Programm Temperatur Vorein- Empfohlene Schleuderdreh-
Maximal stellung Wäsche zahl
3 2 1
Waschprogramme
1 Flüssigwaschmitteltank
2 Waschmittelfach
3 Weichspülertank
voreingestellt
Bedienblende - Display Symbole
Kurzwaschprogramm NormaleVerschmutzung
Knitterschutz Sport
Spülstopp Gras
Intensiv Waschen (1-3) Wein
Extra Spülen (1-3) Kaffee
Obst
Türverriegelung Waschgang Flüssigwaschmittel
Kindersicherung Spülgang Weichspüler
Kein Wasserzulauf Schleudern/ Zeitvorwahl
Abpumpen
Tür offen Waschtemperatur
Intelligente Wasserhärte Schleuderdrehzahl
- Erkennung aktiv
Flüssigwaschmittel Memo
- Tank leer
Weichspüler
- Tank leer
Optionen Fleckenoptionen
Gerätestatus Programmstatus Programmfunktion
OptionalJa Nein
Other manuals for HW80-BD1626
5
Table of contents
Languages:
Other Haier Washer manuals

Haier
Haier HA600TX User manual

Haier
Haier HWM95-113S User manual

Haier
Haier HDS1000TXVE User manual

Haier
Haier HWM50-0701 User manual

Haier
Haier HWM65-7288P User manual

Haier
Haier HW120-BP14959S8 User manual

Haier
Haier HW70-IM12929 User manual

Haier
Haier XPM20-A User manual

Haier
Haier HW80-B14979 User manual

Haier
Haier XQG50-600SW User manual

Haier
Haier HW80-1279 User manual

Haier
Haier B1000TX User manual

Haier
Haier HWF85AW1 User manual

Haier
Haier XQJ100-96A - 09-01 User manual

Haier
Haier HWM130-9188 User manual

Haier
Haier SBM600T User manual

Haier
Haier HWM89VA User manual

Haier
Haier DWE-5102 User manual

Haier
Haier XQJ50-31 User manual

Haier
Haier HK1210TVE User manual