Haier XPB65-27QGS User manual

XPB65-27QGS
Twin-tub Washing Machine
Names of the parts.............the 2 cover
Safety precautions ...............................1
Installation and adjustment ..................3
Introduction of the major functions .......5
Preparation before washing ................6
The musts in washing .........................7
Usage of the detergent .......................8
Washing sequence ..............................9
Disposal after washing .......................13
nd
Contents
Before using
Using process
Please read this manual carefully before using.
Please retain it for future reference.
User's manual
Trouble-shooting*
Answers to question
Specification
.....................15
..............the back cover
Packing list ......................................16

Contents marked with that symbol are related to the safety of
the product and the personal safety of the users. Please operate
in strict conformity to the contents.
Contents marked with that symbol are prohibited, otherwise it
may do harm to the washing machine or the personal security
of the operator.
Accessories
Meaning and description of the symbols
Water inlet hose
Gland
(1 piece )
(1 piece )
Before Using
Before Using
Names of the parts
Buzzer
Water-filling entrance
Water inlet selector handle
Wash selector
Wash timer
Control panel
Overflow filter
Water level adjusting lever
Drain hose hanging hole
Lint filter
Valve cover
Pulsator
Wash tub
Drain hose
Base frame
Outer cover of the spin tub
Inner cover of the spin tub
Spin timer
Spin tub frame
Spin tub
Cabinet
Power cord
Warning sign
Prohibition sign

Before Using
Before Using
Safety precautions
If the power cord is bad, to avoid risk it is required to replace it by the technicians of
our special shop or the after-sale service department. Keep the pin of the power
plug clean.
Be sure to use three-phase receptacle.
Earth the earthing terminal of the
receptacle reliably.
Do not put the machine at damp place
like the bathroom . Never wash it with
water. Do not place wet laundries on the
control panel.
In case the washing machine is installed
on ground with carpet , do not block the
ventilation hole with carpet.
Ventilation hole at
the bottom of the
washing machine
When the machine is normally using, please
put the power plug at the location easily to
be inserted and extracted by hand. Be sure
to pull the plug off when there'spower failure,
or the machine is being moved, cleaned or
when it is idle.
Do not use water hotter than 50 C .
Do not share one receptacle with other
electric appliances. Do not use it in
case that the power plug is damaged
or the inserting into the receptacle is
loose.
Earth
Do not wash water-proof laundries such
as the raincoat, bicycle shelter etc. To
avoid abnormal vibration during spinning.

Before Using
Before Using
Do not stretch hands into the working
machine. It is dangerous even if the
rotation is slow. Take special care of
the children.
Handicapped or children without care
shall not use the machine.
Do not put any hot or heavy items
( such as the kettle with hot water )
on the washing machine.
Do not decompose, repair or alter the
machine by yourself.
Keep the machine away from direct
sunlight and heat source like the
heater.
Do not wash laundries with volatile
materials (such as thinner, petrol etc.).
Petrol
Thinner
Safety precautions

Please install and adjust the machine according to the requirement of the manual.
It is very important to your security and correct operating the machine.
Usage of the drain hose
The drainage shall be smooth with the drain hose.
Before Using
Before Using
Installation and adjustment
Install the water inlet hose; Select the water level
(about 46L)
High High
(about 55L)
Low Low
(about 36L)
Medium Medium
Adjust the water level adjusting
lever to desired water level line.
Water inlet hose
Water-filling
entrance
Water level
adjusting lever
4.If extra drain hose is needed , the inner
diameter of the extra hose shall not less
than 30mm, and the length shall not exceed
1.5m.
<10cm
> 30mm
<1.5m
1.The height of the drain hose shall be
less than 10cm , or the drainage will
not be smooth enough and cause
incomplete drainage.
2.Do not step on or press the drain hose.
3 If the drain hose is too long, cut it at mid
point. To make smooth drainage, cut the
front end of the hose slantingly.
Insert the water inlet hose into the water-filling
entrance on the control panel directly. (pull it
out to dismantle it)
Select water level according to the
quantity of the laundries.
Attention:
In water filling, do not exceed
the"High" water level. Otherwise
the water may overflow out of the
washing machine.

Before Using
Before Using
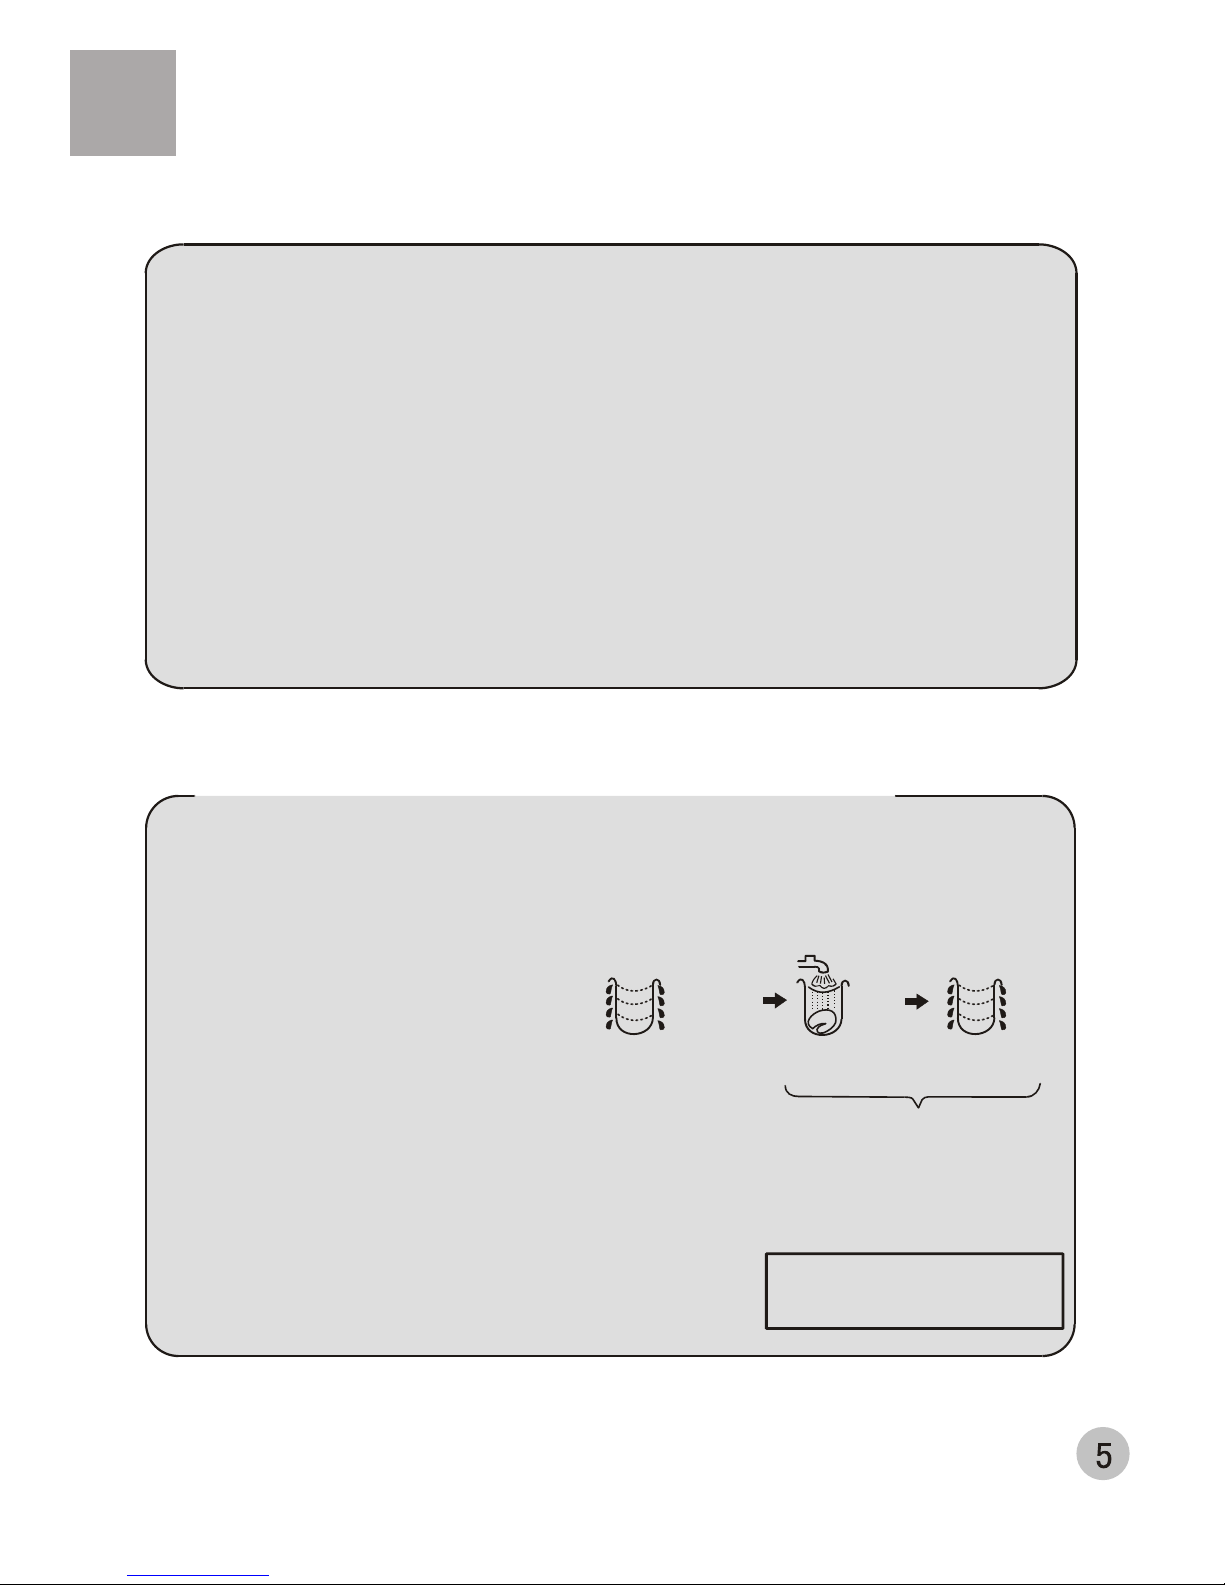
How to change the direction of the drain hoses
Figure 1 indicates the ex factory
installation position of the drain
hose.
Then hang the drain hose into the hanging
hole at the spin tub side. (As per Figure 5).
Extend the drain hose from the side of spin tub.
Extend the drain hose from the rear side
Take out the drain hose from the fixing
hook. Extend it from the rear side (When
the drain hose is extended from the rear
side, it can be hung on the point for drain
hose at the two sides of the cabinet.)
(See to Figure 6).
Take off the drain hose from the hanging
hole of the cabinet. Pull the drain hose
fixing hook outwards gently to take out
the drain hose from the two fixing hooks.
(As per Figure 2)
Rotate the drain hose fixing hook for 90
to take it out from the installation hole
(As per Figure 3).
Install the two drain hose
fixing hooks taken out into
the installation hole at the
other side of the base frame
(to aim at the installation
hole accurately you can
lean the washing machine
forward slightly).Then rotate
for 90 (As per Figure 4).
Pull the fixing hook outwards slightly.
Inlay the drain hose into the fixing hooks
reliably along the groove at spin tub side,
and make it extend towards spin tub side.
Figure 6
Figure 5
Figure 4
Figure 2
Figure 1
Figure 3
Drain hose
fixing hook
Drain hose
fixing hook
Pull outwards
slightly
Side sectional view
Fixing hook
installation hole
Drain hose
Take off
the drain hose
Rotate the fixing
hook for 90 Rotate the fixing
hook for 90
Insert the fixing hook into the
installation hole upwards
Take off the fixing
hook downwards
to fix it

Using process
Using process
Introduction of the major function
The machine has good comprehensive performance, and nice appearance.
It adopts streamline appearance and full plastic shell, which will never get rust.
For the design on safety and reliability, it adopts the wash shelf and water reception
groove design, and reduces the unfavorable influence on the electrical component by the
vapor. Therefore it guarantees more safe and reliable washing.
It adopts complete enclosed base frame and low-noise motor, and thus reduces the
working noise significantly. We can guarantee that the purchase of this machine will bring
you a clean world without disturbing your quiet life.
Use the foam-removing spinning to
remove the extra detergent liquid. It can
both shorten the washing time and save
the water consumption.
Foam-removing spinning during high-efficiency rinsing
Foam-removing
spinning
Remove most of the foam
extra detergent liquid. it can
both shorten the washing
time and save the water
consumption.
Remove the detergent
liquid remained
The effect is best when the
laundries quantity is below
80% of the rated value.
Spin
Spin for about
1~2 minutes Fill water for
about 1 minutes Spin for about
1~2 minutes

Confirm if
there's special
requirement for
the laundries.
Clear the pocket.
Take out the
coins , sand,
hairpins etc.
Fasten the
buttons and
zippers.
When the pulsator
is running , the
buttons of the
laundries may
cause noise. For
the sake of
discretion,please
put the laundries
with buttons into
other laundries.
Preparation before washing
1.Connect the water inlet hose.
2.Confirm that the washing machine is earthed
reliably . Then insert the power plug into the
receptacle. Do not connect the earth terminal
to the gas pipe and tap water pipe.
3.Put down the drain hose .
4.Slanting or uneven ground may result in
unstable working or abnormal noise. Please
make the machine stand horizontally.
The quantity of
the laundries
shall not exceed
the rated value.
The big laundries
like the jeans
shall be put in
loosely.
Using process
Using process
Preparation before washing
Pay attention to followings before washing the laundries

Reference weight of the laundries
Working suit up,down
Jeans about 800g
The capacity of washing and spinning of
the machine refer to the largest weight of
the standard laundries under dry condition
that can be washed or spinned in one time.
Laundries quantity in one washing cycle
shall be lower than the rated capacity.
The largest capacity of this machine is
6.5 kg.
The thickness ,size , type of the cloth will
influence the actual washing capacity. It
is suitable to put in reasonable amount of
laundries and the laundries can be turned
round in washing for one time washing.
Do not select " High " water level for
laundries less than 3.2kg, so as to avoid
splashing of water.
Blending coat
about 800g
Shirt Jacket
Single bed sheet
Socking
Underpants
Undershirt
Pajamas
Blanket
cotton,about 900g
cotton,about
300g
cotton,about
800g
cotton,about 600g
blending,about 50g
cotton,about 70g
cotton,about 180g
Using process
Using process
The musts in washing
cotton,about 1120g

Selection of the quantity of the washing powder list 1
Selection of the current , water level and washing time list 2
How to use the washing powder
How to use the whitener
Fill water to decided level. Dilute the whitener with container. Pour it slowly into the
washing tub.
Avoid using whitener on laundries with color or pattern as they are prone to lose color.
The whitener shall not touch the laundries directly.
Direct dissolved in the machine:
1.Fill small quantity of water.
2.Add the powder . Run for 30 seconds to
dissolve it completely.
3.Put it in the laundries. Select suitable
water level.
The instant dissolving of the washing powder:
1.Prepare warm water of 30 C and a container.
2.Add the powder while stirring to fully
dissolve it.
The powder is more prone to pollute the
laundries than the detergent. Therefore
please use it with proper quantity.
It is suggested not to use high sudsing
detergent.
Dosage of different washing powder is
different. Please refer to the instruction
of the washing powder for the detail
dosage.
Refer to the user's manual for the usage and quantity of the whitener.
For powder whitener, please dissolve it before using.
Laundries
quantity
Laundries
quantity
Water level
Water level
Current
Standard dosage
Concentrated washing
powder
Laundries
Common washing
powder
Washing time
(minutes)
Water quantity
Water quantity
About About
About3~6
About8~10
About10~13
About7~13
About2~4
About3~6
About8~10
About About
About About
4.5kg~6.5kg
3.2kg~6.5kg
2.5kg~4.5kg
Below2.5kg
Below3.2kg
High (about55L)
High (about55L)
Standard
Low (about36L)
Low (about36L)
~
Gentle
Medium (about46L)
Medium (about46L)
~
Medium (about46L)
46g
38g
30g
55g
46g
36g
Usage of the detergent Using process
Using process
Knitwear
Cotton,blending,linen
Very dirty and thick
Bed sheet
Silk(thin laundries)
Chemical fiber
Cotton,blending,linen

OFF
OFF
OFF
OFF
DRAIN
STANDARD
GENTLE
MAX
Washing sequence
Figure 1
Figure 2
Figure 3
Figure 4
Figure 5
WOOL
WOOL
Spin timer
SPIN TIMER
SPIN
WASH
Wash timer
WASH TIMER
WASH TIMER
WASH SELECTOR
Wash selector Buzzer
BUZZER
Water-filling entrance
(To set to below 2 minute,
first set to 5 minute then
turn it back. it can increase
the service life of the timer).
LINEN
LINEN
Using process
Using process
(gentle current,
standard current) (The buzzer will ring when
the washing finishes) (to set to below 1 minute,
first set to 2 minute then
turn it back. it can increase
the service life of the timer).
Overfilling sign
Water-filling selector handle
Wash
SILK
SILK
COTTON
COTTON
DRAIN
DRAIN
STANDARD
STANDARD
GENTLE
GENTLE
WASH SELECTOR
WASH SELECTOR
1.Water-filling selector
(1) Set the water-filling selector at the "WASH" side.
(Figure 1)
(2) Fill the water and add the dissolved washing
powder to make the water level reach the preset
position. (Figure 2)
Run washing program for some time to stir and
dissolve the powder completely.
2.Put in the laundries. If the water quantity is
insufficient, please add water.
3.Select the current.
Select the" STANDARD" or "GENTLE "current
according to the laundries. (Figure 3)
4.Select the washing time
Select the washing time according to the laundries.
(Figure 4)
5.After washing, the buzzer will ring. Set the "WASH
SELECTOR" at "DRAIN". (Figure 5).

Midway spinning
1.
2.
3.
Put the laundries into the spin tub evenly and smoothly.
Spin
Run the foam-removing spinning.
Push
Push
Proper Proper
Outer cover of
The spin tub
Inner cover of
The spin tub
The laundries
are slanting
Gland
No gland
Using process
Using process
(1) Put the gland in properly.
Please put in the gland properly even if the laundries quantity is smal.l
(2) Close the inner and outer cover of the spin tub.
(3) Spin for 1-2 minutes.
(1) Open the outer cover of the spin tub.
(2) Set the water-inlet selector control
rod at the "SPIN" side. Fill water for
about 1 minute.
If the water quantity filled is too large,
the water may flow out from the wash
tub side. Please twist the water tap to
limit the water filling.
(3) Close the outer cover of the spin tub. Spin for 1-2
minutes.
SPIN
WASH

Rinse with stored water
Rinse with water-filing
1. Put the laundries into the wash tub. Select suitable current according to
the laundries.
2. Fill water to preset water level.
3. Rinse
Adjust the wash timer to 2-3 minutes to do rinsing.
When the laundries quantity is below 3.2kg, please use "Gentle" current.
If you use "Standard" current, it may splash.
Rinsing
Using process
Using process
(Repeat the midway spinning and
rinsing with stored water for 2-3 times)
1.Put the laundries into the wash tub. Select
suitable current according to the laundries.
2.Adjust the water level
According to the laundries quantity, set the
water level with the adjusting lever. Fill
suitable water consecutively.
3.Rinse
Adjust the wash timer to 5-7 minutes to do
rinsing.
OVERFILL
If the water flows out
of the overfill holes,
that is overfilling

Selection of the spin time list 3
Laundries Spin time
(minutes)
About 4~5
Bed sheet or
blanket
About 2~4
Underwear
(knitwear)
Swear
(chemical fiber) About 1~2
Within 1 minute
Blending thin
laundries
Using process
Using process
1. Put the laundries into the spin tub
evenly and smoothly.
2. Press the gland in the tub properly.
Close the inner and outer cover of
the spin tub.
3. Spin
Select suitable spin time according
to the laundries, and do spinning.
During spinning, if there's abnormal
sound, it is generally owing to
slanting placement of the laundries.
Please stop the machine and re-order
the laundries.
In spinning, it will pause the work if you open the outer cover of the spin
tub. Close it to resume the spinning.
Spinning
To do spinning and draining or rinsing
with water-filling together, please first
do spinning for around 1 minute, then
do draining or rinsing with water-filling.
Otherwise the spinning will stop owing
to too much water stored in the spin tub.

After using, please clean the lint and foreign materials of the lint filter and lint frame
in time. Otherwise it may influence your using the machine.
Please first pull off the power plug from the receptacle before cleaning.
1 Take off the filter frame.
As indicated in the figure, nip the elastic fixing
claw and pull it to the direction of the arrow to
take it off.
Cleaning the filter frame
Too much lint on the filter frame will influence
the normal usage of the machine. Please
clean it every two months.
Elastic fixing
claw
Figure 2
Figure 3
Figure 1
1. Take off the lint filter
Put hand at the indicated position.
Push down to take it off. ( See to
Figure 1)
2. Clean the lint
Put it in water and clean while it is
still wet.(See to Figure 2)
3. Install the lint filter
After cleaning, insert the bottom
of the lint filter ( marked with
"down side") into the filter frame,
then push the upper part of the
filter in ( marked with " up side ").
(See to Figure 3)
The lint filter must be used during washing.
It must be cleaned in time after each using.
Cleaning the lint filter
Using process
Using process
Disposal after washing

Wipe the complete unit with soft cloth
twisted dry.
Wipe with neutral detergent if too dirty
Do not wash it directly by water
Using process
Using process
Cleaning the filter frame
2. Take off the corrugation pipe.
Dismantle the upper part of the
corrugation pipe inside the
overflow filter (See to Figure 1).
3. Cleaning the filter frame
Clean the lint around the frame
and flush with tap water.
4. Install the filter frame.
(1).Install the corrugation pipe.
(2).Insert the mounting plate at
the bottom of the frame into
the valve cover.
(3).Hang up the hook at the left
upper side.
(4).Push the upper part in as
indicated in Figure 2.
Corrugation
Pipe
Hook
Figure 1
Figure 2
Water level
adjusting lever
After washing, dismount the water inlet
hose.
Do not store water in the tub for long
period. Discharge the water immediately
after each using.
Pull off the power plug and hang up the
power cord.
Hang up the drain hose.
Wipe off the water drops on the surface
and inside the tub with clean soft cloth.
Open the cover of the wash tub and the
inner/outer cover of the spin tub for
some time (about one hour), then close
them.
Disposal of the complete unit
Thinner
Alcohol
Petrol

2~3L
Trouble-shooting Answer to question
Below 50 c
(If there's breakdown, please pull off the power plug before checking) The following
phenomena are not breakdowns sometimes. Please confirm again before sending
it to repair. If there are real breakdowns, please come to the special maintenance
department or after-sale service department of our company. Do not repair it by yourself.
Phenomena The reason
The machine does not act.
Is there power failure?
Is the power plug loose?
Is the pulsator twisted by foreign materials?
The draining does not work
Is the drain hose put down?
Is the drain hose frozen?
Is the drain hose blocked by foreign material?
There's abnormal sound
during washing Are there hair pin, coins or metal items brought
inside the tub?
Is the machine slanting?
Is the gland pressed evenly?
Are the laundries in spin tub too much?
It is the water remained in the factory inspection
of performance.
There may be some water
flowing out of the drain
hose in the first use of
the machine.
There's abnormal sound
and violent vibration
during spinning
When the remained water is frozen
Prevent the freezing (be sure to discharge the water completely after using)
After complete draining, set the "WASH SELECTOR" at "GENTLE" or "STANDARD".
If it is set at "DRAIN", it will be rather difficult for the frozen water to melt.
When the water is frozen
Pour hot water below 50 into the wash tub
to soak it completely. Then turn the pulsator
with hands gently. Please confirm the drainage
can work normally before next using.

Packing list
User's manual 1 Pc.
1 Pc.
1 Pc.
1 Set
Water inlet hose
Gland
Twin-tub washing machine
Table of contents
Other Haier Washer manuals

Haier
Haier JW-K33B User manual

Haier
Haier HA1000T Instruction Manual

Haier
Haier HLP20E - Pulsator Washer User manual

Haier
Haier HW-F1281ME User manual

Haier
Haier XPB50-22S User manual

Haier
Haier SSW 800E User manual

Haier
Haier HWM55-10 User manual

Haier
Haier HWM80-113S User manual

Haier
Haier HWM 80-AS User manual

Haier
Haier HNS1260TVE Operation and maintenance manual

Haier
Haier HWM75-0713S User manual

Haier
Haier HWT60AA User manual

Haier
Haier HWD-C1200TXVE-U User manual

Haier
Haier XPB135-LA User manual

Haier
Haier JW-K51A User manual

Haier
Haier LMD7023PBBP User manual

Haier
Haier HWM95-261NZP User manual

Haier
Haier HW70-IM12929 User manual

Haier
Haier LMA9020WGAB0 User manual

Haier
Haier HW70-BP1439N User manual