Hall Technologies HT-CAM-1080PTZ User manual

Hall Technologies February 03, 2023 Page 1 of 52
Hall Technologies • 1234 Lakeshore Dr Suite #150 Coppell, TX 75019 • halltechav.com
HT-CAM-1080PTZ
Full HD PTZ Camera
USER MANUAL
January 23, 2023

Hall Technologies February 03, 2023 Page 2 of 52
Important Safety Instructions
1. Do not expose this apparatus to rain, moisture, dripping or
splashing and that no objects filled with liquids, such as vases,
shall be placed on the apparatus.
2. Do not install or place this unit in a bookcase, built-in cabinet or
in another confined space. Ensure the unit is well ventilated.
3. To prevent risk of electric shock or fire hazard due to
overheating, do not obstruct the unit’s ventilation openings with
newspapers, tablecloths, curtains, and similar items.
4. Do not install near any heat sources such as radiators, heat
registers, stoves, or other apparatus (including amplifiers) that
produce heat.
5. Do not place sources of naked flames, such as lighted candles,
on the unit.
6. Clean this apparatus only with dry cloth.
7. Unplug this apparatus during lightning storms or when unused
for long periods of time.
8. Protect the power cord from being walked on or pinched
particularly at plugs.
9. Only use attachments / accessories specified by the
manufacturer.
10. Refer all servicing to qualified service personnel.

Hall Technologies February 03, 2023 Page 3 of 52
Table of Contents
Introduction 4
Web UI 23
Overview
Preview
Features
Monocular Tracking
Package Contents .
Configuration: audio
Product Views .6
Configuration: video configure / video encode
Front View
Configuration: video configure / stream publish
Rear View
Configuration: video configure / rtp multicast
Dimensions View
Configuration: video configure / video parameters / focus
Rotary Dial 7
Configuration: video configure / video parameters / style
Connectors & Indicator_______________
Configuration: video config/video parameters/exposure
RS-232 INTERFACE
Configuration: video configure / video parameters / color
RS-232 MINI-DIN 8-PIN
Configuration: video config / video parameters / image
RS-232 (DB9)
Configuration: video configure / video parameters / nr
Setup u
Configuration: video configure / video osd
Installation
Configuration: video configure / osd font size
Step one
Configuration: video configure / video out
Step two
Configuration: network configure / network port
Step three
Configuration: network configure / ethernet
Step four
Configuration: network configure / dns
Application Wiring g
Configuration: network configure / srt
Scenario A : USB-B Output
Configuration: network configure / rtsp
Scenario B : HDMI & HD-SDI Outputs
Configuration: system configure / system attribute
Scenario C : Streaming
Configuration: system configure / system time
Control – IR Remote Control l
Configuration: system configure / user set
Key Combinations
Configuration: system configure / update
OSD Menu u
Configuration: system configure / default
Main Menu
Configuration: system configure / reboot
Monocular Tracking
Soft Codec Support 45
Setup
Google Meet
Camera
Microsoft teams
Camera - exposure
Zoom
Camera - color
Video
Camera - image
Troubleshooting 48
Camera - focus
No Image
Camera - noise reduction
Abnormal Image
PTZ
Shaky or Vibrating Image
Video - format
No Video in Soft Codec
Version
Specifications 49
Restore Default

Hall Technologies February 03, 2023 Page 4 of 52
Introduction
OVERVIEW
The HT-CAM-1080PTZ is an HD PTZ camera. With built-in AI intelligence, the camera can automatically
pan, tilt, and/or zoom to the best view to include all participants or track a presenter, and regions can
be set in the view to prevent the camera from tracking undesired areas. And, built around a low noise
CMOS image sensor, the lens provides for a clean and clear video even in low lit areas.
The HT-CAM-1080PTZ includes multiple output options including HDMI, 3G-SDI, USB3.0, and LAN, with
simultaneous sub streams. When used as the main or sub stream, the USB3.0 output supports multiple
audio/video compression standards and multiple soft codec applications such as Google Meet,
Microsoft Teams, and Zoom.
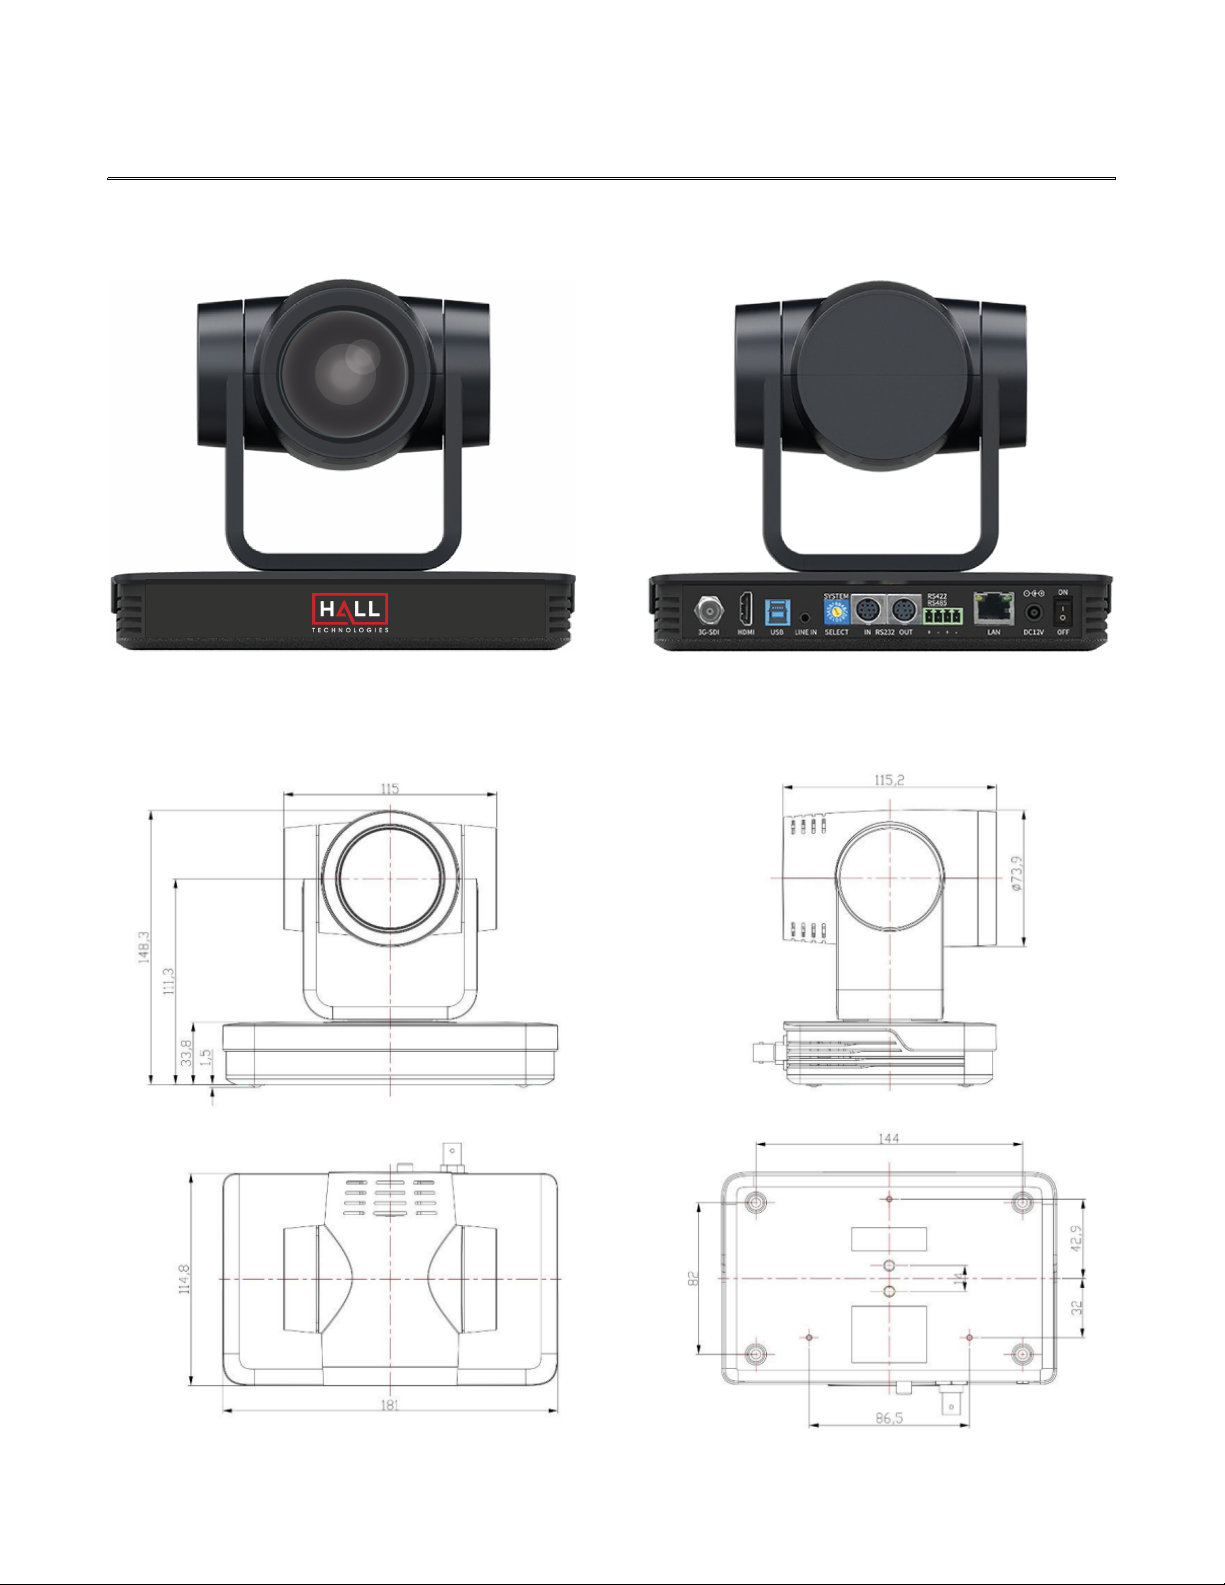
With a height of just over 7” the camera’s small form factor allows for it to be installed in any room
without being obtrusive. The camera can be fixed to a tripod, installed on the wall using the included
wall mount, or installed to the ceiling (ceiling mount sold separately).
FEATURES
! Multiple video output interfaces including HDMI, SDI, USB 3.0, LAN
! Full HD Resolution up to 1920x1080@60fps
! Up to 12x optical zoom and 15x digital zoom
! 1/2.8 inch high quality CMOS image sensor
! Auto Framing with superior face detection to automatically frame the view according to the
number of people in the room
! Supports multiple audio/video compression standards, including H.264/H.265 video compression
and AAC, MP3 and G.711A audio compression
! USB 3.0 dual coding stream adding a simultaneous output for YUY2, MJPEG, H.264, NV12, H.265
video coding
! Low noise CMOS with advanced 2D/3D noise reduction technology providing for a high signal-to-
noise ratio for clean and clear video even in low-lit areas
! Built-in high accuracy step driving motor for quiet and smooth pan and tilt movement
! Supports multiple applications such as personal video conferencing, collaboration meetings,
enterprise video conferencing, etc.
! Supports multiple soft codec applications such as Google Meet, Microsoft Teams, and Zoom.

Hall Technologies February 03, 2023 Page 5 of 52
Package Contents
! 1x 1080p PTZ Camera
! 1x USB 3.0 Type-B to Type-A Cable, 3m (9.8ft)
! 1x 9-pin Female D-Sub to 8-pin Male mini-DIN cable
! 1x IR Remote Control
! 1x Power Adapter
! 1x Wall Mount

Hall Technologies February 03, 2023 Page 6 of 52
Product Views
FRONT VIEW REAR VIEW
DIMENSIONS VIEW

Hall Technologies February 03, 2023 Page 7 of 52
Connectors & Indicators
No.
Name
Description
1
Camera Lens
Camera Lens
2
Camera Base
Base of the PTZ Camera
3
LED
Solid green LED when the camera is on.
Flashes green when commands are received from the remote control
4
Infrared Receiver
Receives the remote-control commands.
5
Tripod Screw
Used for securing to a tripod.
6
Hole
Used for positioning and securing to a tripod.
7
3G-SDI
BNC connector for 3G-SDI output signal
8
HDMI
HDMI output
9
USB
USB 3.0 Type-B output connector.
10
LINE IN
3.5mm stereo audio input
11
SYSTEM SELECT
Select the desired video format of the camera (see Rotary Dial section for the complete
list of options).
12
RS232 IN
8-pin mini-DIN connection for controlling the PTZ camera using RS232 protocols
13
RS232 OUT
8-pin mini-DIN loop through RS232 connection to next camera
14
RS422/RS485
Phoenix connection for controlling the PTZ camera using RS422/RS485 protocols
15
LAN
RJ45 Ethernet port, PoE
16
DC12V
Power supply connection (when not using PoE)
17
Switch
Power on/off switch

Hall Technologies February 03, 2023 Page 8 of 52
PRODUCT WIRING and CONNECTIONS DIAGRAM
RS-232 INTERFACE

Hall Technologies February 03, 2023 Page 9 of 52
RS-232 MINI-DIN 8-PIN
RS-232 (DB9)
Rotary Dial
Rotate the dial to select the desired video format.
A camera reboot is needed after changing the selection.
By default, F is selected on the rotary dial, which allows
for video format selection on the OSD menu (accessed
with the remote control).

Hall Technologies February 03, 2023 Page 10 of 52
Setup
INSTALLATION
To install and connect the HT-CAM-4K-EPTZ camera, do the following:
1. Step One
Mark the mounting holes on the wall and drill the appropriate size hole to mount either the
included M6 swelling bolts or drywall anchors (not included).
2. Step Two
Insert the limiting post onto the top of the wall mount.
3. Step Three
Secure the wall mount to the wall using the included M6 nuts and washers, or, if using drywall
anchors in step one, secure using the drywall anchor screws.
4. Step Four
Mount the camera to the top of the wall mount and secure with the included camera bolt.

Hall Technologies February 03, 2023 Page 11 of 52
Application Wiring
There are many applications for using the HT-CAM-1080PTZ camera depending on the needs of the user.
The following are some examples, which can also be used simultaneously.
USB-B OUTPUT
With the USB-B output the camera can be directly connected into any USB hub to be sent to the USB
host for use with a laptop on a soft codec call. In this example, the laptop will be able to select the HT-
CAM-1080PTZ camera as the USB camera to use for a Google Meet, Microsoft Teams, or Zoom call.

Hall Technologies February 03, 2023 Page 12 of 52
HDMI & HD-SDI OUTPUTS
Using either the HDMI or HD-SDI video outputs, users can connect camera(s) to a larger video
conference system. Pan, tilt, and zoom control can be accomplished over Ethernet or RS-232.
STREAMING
Using the LAN port the HT-CAM-1080PTZ can stream directly to a server or provide an RTSP stream.

Hall Technologies February 03, 2023 Page 13 of 52
Control – IR Remote Control
Many camera controls can be accessed using the included remote control.
Remote Element
Description
Standby On: To put the camera into standby mode, hold power button for 3 seconds. The
camera’s LED will flash green during the button press and then will turn red, and the
camera will turn and face the back.
Standby Off: To exit out of standby mode, hold power button for 3 seconds. The camera
will self-test and return to the home position.
Set: Set the remote to control different cameras.
Camera Select: Select the camera, 1~4, to control with the remote.
Number Key: Used to set or recall presets, 0 ~ 9.
*, #: Used for key combination use.
Note: See below for all possible key combinations.
Auto: Puts the camera’s focus into auto mode.
Manual: Puts the camera’s focus into manual mode
Focus +/-: Manually adjusts the camera’s focus.
Zoom +: Increase the zoom on the camera.
Zoom -: Decrease the zoom on the camera.
Note: Holding the zoom +/- buttons will keep zooming in or out and stops as soon as the
button is released.
Set Preset: To set a camera preset, press this button and then the desired 0~9 number.
Clear Preset: To clear a camera preset, press this button and then the desired 0~9
number.
BLC ON/OFF: This button turns on/off the back light feature.
Menu: Press this button to enter or exit the on-screen display (OSD) menu. (See next
section to view the OSD settings.)
Pan: Press the arrow left/right buttons to pan the camera.
Tilt: Press the arrow up/down buttons to tilt the camara.
Note: Holding the buttons will continue to pan/tilt and stops as soon as the button is
released.
Home: This button returns the camera to the middle position, or, acts as the enter button
in the OSD menu.
F1: Turns off AI human detection.
F2: Turns on AI human detection.
F3: Toggles between Real-time Tracking mode and Region Tracking mode.
F4: Change tracking target on Real-time Tracking mode.

Hall Technologies February 03, 2023 Page 14 of 52
KEY COMBINATIONS

Hall Technologies February 03, 2023 Page 15 of 52
OSD Menu
Pressing the menu key turns on the camera’s OSD menu for detailed setting changes.
MAIN MENU
When accessing the menu and submenus, the up/down arrows on the remote move the cursor
up/down to go to the desired setting/submenu, and the left/right arrows toggle between the options
available for that setting. The [HOME] key is the enter button, and [MENU] returns to the previous
menu or exits out of the OSD.
Menu Item
Description
Selection Options
Language
Change the language of the OSD menu.
Simplified Chines | English
MONOCULAR TRACKING
Menu Item
Description
Selection Options
Tracking
Turn on/off AI tracking and select between
the two tracking modes.
OFF | ON: Region Tracking | ON: Real-time
Tracking

Hall Technologies February 03, 2023 Page 16 of 52
SETUP
Menu Item
Description
Selection Options
Protocol
Select the control protocol
Auto | VISCA | PELCO-D | PELCO-P
Visca Address
Set the camera’s Visca Address
1 ~ 8
Visca Address Fix
Fix the Visca address
OFF | ON
Pelco-P Address
Set the camera’s Pelco-P address
1 ~ 255
Pelco-D Address
Set the camera’s Pelco-D address
1 ~ 255
Baud rate
Set the camera’s baud rate
2400 | 4800 | 9600 | 38400 | 115200
USB Transmission
Turns on/off USB video transmission
OFF | ON
Auto Flip
Automatically flips the picture if the camera is
installed upside down.
OFF | ON
CAMERA
Menu Item
Description
Selection Options
Style
Change the image between various built-in
presets.
Default | Normal | Clarity | Bright | Soft

Hall Technologies February 03, 2023 Page 17 of 52
CAMERA - EXPOSURE
Menu Item
Description
Selection Options
Mode
Select the exposure settings.
• SAE (Shutter Automatic Exposure) – sets
the aperture based on desired shutter
speed.
• AEAE (Aperture Automatic Exposure) –
sets the shutter speed based on the
desired iris opening.
Auto | Manual | SAE | AAE | Bright
EV
Manually set the camera’s exposure value
(only available in Auto mode).
ON: -7 ~ 7 | OFF
BLC
Control the backlight compensation (only
available in auto mode)
ON | OFF
Flicker
Prevent flicker on the video (only available in
Auto, Shutter, and Brightness Priority modes)
OFF | 50Hz | 60Hz
G. Limit
Limit the camera’s gain (only available in
Auto, Shutter, and Brightness Priority modes)
0 ~ 15
DRC
Modify the settings of the dynamic range
compression
Close | 1 ~ 8
Shutter
Select the priority setting of the shutter
speed (only available in Manual and SAE
modes)
1/25 | 1/30 | 1/50 | 1/60 | 1/90 | 1/100 |
1/120 | 1/200 | 1/250 | 1/350 | 1/500 |
1/1000 | 1/2000 | 1/3000 | 1/4000 | 1/6000
| 1/10000
Iris
Select the priority of the camera’s iris
opening (only available in AAE mode)
Close | F11 | F9.6 | F8.0 | F6.8 | F5.6 | F4.8 |
F4.0 | F3.4 | F2.8 | F2.4 | F2.0 | F1.8

Hall Technologies February 03, 2023 Page 18 of 52
CAMERA - COLOR
Menu Item
Description
Selection Options
WB Mode
Control the white balance
Auto | Manual | One Push | VAR
RG Tuning
Fine tune red gain (only available in Auto,
One Push, and VAR modes)
-10 ~ 10
BG Tuning
Fine tune blue gain (only available in Auto,
One Push, and VAR modes)
-10 ~ 10
Saturation
Set saturation levels
0 ~ 100
Hue
Control backlight compensation (only
available in Auto mode)
0 ~ 10
AWB Sensitivity
Control the camera’s auto white balance
sensitivity (only available in Auto mode)
HIGH | MIDDLE | LOW
CAMERA - IMAGE

Hall Technologies February 03, 2023 Page 19 of 52
Menu Item
Description
Selection Options
Brightness
Modify the brightness levels
0 ~ 100
Contrast
Modify the contrast levels
0 ~ 100
Sharpness
Modify the sharpness levels
0 ~ 15
B&W Mode
Change camera from color to black & white
Color | Black/White
Gamma
Modify the gamma settings
Default | 0.45 | 0.50 | 0.55 | 0.63
DZoom
Turn on/off the digital zoom feature
ON | OFF
Low-Light Mode
Improve the image when the light is low
ON | OFF
CAMERA - FOCUS
Menu Item
Description
Selection Options
Focus Mode
Togg le the focus mo de
Auto | Manual | One Push
AF Zone
Set the camera’s focus zone for the auto
focus
All | Top | Center | Bottom
AF Sensitivity
Set the sensitivity of the auto focus mode
Low | Middle | High

Hall Technologies February 03, 2023 Page 20 of 52
CAMERA – NOISE REDUCTION
Menu Item
Description
Selection Options
NR-2D
Reduce noise from one frame to the next by
removing any oddity that does not appear in
each frame
OFF | 0 ~ 7
NR-3D
Remove grainy fuzzy appearances of low light
images
OFF | 0 ~ 8
PTZ
Menu Item
Description
Selection Options
Speed by zoom
Automatically slow down pan and tilt speeds
when the camera is zoomed into objects that
are far away
ON | OFF
Zoom Speed
Set the camera’s zoom speed
1 ~ 8
Other manuals for HT-CAM-1080PTZ
1
Table of contents
Other Hall Technologies Security Camera manuals