Hall Technologies HT-CAM-1080PTZ User manual

Hall Technologies March 2, 2022 Page 1 of 41
!
!
!
Hall Technologies • 1234 Lakeshore Dr Suite #150 Coppell, TX 75019 • halltechav.com
HT-CAM-1080PTZ
Full HD PTZ Camera
User Manual
Version: 1.0

Hall Technologies March 2, 2022 Page 2 of 41
Attentions
Improper operations may damage the product structure and result in mechanical failure.
Please note the following tips:
This manual introduces functions, installations, and operations for this PTZ camera in detail.
Please read this manual carefully before installation and use.
Do not move the camera by
grabbing the head.
Move the camera by holding the
bottom with one or both hands.
Do not rotate the lens and holder
manually regardless, if the camera is
powered on or off. To do so may
damage the camera structure and result
in the failure of the camera self-check
as well as being unable to start the
camera.

Hall Technologies March 2, 2022 Page 3 of 41
1. Cautions
1.1 Avoid damage to the product caused by heavy pressure, strong vibration, or immersion
during transportation, storage, and installation.
1.2 The housing of this product is made of organic materials. Do not expose it to any liquid,
gas, or solids which may corrode the shell.
1.3 Do not expose the product to rain or moisture.
1.4 To prevent the risk of electric shock, do not open the case. Installation and maintenance
should only be carried out by qualified technicians.
1.5 Do not use the product beyond the specified temperature, humidity, or power supply
specifications.
1.6 Wipe it with a soft, dry cloth when cleaning the camera lens. Wipe it gently with a mild
detergent if needed. Do not use strong or corrosive detergents to avoid scratching the lens
and affecting the image.
1.7 This product contains no parts which can be maintained by users themselves. Any
damage caused by dismantling the product by the user without permission is not covered by
warranty.
2. Electrical Safety
Installation and use of this product must strictly comply with local electrical safety
standards. The power supply of the product is 12V, the max electrical current is 2A.
3. Install
1.1 Do not rotate the camera head violently, otherwise it may cause mechanical failure.
1.2 This product should be placed on a stable desktop or other horizontal surface. Do not
install the product obliquely, otherwise it may display an inclined image.
1.3 Ensure there are no obstacles within rotation range of the holder.
1.4 Do not power on before completing the installation.
4. Magnetic Interference
Electromagnetic fields at specific frequencies may affect the video image. This product is
Class A. It may cause radio interference in a household application. Appropriate measures
are required.

Hall Technologies March 2, 2022 Page 4 of 41
Table of Contents
HT-CAM-1080PTZ ............................................................................................................ 1
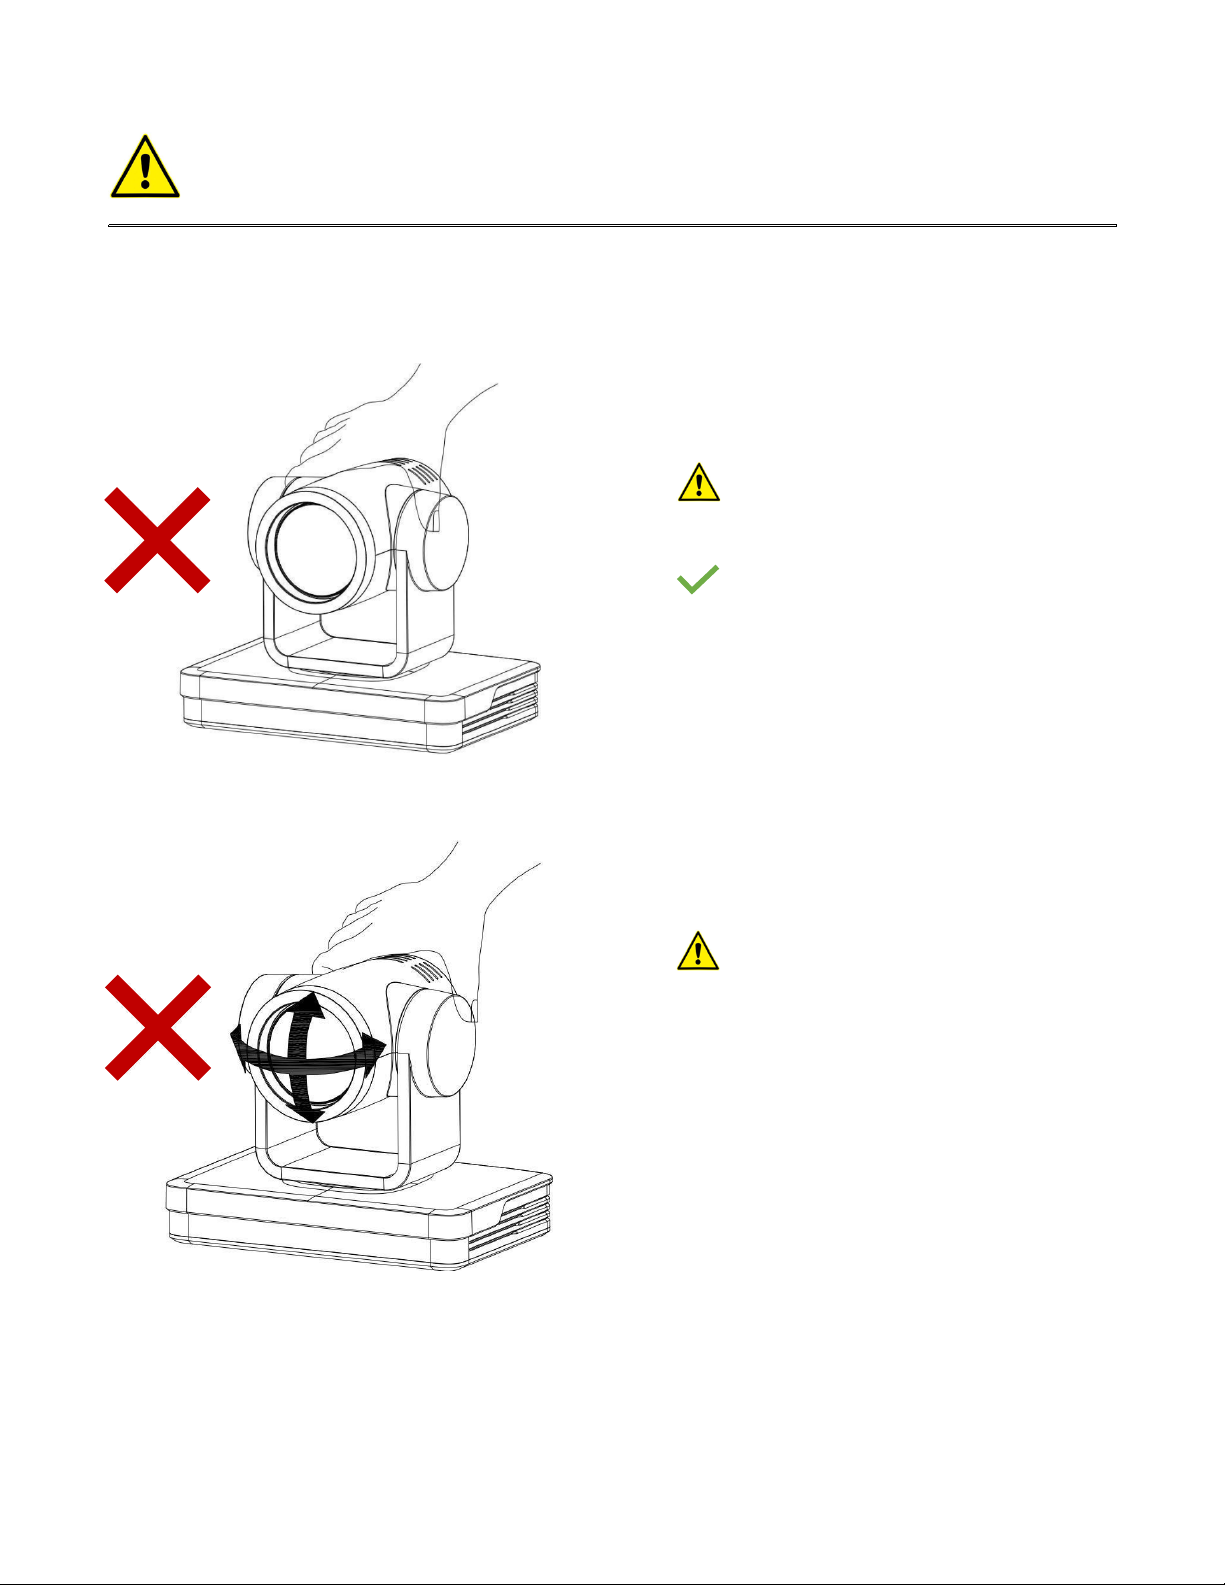
1. Camera Installation ...................................................................................................... 5
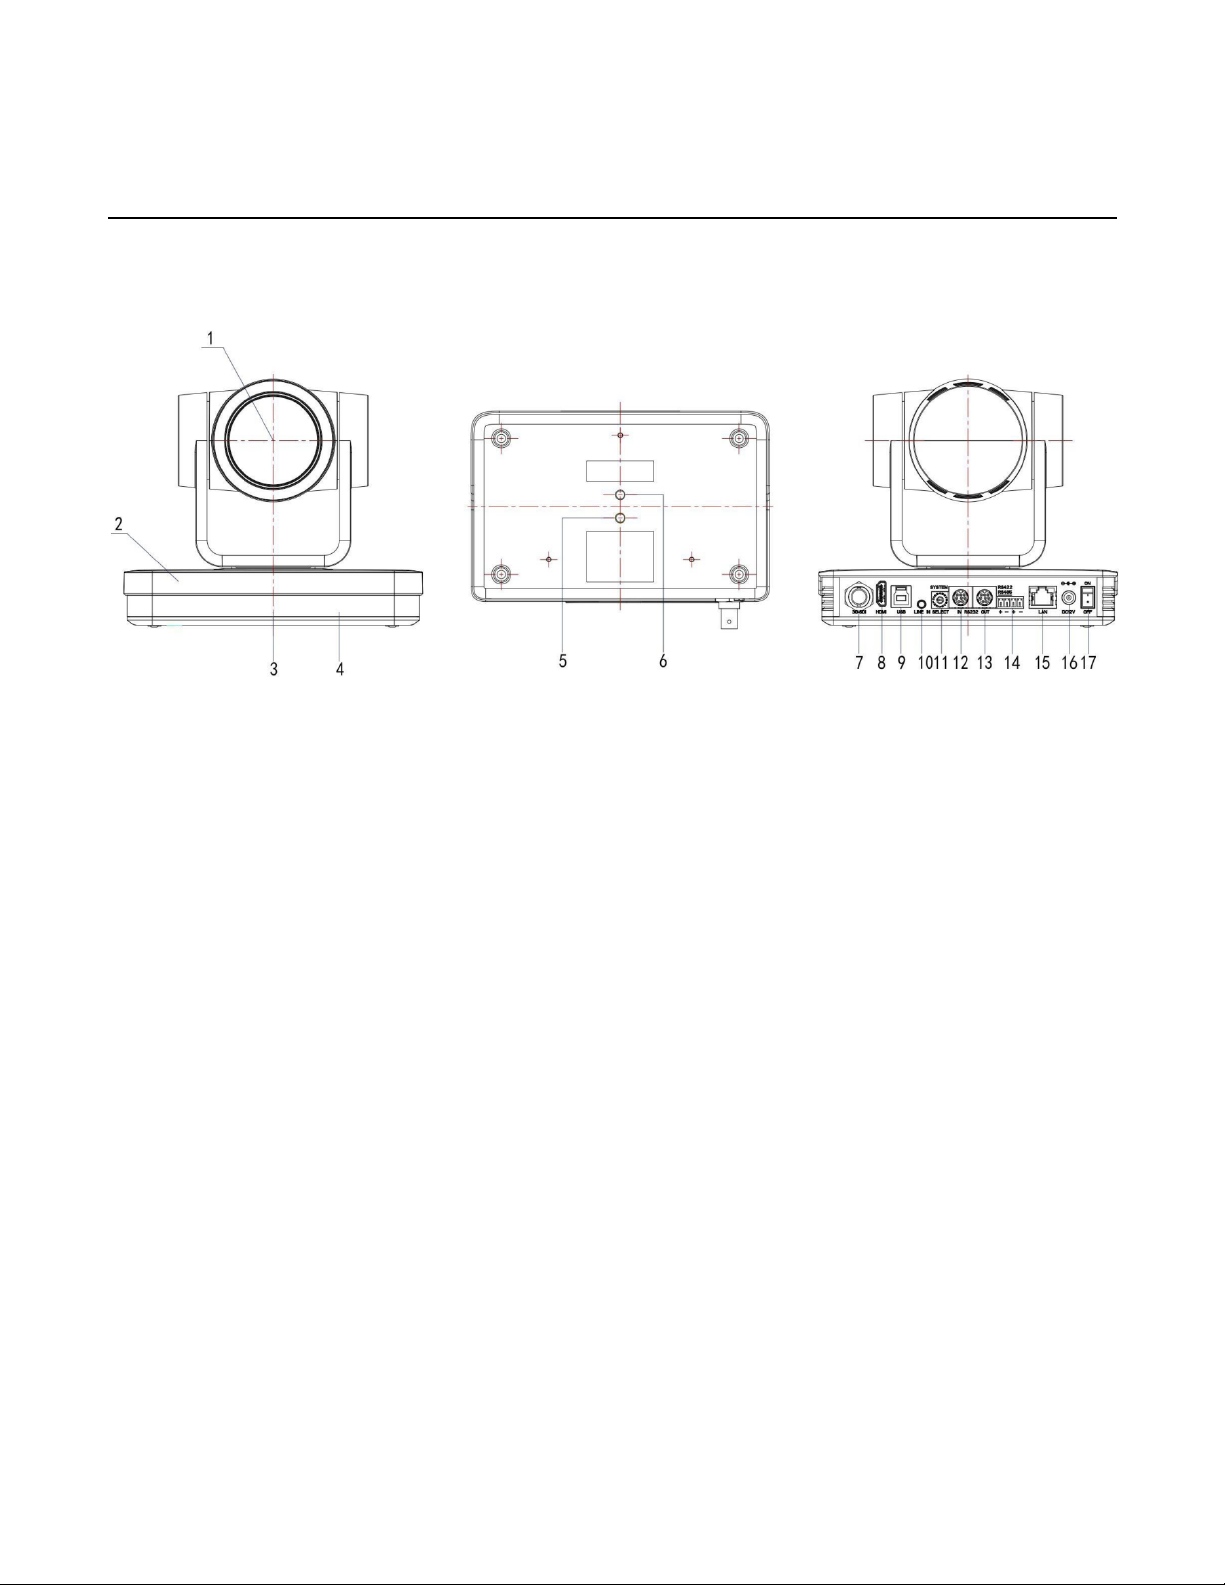
1.1 Camera Interface ...................................................................................................... 5
1.2 Interfaces and Connections ..................................................................................... 6
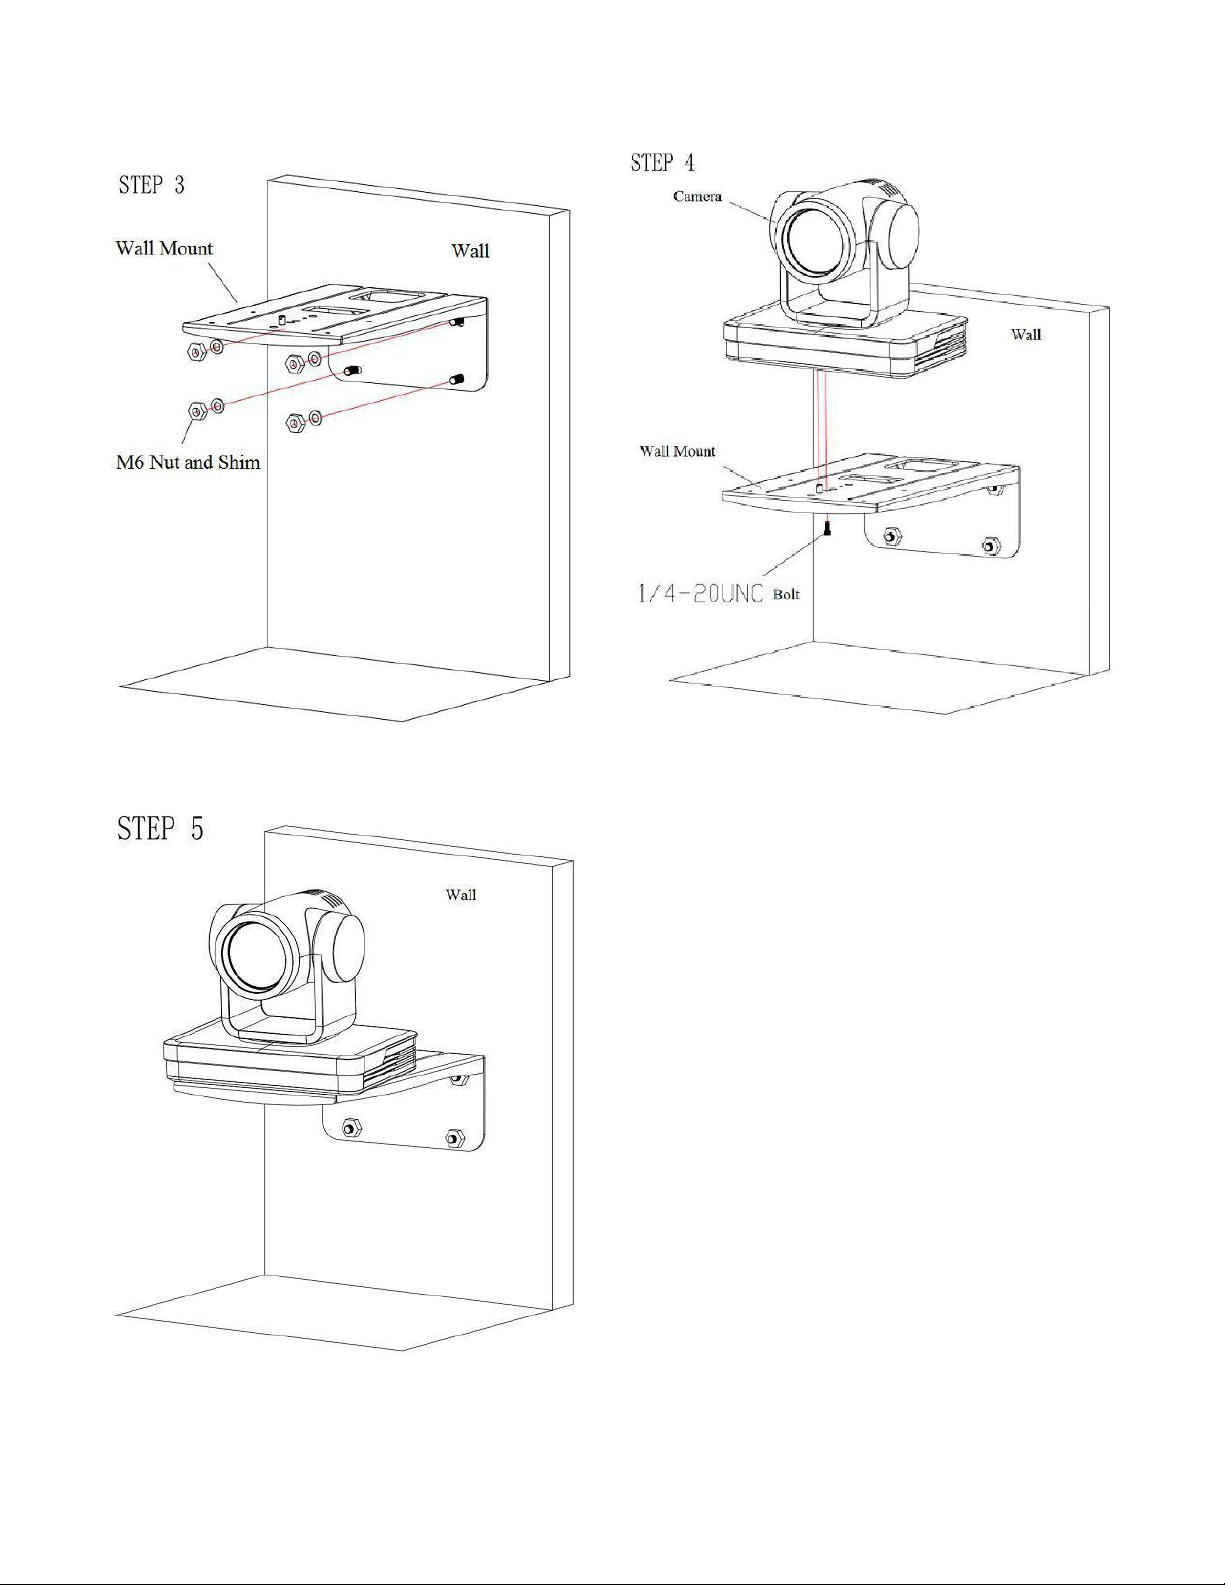
1.3 Mounting Brackets ................................................................................................... 6
2. Product Overview ....................................................................................................... 11
2.1 Product Introduction .............................................................................................. 11
2.2 Dimensions ............................................................................................................. 12
2.3 Accessories ............................................................................................................ 12
2.4 RS-232 Interface ..................................................................................................... 13
2.5 Rotary Dial Switch ................................................................................................... 15
2.6 Main Features ......................................................................................................... 15
2.7 Specifications ......................................................................................................... 17
3. Remote Control .......................................................................................................... 20
3.1 Match code for Wireless Remote Control ............................................................. 20
3.2 Keys Introduction for IR Remote Control .............................................................. 21
3.3 Menu Introduction .................................................................................................. 24
4. Network Configuration ............................................................................................... 25
4.1 Network Connection ............................................................................................... 25
4.2 IE Login .................................................................................................................... 26
4.3 Streaming ................................................................................................................ 27
4.4 Software Upgrading ................................................................................................ 29
5. Serial Communication Control ................................................................................... 30
5.1 VISCA Protocol Return Command ......................................................................... 30
5.2 VISCA Protocol Control Command ....................................................................... 30
5.3 VISCA Protocol Inquiry Command ........................................................................ 34
5.4 PELCO-D Protocol Command List ......................................................................... 36
5.5 PELCO-P Protocol Command List ......................................................................... 37
6. Maintenance and Troubleshooting ............................................................................ 38
6.1 Maintenance ........................................................................................................... 38
6.2 Troubleshooting ...................................................................................................... 38

Hall Technologies March 2, 2022 Page 5 of 41
1. Camera Installation
1.1 Camera Interface
!
!
!
!
!
1. Camera Lens
2. Camera Base
3. Remote Control Receiving Indicator
4. Infrared Receiver
5. Tripod Screw Hole
6. Screw Hole for Tripod
7. SDI Output Interface
8. HDMI
9. U3
10. Audio Input Interface (LINE-IN)
11. Rotary Dial Switch
12. RS232 Input Interface (input)
13. RS232 Output Interface (Output)
14. RS422 Compatible with RS485 Interface
15. LAN Port
16. Power Input Socket (DC12V)
17. Power Switch Button
!
!
!
!
!
!
!
!
!
!
Figure 1.1 Interface of SU (standard) Model!

Hall Technologies March 2, 2022 Page 6 of 41
1.2 Interfaces and Connections
1. After power on and self-check, the camera will automatically return to the preset 0 position if
it’s presets have been set.
2. The default address for the IR remote control is 1#.
If the menu is restored to factory defaults, the remote-control default address will restore to 1#.
!
!
1.3 Mounting Brackets
Notes:
Ceiling or wall mounting brackets can only be mounted on the template and concrete wall.
For safety reason, plasterboard is not recommended.
!
!
!
!
!
!
Figure 1.3 Wiring Diagram!

Hall Technologies March 2, 2022 Page 7 of 41
1. Wall Mounting
!
!
!
!
!
!!!!!!!!! !
!

Hall Technologies March 2, 2022 Page 8 of 41
!!!!!!!!!! !
!
!
!
!
!
!

Hall Technologies March 2, 2022 Page 9 of 41
2. Ceiling Mounting
!
!
!
!
!!
!
!

Hall Technologies March 2, 2022 Page 10 of 41
!
!
!
!
!

Hall Technologies March 2, 2022 Page 11 of 41
!
!
!
!
!
2. Product Overview
2.1 Product Introduction
Model No. —XX—XX
Users are requested to confirm the model number before referring to product functions
accordingly.
Figure 2.1 Product Model!
IR— Infrared Remote Controller
WR--- Wireless Remote Controller
12---12X Optical Zoom Lens
20---20X Optical Zoom Lens
30---30X Optical Zoom Lens

Hall Technologies March 2, 2022 Page 12 of 41
2.2 Dimensions
2.3 Accessories
Please check below standard and optional accessories when unpacking the box.
!
Figure 2.2 Product Dimensions!
Standard Accessories
Power Adapter
RS-232 Cable
User Manual
USB3.0 Cable (only for model
with USB3.0 output)
Warranty Card
Optional Accessories
Wireless Remote Control
Ceiling Mount
Wall Mount
Infrared Remote Control

Hall Technologies March 2, 2022 Page 13 of 41
2.4 RS-232 Interface
1. RS-232 Interface Definition
2. RS-232 Mini-DIN 8-pin: Port Definition
3. RS-232 (DB9) Port Definition

Hall Technologies March 2, 2022 Page 14 of 41
4. VISCA Networking as shown below:
!

Hall Technologies March 2, 2022 Page 15 of 41
2.5 Rotary Dial Switch
Note: After turning the dial to modify the video format, power off and restart the unit to take
effect.
After turning the dial to F, power off and restart, the menu can display the video format.
2.6 Main Features
This series camera has perfect functions, superior performance, and rich video output
interfaces, featuring with advanced ISP processing algorithms, offering vivid and high-
resolution video with a strong sense of depth and fantastic colour rendition. It supports
H.264/H.265 encoding which makes motion video more fluent and clearer under low
bandwidth conditions.
• Full HD Resolution: 1/2.8-inch-high quality CMOS sensor. Resolution is up to 1920x1080 with
frame rate up to 60 fps.
• Multiple Optical Zoom Lens: 12X/20X/30X optical zoom lens.
• Leading Auto Focus Technology: Fast, accurate and stable auto focusing technology.
• Low Noise and High SNR: Super high SNR image is achieved with low noise CMOS. Advanced
2D/3D noise reduction technology further reduces the noise while ensuring high image
clarity.
• Multiple video output interfaces: HDMI, SDI, CVBS, LAN.

Hall Technologies March 2, 2022 Page 16 of 41
• Simultaneously output audio and video signal via HDMI, SDI and LAN. LAN interface supports
POE, USB 3.0 supports dual code stream, SDI supports transmission up to 100m under
1080P60 format
• Multiple Audio/Video Compression Standards: Support H.264/H.265 video compression, up
to 1920 1080 resolution 60 fps; support AAC, MP3 and G.711A audio compression, 8000、
16000、32000、44100、48000 sampling frequency
• USB3.0 Supports Dual Coding Stream: Supports mainstream and sub –stream, and
simultaneous output; support YUY2, MJPEG, H.264, NV12, H.265 video coding format
• Built-in Gravity Sensor: supports PTZ auto-flip function and easy installation.
• Multiple Network Protocol: supports ONVIF、GB/T28181、RTSP、RTMP、VISCA OVER IP
、IP VISCA、RTMPS、SRT protocols; Supports RTMP push mode making it easy to be
connected to streaming server (Wowza、FMS); Supports RTP multicast mode.
• Control Interface: RS422 is compatible with RS485, RS232-IN, RS232-OUT, and the
RS232interface supports cascading.
• Multiple Control Protocol: Supports VISCA 、PELCO-D 、PELCO-P protocols; Supports
automatic identification protocols.
• Quiet Pan / Tilt Movement: with high accuracy step driving motor, camera can pan / tilt
extremely quietly and smoothly.
• Various remote controls: Users can choose infrared remote control or wireless remote
control according to the environmental conditions used. The 2.4G wireless remote control is
not affected by angle, distance, and infrared interference. Support the remote-control signal
transparent transmission function, which is convenient for back-end equipment to use.
• Multiple Application: Online-education, Lecture Capture, Webcasting, Video conferencing,
Tele-medicine, Unified Communication, Emergency command and control systems, etc.
!
!
!
!
!
!
!
!
!
!
!
!
!
!
!
!

Hall Technologies March 2, 2022 Page 17 of 41
2.7 Specifications
!
!
!
!
!
!
!
!
!
!
!
!
!
!
!
!
!
!
!
!
!
!
!
!
!
!
!
!
!
!
!
!
!
!
!
!
!
!
!
!
!
!

Hall Technologies March 2, 2022 Page 18 of 41
!
!
!
!
!
!
!
!
!
!
!
!
!
!
!
!
!
!
!
!
!
!
!
!
!
!
!
!
!
!
!
!
!
!
!
!
!
!
!
!
!
!
!

Hall Technologies March 2, 2022 Page 19 of 41
!
!
!
!
!
!
!
!
!
!
!
!
!
!
!
!
!
!
!
!
!
!
!
!
!
!
!
!
!
!
!
!
!
!
!
!
!
!
!
!
!
!
!

Hall Technologies March 2, 2022 Page 20 of 41
3. Remote Control
!
3.1 Match code for Wireless Remote Control
!
!
!
!
One to One Code Matching:
Press the "set" and "*" keys combined for 3 seconds, LED indicator
starts flashing. Camera receives the signal and power on, LED
indicator will go off if code matching is successful. The camera
can be controlled by this wireless remote control only after one-
to-one code pairing.
Otherwise please clear the code matching of this remote control
or use another remote control to pair with the camera again. If
one to one code matching fails, the red LED light flashes for 20
seconds and then goes off, camera will stop code match and turn
on sleep mode; Press any key to wake up the camera and re-
match code.
Note: After code matching successfully, please select the camera
address to control it.
Clear Code:
Press the "set" and "*" keys combined for 3 seconds, LED indicator
starts flashing. Camera will power off and on, the LED indicator
will go off if clear code successfully.
Sleep Mode and Wake Up:
Press any key to wake up the camera from sleep mode.
Other manuals for HT-CAM-1080PTZ
1
Table of contents
Other Hall Technologies Security Camera manuals