Halo Board Halo Go User manual

HALO GO
TM


Before You Begin---------------------01
Main Components-------------------02
Charging Your Batteries------------03
Powering on the Halo Go----------04
Indicator Lights ----------------------05
Pairing your Bluetooth Device----06
Riding Your Halo Go-----------07-10
Safety Alerts--------------------------11
Driving Safety--------------------12-15
Technical Specications-----------16
Battery Safety--------------------17-18

Before You Begin
Before You Begin
Before learning to ride your Halo Go, you must read and follow all instructions and warnings in
this user manual. It is important that you follow all safety warnings and cautions that appear
throughout the user manual and that you use good judgment when you ride your Halo Go.
The Risk of injury
The Halo Go is a self-balancing, personal scooter that uses balancing technology. Balancing
technology cannot prevent injury if you do not ride the scooter safely. Whenever you ride the
scooter , you risk death or serious injury from loss of control, collisions, and falls. To reduce risk
of injury, you must read and follow all instructions and warnings in the user manual.
01
NOTE: The Halo Go comes with Ride-Assist Technology that keeps the board balanced at all
times. This technology requires the board to be placed on a surface while powered on. Do NOT
pick up the Halo Go while it is still on if Ride-Assist is turned on. Always power o the board prior
to picking up. Failure to do so will cause the System Warning Indicator to sound and the board
will need to be powered o and back on again before you can ride (learn more - page 8-9).

Main Components
02
Foot Mat
1
11
3 3
54
2
Indicator Lights
2
Headlights
3
Power Button 4
Charging Port 5

Charging Your Batteries
Battery Charge Indicator Light
When scooter is plugged in and charging, battery charge indicator will be solid red.
When the battery charge indicator turns green, the batteries are fully charged.
03
1
3
2
Do NOT insert the power cord plug if the charge
port, power cord or AC power outlet is wet.

Powering On the Halo Go
Power on your scooter by pressing the Power button. The Power button is located on the back
side of the scooter . The indicator lights will illuminate to indicate the power is ON.
Resetting and Calibrating the Halo Go
Put the scooter on a level surface where the wheels do not make contact with the ground.
Press the Power Button for 3-5 seconds until caution light ashes.
Turn OFF the scooter and turn ON again.
Powering On the Halo Go
04
1
1
3
2
2
Power Button Caution Light

Warning Indicator Light (Red)
If red warning light is ashing, there is an issue with the scooter (low battery, over speed,
power issue, etc).
Indicator Lights
05
1
Balance Indicator Light (Green)
The scooter is in Balance Mode with rider on.
1
Battery Status Indicator Light (Green)
When powered on, the battery status indicator light will turn on solid green.
2

Pairing your Bluetooth Device
06
Make sure both the Bluetooth® function on your device and the scooter are turned on.
On your device, locate the Bluetooth® device list.
Select “Halo Go Music” from the list to pair.
1
2
3
To pair with a Bluetooth®device
follow these steps:
To reset Bluetooth®Memory, you must reset
the scooter. Refer to Resetting the
Halo Go (page 4).
Resetting Bluetooth®Memory
Speaker

07
Before riding, make sure your Halo Go is charged. Inspect your scooter before each use. Do not ride
if any part is loose or damaged. The Scooter is highly maneuverable and allows you to easily navigate
around obstacles. However, to prevent the loss of traction, you must always be careful when riding
and learn to identify and avoid unsafe surfaces. Slippery, icy, or wet surfaces, loose materials
(sand/gravel), steep slopes, and obstacles might aect the Halo Go’s performance. Familiarize
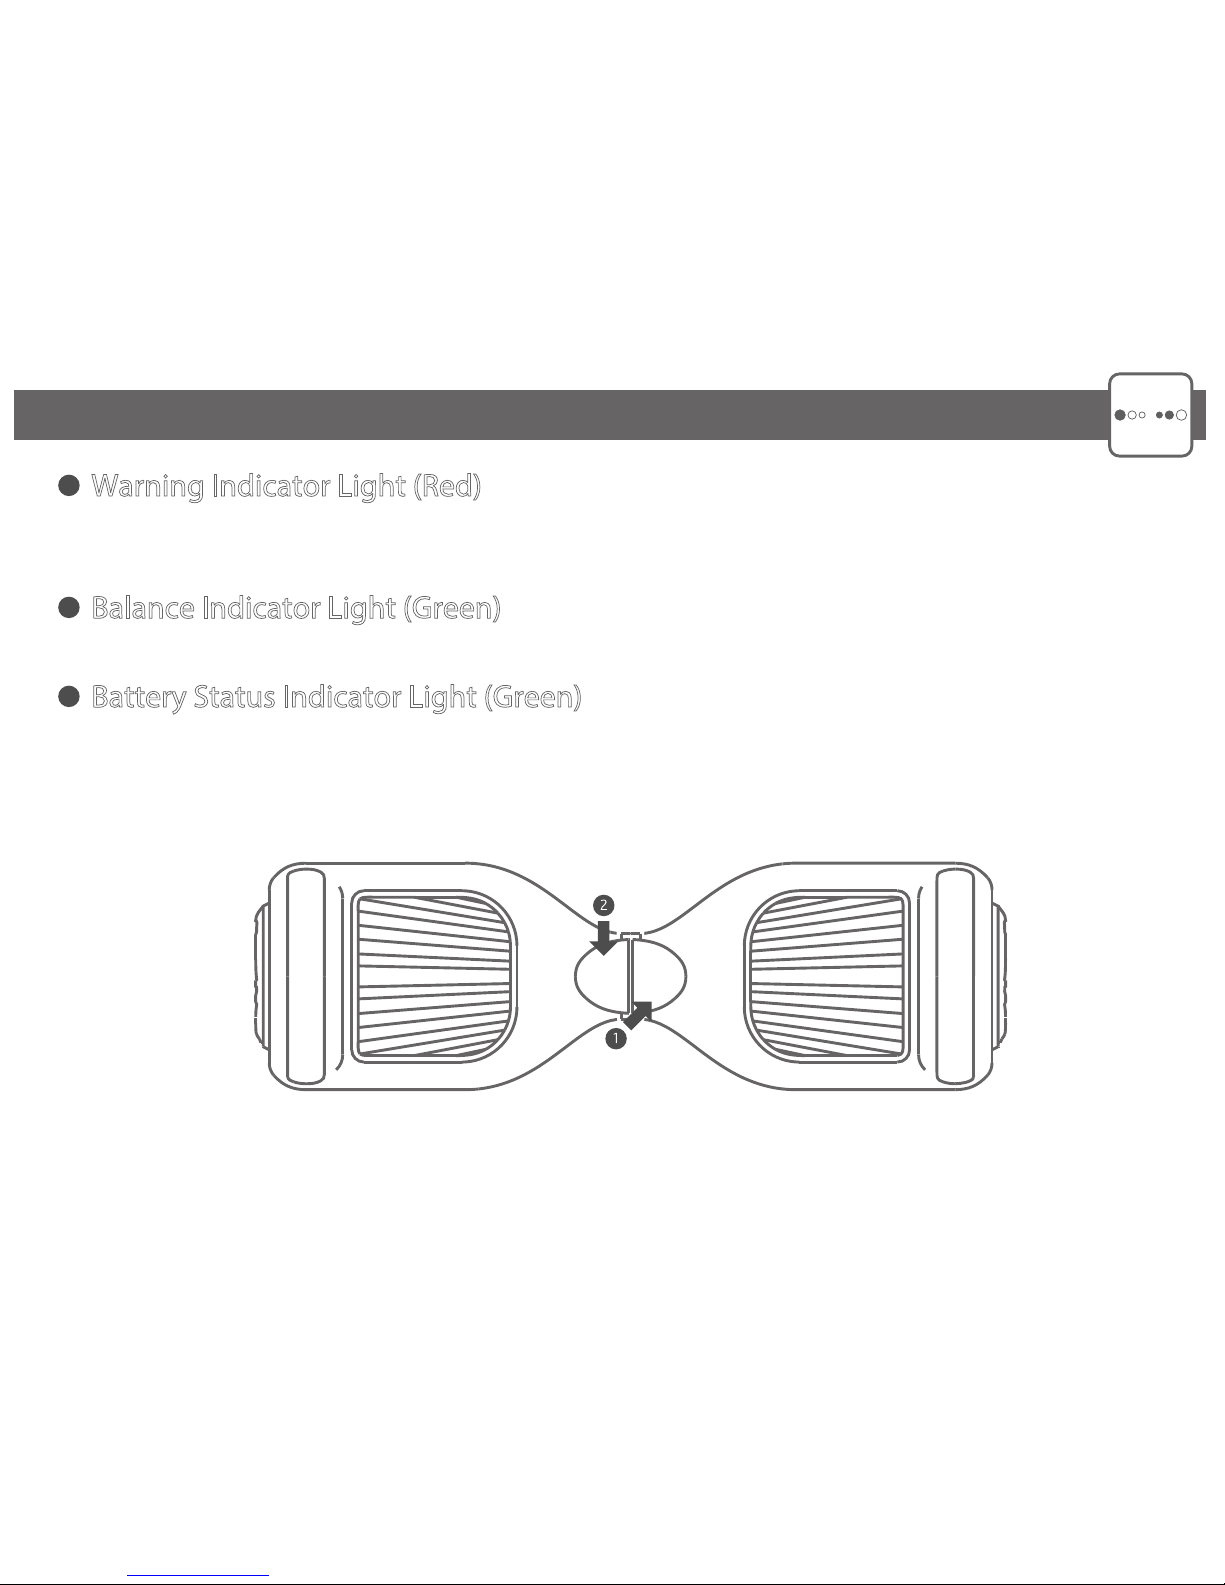
yourself with the indicator lights that may be displayed on the scooter (page 5).
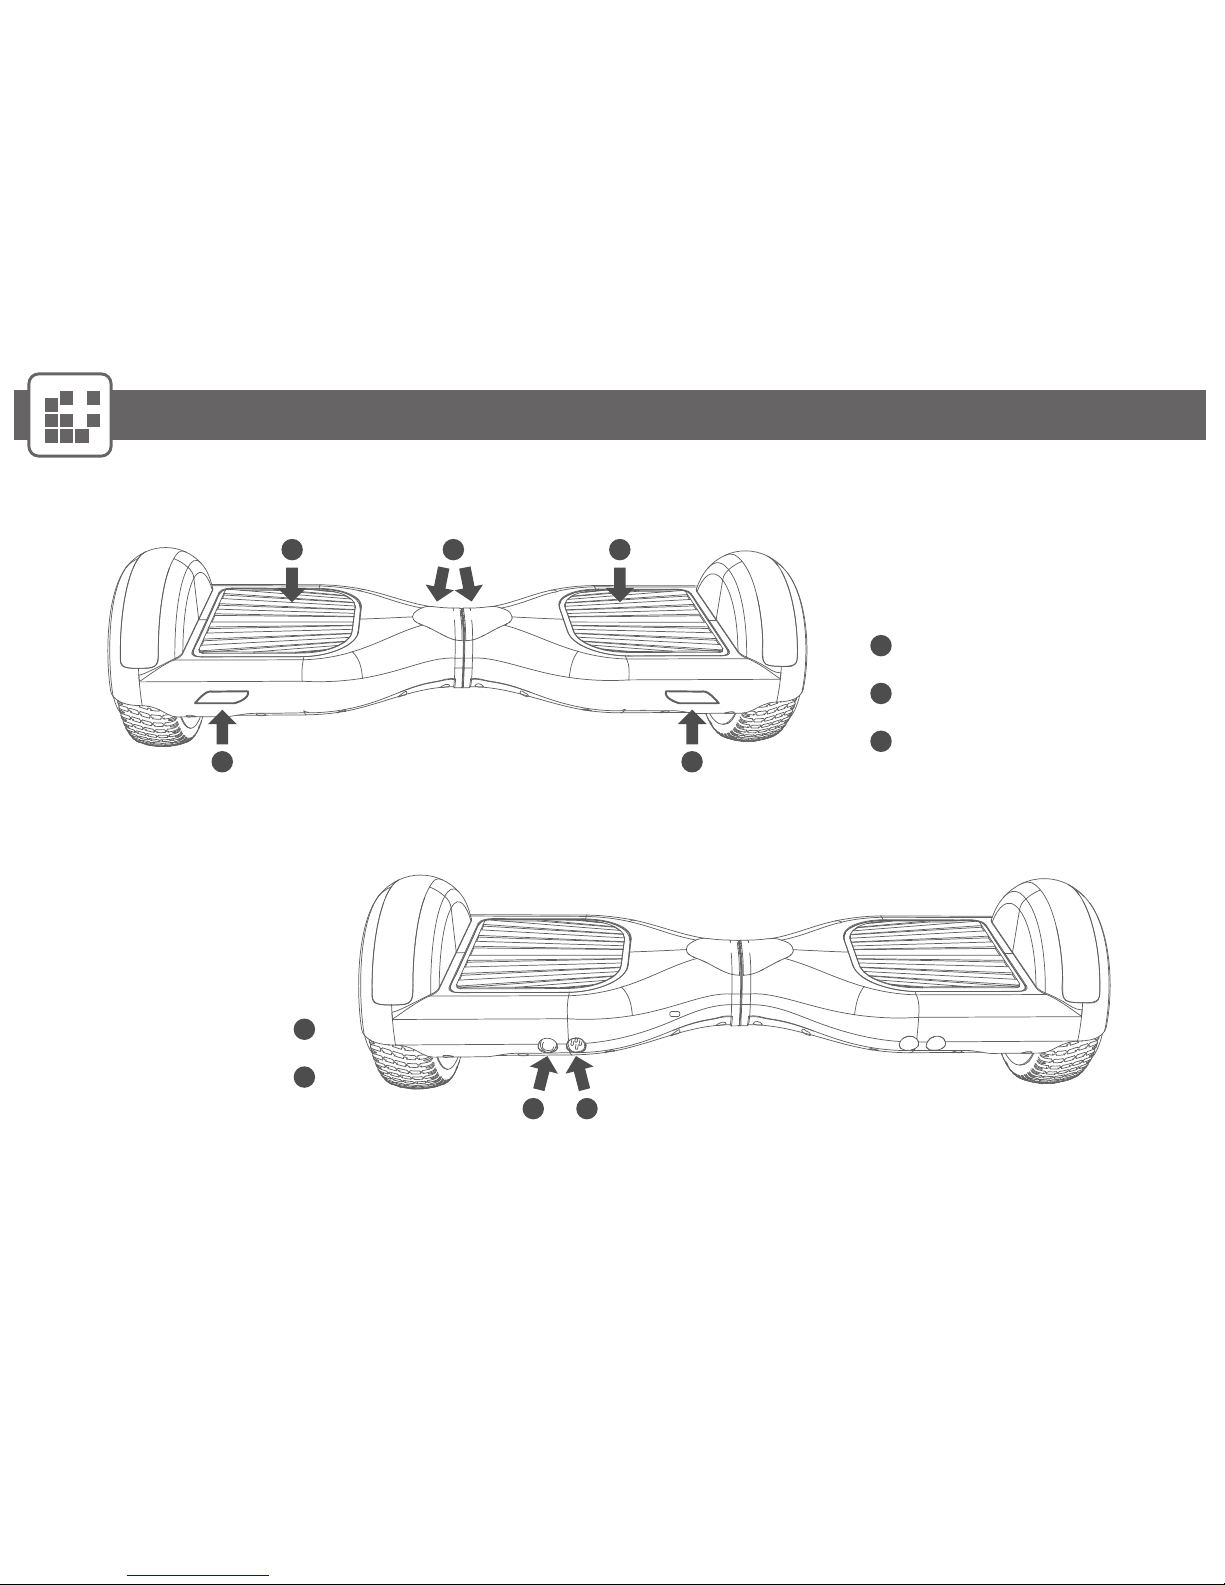
Step 1. Power ON the Halo Go by pressing the power button. Make sure the
Battery Status Indicator light is on.
1
2
Riding Your Halo Go
The Halo Go includes proprietary Halo Ride-Assist Technology Sensors.
When powered on, the Rover will automatically lift itself into a balanced position
and will remain upright until powered off. Do NOT pick up the board while the board
is on if Ride-Assist Technology is turned on (see Page 9 to turn off this feature).

08
1
2
3
4
Riding Your Halo Go
Place one foot on the foot mat.
The Balance indicator light will turn ON. Enabling the
automatic balancing system.
Try to keep scooter steady and leveled.
Place your other foot on the other
foot mat.
Step 2: Getting on the Halo Go
1
2
3
4
NOTE: The Halo Go comes with the Halo Ride-Assist Technology turned on.
This feature keeps the board upright whether you are standing on it or not.
To turn o this feature, make sure the scooter is o.
Now double click the power button when turning it on
(tap twice in quick succession). You will hear the normal
power-on beep tone, followed by a longer beep tone.
Ride-Assist is now turned o.

Riding Your Halo Go
09
2
1Keep scooter still by remaining level when
standing on it.
SLIGHTY lean your body forward or
backward to enable the scooter to move
forward or backwards respectively.
Step 3: Moving forward and backwards
NOTE, When the scooter is unable to achieve a
balanced position, an alarm will sound and trigger
the Warning Indicator light. The scooter will return
to a balanced position automatically.
During this process, you should not step on or ride
the scooter.
Body leaning should be done in small increments.
Only small leaning angles are needed to drive the
scooter forward or backwards.
Leaning forward or backwards too much can
aect riding safety.

Riding Your Halo Go
10
Step 4: Steering the Halo Go
Step 5: Getting o the Go
Press right foot forward
to turn left
Press left foot forward
to turn right
Make sure the scooter completely stopped
and stable before stepping o. Step o the
scooter by stepping back one foot at a time.
Do not turn while in high speeds to avoid dangerous
situations.
The scooter balances front to back but not side-to-side.
Avoid riding across steep slopes.

Safety Alerts
11
Here are some reasons that will trigger the Warning Indicator Light:
While operating, the scooter can alert users if there are any irregularities in the system. If the
scooter detects a fault in any of its redundant systems, or the batteries are depleted beyond
limit, it automatically slows down the motors, ashes the warning indicator light, emits a warning
tone, and disables self balancing mode.
-- Irregular platform angle.
-- Low Battery Voltage
-- Plugged in and Charging
-- Platform distortion while riding (System Shutdown)
-- Speed Limit reached
-- Platform angle is greater than 35 degrees, (System Shutdown)
-- Wheels get stuck
-- Electrical Current Surge
Do not get back on the scooter after until the condition that caused the warning alert has been identied and corrected.
Never restart and ride your scooter after it has indicated an empty Battery condition or shutdown due to Low Battery.
The Scooter may not have enough power to keep you balanced. If you restart and continue riding, you risk falling. Also
you risk damaging your batteries, resulting in reduced battery life and capacity.

Driving Safety
12
When riding the scooter you risk serious injury from loss of control, collisions, and falls. It is your
responsibility to learn how to safely ride the scooter in order to reduce this risk. To ride safely
you must follow all instructions in the user materials, including the user manual.
- Always wear proper attire when using the scooter, do not wear loose clothing that can catch in
the tires and prevent proper steering.
- Never place anyting on the foot mats except your feet.
- Avoid obstacles and surfaces that could result in a loss of balance or traction and cause a fall.
- Use caution when riding over any terrain change such as pavement to sand, grass or speed
bumps.
- Avoid riding across steep slopes. Maintain both tires in contact with the ground.
- Avoid holes, curbs , steps, and other obstacles.
- Avoid riding over any surface where the bottom of the scooter may impact any object.
- When using on sidewalks, make sure that one wheel does not drop o the curb.
- Use caution when riding in new environments.
- Make sure you leave enough wheel clearance.
- Be careful and considerate of others while riding.

Driving Safely
13
- Always ride under control at a speed that is safe for you and those around you.
- Always be prepared to stop.
- Respect pedestrians by always yielding the right of way.
- Avoiding startling pedestrians. When approaching from behind, announce yourself and slow
down to walking speed when passing. Pass on the left whenever possible. When
approaching a pedestrian from the front, stay to the right and slow down.
- In heavy pedestrian trac conditions, slow down and proceed at the pace of pedestrian trac.
Pass only if there is ample space to do so safely. Do not weave in and out of pedestrian trac.
- When riding with other Scooter riders, maintain a safe distance, identify hazards and obstacles,
and do not ride side-by-side unless there is plenty of room left for pedestrians.
- Cross roads at designated crosswalks or signaled intersections. Do not jaywalk/ride.
- Only travel on a road when a pedestrian way is not available or when sidewalk use is not
allowed. Do not ride your scooter on private property (inside or outside) unless you have
obtained permission to do so.
- Learn about and obey applicable local laws and regulations.
- Inspect your scooter before each use.
- Do not allow any person to use your scooter unless that person has carefully read this Manual.

Driving Safely
14
- Use caution on slopes. Use caution when ascending, descending, or crossing slopes. When
riding across any slope, lean uphill to maintain balance.
- Always turn slowly and with caution. Fast turns can lead to loss of control and falls.
- No passengers. The scooter is designed for one rider. Do not ride double or carry any
passengers. Do not carry a child in you arms or in a child carrier while riding. Expectant
mothers should not ride the scooter.
- Do not exceed the maximum weight limit (rider and all cargo) specied in this Manual. If you
exceed the maximum weight limit, you are at greater risk of falling and injury. Also, the rider’s
weight must not be less then the minimum rider weight limit specied in this manual.
- Do not step o the scooter while moving. Always come to a stop before stepping o.
- Be alert. As with any other transportation device, you must be mentally alert to safely ride.
Do not attempt to ride if you are ill or if you cannot comply fully with the instructions and
warnings in this manual. Do not ride under the inuence of alcohol or drugs. Avoid distractions.
Do not use a mobile phone, or engage in any other activity that might distract you or interfere
with your ability to monitor your surroundings while riding.
- When riding, keep both feet on the foot mats. Be relaxed. Ride in a relaxed position with your
knees and elbows slightly bent and head up.

Driving Safely
15
- Do not ride backwards for long periods of time. Instead, turn and ride forward.
- Riding on the road. The scooter is not intended or recommended for primary use on roads.
If you must ride on the road, or must cross the road, be extremely careful. Ride as far away
from trac as possible. Check to make sure that riding on the road is allowed by local law.
- Ride in areas free of obstacles and distractions until you are comfortable using and maneuvering
your scooter. Practice until you can step on, ride forward and backward, turn, stop, and
step o without any problems.

Technical Specications
16
Lithium-ion Battery
Motor
Distance on Full Charge
Charging time
Input
Max Speed
Water Resistance
Max Load
Max Climbing Limit
Operating Temperature
Frame Material
Wheel size
Product Dimensions
Net Weight
4.3Ah, 36V 154WH
Dual 250W Motor with Dual Independent Gyros
Up to 12.5 Miles / 20 km
Charging Temperature 32 °F to 104 °F / 0 °C to 40 °C
2 to 3 hours
DC 42V 2A
Up to 9 MPH / 15 km/h
IPX4
264 LBS / 120 Kg
15 degrees
14°F to 113°F / -10 °C to 45 °C
Aluminum with Plastic Components
6.5 inch / 165mm
23.8 x 7.3 x 7.3 inch / 605 x 186 x 185 mm
22 LBS / 10 Kg

Battery Safety
17
- Do not use a Battery if the battery pack casing is broken or if the battery emits an unusual odor,
smoke, excessive heat or leaks any substance. Avoid contact with any substance seeping from
the Batteries.
- Keep out of reach of children and pets. Exposure to battery voltage could result in death or
serious injury.
- Unplug or disconnect the scooter from AC power before removing or attaching Batteries or
performing any service. Never work on any part of the Scooter when it is plugged into AC power
source. You risk serious bodily injury from electric shock as well as damage to the scooter.
- The cells within the batteries contain toxic substances. Do not attempt to open the batteries. Do
not insert any object into the batteries or use any device to pry at the battery casing. If you insert
an object into any of the battery ports or openings you could suer electric shock, injury, burns, or
cause a re. Attempting to open the battery casing will damage the casing and could release
toxic and harmful substances, and will render the pack unusable.
- Observe and follow all safety information on the warning label found on the batteries.
- Failure to charge the batteries could result in permanent damage to them. Left unplugged, the
batteries could fully discharge over time, causing permanent damage.
- Only use charging devices approved by Halo Board and never attempt to bypass or override their
charging protection circuits.
Table of contents
Other Halo Board Hoverboard manuals