Halo ZED-TTR2-TY User manual

Smart Thermostat
Installation Manual


| 3 |
Summary
EN /Installation manual..................................................6
General description.............................................................................6
Safety warnings..................................................................................7
Halo Smart tHermoStat.........................................................................8
Installation..........................................................................................9
Reset Procedure ...............................................................................12
Troubleshooting ................................................................................13
Technical specifications....................................................................14
Conformity........................................................................................15
Information and support....................................................................15
IT /Manuale installazione.............................................16
Descrizione generale ........................................................................16
Avvertenze di sicurezza.....................................................................17
Halo Smart tHermoStat.......................................................................18
Installazione......................................................................................19
Procedura di Reset............................................................................22
Risoluzione dei problemi...................................................................23
Specifiche tecniche...........................................................................24
Conformità........................................................................................25
Informazioni ed assistenza................................................................25

| 4 |
FR /Manuel d’installation .............................................26
Description générale.........................................................................26
Consignes de sécurité.......................................................................27
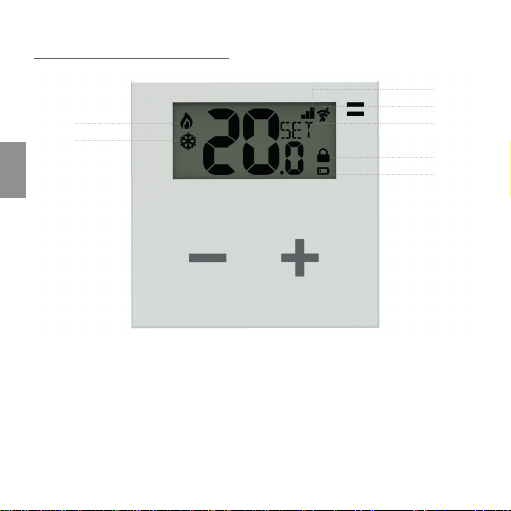
Halo Smart tHermoStat.......................................................................28
Installation........................................................................................29
Procédure de réinitialisation..............................................................32
Résolution des problèmes.................................................................33
Spécifications techniques .................................................................34
Conformité........................................................................................35
Informations et assistance ................................................................35
DE /Installations- und Bedienungsanleitung...............36
Allgemeine Beschreibung..................................................................36
Sicherheitshinweise..........................................................................37
Halo Smart tHermoStat.......................................................................38
Installation........................................................................................39
Reset................................................................................................42
Problembehebung.............................................................................43
Technische Daten .............................................................................44
Konformität.......................................................................................45
Informationen und Support ...............................................................45
Notes /Note /Notes /Anmerkungen............................46

| 5 |
Codice / Code Nome / Name
ZED-TTR2-TY Halo Smart Thermostat
EN /Read and keep these instructions
IT /Leggere e conservare queste istruzioni
FR /Lisez et conservez ce manuel
DE /Diese Anleitung lesen und aufbewahren

| 6 |
EN
EN /Installation manual
General description
The Halo Smart tHermoStat is a battery powered wireless timer thermostat,
easy to use. It is equipped with a three way voltage free contact for the
control of heating and/or cooling systems.
Minimum requirements
To use the Halo Smart tHermoStat, the following items are required:
/ A previously installed Halo WHiteBox
/ A mobile device (smartphone/tablet) with Android or Apple iOS
operating system
Contents of the pack
/ 1 Halo Smart tHermoStat
/ 1 x Installation manual
/ 2 x screw; 2 x masonry plug
/ 2 x AA battery
Tools required for installation
/ 1 x slotted head screwdriver
/ 1 x cross head screwdriver
/ 1 x drill
/ insulating tape

| 7 |
EN
Safety warnings
All hardware connections must be made by a person who is suitably quali-
fied and aware of the risks associated with installation, observing minimum
standards of safety, and with the equipment isolated from the power supply.
The user accepts all responsibilities and risks connected with the steps of
installing, configuring and using products to the end of obtaining the ben-
efits and advantages they afford. The liability of the Tyrrell in respect of its
products is regulated by the Tyrrell General Conditions of Sale (published on
the company’s website www.tyrrellproducts.com).
Caution
The Halo Smart tHermoStat must be used only indoors and in dry conditions,
and not positioned in places exposed to high levels of humidity and/or water
splash.
Maintenance
To clean a Halo Smart tHermoStat, isolate it from the power supply and wipe
with a slightly moist cloth. Do not use solvents. Do not immerse in liquids.
Should the product develop a fault, do not open it up or attempt to repair it,
as this will invalidate the guarantee.

| 8 |
EN
Halo Smart tHermoStat
3
4
5
6
1
2
7
1. Heating system active
2. Cooling system active
3. Quality of incoming wireless
signal
4. No wireless radio signal
5. SET: blinks for 5 seconds when
the thermostat receives a
new control signal/new target
temperature
6. Keypad lockout active
7. Battery low indicator

| 9 |
EN
Installation
Removal of existing thermostat
1. Caution: isolate the thermostat circuit from the power supply
2. Remove the existing thermostat
3. Photograph the terminal block with the wires connected
4. Identify the control wires COM (Common), NO (Normally Open) and NC
(Normally Closed), referring to the labels or diagrams generally affixed
to the thermostat (fig. 1)
5. Caution: if there are power conductors present, these must be identi-
fied and isolated
6. Disconnect the existing thermostat
COM
NO NC L N
Caution: dangerous
voltage parts
fig. 1 A
fig. 2

| 10 |
EN
Connection of Halo Smart tHermoStat
7. Open the Halo Smart tHermoStat by pressing on point A with a slotted
head screwdriver (fig. 2)
8. Remove the protective cover from the terminals (fig. 3)
9. Connect the wires to the terminals, maintaining positions COM (Com-
mon), NO (Normally Open) and the optional NC (Normally Closed) if wired
into the system (fig. 4). Offer the back plate to the wall and fix in place.
10. Cover the terminals with the shield provided.
11. Insert the batteries and mount the Halo Smart tHermoStat to the wall
(figures 5 and 6).
12. Reconnect to the electrical power supply.
COM NCNO
fig. 3
COM
NC
NO
fig. 4

| 11 |
EN
fig. 5 fig. 6
Connect the Halo Smart tHermoStat to the Halo network
13. Check that the Halo WHiteBox is powered up
14. Check that the display of the tHermoStat reads “noNET”; if not, run the
“Reset” procedure
15. Start the “Halo Smart living” app on a smartphone or tablet and select
“Add device”
16. Follow the guided procedure presented by the App.

| 12 |
EN
Check installation
17. Check that the tHermoStat is included in the list of devices on the
“Home” page of the App.
18. Use the + or - buttons until a flame appears in the display of the
tHermoStat. In this condition the heating should be in operation; if not,
check the connections and/or the wiring between the tHermoStat and
the boiler.
Reset Procedure
1. Press and hold the + and - buttons simultaneously until the message
“PRo” appears in the display
2. Press the + button repeatedly until the letters “RST” appear above the
“PRo” message, then wait; the thermostat will revert automatically to
the screen displaying ambient temperature.
3. Press and hold the + and - buttons simultaneously until the message
“PRo” appears in the display
4. Press the + button repeatedly until the letters “LEA” appear above the
“PRo” message, then wait
5. If the control signal was sent correctly, the thermostat will display the
feed back message “YES” and restart
6. The Reset procedure is now complete; the Thermostat displays the
message “no Net”.

| 13 |
EN
Troubleshooting
1) The temperature measurement appears/disappears continuously on the
display of the Halo Smart tHermoStat.
/ Replace the internal batteries, which may have run low
2) During the Halo Smart tHermoStat pairing procedure, the App gives an
error message.
/ The thermostat was not unpaired correctly (noNet) before starting
the procedure. Proceed with the tHermoStat Reset procedure and try
pairing the device again
3) The ambient temperature appears on the Halo Smart tHermoStat but the
Thermostat display shows the icon (Wi-Fi strikethrough):
/ No radio connection with the WHiteBox. Position the control unit nearer
the Thermostat, add Halo devices providing repeater functionality, or
check that the WHiteBox is powered up.

| 14 |
EN
Technical specifications
Halo Smart tHermoStat
General specifications
Battery powered wireless thermostat with touch screen
technology
Electronic control device for separate installation
Radio specifications Frequency: 2.4 GHz
ZigBee HA 1.2
Power supply Alkaline battery (2x) AA 1.5V
Battery life: >2 years minimum
Control relay NC/COM/NO contacts 250V 5A Cos(Φ)=1 resistive load
Temperature
Setting range: +7 – 50 °C
Resolution: 0.1°C
Accuracy: ±0.5°C
Ambient parameters Operating temperature: -10 to +60°C; <80% R.H. n.c.
Storage temperature: -20 to +70°C; <80% R.H. n.c.
Degree of protection IP30
Insulation Class II
Conformity
Directives 2014/30/UE(EMC), 2014/35/UE (LVD) e
2014/53/UE (RED). European Standards IEC/EN 60730-1;
IEC/EN 60730-2-9; IEC/EN 62311; ETSI EN 300328; ETSI
EN 301489-1; ETSI EN 301489-17
Dimensions (L x H x D) 86 x 86 x 22 mm

| 15 |
EN
“Halo Smart living” app
App available free of charge from Apple App Store and Google Play Store.
Conformity
All models comply with Directives 2014/30/UE(EMC), 2014/35/UE
(LVD) e 2014/53/UE (RED). The appliance (or product) is subject to
sorted collection, in compliance with local regulations on waste disposal
currently in force.
The Tyrrell hereby declares that this product is in compliance with essential
requirements and other pertinent provisions established under Directive
2014/53/UE (RED). The declaration of conformity can be viewed at www.
tyrrellproducts.com.
Safety and disposal
Electrical and electronic equipment requiring sorted collection, in
compliance with local regulations on waste disposal currently in
force.
Information and support
For more information and technical support, visit www.tyrrellproducts.com.
Tyrrell reserves the right to change product specifications without notice.

| 16 |
IT
IT /Manuale installazione
Descrizione generale
Halo Smart tHermoStat è un cronotermostato wireless a batterie, facile da
utilizzare. È dotato di contatto pulito a tre vie per la gestione di impianti di
riscaldamento e/o raffrescamento.
Requisiti minimi
Per utilizzare Halo Smart tHermoStat sono necessari:
/ Una WHiteBox Halo precedentemente installata
/ Dispositivo mobile (smartphone/tablet) con sistema operativo Android
o Apple iOS
Contenuto della confezione
/ 1 Halo Smart tHermoStat
/ 1 Manuale di installazione
/ 2 viti; 2 tasselli
/ 2 Batterie AA
Materiale necessario per il montaggio
/ 1 cacciavite a taglio
/ 1 cacciavite a stella
/ 1 trapano
/ nastro isolante

| 17 |
IT
Avvertenze di sicurezza
Tutti i collegamenti hardware devono essere effettuati da personale quali-
ficato o consapevole dei rischi di un’installazione tenendo conto dei minimi
standard di sicurezza ed in assenza di tensione in ingresso.
L’utente si assume ogni responsabilità e rischio in relazione alle fasi di in-
stallazione, configurazione e utilizzo dei prodotti per il raggiungimento dei
risultati previsti dal singolo prodotto. La responsabilità di Tyrrell in relazione
ai propri prodotti è regolata dalle Condizioni generali di vendita Tyrrell (con-
sultabili sul sito www.tyrrellproducts.com).
Attenzione
Halo Smart tHermoStat deve essere utilizzato in ambienti interni ed asciutti,
evitando il posizionamento in luoghi soggetti ad elevata umidità e/o spruzzi
d’acqua.
Manutenzione
Per pulire i dispositivi Halo Smart tHermoStat, togliere alimentazione ed
usare un panno leggermente inumidito. Non utilizzare liquidi solventi. Non
immergere in liquidi. In caso di guasto, non smontare o provare a riparare il
prodotto, al fine di mantenere la garanzia.

| 18 |
IT
Halo Smart tHermoStat
3
4
5
6
1
2
7
1. Impianto di riscaldamento attivo
2. Impianto di raffrescamento
attivo
3. Qualità del segnale wireless
ricevuto
4. Assenza segnale radio wireless
5. SET: lampeggia per 5 secondi
quando il termostato riceve
un nuovo comando/una nuova
temperatura desiderata
6. Funzione blocco tasti attiva
7. Indicatore batterie in esaurimento

| 19 |
IT
Installazione
Rimozione vecchio termostato
1. Attenzione: togliere l’alimentazione al circuito del termostato
2. Rimuovere il vecchio termostato
3. Fare una foto al morsetto con i fili collegati
4. Identificare i cavi di controllo COM (Comune), NO (Norm. Aperto) ed NC
(Norm. Chiuso) aiutandosi con etichette/schemi di collegamento spesso
presenti sul termostato (fig. 1)
5. Attenzione: se presenti cavi di alimentazione identificarli ed isolarli
6. Scollegare il vecchio termostato
COM
NO NC L N
Caution: dangerous
voltage parts
fig. 1 A
fig. 2

| 20 |
IT
Collegamento Halo Smart tHermoStat
7. Aprire Halo Smart tHermoStat premendo sul punto A con un cacciavite
a taglio (fig. 2)
8. Rimuovere la protezione morsetti (fig. 3)
9. Collegare i fili ai morsetti rispettando le posizioni COM (Comune), NO
(Norm. Aperto) e l’opzionale NC (Norm. Chiuso) se previsto dal proprio
impianto (fig. 4). Posizionare e fissare la placca al muro.
10. Coprire i morsetti con il coperchio in dotazione.
11. Inserire le batterie e fissare il Halo Smart tHermoStat al muro
(figg. 5 e 6).
12. Riattivare la corrente elettrica
COM NCNO
fig. 3
COM
NC
NO
fig. 4
Table of contents
Languages: