Halyard ON-Q ONDEMAND User manual

Instructions for Use
Pain Relief System
PUMP
with ONDEMAND*
BOLUS BUTTON


1
ON-Q* Pump with ONDEMAND* Bolus Button
Instructions for Use
Important Information
Please read the entire document before operating
the ON-Q* device. Follow all instructions carefully to
ensure the safety of patient and/or user.
User information
• For 24-hour Product Support, call 1-800-444-2728 or
+1-949-923-2400 (English only).
• Visit www.halyardhealth.com or contact your sales
representative for the latest product information and
Technical Bulletins, including but not limited to:
• Use of ON-Q* Pump in Magnetic Resonance (MR)
environment
• Latex Sensitivity
• Continuous Infusion in Pediatric Patients
• Use of ON-Q* Pump in Hand and Foot Surgery
Volume and Flow Rate Selection
• WhatWe Know About ChondrolysisToday
• Perioperative Autologous BloodTransfusions
• USP 797
• Eect of StorageTimes on Flow Rate on Pre-lled
ON-Q* Elastomeric Pumps
• Patient Guidelines
Warning
Bolus is deliverable on demand. To reduce potential
adverse effects, medication dosing should be based
on the Total Flow Rate.
• Total Flow Rate refers to bolus + basal rate.To
reduce potential adverse effects, medication dosing
should be based on the Total Flow Rate.
• Due to risk of ischemic injury, vasoconstrictors
such as epinephrine are not recommended for
continuous infusions for the following routes of
administration: intraoperative site, perineural and
percutaneous (excluding epidural).
• Medications or fluids must be administered per
instructions provided by the drug manufacturer.
Physician is responsible for prescribing drug based
on each patient’s clinical status (such as age, body
weight, disease state of patient, concomitant
medications, etc.).
• There is no alarm or alert when flow interruption
occurs, therefore, life-supporting medications
whose usage may cause serious injury or death
due to stoppage or under-delivery are not
recommended for infusion with the ON-Q* device.
• There is no indicator of pump infusion status,
therefore, use caution where over-delivery of
medications could result in serious injury or death.
• Epidural infusion of analgesics is limited to uses
of indwelling catheters specifically designed for
epidural delivery. To prevent infusion of drugs not
indicated for epidural use, do not use IV set with
additive ports. It is strongly recommended that
devices used for administration of medication via
epidural routes be clearly differentiated from all
other infusion devices.
• To avoid complications, use the lowest flow rate,
volume and drug concentration required to produce
the desired result. In particular:
• Avoid placing the catheter in the distal end of
extremities (such as fingers, toes, nose, ears,
penis,etc.)wherefluidmaybuildupasthismay
lead to ischemic injury or necrosis.
• Avoid placing the catheter in joint spaces.
Although there is no definitive established
causal relationship, some literature has shown
a possible association between continuous
intra-articular infusions (particularly with
bupivacaine)andthesubsequent development
of chondrolysis.
• Avoid tight wrappings which can limit blood
supply or fluid diffusion.
• To prevent continuous over-delivery of medication
significantly greater than the Total Flow Rate, close
the clamp if any of the following conditions occur:
• The red tab is not removed or breaks while
removing.
• The orange bolus refill indicator is not near the
top at all times except within 60 minutes of
pressing the bolus button.
• The bolus button will not latch except within
30 minutes of pressing the bolus button.

2
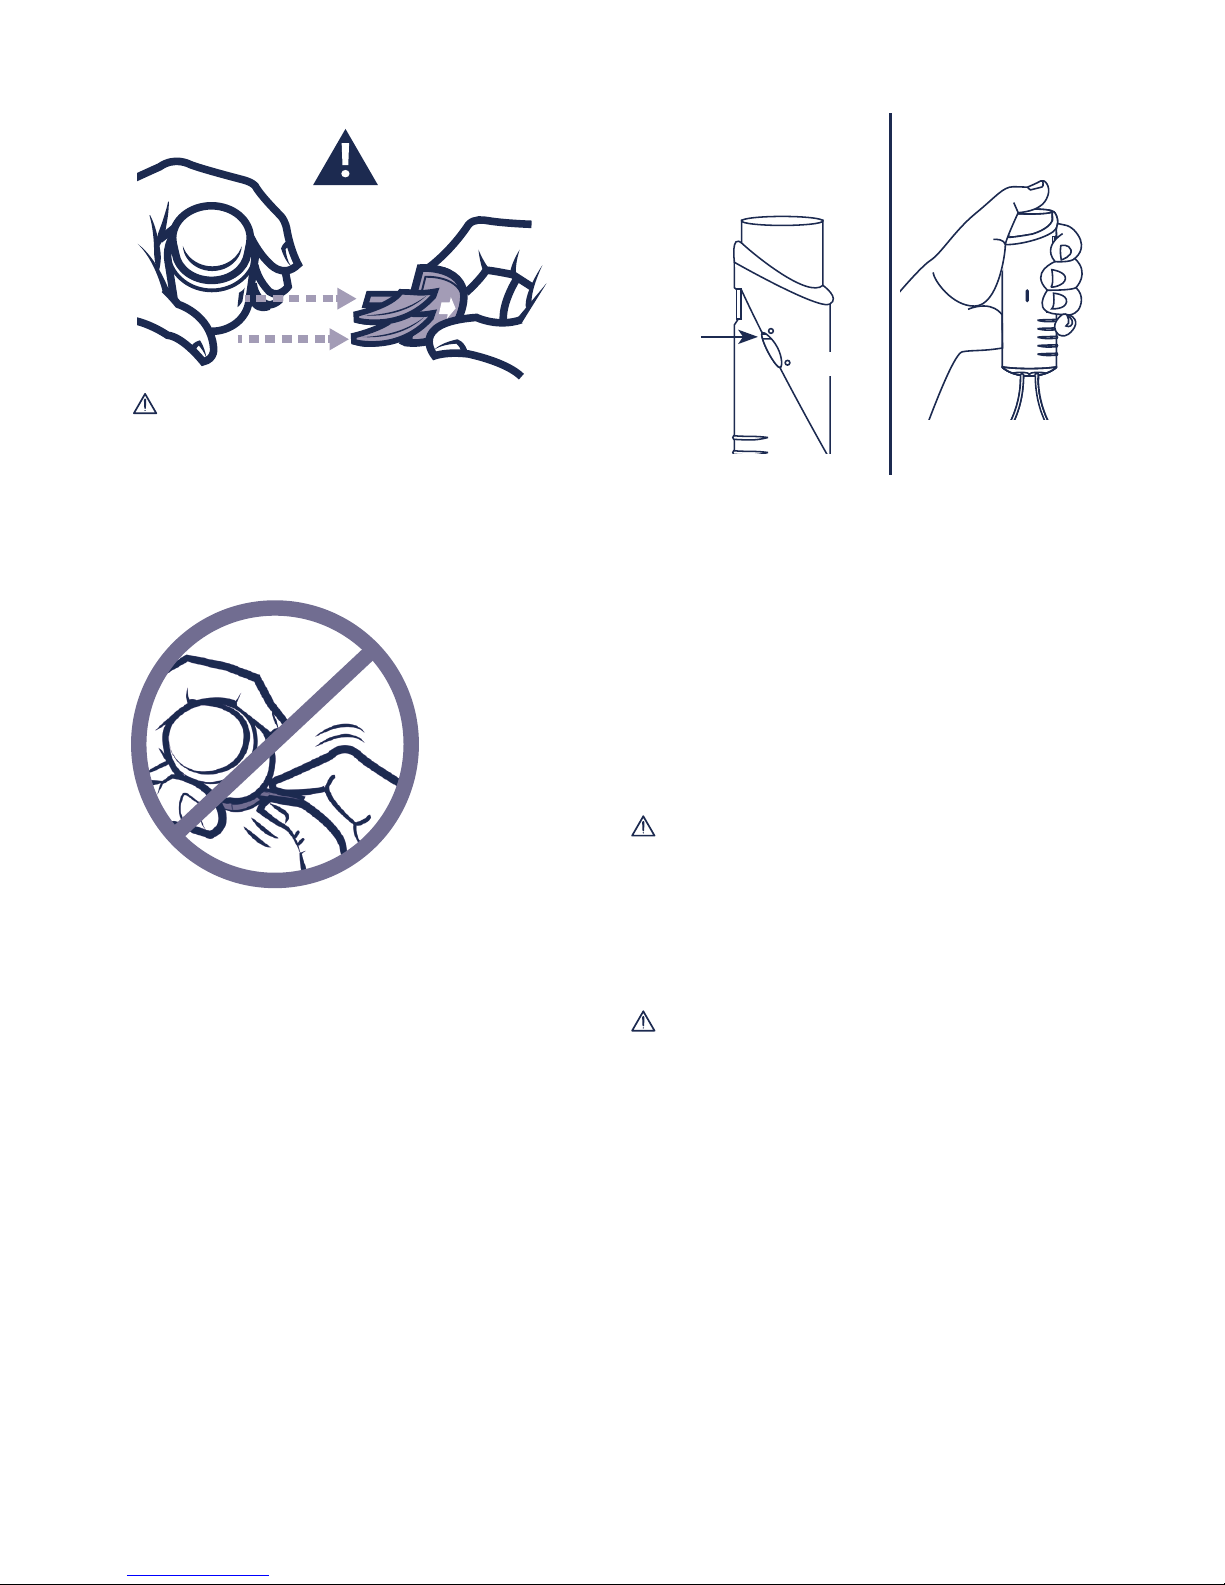
If the bolus button does not pop back up within
30 minutes of pressing it, check position of orange
indicator:
• If orange indicator is in the bottom position, close
the clamp. Continuous medication delivery may
be occurring significantly greater than theTotal
Flow Rate.
• If orange indicator is in the top position:
something may be impeding the flow. Check
for tubing kinks, closed clamp or patency of
connected devices such as catheter or unvented
filter (verify patency) according to your standard
protocol.
• It is the responsibility of the healthcare provider to
ensure patient is educated on the proper use of the
system.
• It is the responsibility of the healthcare provider to
modify Patient Guidelines provided with the pump
as appropriate for your patients’clinical status and
medication prescribed.
Cautions
• Do not use if package is open, damaged or a
protector cap is missing.
• Single use only. Do not resterilize, rell or reuse.
Reuse of the device could result in the following risks:
• Improper functioning of the device (i.e., inaccurate ow
rate)
• Increased risk of infection
• Occlusion of the device (i.e., impedes or stops infusion)
• The pump is sterile and non-pyrogenic.
• Product uses Di (2-ethylhexyl) phthalate (DEHP)
plasticized PVC:
• DEHP is a commonly used plasticizer in medical devices.
There is no conclusive scientic evidence to date that
exposure to DEHP has a harmful eect on humans.
However, the risk and benet of using medical devices
with DEHP for pregnant women, breastfeeding mothers,
infants and children should be evaluated prior to use.
• Certain solutions may be incompatible with the
PVC material used in the administration set. Consult
drug package insert and other available sources of
information for a more thorough understanding of
possible incompatibility problems.
• Do not underll pump. Underlling pump may signicantly
increase the ow rate.
• Do not exceed maximum ll volume. (Table 1)
• Clamp is provided to stop the infusion. Do not remove or
break clamp. Do not use clamp as an intermittent
delivery device.
• Roll tubing between ngers to promote ow if clamped for
extended time.
• The ll volume, infusion rate, bolus dose and bolus interval
is labeled on the ll port.
• Avoid contact of cleansing agents (like soap and alcohol)
with the lter because leakage may occur from the air
eliminating vent.
• Do not tape over lter(s) as this could block the air vent and
impede the infusion.
• Do not immerse pump in water.Take care to protect the
pump during any activities, which could cause pump and
lter to get wet, such as showering.
• In the event of any leakage from pump or administration
set, close tubing clamp. Replace pump if necessary.
• Do not discard the pump and contact Halyard Health for
product return instructions.
• Do not add unvented lter to end of the administration set
as this may impede or stop the ow rate.
• Do not remove the red tab until the tubing is completely
primed. Up to 5 ml bolus of air may be delivered if not
primed correctly.
• Flow rates may vary due to:
Fill volume
• Filling pump less than the labeled volume results in
faster ow rate.
• Filling pump greater than the labeled results in slower
ow rate.
• Viscosity and/or drug concentration
• Pump position - position pump at approximately the
same level as the catheter site:
• Positioning pump above this level increases ow rate.
• Positioning pump below this level decreases ow rate.
Temperature
• The ONDEMAND* device should be worn outside
clothing and kept at room temperature.
• To ensure ow rate accuracy, do not place heat or cold
therapy in close proximity to the ow controller.
• Temperature will aect solution viscosity, resulting in
faster or slower ow rate.
• ONDEMAND* device have been calibrated using Normal
Saline (NS) as the diluent and room temperature (22°C,
72°F) as the operating environment. Flow rate will
increase approximately 1.4% per 1°F/0.6°C increase in

3
temperature and will decrease approximately 1.4% per
1°F/0.6°C decrease in temperature.
• If refrigerated, allow pump to reach room temperature
before using.
• It may take approximately 12 or 15 hours (depending
on model) for a pump to reach room temperature. (See
table below.)
Fill Volume (ml) 270 400
Refrigeratorto RoomTemp(hr) 12 15
Storage
• Storage of a lled ON-Q* Pump for more than 8 hours prior
to starting infusion may result in a slower
ow rate.
External pressure
• External pressure such as squeezing or laying on pump
increases ow rate.
Indications for Use
• ON-Q* Pump is intended to provide continuous delivery
of medication (such as local anesthetics) to or around
surgical wound sites and/or close proximity to nerves
for preoperative, perioperative and postoperative
regional anesthesia and/or pain management. Routes
of administration include: intraoperative site, perineural,
percutaneous and epidural.
• ON-Q* Pump is indicated to signicantly decrease pain and
narcotic use when used to deliver local anesthetics to or
around surgical wound sites, or close proximity to nerves,
when compared to narcotic only pain management.
Contraindications
• ON-Q* Pump is not intended for blood, blood products,
lipids, fat emulsions, orTotal Parenteral Nutrition (TPN).
• ON-Q* Pump is not intended for intravascular delivery.
• The ON-Q* Pump with ONDEMAND* device is
not intended for use with ON-Q* SOAKER* and
SILVERSOAKER* catheters because they could prevent
the proper functioning of the ONDEMAND* device.
Description of Device: (Figure1)
The ON-Q* Pump with ONDEMAND* device incorporates a bolus
device.The ONDEMAND* device delivers a continuous infusion
(basal) and allows xed boluses to be delivered on demand by
patient or healthcare provider.
1Fill Port Cap
2Fill Port
3ON-Q* Pump
4Clamp
5Air Eliminating Filter
6ONDEMAND* Bolus Device
7Tubing
6
1
2
3
4
5
Figure 1
5
7

4
Caution: Do not ll less than the labeled ll volume or
exceed the maximum ll volume. (Table 1)
Table 1: Fill Volume
Labeled
Fill Vol Maximum Fill Vol. Retained
Vol.
270 ml 335 ml ≤ 9 ml
400 ml 550 ml ≤ 15 ml
Total Flow Rate Dosing
Total Flow Rate refers to bolus + basal, which is the infusion
rate per hour. (Table 2)
Table 2: Total Flow Rate
Bolus
Dose Refill
Time Total Flow Rate
5 ml 30 min 10 ml/hr + Basal Rate
5 ml 60 min 5 ml/hr + Basal Rate
Priming The Administration Set
Use Aseptic Technique
Caution: Do not remove the red tab until the tubing is
completely primed. Up to a 5 ml bolus of air may be delivered
if not primed correctly.
1. Lay the ONDEMAND* device on at surface with the red
tab label side up.
2. Open clamp and remove tubing cap to begin priming. Do
not discard tubing cap.
3. When all air has been removed from the entire tubing
and uid is observed at end of Luer lock (approximately
4 minutes), the administration set is primed.
4. Replace tubing cap until ready for use.
5. Remove the red tab by pulling straight out (Figure 3-A). It
is important to remove red tab completely and ensure it
does not break (Figure 3-B).The ONDEMAND* bolus device
will begin to ll.
Instructions for Use
Use Aseptic Technique
Filling the ONQ* Pump: (Figure 2)
Note: Follow hospital protocols and applicable regulations for
lling pump.
1. Close clamp.
2. Uncap the ll port.
3. Attach lled syringe to ll port. Invert pump as shown.
4. Grasp syringe with both hands.
5. Push down on plunger continuously until volume is
dispensed. Do not handle pump while lling, as the
syringe tip may break. Repeat as necessary. Syringe
accuracy is ±4%.
Note: Filling Extension Sets are provided with larger pumps
(see product insert).
Caution: Do not underll pump. Underlling pump may
signicantly increase the ow rate. Do not exceed maximum
ll volume. (Table 1)
6. Remove syringe from ll port.
7. Replace ll port cap. Label with the appropriate
pharmaceutical and patient information.
Note: The ON-Q* Pump contains a Carry Case for
holding pump.
Figure 2

5
Warning: Do not pull the red tab upwards
as breakage could occur (Figure 3-B). If red
tab is not removed or breaks while removing,
continuous delivery will occur. This delivery may
be significantly greater than the Total Flow Rate
(bolus + basal).
WRONG WAY
Figure 3-B
6. The device is now ready to use; however, a complete bolus
dose won’t be available until the labeled rell time has
elapsed.The orange indicator should be at the top level
(Figure 3-C).
Starting Infusion
Use Aseptic Technique
1. Connect tubing to patient’s catheter. Make sure
connection is secure.
2. The patient or clinician should give a bolus as soon as
possible after the infusion has started to ensure the bolus
device is working properly.The bolus button should pop up
within a few minutes and the orange indicator should begin
to move towards the top.
Figure 3-A
Bolus Activation
1. Press down on the ONDEMAND* button until it locks into
place (Figure 3-D).
2. Bolus will be delivered and ONDEMAND* device will begin
to rell.
3. The orange indicator shows how much medication is in
the bolus device (Figure 3-C).
4. The next full bolus will be available when orange
indicator is at the top level.
5. Pressing the bolus button prior to the end of the rell
time will result in a partial bolus dose.
Warning: If the bolus button will not latch, close the
clamp. Otherwise continuous medication delivery may
be occurring. This delivery may be significantly greater
than the Total Flow Rate.
Note: It is normal that it will not latch within 30 minutes of
pressing the bolus button.
Warning: If the ONDEMAND* button does not pop
back up within 30 minutes, check position of orange
indicator:
1. If orange indicator is in the bottom position, close the
clamp. Continuous medication delivery may be occurring
which can be signicantly greater than theTotal Flow Rate.
or
2. If orange indicator is in the top position, something may
be impeding the ow. Check for tubing kinks, closed
clamp or patency of connected devices such as catheter
or unvented lter (verify patency) according to your
standard protocol.
Orange
Bolus Rell
Indicator
Top
Bottom
Figure 3-C Figure 3-D
RIGHT WAY

6
ONDEMAND* Device Refill Chart
30 min. rell
60 min. rell
30
5.0
2.5
Rell Time (minutes)
Bolus Vol. (ml)
60
TheONDEMAND* deviceis available in30 or 60minute relltimes
aslabeled on thedevice.Rell time isapproximatelylinear.
During the Infusion
• A change in appearance and size of the pump may not be
evident during the rst 24 hours after start of infusion.
• As medication is delivered, the pump will gradually
become smaller.
• Make sure:
• Clamp is open.
• There are no kinks in the tubing.
• Filter vent is not taped or covered.
• Heat, ice or cold therapy is placed away from the ow
controller.
End of Infusion
• Infusion is complete when pump is no longer inated.
• Close clamp, disconnect and dispose of pump according to
your institution’s protocol.
Note: If pump did not perform as expected do not discard.
Contact Halyard Health for product return instructions at:
1-800-448-3569.
Technical Specifications
Delivery Accuracy:When lled to the labeled volume,
basal ow rate accuracy is ±15% and bolus dose accuracy
is +10/-20% of the labeled rates when infusion is started
0–8 hours after ll and delivering normal saline as the
diluent at 22°C/72°F.
Typical Flow Curve
The ow rate may be higher or lower at the beginning and
end of the infusion (Figure 4).
Note:
Latex is not in uid pathway or in contact with human. Refer to
Latex Sensitivity Technical Bulletin at halyardhealth.com.
Storage Conditions
Store under general warehouse conditions. Protect from light
sources and heat. Keep dry.
Figure 4 Typical Flow Curve
Flow Rate
Percent Delivery Time 100%
Nominal

7
Rx only = Caution: Federal (U.S.A.) law restricts this
device to sale by or on the order of a physician.
Additional U.S and Foreign Patents may be issued and/or
pending.
*RegisteredTrademark orTrademark of Halyard Health, Inc.
or its aliates. © 2015 HYH. All rights reserved.
For more information, please call
+1.949.923.2400 • 1.800.448.3569
(English only) or visit www.halyardhealth.com for the
latest product information andTechnical Bulletins.
To order additional Instructions for Use or
Patient Guidelines please email or call:
+1.949.923-2400.

8


For Customer Service please call:
1.800.448.3569 U.S. only
halyardhealth.com
Distributed in the USA by Halyard Sales, LLC, Alpharetta, GA 30004
In USA, please call 1-844-425-9273 • halyardhealth.com
Halyard Health, Inc., 5405 Windward Parkway, Alpharetta, GA 30004 USA
Halyard Belgium BVBA, Leonardo Da Vincilaan 1, 1930 Zaventem, Belgium
Sponsored in Australia by Surgical Specialties Pty Ltd; 1/17 Rodborough Road, Frenchs Forest, NSW 2086
*Registered Trademark orTrademark of Halyard Health, Inc., or its aliates. © 2015 HYH. All rights reserved. 2017-02-14
15-H1-924-0-01 / 70207282
0086
Table of contents
Other Halyard Water Pump manuals
Popular Water Pump manuals by other brands

Baxi
Baxi SB 150-XL Installation, assembly and operating instructions

Calpeda
Calpeda GEOCLEAN FF02-V30 operating instructions

AMT
AMT 4946-99 Specifications information and repair parts manual

Tsurumi Pump
Tsurumi Pump SQ Series Operation manual

EINHELL
EINHELL GC-PW 1215 Original operating instructions

Wilo
Wilo Atmos TERA-SCH Installation and operating instructions

Little Giant
Little Giant 8E-CIM instruction sheet

Little Giant
Little Giant BIG JOHN 6-CIA manual

Wesco
Wesco 272397 Operating instructions and parts manual

FLORABEST
FLORABEST fgp 1000 a1 Original operating instructions

AME
AME 15905 Instruction manual & parts breakdown

Little Giant
Little Giant PE-1 instruction sheet