Hamamatsu Photonics C13440-20CU User manual

A3410301-03
ORCA-Flash4.0 V3
Digital CMOS Camera
C13440-20CU / C13440-20CU01
Instruction manual
Thank you for your purchase
•
Follow the safety precautions in Chapter 1 in order to avoid personal injury and
damage to property when using this system. The manual describes the correct
handling method of the system and provides instructions that should be followed
to avoid accidents. Read this manual carefully before using this system. After
reading this manual, store it in a location where you can refer to it at any time.
Ver.1.3
April 2017
HAMAMATSU PHOTONICS K.K.

~ Blank page ~

C13440-20CU / C13440-20CU01 Instruction manual_Ver.1.3
3
1. SAFETY PRECAUTIONS
1-1 SYMBOLS
The symbols shown below are used for this camera.
Direct current
Alternating current
1-2 CLASSIFICATION OF WARNINGS
We have classified the warnings symbols that appear in this instruction manual and on the camera
as follows for your convenience. Make sure that you fully understand them and follow the
instructions they contain.
Improper handling of the camera without observing these warnings could
lead to serious injury to the user and even death.
Improper handling of the camera without observing these cautions could lead
to personal injury to the user or damage to property.
This symbol indicates a cautionary item that should be followed when handling the
camera. Read the contents carefully to ensure correct and safe use.
This symbol indicates an action that
is forbidden. Read and follow the instructions
carefully.
This symbol indicates a compulsory action or instruction. Read and follow the instructions
carefully.
Note
This symbol indicates a note to help you get the best performance from the camera. Read
the contents of the note carefully to ensure correct and safe use. Failure to observe one of
these notes might impair the performance of the camera.

C13440-20CU / C13440-20CU01 Instruction manual_Ver.1.3
4
Power supply
Use the camera with the indicated voltage on the rating sticker. Using a different
voltage can damage the camera and lead to fire or electric shock.
Cables
Do not to place heavy objects on cables or bend them excessively. Doing so can
damage the cables and lead to fire or electric shock.
Power supply cord
Use the accessory power supply cord when using this camera.
AC adapter
Use the accessory AC adapter when this using this camera.
Do not touch the plug with wet hands. Doing so can lead to electric shock.
Do not attempt to dismantle or modify the camera
Doing so can also lead to damage and even injury, as some internal components
become very hot or high voltage. Do not touch parts that are not indicated in this
manual.
Do not allow foreign objects
Such as combustible substances, metal objects or water to get inside the camera.
These can damage the camera and lead to fire or electric shock.
In the event of an anomaly
such as the image suddenly disappearing or the occurrence of a strange noise, a
strange smell or smoke coming from the system, immediately turn off the power
switch and unplug the power supply cord and contact a Hamamatsu subsidiary or
your local distributor. Do not attempt to repair the camera yourself.

C13440-20CU / C13440-20CU01 Instruction manual_Ver.1.3
5
AC adapter
When unplugging the power supply cord, do not pull on the cord. Remove the plug
from the outlet to avoid causing electric shock or fire.
When unplugging the power supply cord, do not pull on the cord, but remove the
plug from the camera to avoid breakdown of the AC adapter
or the camera.
Connecting and disconnecting cables
Always turn off the power supply of the peripheral device before connecting and
disconnecting cables.
Mounting the camera
When mounting the camera to a tripod or other fixture, use the optional base plate.
Be careful that the mounting screw does not enter more than 8 mm from the
surface of the base plate. Screwing it in further can impair normal operation.
Lenses (C13440-20CU)
Be careful not to screw the lens more than 7 mm into the C-mount of the camera.
Doing so can scratch the protective glass. (Some wide-angle lenses in particular
can have a thread of 7 mm or more.)
Shipping precautions
When transporting the camera by truck, ship, airplane, etc., wrap it securely in
packaging material or something similar.
Strong impact
Do not subject the camera to strong shocks (such as dropping it). Doing so can
damage the camera.
Operating environment
This camera is designed and tested for use in an industrial environment. If this
camera is used in residential areas, EMI (electro-magnetic interference) may occur.
This camera must not be used in residential areas.
Disposal
When
disposing of the camera, take appropriate measures in compliance with
applicable regulations regarding waste disposal and correctly dispose of it
yourself, or entrust disposal to a licensed industrial waste disposal company.
In
any case, be sure to comply with the regulations in your country, state, region or
province to ensure the camera is disposed of legally and correctly.

C13440-20CU / C13440-20CU01 Instruction manual_Ver.1.3
6
Using water cooling
Be careful water does not splash on the camera. Cut off the power supply of the
circulating water cooler and the camera when you remove and install the cooling
water hoses.
Cooling water
It is recommended to use soft water (except pure water) for cooling water. Follow
instruction manual which is attached to your circulating water cooler for an
appropriate temperature range of cooling water. If you plan on using water other
than soft water as recommended for example antifreeze etc, please refer to
description of cooling water which is written in 12. “MAINTENANCE” or contact a
Hamamatsu subsidiary or your local distributor.
Condensation
At the Water-cooling, if ambient temperature and ambient humidity become high,
condensation will take place easily. Use the camera under the environment where
condensation will not take place referring to the following graph.

C13440-20CU / C13440-20CU01 Instruction manual_Ver.1.3
7
2. CHECK THE CONTENTS OF PACKAGE
When opening the package, check that the following items are included before use.
If the contents are incorrect, insufficient or damaged in any way, contact a Hamamatsu subsidiary
or your local distributor before attempting to operate the camera.
Camera: C13440-20CU or C13440-20CU01
1
AC adapter
1
Power supply cord for AC adapter
1
Lens mount cap (attached to the camera)
1
C13440-20CU Before Use (Booklet)
1
C13440-20CU Instruction manual (CD-ROM)
1
QC sheet
1
[Option]
Cooling water hose (2 hoses)
A10788-04
SMA-BNC cable
A12106-05
SMA-SMA cable
A12107-05
Camera Link interface board
M9982-29
Camera Link interface cable
A14038-04
USB 3.0 interface board
M9982-25
USB 3.0 interface cable
A12467-03
Adjustable pole for C11440-22CU
A11185-01
Fixing bracket for C11440-22CU cable
A13261-01
• Handle the circulating water cooler and the cooling water according to the instruction manual
of the circulating water cooler.
Note
• The cable listed in option is highly recommended for use with the camera. The camera
system may not confirm to CE marking regulation if other type of cable is used with.
Note
• If you use the above options, please refer to the each installation manual.

C13440-20CU / C13440-20CU01 Instruction manual_Ver.1.3
8
3. INSTALLATION
Avoid using or storing this camera in the following places
•
Places where the temperature is not the operating temperature indicated in the specifications
• Places where the temperature is not the storage temperature indicated in the specifications
• Places where the temperature varies greatly
• In direct sunlight or near a heater
• Places where the humidity levels are not the operating humidity levels indicated in the
specifications and where the camera may be exposed to liquid
• Places where the humidity levels are not the storage humidity levels indicated in the
specifications and where the camera may be exposed to liquid
• Close to a strong source of magnetism or ratio waves
• Places where there are vibrations
• Places where the camera may come into contact with corrosive gases (such as chlorine or
fluorine)
• Places where there is a lot of dust
How to place the camera (when the camera is placed on a table)
Place the camera with water connectors on the side.
Do not place the camera with the vent opening, water connections or rear panel on
the bottom. (Do not block ventilation openings.)
Do not allow the ventilation ports to become blocked.
To prevent the camera from overheating, do not wrap the camera in cloth or any
other material, or in any way allow the camera’s ventilation ports to become
blocked. If the camera is being operated in an
closed environment, ensure
clearance of at least 10 cm from both the intake and exhaust vents when setting
up when setting up the camera.
Weight of the camera
Be careful not to drop the camera when moving it as it is approx. 2.2 kg.

C13440-20CU / C13440-20CU01 Instruction manual_Ver.1.3
9
C
Co
on
nt
te
en
nt
ts
s
1. SAFETY PRECAUTIONS...................................................................................3
1-1 SYMBOLS...........................................................................................................................3
1-2 CLASSIFICATION OF WARNINGS ...................................................................................3
2. CHECK THE CONTENTS OF PACKAGE..........................................................7
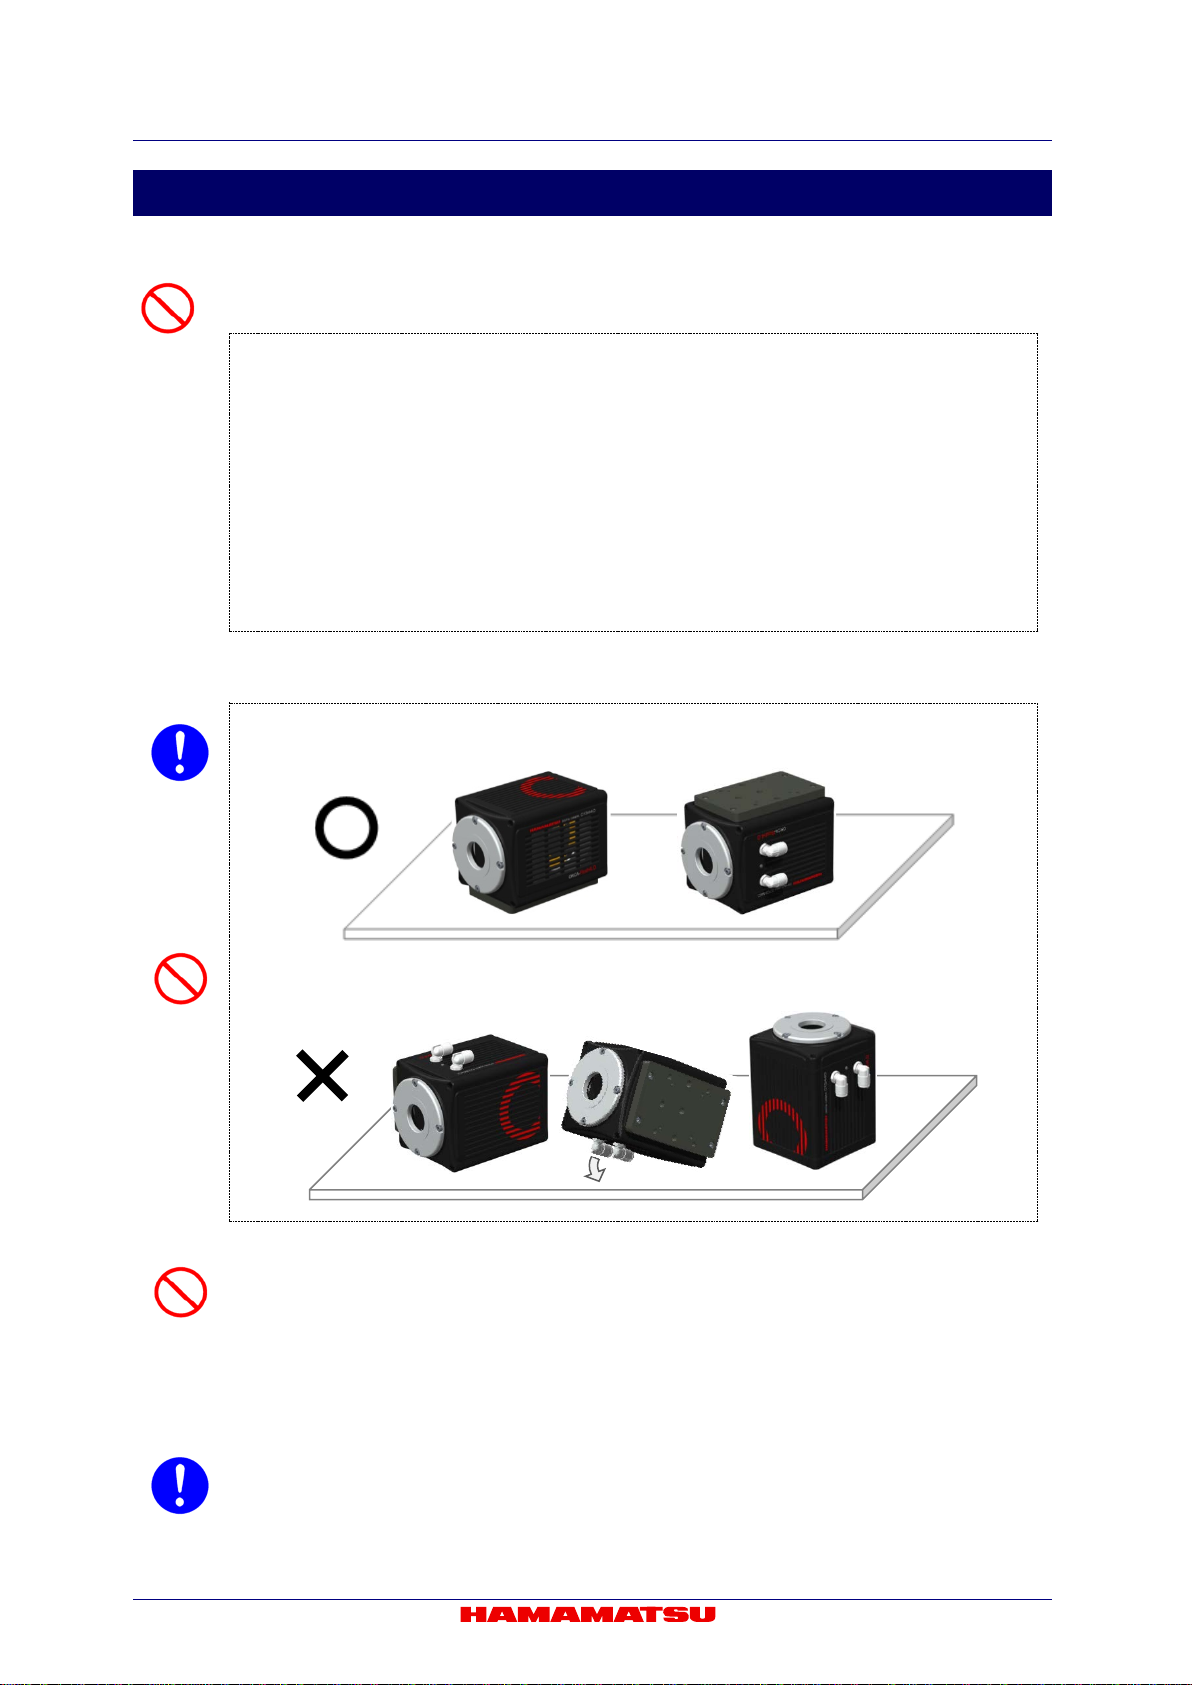
3. INSTALLATION..................................................................................................8
4. OVERVIEW.......................................................................................................11
5. FEATURES.......................................................................................................12
6. NAME AND FUNCTION OF PARTS ................................................................15
7. CONNECTION..................................................................................................18
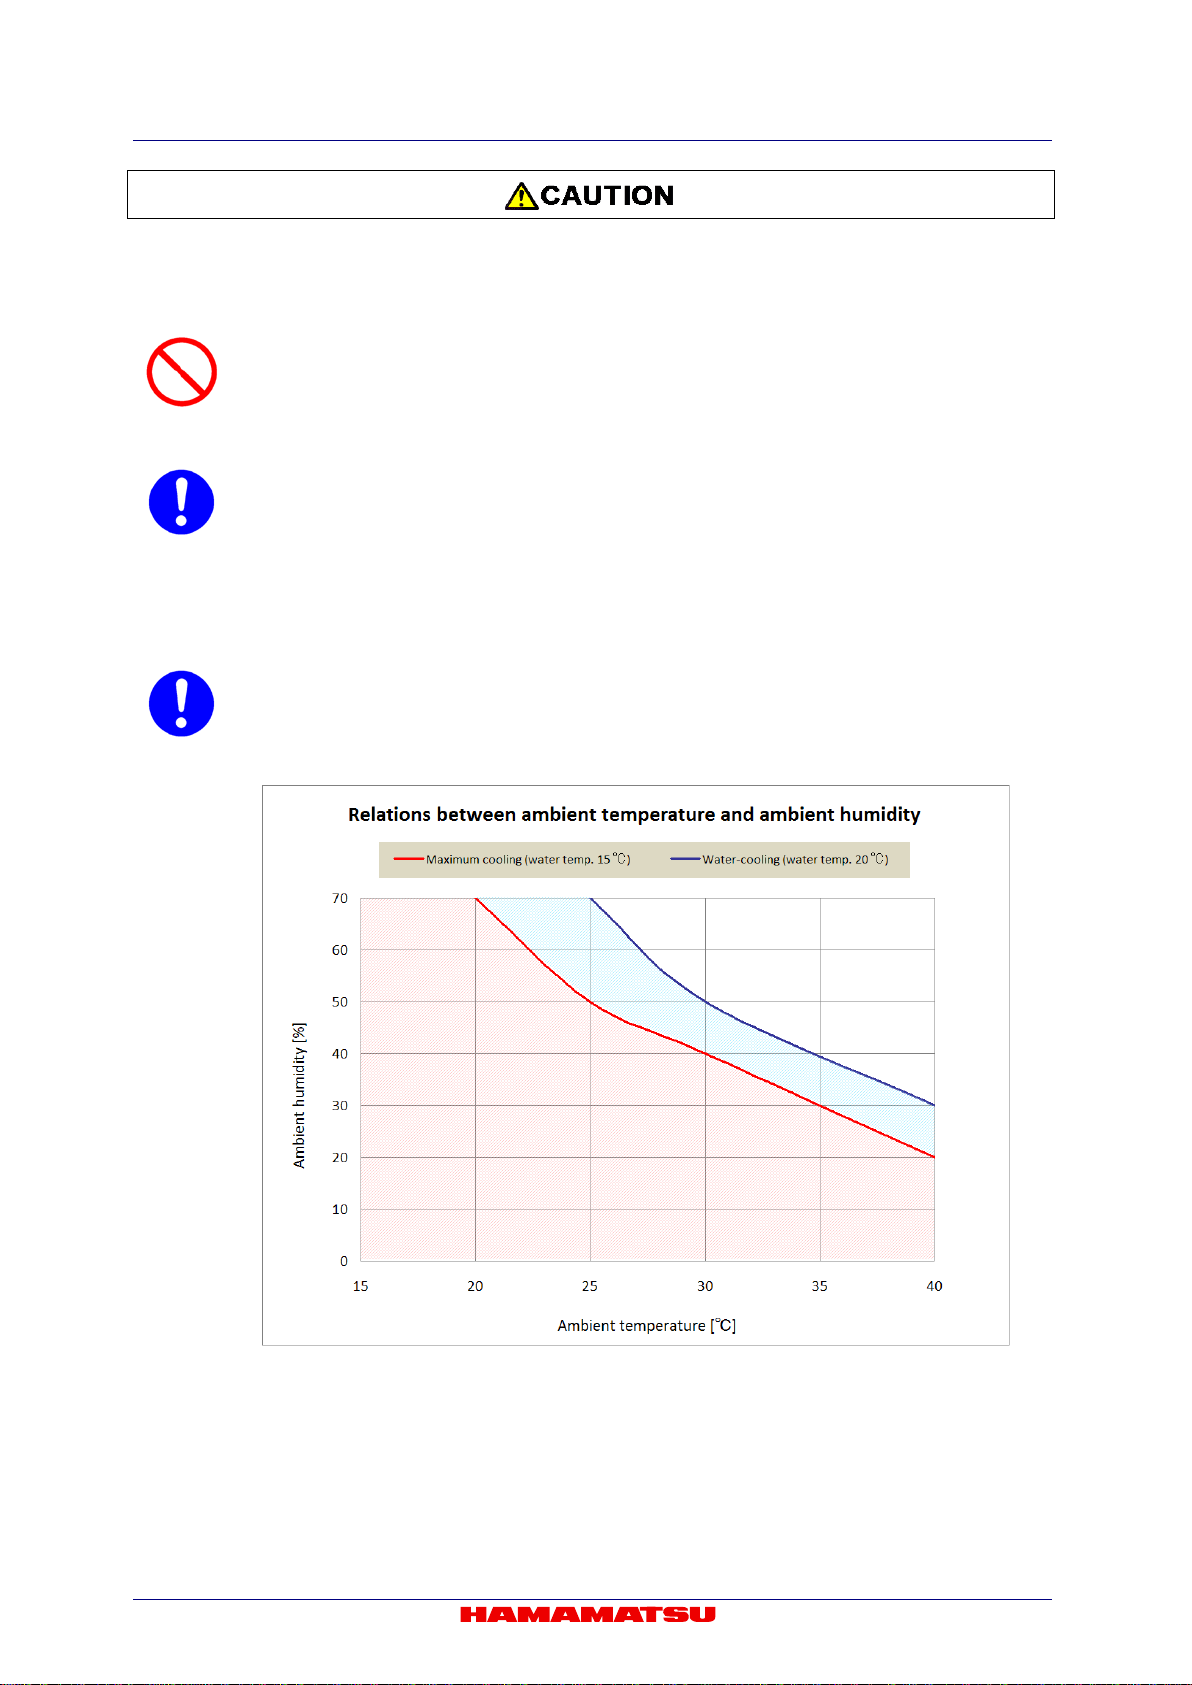
8. WATER COOLING ...........................................................................................20
8-1 CAUTIONS........................................................................................................................20
8-2 CONNECTION OF WATER COOLING HOSES...............................................................22
8-3 DISCONNECTION OF WATER COOLING HOSES.........................................................23
9. OPERATIONS ..................................................................................................24
9-1 OPERATING PRECAUTIONS..........................................................................................24
9-2 PREPARATING FOR IMAGING.......................................................................................25
9-3 IMAGING...........................................................................................................................25
9-4 END OF IMAGING ............................................................................................................25
9-5 STARTUP DCAM CONFIGURATOR ...............................................................................26
10. DESCRIPTION OF CMOS IMAGE SENSOR...................................................28
10-1 THEORY OF CMOS IMAGE SENSOR.............................................................................28
10-2 READOUT METHOD OF CMOS IMAGE SENSOR .........................................................29
10-3 PRECAUTION WHEN USING CMOS IMAGE SENSOR .................................................29
11. DESCRIPTION OF VARIOUS FUNCTIONS ....................................................30
11-1 NORMAL AREA MODE....................................................................................................30
11-2 LIGHTSHEET READOUT MODE.....................................................................................49
11-3 W-VIEW MODE.................................................................................................................56
11-4 DUAL LIGHTSHEET READOUT MODE..........................................................................68
11-5 REAL-TIME DEFECT PIXEL CORRECTION...................................................................74
11-6 DATA REDUCTION FUNCTIONS....................................................................................75
11-7 MASTER PULSE...............................................................................................................77
12. MAINTENANCE................................................................................................79
12-1 CARE.................................................................................................................................79
12-2 INFORMATION ON COOLING WATER FOR THE CIRCULATING WATER COOLER.80
13. TROUBLESHOOTING......................................................................................81
13-1 IMAGE IS NOT TRANSFERRED......................................................................................81
13-2 ALTHOUGH IMAGES ARE TRANSFFERED ..................................................................81

C13440-20CU / C13440-20CU01 Instruction manual_Ver.1.3
10
14. SPECIFICATIONS............................................................................................82
14-1 CAMERA SPECIFICATIONS............................................................................................82
14-2 CONDENSATION..............................................................................................................85
14-3 SPECTRAL RESPONSE CHARACTERISTICS (TYP.)...................................................86
14-4 INTERFACE SPECIFICATIONS.......................................................................................87
14-5 OUTPUT TIMING SPECIFICATIONS...............................................................................89
15. DIMENSIONAL OUTLINES..............................................................................93
15-1 C13440-20CU....................................................................................................................93
15-2 C13440-20CU01................................................................................................................94
16. WARRANTY .....................................................................................................95
16-1 BASIC WARRANTY .........................................................................................................95
16-2 REPAIRS...........................................................................................................................95
17. CONTACT INFORMATION ..............................................................................96

C13440-20CU / C13440-20CU01 Instruction manual_Ver.1.3
11
4. OVERVIEW
C13440-20CU / C13440-20CU01 is equipped with the new scientific image sensor, an advanced
CMOS device that realizes the multiple benefits of high resolution, high readout speed, and low
noise all at once.
The camera provides 4.0 megapixels resolution at 100 fps (frames/s) (and up to 25 655 fps by
sub-array readout) while achieving 1.0 electrons (median) 1.6 electrons (r.m.s) readout noise
performance. Moreover, the camera delivers high sensitivity through its on-chip micro lens, 37
000:1 high dynamic range that makes the camera suitable for almost any scientific application from
bright field imaging to low-light fluorescence imaging across a wide spectral range. Various
external trigger functions and timing output functions ensure proper timing control with peripheral
equipment to cover a wide range of applications.
The camera is the new scientific digital camera for life science microscopy, semiconductor
inspection, x-ray scintillator readout or industrial imaging.

C13440-20CU / C13440-20CU01 Instruction manual_Ver.1.3
12
5. FEATURES
(1) Readout noise
In the camera, the pixel amplifier is optimized: it has high gain from optimizing the semiconductor
process, and the difference among pixel amplifiers are greatly minimized. In addition, there is
on-chip CDS (correlated double sampling) circuit, which plays an important role in achieving low
noise. Moreover, the sensor features a split readout scheme in which the top and bottom halves
of the sensor are readout independently, and the data of each horizontal line is read by 2 lines of
column amplifier and A/D in the top and the bottom in parallel and simultaneously. As a result, it
achieves very fast readout speed while keeping very good low-noise performance.
The camera has lower readout noise (1.0 electrons (median), 1.6 electrons (r.m.s)) than the
conventional cooled CCD camera. Moreover, high-speed readout (100 fps with 2048 pixels ×
2048 pixels) with very low readout noise, which was impossible, can now be achieved.
In addition, the camera can achieve further lower readout noise (0.8 electrons (median), 1.4
electrons (r.m.s) with slow scan mode (30 fps with 2048 pixels × 2048 pixels).
(2) Cooling structure
In the camera, the CMOS image sensor is cooled down by a peltier element to suppress the dark
current. If the CMOS image sensor is exposed to the atmosphere, condensation of the moisture
from the air might occur. However the camera has a special hermetic chamber structure to isolate
the sensor from the atmosphere, and the chamber is filled with nitrogen gas.
(3) Pixel number and pixel size
CMOS image sensor has 6.5 µm x 6.5 µm pixel sizes that is equivalent to conventional CCD
image sensor (2/3 inch, 1.3 megapixels). Also, the camera can observe a wider field of view
because the pixel number is about 3 times that of the conventional CCD image sensor (2/3 inch,
1.3 megapixels)
(4) Readout methods
The camera has a variety of readout modes. In addition to full resolution readout mode (1×1),
sub-array readout and binning readout (2×2, 4×4) are supported.
(5) Frame rate
CMOS image sensor which this camera adopts realizes both low noise (1.0 electrons (median)
1.6 electrons (r.m.s)) and high speed readout (100 fps with 2048 pixels x 2048 pixels)
simultaneously, by a split readout scheme in which the top and the bottom halves of the sensor
are readout independently, and the data of each horizontal line is read by 2 lines of column
amplifier and A/D in the top and the bottom in parallel and simultaneously.
(6) Real-time correction functions
There are a few pixels in CMOS image sensor that have brighter or darker intensity, and a few
pixels that have slightly higher readout noise performance, when compared to surrounding pixels.
The camera has a real-time variant (defective) pixel correction feature to further improve image
quality. The correction can be performed in real-time without sacrificing any of the readout speed.
(7) Data reduction functions
The camera provides a maximum 4.0 megapixel resolution at a rate of 100 fps and with 16 bit
intensity levels per pixel. With these conditions, the camera outputs 800 MB of data per second,
making it necessary to store a large amount of data. With data reduction functions now
available in the camera, it is possible to select reduced areas of the image and/or reduced
intensity levels to transfer and store only the data of interest.

C13440-20CU / C13440-20CU01 Instruction manual_Ver.1.3
13
(8) Interface
This camera has both Camera Link and USB 3.0 interface.
Camera Link Interface:
The camera Link interface is able to transfer large volumes of data. It can transfer a 4 megapixels
image with 100 fps.
In order to realize such a large volume data transfer, the camera uses Camera Link "Full
Configuration Deca Mode" which is an expanded version of Camera Link "Full Configuration". It
enables a transfer maximum 85 MHz x 10 Taps (8 bit) image data to computer as fast as 100 fps.
In order to use this interface, a Camera Link interface board which supports "Full Configuration
Deca Mode" is required.
USB 3.0 Interface:
USB 3.0 interface is able to transfer a 4 megapixels image with 40 fps. It is versatile interface
which is suitable to use when fast data transfer is not required.
This interface does not require a Camera Link interface board. It transfers image with moderate
transfer speed.
• When a connection interface is changed from Camera Link to USB 3.0, and vice versa, the
application software must be closed and the camera must be turned off.
• Do not connect Camera Link and USB 3.0 interface simultaneously.
(9) Camera readout modes
The camera has four kinds of readout mode, Normal Area Mode, Lightsheet Readout Mode,
W-VIEW Mode and Dual Lightsheet Readout Mode. The camera also has two scan speed in
Normal Area Mode and W-VIEW Mode, and two readout direction in Lightsheet Readout Mode,
W-VIEW Mode and Dual Lightsheet Readout Mode.
(Camera readout modes) (Scan speed) (Readout direction)
Normal Area Mode
Standard scan
Slow scan
Lightsheet
Readout Mode
Standard scan
Top to Bottom
Bottom to Top
W-VIEW Mode
Standard scan
Top to Bottom
Bottom to Top
Slow scan
Top to Bottom
Bottom to Top
Dual Lightsheet
Readout Mode
Standard scan
Top to Bottom
Bottom to Top

C13440-20CU / C13440-20CU01 Instruction manual_Ver.1.3
14
(10)Camera operation modes
The camera has three operation modes: 1) Free running mode, in which the exposure and
readout timing are controlled by the internal microprocessor, and 2) External trigger mode, in
which the exposure and readout timing are decided by an external trigger. 3) Start trigger mode is
used to start operating the camera by a trigger input for a continuous imaging.
(Camera readout modes) (Camera operation modes) (External trigger modes)
Normal Area Mode
Free running mode
External trigger mode
Edge trigger mode
Start trigger mode
Global reset
Edge trigger mode
Level trigger mode
Global reset
Level trigger mode
Synchronous readout
trigger mode
Lightsheet Readout
Mode
Free running mode
External trigger mode
Edge trigger mode
Start trigger mode
W-VIEW Mode
Free running mode
External trigger mode
Edge trigger mode
Start trigger mode
Global reset
Edge trigger mode
Level trigger mode
Global reset
Level trigger mode
Synchronous readout
trigger mode
Dual Lightsheet
Readout Mode
Free running mode
External trigger mode
Edge trigger mode
Start trigger mode

C13440-20CU / C13440-20CU01 Instruction manual_Ver.1.3
15
6. NAME AND FUNCTION OF PARTS
(1) C13440-20CU (C-mount type)
Figure 6-1
(2) C13440-20CU01 (F-mount type)
Figure 6-2
b a d c e
k f
g h i j
l
b a d c e
k f
g h i j
l

C13440-20CU / C13440-20CU01 Instruction manual_Ver.1.3
16
•
Place the camera the water connectors to be lateral side. Do not place the rear
panel of the camera, which connectors are located, to be at the bottom (Do not
block ventilation openings.).
a. Lens mount
C13440-20CU can be attached to C-mount lens or an optics system.
C13440-20CU01 can be attached to F-mount lens or an optics system.
Note
• The depth of the C-mount is 7 mm. Screwing in the C-mount too deeply might
scratch the glass surface.
b. WATER connector [WATER] (when using Water-cooling)
It connects the camera and the circulating water cooler with the cooling water hoses. The connector
position of WATER IN/OUT is not specified.
• See 8 “WATER COOLING” for instruction of water-cooling.
c. Camera Link interface connector 1 [DIGITAL OUT 1]
d. Camera Link interface connector 2 [DIGITAL OUT 2]
The connector 1 is connected to the Camera Link interface connector 1 on the computer.
The connector 2 is connected to the Camera Link interface connector 2 on the computer.
• When a connection interface is changed from Camera Link to USB 3.0, and vice
versa, the application software must be closed and the camera must be turned off.
• Do not connect Camera Link and USB 3.0 interface simultaneously.
e. Trigger input connector [EXT.TRIG]
This is used when the camera is being operated using external synchronization.
Input is 3.3 V LVCMOS level, and input impedance is 10 kΩ.
When an external trigger is input, the trigger is activated at the falling or rising edge of the signal. (You
can choose external trigger polarity between Negative and Positive.)
f. Timing out connector 1,2,3 [TIMING 1,2,3]
This is used when peripheral device(s) require synchronization with the camera.
Output is 3.3 V LVCMOS level, and it is output though BUS TRANSCEIVER IC SN74LVC541. Output
impedance is 33 Ω.
Note
• Determine termination according to cable length and so on.
g. STATUS lamp [STATUS]
The LED indicates status of camera.
Lighting color
Status of power distribution
Turn off (no color)
Power off
Orange (Blinking)
Initialization
Green (lighting)
Power on
Orange (lighting)
Data transfer
Red (lighting)
Heat up
• When the camera heats up, stop operation and unplug the
AC adapter immediately.

C13440-20CU / C13440-20CU01 Instruction manual_Ver.1.3
17
h. Power switch [POWER]
The power is turned on/off.
- When the power switch is set to "ON", the camera turns on and starts initialization and the lamp
blinks in green.
- When the initialization is completed, the lamp color stays in green.
- When the camera transfers data, and the lamp color turns orange.
- When the power switch is set to "OFF", the camera returns to the power off state and the lamp turns
off.
i. DC power input connector [DC IN]
This is the power supply terminal. Use the accessoryAC adapter.
j. USB 3.0 interface connector [USB 3.0]
This is connected to the USB 3.0 interface connector on the computer.
• When a connection interface is changed from Camera Link to USB 3.0, and vice
versa, the application software must be closed and the camera must be turned off.
• Do not connect Camera Link and USB 3.0 interface simultaneously.
k. Air inlet
This is the inlet for the heat ventilation.
• If the camera is being operated in an enclosed environment, ensure to keep
clearance at least 10 cm from both intake and exhaust vents when setting up.
• To prevent overheating inside the camera, do not wrap the camera in cloth or other
material, or block the camera’s ventilation.
l. Base plate
This base plate is for attaching to a lab jack or a tripod.
When you use an adjustable pole (A11185-01) or a fixing bracket (A13261-01), please detach the base
plate, and then attach the options.
Note
• Please refer to the installation manual of options about the detaching method of
base plate and the attaching method of the option.

C13440-20CU / C13440-20CU01 Instruction manual_Ver.1.3
18
7. CONNECTION
Refer to the figure when connecting the various cables.
(1) Camera Link interface
Figure 7-1
(2) USB 3.0 interface
Figure 7-2
•
Place the camera the water connectors to be lateral side. Do not place the rear
panel of the camera, which connectors are located, to be at the bottom (Do not
block ventilation openings.).
• When you connect cables, turn off the power supply of the camera and the peripheral devices.
Note
• If you use the above options, see each installation manual.
Camera (Rear)
b
b
a Computer Circuit
water cooler
d to connector 2
c to connector 1
Camera Link interface board
Camera (Rear)
b
b
a Computer Circuit
water cooler
e
USB 3.0 port

C13440-20CU / C13440-20CU01 Instruction manual_Ver.1.3
19
a. AC adapter
This is the cord to supply a power supply. Use the accessoryAC adapter.
b. Cooling water hose (at Water-cooling: Option)
It connects the camera and circulating water cooler. The insert position of WATER IN/OUT on the
camera WATER connector is not specified.
• See 8 “WATER COOLING” for instruction of water-cooling.
c. Camera Link interface cable 1 (Option)
This is the cable to connect the Camera Link interface connector 1 of the camera and the Camera Link
interface connector 1 on the computer.
d. Camera Link interface cable 2 (Option)
This is the cable to connect the Camera Link interface connector 2 of the camera and the Camera Link
interface connector 2 on the computer.
• When a connection interface is changed from Camera Link to USB 3.0, and vice
versa, the application software must be closed and the camera must be turned off.
• Do not connect Camera Link and USB 3.0 interface simultaneously.
Note
• Hamamatsu recommends A14038-04 optional Camera Link interface cable for this
camera. The camera complies with EMC direction with using A14038-04 Camera
Link interface cable. Be careful that the camera with other interface cable may not
fulfill the EMC directive requirements.
e. USB 3.0 interface cable (Option)
This is the cable to connect the USB 3.0 interface connector of the camera and the USB 3.0 interface
connector on the computer.
• When a connection interface is changed from Camera Link to USB 3.0, and vice
versa, the application software must be closed and the camera must be turned off.
• Do not connect Camera Link and USB 3.0 interface simultaneously.
Note
• Hamamatsu recommends A12467-03 optional USB 3.0 interface cable for this
camera. The camera complies with EMC direction with using A12467-03 Camera
Link interface cable. Be careful that the camera with other interface cable may not
fulfill the EMC directive requirements.

C13440-20CU / C13440-20CU01 Instruction manual_Ver.1.3
20
8. WATER COOLING
• Improper handling of the camera without observing these cautions could lead to
personal injury to the user or damage to property.
8-1 CAUTIONS
(1) Change the cooling method
The default setting of cooling method is Air-cooling. Cooling mode can be changed by software
which is called, “DCAM Configurator”. (refer to 9-5 “STARTUP DCAM CONFIGURATOR”).
(2) Cooling water
It is recommended to use soft water (except pure water) for cooling water.
If you plan on using water other than soft water as recommended for example antifreeze etc,
please refer to description of cooling water which is written in 12. “MAINTENANCE” or contact a
Hamamatsu subsidiary or your local distributor.
(3) Recommendation temperature
Hamamatsu recommends 20 °C for Circulating water temperature.
For the appropriate temperature range of the cooling water, confirm with the instruction manual of
your circulating water cooler.
(4) Condensation
Use the camera under the environment where condensation will not take place referring to the
following graph.
This manual suits for next models
1
Table of contents
Other Hamamatsu Photonics Digital Camera manuals

Hamamatsu Photonics
Hamamatsu Photonics ORCA-Fire C16240-20UP User manual

Hamamatsu Photonics
Hamamatsu Photonics C11440-10C User manual

Hamamatsu Photonics
Hamamatsu Photonics C10910 User manual

Hamamatsu Photonics
Hamamatsu Photonics C11440-22CU User manual

Hamamatsu Photonics
Hamamatsu Photonics C11440-42U30 User manual

Hamamatsu Photonics
Hamamatsu Photonics C15550-20UP User manual

Hamamatsu Photonics
Hamamatsu Photonics C9300-124 User manual

Hamamatsu Photonics
Hamamatsu Photonics C15440-20UP User manual

Hamamatsu Photonics
Hamamatsu Photonics C11440-36U User manual

Hamamatsu Photonics
Hamamatsu Photonics C11440-22C User manual