manuals.online logo
Brands
  1. Home
  2. •
  3. Brands
  4. •
  5. Hand&Eye
  6. •
  7. Home Lighting
  8. •
  9. Hand&Eye Melina Original instructions

Hand&Eye Melina Original instructions

info@handandeyestudio.co.uk
handandeyestudio.co.uk
©October 2021
Lighting for all the senses.
Melina Wall Light
Instructions & Safety
Information
70mm
2.7 inch
1
2
7
mm
2
.7 inc
h
18 109
4.3 inch
165
6.5 inch
Dimensions- Side View
Dimensions- Top View
70mm
2.7 inch
127
mm
2.7 inch
18 109
4.3 inch
165
6.5 inch
Dimensions- Front View
70mm
2.7 inch
127
mm
2.7 inch
18 109
4.3 inch
165
6.5 inch
Design by
Mentsen
Material & nish
- Raw brass wall tting
- Matt glass in either opal or clear-etched nish
Dimensions & weight
Ø165mm, H.127mm, 0.85kg
Ø 6.5inch, H. 5inch, 1.87lb
Lamp type & wattage
•
G9 lamp holder, max 6W LED (bulb not included)
• Dimmable
(if used with compatible dimming controls and bulbs)
IP rating
IP20
Wiring certication
CE, EN60598
info@handandeyestudio.co.uk
handandeyestudio.co.uk
©October 2021
Lighting for all the senses.
• Please read these instructions IN FULL and carefully
BEFORE commencing assembly and installation.
• We recommend the use of a professional trades
person with suitable qualications for the installation
of electrical lights.
• Install the light in conformity with all relevant local
building codes and regulations.
• Make sure mains power is o during installation.
• Make sure that the light is securely mounted to the
ceiling or wall and that there is a suitable substrate for
this.
• Ensure you are working from a safe platform or ladder
if working at height.
• Do NOT use a lightbulb of more than 6W.
• Take care with the glass shade as this can break if it is
hit hard enough.
• If at any point your lightbulb breaks then, as with any
light, do not touch the lament/LED part unless the
power is turned o
• Always turn o the power before changing a lightbulb.
• Used electrical equipment (WEEE) should not be
mixed with general household waste. Please recycle.
Our products can be dismantled prior to disposal.
Melina Wall Light
Safety Information
info@handandeyestudio.co.uk
handandeyestudio.co.uk
©October 2021
Lighting for all the senses.
Melina Wall Light
Instructions
1/2
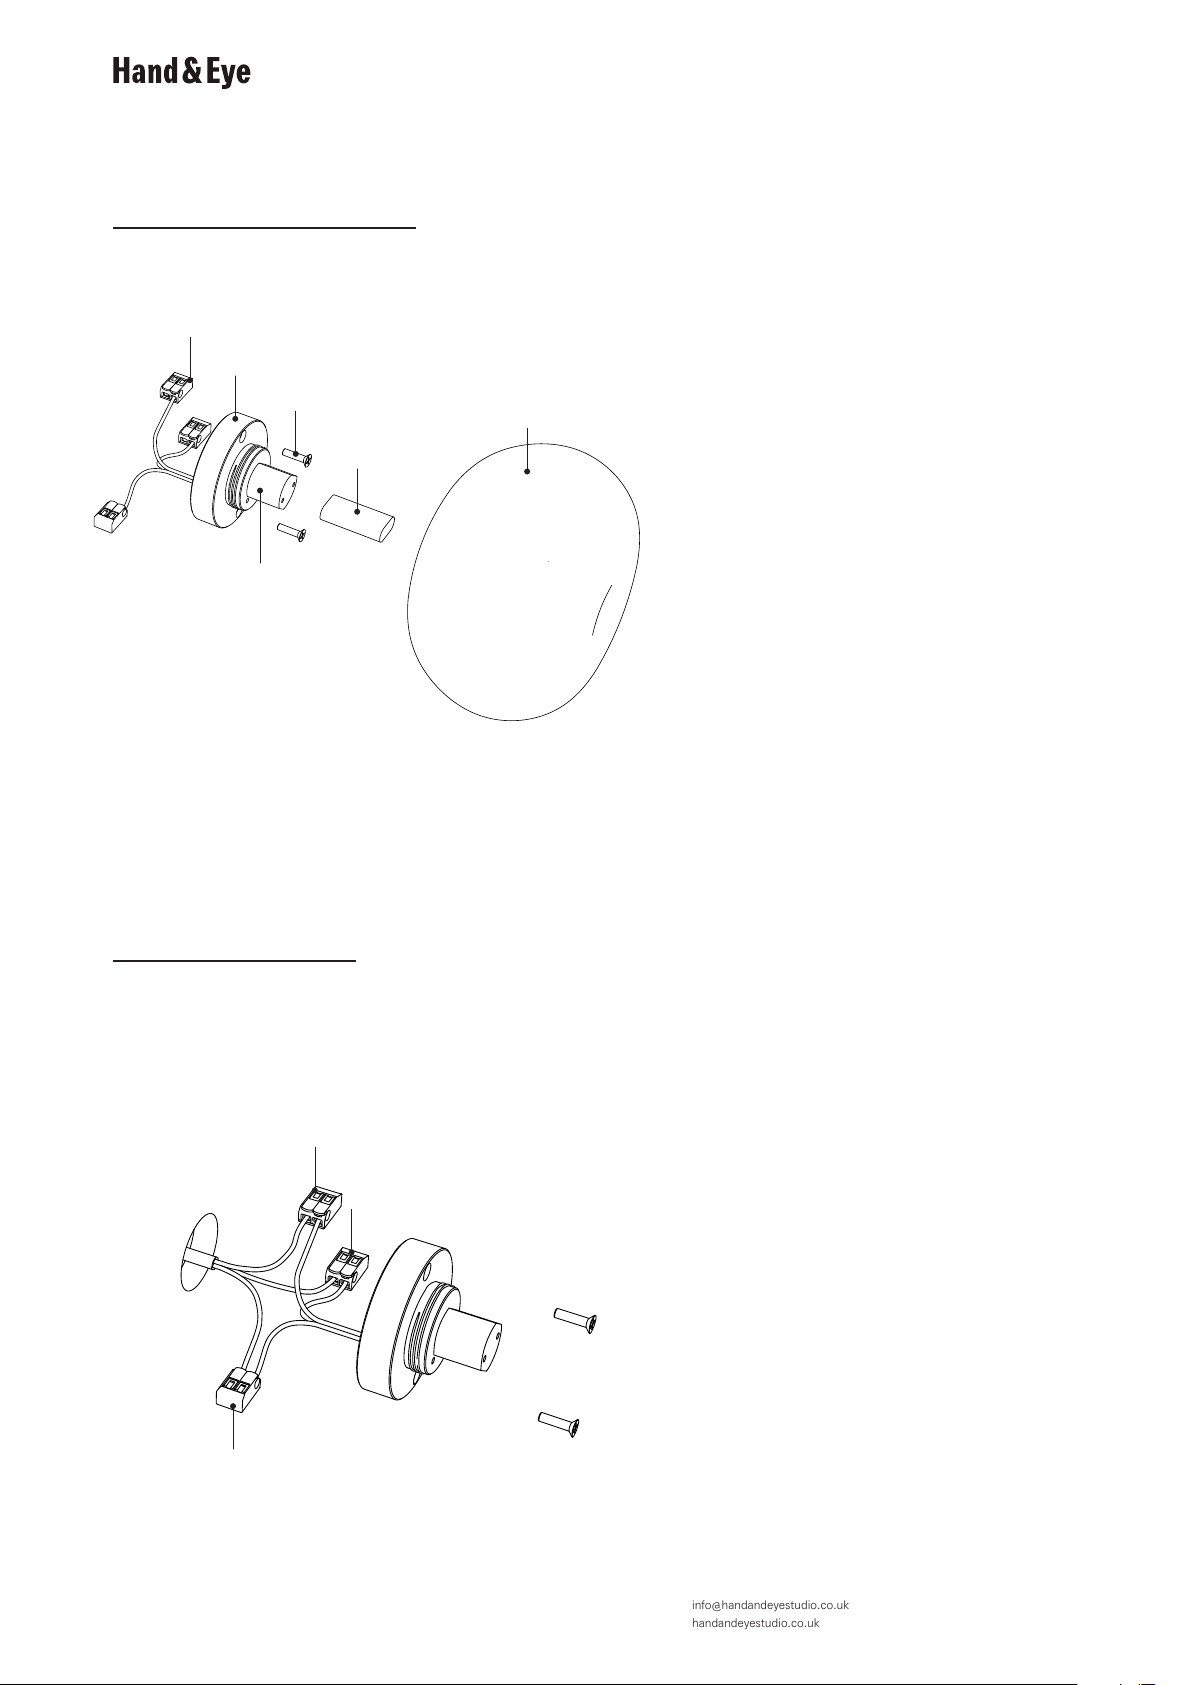
1. Wago connectors x3
2. Live cable connection
3. Neutral cable connection
4. Earth termination cable connection
5. Brass wall mount
6. G9 lamp holder
7. Screws for wall connection x2
8. G9 LED lightbulb (not supplied)
9. Glass shade and pre attached threaded metal attachment
Diagram 1
Exploded view of the Melina Wall Light
Diagram 2
Electrical connections and attaching to the wall
Attaching & connecting the Mela light
Steps
1Prepare the ceiling / wall
Make sure the ceiling or wall location has been suitably
prepared allowing for a secure xing substrate that can
take the weight of the light. We recommend the light is
xed to a timber / timber pattress behind the wall.
2Connect to mains electrics
Connect the pre -installed electrical cables to the mains
supply using the Wago connectors and ensuring the
correct polarity (see diagram 3).
Connections and excess cables can be housed in the
brass wall mount.
Note!
• Always use a professional electrician
• Ensure the mains electrics are OFF prior to making
the electrical connections
• If cables are cut on-site, remember to leave earth
cable longer than the live/neutral cables to ensure
earth continuity.
3Secure the brass wall mount
Now that the connection has been made the brass wall
mount can be secured to the ceiling or wall. The provided
wall screws are supplied as an example, ensure suitable
screws / xing method are used depending on your wall
substrate!
The wall mount should be ush to the wall and no
movement should occur.
Note!
• A foam gasket is pre installed to the back of the
brass mount to ensure the IP rating. This can only
be removed if installed in IP20 locations.
1
5
7
6
8
9
2
4
3
info@handandeyestudio.co.uk
handandeyestudio.co.uk
©October 2021
Lighting for all the senses.
Melina Wall Light
Instructions
2/2
Diagram 5
Attaching the glass shade
Diagram 3
Wiring diagram
4Connect the light bulb
Select a suitable G9 LED light bulb with a maximum of
6W output. For a warm glow we would recommend a
2700K and for a cooler white glow a 3000K light bulb.
Push in the bulb and test the lamp is working prior to the
next step.
5Unpacking the glass
Carefully remove the glass from the packaging. During
installation be careful not to scratch or scrape the glass
with any metal tools such as screw drivers as these can
leave marks on the glass. The brass connector ring is pre
attached to the glass shade.
6Fitting the glass to the wall mount
The glass shade comes tted with a brass collar which
screws onto the brass wall mount. Locate the shade onto
the brass wall mount, inserting the light bulb carefully
through the open neck of the glass. Gently turn the
shade clockwise keeping the glass parallel to the wall
mount.
When the lamp meets the end of the thread stop turning
the shade. Do not force or overtighten.
7Protecting the glass
If further works are taking place on-site, the plastic bag
can be used to cover the glass until all works have been
completed to ensure the glass remains dirt free.
LIVE = BROWN
LIVE
NEUTRAL
EARTH
NEUTRAL = BLUE
Diagram 4
Attaching the bulb
G9 lamp holder
G9 LED bulb max 6w

Other Hand&Eye Home Lighting manuals

Hand&Eye Isla Original instructions

Hand&Eye

Hand&Eye Isla Original instructions

Hand&Eye Duo Instruction Manual

Hand&Eye

Hand&Eye Duo Instruction Manual

Popular Home Lighting manuals by other brands

pholc 202318 installation instructions

pholc

pholc 202318 installation instructions

Verilux VD09 owner's manual

Verilux

Verilux VD09 owner's manual

Hay CLOCHE instruction manual

Hay

Hay CLOCHE instruction manual

Philips myLiving 37481/30/16 user manual

Philips

Philips myLiving 37481/30/16 user manual

Cattelan Italia THOR Assembling instructions

Cattelan Italia

Cattelan Italia THOR Assembling instructions

Philips 59655-48-16 user manual

Philips

Philips 59655-48-16 user manual

Philips Ecomoods 42234/17/16 Specifications

Philips

Philips Ecomoods 42234/17/16 Specifications

Safavieh LIT4034A manual

Safavieh

Safavieh LIT4034A manual

Original BTC Fin US-FT572 instruction manual

Original BTC

Original BTC Fin US-FT572 instruction manual

JONATHAN Y AMBERLY manual

JONATHAN Y

JONATHAN Y AMBERLY manual

John Lewis DUO GLASS SHELF FLOOR LAMP user guide

John Lewis

John Lewis DUO GLASS SHELF FLOOR LAMP user guide

Quoizel Kirkwood installation guide

Quoizel

Quoizel Kirkwood installation guide

Uplift Technologies Day-Light SKY user guide

Uplift Technologies

Uplift Technologies Day-Light SKY user guide

JONATHAN Y JYL6202A manual

JONATHAN Y

JONATHAN Y JYL6202A manual

MOOD CHIC instruction manual

MOOD

MOOD CHIC instruction manual

Intermatic CP150HPS installation instructions

Intermatic

Intermatic CP150HPS installation instructions

MaxLite 5ADL07830 Series operating instructions

MaxLite

MaxLite 5ADL07830 Series operating instructions

BePureHome BODY quick start guide

BePureHome

BePureHome BODY quick start guide

manuals.online logo
manuals.online logoBrands
  • About & Mission
  • Contact us
  • Privacy Policy
  • Terms and Conditions

Copyright 2025 Manuals.Online. All Rights Reserved.