HandyWave HandyPort HPU-120 User manual

London Electronics Ltd. - HandyPort-USB
Multi Serial Port Profile (MSPP)
Wireless Serial Multi Port
User’sManual

2
Table of Contents
1. INTRODUCTION ....................................................................................................................3
1.1. FEATURES.........................................................................................................................3
1.2. PACKAGE ..........................................................................................................................3
2. USB ADAPTER......................................................................................................................4
2.1. GENERAL SPECIFICATIONS ................................................................................................. 4
2.2. DISPLAY STATUS ................................................................................................................4
2.3. HARDWARE DESCRIPTION ..................................................................................................5
2.3.1. HPU-120 ...................................................................................................................... 5
2.3.2. HPU-100 ...................................................................................................................... 5
2.4. INSTALL PROCEDURE FOR HPU-120 ..................................................................................5
3. SOFTWARE INSTALLATION ................................................................................................6
3.1. INSTALLATION ....................................................................................................................6
4. SOFTWARE USAGE .............................................................................................................8
4.1. INSTALLATION VERIFICATION...............................................................................................8
4.1.1. Checking Device Manager ..........................................................................................8
4.1.2. Checking program icon................................................................................................8
4.2. PROGRAM EXECUTION .......................................................................................................9
4.3. QUICK USAGE GUIDE....................................................................................................... 11
4.3.1. File ............................................................................................................................. 11
4.3.2. View ........................................................................................................................... 11
4.3.3. My Bluetooth.............................................................................................................. 11
4.3.4. My Service .................................................................................................................12
4.3.5. Tools ..........................................................................................................................13
4.4. USAGE EXAMPLE .............................................................................................................13
4.4.1. Device Search ...........................................................................................................13
4.4.2. Service Browsing ....................................................................................................... 14
4.4.3. Bluetooth Wireless Link Setup...................................................................................15
4.4.4. Connection Status Display ........................................................................................ 16
4.4.5. Disconnection ............................................................................................................17
4.4.6. Make a Shortcut.........................................................................................................18

3
1. Introduction
Thank you for purchasing a HandyPort. HandyPort is a brand name of HandyWave’s Bluetooth
adapter products. HandyPort is the cable replacement solution that can eliminate the necessity
of wiring between PC and its peripheral devices and between diverse industrial controllers and
their peripheral equipments. HandyPort provides clean environment and helps to reduce the
installation and maintenance cost of cable.
1.1. Features
z Supports Bluetooth Serial Port Profile and Generic Access Profile
z Uses a USB port (USB 1.1 compliant)
z Supports up to 7 simultaneous wireless connections
z Supports MS Windows 98Se, Me, 2000, and XP
z Supports up to 100 meter (Line of Sight)
1.2. Package
z A HPU-120 or a HPU-100
z An antenna (In case of HPU-120)
z A cable for making a connection between HPU-120 and PC’s USB port (In case of
HPU-120)
z A manual

4
2. USB Adapter
2.1. General Specifications
Table 2-1 General Specifications of HPU-120
Coverage Up to 100 M
Connection Point-to-Point and Point-to-Multipoint
Interface USB 1.1
Standard Bluetooth Specification Version 1.1
Frequency 2.400 ~ 2.4835GHz
Hopping 1,600/Sec, 1MHz Channel Space
Modulation GFSK, 1Mbps, 0.5BT Gaussian
Tx. Power Max 20 / Typical 16dBm (Class 1)
Rx. Sensitivity -84dBm
Antenna Interface SMA Female (Note1)
Antenna Gain Max. 2dBi (Note2)
Power Supply Via USB
Current
Consumption
Max. 100mA (Note3)
Operation
Temperature
-20 ~ 75 °C
Size 35mm (W) x 65mm (D) x 16mm (H)
Note1) In case of HPU-100, It uses an internal chip antenna.
Note2) In case of HPU-100, It is 0dBi. In case of HPU-120, you can increase the antenna gain
with a high gain antenna.
Note3) In case of HPU-100, It is 190mA.
2.2. Display Status
The following is the LED status information for HPU-120.
z OPR (Red): Rx status of radio links
z LNK (Green): Tx status of radio links

5
2.3. Hardware Description
2.3.1. HPU-120
Figure 2-1 Hardware Description
2.3.2. HPU-100
Figure 2-2 HPU-100
2.4. Install Procedure for HPU-120
Step 1: Assemble an antenna to HPU-120 body.
Step 2: Assemble a USB to HPU-120 cable.
Antenna
Connector
USB to HPU-
120 Cable RF Rx LED RF Tx LED

6
3. Software Installation
You can follow the next steps to install MSPP software into your PC.
Notice: Don’t place a USB adapter into your PC’s USB port before software installation!
3.1. Installation
Step 1: Insert a provided CD-ROM into CD-ROM driver of your PC.
Step 2: Execute “Setup.exe”.
Step 3: Follow instructions by installation wizard.
(Note 1) You may encounter a message regarding to a certification for Bluetooth device under
Windows 2000/XP, you can continue the installation after clicking “Yes”.
(Note 2) You can continue the installation by checking on “Skip detect Bluetooth USB dongle”
and clicking next button.
Figure 3-1 Skip detect Bluetooth USB dongle

7
Step 4: Remove any disks from their drivers, and then click Finish to complete setup.
Figure 3-2 Setup Completion

8
4. Software Usage
4.1. Installation Verification
4.1.1. Checking Device Manager
You can verify whether installation process is successfully done or not at Device Manager like
the bellow figure. If installation process is successfully done, you can fine 14 Bluelet COM ports.
Figure 4-1 Verify COM Ports setup
4.1.2. Checking program icon
You can fine an icon for starting MSPP at desktop.
Figure 4-2 Program icon

9
4.2. Program Execution
z Before Program Execution
After finishing software installation successfully, you can place a HPS-120 into your PC’s
USB port. Once it is placed, the software is installed automatically. If the found new
hardware wizard is started, then follow the next steps.
Step 1: Choose “Install the software automatically (Recommended)” and click “Next” to
continue.
Step 2: You may encounter a Logo testing message under Windows 2000/XP, then
click “Continue Anyway”.
Step 3. After finishing the driver installation, you can find the “Bluetooth USB Dongle”
at Device Manager.
Figure 4-3 Verify the software for USB

10
z Running Program
You can execute the program by clicking “BlueSoleil MultiSerialPort” icon on the desktop.
If it is the first time, you can see “Welcome to BlueSoleil” screen. You can configure this
screen as follows:
Device Name: You can give any name to distinguish among adapters.
Device Type: You can choose a computer type accordingly.
Check on “Use security level Low”. (If you want to use the authentication, you
have to uncheck here and configure the serial adapters properly.) And click “OK”
to continue.
Figure 4-4 Welcome Screen
z Program Status Indication
Once the program is starting, the star is moving on the task bar. If you right-click the star
you can see a menu. If you choose “Display”, you can see program. If you choose “Exit”,
the program will be terminated.
Figure 4-5 Program Status

11
4.3. Quick Usage Guide
4.3.1. File
z Hide: Hide the program windows.
z Always On Top: Set the program window is always on top.
z Exit: Program Termination
4.3.2. View
z Main Window: You can move to Main Window.
z Service Window: You can move to Service Window.
z Arrange Devices: You can arrange devices by name, address, and type.
z Refresh Devices: Execute searching devices.
4.3.3. My Bluetooth
z Bluetooth Device Inquiry: Execute Bluetooth Device Inquiry.
z Bluetooth Service Browsing: Execute Service Browsing on selected device.
z Security: You can configure the security. If you choose “High” in the security level, the
program will ask the PIN code for every connection. If you check “Set Default Passkey”
and give the passkey, then the program will use this passkey without asking the PIN
code for every connection.
Figure 4-6 Security Configuration

12
z Properties: You can change the device name and type at “General” tap. It is strongly
recommended not to change any information at “Accessibility” and “Hardware” taps.
Figure 4-7 My Bluetooth Device
4.3.4. My Service
z Start Service: You can start any COM port service that is not active.
z Stop Service: You can stop any COM port service that is active.
z Status: You can see status information on the connected COM port.
z Properties: You can configure each port for Auto-start. If you want to use the HPS-120
with register and connect mode, you must check auto-start for each COM port.
Figure 4-8 Properties for serial ports

13
4.3.5. Tools
z My Shortcuts: You can select a shortcut to connect or delete.
z Find Device: You can find a device by name or address.
z Add New Device: You can add a device manually.
z Add Device from History: You can add or delete a device from history.
z Bluetooth Device: You can select an interface of Bluetooth device.
4.4. Usage Example
We will show you how to use the MSPP with some examples.
4.4.1. Device Search
You can search Bluetooth devices by double-clicking my device. It will be taken 10 to 30 second.
Figure 4-9 Device Search
If you point m
y
device, you
can see brief
device info.
This is m
y
device.
14
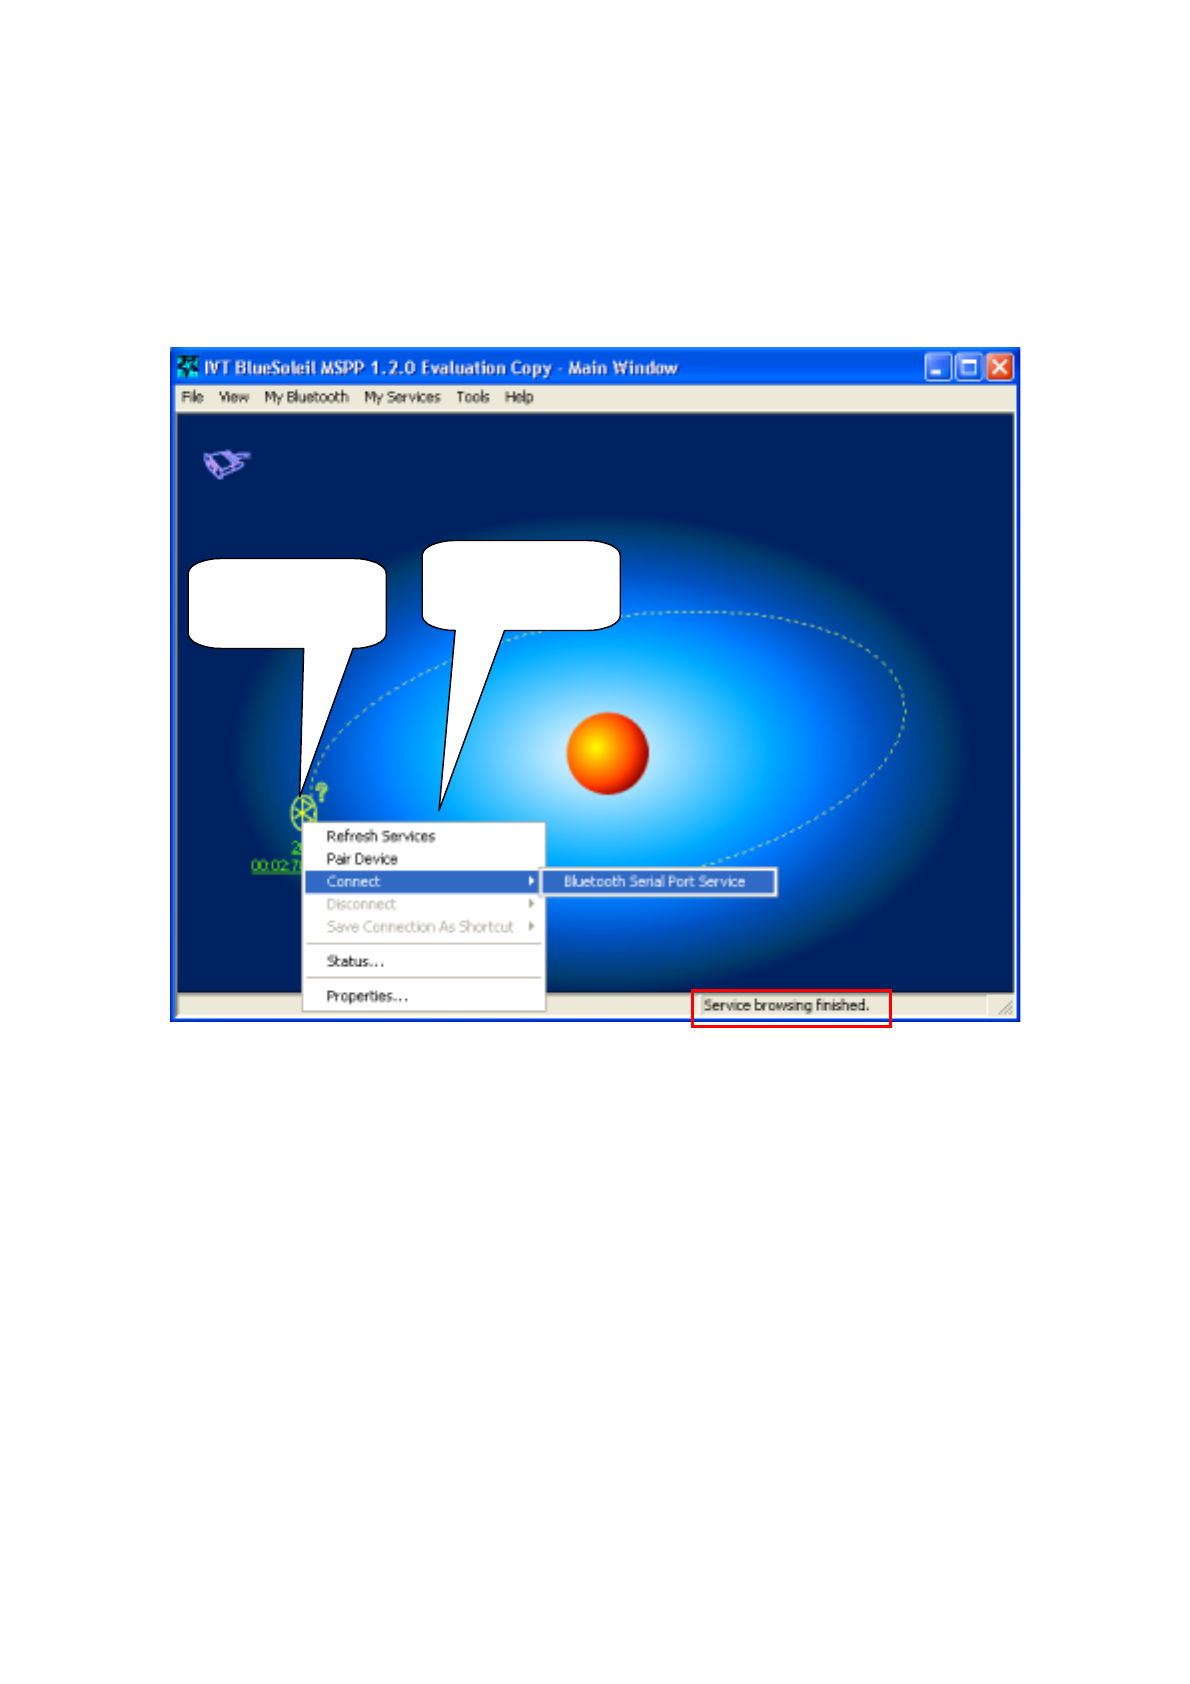
4.4.2. Service Browsing
You can browse a SPP service on searched device by double-clicking on it. After finishing
service browsing, you can find a service by right-clicking on it and make a connection by
clicking Bluetooth Serial Port Service.
Figure 4-10 Service Browsing
Searched device.
Browse a service b
y
double-clickin
g
You can find a
searched service
b
y
ri
g
ht-clickin
g
.

15
4.4.3. Bluetooth Wireless Link Setup
When a wireless link brings up, you can find out a COM port to communicate with remote device.
Figure 4-11 Wireless Link Setup
Connected
Status
You can communicate
with remote device via
indicated COM
p
ort.

16
4.4.4. Connection Status Display
You can display the status of the remote Bluetooth device. Right-click on the remote device and
click Status on the menu.
Figure 4-12 Remote Device Status

17
4.4.5. Disconnection
To disconnect a link, you can right-click the remote device and click Bluetooth Serial Service on
Disconnect. And click “Yes” on the next message.
Figure 4-13 Disconnect a Link

18
4.4.6. Make a Shortcut
You can make a wireless link by starting MSPP using the save connection as shortcut as
follows:
Step 1: Bring up a wireless link between my device and the remote device.
Step 2: Right-click the remote device and click Bluetooth Serial Port Service on Save
Connection As Shortcut.
Figure 4-14 Make a Shortcut

19
Step 3: Go to “Tools -> My Shortcuts” and check Auto Start.
Figure 4-15 Auto Start Setup
This manual suits for next models
1
Table of contents
Other HandyWave Adapter manuals


