Hanna HI 9124 User manual

1
Instruction Manual
www.hannainst.com
HI 9124 HI 9125
Portable Waterproof
pH Meters

2
WARRANTY
Dear Customer,
Thank you for choosing a Hanna Instruments product.
Please read this instruction manual carefully before using these instruments.
This manual will provide you with the necessary information for correct
use of these instruments, as well as a precise idea of their versatility.
If you need additional technical information, do not hesitate to e-mail
WARRANTY .................................................................................. 2
PRELIMINARY EXAMINATION ......................................................... 3
GENERAL DESCRIPTION ................................................................. 3
LCD MESSAGE GUIDE .................................................................... 4
FUNCTIONAL DESCRIPTION ........................................................... 5
SPECIFICATIONS........................................................................... 6
OPERATIONAL GUIDE.................................................................... 7
pH CALIBRATION ....................................................................... 10
pH BUFFER TEMPERATURE DEPENDENCE ....................................... 13
SETUP MENU ............................................................................. 14
mV CALIBRATION (HI 9125 only)................................................ 15
TEMPERATURE CALIBRATION ....................................................... 15
BATTERIES REPLACEMENT ............................................................ 16
TEMPERATURE CORRELATION FOR pH SENSITIVE GLASS................ 18
ELECTRODE CONDITIONING & MAINTENANCE ................................ 19
TROUBLESHOOTING GUIDE ......................................................... 21
ACCESSORIES ............................................................................. 22
WARRANTYWARRANTY
WARRANTYWARRANTY
WARRANTY
HI 9124 & HI 9125 are guaranteed for two years against defects in
workmanship and materials when used for their intended purpose
and maintained according to instructions. Electrodes and probes are
guaranteed for six months. This warranty is limited to repair or
replacement free of charge.
Damage due to accidents, misuse, tampering or lack of prescribed
maintenance is not covered.
If service is required, contact the dealer from whom you purchased
these instruments. If under warranty, report the model number, date
of purchase, serial number and the nature of the problem. If the
repair is not covered by the warranty, you will be notified of the
charges incurred. If these instruments are to be returned to Hanna
Instruments, first obtain a Returned Goods Authorization number
from the Technical Service department and then send it with shipping
costs prepaid. When shipping any instrument, make sure it is
properly packed for complete protection.
TABLE OF CONTENTSTABLE OF CONTENTS
TABLE OF CONTENTSTABLE OF CONTENTS
TABLE OF CONTENTS

3
The HI 9124 and HI 9125 are state-of-the-art rugged waterproof,
hand held pH meters designed to provide laboratory results and
accuracy under harsh industrial conditions.
A large multi-level LCD, with clear indications related to the electrode
and instrument status, pH and temperature displayed simultaneously,
and user friendly symbols and text instructions during calibration.
The pH calibration procedure is automatic with 5 auto recognized
buffers (4.01, 6.86, 7.01, 9.18 and 10.01) and automatic temperature
compensation.
The HI 9125 can be used with ORP (Oxidation Reduction Potential)
electrodes. mV measurements automatically change from 0.1 to 1 mV
resolution when the reading reaches 700 mV.
Remove the instrument from the packing material and examine it to
make sure that no damage has occurred during shipping.
If there is any damage, notify your dealer or the nearest Hanna
Customer Service Center.
Each meter is supplied with:
•HI 1230B non refillable combination double-junction pH electrode
with gelled electrolyte.
•HI 7662stainless steel temperature probe with 1 m (3.3’’) cable
•pH 4.01 & pH 7.01 buffer solutions, 20 mL sachet
•100 mL plastic beaker
•3 x 1.5V AAA, batteries
•Instruction manual
•Rugged carrying case
Note:Save all packing material until you are sure that the instrument
functions correctly. All defective items must be returned in the
original packing with the supplied accessories.
PRELIMINARY EXAMINATIONPRELIMINARY EXAMINATION
PRELIMINARY EXAMINATIONPRELIMINARY EXAMINATION
PRELIMINARY EXAMINATION
GENERAL DESCRIPTIONGENERAL DESCRIPTION
GENERAL DESCRIPTIONGENERAL DESCRIPTION
GENERAL DESCRIPTION

4
TAGS & SYMBOLS
•Mode tags lights up for indicating the corresponding active
mode, and blinks for warning the user.
MEASURE on: measurement mode.
SETUP on: SETUP menu mode has been entered.
CALIBRATION on: calibration mode has been entered.
MEMORIZE on: measurement stored in the internal memory and
frozen on the display
RECALL MEMORIZED on: stored value recalled.
•Battery symbol blinking: low battery condition. Batteries should
be replaced.
•Calibration messages.
WAIT NOT READY blinking: buffer has been recognized, but
reading is not stable.
READY on: buffer has been recognized and reading is stable.
WRONG and WRONG blinking alternatively: wrong
buffer, value not recognized.
•Main active key messages light up for indicating the
corresponding active key.
CFM blinking: ask for confirmation of calibration or set value.
MR on: MR key available.
MEM on: MEM key available.
CAL on: CAL key available.
RANGE on: RANGE key available. (HI 9125 only)
SETUP on: SETUP key available.
LCD MESSAGE GUIDELCD MESSAGE GUIDE
LCD MESSAGE GUIDELCD MESSAGE GUIDE
LCD MESSAGE GUIDE
5
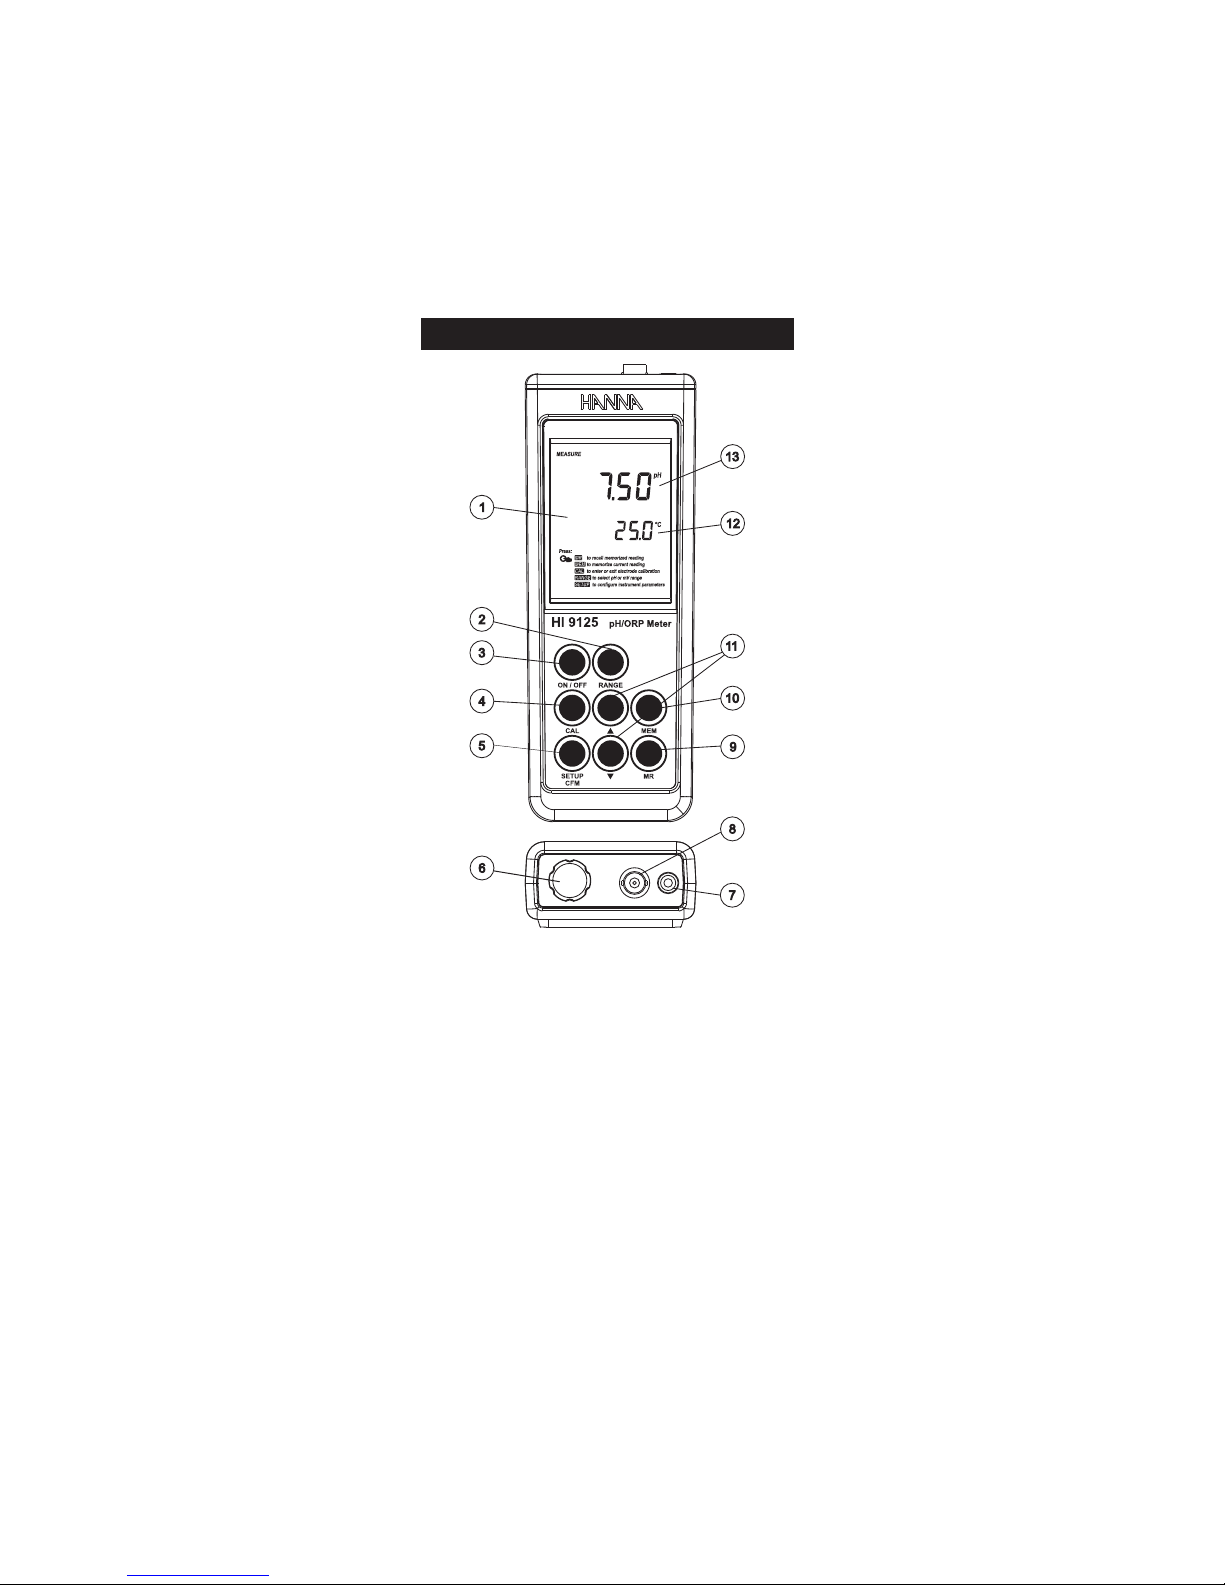
1) Liquid Crystal Display (LCD).
2) RANGE key, to select pH or mV (HI 9125 only).
3) ON/OFF key, to turn the meter ON and OFF.
4) CAL key, to enter or exit calibration mode.
5) SETUP/CFM key, to enter SETUP mode or to confirm calibration.
6) Battery compartment cap.
7) Temperature probe socket.
8) BNC electrode connector.
9) MR key, to recall stored value from memory.
10) MEM key, to store reading in memory.
11) pand qkeys, for manual temperature setting, or selecting
pH buffer value.
12) Secondary display.
13) Primary display.
FUNCTIONAL DESCRIPTIONFUNCTIONAL DESCRIPTION
FUNCTIONAL DESCRIPTIONFUNCTIONAL DESCRIPTION
FUNCTIONAL DESCRIPTION
6
EGNAR
Hp00.61ot00.2-
Vm9991±/Vm9.996±
)ylno5219IH(
C°0.021ot0.02-
)F°0.842ot0.4-(
NOITULOSER
Hp10.0
Vm1/Vm1.0
(5219IH )ylno
)F°1.0(C°1.0
YCARUCCA
Fº86/Cº02@
Hp10.0±
Vm1±/Vm2.0±
(5219IH )ylno
)F°8.0±(C°4.0±
)rorreeborpgnidulcxe(
noitaiveDCMElacipyT
Hp20.0±
Vm1±/Vm2.0±
(5219IH )ylno
)F°8.0±(C°4.0±
noitarbilaCHp
,tniop-2ro1
sreffubdeziromem5htiw
)10.01,81.9,10.7,68.6,10.4(
noitarbilaCtesffO Hp1±
noitarbilaCepolS %801ot08morF
noitasnepmoCerutarepmeT
C°0.021ot0.02-morf,citamotuA
,launamro)F°0.842ot0.4-(
eborperutarepmettuohtiw
edortcelEHp B0321IH )dedulcni(
eborPerutarepmeT 2667IH )dedulcni(
ecnadepmItupnI 01
21
smho
efiL&epyTyrettaB seirettabAAAV5.1x3
esusuounitnocfosruoh002.xorppa
ffo-otuA rosetunim02:elbatcelesresU
delbasid
snoisnemiD )”4.1x8.2x3.7(mm63x27x581
thgieW ).zo6.01(g003
tnemnorivnE )F°221–23(C°05–0
%001HRxam
ytnarraW sraey2
SPECIFICATIONSSPECIFICATIONS
SPECIFICATIONSSPECIFICATIONS
SPECIFICATIONS
7
INITIAL PREPARATION
The instrument is supplied with batteries. In order to place the
batteries inside the instrument follow the instructions from page 16.
To prepare the instrument for use, connect the pH electrode and the
temperature probe to the BNC and temperature sockets on the top of
the instrument. The temperature probe can be used independently to
take temperature measurements, or it can be used in conjunction
with the pH electrode to utilize Automatic Temperature Compensation
(ATC) mode. If the probe is disconnected, temperature can also be set
manually with the ARROW keys.
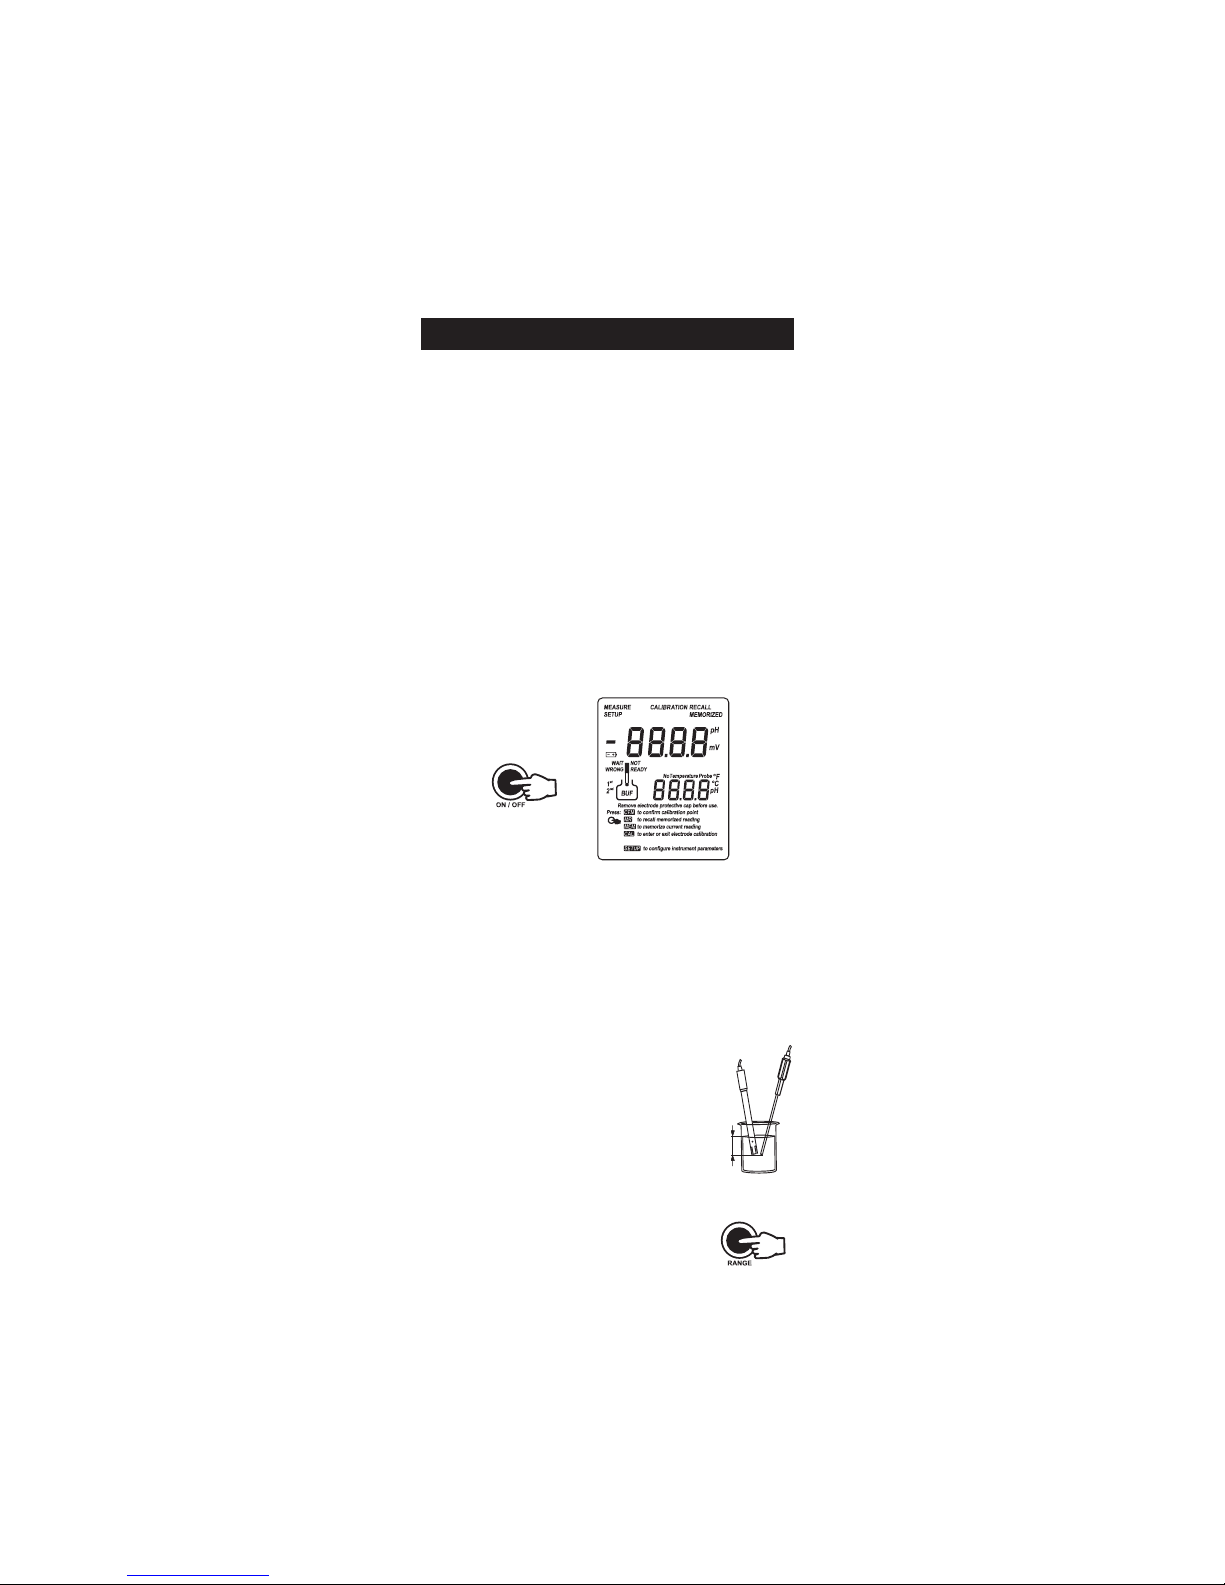
Turn the instrument ON by pressing ON/OFF.
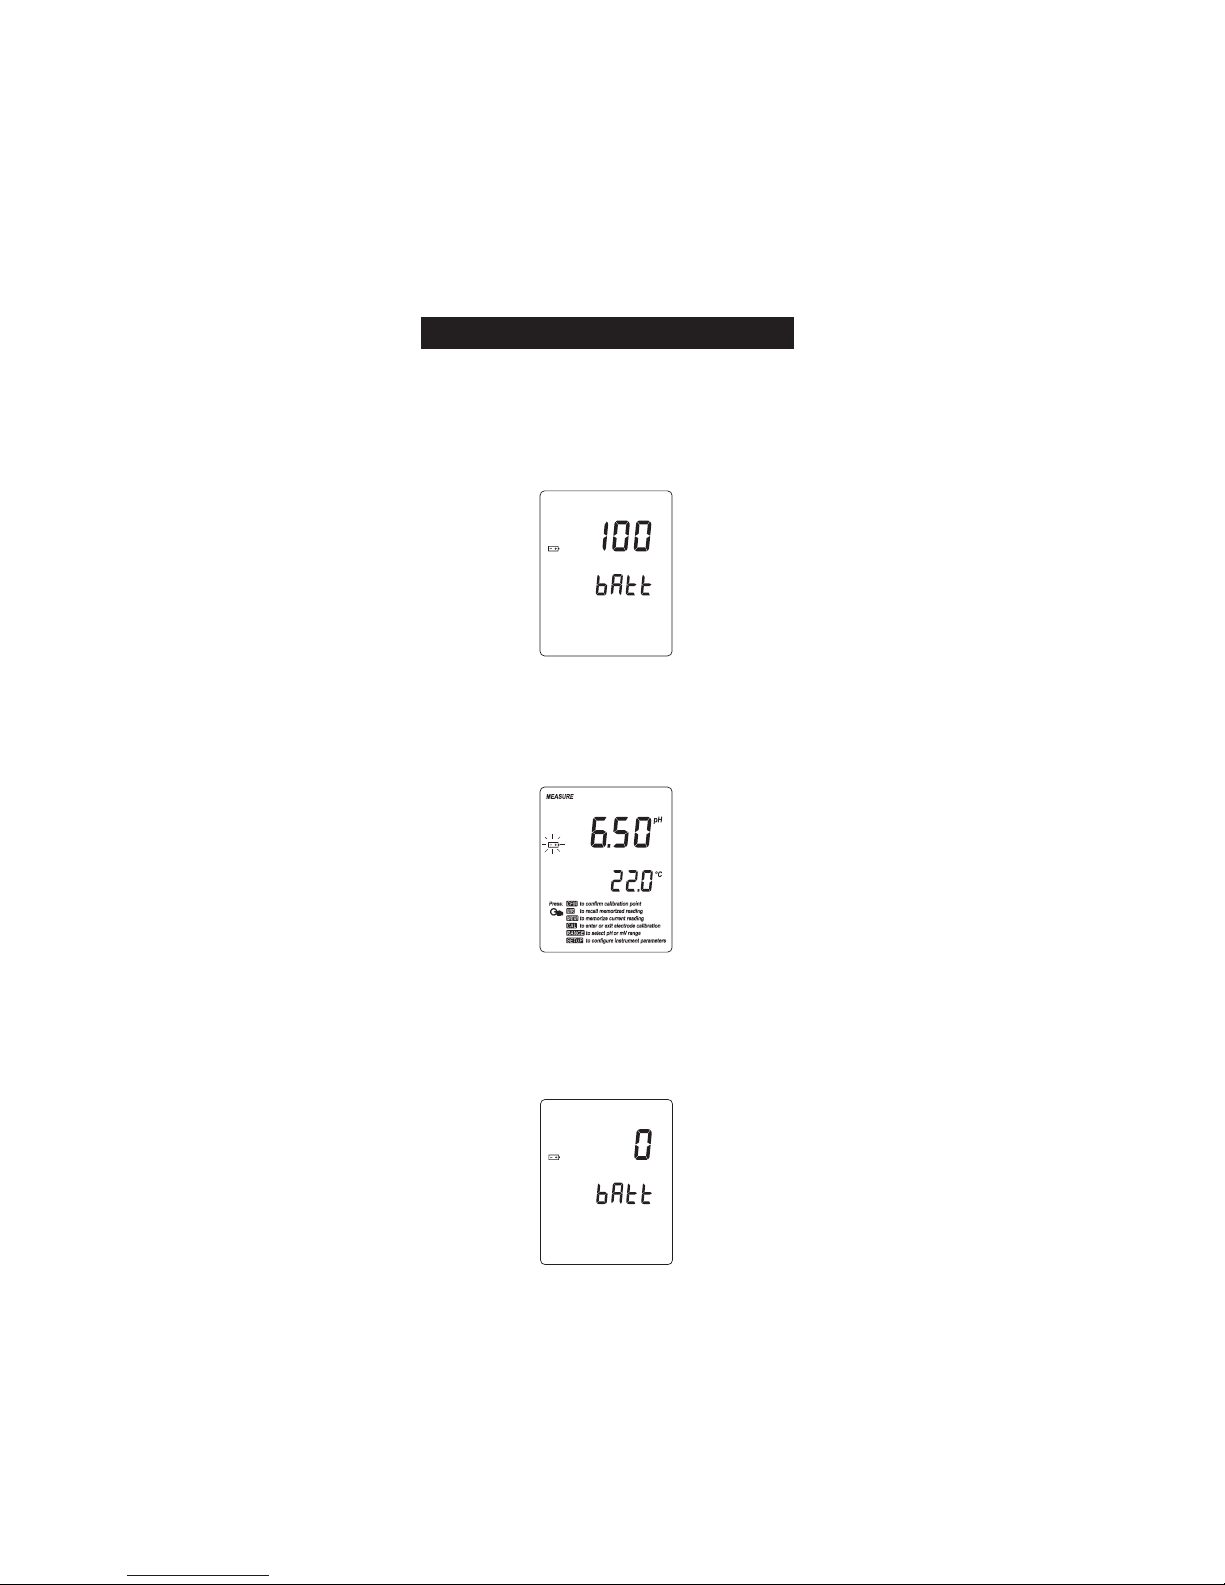
At start-up the display will show all the LCD segments and then the
battery percentage while the instrument performs a self check (or as
long as the button is held).
The meter automatically enters measurement mode.
After measurement, switch the meter off. Clean the electrode and store
it with a few drops of HI 70300 storage solution in the protective cap.
To save batteries, the auto-off feature turns the meter off after
20 minutes with no button pressed. To disable this feature, see
“Setup Menu” section on page 14.
pH MEASUREMENTS
Calibrate the meter and pH electrode before
taking measurements. See page 10 for details.
To take a pH measurement remove the electrode’s
protective cap, rinse off pH sensing tip. Submerse
the electrode and the temperature probe 3 cm
(1¼”) into the sample and stir gently.
If necessary, press the RANGE key until the
display shows pH mode (HI 9125 only).
Allow time for the reading to stabilize.
3 cm
(1¼”)
OPERATIONAL GUIDEOPERATIONAL GUIDE
OPERATIONAL GUIDEOPERATIONAL GUIDE
OPERATIONAL GUIDE

8
The LCD will show the pH measurement and the temperature of the
sample.
If several measurements are taken successively in different samples,
rinse the electrode thoroughly with deionized or tap water and a
small amount of the sample to be measured.
The pH value of the sample is directly affected by temperature. In
order for the meter to measure the pH accurately, the value must be
compensated for temperature. If the sample temperature is different
from the temperature at which the pH electrode was kept, allow a
few minutes for thermal equilibrium.
To use the meter's Automatic Temperature Compensation feature,
submerse the temperature probe into the sample as close to the
electrode as possible and wait for a few minutes.
If manual temperature compensation is desired the temperature
probe must be disconnected from the instrument.
The display will show the default temperature of “25 °C”, or the last
temperature set with the “°C” (or “°F”) indicator blinking.
The temperature can now be adjusted with the ARROW keys. Set the
value at the sample temperature.
Notes:•When the reading is out of
range, the display will flash
the closest full-scale value.
•If using pH electrode while
in mV mode, the meter will
measure the mV generated
by the pH electrode.

9
ORP MEASUREMENTS (HI 9125 only)
To perform ORP measurements, connect an optional ORP electrode
(see “Accessories” section) to the meter and turn it ON.
If necessary, enter the mV mode by pressing RANGE until the display
changes to mV.
Submerse the ORP electrode 3 cm (1¼”) into the sample to be tested
and wait a few minutes for the reading to stabilize.
Measurements within the ±699.9 mV range are displayed with
0.1 mV resolution, while outside this range the resolution automatically
switches to 1 mV.
For accurate ORP measurements, the surface of the electrode must be
clean and smooth. Pretreatment solutions are available to condition
the electrode and improve its response time (see “Accessories” section).
MEM &MR FUNCTIONS
The instrument allows the user to store the current measurement (pH
and temperature, or mV and temperature) into internal memory by
pressing the MEM key. The “MEMORIZE” tag lights up on display.
Stored valuescan be recalled by pressing MR: the display will show
the valuesand the “RECALL MEMORIZED”tag as long as the
button is pressed.

10
It is recommended to calibrate the instrument frequently, especially if
high accuracy is required.
The pH range should be recalibrated:
•Whenever the pH electrode or temperature probe is replaced.
•At least once a week.
•After testing aggressive chemicals.
•When extreme accuracy is required.
PREPARATION
Pour a small quantity of buffer solution into clean beakers. For
accurate calibration use two beakers for each buffer solution, the first
one for rinsing the electrode and the second one for calibration.
PROCEDURE
In order to perform pH calibration:
•Make sure that the meter is in the pH mode (HI 9125 only).
•Remove the protective cap and rinse the electrode with some of
the buffer solution to be used for the first calibration point.
There is a choice of 5 memorized buffers: 4.01, 6.86, 7.01, 9.18 and
10.01 pH.
TWO-POINT CALIBRATION
•Press the CAL key. The “CAL” and “ ” indicators will be
displayed. The secondary LCD will display buffer “7.01”. If a
different calibration buffer is desired (e.g. “6.86”), use the
ARROW keys to change the displayed value.
•Submerse the electrode approx. 3 cm (1¼”) into the solution,
place the temperature probe as close as possible to the electrode
and stir gently.
pp
pp
pH CALIBRATIONH CALIBRATION
H CALIBRATIONH CALIBRATION
H CALIBRATION
or
11
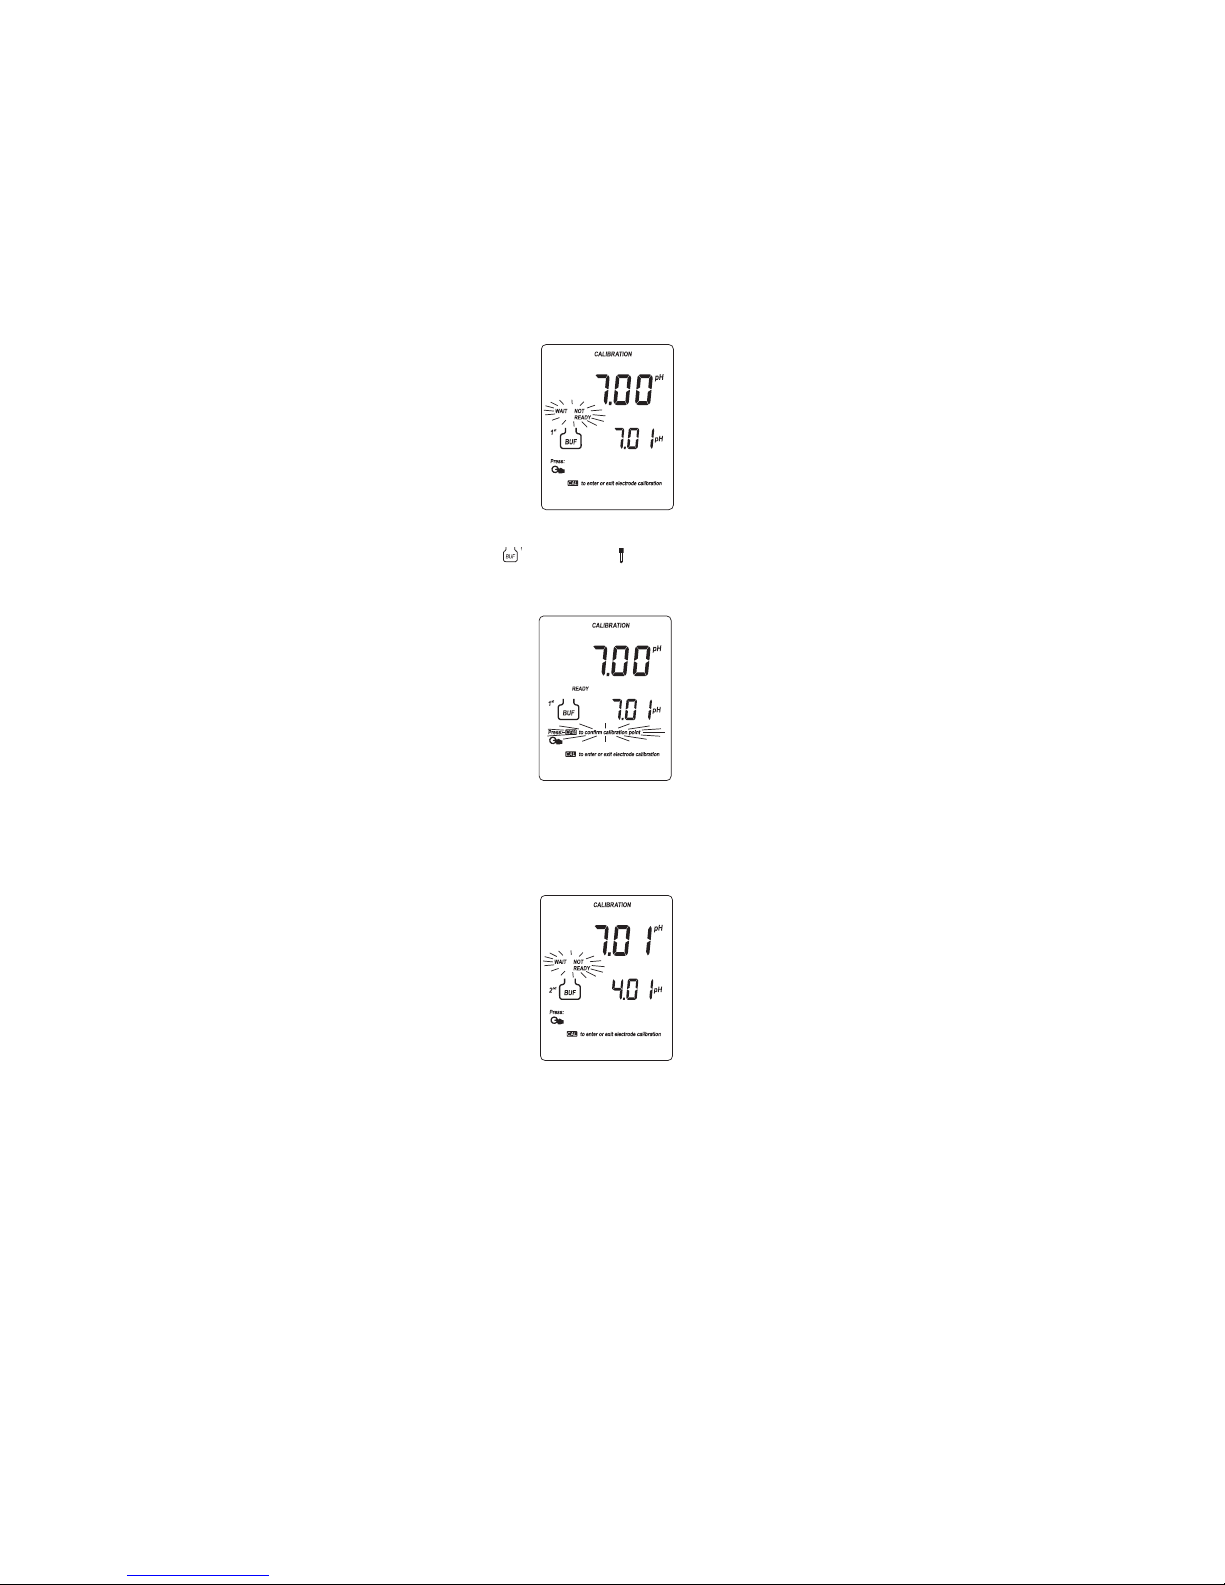
•The LCD will flash the “WAIT NOT READY” message.
•Once the reading is stable, if it is not close to the selected buffer,
“WRONG “ and “WRONG “ will blink alternatively; if it is
close to the selected buffer the display will change to “READY”
and blinking “Press: CFM to confirm calibration point”.
•Press the CFM key to confirm the calibration: the meter stores the
offset calibration point. The calibrated reading is then displayed
on the primary LCD while the secondary LCD will show the second
buffer to be used for calibration (pH 4.01).
•After the first calibration point is confirmed, submerse the electrode
into the second buffer (pH 4.01, 10.01 or 9.18) and stir gently.
Choose pH 4.01 for acidic samples, and pH 10.01 or 9.18 for
alkaline solutions.
•Submerse the electrode approx. 3 cm (1¼”) into the solution,
place the temperature probe as close as possible to the electrode
and stir gently.
•Select the second buffer value on the secondary display by
pressing the ARROW keys.

12
•If the reading is not close to the selected buffer, “WRONG ”
and “WRONG ” will blink alternatively;
•If the reading is close to the selected buffer and the reading is
stable, the “READY” symbol is displayed and the “CFM” symbol
starts blinking on the LCD, asking for confirmation.
•Press the CFM key: the value is stored into memory and the meter
returns to normal mode.
Notes:•The meter automatically skips the buffer used for the first
calibration point to avoid erroneous procedure. A difference
of at least 1.5 pH unit is required between the two buffers
used for the offset and slope calibration: once calibrated at
either pH 7.01 or 6.86, the instrument automatically
ignores the other value for the second point (same for pH
10.01 and 9.18).
•During calibration, the secondary LCD shows the selected
buffer value. For the HI 9125 model, it is possible to
display the buffer temperature during calibration by
pressing RANGE.
•To clear a previous calibration and return to the default
values, in calibration mode press CFM, then CAL before
the first buffer is accepted. The LCD will show “CLr CAL”
for one second, and then will return to normal mode.
ONE-POINT CALIBRATION
For optimum accuracy it is always recommended to perform a
two-point calibration, but for a faster operation a single-point
calibration can be used. pH 7.01 or pH 6.86 (NIST) are normally
used for this purpose, even though the meters can be calibrated with
any of the 5 memorized calibration values.
After calibrating the first point (see above), press the CAL key to end
the calibration procedure.

13
Temperature has an effect on pH. The calibration buffer solutions are
affected by temperature changes to a lesser degree than normal
solutions. During calibration the instrument will automatically calibrate
to the pH value corresponding to the measured or set temperature.
During calibration the instrument will display the pH buffer value at
25 °C.
PMET SREFFUBHp
Cº Fº 10.4 68.6 10.7 81.9 10.01
0 23 10.4 89.6 31.7 64.9 23.01
5 14 00.4 59.6 01.7 93.9 42.01
01 05 00.4 29.6 70.7 33.9 81.01
51 95 00.4 09.6 50.7 72.9 21.01
02 86 00.4 88.6 30.7 22.9 60.01
52 77 10.4 68.6 10.7 81.9 10.01
03 68 20.4 58.6 00.7 41.9 69.9
53 59 30.4 48.6 99.6 11.9 29.9
04 401 40.4 48.6 89.6 70.9 88.9
54 311 50.4 38.6 89.6 40.9 58.9
05 221 60.4 38.6 89.6 10.9 28.9
55 131 80.4 48.6 89.6 99.8 97.9
06 041 90.4 48.6 89.6 79.8 77.9
56 941 11.4 48.6 99.6 59.8 67.9
07 851 21.4 58.6 99.6 39.8 57.9
57 761 41.4 68.6 00.7 19.8 47.9
08 671 61.4 78.6 10.7 98.8 47.9
58 581 71.4 78.6 20.7 78.8 47.9
09 491 91.4 88.6 30.7 58.8 57.9
59 302 02.4 98.6 40.7 38.8 67.9
pp
pp
pH BUFFER TEMPERATUREH BUFFER TEMPERATURE
H BUFFER TEMPERATUREH BUFFER TEMPERATURE
H BUFFER TEMPERATURE
DEPENDENCEDEPENDENCE
DEPENDENCEDEPENDENCE
DEPENDENCE

14
Instrument allows the user to configure several parameters through
the Setup Menu.
To enter the SETUP mode, while in measurement mode, press and
hold the SETUP key for about 5 seconds. When the key is released
the first parameter will be displayed.
Once the menu is entered, each parameter can be changed by using
the ARROW keys; then pressing the CFM key will confirm the value
and scroll to the next parameter.
1. Audible signal: On (default) or Off
2. Auto-off feature: 20 minutes (default) or disabled
3. Temperature measure unit: ºC (default) or ºF
After setting the last parameter, pressing the CFM key will confirm
the value and return to measurement mode.
SETUP MENUSETUP MENU
SETUP MENUSETUP MENU
SETUP MENU

15
HI 9124 & HI 9125 have been precalibrated for temperature at the
factory.
For optimum accuracy, it is recommended to recalibrate the meter for
temperature at least once a year. Contact your Dealer or the nearest
Hanna Customer Service Center for more information.
HI 9125 has been precalibrated for mV range at the factory.
For optimum accuracy, it is recommended to recalibrate the meter for
mV readings at least once a year. Contact your Dealer or the nearest
Hanna Customer Service Center for more information.
mm
mm
mV CALIBRATION (HI 9125V CALIBRATION (HI 9125
V CALIBRATION (HI 9125V CALIBRATION (HI 9125
V CALIBRATION (HI 9125 onlyonly
onlyonly
only))
))
)
TEMPERATURE CALIBRATIONTEMPERATURE CALIBRATION
TEMPERATURE CALIBRATIONTEMPERATURE CALIBRATION
TEMPERATURE CALIBRATION
16
BATTERIES REPLACEMENTBATTERIES REPLACEMENT
BATTERIES REPLACEMENTBATTERIES REPLACEMENT
BATTERIES REPLACEMENT
The instrument is supplied with batteries. First time you start working
with the instrument, insert the supplied batteries in the battery
compartment observing the correct polarity (see page 17).
At start-up the battery percentage is displayed.
If the batteries become weak, the display will flash the battery
symbol to advise the user that approximately 1 hour of working time
remains. It is recommended to change the batteries as soon as the
battery symbol appears blinking.
The instrument is also provided with the BEPS (Battery Error Prevention
System) feature which automatically turns the instrument off when
the battery level is too low to ensure reliable readings. At start-up the
display will show “0 batt” for few seconds, then the instrument
automatically turns off.
17
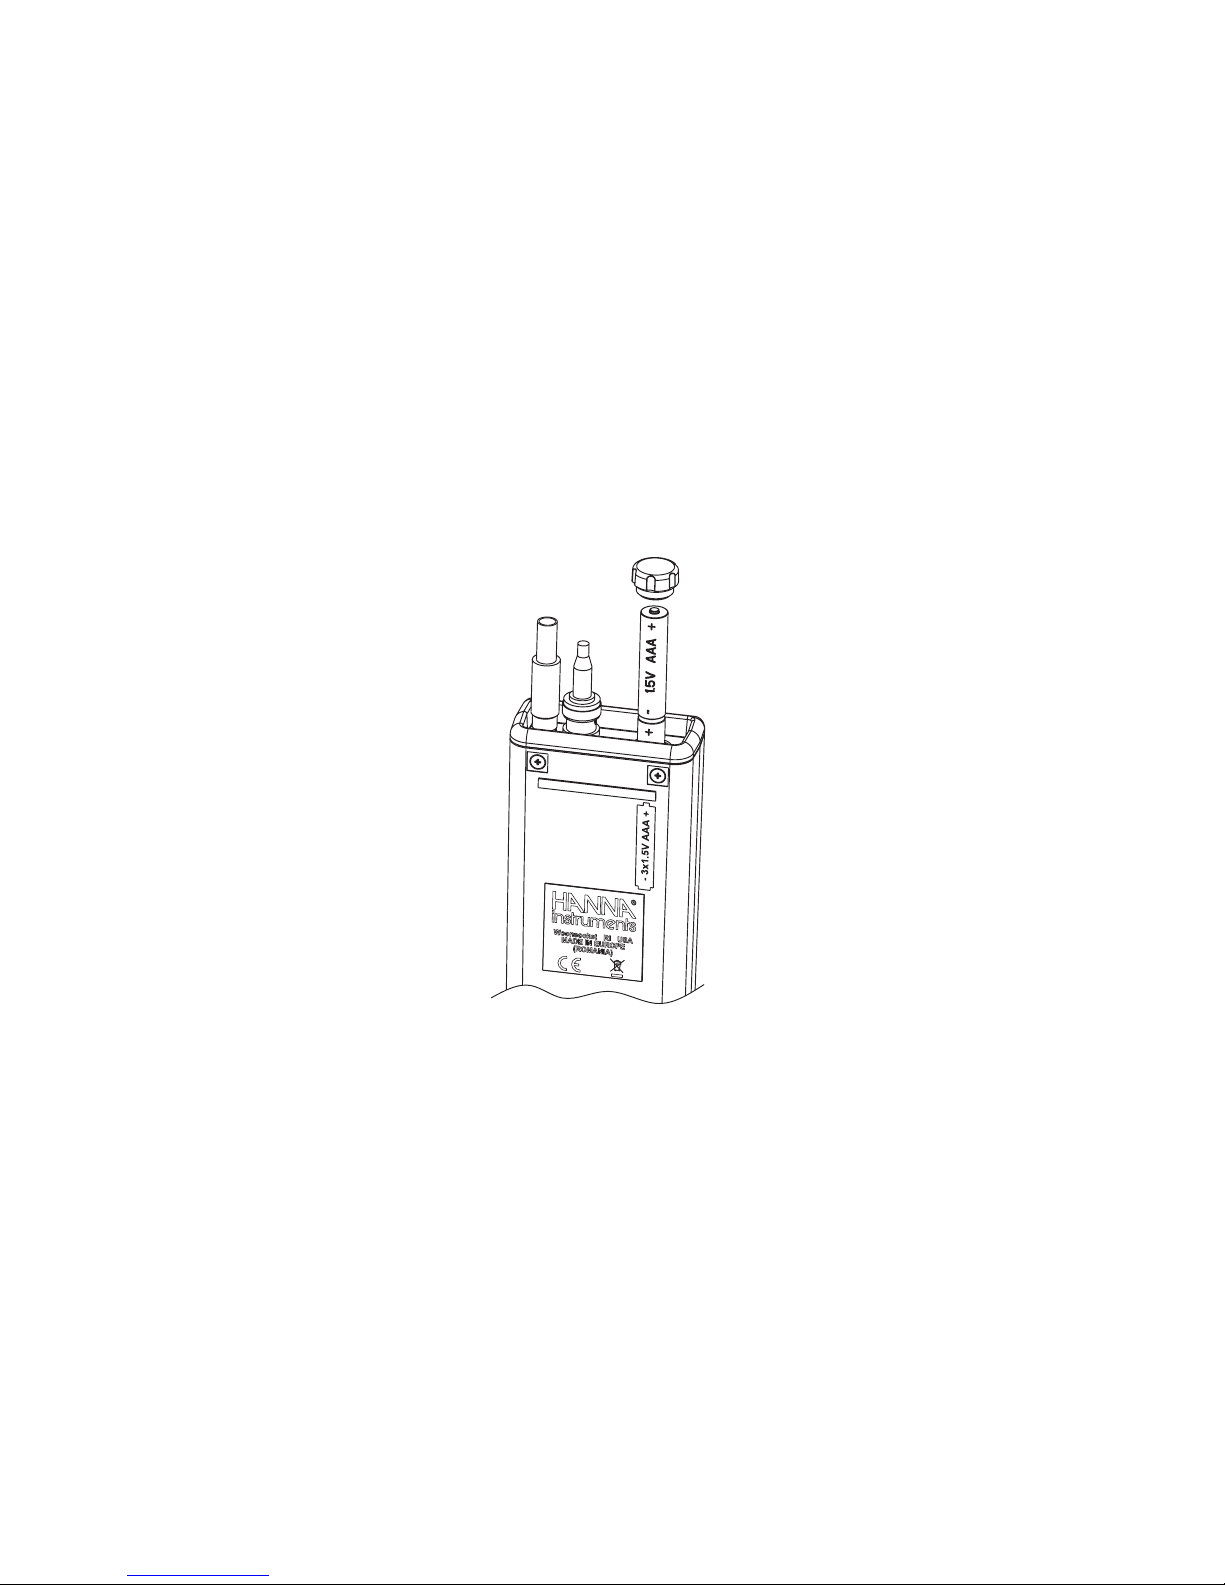
To replace the batteries, follow the next steps:
•Turn the instrument OFF.
•Open the battery compartment cap (located on the top of the
instrument).
•Remove old batteries.
•Insert three new 1.5V AAA batteries in the battery compartment,
observing the polarity on the rear of the instrument.
•Reattach the battery compartment cap.
18
Typical Electrode Life
Ambient Temperature 1 – 3 years
90 °CLess than 4 months
120 °C Less than 1 month
Alkaline Error
High concentrations of sodium ions interfere with readings in alkaline
solutions. The pH at which the interference starts to be significant
depends upon the composition of the glass. This interference is called
alkaline error and causes the pH to be underestimated. Hanna’s glass
formulations have the indicated characteristics.
1.0 Mol L-1 Na+
0.1 Mol L-1 Na+
Sodium Ion Correction for Glass at 20-25 °C
Concentration pH Error
13.00
13.50
14.00
12.50
13.00
13.50
14.00
0.10
0.14
0.20
0.10
0.18
0.29
0.40
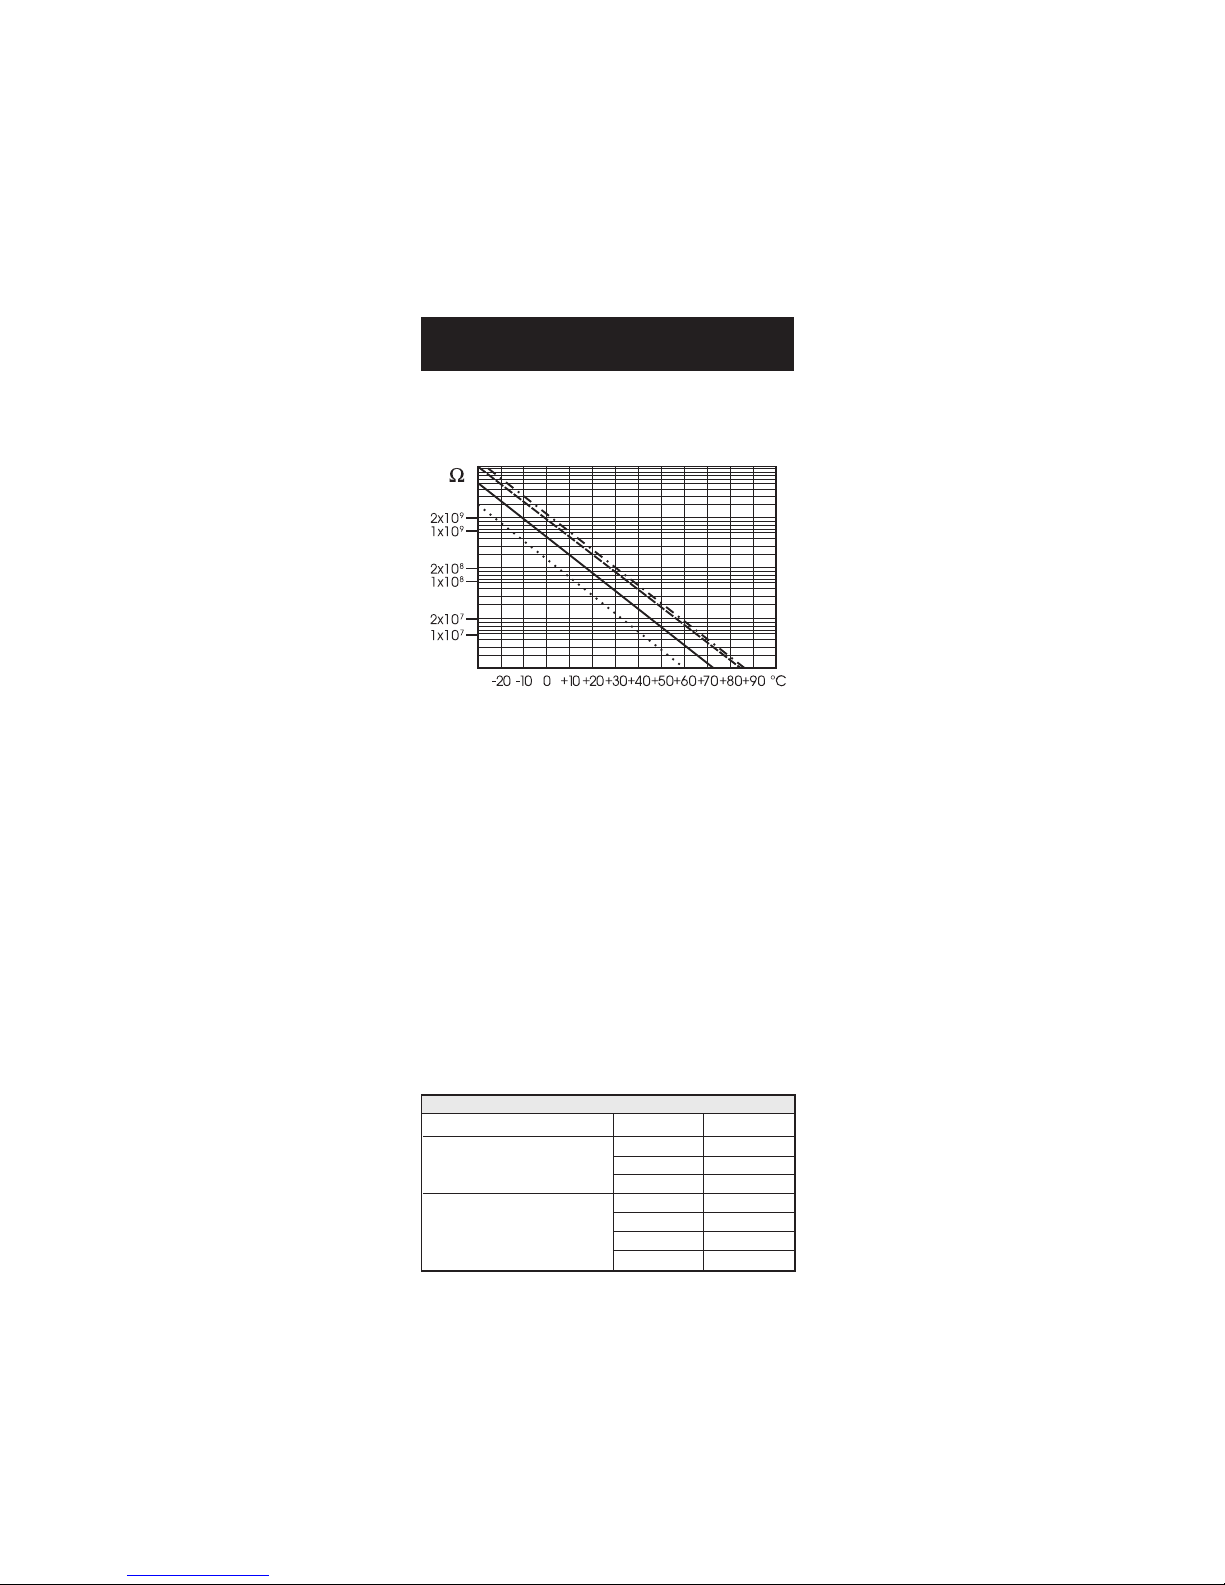
The resistance of glass electrodes partially depends on temperature. The
lower the temperature, the higher the resistance. It takes more time for
the reading to stabilize if the resistance is higher. In addition, the response
time will suffer to a greater degree at temperatures below 25 °C.
Since the resistance of the pH electrode is in the range of 50 – 200
Mohms, the current across the membrane is in the pico Ampere range.
Large currents can disturb the calibration of the electrode for many
hours.
For these reasons high humidity environments, short circuits and static
discharges can be detrimental to a stable pH reading.
The pH electrode’s life also depends on the temperature. If constantly
used at high temperatures, the electrode life is drastically reduced.
TEMPERATURE CORRELATIONTEMPERATURE CORRELATION
TEMPERATURE CORRELATIONTEMPERATURE CORRELATION
TEMPERATURE CORRELATION
FORFOR
FORFOR
FOR pp
pp
pH SENSITIVE GLASSH SENSITIVE GLASS
H SENSITIVE GLASSH SENSITIVE GLASS
H SENSITIVE GLASS
19
PREPARATION PROCEDURE
Remove the electrode protective cap.
DO NOT BE ALARMED IF ANY SALT DEPOSITS ARE PRESENT. This is
normal with electrodes and they will disappear when rinsed with
water.
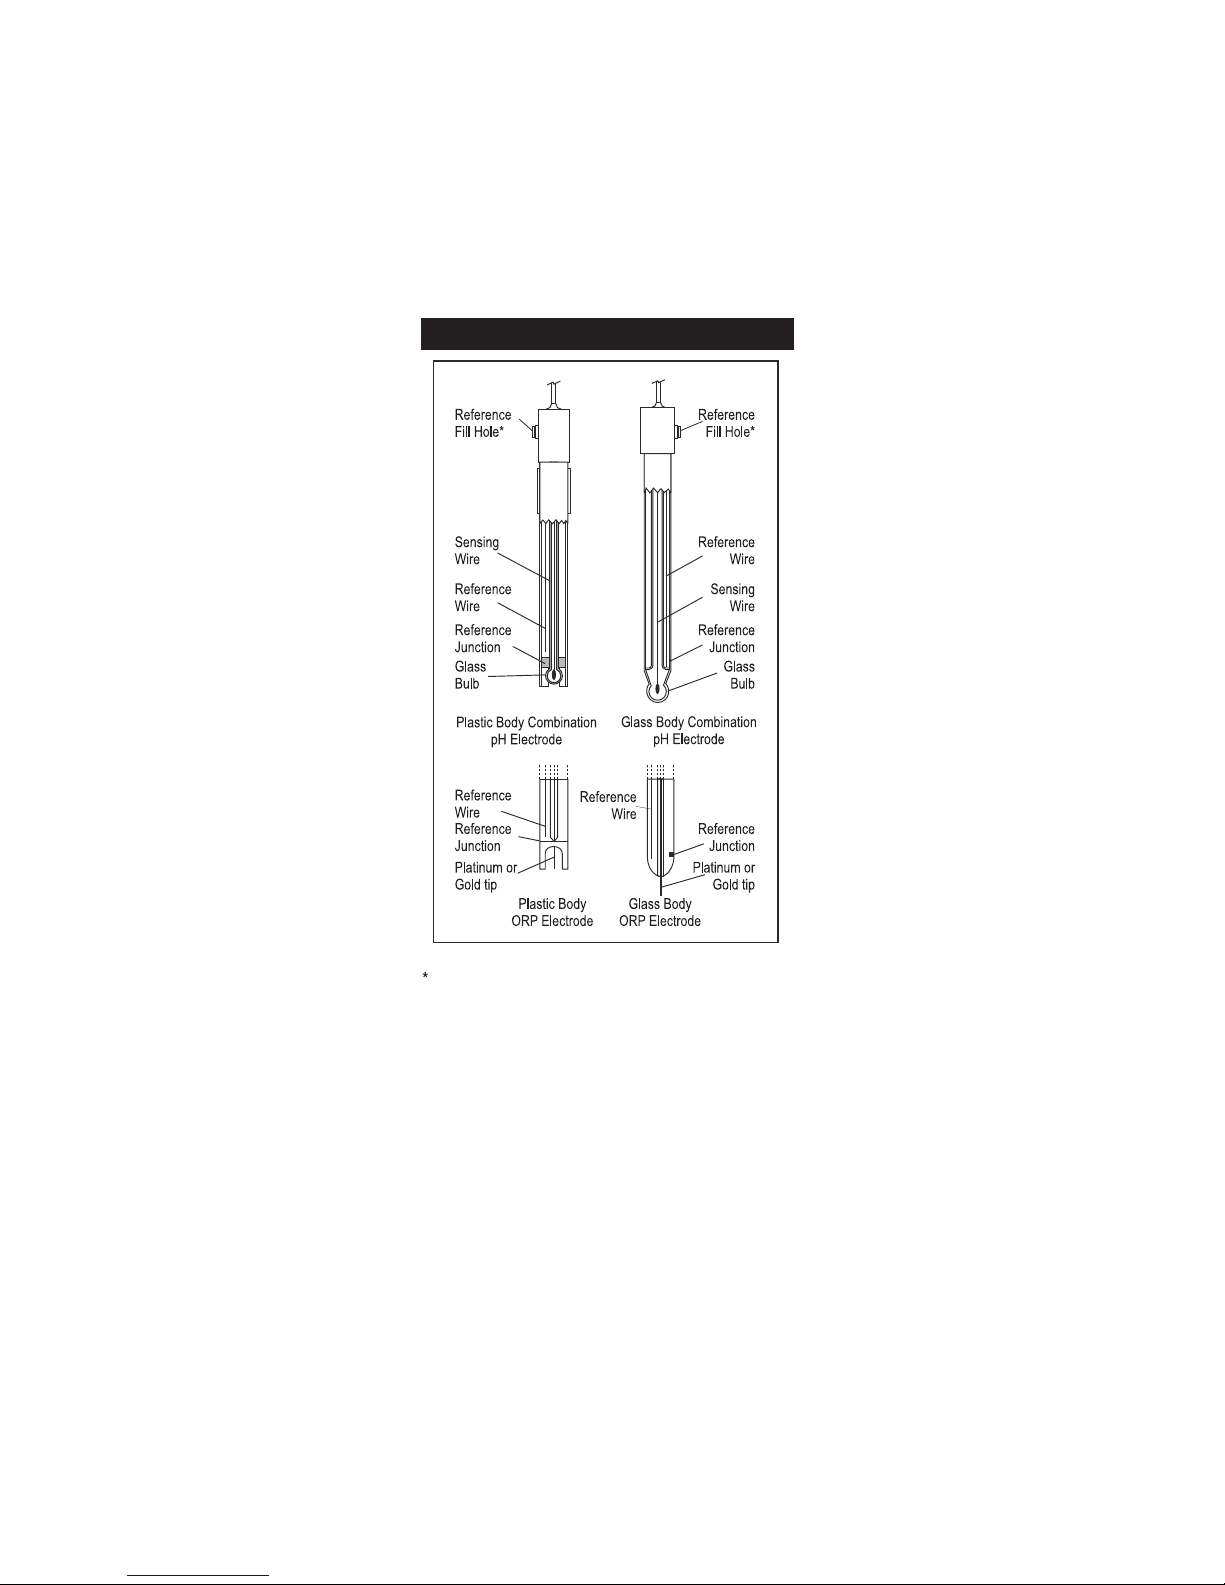
During transport tiny bubbles of air may have formed inside the glass
bulb. The electrode cannot function properly under these conditions.
These bubbles can be removed by "shaking down" the electrode as
you would do with a glass thermometer.
If the bulb and/or junction are dry, soak the electrode in HI 70300
Storage Solution for at least one hour or longer.
Not present in gel electrodes.
EE
EE
ELECTRODE CONDITIONING & MAINTENANCELECTRODE CONDITIONING & MAINTENANCE
LECTRODE CONDITIONING & MAINTENANCELECTRODE CONDITIONING & MAINTENANCE
LECTRODE CONDITIONING & MAINTENANCE

20
For refillable electrodes, if the refill solution (electrolyte) is more than 2½
cm (1”) below the fill hole, add the appropriate Electrolyte Solution.
MEASUREMENT
Rinse the electrode tip with distilled water, submerse it 3 cm (1¼”) in
the sample and stir gently for a few seconds.
For a faster response and to avoid cross contamination of the samples,
rinse the electrode tip with the solution to be tested, before taking
any measurements.
STORAGE PROCEDURE
To minimize clogging and ensure a quick response time, the glass
bulb and the junction should always be kept moist.
When not in use, store it with a few drops of HI 70300 storage
solution in the protective cap.
NEVER STORE THE ELECTRODE IN DISTILLED OR DEIONIZED
WATER.
PERIODIC MAINTENANCE
Inspect electrode and cable. The cable must be intact. No cracks
should be seen on the electrode stem or bulb. If any scratches or
cracks are present, replace the electrode. Rinse off any salt deposits
with water.
Connectors must be perfectly clean and dry.
For refillable electrodes:
Refill the electrode with fresh electrolyte (see the electrode’s specifications
to select the correct refilling solution). Allow the electrode to stand
upright for 1 hour. Follow the Storage Procedure above.
For nonrefillable electrodes:
Do not be concerned if crystals form in the gel. This will not effect pH
electrode response.
CLEANING PROCEDURE
• General Soak in Hanna HI 7061 General Cleaning
Solution for approximately ½ hour.
• Protein Soak in Hanna HI 7073 Protein Cleaning
Solution for 15 min.
• Inorganic Soak in Hanna HI 7074 Inorganic
CleaningSolution for 15 min.
• Oil/grease Rinse with Hanna HI 7077 Oil & Fat Cleaning
Solution for 1 min.
IMPORTANT: After performing any of the cleaning procedures, rinse
the electrode thoroughly with distilled water and soak it in HI 70300
Storage Solution for at least 1 hour before taking measurements.
This manual suits for next models
1
Table of contents
Other Hanna Test Equipment manuals


Popular Test Equipment manuals by other brands

Huazheng Electric Manufacturing
Huazheng Electric Manufacturing HZ-3140A manual

Aeroflex
Aeroflex IFR 4000 Operation manual

CTR Group
CTR Group Proch One Use and maintenance handbook

Fluke
Fluke ScopeMeter 190-104 Technical data

PeakTech
PeakTech 2695 Operation manual

Bibby Sterilin
Bibby Sterilin Techne 140H Operator's manual


