Hansol Hurricane-AW User manual
Hurricane-AW
Manual v1.1
2021
Distributed by :
Hansol Global Corporation
#43-4 Sicheongro , 677beongil Paltan-myeon Hwasung-si Gyeonggi-do S.
Korea
www.colorfirefly.com

Hurricane-AW 1
1. General Safety Information
This General safety information is for the safe and successful using of the device
1. All the persons who are involved in using the device should fully read and understand the manual
prior to using the device.
2. The usage of the device in front of public audiences can have many potential risks, such as severe
personal injuries or property damages. So, it is mostly important to follow all safety rules and
regulations as well as instructions imposed or recommended by relevant parties such as authorities
or manufacturer.
3. Never instruct or order unqualified persons to run the devices in a potentially risky application.
4. This device is intended to provide general flame effect. As with all potentially dangerous special
effects, the operator should be in full view of all the devices at all times during whole events. In
addition, he has to be able to take action in the technical control of the devices at any time if a
potentially dangerous situation happens.
5. Keep off any ignition sources, unqualified persons or children.
6. The necessary fire prevention and first aid measurements should be prepared properly depending
on the size and type of the events.
7. Do not use fuels that are not recommended by the manufacturer.
8. Do not touch the flame head during and just after the usage. It is very hot and you can be injured.
Wait till the flame head is completely cooled down and then touch it
9. Inspect thoroughly and regularly the devices every 6 months for reliability.
10. Do not use damaged equipment. If a damage is found, immediately repair the device or if you can’t
repair, send the device back to the manufacturer for professional repair.
11. Any changes in or to the devices is not allowed. In any case of change to the devices, our warranty
and product liability will be void.
12. Please be sure that the devices are standing securely.
13. Make sure that the device is not covered by anything and that the fuel can be easily exhausted
through the nozzle. Furthermore ensure that combustible objects like papers, confetti or streamers
should not enter the burning chamber of the device.
14. Arm the devices as shortly as possible before the effect and disarm them immediately after the
effect.
15. Cable connections from the control units to the device are always to be insulated and must comply
with the technical standards. At the same time, avoid cable damage from heat, twisting, pinching
and burn-off cinders or forced piercing. All cables must be checked before using.
16. All the relevant persons should meet the relevant safety distances during whole event period.
17. During testing and firing the devices, no persons or animals are allowed in the hazard area.
Furthermore no materials that are heat-sensitive or that can catch fire are allowed in the same.
18. Never bow over the device or put parts of your body above or respectively before the burning
chamber if the device is switched on and always keep at least the safety distance that is required so
that no dangerous situation can happen

Hurricane-AW 2
2. General/Description of Components
2.1 Introduction
Hurricane-AW is moving flame system. Swiveling flame head can produce wide range of magnificent
flame effects and very fast and accurate flame effects with a radius of 180°. Upto 7m flame can be
provided. This device is the all-in-one flame system and it does not need any external propelling media
and fuel reservoir. Fuel reservoir, pumps and accumulator are built in the device. Max. 11 liter of fuel
can be charged into fuel reservoir and the device can shoot 120 shots with 0.5 sec.
Also, the device can be controlled with dmx controller.
2.2 Features
-All-in-one flame system without any external pressure propelling media and fuel reservoir.
- 2 small pressure pumps are built in the device
- Max 11L fuel reservoir and an accumulator are built in the device
- Moving flame head swivels within a radius of 180°
- Flame head is motorized and moveable with pressurized liquid fuel.
- Max. 7m flame can be provided
- Electric spark ignition is adopted
2.3 Package detail
- Hurricane-AW flame device x 1pc
- Power Cord x 1pc
- DMX Cable 5m x 1pc
- User Manual x 1pc
2.4 What should be prepared locally by the operator for using this device
- Fuel (Isopar, Isopropyl alcohol)
※Do not use green & blue color flame fuel and they can break pump.
Only red, gold, orange and purple can be used as fuel for color flame effect.
- DMX Controller

Hurricane-AW 3
2.5. Technical Specification
Power 110-120V, 50/60Hz 220-240V, 50/60Hz
Power Consumption 7A/1100W 3.5A/550W
Working Pressure 16 ~ 18bar 232 ~ 261psi
Flame height Max. 7m Max. 23ft
Ignition Electric spark (2 pins arc installed)
Fuel
Isopar G or H, IPA, our Red, Gold, Orange and Purple color flame fuel
can be used.(Blue and green color flame fuel should not be used. The
pumps will be broken)
Fuel consumption 200ml/sec
Fuel Tank Capacity 11 Liter/3.17gallon (Fuel reservoir is built in the device)
Moving range 0°- 180°
Moving Speed 18ms from 0°to 180°
Propelling Media Pump(2 fuel pumps are built in the device)
Control DMX-512
No of DMX Channel 19 Channels
Pressure Charging Time 10 seconds(10 seconds needed for charging pressure at beginning)
Safety Distance 10 meters from the device in all direction. 10 meters to the ceiling.
Size & Weight 255mm(W)x580mm(L)x415mm(H)
10” x 22.8” x 16.3inch
31Kgs
68LBS
Packing Size & Weight

Hurricane-AW 4
2. 6 Overview of Hurricane-AW
1. Fuel Reservoir cap
2. Pressure Discharge manual valve
3. Handle
4. Ignition & flame jet Box
5. E-stop SW
6. Fuel Level
7. Control Panel
Pressure Discharge manual Valve is for
-Stop or allow the pressurized liquid to flow
into the fuel reservoir from accumulator.
Before the pump working, close this VALVE
to get the working pressure. After the show,
open this VALVE to remove the pressurized
fuel from accumulator, pumps and piping.
-When you get new machine from us, or you
use it again after fully draining, you need to
work only pump for 10 sec to remove air
inside piping, pumps and accumulator at the
open position of this VALVE.
E-Stop SW
- E-stop SW is for cutting power to solenoid
valves and spark igniters.
Hurricane-AW 5
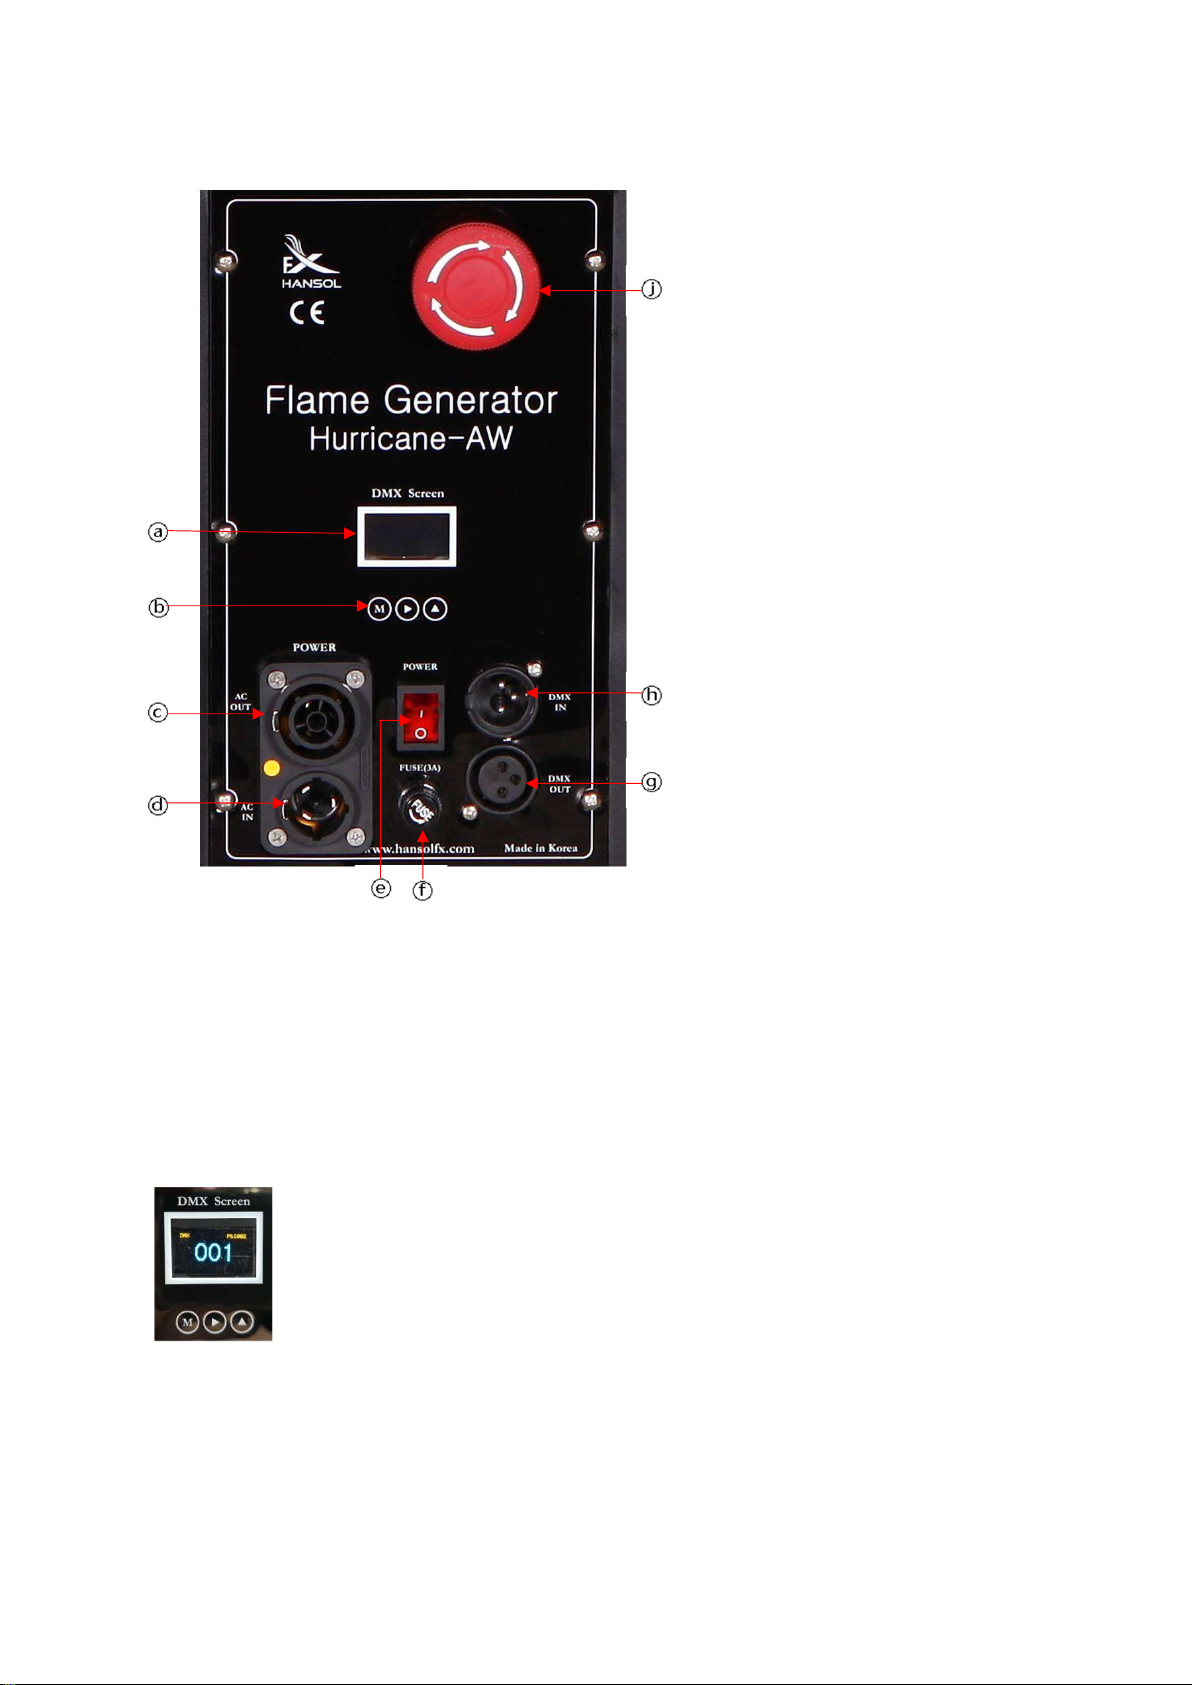
2. 7 Overview of Control Panel
a. DMX Screen : DMX Starting address is
displayed.
b. DMX address setting button
c. Power In
d. Power Out
e. Power Switch
f. Fuse(10ampare fuse)
g. 3 pin DMX Out
h. 3 pin DMX In
i. Emergency Switch
3. Control via DMX 512
3.1. DMX Key Value
The device is controlled by DMX 512. The device has 19 DMX channels. The spark ignition(CH3),
solenoid valve for flame(CH2) and Pump(CH4) work at the range of dmx key 200 ~ 255.
At the range of 0 to 199, the ignition, the solenoid valve and pump do not work.
3. 2. Setting Starting Address
①DMX(Yellow Color) : indicate that all the dmx connection is normal
②001(Blue color) : indicate the Machine’s DMX starting address
③DMX Channel Set Button
M : push 3 seconds for setting “Machine DMX Add.”
▶: change the current mode to the other mode
▲: change the channel address

Hurricane-AW 6
4 . Handling Hurricane AW
4.1 Definition of the audience-side
The control panel side, is the audience-side of the device. This is the side the audience should be seeing during the
show. All Sequences and Positions have been made from this point of view. All important Positions for the device
as well as the movement labels left, middle and right, are only correct, if the device has been placed in this way.
The following graphic shows Hurricane AW from above, and is meant to give you an idea of the labeling.
Left Middle Right
AUDIENCE
4. 2 Definition of Positions
The spectrum of 180°can be used. This spectrum was separated into 9 positions in steps of 22.5°for the control.
These 9 positions were numbered from 1 to 9, and the left end defined as 0°. The following graphic depicts the
single positions as seen from the audience side. When you turn on Hurricane AW, ignition box is located at 90°.
Then, when Hurricane AW gets signal from DMX controller, it moves to the angle of 0°(1) automatically and enter
to standy mode.
No. Angle DMX Key
10°76-95
222.5°96-115
345°116-135
467.5°136-155
590°156-175
6112.5°176-195
7135°196-215
8157.5°216-235
9180°236-255

Hurricane-AW 7
4.3. DMX Channels
Hurricane AW has 19 DMX channels as follows.
CH Function DMX key Definition Remark
1 Angle Channel 0-255 Moving flame head to the angle
2 Flame Channel 200-255 You can shoot flame manually or you can program
your own flame show with this flame channel
differently from single stepp sequences or autoshow.
This flame channel works only after pump and
ignition works. Without pump and ignition working,
this channel does not work.
Below 6bar, flame
channel does not work
below 6 bar.
3 Electric spark 200-255 Electric spark ignition works only after pump starts. Electric spark channel
4 Pump 200-255 Turn on and off the pump(pump stops automatically
at 18bar and below 14bar, re-start to secure enough
working pressure. Initially, Pump needs 10 sec to get
working pressure 16bar then, can start the show
Working pressure : 16-
18bar.
5 Stepp sequence
of single flame
shot
76-255 This single shot sequence is pre-programmed on the
device. Flame shooting time is 20ms(0.2sec)
See the chart 1 for
detail
6 Bank 1 61-255 13 autoshows are pre-programmed. Each program is
selected by DMX key value
See the chart 2 for
detail of the autoshow.
See the chart 3 for
setting loop numbers
and transit time.
7 Loop of Bank 1 0-255 Loop numbers of bank 1
8 Transit time 0-255 Transit time from bank 1 to bank 2
9 Bank 2 61-255 13 auto shows are pre-programmed. Each program
is selected by DMX key value
10 Loop of Bank 2 0-255 Loop numbers of bank 2
11 Transit time 0-255 Transit time from bank 2 to bank 3
12 Bank 3 61-255 13 auto shows are pre-programmed. Each program
is selected by DMX key value
13 Loop of Bank 3 0-255 Loop numbers of bank 3
14 Transit time 0-255 Transit time from bank 3 to bank 4
15 Bank 4 61-255 13 auto shows are pre-programmed. Each program
is selected by DMX key value
16 Loop of Bank 4 0-255 Loop numbers of bank 4
17 Transit time 0-255 Transit time from bank 4 to bank 5
18 Bank 5 61-255 13 auto shows are pre-programmed. Each program
is selected by DMX key value
19 Loop of Bank 5 0-255 Loop numbers of bank 5

Hurricane-AW 8
4.4. channel 1: Angle (Starting address)
Ignition and flame jet box is located at 90 degree position originally. When it receives dmx signal, it moves to
0 degree position. This Channel is for setting shooting angle and each angle is determined by dmx key value.
4.5. Channel 2: Flame – solenoid valve (Starting address +1)
This flame channel is for making your own sequences or manual flame shooting. Under the condition of pump
and electric spark working, the flame channel works. Under that condition, when you turn on this channel, you
can shoot a single flame as you wish in shooting time and shooting angle. If you do not want to use pre-
programmed sequences, you can make your own sequences with this flame channel.
This channel is locked for 10 seconds for safety reason whenever the device is power on.
4.5. Channel 3: Electric Spark (Starting address +2)
The third channel (starting address +2) activates the electric spark with dmx values 200 and 255. Only after
pump starts, it can work. Without pump start, this electric spark channel does not work.
4.6. Channel 4: Pump (Starting address +3)
Hurricane AW has 2 pumps inside the device. After pump pressurizes fuel upto 18bar, it goes into the standby
mode(stop working) and when the pressure falls below 14 bar, it works again to get 18 bar.
4.7. Channel 5(Starting address + 4): Program of Stepp Sequence of single flame shot
Hurricane AW has a number of pre-made sequences, allowing you to access certain sequences with 5th channel
Below, you can find a single flame shot(20ms, 0.2sec.) at each angle of dmx key value.
Chart 1 : CH5 single stepp sequence with dmx key value
(O means shooting flame for 20ms)
CH DMX key 0°22.5°45°67.5°90°112.5°135°157.5°180°
CH 5 0-75 x x x x x x x x x
76-95 O
96-115 O
116-135 O
136-155 O
156-175 O
176-195 O
196-215 O
216-235 O
236-255 O

Hurricane-AW 9
DMX
key
0°22.5°45°67.5°90°112.5°135°157.5°180°
Stepp sequences
0-45
61-75 (L → R) 1 2 3 4 5 6 7 8 9
(L ← R) 16 15 14 13 12 11 10
76-90 (L ← R) 9 8 7 6 5 4 3 2 1
(L → R) 10 11 12 13 14 15 16
91-105 (L → R) 1 2 3 4 5
(L ← R) 8 7 6
106-120 (L ← R) 5 4 3 2 1
(L → R) 6 7 8
121-135 Random 5 3 1 4 2
Stepp + wave sequences
136-150 1 2 3 4 5(wave from 90°to 180°)
151-165 5(wave from 0°to 90°)4 3 2 1
166-180 1 2 3 4(wave)
181-195 4(wave) 3 2 1
196-210 1 2
211-225 1 2
Wave sequences
226-240 (L → R) wave from 0°to 180°
241-255 (L ← R) wave from 180°to 0°
4.8. Channel 6, 9, 12, 16, 18 : Bank channel
At these bank channels, the following sequences of autoshow have been pre-programmed.
Chart 2 : Autoshow Sequence with DMX key value at bank channels
(numbers 1, 2, 3, 4 ….. means order of shooting)

10
4.9. Channel 7, 10, 13, 16, 19 : Loop channel
This channel is to determine how many times each autoshow sequence loops.
4. 10. Channel 8, 11, 14, 17 : Transit Time channel
This channel is to determine the transit time from one bank to another bank
4.11. Autoshow Sequence List (DMX Key 0-45 is not used)
DMX key 0°22.5°45°67.5°90°112.5°135°157.5°180°
Stepp sequences
61-75 (L → R) 1 2 3 4 5 6 7 8 9
(L ← R) 16 15 14 13 12 11 10
76-90 (L ← R) 9 8 7 6 5 4 3 2 1
(L → R) 10 11 12 13 14 15 16
91-105 (L → R) 1 2 3 4 5
(L ← R) 8 7 6
106-120 (L ← R) 5 4 3 2 1
(L → R) 6 7 8
121-135 Random 5 3 1 4 2
Stepp + wave sequences
136-150 1 2 3 4 5(wave from 90°to 180°)
151-165 5(wave from 0°to 90°)4 3 2 1
166-180 1 2 3 4(wave)
181-195 4(wave) 3 2 1
196-210 1 2
211-225 1 2
Wave sequences
226-240 (L → R) wave from 0°to 180°
241-255 (L ← R) wave from 180°to 0°
DMX Key 0-9 10
-
19
20
-
29
30
-
39
40
-
49
50
-
59
60
-
69
70
-
79
80
-
89
90
-
99
100
-
109
… … 240
-
249
250
-
255
Loop 1 2 3 4 5 6 7 8 9 10 11 … … 25 26
DMX Key 0-9 10
-
19
20
-
29
30
-
39
40
-
49
50
-
59
60
-
69
70
-
79
80
-
89
90
-
99
100
-
109
110
-
119
… 240-249
Loop
(ms) 0
-
9ms
10
-
19
20
-
29
30
-
39
40
-
49
50
-
59
60
-
69
70
-
79
80
-
89
90
-
99
1
-
9sec
10
-
19sec
… 140-149sec
Hurricane-AW

Hurricane-AW 11
5. Set up
1. Check the drain bolt is tightly screwed at the bottom of fuel reservoir and then charge fuel to fuel
reservoir, checking fuel level gauge at the side of fuel reservoir.
2. Check the pressure discharge manual valve is closed. Before pump starting, this manual value should
be closed. If not, the device cannot get working pressure.
3. Connect power cable and dmx signal cable and turn on the power.
4. Turn on pump channel to check.
5. Turn on electric spark channel. It is recommended that spark is activated 1 sec before a chain of flame
shooting and deactivated 1 sec after a chain of flame shooting.
6. The device is ready to start the show. For manual flame shooting, turn on flame shooting channel(CH2)
and for changing shooting angle, use Channel 1 simultaneously. For auto show, use CH5 or Bank
channels.
7. After the show, deactivate all the dmx channels to 0 and turn off the power. Then, open the pressure
discharge manual valve for remove the pressure inside the pump and pipings.
Caution
-Check if there is any fuel leakage from fuel reservoir. At the bottom of the device, there is a fuel drain
bolt. Check if any fuel leaks from this drain bolt. This drain bolt is for cleaning fuel reservoir
periodically.
-After fuel charging, the cap of fuel reservoir should be tightly closed. If not, the fuel can be leaked
around cap when pressure purge is made.
-In case of wireless mode, always check wireless DMX group in order to avoid any overlap from other
wireless dmx machines or controllers.
6. Safety
Hurricane AW has some safety functions
-The device has double solenoid valves.
-Without pump working, electrical spark ignition is not made.
-Without electric spark ignition, solenoid valve does not work, then flame cannot be shot.
-The fuel level sensor is installed. Pump does not work in case that the fuel is below the determined low
level.
-Below 6 bar, the solenoid valve for flame does not work. The solenoid valve activates only between 6
and 18 bar.
-When the pressure reached to 18bar stops working and enter to the standby mode. When the pressure
falls below 14 bar, it works again.

Hurricane-AW 12
7. Maintenance
Cleaning
After using, please clean the device with wet towels. Please be sure that the power is switched off when
you clean it and all dmx and power cables are plugged out.
Do not use solvents or abrasives for cleaning. Just wet towel is enough for cleaning.
Keep all power sockets or contacts always clean and dry.
Especially, lots of carbon remnant or soot can be accumulated on the electric spark pins.
Clean them with soft-brush. Do not bend spark pins or change the gap between arc pins.
Leaking Test
Before using, always check any leaking from the device.
A regular leaking test must be made every six months at 18 bar longer than 20 minutes.
Filter
The filter is built in the device to prevent foreign objects or dusts from being jammed in the fuel line
from fuel reservoir to pump and solenoid valve. If some dusts or foreign objects are jammed in this filter,
the filter needs to be cleaned. If not, the flame height will be seriously lowered. In this case, please
refer to How to clean the filter of our repair service manual which is provided separately.
Damages caused by misusage and maloperation, etc
The devices have been designed to generate flame effects. Discuss all other applications with the
manufacturer before usage. In the case that one of the events stated above has happened we are only
liable if the defect was within our range of influence.
Especially the user's work must comply with the safety regulations and the instructions given in this
manual at all times.
High Voltage
For the electrical ignition of the fuel very high voltages that can be dangerous to life are generated in the
device. Never operate the device if the cap of fuel reservoir is not tightly closed. Furthermore never
touch anything inside the device and never touch the ignition electrodes while the device is switched on.
Warranty
The warranty period is 12 months.
If there is any defect during in this period please pack the device properly and send it to the
manufacturer with carriage paid to have it repaired free of charge. Please do not forget to attach a
description of the symptoms, which have occurred. Warranty is excluded if the device was damaged due
to wrong usage or excessive stress.
Table of contents
Other Hansol Camera Accessories manuals

Popular Camera Accessories manuals by other brands


Trojan
Trojan GC2 48V quick start guide

Calumet
Calumet 7100 Series CK7114 operating instructions

Ropox
Ropox 4Single Series User manual and installation instructions

Cambo
Cambo Wide DS Digital Series Main operating instructions

Samsung
Samsung SHG-120 Specification sheet

Ryobi
Ryobi BPL-1820 Owner's operating manual