Harbor Freight Tools 55477 User manual

3” ReflectorTelescope
ASSEMBLY AND OPERATING INSTRUCTIONS
3491 Mission Oaks Blvd., Camarillo, CA 93011
Visit our Web site at http://www.harborfreight.com
Copyright © 2007 by Harbor Freight Tools®. All rights reserved. No portion of this
manual or any artwork contained herein may be reproduced in any shape or form
without the express written consent of Harbor Freight Tools.
For technical questions and replacement parts, please call 1-800-444-3353
55477
Because of continuing improvements, actual product may differ slightly from photo.
To prevent serious injury, read and understand all warnings and instructions before use.

SKU 55477
For technical questions please call 1-800-444-3353
Page 2
Save This Manual
You will need the manual for the safety warnings and precautions, assembly
instructions, operating and maintenance procedures, parts list and diagram. Keep
your invoice with this manual. Write the invoice number on the inside of the front
cover. Keep the manual and invoice in a safe and dry place for future reference.
Safety Warnings and Precautions
WARNING:When using this device, basic safety precautions should always be
followed to reduce the risk of personal injury and damage to equipment.
Read all instructions before using this instrument!
1. WARNING! Do not look at the Sun or other strong light sources through
this instrument unless the Sun Lens is installed. Injury to eyes, even
blindness may result. Do not use this instrument to look at a Solar eclipse
unless the Sun Lens is installed.
2. Observe work area conditions. Do not use tools or instruments in damp or
wet locations. Do not expose to rain.
3. Children should be supervised by an adult when using.
4. Store idle equipment.When not in use, tools and instruments must be
stored in a dry location to inhibit rust. They should be put away properly to
prevent loss of small parts or damage.
5. Maintain instrument with care. Keep instrument maintained and clean for
better and safer performance.The various parts must be kept clean, dry, and
free from oil and grease at all times. When cleaning lenses use only clean
lens paper and an approved lens cleaner.
6. Stay alert. Watch what you are doing and use common sense. Do not walk or
run with the instrument held to your eye. Do not look at bright lights or the sun
through the instrument without the sun filter.
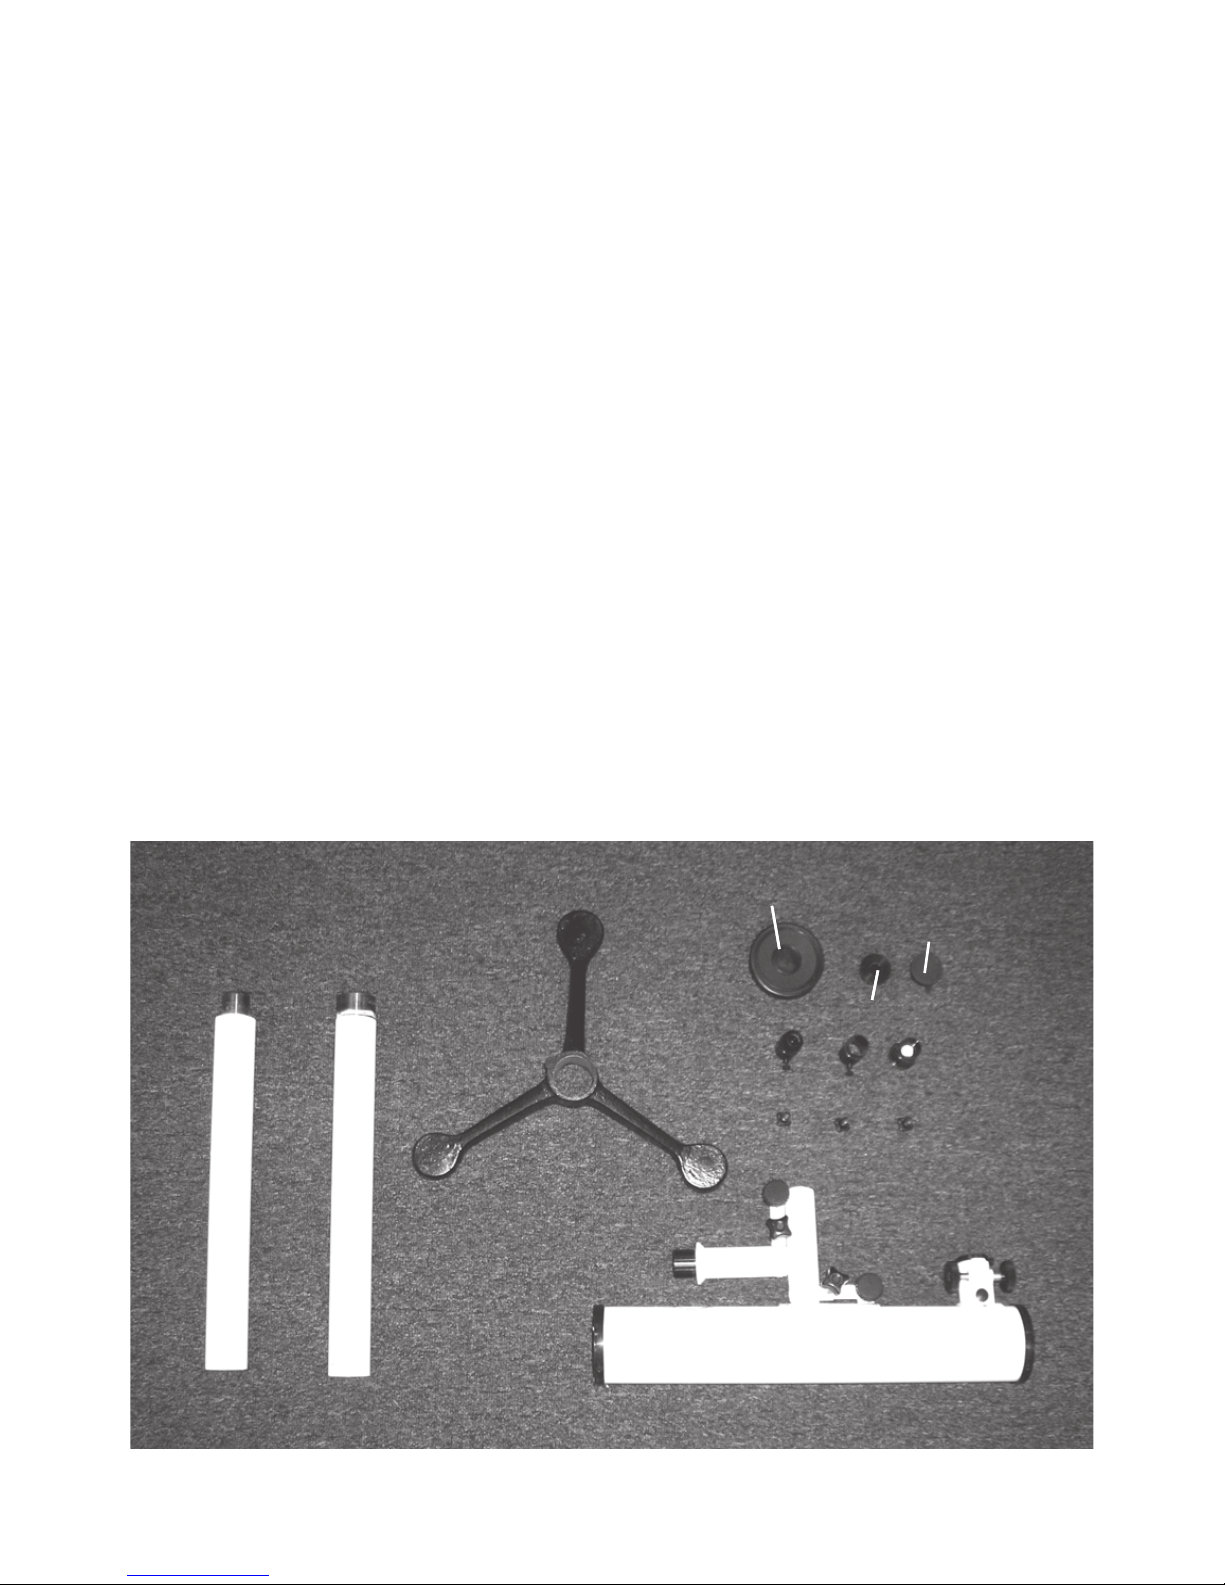
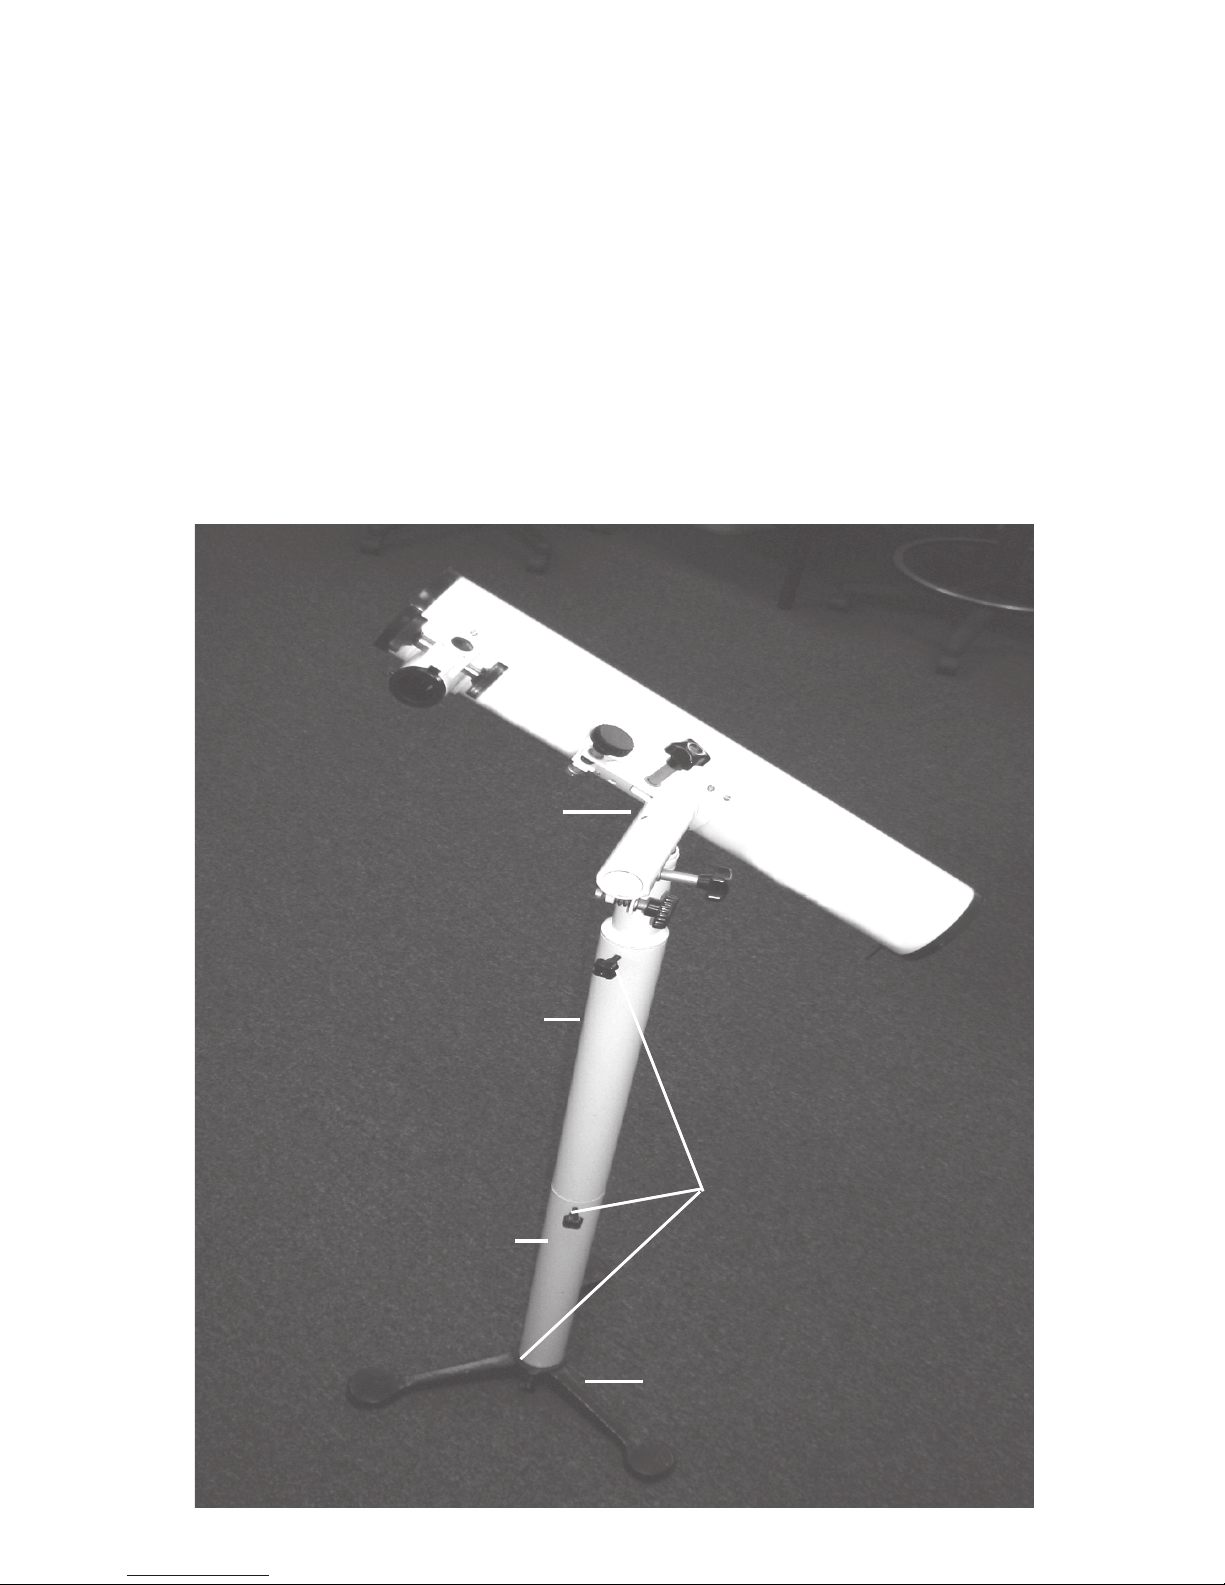
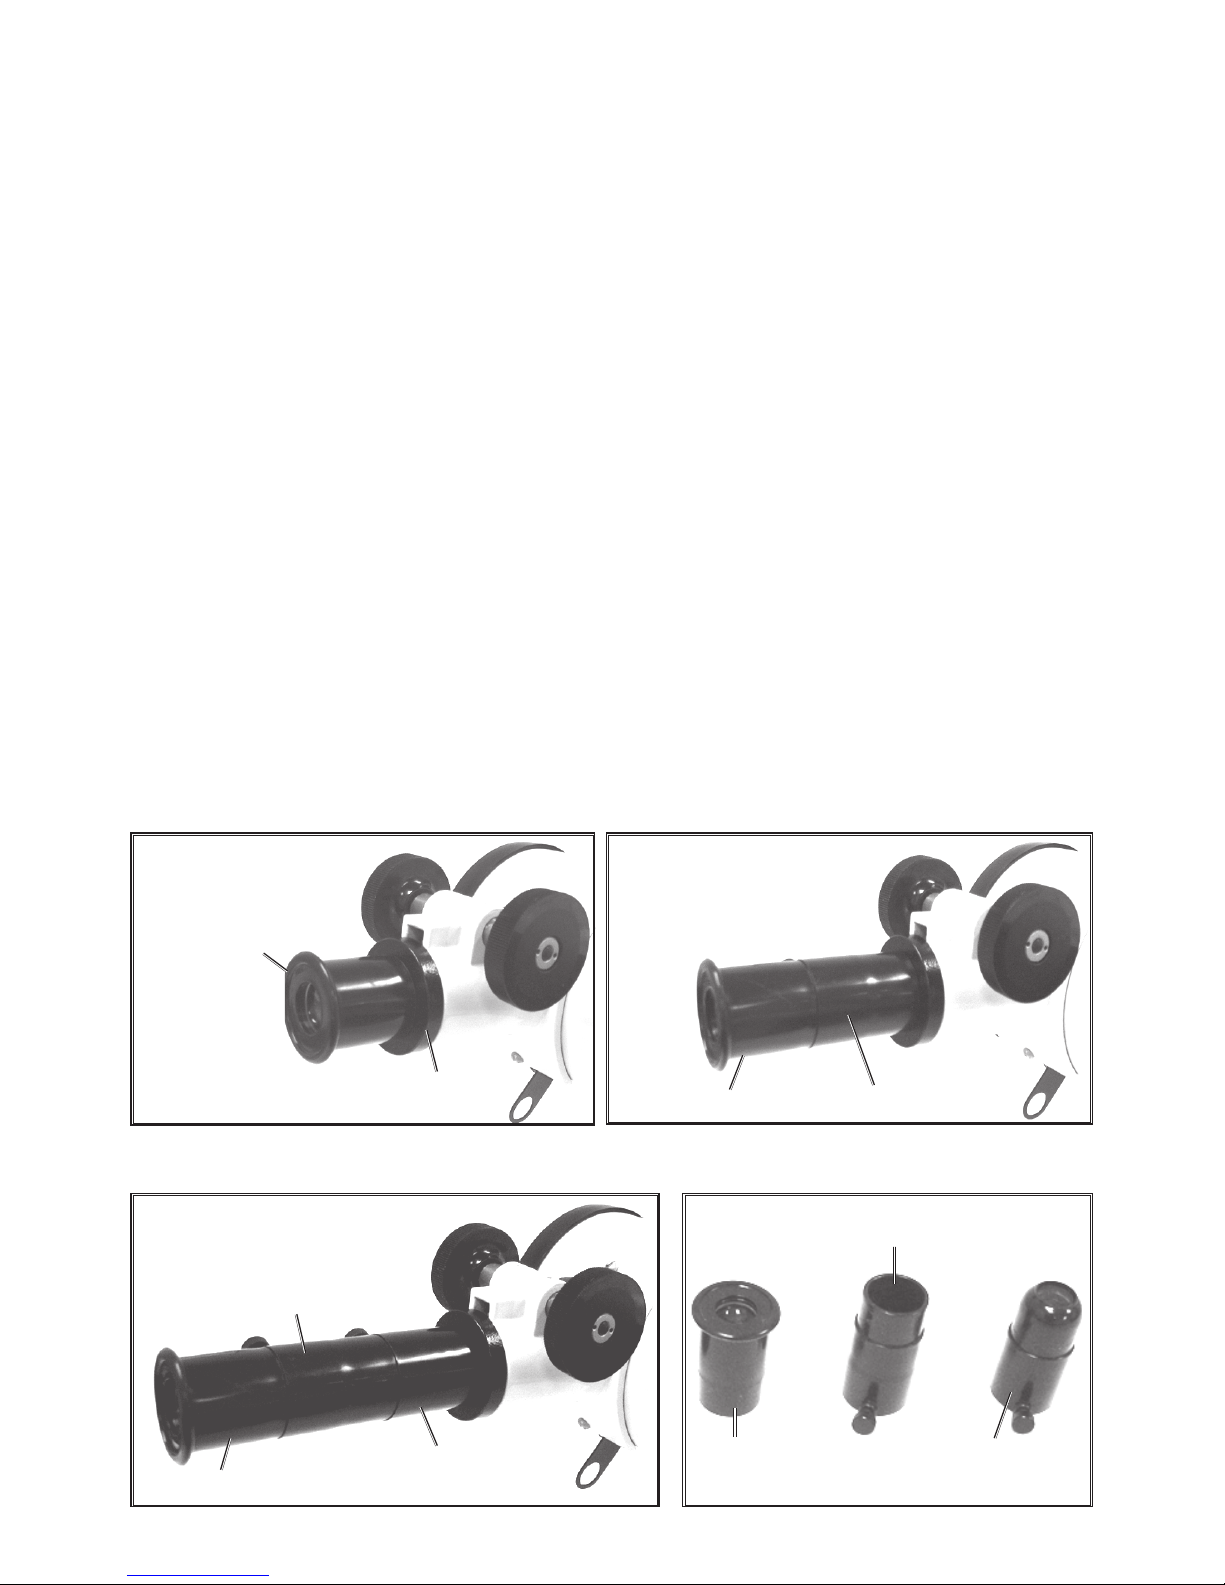
noitcurtsnoC citsalpdedlomdnamunimulAtsaC
.sesnelssalghtiw epyTlacitpOepyTrotcelfeR.aiD"3
noitacifingaMx031
,x06,x03snoisnemiDesaBdaerpSesaB"41ebuTleetS"8/7-1
ylbmessAdnatSeceip3tnuoMepocStahgiH"93tnemtsujdAsucoFepy
TnoiniPdnakcaR
snoisnemiDepocSretemaiD"¼-3xL"½-81thgieWteN.SBL56.22
Specifications

SKU 55477
For technical questions please call 1-800-444-3353
Page 3
WARNING: The warnings, cautions, and instructions discussed in this instruc-
tion manual cannot cover all possible conditions and situations that may oc-
cur. It must be understood by the operator that common sense and caution are
factors which cannot be built into this product, but must be supplied by the
operator.
WARNING: Do not look directly into the sun or any other strong light source
through this telescope unless you have the Sun Filter attached to the eyepiece.
Serious eye injury may result.
Unpacking
When unpacking, check to make sure that all parts shown below are included, and
that the product is intact and undamaged. If any parts are missing or broken,
please call Harbor Freight Tools at the number on the cover of this manual.
Component Parts of your Telescope
Telescope Assembly
Tripod Base
Tripod Supports
Large Lens Cover
Locking Knobs
Telescope Assembly
Eyepieces
Small Lens Cover
Sun Lens
7. Check for damaged parts. Before using any tool or instrument, any part that
appears damaged should be carefully checked to determine that it will operate
properly and perform its intended function. Check for alignment and binding of
moving parts; any broken parts or mounting fixtures; and any other condition
that may affect proper operation. Any part that is damaged should be properly
repaired or replaced by a qualified technician.

SKU 55477
For technical questions please call 1-800-444-3353
Page 4
Assembling your Telescope
Locking Knobs (10)
Tripod Base (8)
UpperTripod Support (7B)
Figure 1
Lower Tripod Support (7A)
Telescope Assembly (3)
1. Assemble the Telescope, by first attaching the Lower Tripod Support (7A) to
the Tripod Base (8). Use one of the Locking Knobs (10) to secure them
together. See Figure 1 below.
2. Next attach of the Upper Tripod Support (7B) to the Lower Tripod Support (7A).
Use one of the Locking Knobs (10) to secure them together. See Figure 1.
3. To complete the assembly, attach the Telescope Assembly (3) to the Upper
Tripod Support (7B). Use one of the Locking Knobs (10) to secure them
together. See Figure 1 below.
Figure 1
NOTE: Before you can see through the telescope you will need to attach at least
one of the eye pieces. The next section will address this topic.

SKU 55477
For technical questions please call 1-800-444-3353
Page 5
NOTE: See figures 2- 5 below to help identify the parts mentioned in this section.
1. Your telescope is provided with a 30x Eyepiece (13). Insert the 30x Eyepiece
into Eyepiece Mount (4). Secure them by tightening the small screw attached
to the lens.With this configuration, your telescope will provide a view 30
times larger than the unaided eye.This is useful for terrestrial viewing, such
as wildlife and scenery. See Figure 2.
3. Insert the Barlow Lens (14) into the Eyepiece Mount (4), then attach the 30x
Eyepiece to the Barlow Lens. Secure them by tightening the small screw
attached to the lens.This configuration will give you a magnification of 60x.
This is useful for most observations including the moon and planets. See
Figure 3.
4. An Eyepiece Sleeve (15) is also included. The Eyepiece Sleeve will increase
the focal length, thereby increasing magnification.See Figure 5 below.
5. Insert the Eyepiece Sleeve (15) into the Eyepiece Mount (4), insert the
Barlow lens, then attach the 30x Eyepiece.The effective magnification of your
telescope is now 130x.This is useful for most celestial observation. See
Figure 4.
30x eyepiece (13) Barlow Lens (14)
30x Configuration 60x Conflagration
130x Configuration
30x eyepiece (13)
30x eyepiece (13) Barlow Lens (14)
Eyepiece Sleeve (15)
Figure 2 Figure 3
Figure 4
30x eyepiece (13)
Barlow Lens (14)
Eyepiece Sleeve
Figure 5
Eyepiece Mount (4)
Using the Eyepieces to Adjust Magnification

SKU 55477
For technical questions please call 1-800-444-3353
Page 6
CAUTION: Do not look through the telescope at the sun or any other bright object
unless you have the Sun Filter attached to the eyepiece.
1. The tripod should be placed on a solid, level platform. For best results, the
platform should not move or transmit vibrations.
2. Point the open end of the telescope (near the Upper Sight #5) in the general
direction of the object to be viewed. Look through the Lower and Upper Sights
(2,5) to point the telescope in the desired direction.
3. Use the Horizontal and Vertical Adjusters (9 and 11) to accurately align the
telescope with the target. Fix the adjustment by tightening the Lock Screws
(10). Remove the Lens Cover (12) from the telescope.
4. Look through the lens and focus by turning the Focusing Wheels (6). See
Figure 6 below.
Operating your Telescope
Lower Sight (2)
Upper Sight (5)
Horizontal Adjuster (9)
Vertical Adjuster (11)
Focusing Wheels (6)
Lock Screws (10)
NOTE: Before using your telescope, it is important to let it acclimate to the conditions
of use. If used outdoors, let the telescope adjust to the ambient temperature for at
least 15 minutes before use.
Figure 6
NOTE: The image viewed in this telescope will be inverted. This is a result of the
position and orientation of the lenses. All Newton reflector type telescopes produce
an inverted image.
Lens

SKU 55477
For technical questions please call 1-800-444-3353
Page 7
About Your Telescope
This is a Newton type Reflector Telescope. This design was invented in the
early 1660’s by James Gregory, a Scottish mathematician. It was further
developed by Isaac Newton, and was used in the development of Newton’s
book Optics which was published in 1704. Because of Newton’s stature in the
history of science, and the importance of his book, this telescope design is
now referred to as a Newton type reflector.
Earlier telescopes, such as the one used by Galileo simply consisted of glass
lenses mounted in a tube. Gallein telescopes have a tendency to separate
light into spectral components (rainbow-like colors) which make observations
difficult.
By using a mirror reflector in the light path the spectrum separation is reduced
and more precise observations can be made with a Newton-type reflector
telescope. Please see the diagram below.
Selecting a viewing location
For best viewing, find a location away from air pollutants, mist and fog
which has little light in the area.
5. When done viewing, remove the Eyepiece, Barlow Lens and Sleeve, and put
them in a safe place. Replace the Lens Cover (12) on the telescope. Detach
the telescope from the tripod and store in a safe place.
NOTE: If viewing for a long time or viewing objects very far away, you will
have to periodically readjust the direction of the telescope.This is because of
the rotation of the Earth on its axis.

SKU 55477
For technical questions please call 1-800-444-3353
Page 8
Adjusting the Primary Mirror
1. Occasionally the Primary Mirror must be adjusted. Remove the Barlow Lens
30x Eyepiece, and the Eyepiece Sleave. Look into the Telescope through the
Eyepiec Mount at the Primary Mirror.
2. The reflection of the Diagonal Mirror and its support will be seen in the
Primary Mirror.The reflected image must be centered in the Primary Mirror as
shown in Figure 7 below.
3. To adjust the Primary Mirror, turn the three adjustment screws located in the
back of the telescope.While looking through the opening of the Eyepiece
Mount to verify that the reflection is centered in the mirror. Only slight
adjustment should be required. See Figure 7 below.
View FromThe Back
Maintenance
1. If the mirrors or lenses need cleaning, use a soft brush or tissue and optical
cleaner available at camera equipment suppliers. Clean carefully to avoid
hazing or scratches.
2. Keep the lens covers in place when not using the telescope.
3. Always store the telescope in a safe place to protect it from damage,
moisture and extreme temperatures.
View looking IntoTube
Adjusting Screws
NOTE: All screws in the telescope are fixed in place with a soft adhesive. If
necessary, use a drop of alcohol to dissolve the adhesive.
Figure 7
Telescope Tube

SKU 55477
For technical questions please call 1-800-444-3353
Page 9
Assembly Diagram and Parts List
PLEASE READ THE FOLLOWING CAREFULLY
THE MANUFACTURER AND/OR DISTRIBUTOR HAS PROVIDED THE PARTS DIAGRAM IN THIS MANUAL AS A REFERENCE
TOOL ONLY. NEITHER THE MANUFACTURER NOR DISTRIBUTOR MAKES ANY REPRESENTATION OR WARRANTY OF ANY
KIND TO THE BUYER THAT HE OR SHE IS QUALIFIED TO MAKE ANY REPAIRS TO THE PRODUCT OR THAT HE OR SHE IS
QUALIFIED TO REPLACE ANY PARTS OF THE PRODUCT. IN FACT, THE MANUFACTURER AND/OR DISTRIBUTOR
EXPRESSLY STATES THAT ALL REPAIRS AND PARTS REPLACEMENTS SHOULD BE UNDERTAKEN BY CERTIFIED AND
LICENSED TECHNICIANS AND NOT BY THE BUYER. THE BUYER ASSUMES ALL RISK AND LIABILITY ARISING OUT OF HIS OR
HER REPAIRS TO THE ORIGINAL PRODUCT OR REPLACEMENT PARTS THERETO, OR ARISING OUT OF HIS OR HER
INSTALLATION OF REPLACEMENT PARTS THERETO.
#traPnoitpircseD.YTQ#traPnoitpircseD.YTQ
1ebuTepocseleT19retsujdAlatnoziroH2
2thgiSrewoL101sbonKkcoL3
3ylbmessAepocseleT11
1retsujdAlacitreV1
4tnuoMeceipeyE121revoCsneL3
5thgiSreppU131eceipeyEx031
6sleehWgnisucoF141sneLwolraB1
A7troppuSdopirTrewo
L151eveelSeceipeyE1
B7troppuSdopirTreppU161sneLnuS1
8esaBdopirT1
NOTE: NO REPLACEMENT PARTS ARE AVAILABLE.
16
13 15 14
7A
7B
Table of contents
Other Harbor Freight Tools Telescope manuals