Hardt INFERNO 3500 User manual
Hardt Equipment Manufacturing Inc.
1400 - 50
th
Avenue, Lachine
Quebec, Canada, H8T 2V3
Technical Support
Tel: (800) 387-6847
(514) 631-7271
Fax: (514) 631-5443
Sales
Tel: (888) 848-4408
www.hardtequipment.com
HARDT
Responsive, Reliable Solutions
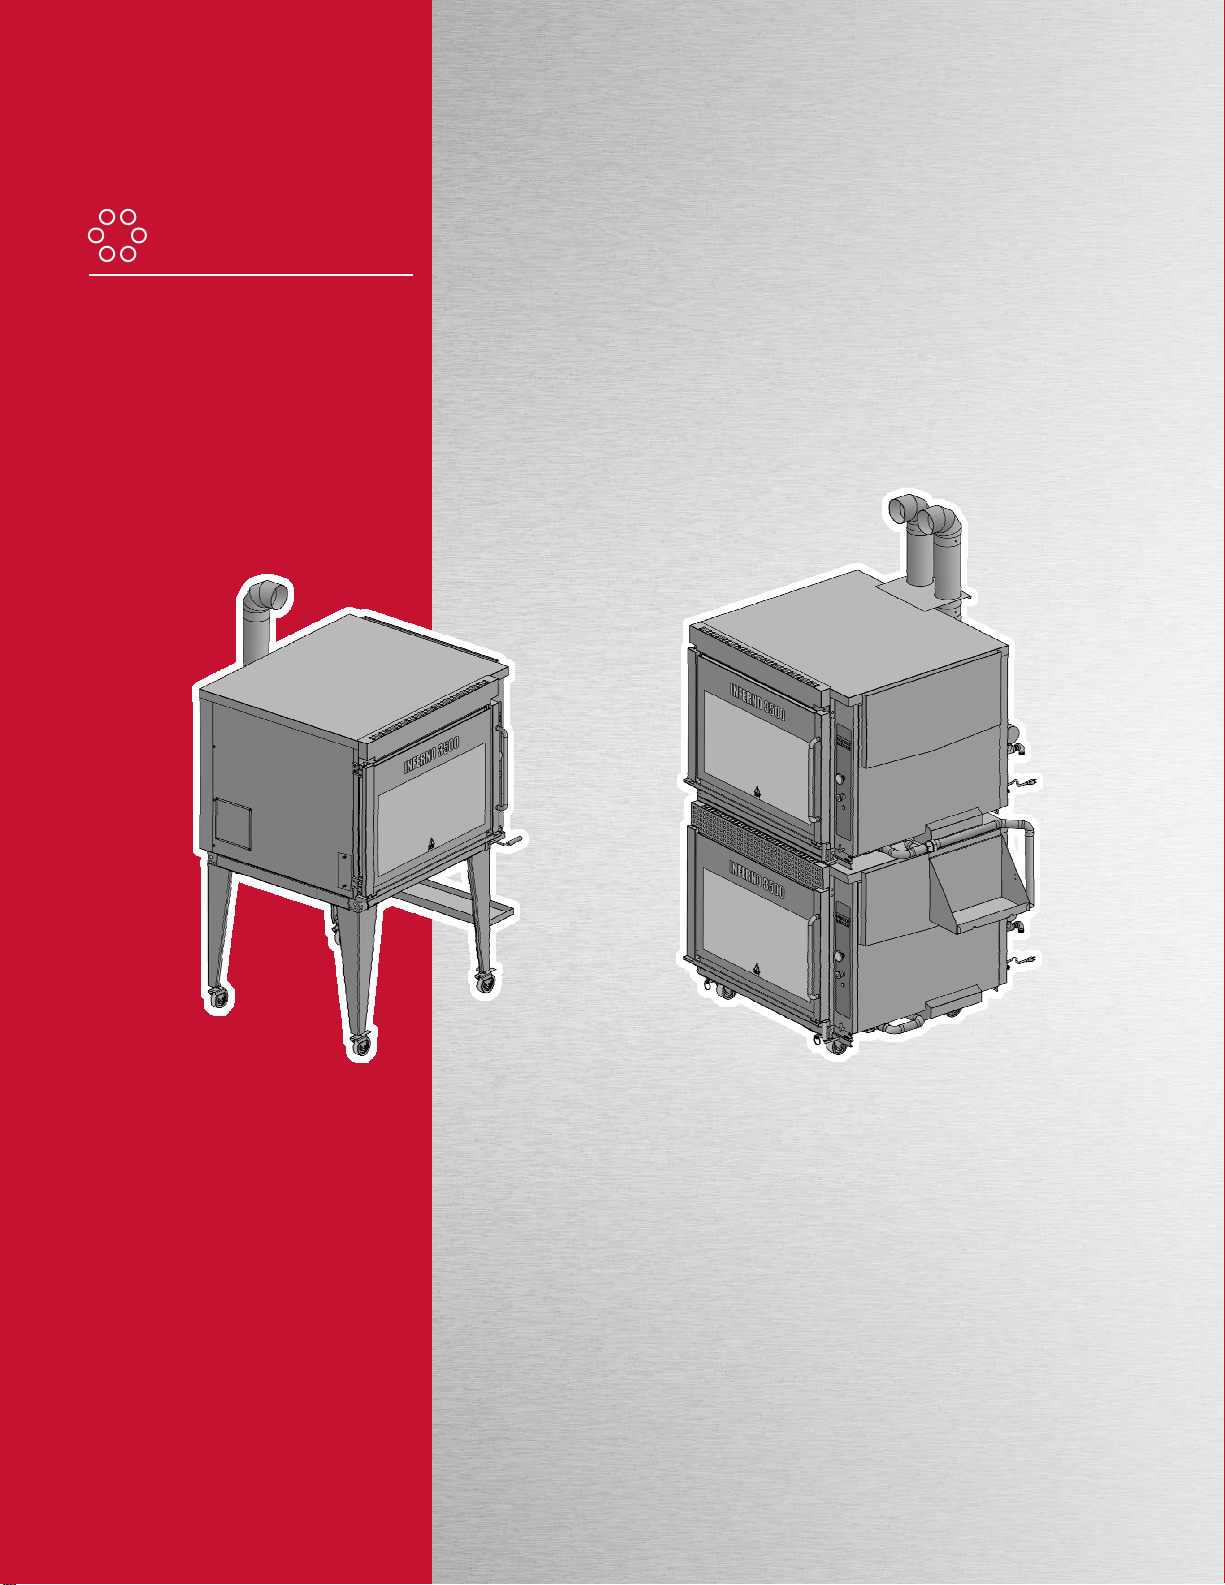
INFERNO 3500
GAS-FIRED, SELF-
CLEANING ROTISSERIE
Operation Manual
This manual is to be left with the customer for future reference.
CUS
-
013
-
0027
-
0
2

Page 2 of 18
CUS-013-0027-02
1.Important Information
The terms Hardt®, Food Systems Resource®, Inferno®, Elemendt®, and the symbol depicting six circles, and other
distinctive terms, are registered and unregistered trademarks of Hardt Equipment Manufacturing, Inc. and associated
companies. Covered by U.S. Patent no. 7,060,942; U.S. Patent 6,127,659; and U.S. Patent 7,241,977. Other patents
pending. © 2011 - 2016 Hardt Equipment Manufacturing, Inc. All rights reserved.
WARNING
Improper installation, adjustment,
alteration, service or maintenance can
cause property damage, injury or death.
Read the installation, operating and
maintenance instructions thoroughly before
installing or servicing this equipment.
WARNING
Do not store or use gasoline or other
flammable vapors or liquids in the vicinity
of this or any other appliance.
Keep the area surrounding the rotisserie
free of any combustible material.
IMPORTANT
You must post in a prominent location,
instructions to be followed in the event the
user smells gas. Specific instructions can
be obtained from your local gas supplier.

Page 3 of 18
CUS-013-0027-0
2
2.Table of Contents
1. Important Information..................................................................................................................... 2
2. Table of Contents............................................................................................................................ 3
3. Safety............................................................................................................................................... 4
3.1 About this Manual...................................................................................................................................................4
3.2 Equipment Safety...................................................................................................................................................4
3.3 What to do if a Service Issue Occurs......................................................................................................................4
3.4 Food Safety............................................................................................................................................................5
4. Equipment Diagrams...................................................................................................................... 6
4.1 Single Standard Rotisserie.....................................................................................................................................6
4.2 Single Top Vent Rotisserie.....................................................................................................................................7
4.3 Double Deck Rotisserie..........................................................................................................................................8
4.4 Control Panel Layout..............................................................................................................................................9
5. Operation....................................................................................................................................... 10
5.1 Morning Startup....................................................................................................................................................10
5.1.1 Starting the Rotisserie..............................................................................................................................10
5.2 Cooking Procedure...............................................................................................................................................11
5.3 Loading & Unloading the Rotisserie......................................................................................................................12
5.3.1 Loading the Skewers ...............................................................................................................................12
5.3.2 Unloading the Skewers............................................................................................................................12
5.4 Controller Functions.............................................................................................................................................13
5.4.1 Buzzers and Alarms.................................................................................................................................13
5.4.2 Programming...........................................................................................................................................13
5.4.3 Programming Favorites............................................................................................................................13
6. Maintenance.................................................................................................................................. 14
6.1 Daily Cleaning......................................................................................................................................................14
6.1.1 During the Day.........................................................................................................................................14
6.1.2 At the End of the Day...............................................................................................................................14
6.1.3 Description of Operation..........................................................................................................................14
6.1.4 AutoClean Operation...............................................................................................................................14
6.1.5 AutoClean effectiveness evaluation..........................................................................................................15
6.2 Weekly Inspection................................................................................................................................................15
7. Troubleshooting............................................................................................................................ 16
7.1 Rotisserie does not Operate.................................................................................................................................16
7.2 Safety Lockout.....................................................................................................................................................16
7.3 Replacing the Halogen Lamp................................................................................................................................17
8. Available Accessories.................................................................................................................. 18

Page 4 of 18
CUS-013-0027-02
3.Safety
3.1 About this Manual
This manual contains information necessary for the operation of the HARDT Inferno 3500 rotisserie. Retain this manual
for future reference. To help the reader in the utilization of this manual certain information has been highlighted using the
following conventions:
INFORMATION
THAT
REFERS TO ACTIONS WH
ICH MAY HAVE CONSEQU
ENCES
POTENTIALLY DANGEROUS TO OPERATOR AND/OR THE ROTISSERIE
Information for proper installation and functioning.
3.2 Equipment Safety
THERE ARE SOME SAFET
Y CONSIDERATIONS TO
TAKE INTO ACCOUNT WH
EN
OPERATING THIS EQUIPMENT. IT IS IMPORTANT THAT YOU UNDERSTAND
THIS DOCUMENT AND THE SAFETY PRECAUTIONS WRITTEN HERE.
•
Read all documentation; only people who have
read and understand the documentation should
use the equipment.
•Do not use this equipment for anything other than
its intended use.
•Do not operate this equipment if it is damaged in
any way.
•Do not use unauthorized accessories.
•Do not operate this equipment near flammable
materials.
•Always check for gas leaks; vacate the area and
call the gas supply company if any are detected.
•Clean the equipment every day; build-up of waste
in the rotisserie can cause fires.
•When the unit is plugged in, there are potentially
dangerous voltages present in the control circuits;
do not open the electrical compartment as there
are potentially lethal voltages present.
•
Do not cover any vents.
•Always check for water leaks; do not operate if
leaks are visible.
•Do not immerse the cord or plug in water.
•Use only approved detergents.
•Keep hair and loose clothing away from any
moving parts.
•Do not work with any hot surfaces without wearing
protective gloves and an apron.
•Keep the area around the rotisserie clear of
combustibles.
•Any equipment that burns gas carries a risk of
producing carbon monoxide; if headaches,
dizziness, shortness of breath, nausea, vomiting or
confusion are encountered, shut down all
equipment and vacate the area. Have the
equipment inspected immediately.
Contact
Hardt
or an approved service provider immediately if any problems are
encountered with your equipment.
FAILURE TO FOLLOW THESE SAFETY PRECAUTIONS CAN RESULT IN INJURY,
DEATH AND/OR PROPERTY DAMAGE.
This appliance is equipped with a restr
aint cable. In the event the cable is
disconnected for inspection or cleaning, ensure that it is reconnected before you
operate the rotisserie.
3.3 What to do if a Service Issue Occurs
•Follow the steps detailed in the Troubleshooting section of this manual
•Contact your local authorized service partner. A list of service providers is available at www.hardt.ca
•Please review your warranty document to be sure of what is covered.
Additional Important Information

Page 5 of 18
CUS-013-0027-0
2
3.4 Food Safety
THERE ARE PRECAUTION
S THAT NEED TO BE TA
KEN WHEN WORKING WIT
H
RAW MEATS, FAILURE TO FOLLOW PROPER FOOD PREPARATION
PROCEDURES CAN RESULT IN ILLNESS AND DEATH. SOME PRECAUTIONS
ARE LISTED IN THIS DOCUMENT BUT YOU SHOULD NOT RELY SOLELY ON THIS
DOCUMENT FOR FOOD SAFE PROCEDURES. IT IS RECOMMENDED THAT ONLY
PERSONS WHO ARE FULLY TRAINED IN FOOD SAFETY SHOULD PREPARE
FOOD ITEMS.
•Wash all surfaces and equipment that comes into contact with raw meat or its juices.
•Always thoroughly wash your hands after working with raw meat.
•Do not allow raw meat or its juices to contact cooked meat.
•Use separate utensils for working with raw and cooked meat.
•Use separate containers/trays for holding raw and cooked meat.
•Always use a clean food thermometer to ensure meat is at a safe temperature before removing from the
rotisserie.
The table below describes how long each type of meat must be at a specific temperature to ensure that all bacteria are
killed. Always use a calibrated food thermometer to ensure that your product reaches these temperatures for the
specified time period before considering it safe for consumption.
Safe Cooking Times and Temperatures
*
Product
Temperature/Time
Poultry (Whole or ground duck, chicken or turkey) 165˚ F, 74˚ C, for 15 seconds
Stuffing and stuffed meat, fish, poultry and pasta 165˚ F, 74˚ C, for 15 seconds
Ground meat (beef, pork, and other meat) 155˚ F, 68˚ C, for 15 seconds
Injected meat (brined ham and flavour injected roasts) 155˚ F, 68˚ C, for 15 seconds
Pork, beef, veal, lamb, Steaks/Chops 145˚ F, 63˚ C, for 15 seconds
Roast 145˚ F, 63˚ C, for 4 Minutes
Seafood (fish, shellfish, crustaceans) 145˚ F, 63˚ C, for 15 seconds
Commercially processed ready-to-eat food 135˚ F, 57˚ C (Hot held for service)
*
National Restaurant Association,
ServSafe Course book
, Fifth Edition, New Jersey, Prentice H
all, 2008
The values listed in this table are industry standard minimum temperatures to ensure
food is safely cooked, and may not represent the temperatures dictated by your
company.
COOKING ANY NEW PRODUCT OR ANY CURRENT PRODUCT PREPARED IN A
DIFFERENT WAY REQUIRES A VALIDATION OF COOKING TIMES AND COOKING
TEMPERATURES BY MEASUREMENT OF INTERNAL PRODUCT TEMPERATURES.
DO NOT ASSUME SAFE COOKING PARAMETERS EXIST WITHOUT PERFORMING
FOOD-SPECIFIC TESTS. ALWAYS MEASURE THE INTERNAL TEMPERATURE OF
A PRODUCT BEFORE ENDING THE COOKING. ACCEPTED INTERNAL
TEMPERATURES SHOULD NOT BE LOWER THAN THOSE PUBLISHED FOR
ESTABLISHED FOOD SAFETY STANDARDS.
Consult Hardt if you need help setting up a food safety program.
Page 6 of 18
CUS-013-0027-02
Auto Clean
Drain
Electrical
Cord
Water Inlet
Gas Inlet
Power Switch
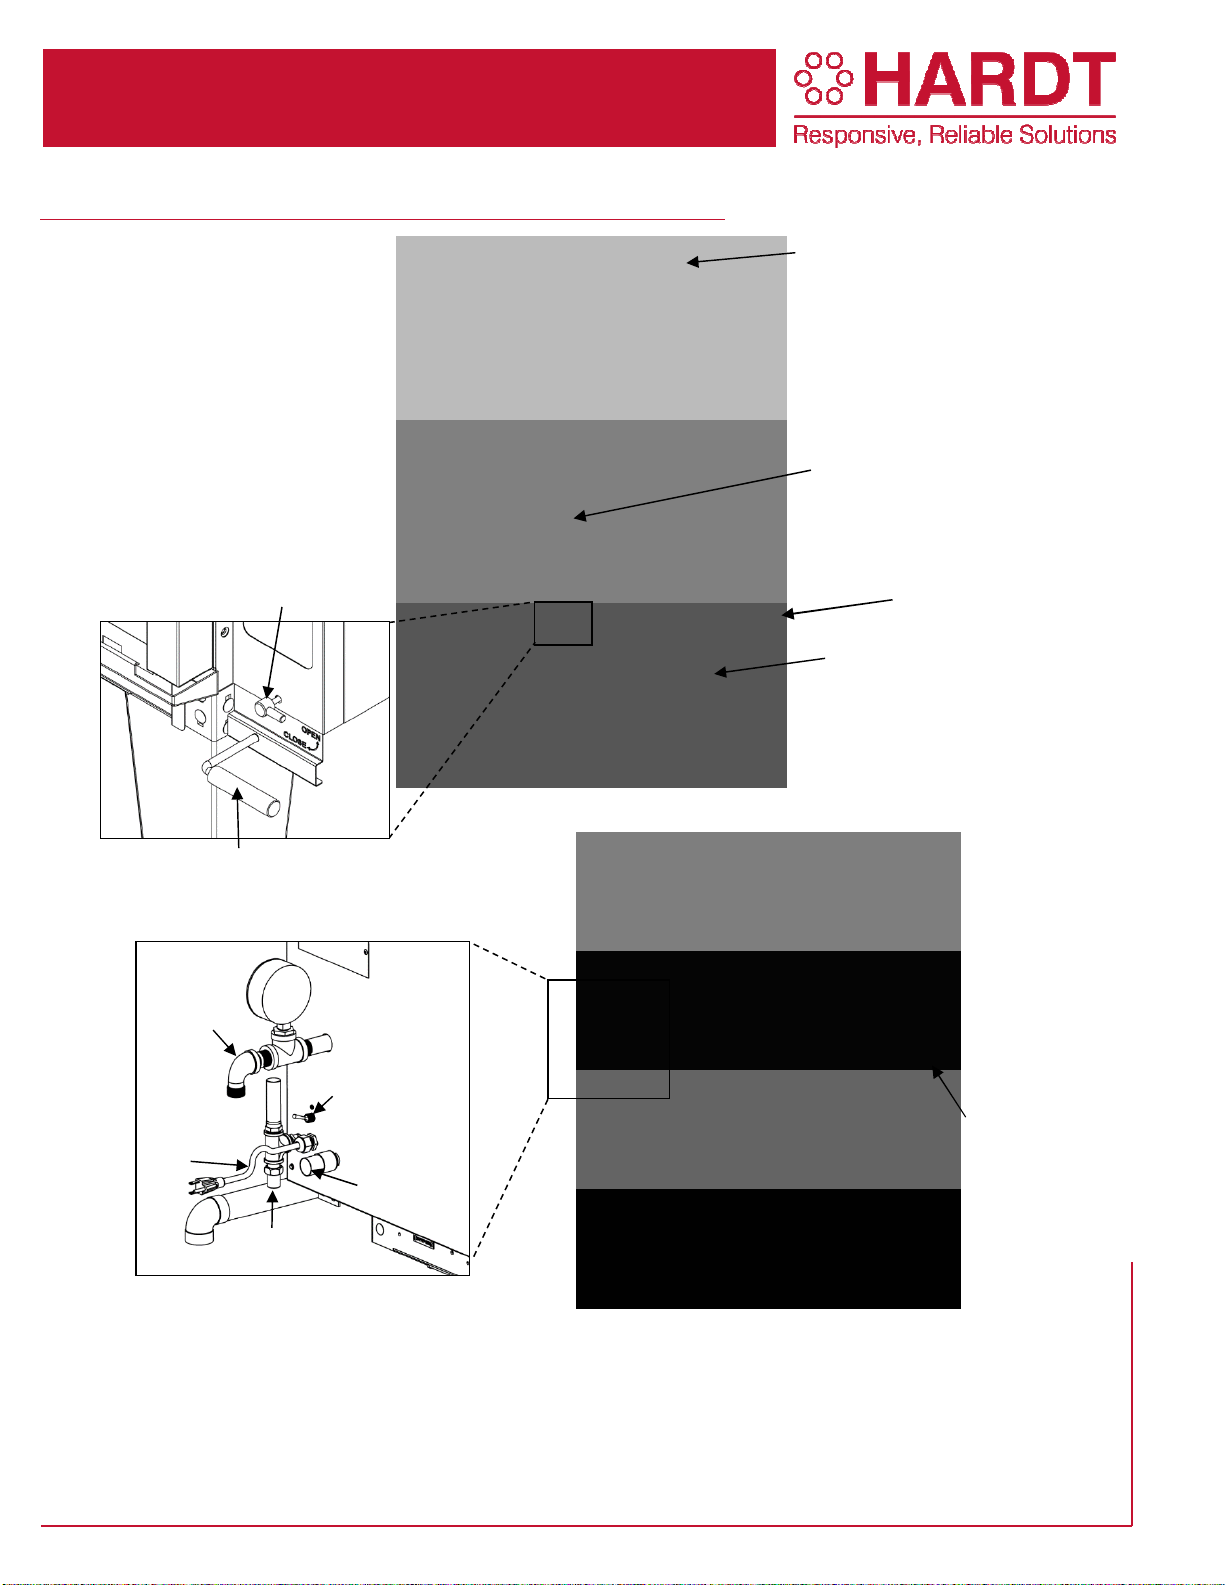
4.Equipment Diagrams
4.1 Single Standard Rotisserie
Figure 4-1: Single Unit
Halogen Lamp
Access Panel
Drain
/ Overflow
(1.5”)
Control Panel
Chimney
Degreaser Shelf
Manual Drain Valve Handle
Water Inlet Valve Handle

Page 7 of 18
CUS-013-0027-0
2
4.2 Single Top Vent Rotisserie
Figure 4-2: Single Unit
Drain
/ Overflow
(1.5”)
Control Panel
Vent
Degreaser Shelf
Manual Drain Valve Handle
Water Inlet Valve Handle
Halogen Lamp
Access Panel
Gas Inlet
Power Switch
Water Inlet
Auto Clean Drain
Electrical
Cord
Flame Sensor
Access Panel

Page 8 of 18
CUS-013-0027-02
4.3 Double Deck Rotisserie
Figure 4-3: Double Deck Unit
Drain / Overflow (1.5”)
Control Panels
Degreaser Shelf
Chimneys
Chimney Bracket
Manual Drain Valve Handle
Water Inlet Valve Handle
Halogen Lamp
Access Panel
Machine Room
Ventilation Elbow
Flame Detector
Access Panel
Auto Clean
Drain
Electrical
Cord
Water Inlet
Gas Inlet
Power Switch
Page 9 of 18
CUS-013-0027-0
2
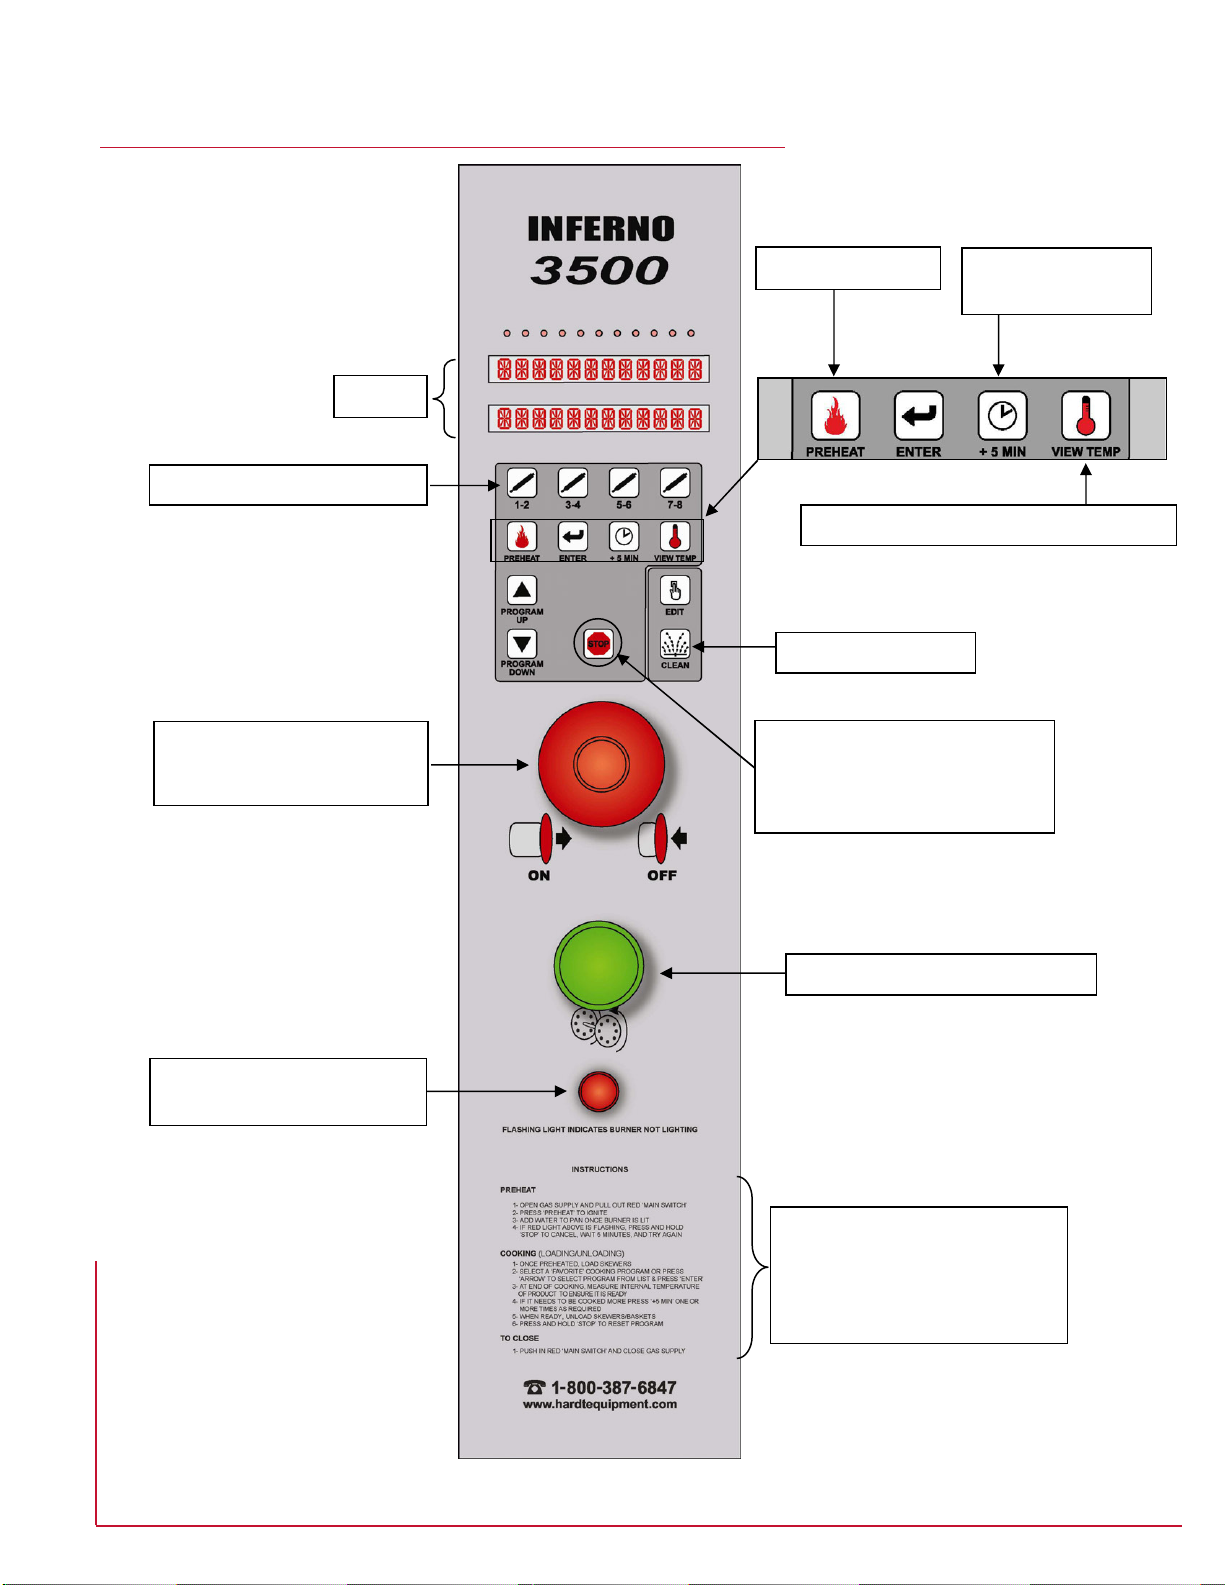
4.4 Control Panel Layout
Figure 4-4: Control Console
Display
Favorite Program Selection
Main On/Off Switch (Red)
IN CASE OF EMERGENCY
PUSH TO STOP
Alarm Lamp
(Indicates burner not lighting)
Preheat Function Incremental Cook
Time Addition
Manual Advance Switch (Green)
Basic Operation Instructions
and Hardt Contact Information
Read this manual for detailed
operation instructions.
Press once stops the buzzer
Press and hold 3 seconds
stops all actions except clean
AutoClean Function
Show current temperature of rotisserie.
Page 10 of 18
CUS-013-0027-02
5.Operation
5.1 Morning Startup
ALWAYS TURN VENTILAT
ION SYSTEM ON BEF
ORE STARTING ROTISSE
RIE. IT
IS REQUIRED TO REMOVE COMBUSTION BY-PRODUCTS AND GREASE-LADEN
AIR.
5.1.1 Starting the Rotisserie
1. With power connected to the rotisserie, turn on the Inferno 3500 by
pulling out the red main on/off switch shown in Figure 4-4.
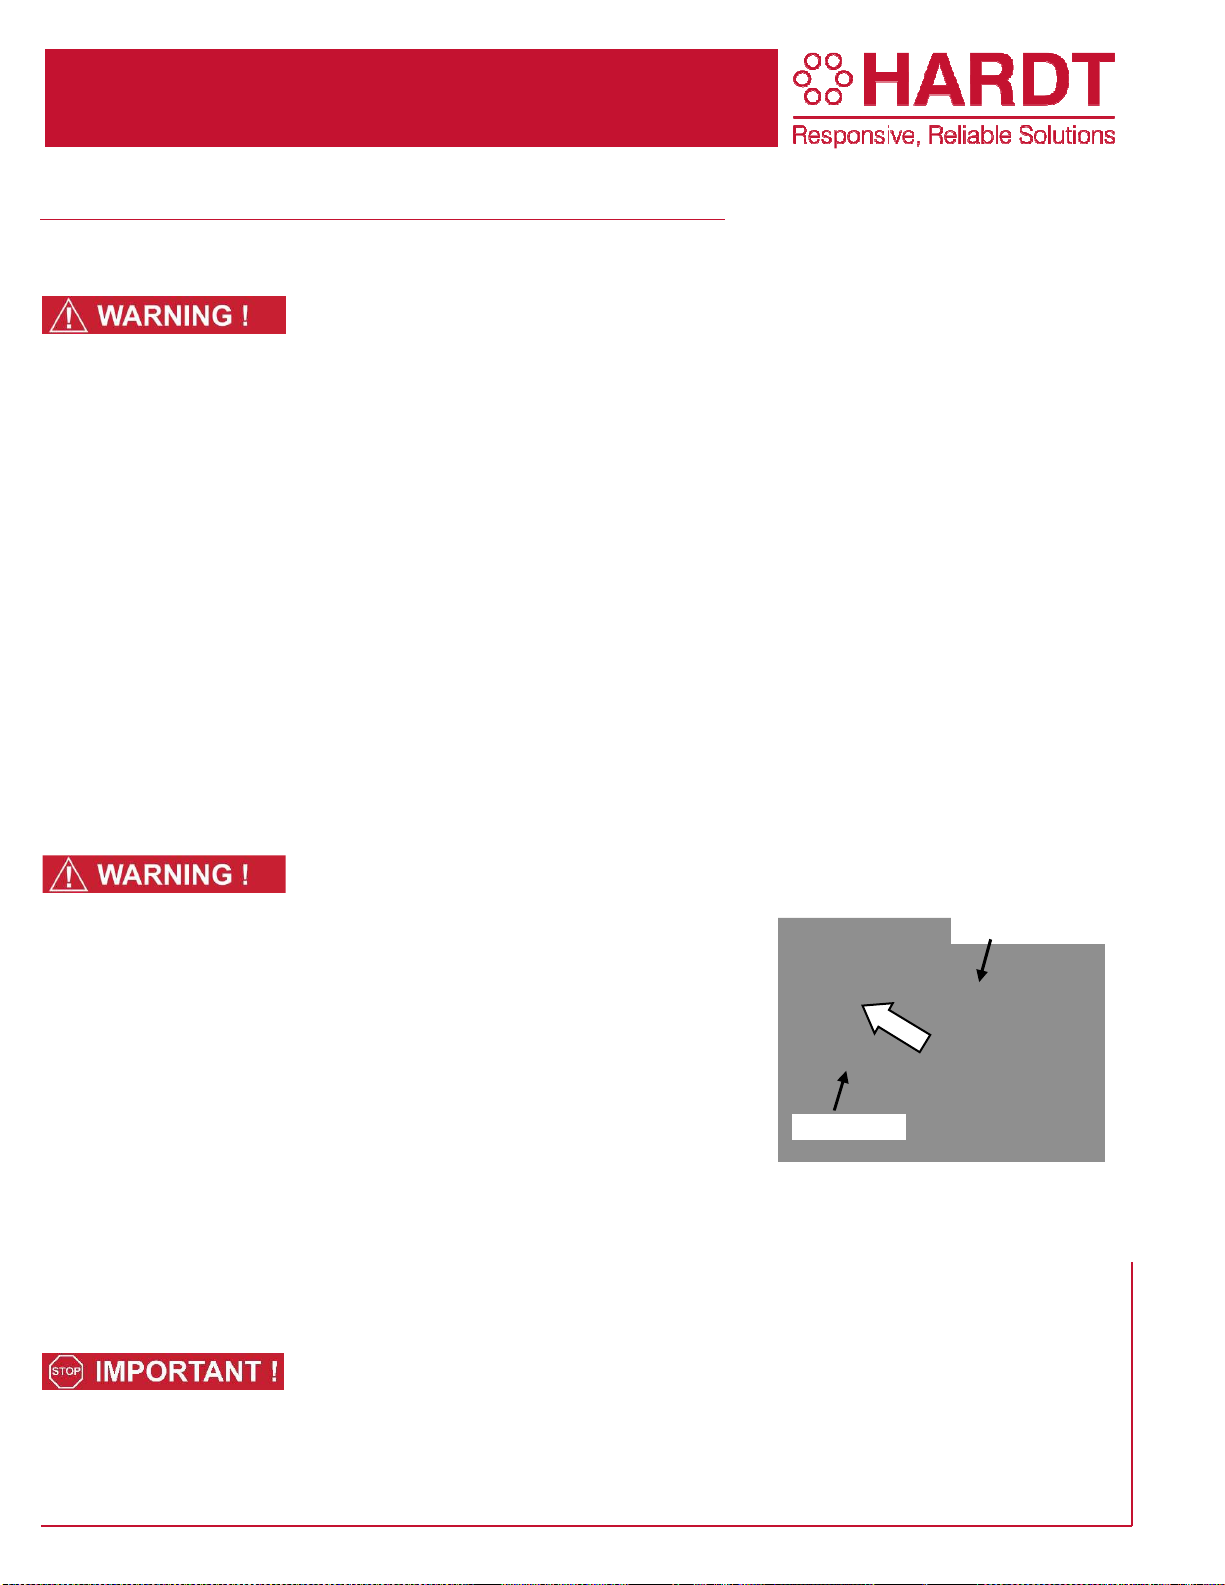
2. Make sure the drain valve is closed as shown in Figure 5-1.
3. Make sure the gas valve to the rotisserie is opened.
4. Follow the instructions scrolling on the display.
5. Clean the strainers and turn on the ventilation hoods.
6. Once these conditions have been filled, press “ENTER”.
7. Select “PREHEAT” to ignite.
8. Fill the water pan with water using the Water Inlet Valve shown.
Figure 5-1: Drain Valve
References will be made to an “IDLE MODE” in the next few sections that relate to
rotisserie operation. When in IDLE MODE, the controller displays “PREHEAT OR
CLEAN”.
If the red lamp is flashing, indicating the burner did not light, press and hold "STOP" to
cancel. Wait 5 minutes and try again. See the safety lockout section of the
troubleshooting chapter on page 16.
The rotisserie cannot be operated during a power failure. In the event of a
prolonged power failure, do not attempt to operate the rotisserie. Turn off the red
main on/off switch and close the gas valve. When power has been restored, open
the gas valve, pull out the red main on/off switch and resume normal operation.
Water Inlet Valve

Page 11 of 18
CUS-013-0027-0
2
5.2 Cooking Procedure
THE ROTISSERIE IS HOT. ENSURE YOU ARE WEARING OVEN MITTS AT ALL
TIMES WHEN WORKING WITH THE HOT ROTISSERIE.
NEVER LOAD PRODUCT INTO A ROTISSERIE WHICH IS NOT PREHEATED.
CROSS CONTAMINATION OF RAW ONTO COOKED PRODUCT IS VERY
DANGEROUS.
DO NOT LOAD FRESH PRODUCT INTO ROTISSERIE UNTIL COOKING CYCLE IS
COMPLETE AND ALL COOKED PRODUCT IS REMOVED FROM ROTISSERIE.
Refer to the table on page 5 for a list of safe cooking temperatures and times.
The procedures described here are basic. Hardt provides extensive cooking and
food program support and training. Your organization may have specific
instructions that should be followed instead of the ones listed here.
1. Following a preheat cycle (see section 5.1.1); the display will indicate “OVEN READY” when the correct
temperature for loading the rotisserie has been reached.
2. Open the door and load the product as per the procedure described in section 5.3.1.
3. Close the door.
4. Select a “FAVORITE” preset recipe (indicated as 1-2, 3-4, 5-6 and 7-8 on the keypad in Figure 4-4: Control
Console on page 9) or press an arrow (“UP” or “DOWN”) to select another program from the saved list. To select
a program, press “ENTER” on the keypad.
The numbers on the favorite buttons dictate how many skewers are to be used. Select
‘1-2’ if using one or two skewers, select ‘3-4’ if using three or four skewers, etc.
5. At the end of the cook, measure product internal temperature. Refer to section 3.4 of this manual for special notes
on product internal temperatures.
6. If the measured internal temperature is insufficient, press “+ 5 MIN” to add five minutes to the cook cycle. The
“+5 MIN” button can be pressed up to three times to add a total of 15 minutes to the cook time. Repeat this step
until correct internal temperature is reached.
7. Press “STOP” and hold for 3 seconds to end and reset the program.
8. Unload skewers from rotisserie following the procedure described in section 5.3.2.
9. Open the water inlet valve to raise the water level. Skim grease down the overflow drain (make sure the liquids
flow freely out of the overflow drain).
10. Close the water inlet valve.

Page 12 of 18
CUS-013-0027-02
5.3 Loading & Unloading the Rotisserie
CROSS CONTAMINATION
OF RAW ONTO COOKED P
RODUCT IS VERY
DANGEROUS.
DO NOT LOAD UNCOOKED PRODUCT INTO ROTISSERIE UNTIL COOKING
CYCLE IS COMPLETE AND ALL COOKED PRODUCT IS REMOVED FROM
ROTISSERIE.
5.3.1 Loading the Skewers
When the rotisserie reaches operating temperature skewers can be loaded.
Open the door to shut off burner and to stop the drive rotation. Use the green Manual Advance Switch (as indicated in
Figure 4-4 on page 9) to position sockets as required.
The orientation of the skewer in the socket will vary depending on the model of
your equipment.
Follow these steps to properly load skewers into the rotisserie.
1. As indicated in diagram ‘A’ below, insert pointed end of the skewer into a hole in the plate on left side of
rotisserie.
2. Align the other end of the skewer with the corresponding socket and push into place (see diagram ‘B’).
3. Slide the skewer back to the left until the shoulder of the tip at the left end of the skewer rests against the left
end plate.
4. Check that the skewer is secured in position (holds in place).
5. Advance the drive to another position using the green manual advance switch. Repeat steps 1-5 as required.
6. Close the door, select the proper cooking program, and the rotisserie will begin to cook.
USE PROTECTIVE CLOTHING WHEN LOADING AND UNLOADING THE
ROTISSERIE.
5.3.2 Unloading the Skewers
1. Open the door to shut off burner and to stop the drive from rotating.
2. Remove each skewer by lifting left end, sliding the skewer to the left and then gently pivot the skewer out of
the rotisserie. Place each skewer on a skewer cart or a cooked food table.
3. Use the green manual advance switch to position skewers (or baskets) as required for removal.
4. Close the door of the rotisserie to resume operation or cooking (burner will reignite).
5. If no further cooking is required, press and hold the “STOP” button for three seconds to end the program.
Figure 5-2: Loading Skewers
A) B)
Slide skewer into the
support plate
Push skewer into socket in
the drive plate.
Align skewer
with s
ocket
Shoulder

Page 13 of 18
CUS-013-0027-0
2
5.4 Controller Functions
This section contains information for basic operation and programming of the Inferno 3500 system. For more detailed
instructions, please refer to the Controls Instruction Manual.
5.4.1 Buzzers and Alarms
(Press STOP once to end a buzzer. Press and hold ‘STOP’ for 3 seconds to stop any action except an AUTOCLEAN
cycle.)
•At the end of a preheat cycle when the correct temperature is reached, a buzzer will sound for 5 seconds.
•If the rotisserie temperature then drops below 150˚F (65.6˚ Celsius), the red alarm lamp will flash and a
message on the controller display will prompt to repeat the preheat cycle.
•At the end of a cooking cycle and of subsequent cook time additions, a buzzer sounds for 10 seconds.
•In case of a Safety Lock Out (gas burner does not light), the red alarm lamp will flash continuously.
5.4.2 Programming
The controls allow many of the rotisserie’s parameters to be accessed and modified. Only the basic programming of
“Favorites” is described in this manual. Additional modification of the parameters must be performed by an authorized
service technician. Please call Hardt Customer Service for further information.
Use UP/DOWN to scroll through menus and to change settings, ENTER to select (and then again to validate selection)
and STOP to exit.
5.4.3 Programming Favorites
A favorite is a shortcut to a cooking program.
Hold EDIT and a Favorite key simultaneously for three
seconds:
To modify a Favorite recipe:
• Display shows the last selected program
• Use the UP/DOWN buttons to locate any program in memory from 1 to 16
• Press ENTER to save program selection to that Favorite button.
Figure 5-3: Favorite Buttons
Page 14 of 18
CUS-013-0027-02
6.Maintenance
6.1 Daily Cleaning
6.1.1 During the Day
ALWAYS ALLOW THE ROTISSERIE TO SUFFICIENTLY COOL BEFORE
ATTEMPTING TO CLEAN IT.
It is recommended to clean the inner glass with a soft, damp cloth after every cooking cycle. This will lead to optimal
cleaning results without scratching the glass. Avoid using scouring pads or cleaners with grit on glass.
It may also be necessary to replenish or change the water in the oven throughout the day, depending on the quantity
of product cooked.
6.1.2 At the End of the Day
It is recommended to run the AutoClean cycle at the end of the business day, after all cooking has been completed.
6.1.3 Description of Operation
The AutoClean cycle consists of a succession of activities that are completely and automatically controlled by the
rotisserie. The sequence is as follows:
•OVEN COOLDOWN: A period of time required for the rotisserie to reach a safe temperature for cleaning.
•PREWASH: A repetition of soaking in water and draining sequences
•SOAP WASH: Involves the repeated application of a cleaning agent followed by soaking and draining
•FIRST RINSE: A rinsing cycle.
•POWER RINSE: Another, different type of rinsing cycle.
•FINAL RINSE: A series of rinsing cycles involving water collection followed by draining.
6.1.4 AutoClean Operation
ENSURE YOU ARE WEARING INSULATED GLOVES AND APRON AT ALL TIMES
WHEN WORKING WITH THE HOT ROTISSERIE.
1. Verify that there is sufficient degreaser in the bottle.
2. Open the door, and open the drain valve as shown in Figure 6-1: Drain
Valve.
3. Remove any large pieces that are left on the bottom of the water pan.
4. Close the drain valve.
5. Open the Water Inlet Valve to add water to the water pan. Make sure the
water is draining freely and not rising or overflowing out the oven door.
6. Close the Water Inlet Valve. Open the Drain Valve and drain the water
pan completely. DO NOT PUSH THE DEBRIS INTO THE DRAINS.
7. Open the Water Inlet Valve to add a small amount of water to the water
pan. Using a towel wipe the water pan clean removing all particles.
8. Close the Water Inlet Valve.
9. Drain the water pan completely.
10. Close the Drain Valve. The Drain Valve must be closed for the Auto clean to operate.
11. Close the oven door and press the ‘CLEAN’ button and then the ‘ENTER’ button. Read the display. If the Auto
clean has begun it will read either, “CHECKING OVEN TEMPERATURE”, “CLEAN COOLDOWN” or
“PREWASH”.
If the display reads, “CLEAN COOLDOWN” the
AutoClean
will not start
immediately as the cooking cavity is too hot. DO NOT open the door to cool the
rotisserie! It must cool on its own with the door closed so the degreaser works
properly. The AutoClean will start on its own when the unit has properly cooled
Figure 6-1: Drain Valve
Water Inlet Valve
Drain Valve
Page 15 of 18
CUS-013-0027-0
2
For units equipped with the optional sensors
–
If the degreaser
is low, an alarm
will sound and the display will show: “REFILL DEGREASER BOTTLE // PRESS
CLEAN”. Replace the degreaser bottle and start again.
If the display shows: “CLOSE DRAIN VALVE // PRESS CLEAN”, the Drain Valve is
not fully closed. Close it and start again.
12. Clean the outside of the rotisserie.
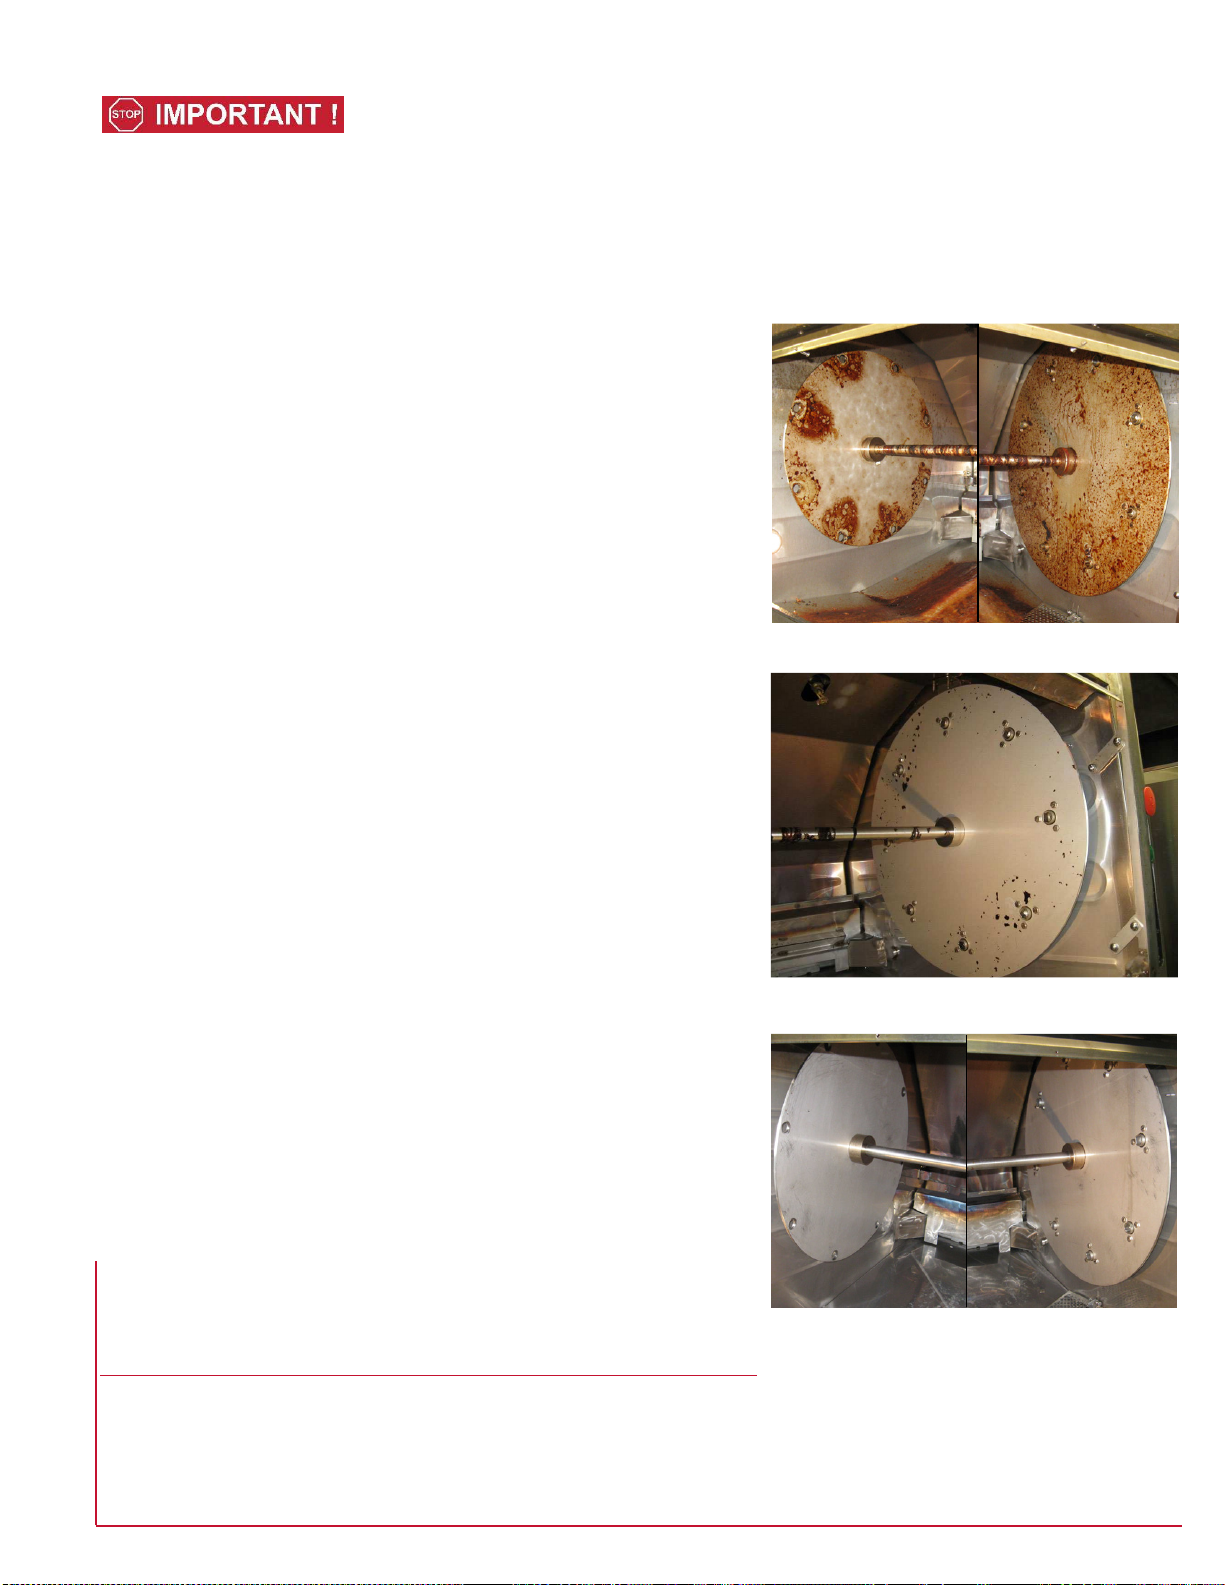
6.1.5 AutoClean effectiveness evaluation
It is important to consider the condition of the rotisserie after the
AutoClean cycle is finished to verify that the cleaning operations are
functioning correctly. The following images illustrate three states of
cleanliness and their related interpretation.
The image in Figure 6-2: Dirty Cavity shows a cavity that has NOT
been cleaned sufficiently to cook in. This may be due to:
•The cleaning procedures not being followed on a consistent
basis.
•The AutoClean system having not functioning properly for an
extended period of time.
It will be necessary to clean the rotisserie by hand using regular oven
cleaner (in a spray bottle) and a scrub pad or scraper to remove the
build-up of carbon prior to running the AutoClean cycle.
The AutoClean function will only clean the grease from 1 day's worth
of cooking. It may take a few days of AutoClean and hand scraping to
get the unit back to the point where following the correct procedures
will produce a clean rotisserie in the morning.
If the rotisserie cavity looks like what is shown in Figure 6-3: Mostly
Clean Cavity, remove the residual flakes with a scrub pad PRIOR to
cooking.
The image shown in Figure 6-4: Clean Cavity – Ready for Cooking
shows a rotisserie cavity that is sufficiently clean and in which cooking
may be performed.
6.2 Weekly Inspection
Thoroughly inspect the venting components supplied with the rotisserie for signs of damage (dents, perforations, etc).
Replace with certified Hardt components if required. Ensure that the electrical cord, water and gas lines are free from
damage and kinks.
Figure 6-2: Dirty Cavity
Figure 6-3: Mostly Clean Cavity
Figure 6-4: Clean Cavity – Ready for Cooking

Page 16 of 18
CUS-013-0027-02
7.Troubleshooting
DISCONNECT POWER TO THE ROTISSERIE BEFORE ANY MAINTENANCE,
SERVICE OR CLEANING IS PERFORMED.
ROTISSERIES EQUIPPED WITH CASTERS ARE SECURED IN PLACE USING A
RESTRAINING CABLE LOCATED ON THE RIGHT REAR UNDERSIDE OF THE
ROTISSERIE. THIS CABLE MUST BE DISCONNECTED PRIOR TO REMOVING THE
ROTISSERIE AND CAUTION MUST BE TAKEN TO ENSURE IT IS CONNECTED
ONCE THE ROTISSERIE HAS BEEN RETURNED TO ITS ORIGINAL POSITION.
THE ROTISSERIE IS HOT WHEN OPERATING. EXERCISE CAUTION WHEN
WORKING NEAR THE HOT ROTISSERIE.
WEAR APPROPRIATE PROTECTIVE CLOTHING.
7.1 Rotisserie does not Operate
The rotisserie does not operate when the red main ON/OFF is pulled out
(i.e. drive does not turn, and no lights in cavity).
SOLUTION:
•Verify that the door is fully closed. The magnetic door switch
disables or enables the ignition system.
•Check rotisserie electrical power: If the rotisserie's lights are off,
check the circuit breaker on the back of the unit as shown in
Figure 7-1. If the circuit breaker is ‘OFF’ (tripped), return to 'ON'.
•If this circuit breaker is ‘ON’, ensure that the power cord is plugged
into the wall and that there is power coming from the socket. If
power is available and the rotisserie still does not operate, contact
your local authorized service partner.
7.2 Safety Lockout
If the red main ON/OFF switch is pulled out, the drive drum will rotate and the igniter will attempt to light the burner. If
there is no flame after six minutes, the rotisserie will go into 'SAFETY LOCKOUT'. Push the red main ON/OFF switch
in to turn the rotisserie OFF.
Possible causes include: the gas supply is shut off, the flame sensor is not sensing flame or there is a component
failure.
SOLUTION:
•If the rotisserie goes into ‘safety lockout’ again. Turn the
rotisserie OFF (push in main ON/OFF switch).
•Verify that the gas supply to the rotisserie and the main gas
valve are both open. Try starting the unit again by pulling the red
main ON/OFF switch out.
•If the rotisserie goes into ‘safety lockout’ again. Turn the
rotisserie OFF.
•If you are certain the rotisserie interior is sufficiently cool to
touch, gently lift the burner cover out of the unit. (Figure 7-2)
(Continued on following page)
Figure 7-1: Circuit Breaker
Figure 7-2: Remove Covers
Circuit Breaker
Burner Cover

Page 17 of 18
CUS-013-0027-0
2
•Using a soft towel, gently wipe the top of the burner and
carefully clean the flame sensor (Figure 7-3). Replace the
covers.
•Try starting the rotisserie again. Pull out the main ON / OFF
switch.
If the rotisserie goes into safety lockout again, there is most likely a
component failure. Turn the rotisserie OFF and contact your local authorized
Hardt service provider.
7.3 Replacing the Halogen Lamp
1. Turn rotisserie OFF (push in main ON/OFF switch) and disconnect
the power cord from the wall receptacle.
2. Allow rotisserie to cool down.
3. Remove the light access panel located on the left side of the
rotisserie by loosening the thumb screws (by hand or using a
screwdriver) (Figure 7-4).
4. Loosen the wing nuts on the light support bracket in order to access
the light (Figure 7-5).
5. While wearing gloves, gently pull the light bulb out of its fixture
(Figure 7-6).
6. Install a new bulb.
7. Position bracket so that the light is oriented towards the center shaft
of the rotisserie. Hand-tighten the two wing nuts.
8. Reinstall access panel.
9. Plug the power cord back into the wall receptacle.
10. Turn the rotisserie ON (pull out main ON/OFF switch).
11. Verify that the replaced bulbs function correctly (it is normal for the
lights to take about 6 seconds to light after the main switch is pulled
to ON). If not, repeat the first four steps of this procedure and make
sure the bulb was correctly inserted in the socket. Reinstall the
access panel, turn the rotisserie ON and recheck. If problems persist,
contact your local authorized service partner.
Figure 7-3: Burner & Flame Sensor
Figure 7-4: Light Access Panel
Figure 7-5: Loosen/Tighten Wing Nuts
Figure 7-6: Replace Bulb
Flame Sensor
Burner
Remove Screws
Do not touch the replacement bulb with
bare fingers or dirty gloves.

Page 18 of 18
CUS-013-0027-02
8.Available Accessories
Please refer to the following table when ordering accessories from Hardt.
Part Name
Description
Illustration
‘V’ Skewers This is the ‘V’ skewer but with a modified end tip so the skewer can
only be loaded one way, ensuring correct positioning of the
product while cooking.
Hanging
Basket Designed for products that should not rotate during cooking. The
basket stays horizontal while the drive turns.
Rib Basket A clamshell basket that is ideal for cooking ribs, chicken parts and
a variety of other products.
Other manuals for INFERNO 3500
4
Table of contents
Other Hardt Oven manuals


