Hardt Blaze User manual
Blaze
GAS-FIRED ROTISSERIE
Operation Manual
Hardt Equipment Manufacturing
©
1756 50
th
Avenue Lachine (Montreal)
Quebec Canada H8T 2V5
Technical Support
Tel: (800) 387-6847
(514) 631-7271
Fax: (514) 631-5443
Sales
Tel: (888) 848-4408
www.hardtequipment.com
HARDT
Responsive, Reliable Solutions

Page 2 of 19
Blaze_Op_Manual_(2012-10-12).doc
HARDT
Responsive, Reliable Solutions
1.Important Information
WARNING
Improper installation, adjustment,
alteration, service or maintenance
can
cause property damage, injury or death.
Read the installation, operating and
maintenance instructions thoroughly before
installing or servicing this equipment.
WARNING
Do not store
or use gasoline or other
flammable vapors or liquids in the vicinity
of this or any other appliance.
Keep the area surrounding the rotisserie
free of any combustible material.
IMPORTANT
You must post in a prominent location,
instructions to be followed in the event the
user smells gas. Specific instructions can
be obtained from your local gas supplier.

Page 3 of 19
Blaze_Op_Manual_(2012-10-12).doc
HARDT
Responsive, Reliable Solutions
2.Table of Contents
1.Important Information..................................................................................................................... 2
2.Table of Contents............................................................................................................................ 3
3.Safety............................................................................................................................................... 4
3.1
About this Manual........................................................................................................................................................ 4
3.2
Equipment Safety ........................................................................................................................................................ 4
3.3
What to do if a Service Issue Occurs........................................................................................................................... 4
3.4
Food Safety.................................................................................................................................................................. 5
4.Equipment Diagrams......................................................................................................................6
4.1
Single Swing Door Rotisserie...................................................................................................................................... 6
4.2
Single French Door Rotisserie..................................................................................................................................... 7
4.3
Double Deck Swing Door Rotisserie............................................................................................................................ 8
4.4
Double Deck French Door Rotisserie.......................................................................................................................... 9
4.5
Control Panel Layout................................................................................................................................................. 10
5.Operation....................................................................................................................................... 11
5.1
Morning Startup ......................................................................................................................................................... 11
5.1.1
Starting the Rotisserie................................................................................................................................ 11
5.2
Cooking Procedure.................................................................................................................................................... 12
5.2.1
Loading & Starting a Cooking Cycle........................................................................................................... 12
5.2.2
End of the Cook Cycle................................................................................................................................ 12
5.3
Loading & Unloading the Rotisserie .......................................................................................................................... 13
5.3.1
Loading the Skewers.................................................................................................................................. 13
5.3.2
Unloading the Skewers............................................................................................................................... 13
6.Maintenance.................................................................................................................................. 14
6.1
Daily Cleaning............................................................................................................................................................ 14
6.1.1
During the Day............................................................................................................................................ 14
6.1.2
At the End of the Day ................................................................................................................................. 14
6.1.3
Cleaning effectiveness evaluation.............................................................................................................. 15
6.2
Weekly Inspection...................................................................................................................................................... 15
7.Troubleshooting............................................................................................................................ 16
7.1
Rotisserie does not Operate...................................................................................................................................... 16
7.2
Safety Lockout........................................................................................................................................................... 16
7.3
Replacing the Halogen Lamp .................................................................................................................................... 17
7.4
Changing Display Temperature Between Fahrenheit and Celsius............................................................................ 17
8.Options ..........................................................................................................................................18
8.1
Smoker Kit ................................................................................................................................................................. 18
8.1.1
Operating Instructions ................................................................................................................................ 18
9.Available Accessories.................................................................................................................. 19

Page 4 of 19
Blaze_Op_Manual_(2012-10-12).doc
HARDT
Responsive, Reliable Solutions
3.Safety
3.1 About this Manual
This manual contains information necessary for the installation of the HARDT Blaze rotisserie. Retain this manual for
future reference. To help the reader in the utilization of this manual certain information has been highlighted using the
following conventions:
INFORMATION THAT REFERS TO ACTIONS WHICH MAY HAVE CONSEQUENCES
POTENTIALLY DANGEROUS TO THE OPERATOR AND/OR THE ROTISSERIE
Information for proper installation and functioning
3.2 Equipment Safety
THERE ARE SOME SAFETY CONSIDERATIONS TO TAKE INTO ACCOUNT WHEN
OPERATING THIS EQUIPMENT. IT IS IMPORTANT THAT YOU UNDERSTAND THIS
DOCUMENT AND THE SAFETY PRECAUTIONS WRITTEN HERE.
•Read all documentation; only people who have
read and understand the documentation should
use the equipment.
•Do not use this equipment for anything other than
its intended use.
•Do not operate this equipment if it is damaged in
any way.
•Do not use unauthorized accessories.
•Do not operate this equipment near flammable
materials.
•Always check for gas leaks; vacate the area and
call the gas supply company if any are detected.
•Clean the equipment every day; build up of waste
in the rotisserie can cause fires.
•When the unit is plugged in, there are potentially
dangerous voltages present in the control circuits;
only qualified technicians should open the control
compartment.
•Do not cover any vents.
•Always check for water leaks; do not operate if
leaks are visible.
•Do not immerse the cord or plug in water.
•Use only approved cleaning products.
•Keep hair and loose clothing away from any
moving parts.
•Do not work with any hot surfaces without wearing
protective gloves and an apron.
•Keep the area around the rotisserie clear of
combustibles.
•Any equipment that burns gas carries a risk of
producing carbon monoxide; if headaches,
dizziness, shortness of breath, nausea, vomiting or
confusion are encountered shut down all
equipment and vacate the area. Have the
equipment inspected immediately.
Contact Hardt or an approved service provider immediately if any problems are
encountered with your equipment.
FAILURE TO FOLLOW THESE SAFETY PRECAUTIONS CAN RESULT IN INJURY,
DEATH AND/OR PROPERTY DAMAGE.
This appliance is equipped with a restraint cable. In the event the cable is
disconnected for inspection or cleaning, ensure that it is reconnected before you
operate the rotisserie.
3.3 What to do if a Service Issue Occurs
•Follow the steps detailed in the Troubleshooting section of this manual
•Contact your local authorized service partner. A list of service providers is available at www.hardt.ca
•Please review your warranty document to be sure of what is covered.
Additional important information

Page 5 of 19
Blaze_Op_Manual_(2012-10-12).doc
3.4 Food Safety
THERE ARE PRECAUTIONS THAT NEED TO BE TAKEN WHEN WORKING WITH
RAW MEATS, FAILURE TO FOLLOW PROPER FOOD PREPARATION
PROCEDURES CAN RESULT IN ILLNESS AND DEATH. SOME PRECAUTIONS
ARE LISTED IN THIS DOCUMENT BUT YOU SHOULD NOT RELY SOLELY ON THIS
DOCUMENT FOR FOOD SAFE PROCEDURES. IT IS RECOMMENDED THAT ONLY
PERSONS WHO ARE FULLY TRAINED IN FOOD SAFETY SHOULD PREPARE
FOOD ITEMS.
•Wash all surfaces and equipment that comes into contact with raw meat or its juices.
•Always thoroughly wash your hands after working with raw meat.
•Do not allow raw meat or its juices to contact cooked meat.
•Use separate utensils for working with raw and cooked meat.
•Use separate containers/trays for holding raw and cooked meat.
•Always use a clean food thermometer to ensure meat is at a safe temperature before removing from the
rotisserie.
The table below describes how long each type of meat must be at a specific temperature to ensure that all bacteria are
killed. Always use a calibrated food thermometer to ensure that your product reaches these temperatures for the
specified time period before considering it safe for consumption.
Safe Cooking Times and Temperatures*
Product Temperature/Time
Poultry (Whole or ground duck, chicken or turkey) 165˚ F, 74˚ C, for 15 seconds
Stuffing and stuffed meat, fish, poultry and pasta 165˚ F, 74˚ C, for 15 seconds
Ground meat (beef, pork, and other meat) 155˚ F, 68˚ C, for 15 seconds
Injected meat (brined ham and flavour injected roasts) 155˚ F, 68˚ C, for 15 seconds
Pork, beef, veal, lamb, Steaks/Chops 145˚ F, 63˚ C, for 15 seconds
Roast 145˚ F, 63˚ C, for 4 Minutes
Seafood (fish, shellfish, crustaceans) 145˚ F, 63˚ C, for 15 seconds
Commercially processed ready-to-eat food 135˚ F, 57˚ C (Hot held for service)
*National Restaurant Association, ServSafe Course book, Fifth Edition, New Jersey, Prentice Hall, 2008
The values listed in this table are industry standard minimum temperatures to ensure
food is safely cooked, and may not represent the temperatures dictated by your
company.
COOKING ANY NEW PRODUCT OR ANY CURRENT PRODUCT PREPARED IN A
DIFFERENT WAY REQUIRES A VALIDATION OF COOKING TIMES AND COOKING
TEMPERATURES BY MEASUREMENT OF INTERNAL PRODUCT TEMPERATURES.
DO NOT ASSUME SAFE COOKING PARAMETERS EXIST WITHOUT PERFORMING
FOOD-SPECIFIC TESTS. ALWAYS MEASURE THE INTERNAL TEMPERATURE OF
A PRODUCT BEFORE ENDING THE COOKING. ACCEPTED INTERNAL
TEMPERATURES SHOULD NOT BE LOWER THAN THOSE PUBLISHED FOR
ESTABLISHED FOOD SAFETY STANDARDS.
Consult Hardt if you need help setting up a food safety program.
Page 6 of 19
Blaze_Op_Manual_(2012-10-12).doc
HARDT
Responsive, Reliable Solutions
4.Equipment Diagrams
4.1 Single Swing Door Rotisserie
Figure 4-1: Single Swing Door Unit
Front View
Rear View
Page 7 of 19
Blaze_Op_Manual_(2012-10-12).doc
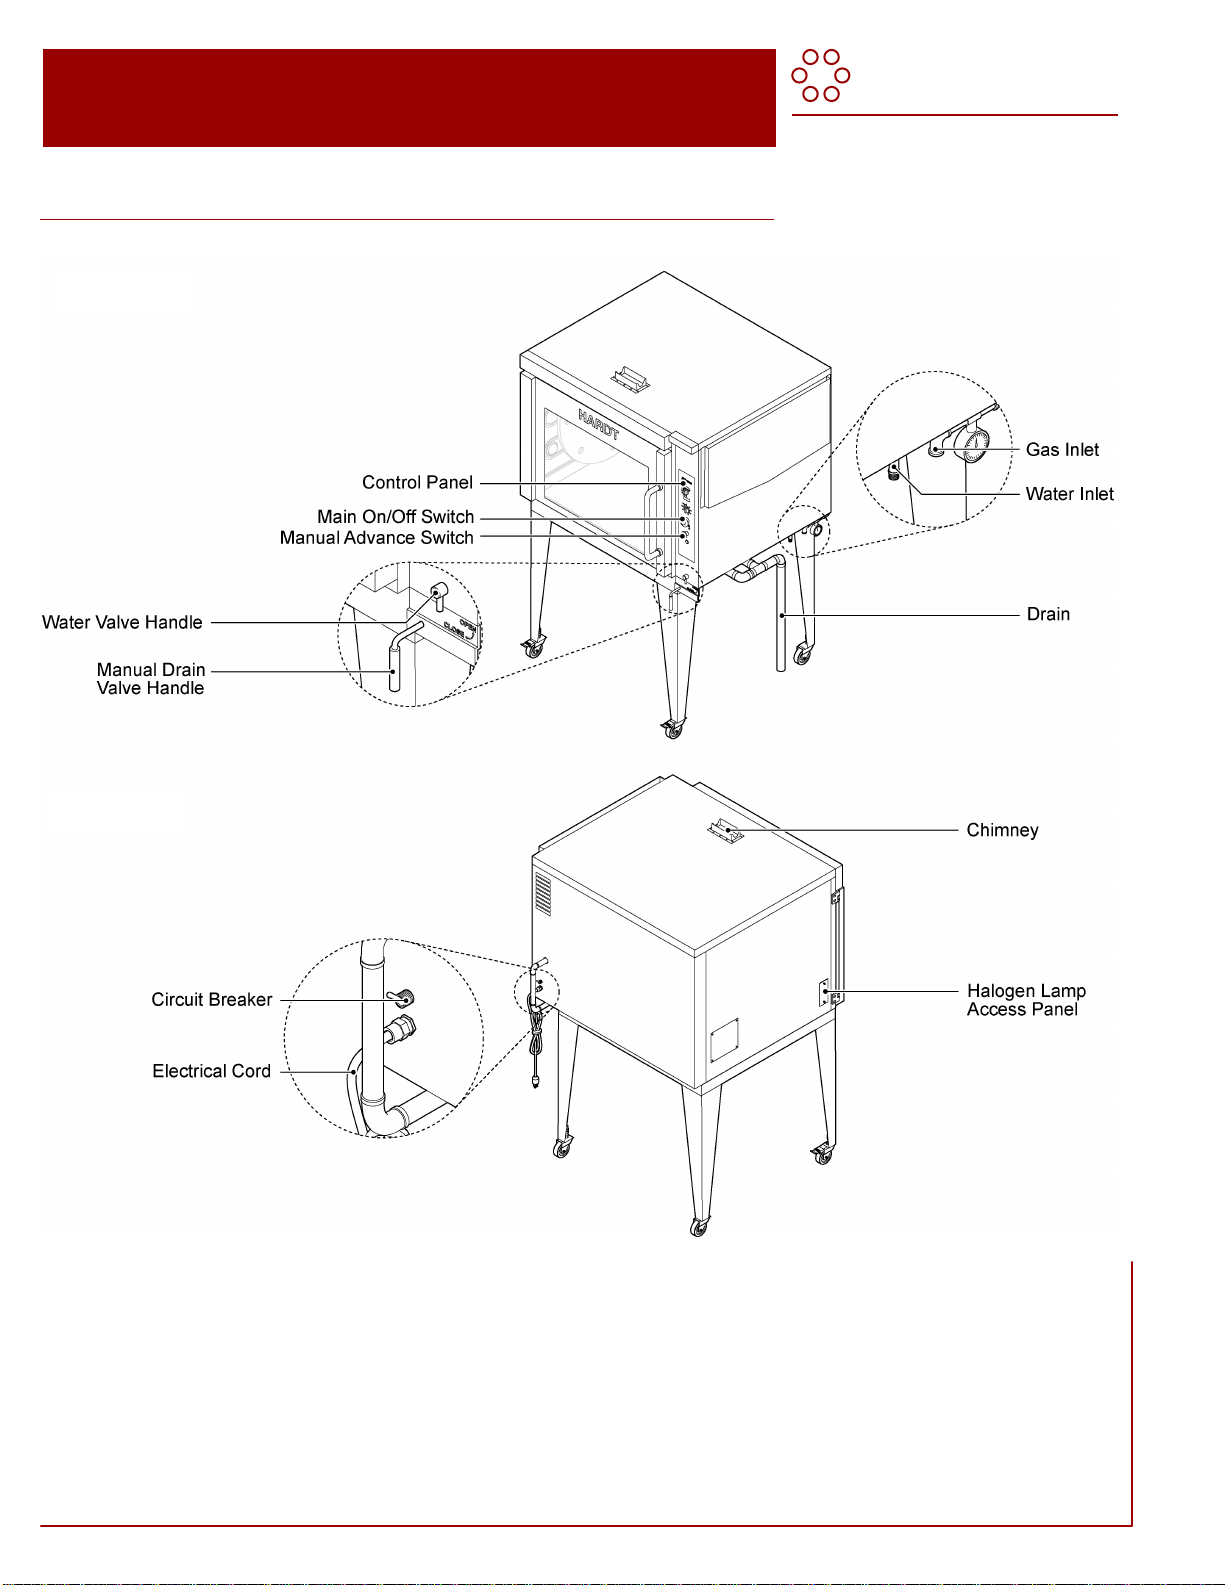
4.2 Single French Door Rotisserie
Figure 4-2: Single French Door Unit
Front View
Rear View

Page 8 of 19
Blaze_Op_Manual_(2012-10-12).doc
4.3 Double Deck Swing Door Rotisserie
Figure 4-3: Double Deck Swing Door Unit
Front View
Rear View

Page 9 of 19
Blaze_Op_Manual_(2012-10-12).doc
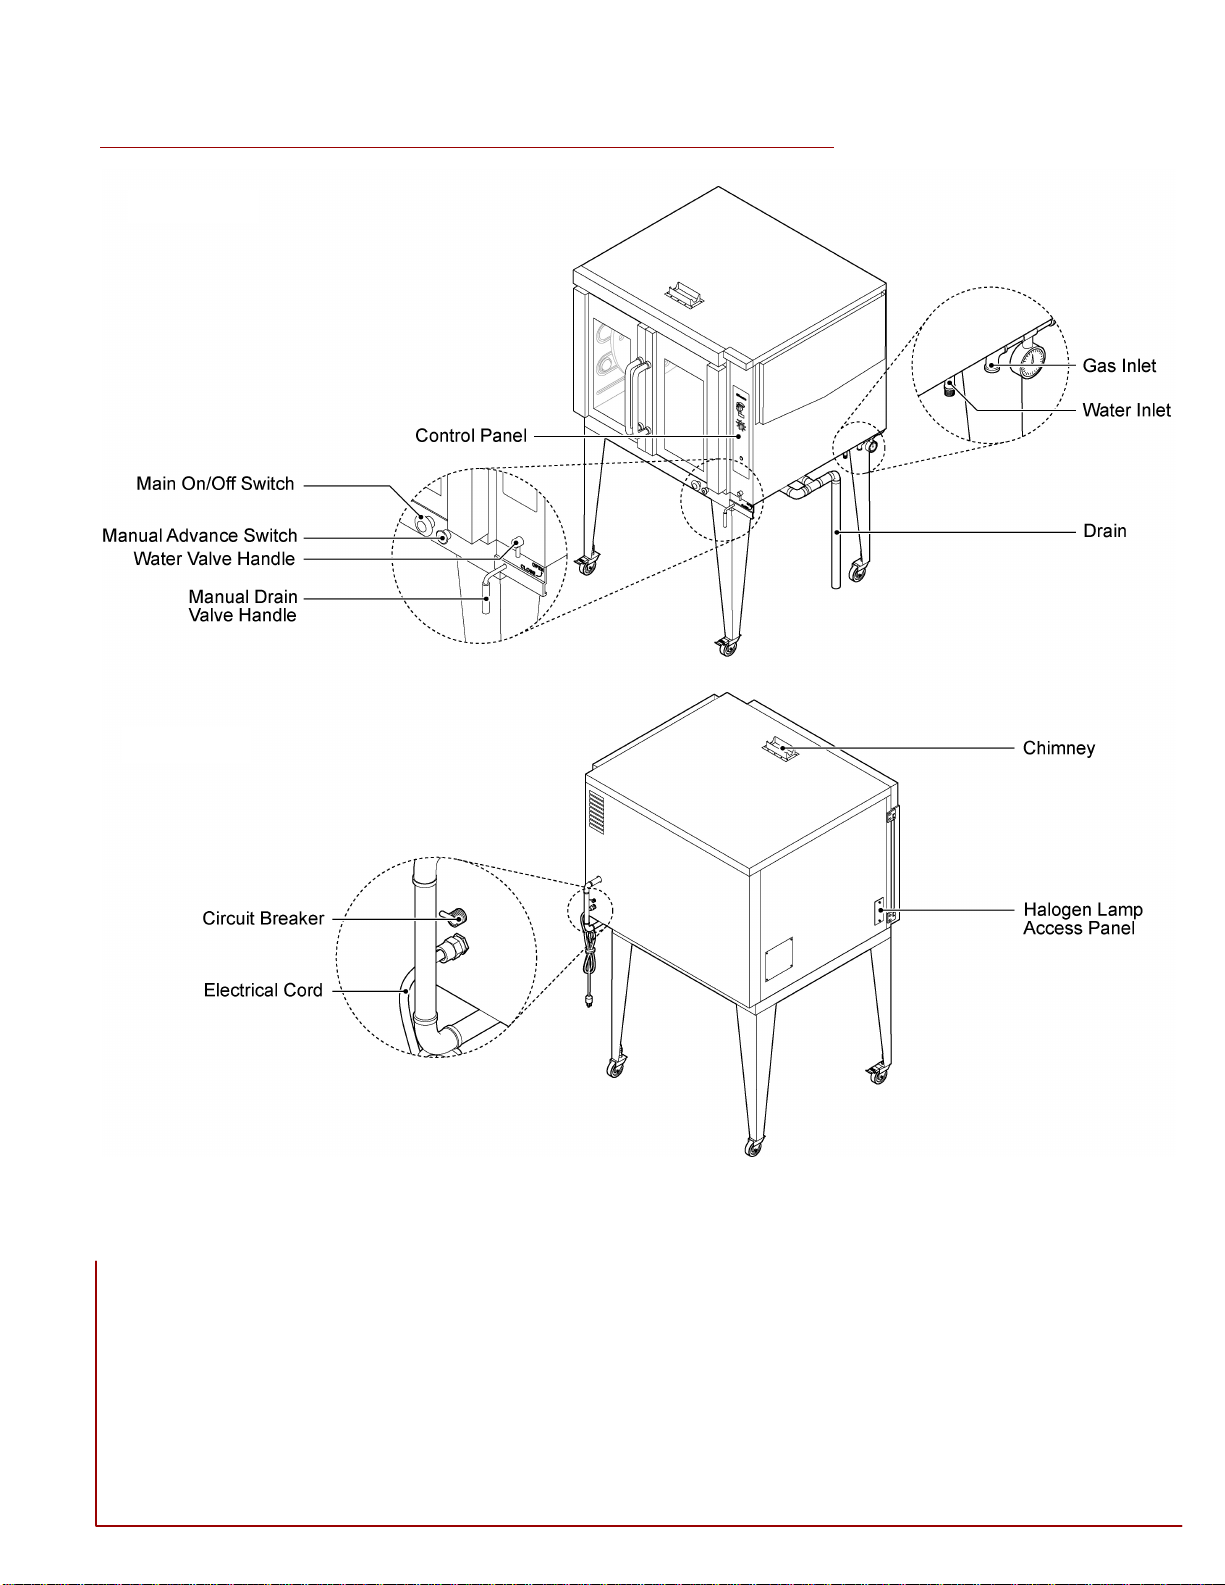
4.4 Double Deck French Door Rotisserie
Figure 4-4: Double Deck French Door Unit
Front View
Rear View
Page 10 of 19
Blaze_Op_Manual_(2012-10-12).doc
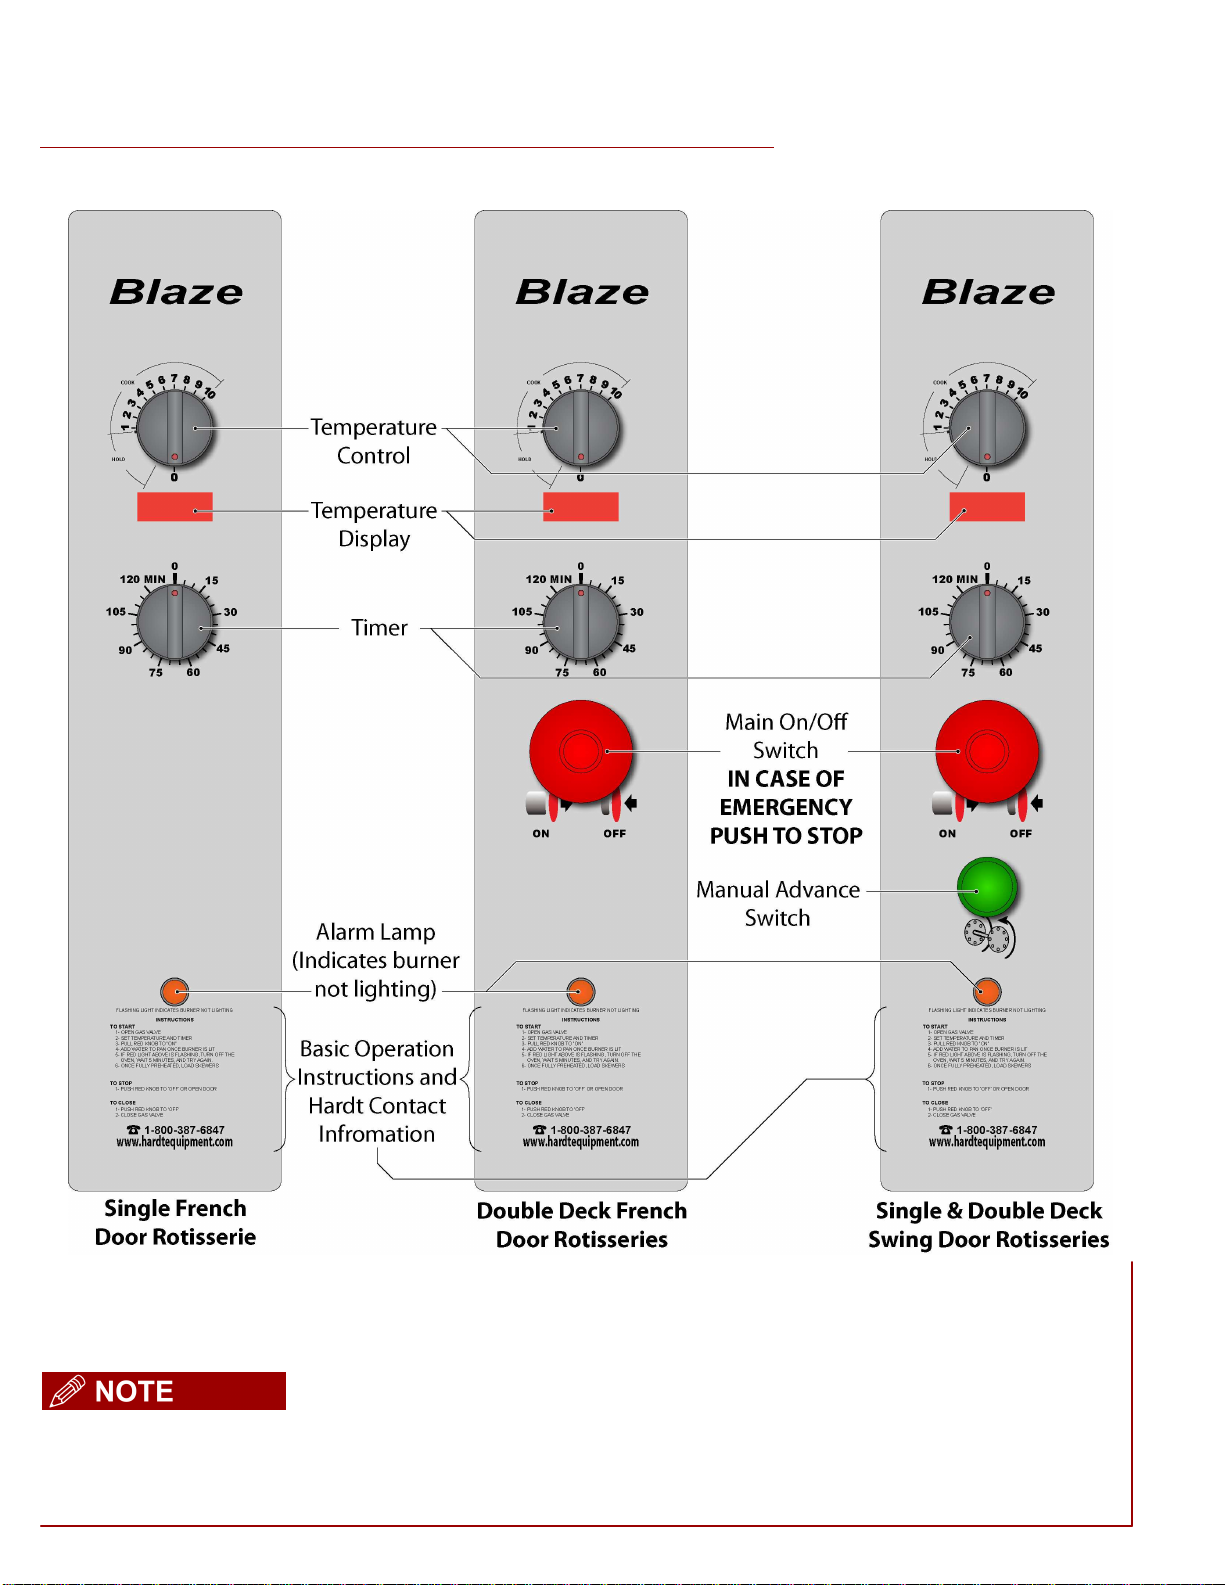
4.5 Control Panel Layout
Figure 4-5: Control Console
The main on/off switch and the manual advance switch for the single and double deck
French door rotisseries can be located on the front of each rotisserie as shown in Figure
4-2 and Figure 4-4.
Page 11 of 19
Blaze_Op_Manual_(2012-10-12).doc
HARDT
Responsive, Reliable Solutions
5.Operation
5.1 Morning Startup
ALWAYS TURN VENTILATION SYSTEM ON BEFORE STARTING ROTISSERIE. IT
IS REQUIRED TO REMOVE COMBUSTION BY-PRODUCTS AND GREASE-LADEN
AIR.
5.1.1 Starting the Rotisserie
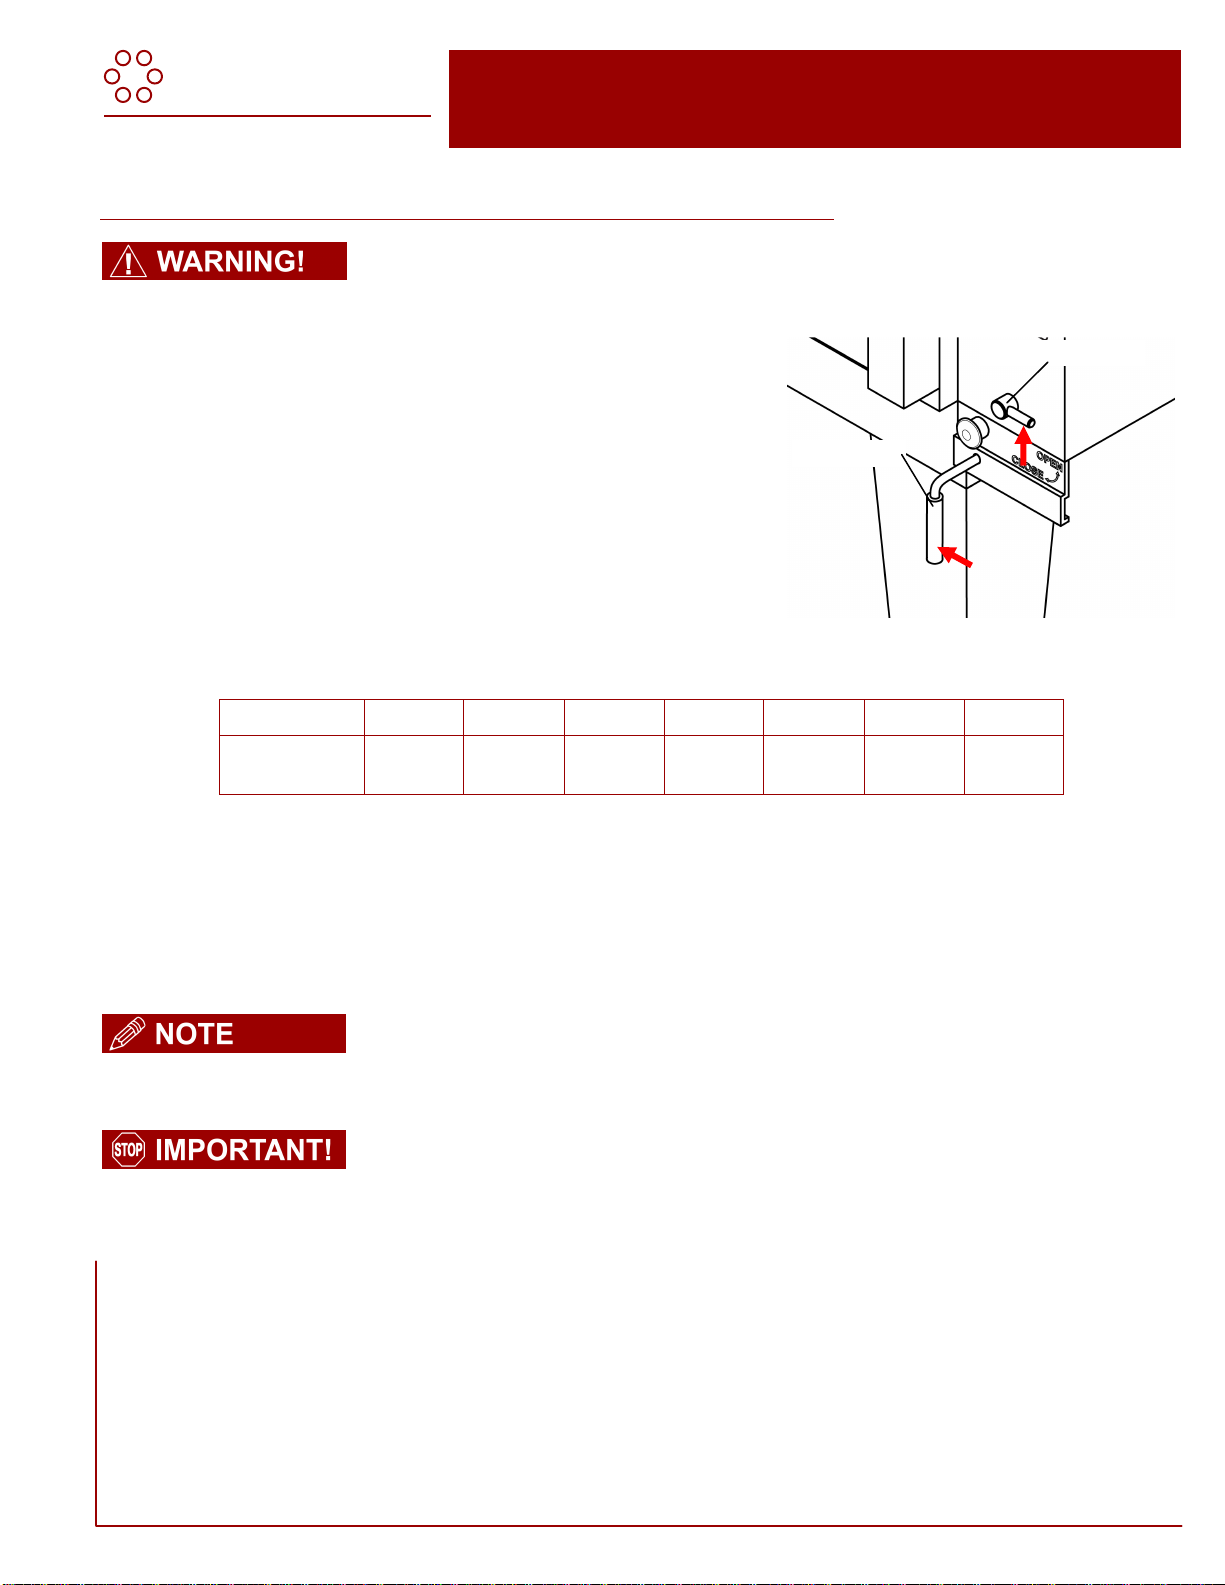
1. Make sure the drain valve is closed as shown in Figure 5-1.
2. Make sure the gas valve to the rotisserie is opened.
3. Turn on the ventilation hoods.
4. Set the thermostat to the desired temperature. Refer to table
below for settings.
Position: 1-4 5 6 7 8 9 10
Temperature: 100˚ F
38˚ C 450˚ F
232˚ C 490˚ F
254˚ C 530˚ F
277˚ C 570˚ F
299˚ C 610˚ F
650˚ F
5. With power connected to the rotisserie, turn on the Blaze by pulling out the red main on/off switch shown in
Figure 4-2, Figure 4-4 and Figure 4-5.
6. Open the water inlet valve (see Figure 5-1) and fill the water pan to the top of the overflow drain. Close the
water inlet valve.
Figure 5-1: Drain Valve & Water Inlet Valve
If the red alarm lamp is flashing, indicating the burner did not light, open the door for 5
minutes and retry. See the safety lockout section of the troubleshooting chapter on page
16 if the problem continues.
The rotisserie cannot be operated during a power failure. In the event of a
prolonged power failure, do not attempt to operate the rotisserie. Turn off the red
main on/off switch and close the gas valve. When power has been restored, open
the gas valve, pull out the red main on/off switch and resume normal operation.
Water Inlet Valve
Drain Valve

Page 12 of 19
Blaze_Op_Manual_(2012-10-12).doc
5.2 Cooking Procedure
THE ROTISSERIE IS HOT. ENSURE YOU ARE WEARING OVEN MITTS AT ALL
TIMES WHEN WORKING WITH THE HOT ROTISSERIE.
NEVER LOAD PRODUCT INTO A ROTISSERIE WHICH IS NOT PREHEATED.
CROSS CONTAMINATION OF RAW ONTO COOKED PRODUCT IS VERY
DANGEROUS.
DO NOT LOAD FRESH PRODUCT INTO THE ROTISSERIE UNTIL THE COOKING
CYCLE IS COMPLETE AND ALL COOKED PRODUCT IS REMOVED FROM THE
ROTISSERIE.
Refer to the table on page 5 for a list of safe cooking temperatures and times.
The procedures described here are basic. Hardt provides additional cooking and
food program support and training. Your organization may have specific
instructions that should be followed instead of the ones listed here.
5.2.1 Loading & Starting a Cooking Cycle
1. Make sure the temperature display reads the desired preheat temperature.
2. Open the door and load the product as per the procedure described in section 5.3.1.
3. Close the door.
4. Set the timer to the desired cook time.
5.2.2 End of the Cook Cycle
5. At the end of the cook when the timer alarm sounds, measure the internal temperature of the product. Refer to
section 3.4 of this manual for guidelines on safe product internal temperatures.
6. If the product is below desired temperature, close the door, and add at least five minutes the timer to continue to
cook.
7. If product is at or above the desired temperature, unload the skewers/baskets following the procedure described
in section 5.3.2
8. If necessary, open the water inlet valve to raise the water level back up to just below the overflow drain. Do not
overfill the drip pan.
9. Close the water inlet valve.

Page 13 of 19
Blaze_Op_Manual_(2012-10-12).doc
5.3 Loading & Unloading the Rotisserie
CROSS CONTAMINATION OF RAW AND COOKED PRODUCT IS VERY
DANGEROUS AND CAN LEAD TO FOOD POISONING.
DO NOT LOAD UNCOOKED PRODUCT INTO THE ROTISSERIE UNTIL THE
COOKING CYCLE IS COMPLETE AND ALL COOKED PRODUCT IS REMOVED
FROM THE ROTISSERIE.
5.3.1 Loading the Skewers
When the rotisserie reaches the desired preheat temperature the skewers can be loaded.
Open the door to shut off the burner and to stop the drive rotation. Use the green Manual Advance Switch (as
indicated in Figure 4-1 and Figure 4-3) to position sockets as required.
The orientation of the skewer in the socket will vary depending on the model of
your equipment.
Follow these steps to properly load skewers into the rotisserie.
1. As indicated in diagram ‘A’ below, insert the pointed end of the skewer into a hole in the plate on left side of
rotisserie.
2. Align the other end of the skewer with the corresponding socket on the right plate and push it into place (see
diagram ‘B’). Each skewer can only be inserted one way.
3. Slide the skewer back to the left until the shoulder of the tip at the left end of the skewer rests against the left
end plate as shown in diagram ‘C’.
4. Check that the skewer is secured in position (holds in place).
5. Advance the drive to another position using the green manual advance switch. Repeat steps 1-5 as required.
6. Close the door, select the proper cooking time and temperature, and the rotisserie will begin to cook.
USE PROTECTIVE CLOTHING WHEN LOADING AND UNLOADING THE
ROTISSERIE.
5.3.2 Unloading the Skewers
1. Open the door to shut off the burner and to stop the drive from rotating.
2. Verify that the internal temperature of the product has reached a safe level.
3. Remove each skewer by lifting the left end, sliding the skewer to the left and then gently pivot the skewer out
of the rotisserie. Place each skewer on a skewer cart or a table designated for cooked product.
4. Use the green manual advance switch to position the skewers (or baskets) as required for removal.
5. Close the door of the rotisserie to resume operation or cooking; (the burner will reignite as long as the
thermostat is set and the red on/off switch is pulled out).
6. If no further cooking is required, push in the red main on/off switch.
Figure 5-2: Loading Skewers
A) B)
Slide skewer into the
support plate
Push skewer into socket
in the drive plate.
Align ske
wer
with socket
Shoulder C)
Plates
Socket
Shoulder
Page 14 of 19
Blaze_Op_Manual_(2012-10-12).doc
HARDT
Responsive, Reliable Solutions
6.Maintenance
6.1 Daily Cleaning
6.1.1 During the Day
ALWAYS ALLOW THE ROTISSERIE TO SUFFICIENTLY COOL BEFORE
ATTEMPTING TO CLEAN IT.
It is recommended to clean the inner glass with a soft, damp cloth after every cooking cycle. This will lead to optimal
cleaning results without scratching the glass. Avoid using scouring pads or cleaners with grit on the glass.
It may also be necessary to replenish or change the water in the oven throughout the day, depending on the quantity
of product cooked.
6.1.2 At the End of the Day
It is recommended that you clean the rotisserie at the end of the business day, after all cooking has been completed.
ALLOW THE ROTISSERIE TO SUFFICIENTLY COOL BEFORE CLEANING.
USE EYE AND HAND PROTECTION
1. Cool down rotisserie until internal surfaces are warm to the
touch.
2. Ensure there is enough space in your effluent collection system
then drain the water pan using the drain valve handle.
3. Remove debris.
4. Use the water inlet valve to float away remaining residues in
water pan.
5. Spray a Hardt-approved oven cleaner on all major surfaces
(Drive plate, spit support, shaft, water pan, side walls).
6. Let the cleaner soak for 15 minutes.
7. Gently scrub with a Hardt approved non-abrasive brush (if
required).
8. Use a hose to gently rinse off all the oven cleaner.
9. Fill the water pan then drain it.
10. Verify that the rotisserie is clean.
11. If required, gently rinse entire oven again.
12. Clean the front of the rotisserie with a mild soap and water solution.
Do not use abrasives or scouring pads!
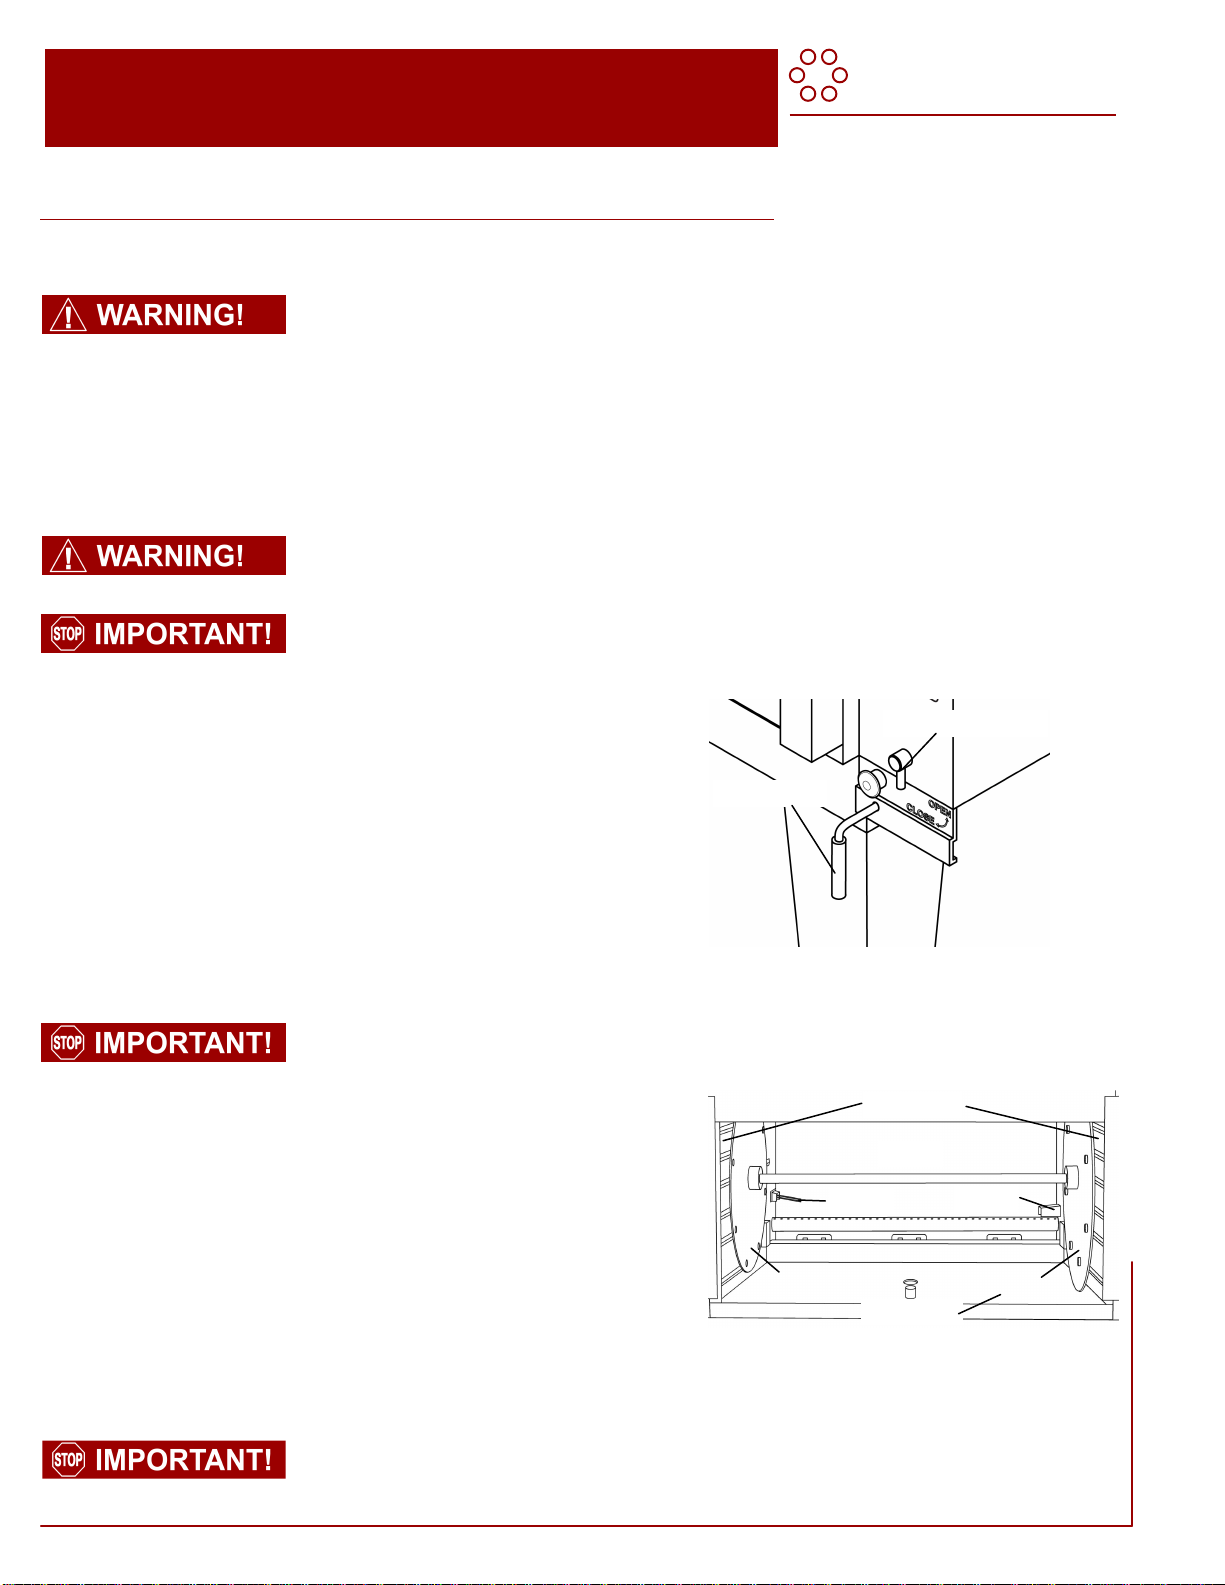
Before draining grease and water from the drip pan, always ensure that the
effluent collection system has enough room to accommodate the liquid.
Figure 6-1: Drain Valve
Do not spray directly on sensor or igniter!
Figure 6-2: Burner cover not shown.
Sensor
Igniter
Shaft
Water Pan
Side Walls
Drive Plate
Spit Support
Water Inlet Valve
Drain Valve
Page 15 of 19
Blaze_Op_Manual_(2012-10-12).doc
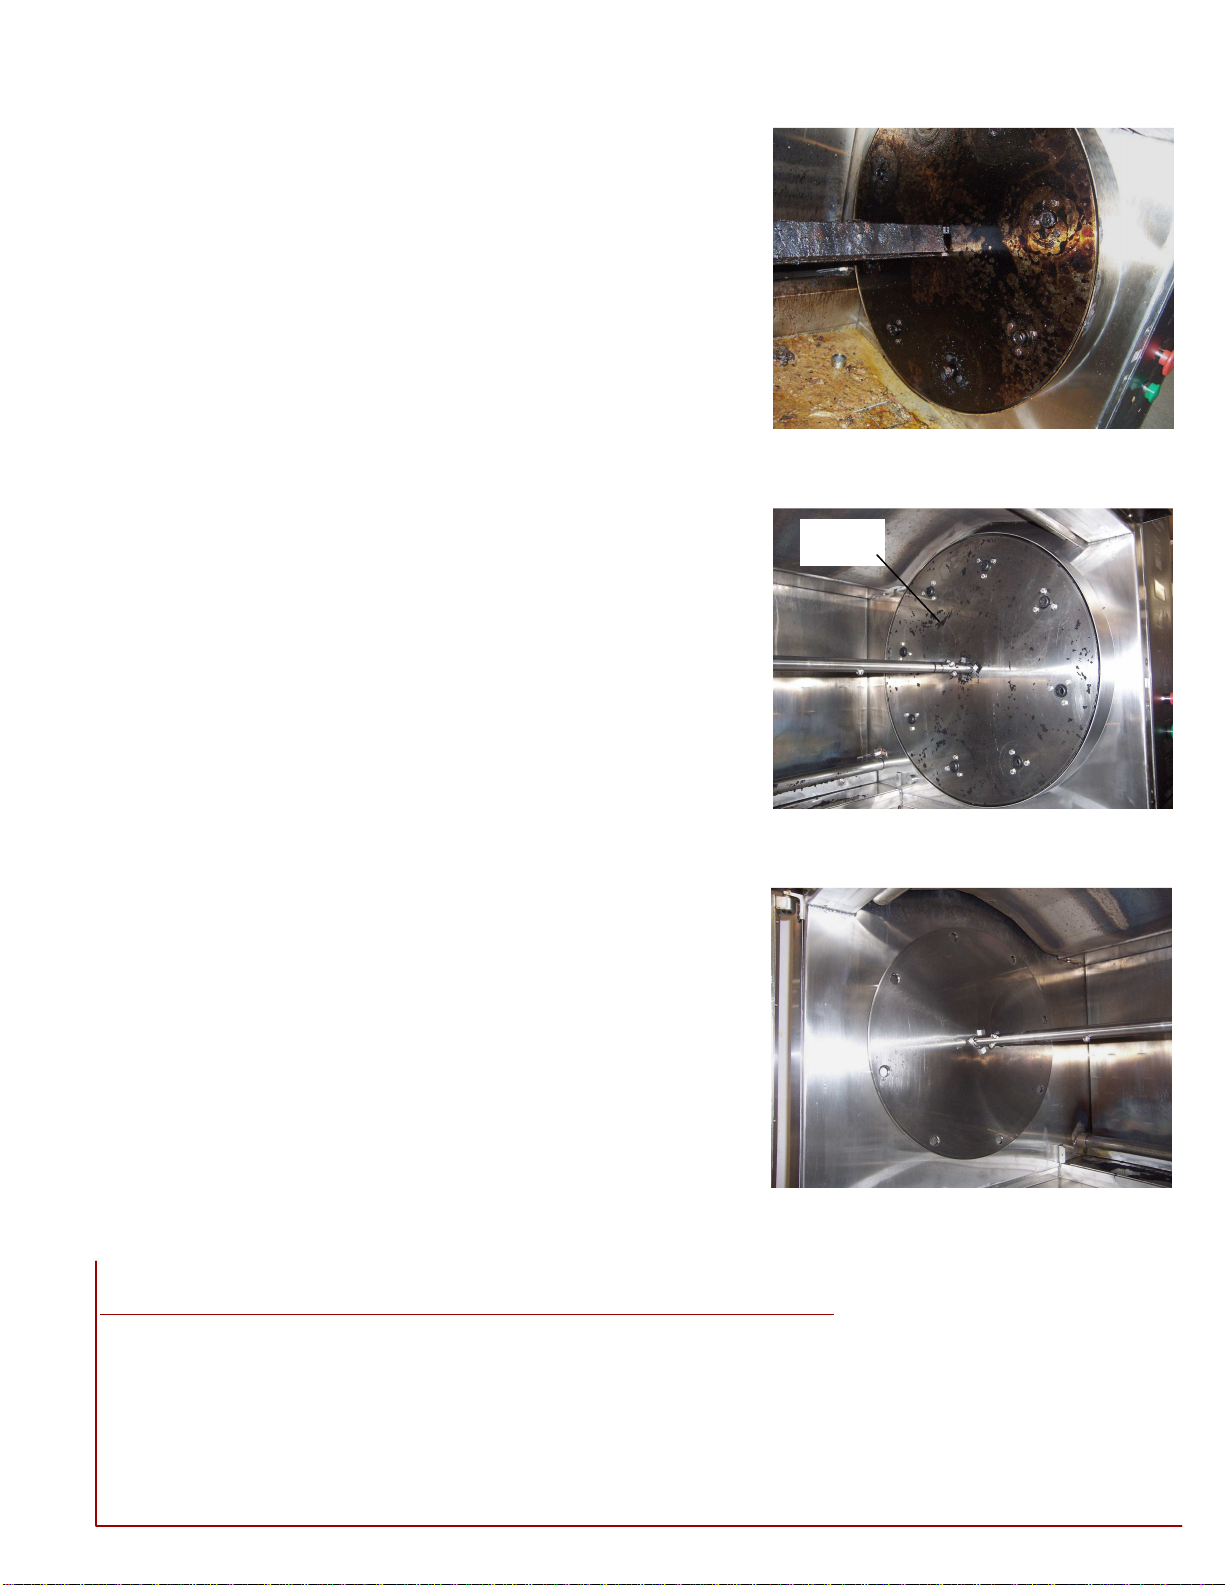
6.1.3 Cleaning effectiveness evaluation
It is important to consider the condition of the rotisserie after cleaning
is finished. The following images illustrate three states of cleanliness
and their related interpretation.
The image in Figure 6-3: Dirty Cavity shows an oven cavity that has
NOT been cleaned sufficiently to cook in. This may be due to the
cleaning procedures not being followed on a consistent basis.
It will be necessary to clean the rotisserie by using regular oven
cleaner (in a spray bottle) and a scrub pad or scraper to remove the
build-up of carbon.
If the rotisserie cavity looks like what is shown in Figure 6-4: Mostly
Clean Cavity, remove the residual flakes with a scrub pad PRIOR to
cooking.
The image shown in Figure 6-5: Clean Cavity shows a rotisserie
cavity that is sufficiently clean and in which cooking may be
performed.
6.2 Weekly Inspection
Thoroughly inspect the venting components supplied with the rotisserie for signs of damage (dents, perforations, etc).
Replace with certified Hardt components if required. Ensure that the electrical cord, water and gas lines are free from
damage and kinks.
Figure 6-3: Dirty Cavity
Figure 6-4: Mostly Clean Cavity
Figure 6-5: Clean Cavity
Residual
Flakes

Page 16 of 19
Blaze_Op_Manual_(2012-10-12).doc
HARDT
Responsive, Reliable S
olutions
7.Troubleshooting
DISCONNECT POWER TO THE ROTISSERIE BEFORE ANY MAINTENANCE,
SERVICE OR CLEANING IS PERFORMED.
ROTISSERIES EQUIPPED WITH CASTERS ARE SECURED IN PLACE USING A
RESTRAINING CABLE LOCATED ON THE RIGHT REAR UNDERSIDE OF THE
ROTISSERIE. THIS CABLE MUST BE DISCONNECTED PRIOR TO REMOVING THE
ROTISSERIE AND CAUTION MUST BE TAKEN TO ENSURE IT IS CONNECTED
ONCE THE ROTISSERIE HAS BEEN RETURNED TO ITS ORIGINAL POSITION.
THE ROTISSERIE IS HOT WHEN OPERATING. EXERCISE CAUTION WHEN
WORKING NEAR THE HOT ROTISSERIE.
WEAR APPROPRIATE PROTECTIVE CLOTHING.
7.1 Rotisserie does not Operate
SYMPTOM:
•The rotisserie does not operate when the red main ON/OFF is
pulled out (i.e. drive does not turn, and no glow from igniter).
SOLUTION:
•Check the rotisserie electrical power: If the rotisserie's lights are
off, check the circuit breaker on the back of the unit as shown in
Figure 7-1. If the circuit breaker is ‘OFF’ (tripped), return to 'ON'.
•Verify that the door is fully closed. The door switch disables the
ignition system.
•If this circuit breaker is ‘ON’, ensure that the power cord is plugged
into the wall and that there is power coming from the socket. If
power is available and the rotisserie still does not operate, contact
your local authorized service partner.
7.2 Safety Lockout
SYMPTOM:
•If the red main ON/OFF switch is pulled out, the drive drum will rotate and the igniter will attempt to light the
burner. If there is no flame after six minutes, the rotisserie will go into Safety Lockout mode, an alarm will
sound and the red light on the panel will illuminate.
SOLUTION:
•Turn the rotisserie off by pushing in the red main ON/OFF
switch.
•Verify that the gas supply to the rotisserie and the main gas
valve are both open. Try starting the unit again by pulling the red
main ON/OFF switch out.
•If the rotisserie goes into ‘safety lockout’ again. Turn the
rotisserie OFF.
•If you are certain the rotisserie interior is sufficiently cool to
touch, use a soft towel to gently wipe the top of the burner and
carefully clean the flame sensor (Figure 7-2).
•Try starting the rotisserie again. Pull out the main ON / OFF
switch.
If the rotisserie goes into safety lockout again turn the rotisserie OFF and
contact your local authorized Hardt service provider.
Figure 7-1: Circuit Breaker
Figure 7-2: Wipe Sensor & Burner
Circuit Breaker
Flame Sensor
Burner
Page 17 of 19
Blaze_Op_Manual_(2012-10-12).doc
7.3 Replacing the Halogen Lamp
1. Turn the rotisserie OFF (push the main ON/OFF switch in) and
disconnect the power cord from the wall receptacle.
2. Allow the rotisserie to sufficiently cool down.
3. Remove the light access panel located on the left side of the
rotisserie by loosening the thumb screws by hand (Figure 7-3).
4. Loosen the wing nuts on the light support bracket in order to access
the light (Figure 7-4).
5. While wearing gloves, gently pull the light bulb out of its fixture
(Figure 7-5).
6. Install a new bulb.
7. Reinstall the bracket and hand-tighten the two wing nuts.
8. Reinstall the access panel.
9. Plug the power cord back into the wall receptacle.
10. Turn the rotisserie ON (pull out main ON/OFF switch).
11. Verify that the replaced bulb functions correctly. It is normal for the
lights to take about 6 seconds to illuminate after the main switch is
pulled to the ON position. If not, repeat the first four steps of this
procedure and make sure the bulb was correctly inserted in the
socket. Reinstall the access panel, turn the rotisserie ON and
recheck. If problems persist, contact your local authorized service
partner.
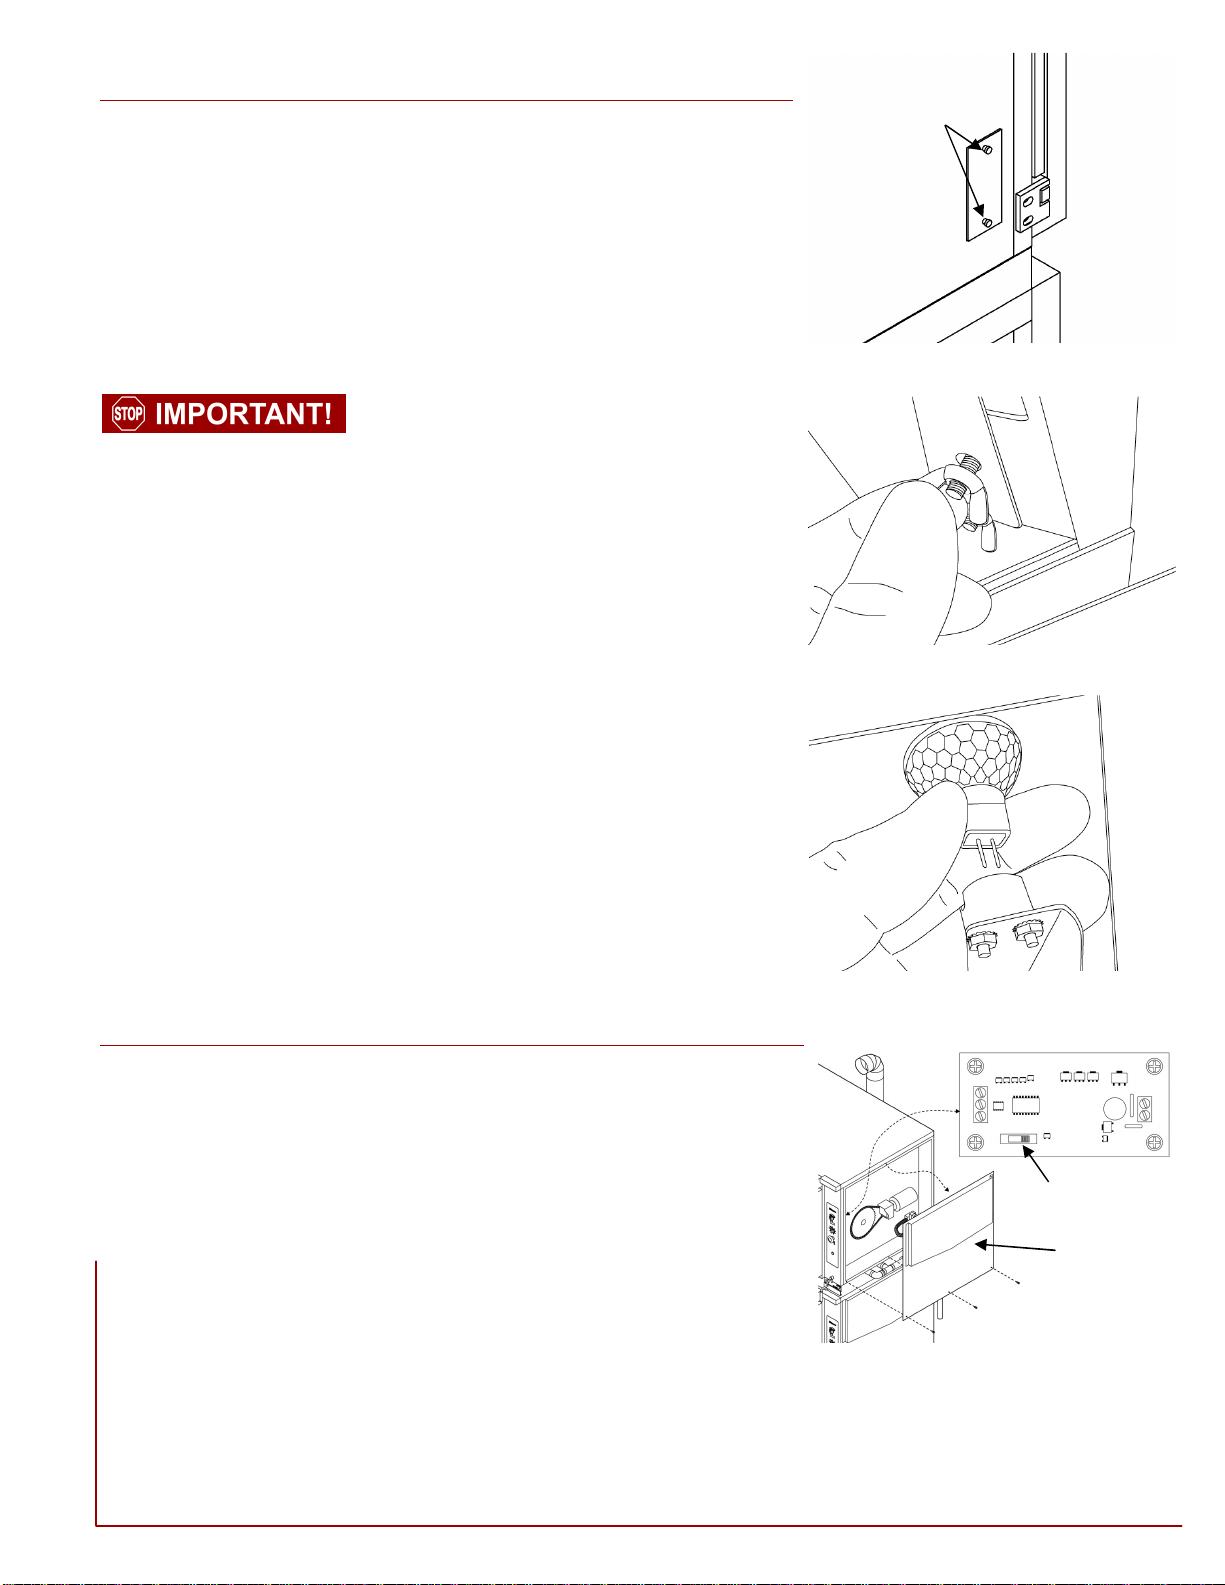
7.4 Changing Display Temperature Between
Fahrenheit and Celsius
1. Allow rotisserie to fully cool down.
2. Turn the rotisserie "OFF" by pushing the main ON/OFF switch in.
3. Remove the side cover by removing the three Phillips screws, and
gently lift and pull it away from the rotisserie.
4. Locate the temperature indicator circuit board (See Figure 7-6).
5. Move the small slide switch to the desired position (Celsius or
Fahrenheit)
6. Turn the rotisserie on. The display will show all 8’s and then a series of
C’s or F’s to indicate its setting.
7. Turn the rotisserie “OFF”.
8. Replace the side panel and install the three phillips screws.
Figure 7-3: Light Access Panel
Figure 7-4: Loosen/Tighten Wing Nuts
Figure 7-5: Replace Bulb
Do not touch the replacement bulb with
bare fingers or dirty gloves.
Remove Screws
Slide Switch
Side Panel
Figure 7-6: Circuit Board Location
Page 18 of 19
Blaze_Op_Manual_(2012-10-12).doc
HARDT
Responsive, Reliable Solutions
8.Options
8.1 Smoker Kit
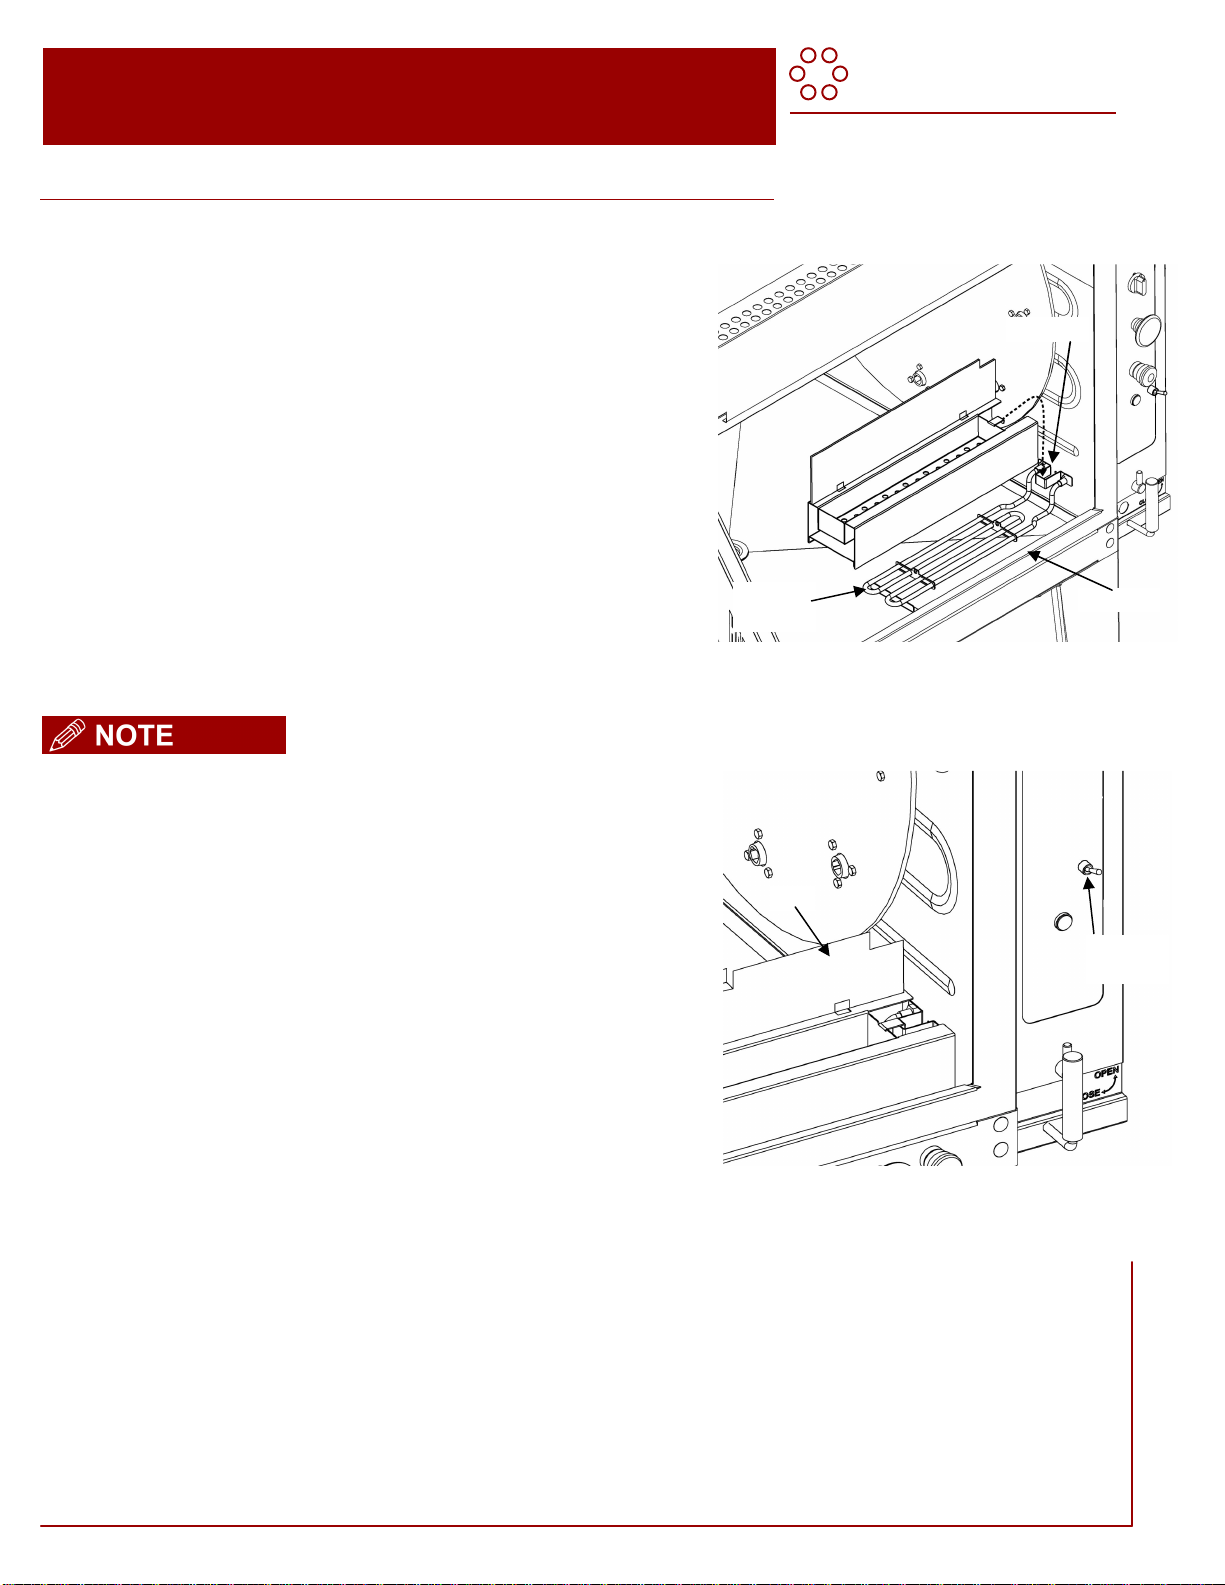
8.1.1 Operating Instructions
1. Insert the smoker box: align it to the front lip of the rotisserie and
then slide it to the right of the oven, where the box can be fixed in
place by hooking it onto the bracket (See Figure 8-1). Make sure
the heating element fits correctly into place, in the smoker box.
2. Verify that the smoker box is firmly seated at the right front side of
the rotisserie drip pan.
3. Measure 2 cups of dry wood chips.
4. Using oven mitts hold open the box lid and pour chips into the
box, spread evenly with a spoon. If there is any previously
collected ash in the box, push it through the holes at the bottom
of the box with a utensil.
5. Close the box's lid and turn ON the smoker (switch at the bottom
of the control panel) to activate the smoker (see Figure 8-2).
The smoker has a separate cord line at the back of the rotisserie that must be connected.
The smoker can only be energized with the rotisserie power on and the rotisserie door
closed.
6. After 20-30 minutes, smoke will start to flow out of the box.
7. Repeat these operations for following batches. Adding chips too
often will reduce smoke quality.
Figure 8-1: Install the Smoker
Figure 8-2: Turn On Smoker
Front Lip
Bracket
Heating
Element
Lid
Smoker
Switch
Page 19 of 19
Blaze_Op_Manual_(2012-10-12).doc
HARDT
Responsive, Reliable Solutions
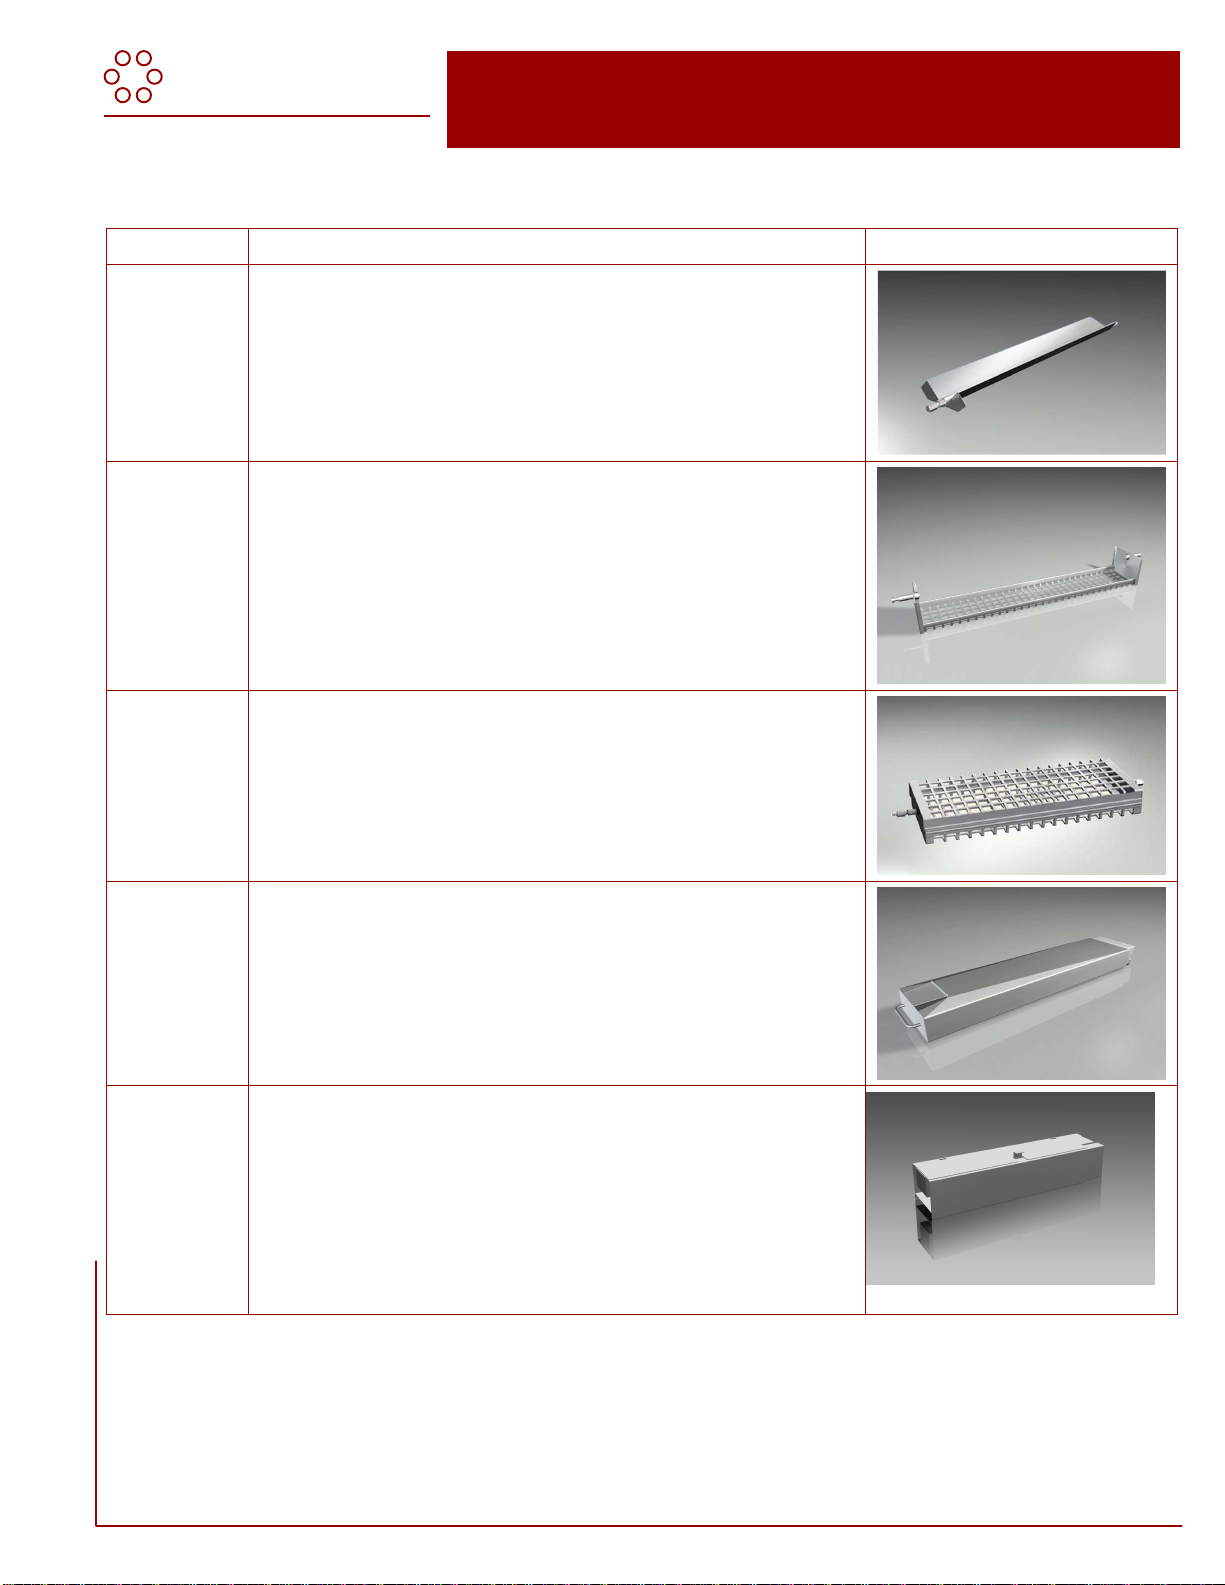
9.Available Accessories
Please refer to the following table when ordering accessories from Hardt.
Part Name Description Illustration
‘V’ Skewers This is the ‘V’ skewer but with a modified end tip so the skewer can
only be loaded one way, ensuring correct positioning of the
product while cooking.
Hanging
Basket Designed for products that should not rotate during cooking. The
basket stays horizontal while the drive turns.
Rib Basket A clamshell basket that is ideal for cooking ribs, chicken parts and
a variety of other products.
Grease
Shuttle
The grease shuttle is used with a lower oven of a double-deck
configuration to transfer the water pan’s contents to a rendering
barrel or other grease capturing device.
Smoker An electric smoker which burns wood chips to add a smoky flavor
to product being cooked in the rotisserie.
Other manuals for Blaze
1
Table of contents
Other Hardt Oven manuals


