Hart Systems EZCORP User manual

HAVE A QUESTION? CALL THE HART HELP DESK at 800-252-2818, or EMAIL US AT elp@ artsystems.com
Copyrig t 2012 by Hart Systems, LLC
HART ID =
317-01
AUDITOR’S REFERENCE GUIDE
AUDITOR’S REFERENCE GUIDE
SYSTEM
SYSTEM
VERSION
03
RECEIVE COMPONENTS/SUPPLIES
RECEIVE COMPONENTS/SUPPLIES
SET UP ACCESS POINTS
SET UP ACCESS POINTS
HART DEVICE
HART DEVICE
SET UP SCANNERS
SET UP SCANNERS
SCANNER FUNCTIONS
SCANNER FUNCTIONS
HOW TO ACCESS REPORTS
HOW TO ACCESS REPORTS
REPORT DESCRIPTIONS
REPORT DESCRIPTIONS
CLOSE THE INVENTORY
CLOSE THE INVENTORY
SHIP EQUIPMENT
SHIP EQUIPMENT
TIPS/TROUBLESHOOTING
TIPS/TROUBLESHOOTING
HART HELP DESK INFORMATION
HART HELP DESK INFORMATION

HAVE A QUESTION? CALL THE HART HELP DESK at 800-252-2818, or EMAIL US AT elp@ artsystems.com
RECEIVE COMPONENTS/SUPPLIES
RECEIVE COMPONENTS/SUPPLIES
You will receive one or more equipment boxes containing all of
t e necessary components for t e Audit.
♦ T e box will be sealed wit tape. Cut the t pe with
knife, do not rip t pe off.
♦ W en opening t e boxes, be careful. Try not to rip or
damage t e box. You will use t e same boxes to return t e
components to Hart Systems.
♦ Inside one equipment box, you will find:
○ Scanners
○ Access Point
○ Scanner c argers
USB Modems - (1) Verizon and (1) AT&T. Use t e air
card t at as best coverage for your area.
NOTE: T e scanners will ave 15+ ours of battery life.
However, if you need to c ange a battery during
Inventory, place t e disc arged battery in t e plastic
bag provided and return to Hart along wit t e
equipment.
NEVER! THROW THE BATTERIES OUT!
♦ Remove t e Scanners from t e foam insert, t en remove
t e foam insert itself and continue wit t e following
“layers”.
Page - 1

HAVE A QUESTION? CALL THE HART HELP DESK at 800-252-2818, or EMAIL US AT elp@ artsystems.com
You will also receive t e following:
♦ A Shipping Instructions envelope, containing labels and
documents used to s ip t e box back to Hart Systems
w en t e audit is complete.
Hart Systems also provides t e following to complete your
audit/inventory:
♦ Auditor’s Reference Guide - t is can be printed from t e
Website.
♦ H rt Control ID B r Code - you will need t is form to set-
up t e scanners for your store.
♦ T is form s ould be printed from t e Hart Website for
t e store you are auditing/inventorying.
♦ Under Inventory Functions, select Wireless Control ID
♦ Internet Password flyer. You will use t is flyer to access
Internet reports. T is password can be supplied by your
corporate office.
If any of the equipment is missing, contact the Hart Help Desk
immediately at 800-252-2818
Page - 2

HAVE A QUESTION? CALL THE HART HELP DESK at 800-252-2818, or EMAIL US AT elp@ artsystems.com
SET UP ACCESS POINT
SET UP ACCESS POINT
WiFi Connectivity Overview
T e Hart Systems NexGen Inventory System provides instant
communications at t e end of eac item. T e Internet reports are
updated in real-time.
Eac location was provided two Access Points. One Access Point
s ould provide sufficient coverage for Inventory. T e ot er access
point can be used as a back-up unit. If you use both Access Points,
ple se keep them t le st 150 feet p rt from e ch other.
VERY IMPORTANT!!!
1. For optimum r nge, pl ce the Access Point in the the middle
of the store nd s high s re son bly possible.
2. Try to void ny known re s with difficult cell cover ge.
3. In the event th t the loc tion h s no cell cover ge, ple se c ll
the H rt Help Desk for further instructions.
T e CradlePoint routers (“Access Points”) can be connected
anyw ere in t e facility wit an accessible power outlet.
To set-up the Access Point:
1. Clear a flat surface area wit access to a power outlet.
2. Place t e following items in t e area:
♦ Access Point.
♦ USB Air Cards
3. Connect t e power adapter for t e Access Point into t e port on
t e back and t en plug into an available outlet.
4. Insert the USB Airc rd into t e USB port in t e back of t e
Access Point.
♦ You received TWO (2) USB Airc rd types for t e main
Access Point - one for Verizon and one for AT&T; you s ould
use t e Aircard for t e respective carrier t at as t e best
coverage in your area.
Page - 3
HAVE A QUESTION? CALL THE HART HELP DESK at 800-252-2818, or EMAIL US AT elp@ artsystems.com
♦ Do not ttempt to use both Airc rds in one or both of the
Access Points.
Page - 4
VERY IMPORTANT!!!
1. For optimum r nge, pl ce the Access Point s high s re -
son bly possible.
2. Try to void ny known re s with difficult cell cover ge.
3. In the event th t the loc tion h s no cell cover ge, c ll the
H rt Help Desk for further instructions.
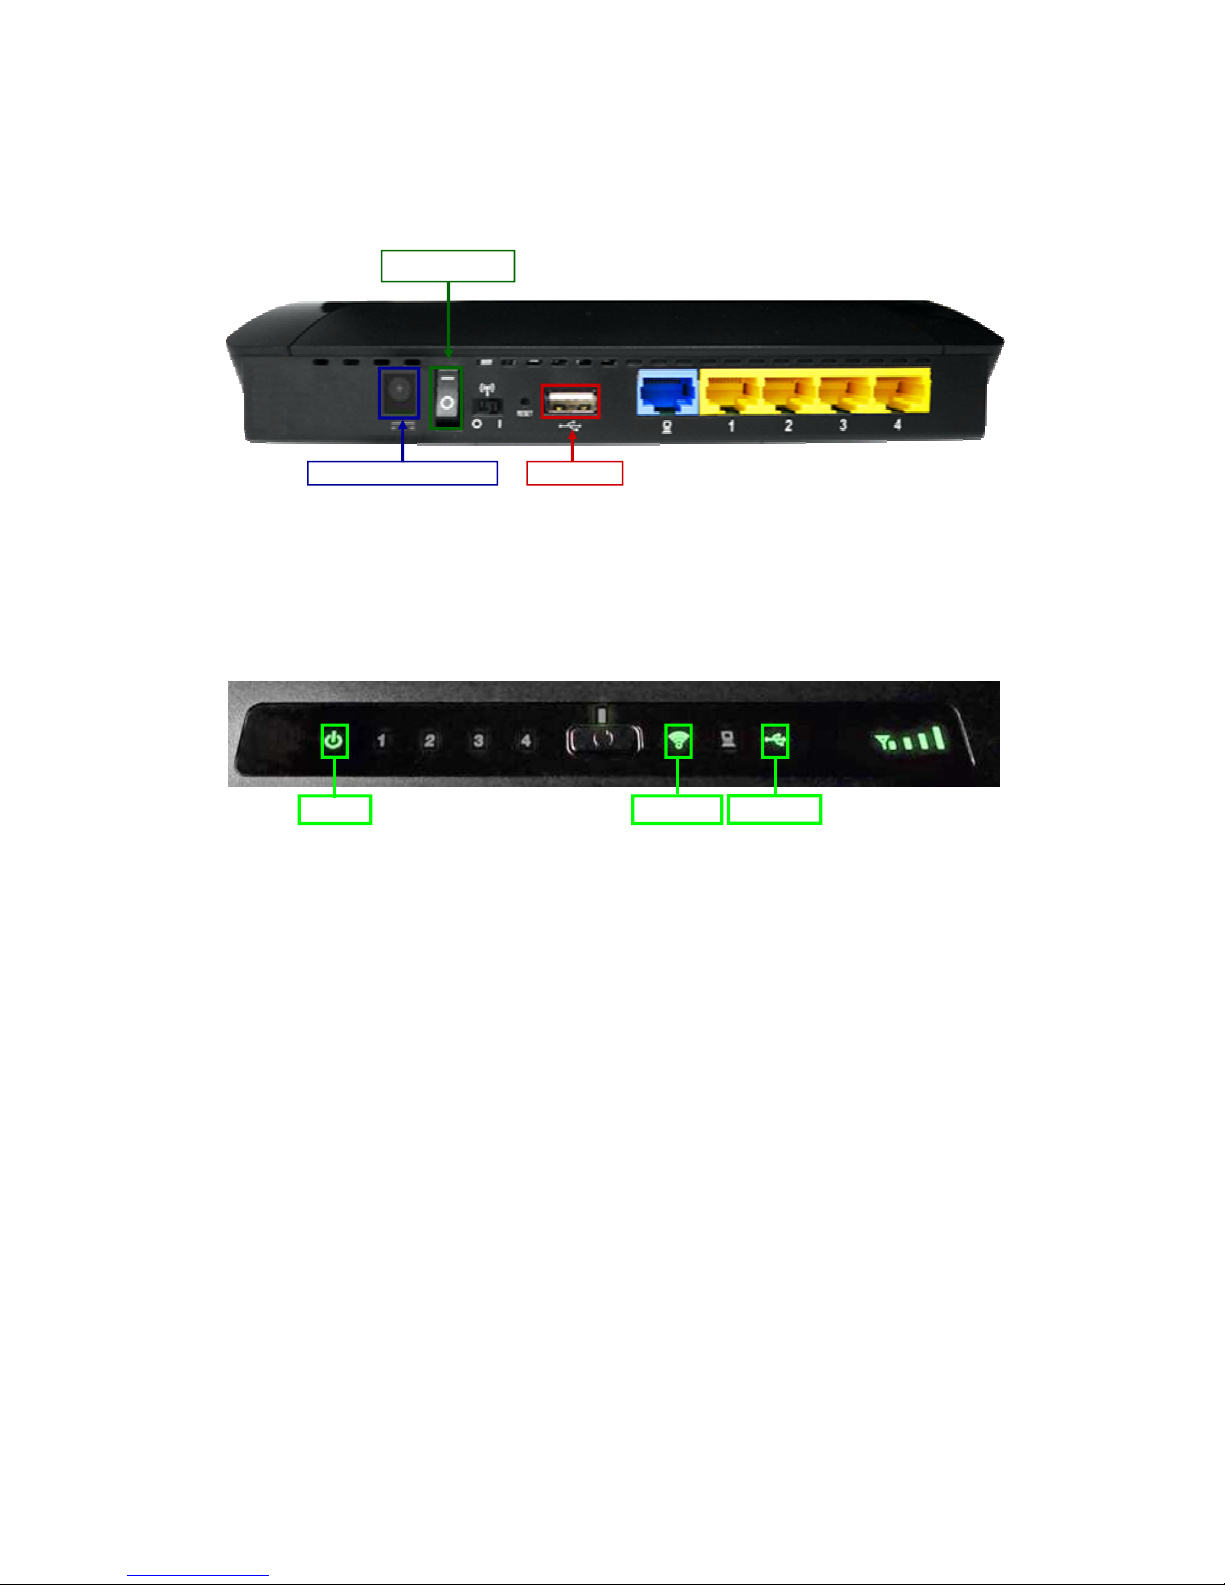
Power Switch
Power Ad pter Port USB Port
5. Once t e Access Point, as been connected to t e power outlet
and t e USB Aircard as been connected, t e Power Status,
(green), USB Port 3 (blue or green) and Wireless indicator (green)
s ould be lit (see below).
The ccess point is now re dy to use!
♦ T e Access Point must be connected in order to transmit.
Remember to connect the ccess point before sc nning ny
live Inventory d t .
Power USB Port
Wireless
HAVE A QUESTION? CALL THE HART HELP DESK at 800-252-2818, or EMAIL US AT elp@ artsystems.com
Page - 5
HART DEVICE
HART DEVICE -
- IMPORTANT KEYS
IMPORTANT KEYS
= Increases screen brig tness.
= Decreases screen brig tness.
= Increases volume.
= Decreases volume.
FUNC (Function) Key
Auxili ry
Sc n Button
Auxili ry
Sc n Button
“SCAN”
Press to scan
bar codes.
“ESC”
Used to clear an
entire field.
“ENTER”
Used to accept all
entries.
(Power Key)
Used to power
t e scanner
on and off.
“BKSP”
Used to clear an
entry, one position
at a time.

HAVE A QUESTION? CALL THE HART HELP DESK at 800-252-2818, or EMAIL US AT elp@ artsystems.com
Page - 6
Signal
Strengt
Store# Employee ID Battery
Strengt
Pending Items Indic tor
P = Sc nner cont ins
items to be
tr nsmitted to H rt.
P1

HAVE A QUESTION? CALL THE HART HELP DESK at 800-252-2818, or EMAIL US AT elp@ artsystems.com
SET UP SCANNERS
SET UP SCANNERS
♦ Now t at t e ccess point is up and running, you can start
registering t e scanners.
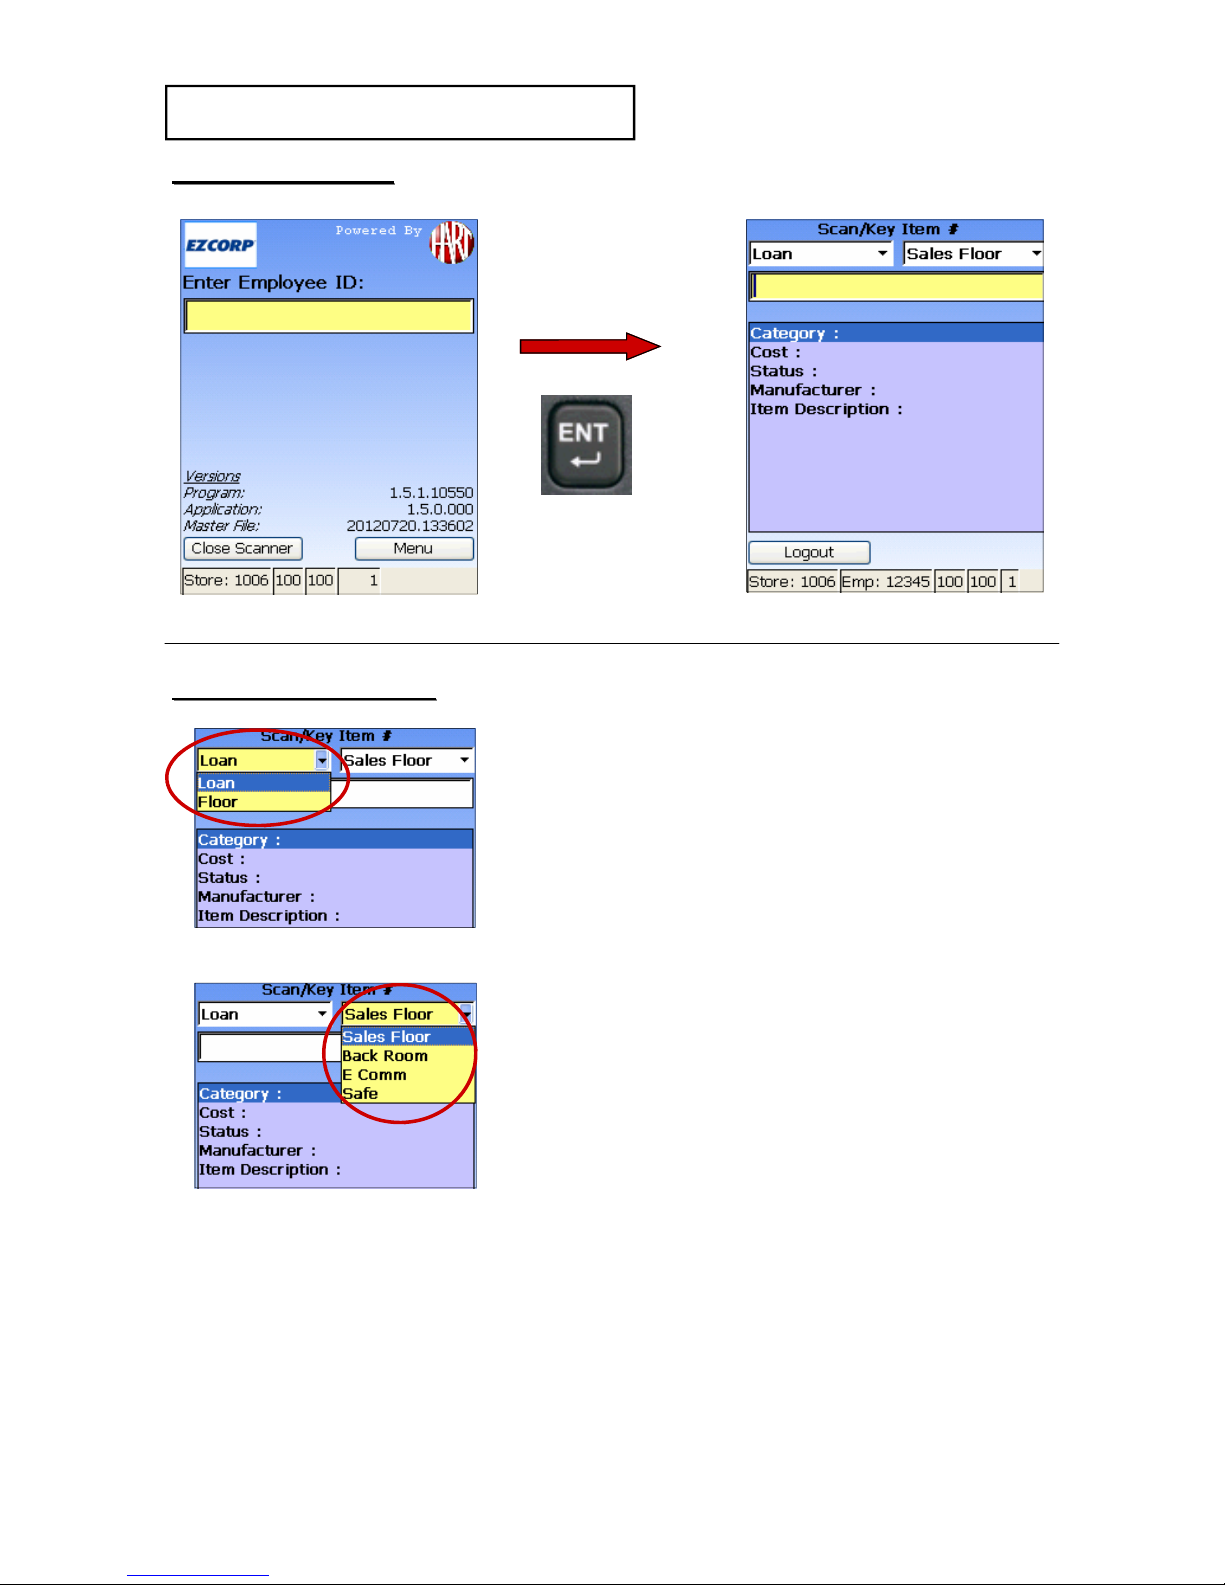
Set Up Sc nners:
1. Sc n t e Hart Control ID bar code.
2. Key your Store Number and press
ENT (Enter).
3. T e scanners will register shortly
fter pressing ENT and will
automatically pick-up any Master File
updates. Be sure to Press t e
Continue button to finis t e
registration.
4. T e “Enter Employee ID” screen will be displayed.
5. Repe t steps 1 and 2 for all scanners.
6. Look on the H rt website to
verify the Sc nners
h ve Registered Successfully:
After entering t e store number, t e “P” s ould disappear
from t e bottom of t e screen.
If t e “P” still appears, it could mean your Access Point is
not connected, or t e Scanners are out of range of t e
access point.
Page - 7
HAVE A QUESTION? CALL THE HART HELP DESK at 800-252-2818, or EMAIL US AT elp@ artsystems.com
After entering t e Employee ID, Confirm
th t the sc nner is set for the correct
STATUS, Lo n or Floor.
You must lso set the sc nner for the
AREA of the store you re sc nning:
S les Floor
B ck Room
E Comm
S fe
Then you c n sc n the item #.
ENTER ITEM SCREEN
ENTER ITEM SCREEN
Page - 8
**The file must be v il ble for your store before you register
the sc nners.**
After the file h s been sent, check the H rt Website Overview for
your store to m ke sure Audit File St tus s ys “Av il ble”
Key t e Employee ID and
press ENT (Enter).
SET UP SCANNER
SET UP SCANNER
SCANNER FUNCTIONS
SCANNER FUNCTIONS

HAVE A QUESTION? CALL THE HART HELP DESK at 800-252-2818, or EMAIL US AT elp@ artsystems.com
1. After scanning t e item t at is part of
t e audit, t e following information for
eac item will be displayed:
Category:
Cost:
Status:
Manufacturer:
Metal Weig t:
Gold Color:
Gold Karat:
Item Description:
SCAN ITEMS
SCAN ITEMS
SCANNER FUNCTIONS
SCANNER FUNCTIONS -
-
Continued
Continued
AUDIT ASSIGNENT ITEM#’s
AUDIT ASSIGNENT ITEM#’s
1. T e scanner will alert you if a scanned
item is not on t e Audit Assignment
File.
• All special messages can be
acknowledged by pressing ENT
(Enter).
You m y only sc n items th t re
p rt of the current udit ssignment.
Page - 9
REMINDER: CONFIRM THAT YOUR SCANNER IS SET TO THE CORRECT
STATUS AND AREA DURING THE AUDIT/INVENTORY!!!
This manual suits for next models
1
Table of contents


