Haunted Hill Farm FSSLWT071A-BLK1 User manual

1
Schematic diagram
Component list
No. Name Number
1 Lamp top 1
2 Lamp holder 1
3 Lamp post (17in)2
4 Adapter (12V AC 500mA) 1
5 Extended wire (137in) 1
6
Power wire (137in)
(inside lamp post: 59, outside: 78in)
1
7
Base trim
1 set
(
4)
8
Ground nail
4
9
Lamp base
1
10
Square base
1
11
Plaque
1
12
Lamp post joint
1
13
Power wire of lamp holder
1
14
Screw
4+1
Note: 1,2,3,4,5,6 are all wire joints.
Caution
This product (especially the lamp holder) is fragile and should be assembled with care.
This product is waterproof; but it is necessary to keep the lamp in the vertical direction to ensure water
drains correctly.
Please follow the below steps and requirements specified in the instruction to ensure safety and
reliability during the installation.

2
1) Install lamp base
Please assemble the product from the bottom to the up,
following the main steps below:
A. Assemble lamp base (9) and square base (10) with 4
screws:
B. Assemble 4 pieces of additional base (7) into a whole,
and then assemble the whole additional base (7) with the
lamp base (9).
Note: The base trim (7) is especially designed to fasten the
street lamp more securely. The base trim does not need to
be installed if the following applies: street lamp is installed
on a flat ground and there is no external force (such as high
winds) to bring it down or if the street lamp is used outdoor
and it can be fixed on the ground by fastening ground nails.
2) Install lamp post
Screw the 2 upper and lower posts (3), lamp post joints (12)
and square lamp base (10) together according to the
sequence shown in the figure below. Note: Every screw
thread must be tightened; otherwise, the lamp posts may
lean.
3) Install lamp holder
A. Thread the power wire (6) and its joint (5) through the
lamp base and lamp post (the lamp base and lamp post
can be laid down or put upside down for convenience. After
drawing out the joint (5), place it correctly for later use);
B. Take out the lamp holder (2) and put on the lamp top (1);
C. Draw out the joint (6) and the power line (13), connect
the joints (5) and (6), put the combined joints and their
wires into lamp post (3). Note: At this time, it will be better
to ask another person to hold the lamp holder (2) for a
more secure assembly.
D. Rotate the lamp holder (2) to fasten it on the lamp post
(3). Note: The screw thread shall be tightened as far as
possible. Meanwhile the direction of the lamp holder (2)
shall be slightly adjusted to make it match the direction of
the lamp bases (9) and (10).
Assembly Instructions
3
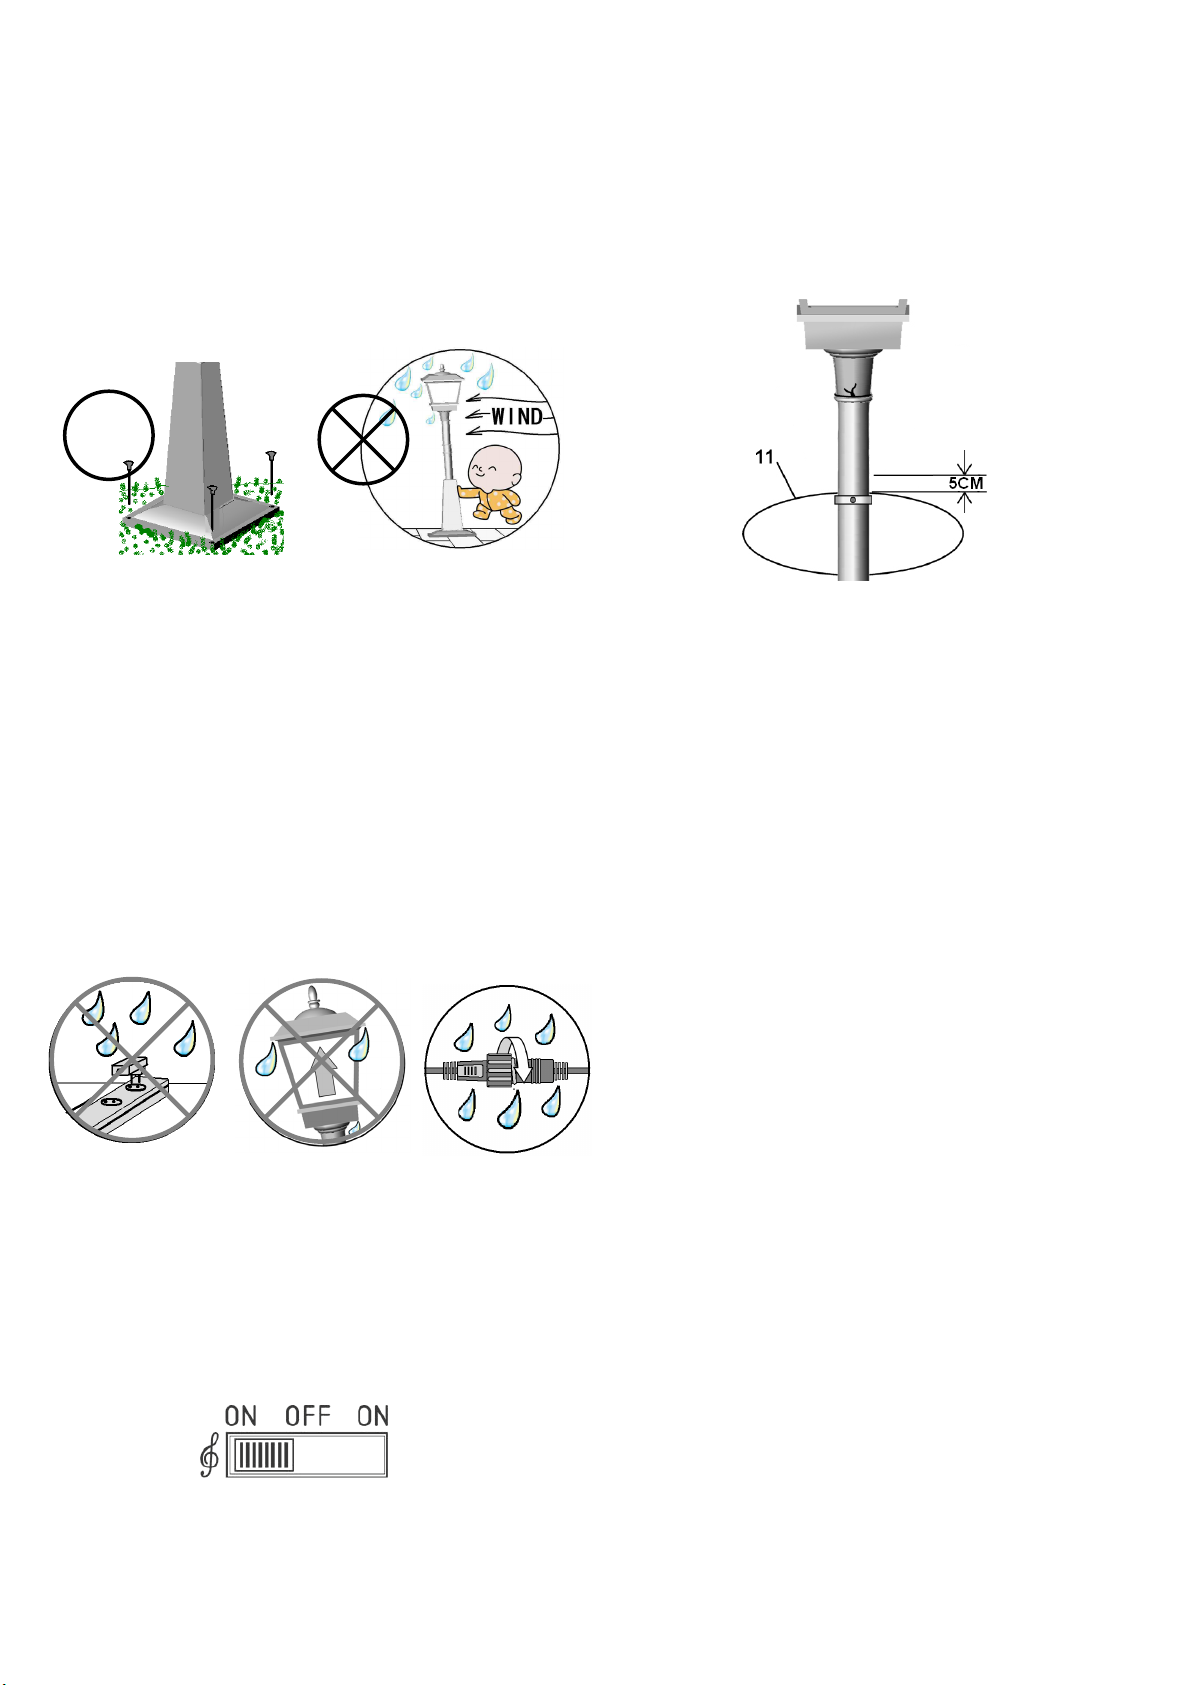
4) Positioning, power-on, Rainproof and examination
A. Positioning: Carefully place the assembled street lamp in
an upright position. Note: (1) If the street lamp is to be
installed outdoor, please fix the lamp base with ground nails
in case high wind blows it down; (2) The street lamp should
be placed at a location without man-made interference to
avoid damages. (3) If the street lamp is being installed
indoor and near a man-made interference, please be sure
to use additional base (7) to keep it secure.
B. Power on: Tightly connect the two joints (1) and (4) of the
adaptor (4) and power wire (6). If the power wire isn’t long
enough, it is able to add the extended wire (5) between
them, and then connect the adapter (4) with the main
power source.
C. Rainproof: (1) The adapter itself is not waterproof, so
make sure that the connection point between the adapter
and the main power source is indoor or free of rainwater or
snow in case of electric leakage or electric shock. (2) The
lamp holder (2) shall be kept vertical to ensure water drains
correctly (3) If the street lamp is used outside, all joints of (1)
and (2), (3) and(4), (5) and (6) must be tightened in case of
water and electric leakage.
D. Examination: When setting the switch on the bottom of
the lamp holder (2) (see the figure below) to the left side,
the lamp should be lit, snowflakes falling down and music
splaying. If it fails to perform such functions, check if the
joints 1, 2, 3, 4, 5 and 6 are connected well. You can also
turn the switch to the right side to turn off the music.
5) Decorate and enjoy
As shown in the figure below, fix the plaque to the upper
side of the lamp post to make the street lamp complete the
look. If the street lamp is going to be installed outside, there
is no need to install these decorations.
√
This manual suits for next models
2
Popular Outdoor Light manuals by other brands

LI-TIAN LIGHTING
LI-TIAN LIGHTING LT-XT-08 installation instructions

Paradise Datacom
Paradise Datacom GL22785 instructions

Silverwood
Silverwood CPLT1874 Assembly instructions

Overland Vehicle Systems
Overland Vehicle Systems UFO Solar Camp Light & Speaker instruction manual

Nemo
Nemo AS1C Assembly instructions

BES LED
BES LED Trion Hudsy BSE243332 quick start guide


Philips
Philips Ecomoods 169148716 brochure

Gama Sonic
Gama Sonic ASPEN GS-8 instruction manual

Maxim Lighting
Maxim Lighting Morrow Bay VX 40285WGET installation instructions

stellar labs
stellar labs 1146 user manual

PROLUMIA
PROLUMIA Pro-Fit + Photocell operating instructions

Performance In Lighting
Performance In Lighting WIN PRO+ 30 manual