Hauswirt HO-301510S User manual
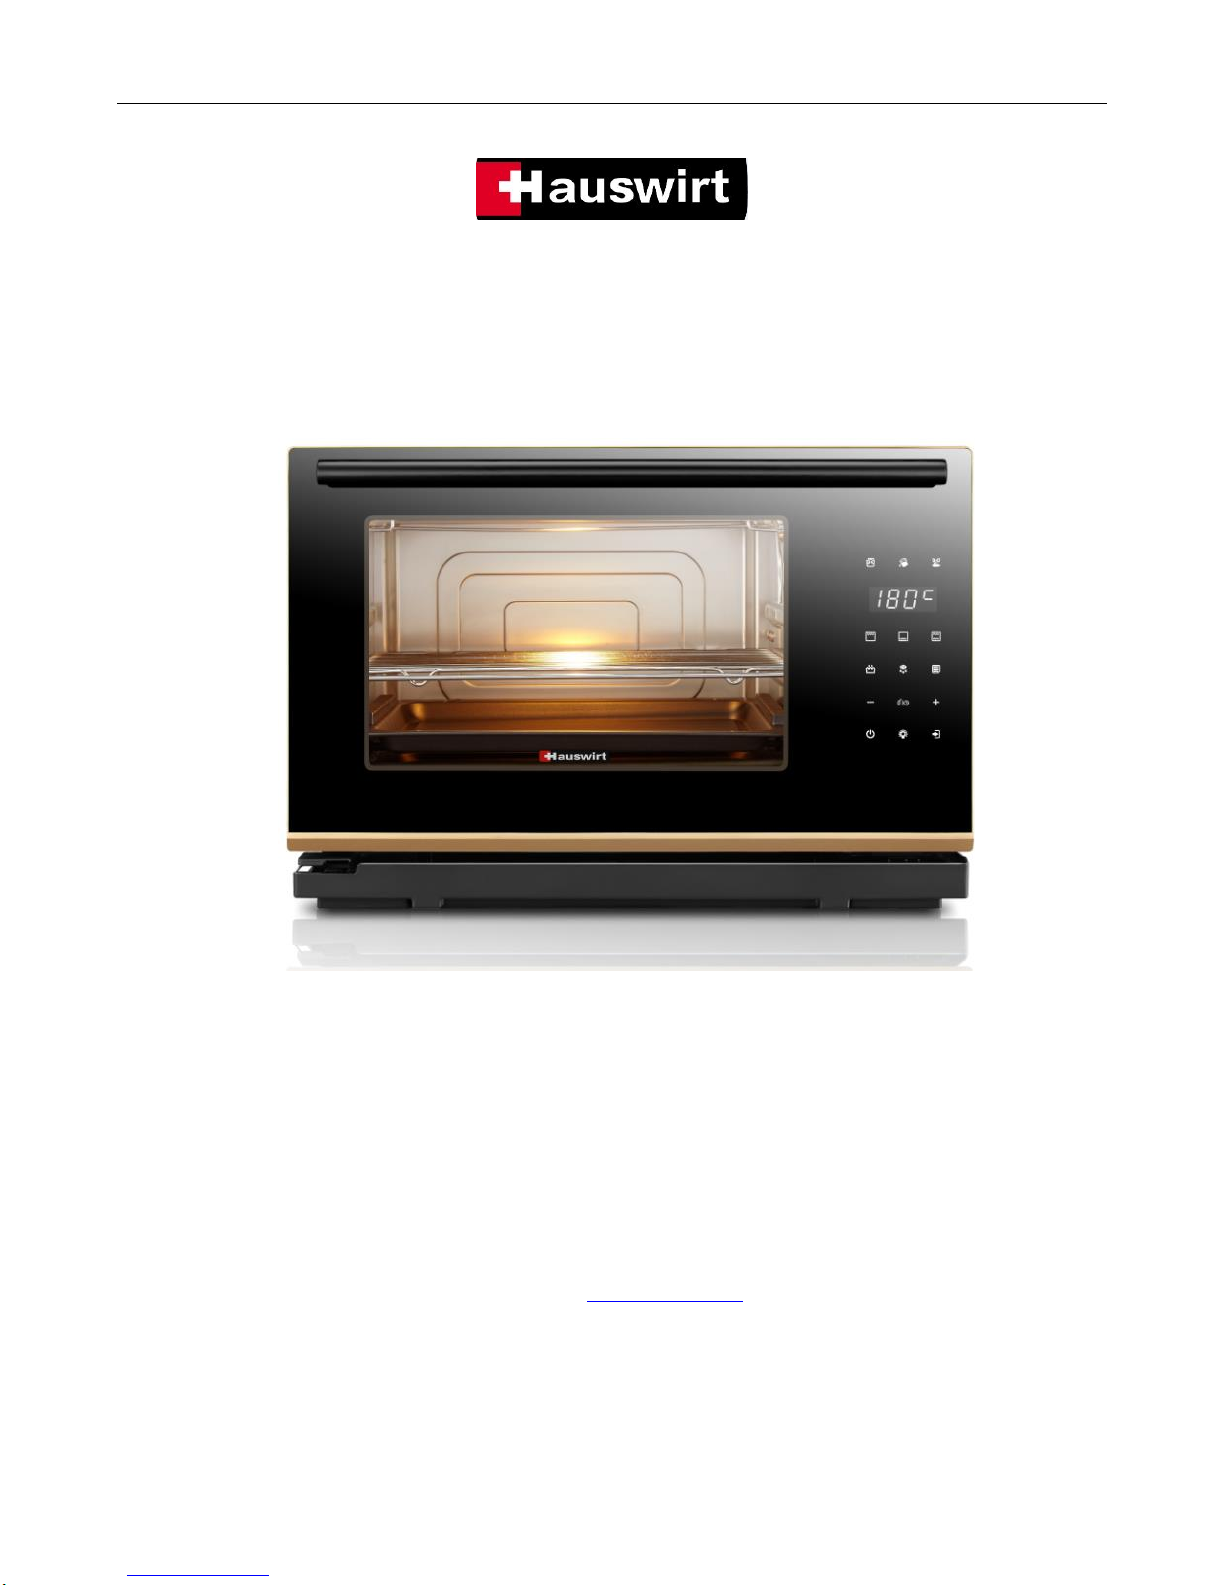
STEAM OVEN
User Manual
Model NO: HO-301510S
Free line: 400-800-0387 www.hauswirt.com
This manual contains important information regarding safety, the use and maintenance of your steam oven.
Read and keep it in an easily accessible place for future consultation
1
INDEX
Specification
P. 2
Installation
P. 2
Important safety information
P. 3
Construction of appliance and accessories
P. 4-5
Control Panel
P. 6
Default Settings
P. 7
How to Use
Control Panel ON/OFF
General Steam Mode
Steam grill combination
Top grill/ bottom grill/ top and bottom grill
Keep warm
Defrost
Lamp ON/OFF
P. 8-10
Tips for using the oven
P. 11
Cleaning and Maintenance Guide
P. 12
Trouble Shooting Guide
P. 13
Problem Diagnosis
P. 14

2
SPECIFICATION
Model
BSQ-26L15
Voltage and Frequency
230V~240V/50Hz
Input Power
2100W
Dimension(W×H×D)
505mm×415mm×349mm
Cavity size(W×H×D)
350mm×320mm×230mm
Cavity capacity
26L
Net Weight
Appx. 13.5 Kg
PRECAUTIONS FOR FIRST TIME USE
Check to confirm the voltage on the rating plate corresponds to the voltage in your home
Remove all the packing material from the oven cavity.
Make sure that the appliance is not damaged. Do not operate this appliance if it has a damaged
power cord or plug. if it is not working properly, or if it has been damaged or dropped, please
contact with Distributor
The appliance is heavy and need to be placed on a firm rigid surface.
Do not block the ventilation of the oven. Stay away from high temperature and steam to avoid
damage to the oven.
Do not place anything on top of the appliance and keep at least 20cm distance with the top of
closet
Leave at least 5cm distance between sides of the appliance and wall, and at least 10cm distance
between the back of the appliance and wall

3
Place the appliance in a dry place, without corrosive gas. Stay away from high temperate and
steam.
Caution –make sure the appliance is connected with power supply correctly and safely.
Manufacturer is not responsible for any problems arising from incorrect use of the oven.
IMPORTANT SAFETY INFORMATION
This manual contains important information regarding safety, the use and maintenance of your
steam oven. Read and keep it in an easily accessible place for future consultation
This appliance is solely designed for domestic use. Do not operate the appliance for commercial
use or other than its intended use as stated in this manual.
Caution: this appliance is not intended for use by persons (including children) with reduced
physical, sensory or mental capabilities, unless they are under supervision of a person who fully
understands the safety information.
It is recommended to fill the water tank upon the max. sign with distilled water. DO NOT USE ANY
LIQUID OTHER THAN WATER. Make sure the water tank is inserted in place before cooking.
YOU MUST EMPTY THE WATER TANK EVERY TIME AFTER USE. This is for hygienic reasons and
proper maintenance of the appliance.
Avoid opening the oven door during the cooking process to avoid loss of steam.
Caution: if you need to open the oven door during the cooking process.
Caution: if it is necessary to open the oven door during the cooking process, please keep
reasonable distance from the oven door to avoid close contacts with high temperature steam.

4
The temperature in oven cavity is still high even when cooking has finished. Always use the
protection glove when you take the food or containers immediately after cooking stops.
Do not use the oven as storage.
If the oven is used to reheat milk or any baby food, please shake the food well and check the
temperature before feeding.
Caution: the appliance should only be repaired by a properly qualified person.
Caution: take contact with service center and do not use the appliance if the oven door or door
ring is damage.
Caution: if the If the power cord or plug is damaged, do not change it by anyone except
professional service center appointed by Baumatic.
Caution: accessible parts may become very hot during the cooking process, children should be
kept away.
Caution: Do not touch the front panel or heating elements inside the cavity DURING AND RIGHT
AFTER the cooking process. It takes time for those parts to cool down after heating.
Clean the appliance or cavity at least 30 min after cooking.
Do not touch the appliance or its power cord and plug with wet or damp hands or feet when its
plugged
5
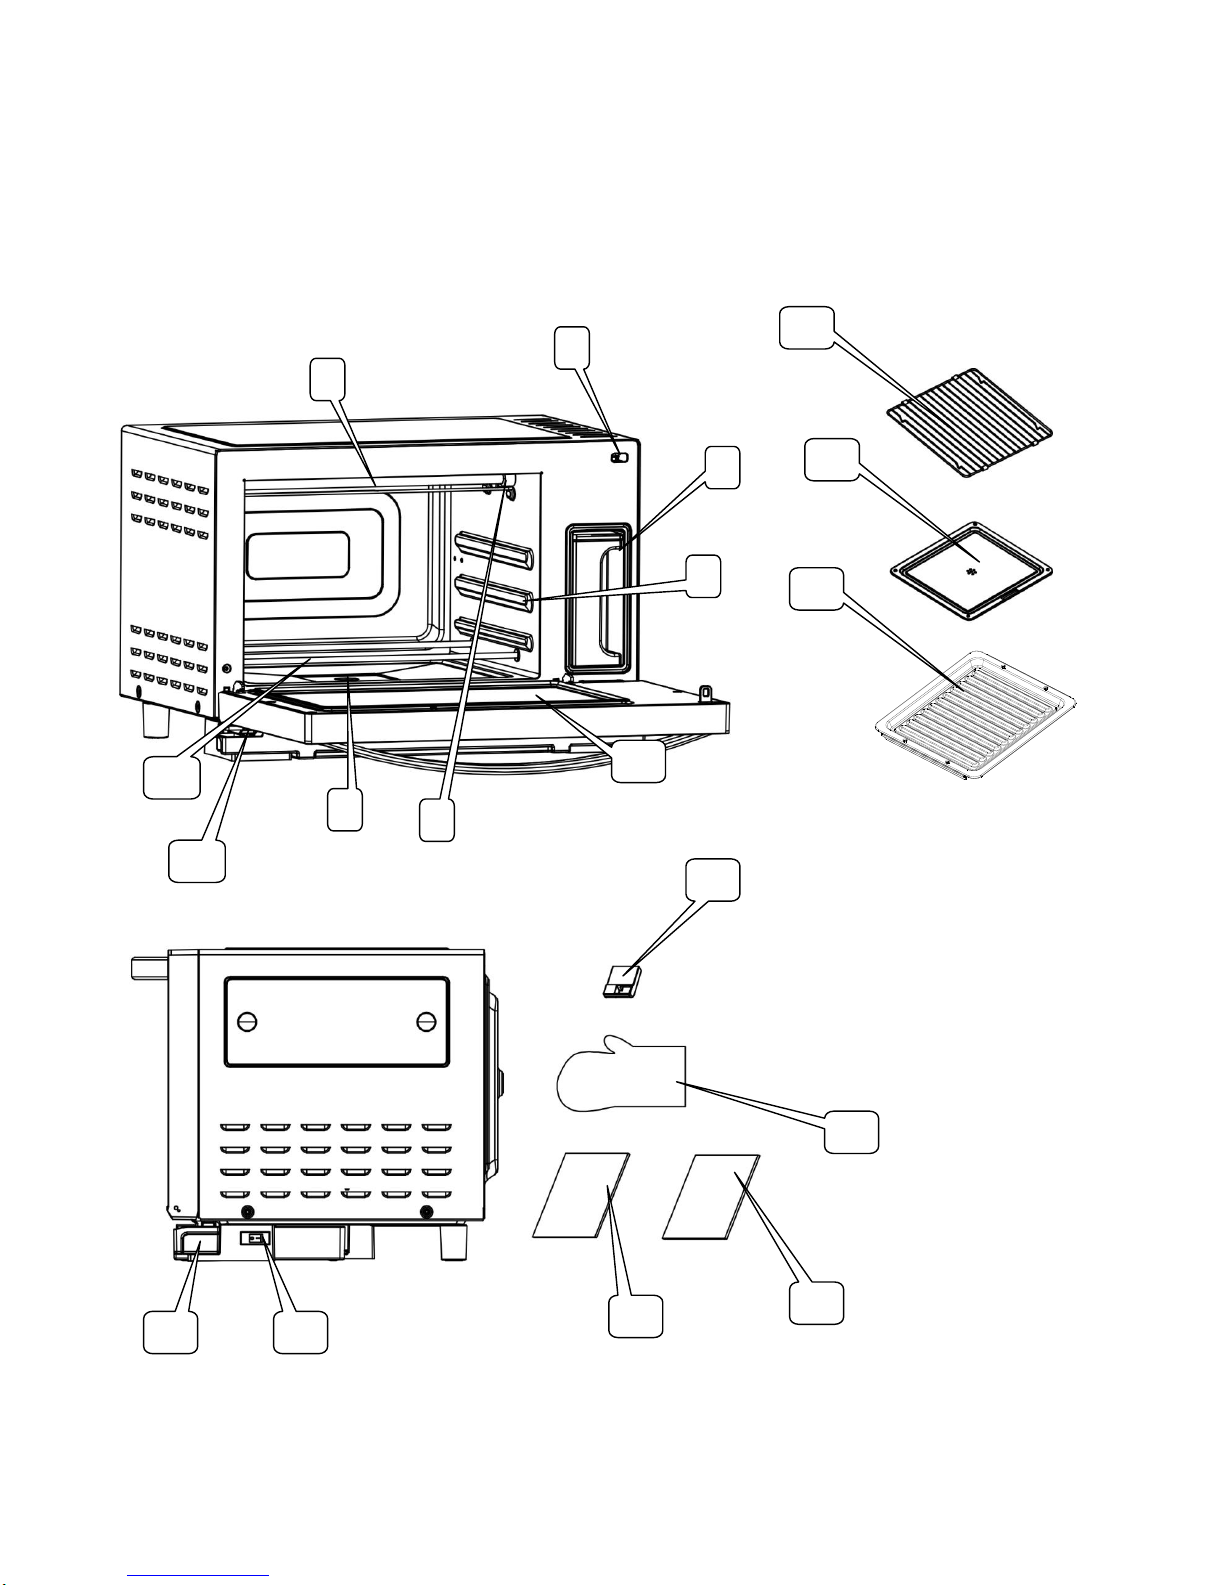
PRODUCT PARTS AND ACCESSORIES
.
13
3
8
6
13
14
15
17
16
10
1
7
16
9
12
2
4
5
11

6
Parts name
Function
1
Air outlet
To exhaust excess steam from the cavity
2
Door safety switch
To disable the appliance from operating when the door is opened.
3
Water tank
To hold water for steam generation
4
Shelves
To support the food trays or rack for cooking
5
Upper heating tube
To produce heating for food cooking/reheating from top
6
Lower heating tube
To produce heating for food cooking/reheating from bottom
7
Steam inlet
To allow the steam to enter the oven cavity
8
Water outlet
To discharge excess water from the oven cavity
9
Wire shelf
To support food container. For steam and grill mode
10
Oil collector
Place in the bottom of the oven cavity to collect oil produced
during the cooking process. Removable design for easy cleaning
11
Grill tray
To support food or food container. Mainly for grill mode
12
Oil collector
Place in the bottom of the cavity to collect oil produced during the
cooking process. Removable design for easy cleaning
13
Drip tray
To collect excess water from the oven cavity
14
Insulated glove
To handle hot food or tray from the oven
15
Steam outlet
accessory
To be installed on the steam outlet to control the steam directly
16
User Manual
Instruction for using the appliance. Please carefully read and keep
for future reference
17
Warranty card
For warranty purpose, please keep it.

7
CONTROL PANEL
備註:按鍵不亮燈時表示該狀態下不可操作,選中的按鍵會加亮。
ICON
FUNCTION
100℃Steam mode
Lack of water
Super steam mode
Cooking time/temperature
display
Upper grill mode
Lower grill mode
Full grill mode
Ferment mode
Defrost mode
Disinfect mode
Lamp ON/OFF
Adjust to“-“
Decrease time/temperature scale
Temperature/time display
To switch the display between time/temperature
Adjust “+”
Increase time/temperature scale
Power/Cancel
Power ON/OFF(Long press)/ cancel (single press)

8
Confirm/Start
Confirm after temperature setting, start after time
setting
Cooking time symbol
Appear when cooking time is displayed
Temperature symbol
Appear when temperature is displayed. When the
temperature is rising to meet the pre-set
temperature, the symbol will blink. When the cavity
temperature reach the target, it will keep lighting on

9
DEFAULT SETTINGS
Mode
Preset time
Preset
temperature
Time scale
Temperate scal
100 ℃Steam
mode
5min
100℃
5-180min (3hrs)
80-115℃
Grill mode
5min
180℃
5-180min (3hrs)
40-250℃
Super steam
5 min
180℃
5-180min (3hrs)
40-250℃
Disinfect
20 min
100℃
Preset
Preset
Ferment
20 min
40℃
5-180min (3hrs)
Preset
Defrost
20 min
60℃
5-180min (3hrs)
Preset

10
HOW TO USE
ON/OFF of Control Panel
Steps:
1. Turn on the Main power switch
2. Press the button for 1 sec,control panel will be activated
3. Press button for 1 sec again to turn off the control panel。
ON/OFF of Lamp
Steps:
Press when the appliance is in standby or cooking mode, turning ON the lamp allows you to check the
cooking status, the lamp will turn off automatically after a few second.
General Steam mode
Example: 20mins steaming
Steps:
1. Make sure the water tank is filled with distilled water
2. In Standby mode, press
3. Preset temperature is 100℃,press to confirm
4. Preset temperate of 5mins is displayed, press to adjust the temperature to 20mins, press
to start.

11
Super steam mode
Example: 20minutes of steaming at 90℃
1. Make sure the water tank is filled with distilled water
2. In Standby mode, press
3. Preset Temperature of 180℃is displayed,press to adjust temperature at 90℃,
press to confirm
4. Preset time of 5minutes is displayed, press to adjust the time to 20 minutes, press
to start
Tips: when cooking process started, it will take a few minutes to reach your target temperature, you
can press to switch between time /temperature display. When temperature is displayed,
if symbol blinks, it means that the cavity temperature is rising, when the temperature
reaches your target, the symbol will light on and a beep sound will follow.
If your recipe have a preheat procedure, please put in the food after the beep sound.
When the oven cavity temperature has reached your target, the oven will self-operate to maintain the
temperature constant.
Upper grill/Lower grill/Full grill
Example: 45mins grill at 200℃
1. In Standby mode, press / /
2. Preset Temperature of 180℃is displayed,press to adjust temperature at 200℃,press to
confirm
3. Preset time of 5minutes is displayed, press to adjust the time to 45 minutes, press to
start

12
Tips: when cooking process started, it will take a few minutes to reach your target temperature, you
can press to switch between time /temperature display. When temperature is displayed,
if symbol blinks, it means that the oven temperature is rising, when the temperature
reaches your target, the symbol will light on and a beep sound will follow.
If your recipe have a preheat procedure, please put in the food after the beep sound.
When the cavity temperature reached your target, the oven will self-operate to maintain the oven
temperature constant.
Ferment
Example: 30minutes keep warm
1. In Standby mode, press
2. Preset temperature is 40℃,preset time displayed is 20minutes, press to adjust to 30
minutes
3. Press to start
Defrost
Example: 30 minutes of defrost
1. In Standby mode. press ;
2. Temperature is preset at 60℃,preset time displayed is 20 minutes, press to adjust to 30
minutes.
3. Press to start
13
Disinfect
1. In Standby mode. press ;
2. Temperature is preset at 100℃,preset time displayed is 20 minutes
3. Press to start
TIPS FOR USING THE OVEN
The following circumstances are regarded as normal:
Circumstances
Reason
Water came out from steam
outlet
Sometime there will be water coming out from the steam outlet,
this is normal.
Steam accumulation in vent
During cooking, excess steam may be expelled from the vent, this is
normal
Electric voltage stability
If power voltage supply is stable between 5-10% of the stated
range, cooking function will operate normally. If there is sudden
surge or decrease in power supply, cooking process may be
interrupted. This is normal.
Note:
1. If the appliance is not working please check the below:
Power cord is connected properly;
Oven door is closed properly;
Water tank is inserted completely;

14
The fuse at home is normal;
2. If the appliance start working when it is not supposed to:
Immediately open the oven door to stop it from working.
CLEANING AND MAINTENANCE GUIDE
NOTE: DO NOT USENEVER USE METAL SCOURING PADS, ABRASIVE CLEANERS, STEEL WOOL PADS,
and GRITTY WASHCLOTHS to clean any part of the oven
1. Please make sure that the appliance is turned off, and disconnected with power supply before any
cleaning and maintenance
2. Always keep the oven cavity clean, especially if spillover has occurred. Do not use metal scoring
pads, abrasive cleansers, steel-wool pads, gritty washcloths, etc. to clean the oven. This may
damage the control panel, baking and steaming trays, cavity and outside of the appliance. Use a
sponge or soft cloth with a mild detergent or a paper towel with spray glass cleaner. Make sure
that oven cavity is dried after each use.
3. It is recommended to use distilled water for cooking.
4. IT IS IMPORTANT TO EMPLY THE WATER TANK AND WATER DRIP TRAY AFTER EACH USE. YOU
CAN TAKE OUT THE WATER TANK AND WATER DRIP TRAY TO CLEAN AND PUT BACK WHEN FULL
DRIED
5. Open the oven door for 10-15 minutes to air dry the oven cavity and door frame after each use.
6. Always clean the oven door and the sealing ring. Failure to keep the seal clean may result in
damage on the fronts or adjacent units. Use soft cloth to clean the sealing ring.
7. If the control panel is wet, use soft cloth to clean and dry it. Do not use abrasive cleanser to clean

15
it.
8. If the appliance will not be used for long time, please disconnect it from the power supply. Keep
the oven cavity, water tank and water drip tray clean and dry. Put it in a dry environment without
corrosive gas.
9. Disconnect the appliance for lamp replacement. Only use parts supplied by manufacturer.
10. If the oven cavity very dirty, please use the disinfect mode to dissolve grease before cleaning.
NEVER USE METAL SCOURING PADS, ABRASIVE CLEANERS, STEEL WOOL PADS, GRITTY
WASHCLOTHS to clean any part of the oven including the oven door, food plate, oil collector.
11. When you dispose this appliance, please follow the local environmental protection and recycling
regulations.
12. If the appliance is damaged, it should be checked by service center appointed by Baumatic.
16
TROUBLE SHOOTING
Problem
Cause
Solution
Nothing appears on the display
Oven is not connected to power
Connect the appliance to power
supply
Power cord fails to work
Contact after-sale service
Display is not working normally
Display screen is damaged
Contact after-sale service
Parts in circuit board are damaged
The appliance fails to work
Power supply is not connected
properly
Connect the power supply again
Oven door is not closed properly
Close the oven door again
Water tank is not in correct position
Reposition the water tank
Circuit board is damaged
Contact after-sale service
Water or steam leaks our from
oven door during cooking
Oven door is not closed tightly
Close the oven door again
Door sealing ring is damaged
Contact after-sale service
Oven lamp fails to light
Lamp is damaged
Contact after-sale service
Master PCB is damaged
Fan fails to work
Fan motor is damaged
Contact after-sale service
Master PCB is damaged
Button fails to work
Control panel damaged
Contact after-sale service
Master PCB is damaged
No steam produced
Water tube is stuffed or damaged
Contact after-sale service
Water tank is not inserted in place
Insert the water tank again
Water pump is damaged
Contact after-sale service
17
ERROR CODE
Code
Explanation
Possible reason
E-1
Oven cavity high temperature
protection
Temperature in oven cavity exceeds the limit of
safety setting
E-2
Steam plate high temperature
protection
Temperature of steam plate exceeds the limit of
safety setting
E-3
Oven cavity low temperature
protection
Continued working for 3 minutes but temperature
of oven cavity is lower than 30℃
E-4
Steam plate low temperature
protection
Continued working for 3 minutes but temperature
of steam plate is lower than 30℃
E-5
Sensor connection failure
Sensor is disconnected
E-6
Sensor failure
Sensor is damaged
E-7
Circuit is damaged
Connection problem
Table of contents
Popular Oven manuals by other brands

Brandt
Brandt FC 222 user manual

aumate
aumate TOA20M04N-1E instruction manual

Maytag
Maytag CWE4100AC - 24" Single Electric Wall Oven Dimension Guide

Kernau
Kernau KBO 1076 S PT B instruction manual

Bosch
Bosch HB 37 N Series User manual and installation instructions

Electrolux
Electrolux EOD5420AA user manual


