Hayton Systems HPK003 User manual
ATS User Manual
Verizon Asset Tracking System
HPK003 Contractor Kit


This document contains training information specifically designed for the ATS
application. ATS is designed and licensed by Hayton Systems specifically for
telecommunications bar coding processes. Any required changes to this
document or the application should be forwarded to Hayton Systems.
Hayton Systems
3210 Smokey Point Drive #200
Arlington, WA 98223
800-990-8360
fax 360-659-6823
www.haytonsystems.com
This document contains Hayton Systems Confidential and Proprietary
Information. Users shall maintain such Confidential and Proprietary
Information in confidence until such information is made publicly available by
Hayton Systems. Users shall take reasonable precautions to limit the
disclosure of such Confidential and Proprietary Information only to your
employees who are necessary to evaluate and/or use such information.

Contents
1. INTRODUCTION 1
2. KIT INFORMATION & PARTS LIST 2
3. QUICK INSTALLATION 4
4. THE HANDHELD TERMINAL 7
4.1
S
TANDARD
A
PPLICATIONS 9
4.2
S
CANNING
N
OTES 9
4.3
E
NTERING
T
EXT 10
4.4
S
ET
D
ATE AND
T
IME 11
5. APPLICATION LAUNCHER AND RESTORER 12
6. START ATS AND ENTER THE SETTINGS 13
6.1
M
AINTAINING THE
L
IST OF
U
SERS 14
7. TRACKING ASSETS 15
7.1
DATA V
IEW 15
7.2
I
NPUT
F
IELDS BY
T
RANSACTION
T
YPE 16
7.3
E
DITING
R
ECORDS 17
7.4
GRID V
IEW 18
7.4.1
Marking Records
19
7.4.2
Marking A Range of Records
20
8.
U
TILITIES 21
8.1
A
UDIT
D
OWNLOAD 23
8.2
F
IND 24
9. TRANSACTIONS 25
9.1
R
ETIREMENT
(X)
25
9.2
T
RANSFER
(T)
25
9.3
S
WAP
-I
N
(I), S
WAP
-O
UT
(O)
25
9.4
M
OVE
(M)
25
9.5
G
ROSS
A
DD
(G)
25
9.6
C
HANGE
BSN (C)
25
9.7
C
HANGE
P/I
26
9.8
T
O
R
EPAIR
(Z)
26
9.9
F
ROM
R
EPAIR
(R)
26
9.10
S
POT
A
UDIT 26
9.11
B
AY
A
UDIT
(B)
26
9.12
W
HOLE
O
FFICE 27
9.13
T
RANSACTION
F
IELD
T
ABLE 28
10. TROUBLESHOOTING 29
10.1
R
ESETTING
Y
OUR
SPT 1700 T
ERMINAL 29
10.1.1
Performing a Soft Reset
29
10.1.2
Performing a Hard reset
29

APPENDIX A – GRAFFITI CHARACTERS 31
APPENDIX B – COMMON ERRORS 33
GLOSSARY 34

© 2002, Hayton Systems Page 1
1. Introduction
The Asset Tracking System (ATS) uses unique bar coded serial numbers and
specific transaction codes to track capital assets when they are placed, moved, or
removed. ATS supports tracking assets down to the card slot level.
ATS Overview
ATS operates on the Symbol SPT1700 and uses the Palm Operating
System. ATS terminals include some standard Palm “organizer” functions
plus an integrated class II laser scanner for bar code input. The terminal’s
processing and storage capabilities allow ATS to provide greater data
integrity, superior data communications capability, and greater application
capability. This combination of features allows ATS to support on-line
validations for improved data accuracy.
In addition to basic asset tracking functions, ATS includes many valuable
features such as “live” validations for Bay and Spot audits, lists of common
part numbers, and easy record editing. This easy-to-use system provides
users with an intuitive application that promotes highly accurate data
collection.
Target Users
This application and training manual are intended for all end users
including COE Installers, CO Maintenance, COEP, and Inventory
Management personnel. This document is designed to be a self-paced
training manual and reference guide.

© 2002, Hayton Systems Page 2
2. Kit Information & Parts List
Your ATS kit comes with everything you need to start tracking company assets.
In addition to the complete kits you can also order spare parts.
Verizon Contractor Kit
Part # HPK-003
Description
Part #
Symbol SPT1700 2D Scanner with slip case
Modem Cradle (with cable)
Cradle Power Supply
Power Supply Cord (for Cradle)
Spare Battery (Lithium Ion)
Stylus 5 Pack
H15018
H15004
H15008
H15009
H15011
H15013
Modem Adapter (9-pin to 25-pin)
Serial/Charging Cable
H15012
H15010
SPT1700 Soft Case for Terminal and Cables
Hard Carrying Case (for the entire kit)
H15007
H15006
Desktop Software CD
ATS License and Support Agreement
User’s Manual
H21700
H21000
H21600
Options & Spare Parts List
Description
Part #
Modem Cradle (with cable)
H15004
Hard Carrying Case (for the entire kit)
H15006
SPT1700 Soft Case for Terminal and Cables
H15007
Cradle Power Supply
H15008
Power Supply Cord (for Cradle)
H15009
Serial/Charging Cable
H15010
Spare Battery (Lithium Ion)
H15011
Modem Adapter (9-pin to 25-pin)
H15012
Stylus 5 Pack
H15013
Vehicle Charging Adapter
H15017
Symbol SPT1700 2D Scanner
H15018

© 2002, Hayton Systems Page 3
Kit Information & Parts List, Continued
The Contractor Kit contains these components. Contact Hayton Systems to
reorder components or accessories.
H15018
Symbol
SPT1700 2D
Scanner
H15004
Modem Cradle
(with cable)
H15008
Power Supply
H15009
Power Supply
Cord
H15006
Hard Carrying
Case (for the
entire kit)
H15011
Spare Battery
(Lithium Ion)
H15013
Stylus 5 Pack
H15012
Modem Adapter
(9-pin to 25-pin)
H15010
Serial/Charging
Cable
H15007
Soft Pouch for
Terminal and
Cables
H15017
Vehicle Charging
Adapter
H21700
Desktop Software
CD
H21600
Manual and
Quick Start
Guide

© 2002, Hayton Systems Page 4
3. Quick Installation
The ATS kit includes all of the parts needed to begin operating. Unpack the kit
and follow these steps:
1. Plug one end of the phone cord into the LINE IN port on the back of the
cradle and the other end into a wall jack.
2. Plug the power supply into the back of the cradle (plug marked “9 VDC”).
Plug one end of the power cord to the power supply and the other end into a
wall outlet.
3. Place the spare battery into the charging slot on the top of the cradle
(contacts down and facing the back of the cradle). Gently push - DO NOT
FORCE - the battery down until the charging light illuminates (leftmost light
on the cradle). A red light means the battery is charging and a green light
means it is fully charged.
4. Remove the terminal from the yellow carry pouch. Place it in the cradle for
approximately 30 minutes to charge the battery fully. The status light for the
battery being charged inside the terminal is the rightmost light on the cradle.
Again, red means charging, green means fully charged.
5. Once the battery in the terminal is fully charged you are ready to start setting
up the terminal. Press the red button on the terminal to turn it on.
6. Remove the yellow stylus from the back of the terminal.
7. Using the stylus, tap the Application Launcher icon until the All
category name shows on the upper right corner of the screen.
8. Using the vertical scroll bar on the screen if necessary, find the Prefs
icon . Tap on the Prefs icon.
9. Set (if they are not correct) the date and time by tapping the desired
“outlined” item on the screen then selecting the correct settings.

© 2002, Hayton Systems Page 5
10. Pull down the drop menu by tapping on the General category in the top
right corner of the screen.
11. Tap on Digitizer and follow the on-screen instructions to align the touch
screen digitizer. It is extremely important that this is done accurately.
12. Tap the Application Launcher icon until the All category name
shows on the upper right corner of the screen.
13. Using the vertical scroll bar on the screen if necessary, find the Restorer
icon . Tap the Restorer icon then tap OK.
14. Once Restorer has finished running, it will automatically launch ATS
Register. NOTE: If ATS Register has been run previously, it will not launch
automatically at this point. You may launch ATS Register at any time by
tapping on its icon from the Application Launcher.
15. Complete the information required in ATS Register. This should all be self
explanatory except for Logon and Password. Please contact your Verizon
liaison for guidance regarding this information.
16. Check (by tapping) the ATS West and/or ATS East boxes as desired. This
instructs the terminal to download one or both of the Verizon ATS versions.
17. Tap Send. A screen will appear affording you the opportunity to check
your connection settings or to Update. If you do not need to enter a pre-dialing
string (such as dialing 9 to get an outside line), proceed to step 20.
18. To set a pre-dialing string, tap Connection Settings. Restorer will have
ensured that all the settings on the Network screen are correct. Tap on the
“outlined” phone number. On the Phone Setup screen, tap the check box for
Dial Prefix. That will ensure that a 9 (and subsequent pause) will be dialed
prior to dialing out.

© 2002, Hayton Systems Page 6
19. Tap OK, then tap Done.
20. Place the terminal in the cradle. Tap Update.
21. Once the update is complete, you may see a welcome screen for the ATS
version you have downloaded. If you asked (checked the boxes) for both ATS
versions, neither will run automatically. Instead, you will see the Application
Launcher. Select the ATS version you wish to run at this point.
22. Follow any additional on-screen instructions that may be presented to you.
You are ready to explore ATS.

© 2002, Hayton Systems Page 7
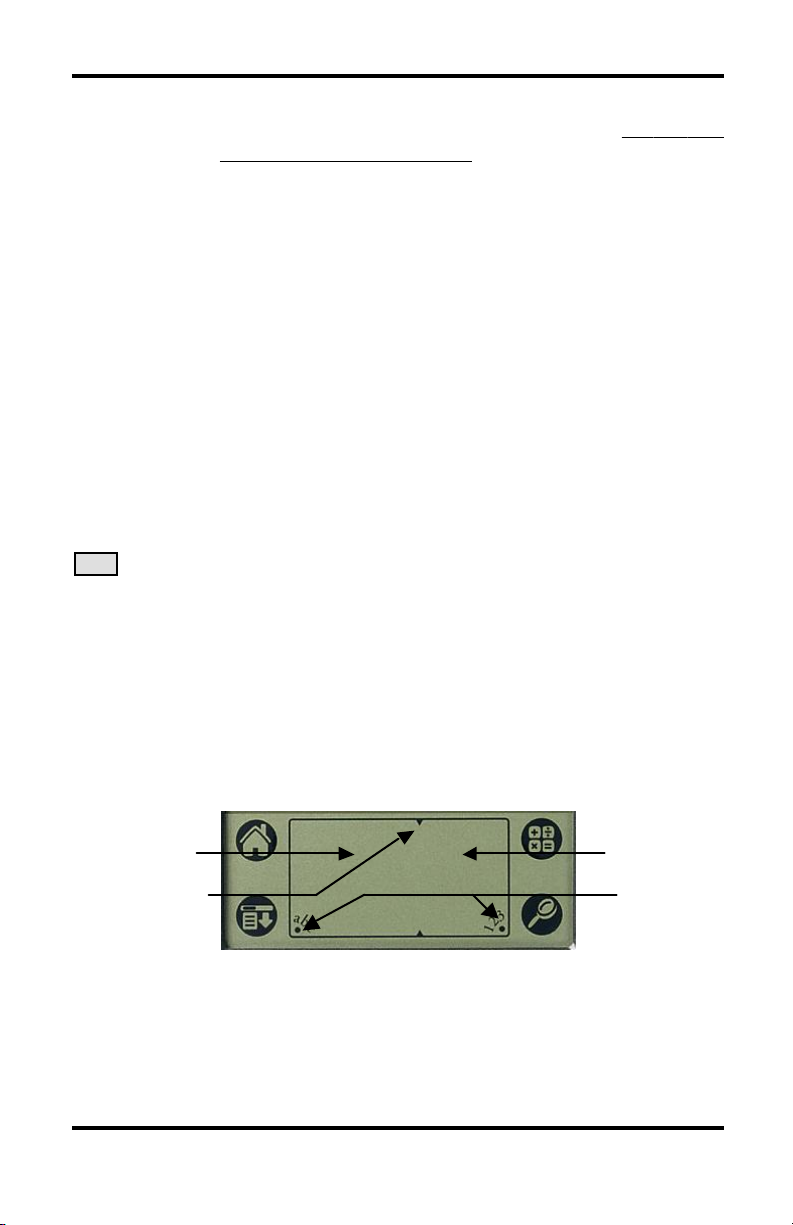
4. The Handheld Terminal
Touch screen technology allows you to hand-enter data using the writing pad
(located on the bottom of the screen) or the on-screen keyboard. Your terminal
also comes with some standard “organizer” applications (see “Standard
Applications” in this section).
Features and functions on the
SPT1700 terminal include:
Application
Buttons
These four buttons activate normal Palm functions. However,
in ATS these buttons activate function unique to ATS. These
buttons are GRID , DATA , UTIL , and HELP .
Application
Launcher
Press this button to see a menu of the applications and to
switch between application categories. The terminal stores
applications in three areas or categories. The categories are:
Main
,
VERIZON
, and
System
. Do not modify or move
applications in these categories.
Contrast
This button allows you to adjust the display contrast for your
current lighting conditions.
DATA
Switches to DATA view. This view acts as the main ATS
data input and edit screen.
GRID
Switches to GRID view. This view acts as a quick reference
to view the most pertinent data for the stored records.
HELP
Provides additional operating information for the user.
On/Off
Contrast
Writing Pad/Keypad
Application Launcher
Touch Screen
Scroll Button
Laser Scanner (Class 2)
Scan Button
Scroll
Buttons
Scan Button
Application Buttons (4)
© 2002, Hayton Systems Page 8
Laser
Scanner
This laser scanner reads and decodes bar codes.
Do
not
look
directly
into
the
scanning
beam
!
On/Off
Press this red button to turn the unit on and off. Press and
hold the On/Off button to turn the backlight on or off. Use
the backlight in low-light conditions but also remember that
using the backlight requires more battery power.
Scan
Buttons
(3 buttons)
The three yellow scan buttons activate the internal laser
scanner used to read bar codes. All three buttons serve the
same purpose. Use the button that is most convenient.
Scroll
Buttons
(2 buttons)
The two scroll buttons allow you to scroll through lists, data
entry fields, and sometimes between screens. Use the button
most convenient for you (both work the same way).
Touch
Screen
The main screen used to display information and enter data.
Be sure to use only a recommended plastic-tipped stylus when
writing on this screen.
UTIL
The utility functions provide functions such as record
deletion, audit downloading, and mass record updating.
Writing Pad /
Keypad
The writing pad allows you to use the handwritten Graffiti
character set to enter data. Use the left side of the writing pad
to enter alphabetic characters and the right for numeric
characters. Writing Graffiti characters is very similar to
writing normal characters but actually requires fewer strokes.
See Appendix B for a complete set of the Graffiti characters.
To view Graffiti templates touch the very bottom of the
display and drag the stylus to the top of the display.
You can also enter data using a pop-up a keypad. To activate
a keypad touch the “abc” or “123” buttons on the bottom
corners of the writing pad. Keypads make it very easy to
enter special characters.
Alpha/Numeric
Divider
Alphabetic
Numeric
Pop-Up
Keypad
Buttons
© 2002, Hayton Systems Page 9
4.1 Standard Applications
The terminal includes several standard applications such as a phone list, to do
list, daily planner, calculator, note pad, etc. Neither Verizon nor Hayton
Systems support these standard applications. Verizon’s host system does not
backup data from standard applications (you are responsible for backing up your
own data). You can use the Palm desktop software provided to allow your PC
to communicate with the terminal.
Many third party applications exist for Palm terminals. We highly recommend
that you
not
use these applications in your terminal. These applications could
have a detrimental effect on the ATS application and the system may
automatically remove these applications during an upload to the host.
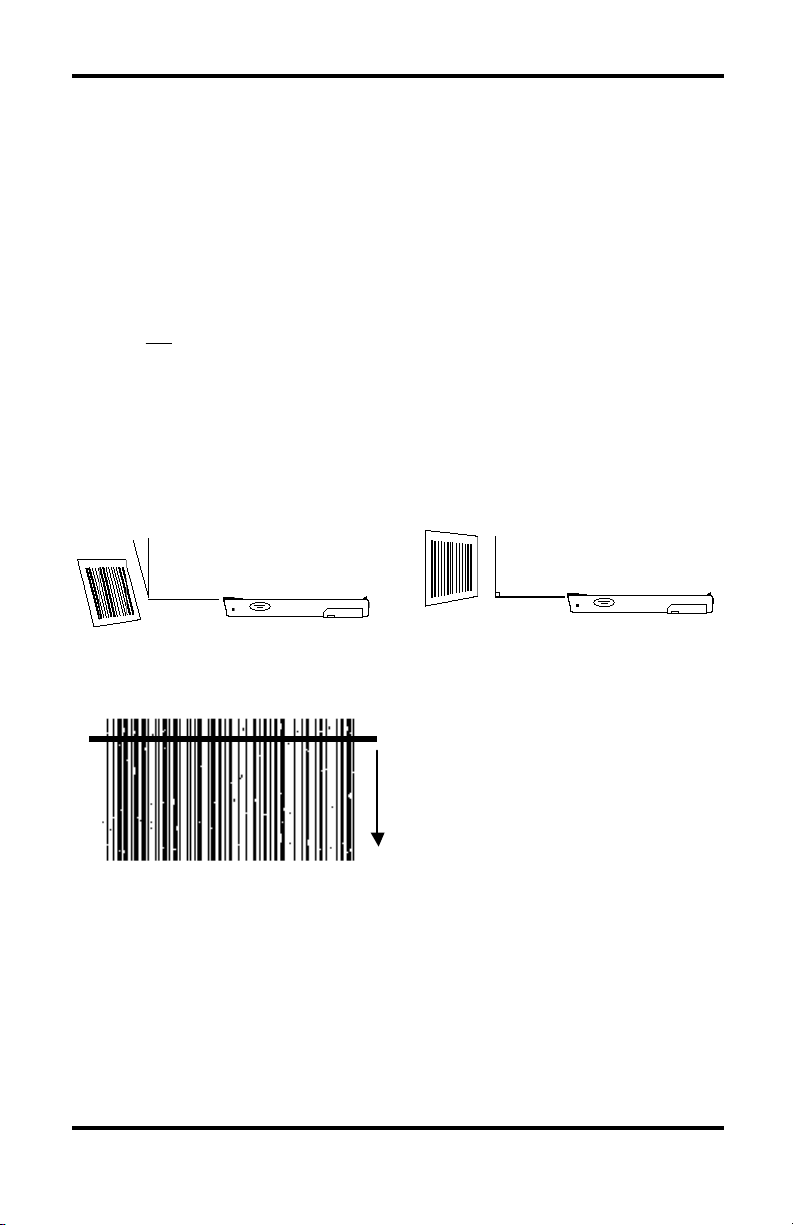
4.2 Scanning Notes
The laser scanner works best when held at an angle to the bar code:
If a bar code does not immediately scan then try moving the scanning beam
from the top of the bar code to the bottom.
Moving the scanning beam through
the bar code (especially “dirty” ones)
gives the scanner a better chance to
find “good spots” within the bar code.
The small asset tags scan best when they are between 1.5” and 3” from the end
of the laser scanner. They also scan very well when the scanner is held at
roughly a 30° angle to the tag.
Right
Wrong

© 2002, Hayton Systems Page 10
4.3 Entering Text
You can enter information into the data fields in three ways: (1) scanning bar
codes using the internal laser scanner, (2) using the writing pad and hand-
entering Graffiti characters, or (3) entering data characters using the pop-up
keypad. Pop up the keypad by tapping the “abc” or “123” keys on the bottom
corners of the writing pad. The custom keypad looks like this:
The custom keypad allows you to scroll through the current set of data fields
and enter information. You can use the Data Field Arrow Keys to move
between input fields. After entering data in the last data field press to
return to the Data view. You can enter information for a single field or for
multiple fields.
Previous Field
Current Field
Data Field
Arrow Keys

© 2002, Hayton Systems Page 11
4.4 Set Date and Time
When you first turn on the terminal
you must calibrate the screen
digitizer and set the date & time.
Tap
Set Time
or
Set Date
to
display these screens:
Adjust the time values using
the up/down arrows. Press
to set the time.
Select today’s date (be sure to set
select the correct year). Press
to set the date.
In the future you can always adjust the date and
time. From the application menu select the
Prefs
program (short for “
Pref
erence
s
”) in the
System
category.
© 2002, Hayton Systems Page 12
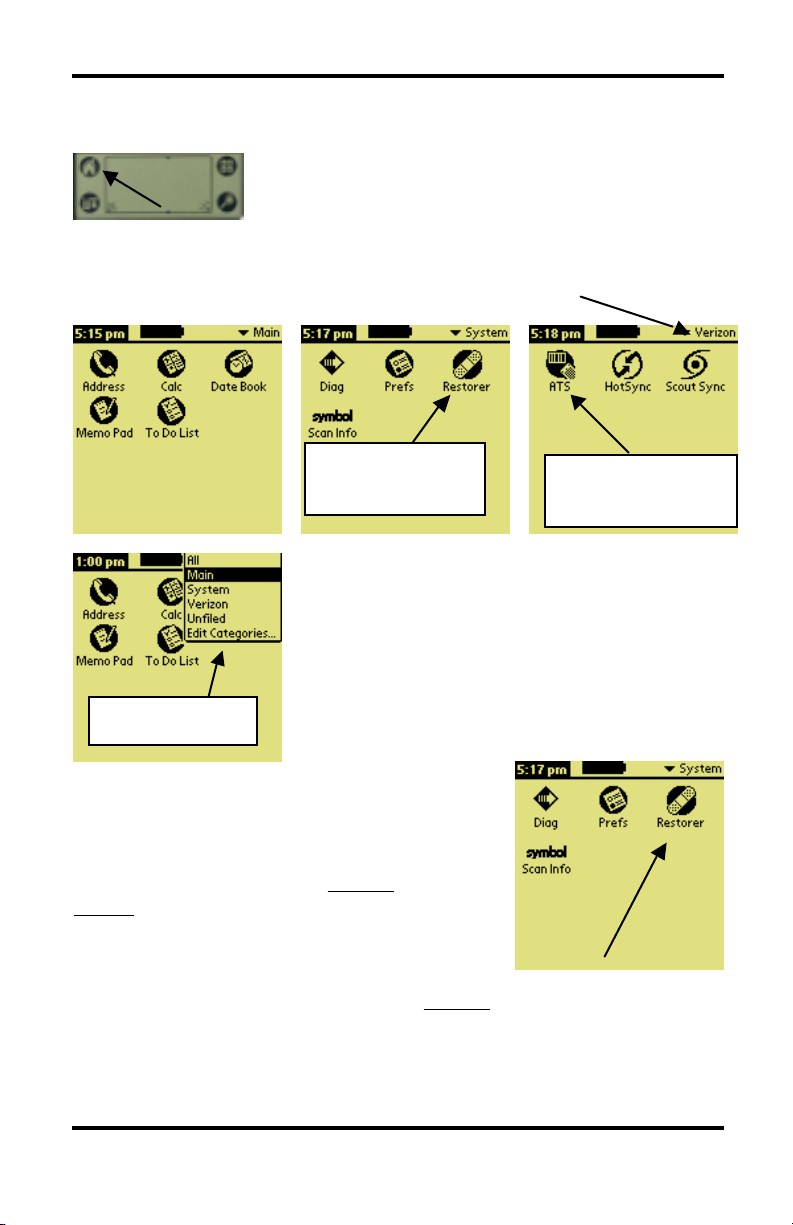
5. Application Launcher and Restorer
After setting the date and time press the application
launcher button on the Writing Pad to display the
application in the current category.
Palm terminals allow you to group applications in categories. Each press of the
Application Launcher button displays the next category of applications. The
current category name appears in the upper right of the screen.
You can also tap the category title (upper right) and
the terminal displays a list of all categories. You can
then select the desired category from the list.
The terminal must connect to the server and
download the current version of ATS. This method
of loading the application ensures that you always
have the most current ATS version. To load the
current ATS application, select
Restorer
from the
System
category.
Place the terminal in the cradle and the
Restorer
will connect to the server.
Follow the instructions and the Restorer will download the latest version of
ATS and prompt you to calibrate the display digitizer.
Tap this to run the
ATS application.
Loads current
version of ATS.
Category menu

© 2002, Hayton Systems Page 13
6. Start ATS and Enter the Settings
Now that the
Restorer
loaded a current version of ATS, you can begin actually
using ATS. The terminal automatically starts ATS after running the
Restorer
.
fl
If a new version
of ATS was loaded
then you see this
message.
Otherwise you see
the normal
“Welcome!”
screen.
‡
goes to Welcome! Screen. ‡
moves you to Settings screen.
Tap to exit ATS.
Set your user name and work order
information. Be sure to verify these settings
each time the terminal is used!! Tap the
user’s initials on the top line of any other ATS
screen to access these “Settings.”
Tap after entering all “Settings” data.
Exit ATS by tapping .
User
Select your user name from the drop-down list or
tap the “Edit Users…” line to enter the “Users”
section. The “Users” section allows you to add,
edit, or delete users.
Plant, Subplant
The “Plant” field must be four characters and
“Subplant” must be three characters.
Other Fields
Each field contains a list of valid entries. Choose
the desired entry from the list.
Button
After entering the required data press and
ATS stores the settings and displays the system
help screen. You will then be ready to use ATS.

© 2002, Hayton Systems Page 14
6.1 Maintaining the List of Users
The “Users” section allows you to maintain the list of users. You can add a
new user, edit an existing user, or delete a user.
From the “Settings” screen tap the
User
field to
display the list of users. Next, select “Edit
Users…” from the list of users. ATS then puts you
in the “Users” section.
The “Users” section allows you to add a new
user, edit user information, or delete a user from
the list. returns you to the “Settings”
screen.
Adding or Editing a User
Tap to create a new user, or to edit
an existing user. Use this “Edit User” screen to
enter or edit the user’s information. Tap to
store the user data and return to the “Users”
screen.
Deleting a User
Highlight the user name to delete and press . ATS then prompts
you to make sure you want to delete the user. Press to delete the
user.
Returning to the Settings Section
When finished press to return to the “Settings” screen. The drop-
down user list will show the updated users list.

© 2002, Hayton Systems Page 15
7. Tracking Assets
ATS uses two data viewing modes
(DATA and GRID views). Use the
buttons on the bottom of the terminal to
access the DATA and GRID views.
7.1 DATA View
In DATA view you can enter or edit records. DATA view shows all of the data
fields for each record. The number and type of data fields varies depending on
the transaction type. The DATA view screen contains the following elements:
To enter a new record, first select the transaction
type by tapping the transaction type field in the
upper-right corner of the screen. Select the
transaction type from the list and ATS displays
the input fields for that transaction type. The
transaction type for new records defaults to the
transaction type used on the previous record.
Also, if you exit and re-enter ATS the
transaction type is set to “Move.”
Battery Indicator
Transaction Type
User Initials &
Setup Screen
Work Order
Information
Record
Scroll Bar
Record Count
View Status
Edit/Cancel Button
New/Save button
Table of contents


