HCL Yap Jack Plus User manual


All Rights Reserved
The use, disclosure, modification, transfer or transmittal of this work for
any purpose, in any form, or by any means, without the written
permission from Net2Phone is strictly forbidden.
Rev. 1.2.5, 2003
Disclaimer
The content of this manual is subject to change without notice and
should not be construed as a commitment by the distributor or
Net2Phone. This manual is furnished for informational use only and
Net2Phone assumes no responsibility or liability for any errors or
inaccuracies that may appear herein.
Any Net2Phone services provided through this Equipment are not
intended to replace or be a substitute for primary line voice services or
Plain Old Telephone Service (“POTS”) and are not meant to provide
guaranteed Automatic Number Identification or Automatic Location
Information capabilities associated with 911 or E911 services or to
permit access to 411 directory assistance services. Net2Phone will not
be liable for any damages, expenses, liabilities, risks, or harms arising
out of or related to the Net2Phone services provided through this
Equipment.

Yap Jack Plus User’s Guide
i
Table of Contents
1 Welcome...................................................................................................1
Overview....................................................................................................1
Product Features......................................................................................2
New Features and Functionality............................................................3
Features.............................................................................................3
User Interface Changes ..................................................................5
New Menu Structure................................................................5
Package Contents....................................................................................7
System and Service Requirements.......................................................7
Using this Guide.......................................................................................8
Symbols .............................................................................................9
Yap Jack Plus Interface.........................................................................10
2 Getting Started......................................................................................11
Overview..................................................................................................11
Setting up your Yap Jack Plus.............................................................11
Entering Net2Phone Account and ISP Information...........................12
Account Information.......................................................................13
ISP Information...............................................................................14
Checking Advanced Setup Information..............................................16
Entering Your Contact Email Address........................................17
Changing Your Telephone Dialing Mode...................................18
Disabling Call Waiting....................................................................18
3 Yap Jack Plus Calling .........................................................................21
Overview..................................................................................................21
Calling Experience.................................................................................22
Call Information.......................................................................................22
Telephone Number Called............................................................23
Call Status .......................................................................................23
Time Left in Account......................................................................23
Funds Left in Account....................................................................23
Call Duration....................................................................................24
Cost of Call......................................................................................24
Volume.............................................................................................24
Calling Regular Telephones .................................................................24
Disconnect Mode............................................................................24
Stay Connected Mode...................................................................26
Calling Other Net2Phone Devices.......................................................27
Disconnect Mode............................................................................27
Stay Connected Mode...................................................................28
Receiving a Call from another Net2Phone Device...........................29

Yap Jack Plus User’s Guide
ii
4 Configuring Your Device....................................................................31
Overview..................................................................................................31
LCD Menu System.................................................................................31
Basic Setup.....................................................................................31
Advanced Setup.............................................................................32
Accept Call......................................................................................33
Upgrade...........................................................................................33
Self Test...........................................................................................33
Information.......................................................................................33
Lock Menus.....................................................................................34
Navigating the LCD Menu.....................................................................34
LCD Menu Flow..............................................................................34
Using the Menu...............................................................................35
Basic Setup.............................................................................................35
Navigating the Basic Setup Menu...............................................37
Account Configuration Sub-Menu................................................38
Navigating the Account Configuration Sub-Menu.............38
ISP Configuration Sub-Menu........................................................39
Navigating the ISP Configuration Sub-Menu.....................40
Primary ISP Sub-Menu..........................................................41
Backup ISP Sub-Menu..........................................................44
Navigating the Backup ISP Sub-Menu...............................45
Advanced Setup.....................................................................................46
Navigating the Advanced Setup Menu.......................................47
Administration Sub-Menu..............................................................48
Navigating the Administration Sub-Menu...........................48
Dialing Setup Sub-Sub-Menu...............................................49
Display Setup Sub-Sub-Menu..............................................51
Device Setup Sub-Menu...............................................................53
Navigating the Device Setup Sub-Menu.............................55
Contact Information Sub-Menu....................................................56
Navigating the Contact Information Sub-Menu.................57
System Sub-Menu..........................................................................57
Modem Country Codes..........................................................................58
5 Using Other Features..........................................................................59
Overview..................................................................................................59
Lock the Menus......................................................................................59
Testing Your ISP Connection...............................................................60
Changing the Display Language..........................................................61
Adding a Custom Name........................................................................62
Displaying the Call Duration.................................................................63
Displaying the Cost of the Call.............................................................63
Setting a Dialing Prefix..........................................................................64
Using Masked Dialing............................................................................65
Changing the Voice Headers Setting..................................................66

Yap Jack Plus User’s Guide
iii
Changing the Frames per Packet Setting..........................................67
Getting Product Information..................................................................67
Testing your ISP Connection................................................................68
Upgrading the Yap Jack Plus Firmware.............................................69
Resetting All Settings to Factory Default............................................70
6 Entering Information ...........................................................................71
Overview..................................................................................................71
Using the Telephone Keypad...............................................................71
Telephone Keypad Map................................................................72
Navigating the LCD Entry Fields..........................................................73
Backspace/Delete (*).....................................................................73
Reset (# or Menu/Exit)...................................................................73
Scrolling (?,?,?,?)....................................................................73
7 FAQs ........................................................................................................75
8 Product Specifications .......................................................................81
Model........................................................................................................81
Standards and Protocols.......................................................................81
Electrical..................................................................................................81
Environmental.........................................................................................81
9 FCC Information ...................................................................................83
ACTA FCC Part 68 Customer Information.........................................83
Part 15......................................................................................................85
Index................................................................................................................87


Yap Jack Plus User’s Guide–Chapter 1
1
1 Welcome
Overview
Congratulations on purchasing the Yap Jack Plus! The
Yap Jack Plus is a dial-up voice over IP device that allows
you to make inexpensive calls over the Internet using your
own telephone.
If you are currently an owner of a Yap Jack Plus, you’ll find
the following enhancements:
?? LCD displays call duration/cost
?? Additional dialing/voice features
?? Customizable device name
?? Specification of primary and backup ISPs
?? ConfigurableDNSservers
?? Adjustable frames per packet setting
To use the Yap Jack Plus, all you need is a dial-up PPP
account with a local Internet service provider (ISP), a Yap
Jack Plus account, an analog telephone, and local
telephone service. If you’re all set up with these services,
you’re ready to go!
This chapter describes:
?? Product Features
?? New Features and Functionality
?? Package Contents
?? System and Service
Requirements
?? Using this Guide
?? Yap Jack Plus Interface
1

Yap Jack Plus User’s Guide–Chapter 1
2
Product Features
Feature highlights include:
?? Easy Configuration—Using the LCD display
and your telephone handset, you can quickly
enter your ISP and Yap Jack Plus account
information. You can also easily configure your
device with optional features the same way!
?? ISP Connection Options—You can choose to
keep your Yap Jack Plus connected to your ISP
or disconnect after each call.
?? ISP Self Test—Quickly check to see if your ISP
access is up and running properly.
?? Remote Upgrades—Keep your Yap Jack Plus
up-to-date with the latest features and
functionality.
?? Call Waiting Block/Enable—If you have Call
Waiting set up on your telephone line, you can
easily block and enable it each time you use the
device so your calls won’t be interrupted.
?? Remote Technical Support—If you’d like to
receive frequent updates, tips and upgrade
notifications on your Yap Jack Plus, you can
provide us with your contact email address and
telephone number, as well as allow technical
support to send message notifications on the
device itself. (Highly recommended!)
?? Device-to-Device Calling—Save even more by
calling friends, family members and co-workers
who have a Yap Jack Plus or one of the following
devices powered by Net2Phone: IP Phone,
Linksys Voice Router, PRO, 2-Port Gateway, and
MAX gateways.
?? Call Duration Display—Display the duration of
the call during the call, after the call, or both.
?? Cost of Call Display –Display the cost of the call
during the call, after the call, or both.

Yap Jack Plus User’s Guide–Chapter 1
3
New Features and Functionality
Features
Versions 1.2.1 through 1.2.5 provide the following new
features:
?? Accept Call—You can now set up your Yap Jack
Plus to receive incoming calls. For instructions on
setting up this feature, refer to Receiving a Call
from Another Net2Phone Device in Chapter 3,
Yap Jack Plus Calling.
?? Language Support—You can now view the LCD
menu and device functionality in three languages:
English, Spanish, and French. (More languages
will be supported in the future.) The default
language is English.
?? Masked Dialing—This new feature enables you
to insert the international dialing prefix for the
country you are in so that when you make an
outgoing international call, you will not need to
dial the US prefix of “011” as was required in
previous versions. This feature has been added
to make dialing international calls more natural to
use.
?? Dialing Prefix—The Yap Jack Plus now supports
automatically inserting a prefix (such as “9” to
gain access to an outside line) prior to the dialed
ISP access number.
?? Menu Locking—You can now lock the Yap Jack
Plus so that the menu system cannot be accessed
without the entry of a preset password. (For version
1.2.4, the default password when lock menus is
enabled is 12345. For version 1.2.5, you will be
prompted to enter a password when you enable the
lock menus feature.)
?? Mute—During a call, you can press the @ button
to mute the call so that you won’t be heard by the
person on the other end of the call. To disable
the mute function, press @ again.
?? Custom Device Name—You can configure the
Yap Jack Plus to display a custom name (up to
16 characters) on the LCD. The default message

Yap Jack Plus User’s Guide–Chapter 1
4
is Yap Jack Plus * Ready *. For
example, if you enter “Good Morning” as the
Custom Name, the LCD will display Good
Morning * Ready *.
?? Call Duration Display—You can now display the
duration of a call during the call, after the call, or
both.
?? Cost of Call Display—You can now choose
whether or not the device will display the cost of
a call. The cost of the call will be displayed in the
currency defined in the user’s Net2Phone
account.
?? Primary and Backup ISP Configs—You can
now specify a primary and backup dial-up ISP
and the amount of times each dial-up call is
attempted. (Default: 3)
?? Full Character Support—Full character support
is now available for the ISP phone number field
and beta upgrade server fields (version 1.2.3
supported only numeric characters). Additionally,
support for the “!” character was added for all
menu fields.
?? Configurable DNS Entries—You can configure
the DNS servers that the Yap Jack Plus utilizes
after connecting to a dial-up service. By default,
the Yap Jack Plus will attempt to use the DNS
servers provided by the ISP. If the ISP does not
provide DNS servers, it will use those entered in
the Yap Jack Plus. (Note: Net2Phone’s DNS
server is entered by default.)
?? Configurable Voice Headers—You can switch
between N2P and RTP voice headers, depending
on Net2Phone network routing. This value
should only be modified if directed to by a
Net2Phone reseller or Net2Phone support.
(Default: RTP)
?? Frames per Packet Setting—If you encounter
poor call quality because of bandwidth issues,
you can change the frames per packet setting to
1, 2 or 3. The default setting is 2. 1 can be used
when the connection isgood, 3 when the
connection is poor.

Yap Jack Plus User’s Guide–Chapter 1
5
If you have an older version of the Yap Jack
Plus firmware, and you want to take
advantage of these new features, you can
upgrade remotely right from your device.
See Getting Product Information in Chapter
5, Using Other Features, to find out how to
see what firmware version you currently
have. See Upgrading the Yap Jack Plus
Firmware, also in Chapter 5, for details on
how to upgrade your device.
User Interface Changes
New Menu Structure
New and changed menu items (in bold) are as follows:
?? Basic Setup:
?? Language—Enables you to change the LCD
and voice prompts from English to French or
Spanish.
?? Account Configuration—Enables you to
enter the following Net2Phone account
information:
oAccount Number
oPIN
?? ISP Configuration—Enables you to enter
the following dial-up information for the
ISP(s) they’ll be using to place calls:
oPrimary ISP Information
?? ISP Phone Number
?? ISP User Name
?? ISP Password
?? ISP Access Type
?? Custom Script
oBackup ISP Information
?? ISP Phone Number
?? ISP User Name
?? ISP Password
?? ISP Access Type

Yap Jack Plus User’s Guide–Chapter 1
6
?? Custom Script
oUse Dial Prefix
oDialing Prefix
oISP Redial
oDNS 1
oDNS 2
?? Connect Options
?? Connection Time
?? Advanced Setup—This new main menu item
(previously called Extended Configuration) now
contains the following features and sub-menus:
?? Administration—Enables you to select a
setup sub-menu or change the login
password:
oDialing Setup
?? Use Masked Dialing
?? Mask Dial Prefix
oDisplay Setup
?? Call Duration
?? Cost of Call
?? Custom Name
oChange Password
?? Device Setup—Enables you to enter/select
the following setup information:
oCall Waiting
oC-W Enable Code
oC-W Block Code
oModem Country
oDialing Mode
oVoice Headers
oFrames Per Packet
?? Contact Info—Enables you to enter/select
the following information:
oYour Email
oYour Phone
oAllow Messages

Yap Jack Plus User’s Guide–Chapter 1
7
?? System—Enables you to enter or change
device functionality—only as directed by
technical support:
oDSMAP
oBeta Map
oDoorman 1
oDoorman 2
oDoorman Port
oDebug
oDNS Overwrite
?? Accept Call
?? Upgrade—Moved to the main menu for easier
access.
?? Self Test—Moved to the main menu for easier
access.
?? Information—Allows you to view the firmware
version number, as well as the hardware serial
number.
?? Lock Menus—This new feature enables you to
lock and unlock LCD menu access and set up a
menu password.
Package Contents
You should find the following contents in your Yap Jack
Plus package:
?? Yap Jack Plus device
?? Power adapter (24 VDC, 250mA)
?? One telephone cable (RJ-11)
?? Quick Start Guide
?? User’s Guide (if not available in your package,
please contact your distributor)
?? Warranty card
System and Service Requirements
You’ll need the following items/services to use your Yap
Jack Plus:

Yap Jack Plus User’s Guide–Chapter 1
8
?? Access to a dial-up Internet service provider
(ISP) that is PPP compatible
?? At least one valid ISP account
?? A Net2Phone account number and PIN
?? Any conventional analog telephone
?? A telephone line wall jack
?? Local telephone company service
Using this Guide
This guide is for Yap Jack Plus users and describes how
to use the device. Highlights include:
For information on… Go to…
Product features and
components Chapter 1, Welcome
System requirements Chapter 1, Welcome
Basic device setup Chapter 2, Getting
Started
Initial configuration Chapter 2, Getting
Started
Calling phones and
Net2Phone devices Chapter 3, Placing and
Receiving Calls
LCD menu system
navigation Chapter 4, Configuring
your Device
ISP connection testing Chapter 5, Using Other
Features
Locking the menus Chapter 5, Using Other
Features
Firmware upgrades Chapter 5, Using Other
Features
Telephone keypad entry Chapter 6, Entering
Information
Frequently Asked
Questions Chapter 7, FAQs

Yap Jack Plus User’s Guide–Chapter 1
9
Symbols
Throughout the manual, you’ll see information highlighted
for you with the following fun symbol icons:
Symbol Represents
Chapter Description
Note
Tip
Important
Yap Jack Plus User’s Guide–Chapter 1
10
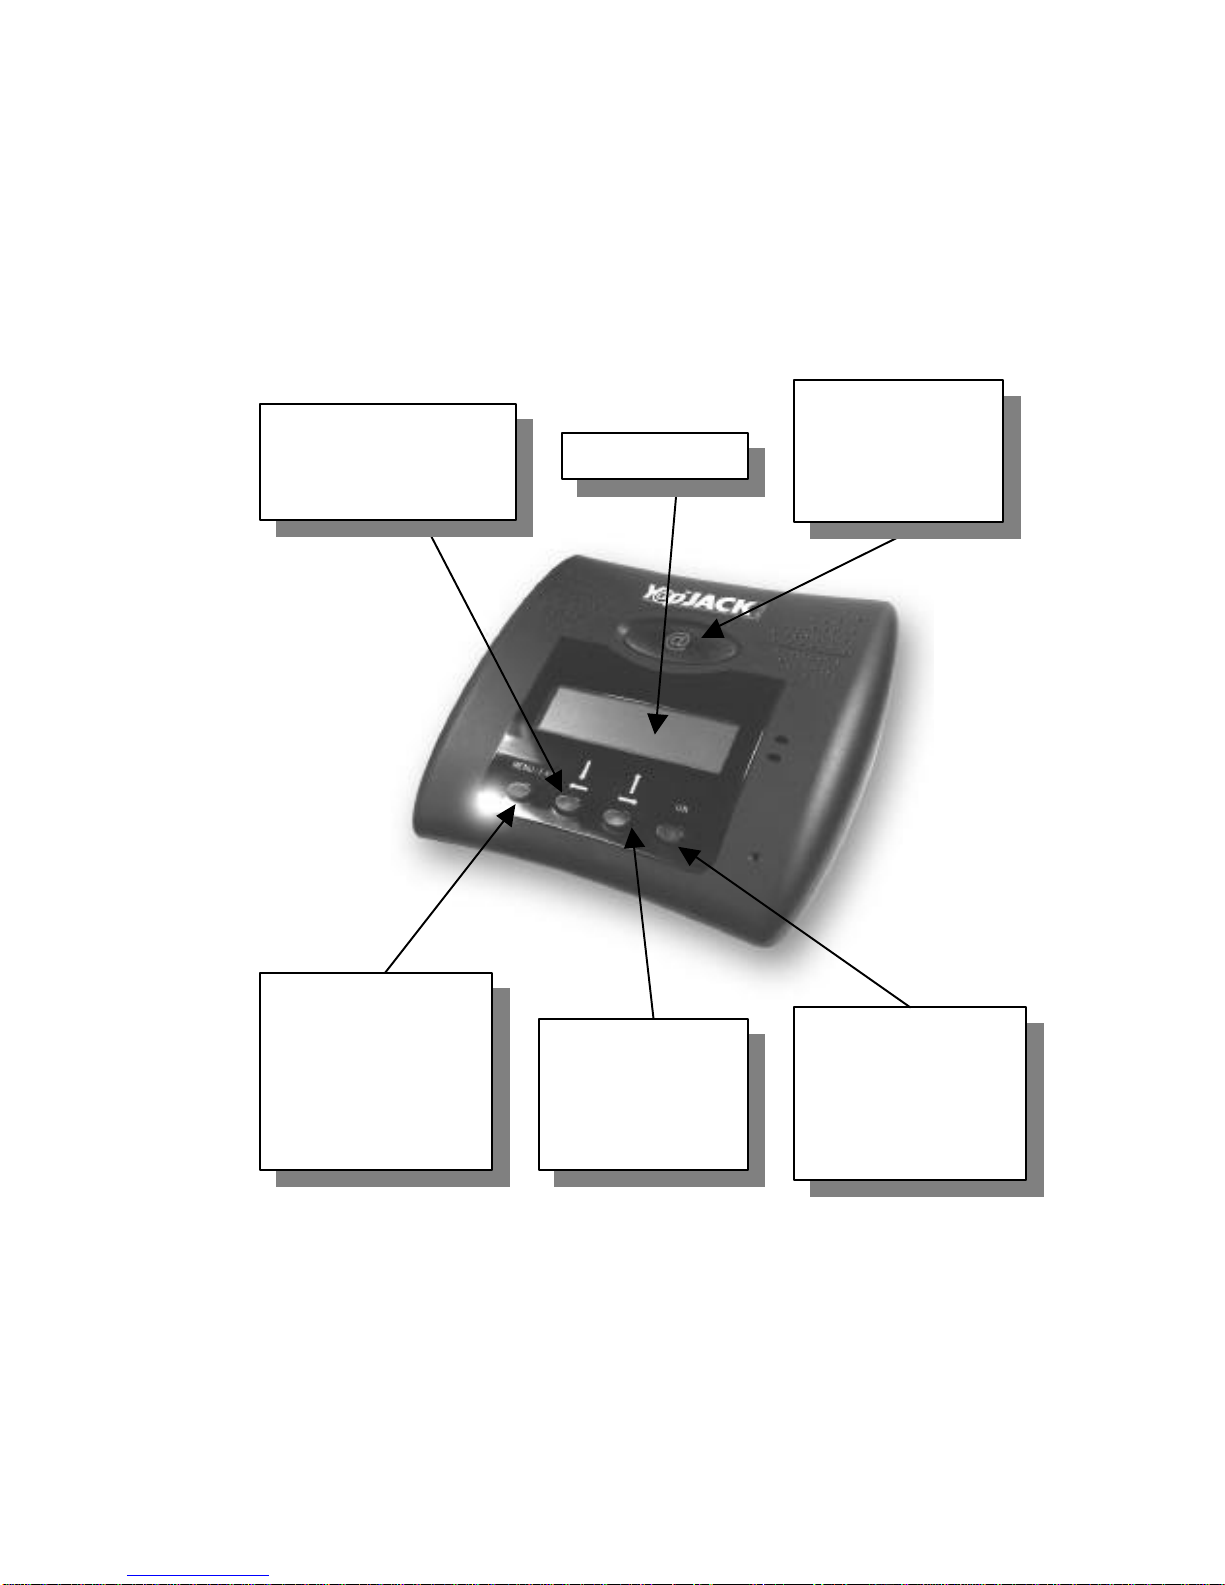
Yap Jack Plus Interface
The Yap Jack Plus interface consists of an LCD screen
and five buttons. The picture below describes each
interface element and its purpose.
@ button:
Press
to initiate a call or
enable the mute
function while a
call is in progress.
OK button:
Press to
accept settings and,
during a call, view
time left, call credit,
call duration, and
cost of call.
Menu/Exit button:
Press to enter the
LCD menu system,
exit menu items and
settings, disconnect
fromthe ISP or end
a call.
Down/left button:
Press to scroll down or
to the left in
configurationsettings.
LCD display
Up/rightbutton:
Press to scroll up
or to the right in
configuration
settings.
Yap Jack Plus User’s Guide–Chapter 2
11
2 Getting Started
Overview
To start using your Yap Jack Plus, you simply have to:
1. Set up the device
2. Enter ISP and Yap Jack Plus account information
3. Check advanced setup information
4. Test your ISP connection
Once you finish the foursteps above, you’ll be all set to
make and receive telephone calls using your Yap Jack
Plus!
This chapter describes how to:
?? Set up your Yap Jack Plus
?? Enter ISP and Yap Jack Plus
account information
?? Check advanced setup
information
?? Test your ISP connection
Setting up your Yap Jack Plus
2

Yap Jack Plus User’s Guide–Chapter 2
12
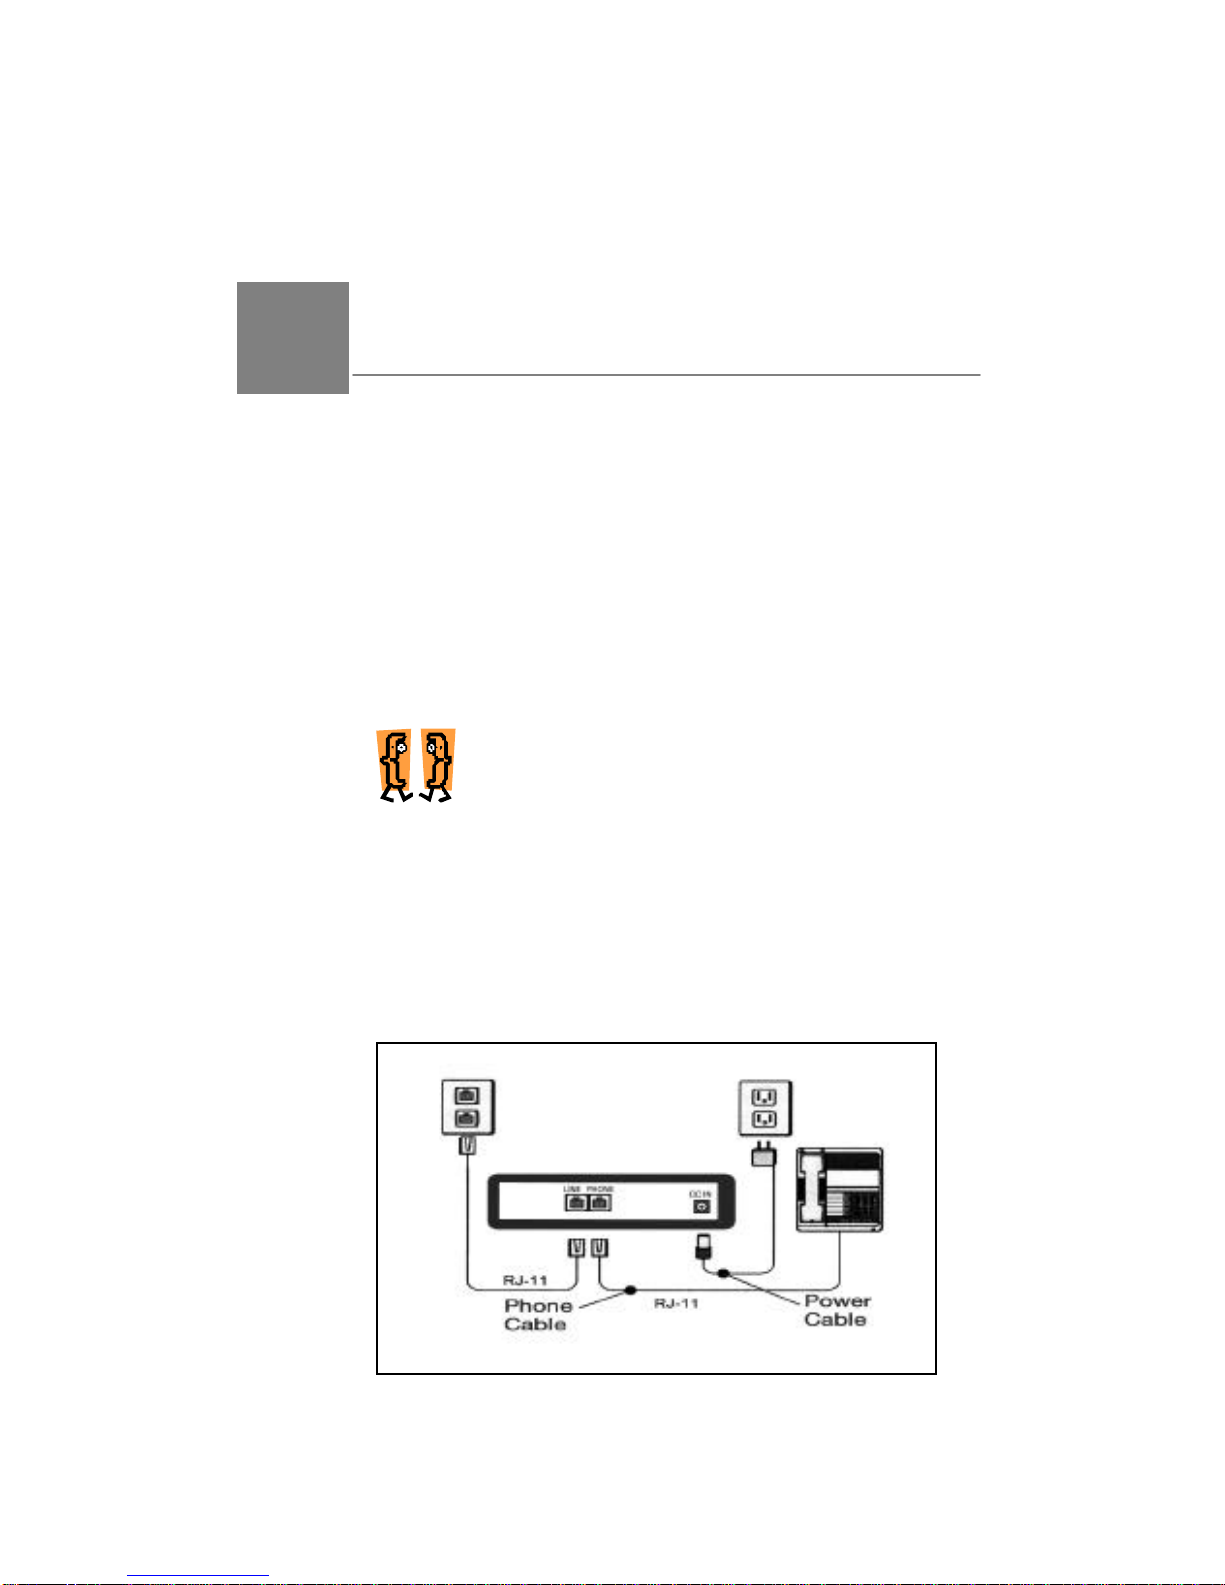
To set up and connect your device:
1. Connect the Yap Jack Plus into your telephone
jack.
?? Plug one end of the telephone cable (RJ-11)
into theLine port on the back of the device.
?? Plug the other end into a working telephone
wall jack.
2. Connect your telephone into the Yap Jack Plus.
?? Plug the RJ-11 cable from your telephone
into thePhone port on the back of the
device.
3. Power-up the Yap Jack Plus.
?? Plug the power supply into an AC outlet and
plug its power cable into theDC INport on
the rear of the device.
The device powers-up immediately. You will
hear three beeps, the lights will glow, and
the display will readInitializing
Please Wait… and thenYap Jack Plus
* Ready *.
Entering Net2Phone Account and
ISP Information
Now that you’re all connected, you need to configure the
device with your Net2Phone account and ISP information
so that you can place calls.
If you try to place a call before the information has been
entered, the device will perform acheck, and if any
information is missing, you will be prompted to enter each
field one at a time.
One of the new features in Yap Jack Plus, version 1.2.5 is
the ability to specify two different sets of ISP information:
Primary ISP and Backup ISP. If you have two separate
ISP accounts, you will be able to enter one account’s
information (ISP phone number, name, password, and
access type) as the Primary ISP and the other account’s
information as the Backup ISP. If you only have one ISP
account, you can enter your account information as the
Primary ISP and then use the Backup ISP to specify a
secondary access number.

Yap Jack Plus User’s Guide–Chapter 2
13
Please have all account information ready and be
prepared to enter your:
?? Net2Phone account number
?? Net2Phone personal identification number (PIN)
?? ISP access telephone numbers for both your
primary and backup ISPs
?? ISP user name (only if needed by your primary
and/or backup ISP)
?? ISP password (only if needed by your primary
and/or backup ISP)
For detailed information on how to navigate
and use theLCD menu system, see Chapter
4, Configuring Your Device.
The following instructions assume that no
Net2Phone account and ISP information has
been entered. If your device has been pre-
configured, you can skip to the section
entitled Checking Advanced Setup
Information later in this chapter.
Account Information
To enter your account information:
1. When Yap Jack Plus * Ready * is
displayed on the LCD, press theMenu/Exit
button.
2. Select the>Basic Setup menu item by
pressing theOK button.
3. Using the down (?) button, move to the
>Account Config menu option and press the
OK button.
4. Select >Account Number by pressing theOK
button.
The Account Number entry field displays.
5. Pick up your telephone handset, and, using your
telephone keypad, enter your Yap Jack Plus
account number.
6. To save your entry, press theOK button.

Yap Jack Plus User’s Guide–Chapter 2
14
7. Using the down (?) button, select >PIN and
press theOK button.
The PIN entry field displays.
8. Pick up your telephone handset, and, using your
telephone keypad, enter the PIN associated with
your account number.
9. To save your entry, press theOK button.
ISP Information
To enter your ISP information:
1. Press theMenu/Exit button to return to theBasic
Setup menu.
2. Using the down (?) button, select >ISP Config
and press theOK button.
3. Select >Primary ISP by pressing theOK
button.
If you only have one ISP, you can enter that
ISP’s main access number as the Primary
ISP and a secondary access number for the
same ISP as the Backup ISP.
4. Select >ISP Phone Num. by pressing theOK
button.
The ISP Phone Num. entry field displays.
5. Pick up your telephone handset, and, using your
telephone keypad, enter your primary ISP’s
access telephone number.
If your phone line requires you to dial a
prefix to access an outside line (for
example, some business phones require
that you dial a 9 to access an outside line),
refer to the Setting a Dialing Prefix section in
Chapter 5, Using Other Features.
All information entered on your telephone
keypad is displayed on the Yap Jack Plus
LCD screen. Please check the LCD as you
enter information.
6. To save your entry, press theOK button.
Table of contents


