HDanywhere MHUB User manual

Revision 1: 10/07/19
MHUB AUDIO (6x4) Product Guide
CODE: MHUBAUDIO64

2Box. Features. Specs.

Box. Features. Specs.
1.
Glossary of termsContents
In the box
MHUB Video or Audio distribution systems manufactured
by HDANYWHERE.
Video enabled MHUB Specically a video distribution system
manufactured by HDANYWHERE.
Audio enabled MHUB Specically an audio distribution system
manufactured by HDANYWHERE
Standalone When MHUB is installed by itself.
Stack When MHUB is installed with one or more stackable
MHUB systems.
V&A A stack comprised of one Video enabled MHUB and
multiple MHUB AUDIO systems.
A&A A stack comprised of one or more MHUB AUDIO
systems.
Master The designated controller for all other MHUB
systems found in a stack.
Slave MHUB devices which communicate to a Master
MHUB device.
uControl
A remote control app for MHUB systems made by
HDANYWHERE and available from iOS & Android app
stores.
Control System
A 3rd party method of control for MHUB systems.
For example, Crestron, Control4, RTI, Savant, Fibaro
etc.
MHUB-OS MHUB’s on-board operating system.
Glossary, in the box, specs & features 4-5
Front & Rear panel 8-9
MHUB control methods 10
Stacking: creating (V&A or A&A) systems 11
Setup: example wiring for operation in standalone mode 14-15
Setup: example wiring for operation in stack mode 16-17
Setup on uControl (standalone or stack) 20-21
MHUB-OS 24
MHUB-OS pages 25
Legals: Compliance, conformity & Product Guarantee 28-29
x1 MHUB AUDIO (6x4) Chassis/Hub
x4 Rubber feet & screws
x2 Rack mounting ears
x1 IEC power lead
x4 3.5mm stereo jack leads
x4 Four Pin Phoenix connectors
x1 MHUB AUDIO (6x4) user guide
5
Features Specication
4x 110w stereo zones, 8x 55w channels 4 Ohm (all zones driven)
Parametric DSP EQ + crossover
Stackable with MHUB U & MHUB PRO systems
Remotely monitorable
Works with uControl and voice control
High-efciency power supply
Adjustable lip-sync delay
Auto low power mode
Sold as a complete package with mounting kit included.
Form factor 19”/1U aluminium rack-mountable unit
Input / Output / AUX / Sub 6 / 4 / 4
Input type 3.5mm Stereo Jack (x4)
Optical (x2)
Digital Coaxial (x2)
Output type Digital Coaxial (x2)
3.5mm Jack (x4) sub/slave
Audio support (digital) Stereo
Audio support (analogue) Stereo
Lip-sync delay 0 – 170ms on input
Amplier output power 110 watts stereo zones 55 watts into
4 ohms/channel
Package weight 3900g
Dimension (W/D/H) 440 / 284 / 43
Power 110-240V
Guarantee 3/4-year guarantee (Cloud registration required)

6Interface. Control. Stacking.

Interface. Control. Stacking.
2.
HUB CONTROL
AUDIO DIGITAL (IN)
1 2 3 4
AUX 1 AUX 2
sub / SLAVE (out)
AUDIO ANALOGUE (IN)
IP
hub ir (IN) MHUB LINK
A
A B
C D
2X55W/4Ω
(- R +) (- L +)
B
(- R +) (- L +)
C
(- R +) (- L +)
D
(- R +) (- L +)
RS232
100-240V AC 50/60HZ
AUDIO
MHUB
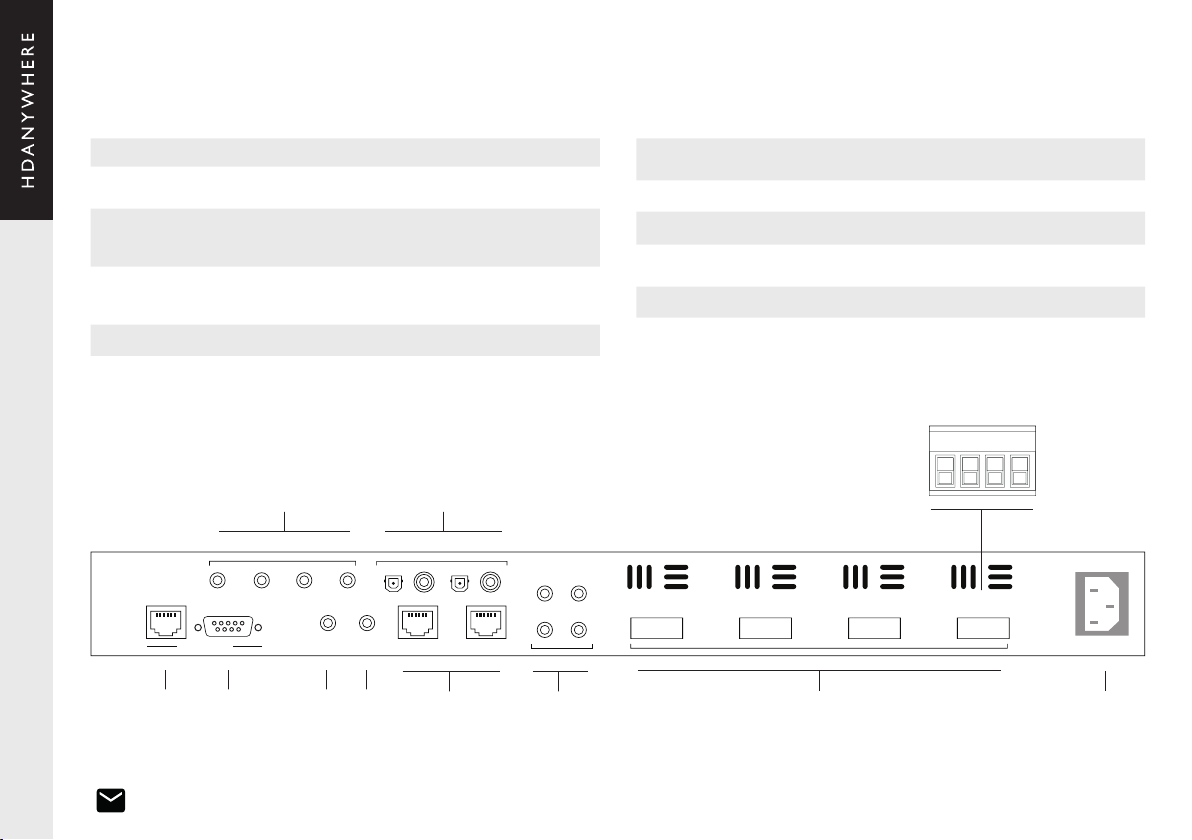
1. Audio Analogue (IN): Connect audio sources via 3.5mm jack cable.
2. Audio Digital (IN): Connect audio source via optical cable, digital-coax or
remote input.
3. Speaker Outputs (A-D): 110w Stereo Output via 4-way phoenix connectors.
3a. Phoenix Connector: Terminate speaker cable to pins (R - /+) then (L - / +) as
per the diagram.
4. Hub Control (IP): Connect the MHUB system to your router via this port to
enable setup and control via our app uControl. Also required for connection to
control systems.
5. Hub Control (RS232): Connect MHUB directly to a control system via RS232.
6. MHUB IR (IN): Send Infrared (IR) commands from a remote control or control
system via a HDA IR Receiver in to MHUB AUDIO for switching control.
7. MHUB LINK: Future expansion port details TBC.
8. Remote Audio (IN): Future expansion port details TBC.
9. SUB/SLAVE OUT (A-D): Subwoofer or mirrored/slave outputs. This mode is
determined inside MHUB-OS.
10. AC Power: Connect an IEC lead to this port to provide power to your MHUB.
9 3 108
21
7654
Rear panel: MHUB AUDIO (6x4)
3a
R
- + L
- +
AUDI O
MHUB
9
3 4
1 2
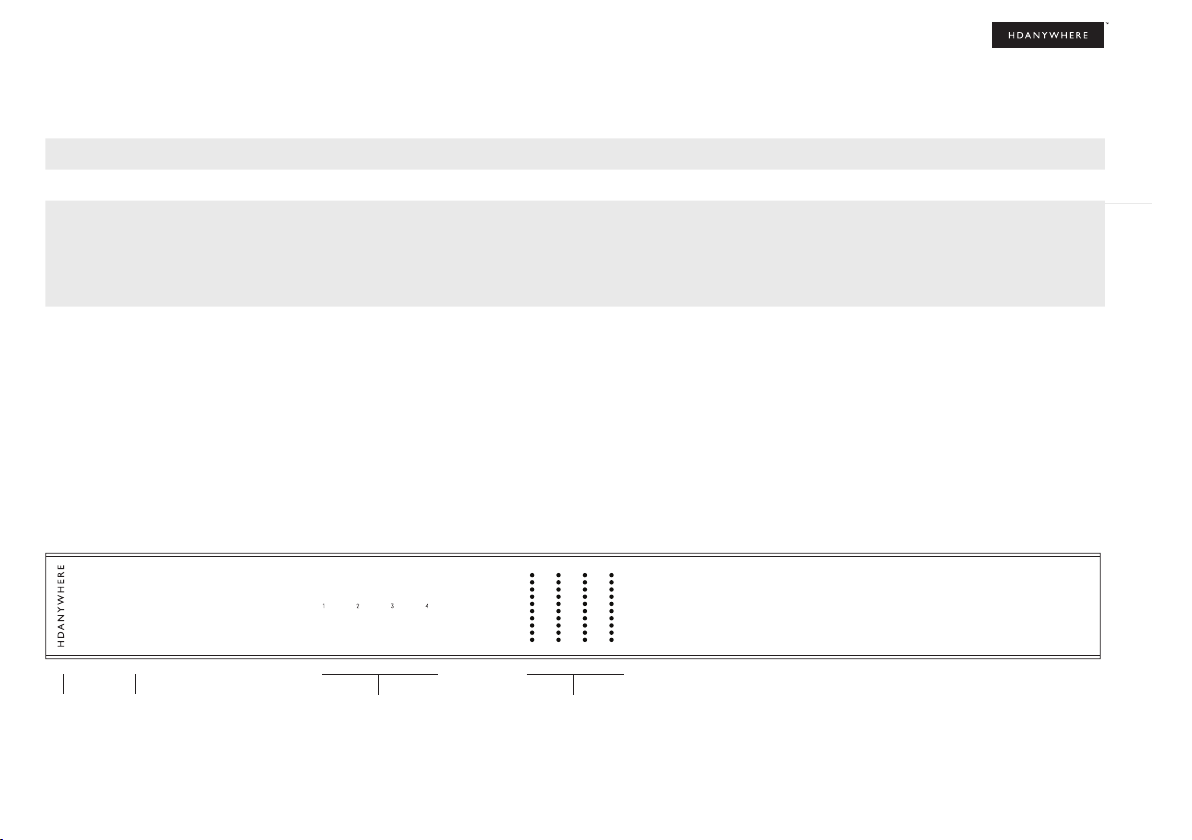
1. HDANYWHERE logo: Indicator light. If this light is on and solid then MHUB AUDIO has power and is on.
2. MHUB AUDIO logo: Indicator light. If this light is on and solid then MHUB AUDIO has power and is on. If the light is flashing then MHUB AUDIO is in detection mode.
3. Input (1-4): Input level presence indicator light. This light has 4 modes (Off/Flashing/Solid/Red): Off, Flashing & Solid are all OK for normal operation. Depending on the
input level this will determine the behaviour of the light. If the light is Red then the input is being overloaded and it’s recommended that you adjust the level down.
Solid light: -19.5dB
Red light (overload): +4.6dB
4. Output Meter (A-D): Amplier power indicator. There are four thresholds indicated by different colours. Green, Yellow and Red.
Green light on: -20dB
Yellow light on: -14dB
Red light on: -10dB
All lights on: 0dB
If all lights are on then MHUB AUDIO’s ampliers are operating at full power. HDANYWHERE does not recommend that you operate MHUB AUDIO at this level as this can
damage the life expectancy of your system and will negatively affect the audio quality (distortion and clipping). Levels and gain can be managed from within MHUB-OS
(see page 24-25). When MHUB AUDIO is setup correctly these lights should operate within the Green and Yellow ranges with occasional peaking in to the Red being OK.
Depending on your devices/settings you may not see the lights operate at all. This is also OK.
Front panel: MHUB AUDIO (6x4)

MHUB control methods
MHUB AUDIO has been designed to be operated and controlled in numerous ways depending on your requirements. There are no control buttons on the front of the MHUB
AUDIO (see MHUB AUDIO (6x4) Front Panel). This MHUB has been designed to be located centrally and its control methods are primarily those which do not require line of
sight to the unit. The methods to control MHUB AUDIO and considerations for each are listed below.
uControl
Available on iOS and Android, uControl is MHUB AUDIO’s native method of control. All of MHUB AUDIO’s built-in features are available; offering comprehensive control over
switching, volume, grouping, executing Sequences and mute states in all zones. uControl communicates over the same Local Area Network (LAN) as your MHUB AUDIO
which allows for global control over the entire system regardless of what zone you are in.
Voice
All MHUB systems support voice control as standard via an Amazon Echo (Alexa) device. Voice control is not designed to act as a primary control method but to assist the
other methods listed on this page. Using voice it is possible to control volume adjustments (“set volume to 25%”), muting and switching input from any zone.
Third-party control system
Control via a third-party control system is also supported using our latest and most advanced API to date. For an up-to-date list of systems that MHUB AUDIO supports
please visit the “Control Drivers” section of our support site: http://support.hdanywhere.com. Control varies depending on the control system being used but typically,
switching, volume and mute control is supported.
MHUB-OS
Any device with a web browser can control MHUB AUDIO directly from the MHUB-OS dashboard. From here it is possible to control switching, volume and mute states.
MHUB-OS is also where all conguration for MHUB AUDIO can be done.
Infrared (IR)
This is a legacy method of control. If you would like to use IR as your control method then you will need to purchase an IR Receiver and congure your remote control device
to output MHUB AUDIO’s IR control commands. IR codes can be found on our support site: http://support.hdanywhere.com. This method of control requires line of sight with
the MHUB system as there is no way to send an IR command from any zone back to the MHUB device. HDANYWHERE’s recommendation is not to use this method other
than for testing the system should no LAN be present.

11
MHUB AUDIO is a ‘stackable’ system meaning that it can be added to any MHUB PRO, MHUB PRO 2.0, MHUB U (video MHUB) or MHUB AUDIO (audio MHUB) system
manufactured after 2017. When you create a system comprised of a video MHUB and an audio MHUB then we refer to this as a V&A system. If you combine MHUB AUDIO
with another MHUB AUDIO then you will have an A&A system.
Master & slave devices
Stacking works by taking one or more MHUB systems and combining them together so that it presents itself to the user as one larger system. A stacked system requires that
a ‘Master’ MHUB is nominated as well as ‘Slave’ devices which the Master will control. All communication and the large majority of system conguration will be done on the
Master system only. Once the MHUB systems are setup in stack mode then management of any of the slave devices becomes locked to the user.
You can only create a stack with uControl
To create a stacked system you will need uControl. uControl will scan your network and will identify any MHUB that is present on it. If more than one MHUB is found then you
will be presented with additional options: 1) to setup and connect to any MHUB system in standalone mode or 2) to combine one or more MHUB systems in to a stack. If you
select option #2, then you will be asked to nominate your Master device rst.
• If you are setting up a stack with a video MHUB and an audio MHUB (V&A) then the video MHUB will automatically be selected as the Master device.
• If you are setting up a stack with multiple MHUB AUDIO’s then you will be given the option to choose which device is the Master.
• You can not create a stack with more than one video MHUB included.
• You are limited to a maximum of 3 Slave devices.
• You can reorder the Slaves in your stack to match how your systems are physically setup in your rack.
TIP: Have a plan in place before you start
It is advisable to have a drawing or a plan in place before you start to connect your MHUB systems up. Outputs from MHUB can act as inputs for Slave MHUBs and both
can be switched to any input/output combination. This can get very confusing! Detail everything and label your cables and interconnects to make troubleshooting easier.
Modifying or deleting a stack after stack setup is complete
It is possible to modify any aspect of the stack setup from MHUB-OS and uControl. However, if you wish to add or remove a Slave device or would like to upgrade the Master
MHUB then you will have to reset all systems in the stack back to factory settings and restart the setup Stack process.
Stacking: creating (V&A or A&A) systems

12 Wiring. Power Up. First Boot.

Wiring. Power Up. First Boot.
3.


15
1 Ensure that audio source devices are off.
2 Connect audio inputs to MHUB AUDIO .
3 Connect MHUB AUDIO outputs or sub/slave ports to speakers or ampliers.
4 Connect an Ethernet cable between your router and the IP control port.
5 Connect the power cable to MHUB AUDIO - the MHUB will turn on.
6 Turn on any audio source devices
7 MHUB AUDIO will begin to boot up, this can take 60 seconds. uControl will not
nd MHUB AUDIO until this period has passed.
8 Load uControl
9 Complete setup on uControl (see “Setup on uControl”)
Power up
Standalone setup example
Listen to anything everywhere
In the diagram (“Setup: wiring for operation in standalone mode”) we have
demonstrated a typical setup where MHUB AUDIO might be used to provide music
and audio in a restaurant location. MHUB AUDIO is being used to power 16 speakers
in total using a method of wiring called Parallel Connectivity. There are also four
active subwoofers (#1) providing full-range, high quality audio in each one of the
dened zones, “Reception”, “Drinks”, “Upstairs Dining and “Downstairs Dining”.
Full control over audio routing
In this example, the music streaming device is being used to route audio to the
dining areas. In the bar, staff are allowed to connect their own devices and play the
music that they like. For times when a pre-dened playlist is required then there is a
PC which can have music loaded on to it. At any time, all zones can switch in to any
input by using uControl or a control system.
Note:
MHUB AUDIO has been designed so that it can be installed in several
different ways. The purpose of the diagram is to illustrate a typical setup
and assumes that you are already familiar with the basics of audio wiring
and infrastructure. If you are unsure how you might install MHUB AUDIO in to
Setup: wiring for operation in stacked mode (V&A)
1
D
o
n
t
h
a
v
e
t
i
m
e
?
W
a
t
c
h
o
n
l
i
n
e
!
https://youtu.be/Vq-_dj0m5KU

17
Power up
1 Ensure that all devices are turned off.
2 Connect the audio outputs from the Master system to the inputs on the Slave
device(s).
3 Refer to the user manual for the video enabled MHUB and follow the setup
guidelines listed in there - do not proceed to uControl setup, instead, return to
the instructions listed here.
4 Connect MHUB AUDIO outputs or sub/slave ports to speakers or ampliers.
5 Connect an Ethernet cable between your router and the IP control port on
your MHUB AUDIO.
6 Connect the power cable to MHUB AUDIO - the MHUB will turn on.
7 MHUB AUDIO will begin to boot up, this can take 60 seconds. uControl will
not nd MHUB AUDIO until this period has passed.
8 Load uControl
9 Complete setup on uControl (see “Setup on uControl”).
Both devices are new
If all the MHUB systems in your stack are new then follow the instructions below to
setup your stacked system. Avoid using uControl to congure your system until all
systems in your stack have been connected to one another and they’re all powered
on.
IMPORTANT: Adding MHUB AUDIO to an existing MHUB system
If you are upgrading an existing MHUB system with MHUB AUDIO then you will
have to restore the older MHUB back to its default settings rst. You can do this
by loading uControl and selecting the “Manually Connect” option from the home
screen. Restoring your MHUB will wipe any operational data, uControl packs,
Sequences, HDA Cloud information and user settings.
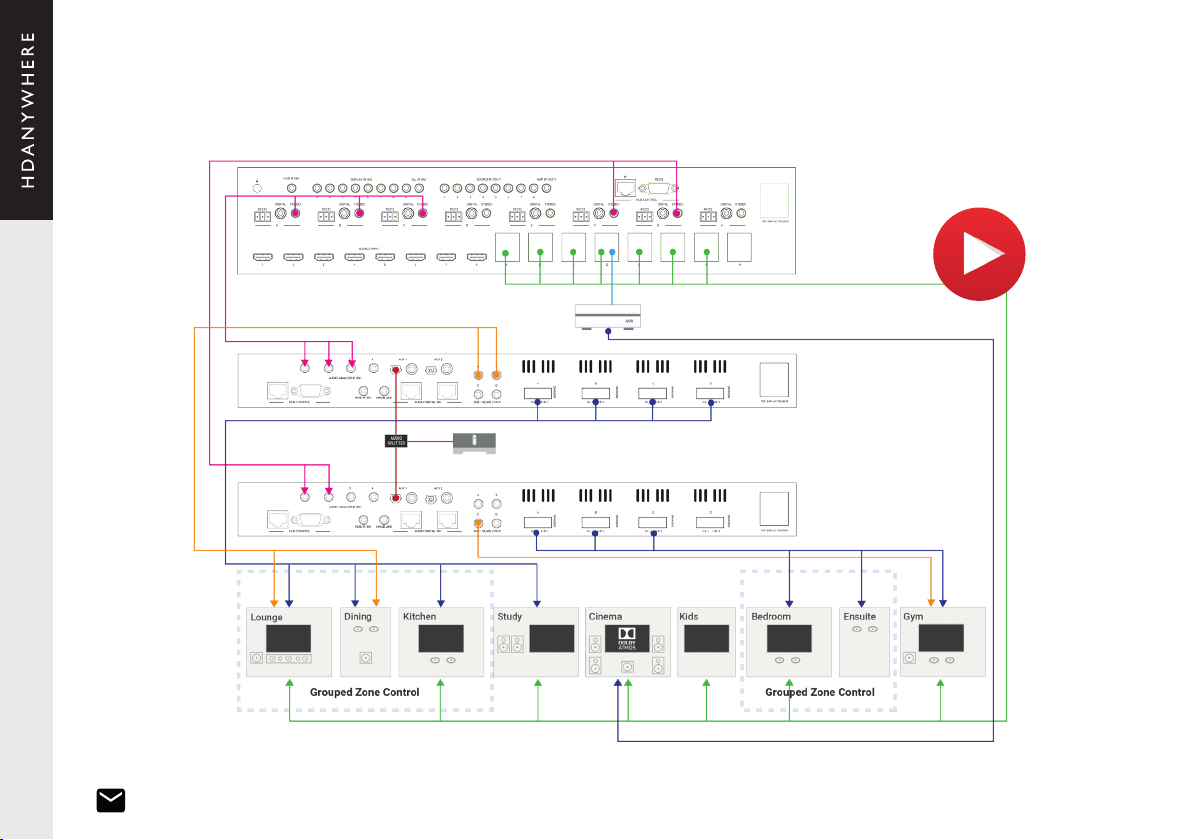
Stack setup example
Whole-home audio and video distribution
Stack a video enabled MHUB system with a single or multiple MHUB AUDIO’s to
create pixel-perfect 4K images on all displays and impactful sound in every room.
The speakers in each zone can access the sound being routed to your TV or can
be used independently to play any music or audio of your choosing. In the diagram
(“Setup: wiring for operation in stacked mode (V&A)”) we are illustrating how MHUB
PRO (4x4) 40 can be used with x2 MHUB AUDIO (6x4) systems to create a stack
comprising of video only, audio only and video and audio zones.
Whilst the purpose of this setup is primarily to add high-quality sound to the video
being watched there is also the option to distribute the Sonos player to all zones in
the home (#1). This is done by routing the output of the Sonos in to an audio splitter
which then feeds in to the auxillary ports on each MHUB AUDIO device. This way
sound from Sonos is available to be accessed in all zones of the property.
Note:
MHUB AUDIO has been designed so that it can be installed in several
different ways. The purpose of the diagram is to illustrate a typical setup
and assumes that you are already familiar with the basics of audio wiring
and infrastructure. If you are unsure how you might install MHUB AUDIO in to

18 Setup with uControl.

Setup with uControl.
4.
Setup on uControl (standalone or stack)
Before starting setup on uControl, ensure that your MHUB is wired up correctly, is turned on and is connected to the same router as your phone or tablet. If it is not, then
please refer to pages 15 & 17 and follow the steps there. You can not proceed with setup if you do not have uControl installed on your mobile device.
Completing setup in uControl will teach the MHUB what inputs are connected to it and where the outputs are located throughout your property (zones). Additionally, it will
grant you access to MHUB-OS for advanced management of your MHUB and, should you wish, connect the MHUB to HDANYWHERE’s online services (HDA Cloud) to register
your unit, extend your warranty, connect to the uControl service, enable voice control and remote monitoring or management. uControl setup should not take longer than
15 minutes to complete.
Start setup with uControl (Part 1)
1 . Load up uControl. You will be presented with an intro screen which will automatically disappear or can be swiped away.
2. You will now see the home screen. This screen is only visible when no MHUB system is paired with uControl.
3. There are two options “Connect to MHUB” and an advanced management/tool option called “Manually Connect”. Select “Connect to MHUB”.
4. uControl will now perform a scan of your network and will nd all active MHUB systems.
5. If there are any problems detected in the scan then they will be displayed in uControl here. The messages are dependent on what is detected:
Software Update Required: uControl has detected that one or more MHUB requires an update to proceed. Remedy: update all MHUB’s in your network.
Software Mismatch: the software found on one or more MHUB systems do not match Remedy: update all MHUB’s in your network.
MHUB’s is still in Stack: uControl has detected that one or more MHUB systems are still in stack mode. Remedy: reset the MHUB in question back to factory settings.
6. If there are no errors then uControl will present you with the following options:
1) if a standalone MHUB is found then uControl will proceed to congure that system directly. (Jump to step 8)
2) if multiple MHUB’s are found then uControl will ask if you want to stack those systems (if supported) or connect to one of them individually.
7. If MHUB is being setup in Stack mode then you will be asked to nominate a Master and Slave device(s). Tip: identify the MHUB easily by clicking on the magnifying glass
icon to put that MHUB in to identication mode.
8. uControl will then contact your system to start the conguration process.
9. You will now be redirected to MHUB-OS, the operating system on board MHUB, to complete the setup process (see next page).
Other manuals for MHUB
4
Other HDanywhere Stereo System manuals


 instruction manual")
