HDFury NEW-HDF0090-1 User manual

4K Integral
User Manual 4K Integral Rev 1.4

Disclaimer: 3rd party and/or custom firmware providing extra features are not covered in this manual.
2
4K Integral –User Manual
Table of Contents
Overview …...................................................................................................... 3
Connecting Cables …........................................................................................ 4
Power Status/LED ….........................................................................................5
Reset HPD/Factory Default…...........................................................................6
EDID Mode Selection .......................................................................................7
CEC Trigger Button ………..................................................................................8
Input Switching and Matrix Mode...................................................................9
HDCP Settings………………………..…………………………………………………………………….10
Audio Settings…............................................................................................... 11
Combo RST + INP to select Custom EDID........................................................ 12
List of Custom EDID available..........................................................................13
Backside Sticker............................................................................................... 14
Selecting the Windows PC driver for USB GUI and Firmware Update......……15
Update the Integral Firmware with a Windows PC...................................……16
Integral USB GUI for Windows PC..............................................................……19
Integral Total Control APP............................................................................... 30
Frequently Asked Questions (FAQ) ................................................................ 32
Specifications................................................................................................... .36
Certifications.................................................................................................... 40

Disclaimer: 3rd party and/or custom firmware providing extra features are not covered in this manual.
3
4K Integral –User Manual
Overview
The HDfury team would like to thank you personally for purchasing the 4K Integral!
This unique HDMI2.0a and HDCP2.2 device supports true full 4K60 4:4:4 600MHz 18Gbps bandwidth
signals. It will allow you to solve any HDCP error, Split any SD/HD/Full HD/4K or PC signals up to
600MHz, replace or extract HDMI audio, Input CEC commands, Update and switch between multiple
edid banks, work as a Matrix, Inject Infoframe and more. Control can be completed with IR codes,
through slide switch or push buttons on the unit, via a wired USB connection to a Windows PC or
through wireless Bluetooth connection with any Smartphone or Tablet running Android or iOS.

Disclaimer: 3rd party and/or custom firmware providing extra features are not covered in this manual.
4
4K Integral –User Manual
Connecting Cables
To use your 4K Integral:
• Connect a HDMI input cable to the HDMI input.
• Connect a HDMI output cable to the HDMI output.
• Connect the Integral power supply.
• Connect any additional HDMI input/output cable or any audio input /output cable (optional).
As shipped, the Integral defaults to HDCP1.4 on the Bottom output port. Top Output port can be
configured to any HDCP revision. Make sure that you are using 600MHz certified HDMI 4K cable if you
plan to set up a 4K60 4:4:4 600MHz 18Gbps link in your setup.

Disclaimer: 3rd party and/or custom firmware providing extra features are not covered in this manual.
5
4K Integral –User Manual
Power/Status LED
The Integral logo will glow Green when in use. When the Integral first receives an HDMI signal the logo
will quickly turn on, then off, and then on permanently to indicate that the HDCP handshake has been
completed.
The status of the green logo may be used for troubleshooting:
[Logo OFF]: Insufficient power or no incoming signals. Use the Integral power supply, make sure
the source and sink devices are correctly connected and ON.
[Logo BLINKING] (ON for split second, OFF for 5 seconds): The Integral is receiving power and is
ready to accept an HDMI signal.
[Logo ON]: The Integral is powered and receiving and decoding a HDMI signal.

Disclaimer: 3rd party and/or custom firmware providing extra features are not covered in this manual.
6
4K Integral –User Manual
Reset HPD (Short Press) or Reset to factory default (Long Press)
The 4K Integral offers 2 functions per push button.
[Short Press] on Reset Button will generate Hot Plug Detection event.
[Long Press] (over 10s for security) will reset the Integral to factory default.
Note: You can also Reset the unit or perform any others control with IR codes, from the USB GUI for
Windows PC or via smartphone/tablet APP for Android and iOS.

Disclaimer: 3rd party and/or custom firmware providing extra features are not covered in this manual.
7
4K Integral –User Manual
EDID Mode Selection
EDID slide switch has 3 positions.
Switch should be set to middle position to allow control via USB, IR or Bluetooth device.
[Automix Mode]: Create EDID based on mutual least capabilities so both displays will always show a
picture and audio. You can access advanced options of the Automix mode via the GUI for Windows PC
and Android/iOS APP.
[Custom Use / BT]: Pick and use EDID from a selection of preloaded EDID tables (see p.13) or load any
EDID bank of your choice. By default the selected EDID table is a 4K30 4:4:4 300MHz with Full Audio
capabilities. Leave the slide in this position to allow remote control via USB/IR or Android/iOS APP
and/or to pick and use any of the 25 different EDID tables available (see p.13 for the full list).
[Fixed EDID with L/R Audio]: This mode is a 1080p60 2channel stereo basic table. It can be used as a
security EDID to ensure a picture in every setup/situation.
Note: You can also switch EDID mode and any others control with IR codes, from the USB GUI for
Windows PC or via smartphone/tablet APP for Android/iOS.

Disclaimer: 3rd party and/or custom firmware providing extra features are not covered in this manual.
8
4K Integral –User Manual
CEC Trigger Button
CEC Trigger Button allows you to send two custom CEC commands on the HDMI/CEC network.
Integral TOP output port is the CEC master output.
[Short Press] on CEC Trigger Button will send CEC1 command.
[Long Press] (over 2sec) on CEC Trigger Button will send CEC2 command.
By default CEC1 is 0F:04 (Display View On, it will turn ON HDMI/CEC capable unit)
By default CEC2 is 0F:36 (Standby, it will turn OFF HDMI/CEC capable device)
Note: To send LIVE CEC commands or to update the default CEC commands please refer to the USB GUI
software for Windows PC at page 15 or the smartphone/tablet APP for Android and iOS at page 17.
Disclaimer: 3rd party and/or custom firmware providing extra features are not covered in this manual.
9
4K Integral –User Manual
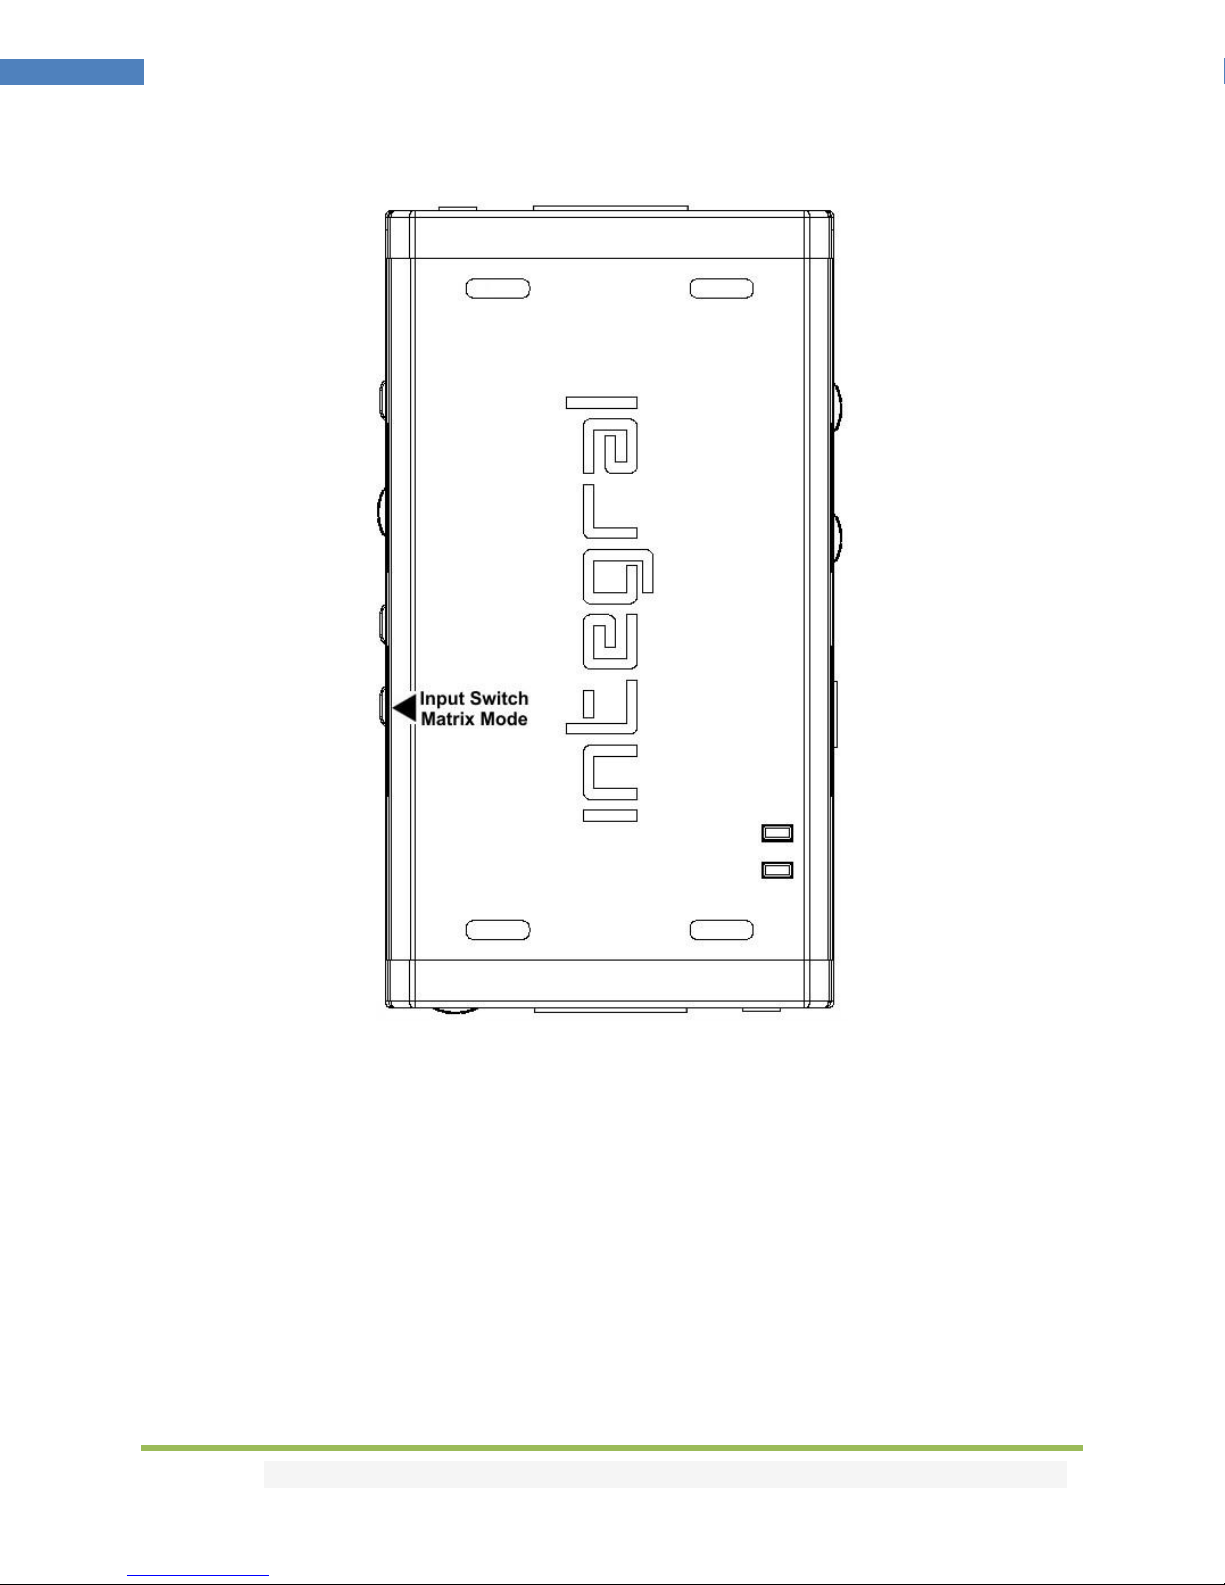
Input Switching and Matrix mode
Input Switch / Matrix Mode Button allow you to switch active inputs or enter/exit the Matrix mode.
[Short Press] will switch the active input channels in Splitter Mode and swap/cross signals in Matrix
mode.
[Long Press] (over 2sec) will enter/exit the Matrix Mode (only available for signals up to 4K30 4:4:4
300MHz or 4K60 4:2:0 300MHz).
Blue LEDs on the unit will show the active input channel (when one LED is ON) or Matrix Mode (when
both LEDs are ON).
Note for Matrix Mode:
It is only available for signals up to 300MHz (max 4K30 4:4:4 or 4K60 4:2:0).
Input in this mode is limited to one HDCP 2.2 stream; the other must be HDCP 1.4 or DVI-D.

Disclaimer: 3rd party and/or custom firmware providing extra features are not covered in this manual.
10
4K Integral –User Manual
HDCP Settings
HDCP slide switch has 3 positions.
The switch should be set to the middle position to allow control via USB, IR or a Bluetooth device.
[HDCP 2.2 Mode]: In this mode you always have HDCP 2.2 on the TOP output port and HDCP 1.4 on
bottom output port.
[HDCP Auto / BT]: In this mode the Integral unit makes sure that the conversion will always output a
working signal. The bottom output is always HDCP 1.4 but the top output is dynamic.
[HDCP 1.4]: In this mode, you always have a HDCP1.4 signal on both output ports.
Note on HDCP:
Both inputs accept HDCP1.4/2.2. Both outputs can work with HDCP1.4/2.2 devices.

Disclaimer: 3rd party and/or custom firmware providing extra features are not covered in this manual.
11
4K Integral –User Manual
Audio Settings
Audio slide switch has 3 positions.
The switch should be set to the middle position to allow control via USB, IR or a Bluetooth device.
[Audio Replaced] from 3.5mm input: HDMI output sound can be replaced by 44.1kHz (or 48kHz) audio
from the 3.5mm input. In the splitter mode both HDMI outputs will offer the new replaced audio from
3.5mm jack. The S/PDIF and L/R outputs of the Integral continue to output the original HDMI audio.
[Audio Auto /BT]: This slide switch position allows change via Bluetooth, IR or via USB. By default, it’s
set to HDMI.
[Audio from HDM]I: HDMI audio pass-through mode.

Disclaimer: 3rd party and/or custom firmware providing extra features are not covered in this manual.
12
4K Integral –User Manual
Combo Hold RST + Press INP to select Custom EDID
Since FW 0.55.0.30 Users now have the possibility to select a custom EDID directly from the unit push
buttons by performing the below combo.
HOLD RST button + press INP button X number of times to select custom EDID.
Ex: Hold RST and press 8 times INP button to select EDID table 8 –4k60-420 12-bit HDR BT.2020 All
Sound from the Custom EDID tables listed on the next page.
Note: User can also select custom EDID banks using IR, USB GUI or Android/iOS APP.

Disclaimer: 3rd party and/or custom firmware providing extra features are not covered in this manual.
13
4K Integral –User Manual
List of Custom EDID available.
Since FW 0.55.0.30, User can now select an EDID from all below EDID tables or force the creation of an
Automix EDID with below options.
[FIXED EDID with L/R stereo]
1080p-444 148MHz Stereo
[CUSTOM USE]
1 –Custom Uploaded/Default EDID
2 –4k60-444 600MHz HDR BT.2020 All Sound
3 –4k60-444 600MHz HDR BT.2020 Stereo
4 –4k60-444 600MHz All Sound
5 –4k60-444 600MHz Stereo
6 –4k50-444 600MHz HDR BT.2020 All Sound
7 –4k50-444 600MHz HDR BT.2020 Stereo
8 –4k60-420 12-bit HDR BT.2020 All Sound
9 –4k60-420 12-bit HDR BT.2020 Stereo
10 –4k60-420 12-bit BT.2020 All Sound
11 –4k60-420 12-bit BT.2020 Stereo
12 –4k60-420 8-bit 300MHz All Sound
13 –4k60-420 8-bit 300MHz Stereo
14 –4k30-444 300MHz All Sound
15 –4k30-444 300MHz Stereo
16 –4k30-RGB 300MHz All Sound
17 –4k30-RGB 300MHz Stereo
18 –4k24-422 12-bit BT.2020 All Sound
19 –4k24-422 12-bit BT.2020 Stereo
20 –1080p-444 148MHz All Sound
21 –1080p-444 148MHz HDR Stereo
22 –1080p24-444 All Sound
23 –1080p24-444 Stereo
24 –1080I-444 All Sound
25 –1080I-444 Stereo
[AUTOMIX]
Enforceable flags available in Automix mode:
Stereo, 5.1, Full Sound, YCbCr, BT2020, 3D Remove, HDR
Selectable algorithms available in Automix mode:
Min Mixed Capabilities, Max Audio/Min Video, Top Output Priority, Max Audio/Max Video
Note: All options are also available via IR, USB GUI or Android/iOS APP.
To upload a custom EDID or Sniff EDID from sink device, please refer to GUI section p.19
Disclaimer: 3rd party and/or custom firmware providing extra features are not covered in this manual.
14
4K Integral –User Manual
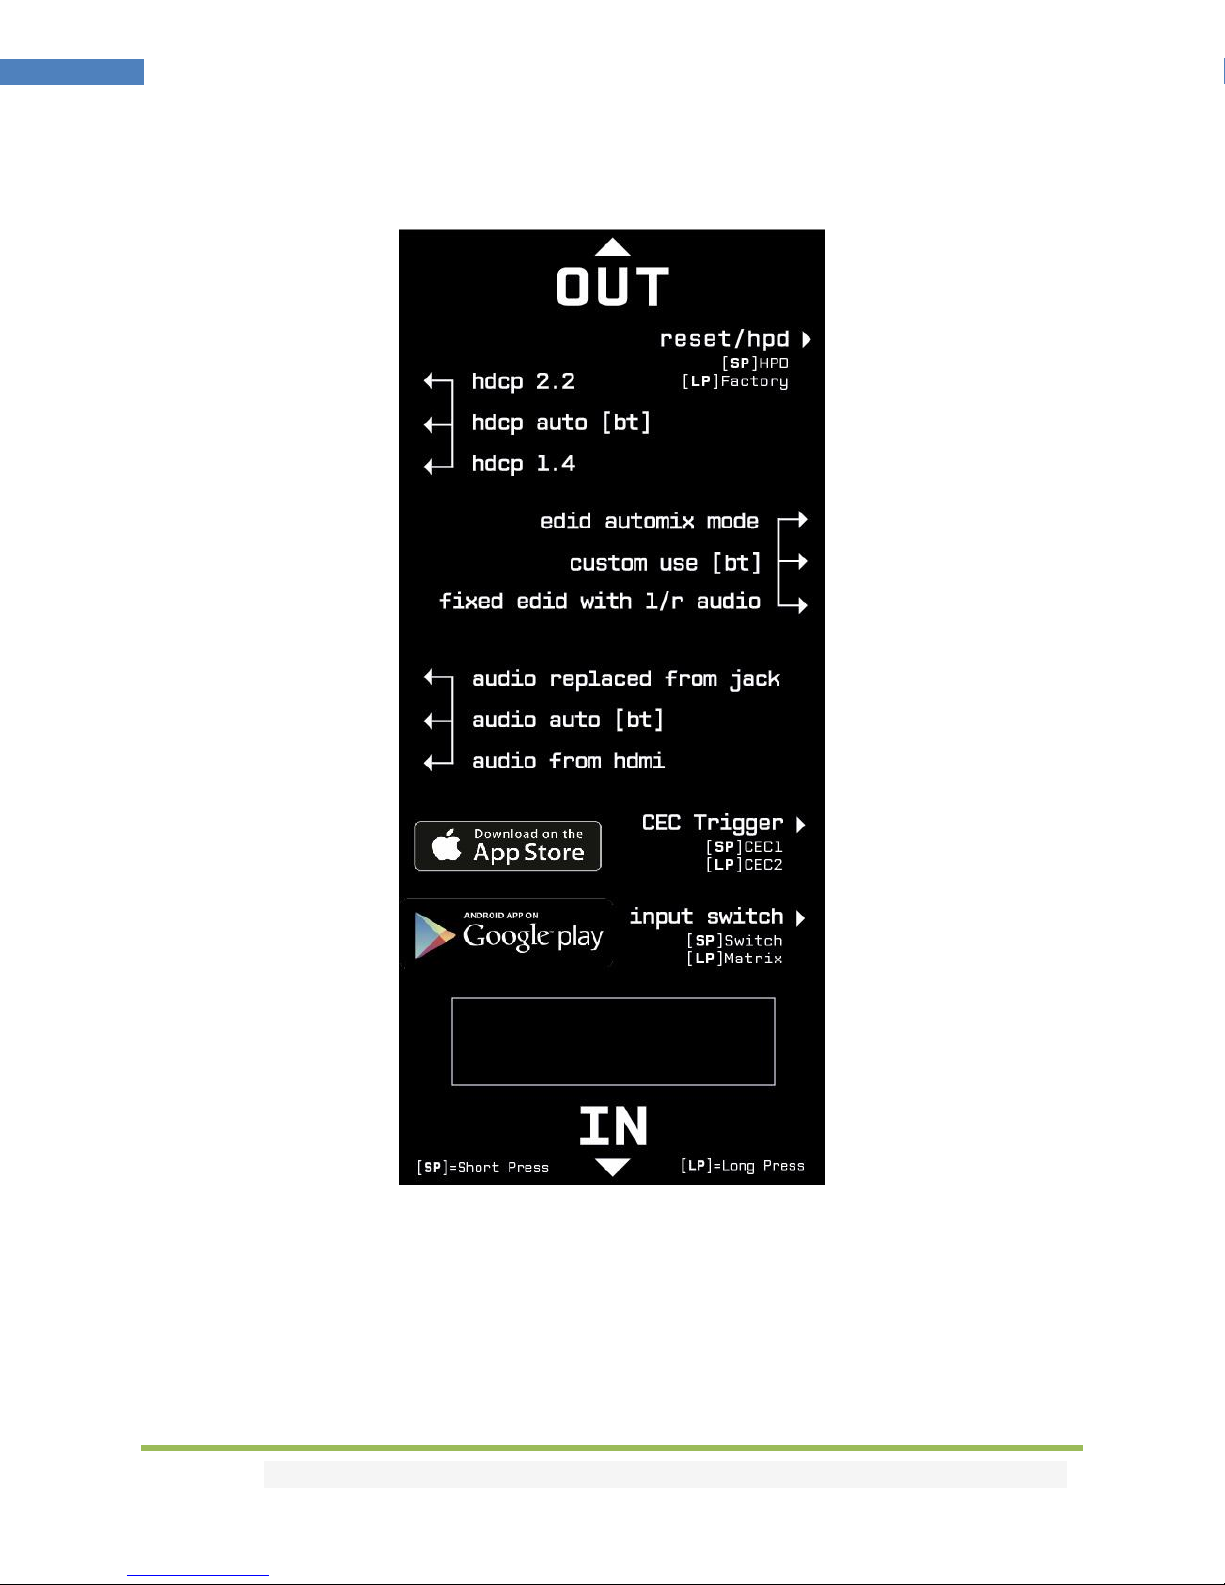
Backside Sticker
A sticker is available on the back of the unit to remind you the basic configuration options available from
the physical button and slide switches as well as the Short Press [SP] and Long Press [LP] functions of
each button. The sticker also provides you with the BT address, useful when you have several Integral
and need to access one of them remotely using Android or iOS APP.

Disclaimer: 3rd party and/or custom firmware providing extra features are not covered in this manual.
15
4K Integral –User Manual
Selecting your Windows PC Driver for USB GUI and Firmware update
Make sure to install the right Silabs driver for Windows PC based on your Windows OS version and USB
port version.
Silabs Driver 4.0.0 for XP/VISTA/WIN7/WIN8/WIN10
Silabs Driver 4.0.0 - ZIP - 9.18 Mo
USB2.0: WIN XP / VISTA / WIN7 / WIN8 / WIN10
USB3.0: WIN10 / Partial support for others Windows version.
Silabs Driver 3.9.2 for XP/VISTA/WIN7/WIN8
Silabs Driver 3.9.2 - ZIP - 1.65 Mo
USB2.0: WIN XP / VISTA / WIN7 / WIN8
USB3.0: WIN XP / VISTA / WIN7 / WIN8
If you are using Windows 10, the Silabs Driver 4.0.0 is mandatory.
However, Silabs driver 4.0.0 only have partial support for USB3.0 on Win8 and previous Windows
version, so you might prefer the 3.9.2 in such case.
For installation simply download from the above link, unzip and then run the .EXE file
Silabs 3.9.2 driver: run the USBXpressInstaller.exe
Silabs 4.0.0 driver: USBXpressInstaller_x86. exe for 32bit or USBXpressInstaller_x64.exe for 64bit.
Once you have correctly selected, downloaded and installed the right driver, you can proceed with
either updating Firmware (p.16) or using GUI utility (p.20)
Both Firmware update and GUI utility provides 2 directories labelled as per Driver version, make sure to
use the right directory matching your driver version.
Ex: If you installed 3.9.2 driver, Use the 3.9.2 directory to run Firmware update or the 3.9.2 directory to
run the GUI utility.
Note: You can install or remove any driver any time:
Control Panel > Program > Remove Software.

Disclaimer: 3rd party and/or custom firmware providing extra features are not covered in this manual.
16
4K Integral –User Manual
Updating your Integral Firmware for Windows PC
The Integral Firmware Updater is compatible with all Windows from Win XP to Win 10.
Make sure you have installed the right Silabs driver based on your Windows version and USB port as
described in previous page.
You can download the latest Firmware version for your Integral device from the Download Tab on the
Integral Product page: here. If you are unsure about your Firmware version currently in use, simply use
the Total Control APP for Android/iOS info page or the USB GUI for Windows PC to retrieve it.
Once downloaded and extracted, you should have a directory on your computer with the following files
You will have to run both Update FPGA and Update MCU to successfully upgrade your Integral unit.
Note: Version number could be different depending on the FW revision you downloaded.
You can start by any of them; there is no particular order to respect.
FPGA update will take about 50s while MCU update is taking less than 5s.
FPGA Update Instructions
Double-click UpdateFPGA executable (if needed, right-click and select Run as Administrator)
The below window will open.
Click Update Firmware as shown on the above picture.

Disclaimer: 3rd party and/or custom firmware providing extra features are not covered in this manual.
17
4K Integral –User Manual
Flashing time is around 50 seconds
Do not disconnect your device while the upgrade process is running.
Once completed, you will hear a windows notification sound and the below window will pop up.
Simply click OK and the main updater will display the below message.
This confirms the FPGA update process is completed; you can process to next step.

Disclaimer: 3rd party and/or custom firmware providing extra features are not covered in this manual.
18
4K Integral –User Manual
MCUUpdate Instructions
Double-click UpdateMCU executable (if needed, right-click and select Run as Administrator)
The below window will open.
Click Update Firmware as shown on the above picture.
Flashing time is less than 5 seconds.
Once completed, you will hear a windows notification sound and the below window will pop up.
Simply click OK and the main updater will display the below message.
Congratulations, you have successfully updated both the MCU and FPGA and your unit is now ready to
operate with the benefits from the latest software additions.
Disclaimer: 3rd party and/or custom firmware providing extra features are not covered in this manual.
19
4K Integral –User Manual
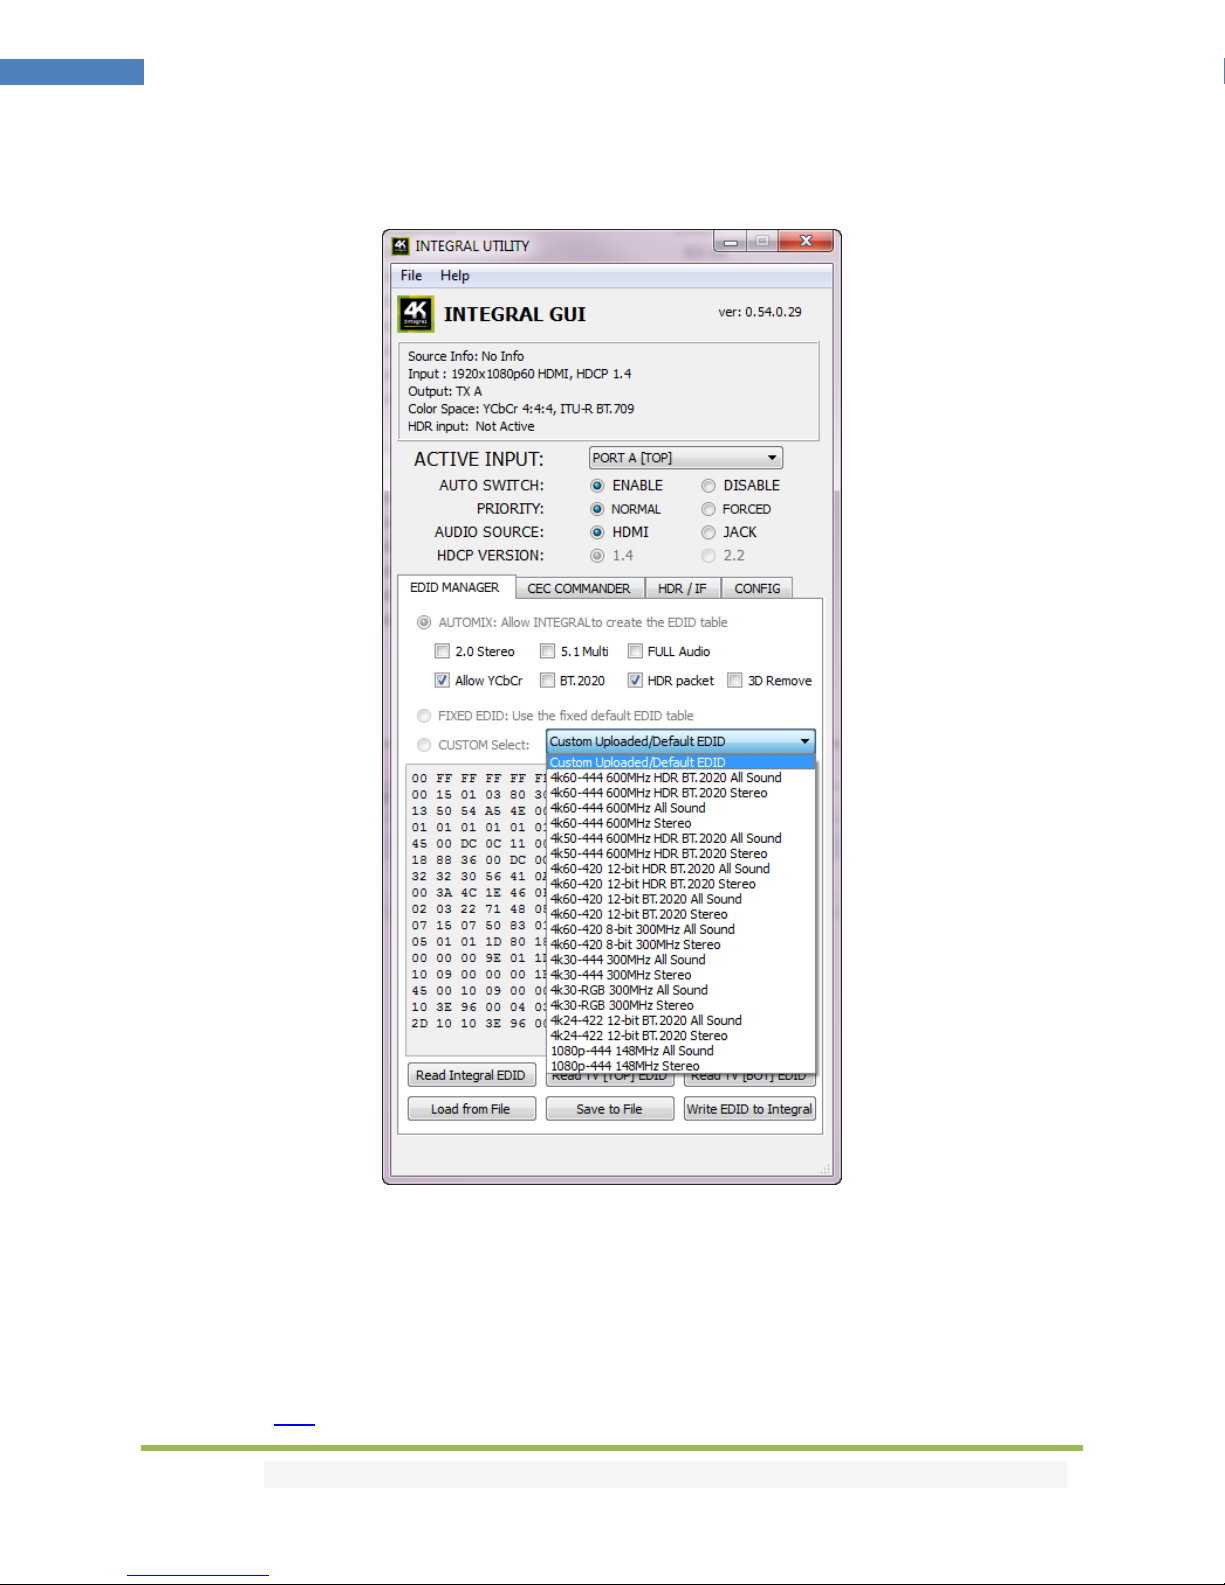
Integral USB GUI (Software for Windows PC)
The USB GUI is compatible with all Microsoft Windows version from Win XP to Win 10.
Make sure you have installed the right Silabs driver based on your Windows version and USB port as
described in p.15
You can download the latest GUI version for your Integral device from the Download Tab on the Integral
Product page: here. Always run latest FW when running latest GUI to benefit from all new features.

Disclaimer: 3rd party and/or custom firmware providing extra features are not covered in this manual.
20
4K Integral –User Manual
The USB GUI for Windows PC allows the following control:
- Display Information on source device when available.
- Display Input signal resolution, refresh rate and bandwidth.
- Display Input signal colorspace.
- Display the Firmware revision.
- Display Active input and output link information.
- Switch Active Input
- Turn ON or OFF the Autoswitch feature.
- Set Input Priority for Autoswitch mode (Normal/Forced)
- Select the Audio Source.
- Select HDCP output revision.
- Set HDCP rules.
- Enable or Disable 4:4:4 > 4:2:0 conversion mode.
- Select the default EDID table from a selection of multiple preloaded EDID banks.
- Select forced flags for Automix mode. (Stereo/5.1/Full/YCbCr/BT.2020/HDR/3D)
- Sniff EDID from connected sink devices. (Read EDID from TOP and BOT output)
- Read, Write, Load, and Save any custom EDID bank.
- Send Live HDMI CEC command.
- Save CEC1 SP/ CEC2 LP commands.
- Turn ON/OFF CEC processing.
- Define CEC ID# (Either AVR ID#5 for ARC feature or processor ID#14)
- Send Live HDR and InfoFrame Metadata.
- Repurpose CEC SP/LP as HDR enable/disable.
- Turn ON/OFF Full HDR mode or Samsung HDR mode.
- Turn ON/OFF the LOGO LED. (GREEN)
- Turn ON/OFF the channel LED. (BLUE)
- Turn ON/OFF the AVR Fix Beta.
- Reset the unit to Factory Default.
Note:
The 4K60 4:4:4 > 4:2:0 conversion only affects the TOP output. The bottom output will still offer a 4K60
4:4:4 direct path.
The Full HDR mode and the beta fix for AVR audio cannot be activated together, it’s either one or the
other but not both at the same time.
When activated, the Autoswitch feature will force the Integral unit to automatically switch to the active
signal if the selected signal is lost.
When you select an EDID bank from the dropdown list of preloaded EDID banks, there is nothing else to
do, once clicked, the EDID of your choice will be loaded and HPD events will reset the signal to present
your selected EDID automatically.
This manual suits for next models
1
Table of contents
Popular DVD Player manuals by other brands

Philips
Philips BDP1305 Series quick start guide

Pioneer
Pioneer NextWindow DVD-V7300D operating instructions

Muzak
Muzak ENCOMPASS CM1 quick start guide

Marantz
Marantz DV4001 user guide

Sony
Sony DVP-NS601HP - Cd/dvd Player Specification sheet

Panasonic
Panasonic CQDVR592U - AUTO RADIO/CD/DVD PL operating instructions


