HDMI SX-EX46B User manual

50M HDMI+USB KVM Extender

Operating Instructions
Thank you for purchasing this product. For optimum performance and safety, please
read these instructions carefully before connecting, operating or adjusting this
product. Please keep this manual for future reference.
SAFETY PRECAUTIONS
Please read all instructions before attempting to unpack, install or operate this equipment and
before connecting the power supply.
Please keep the following in mind as you unpack and install this equipment:
Always follow basic safety precautions to reduce the risk of fire, electrical shock and
injury to persons.
To prevent fire or shock hazard, do not expose the unit to rain, moisture or install this
product near water.
Never spill liquid of any kind on or into this product.
Never push an object of any kind into this product through any openings or empty
slots in the unit, as you may damage parts inside the unit.
Do not attach the power supply cabling to building surfaces.
Use only the supplied power supply unit (PSU). Do not use the PSU if it is damaged.
Do not allow anything to rest on the power cabling or allow any weight to be placed
upon it or any person walk on it.
To protect the unit from overheating, do not block any vents or openings in the unit
housing that provide ventilation and allow for sufficient space for air to circulate
around the unit.
2

Operating Instructions
CONTENTS
1.INTRODUCTION...............................................................................4
2.APPLICATIONS.................................................................................4
3. PACKAGE CONTENTS...................................................................4
4. SYSTEM REQUIREMENTS...........................................................4
5. FEATURES........................................................................................5
6. SPECIFICATIONS...........................................................................5
7. OPERATION CONTROLS AND FUNCTIONS...........................6
7.1 Transmitter Front and Rear...........................................................6
7.2 Receiver Front and Rear Panels....................................................7
8. CONNECTION DIAGRAM............................................................8
9. MAINTENANCE..............................................................................10
10. PRODUCT SERVICE.....................................................................10
11. WARRANTY.....................................................................................10
3

Operating Instructions
1. INTRODUCTION
This Model allows HDMI signals to be transmitted over a Single CAT5e/6 cable . It can extend
1080p@60Hz over single Cat5e/6. The transmit distance up to 100m over single Cat5e/6 cable, and
50m over single Cat5e/6 cable under USB mode. It supports PCM2.0 and USB2.0 pass through.
2.APPLICATIONS
Household entertainment sharing and control
Lecture room display and control
Meeting room presentation and control
Classroom display and control
3. PACKAGE CONTENTS
1Main Unit: HDMI Extender( Transmitter& Receiver)
21x Power Adapter DC 12V
31x USB 2.0 AM to BM Cable
41x User’s Manual
4. SYSTEM REQUIREMENTS
Input HDMI source equipment such as DVD/Blu-ray player PC and HDMI
equipped output display (TV or monitor).
4

Operating Instructions
5. Features
Each set includes one transmitter and one receiver
Transmit distance up to 100m over single Cat5e/6 cable under Non-USB mode
Transmit distance up to 50m over single Cat5e/6 cable under USB Mode
USB 2.0 pass through
Support Full HD 1080P@60Hz, and bandwidth 1.65Gbps.
Support Dual POC(RX powered by TX or TX powered by RX)
HDCP1.4 compliant
Support PCM2.0, audio sampling rate: 44KHz, 48KHz.
Power Supply DC12V
6. Specifications
Operating Temperature Range -10 to +45℃(14to+113℉)
Storage Temperature Range -15 to +70℃(5 to +158℉)
Operating Humidity Range 5 to 90%RH (No Condensation)
Support Video Format
DTV/HDTV: 480P/576P/720P/1080P
VESA:640x480, 800x600, 1024x768, 1280x1024,
1680x1050, 1280x720, 1360x768
Connector on Transmitter 1x HDMI Input , 1x USB B Type
1xRJ45 Output
Connector on Receiver 1xRJ45 Input
1x HDMI Output, 4x USB A Type
Transmission Distance 100m (Max) over single Cat5e/6 /24AWG/Solid under Non-USB Mode
50m(Max) over Single Cat5e/6 /24AWG/Solid under USB Mode
USB Transmit speed 480M bit/s (Max)
Power consumption 4.8W( Max)
Dimension (L×W×H) L84.2xW75.2xH27.5mm
Net Weight Transmitter:257.5g ; Receiver:257.5g
5
Operating Instructions
7. OPERATION CONTROLSAND FUNCTIONS
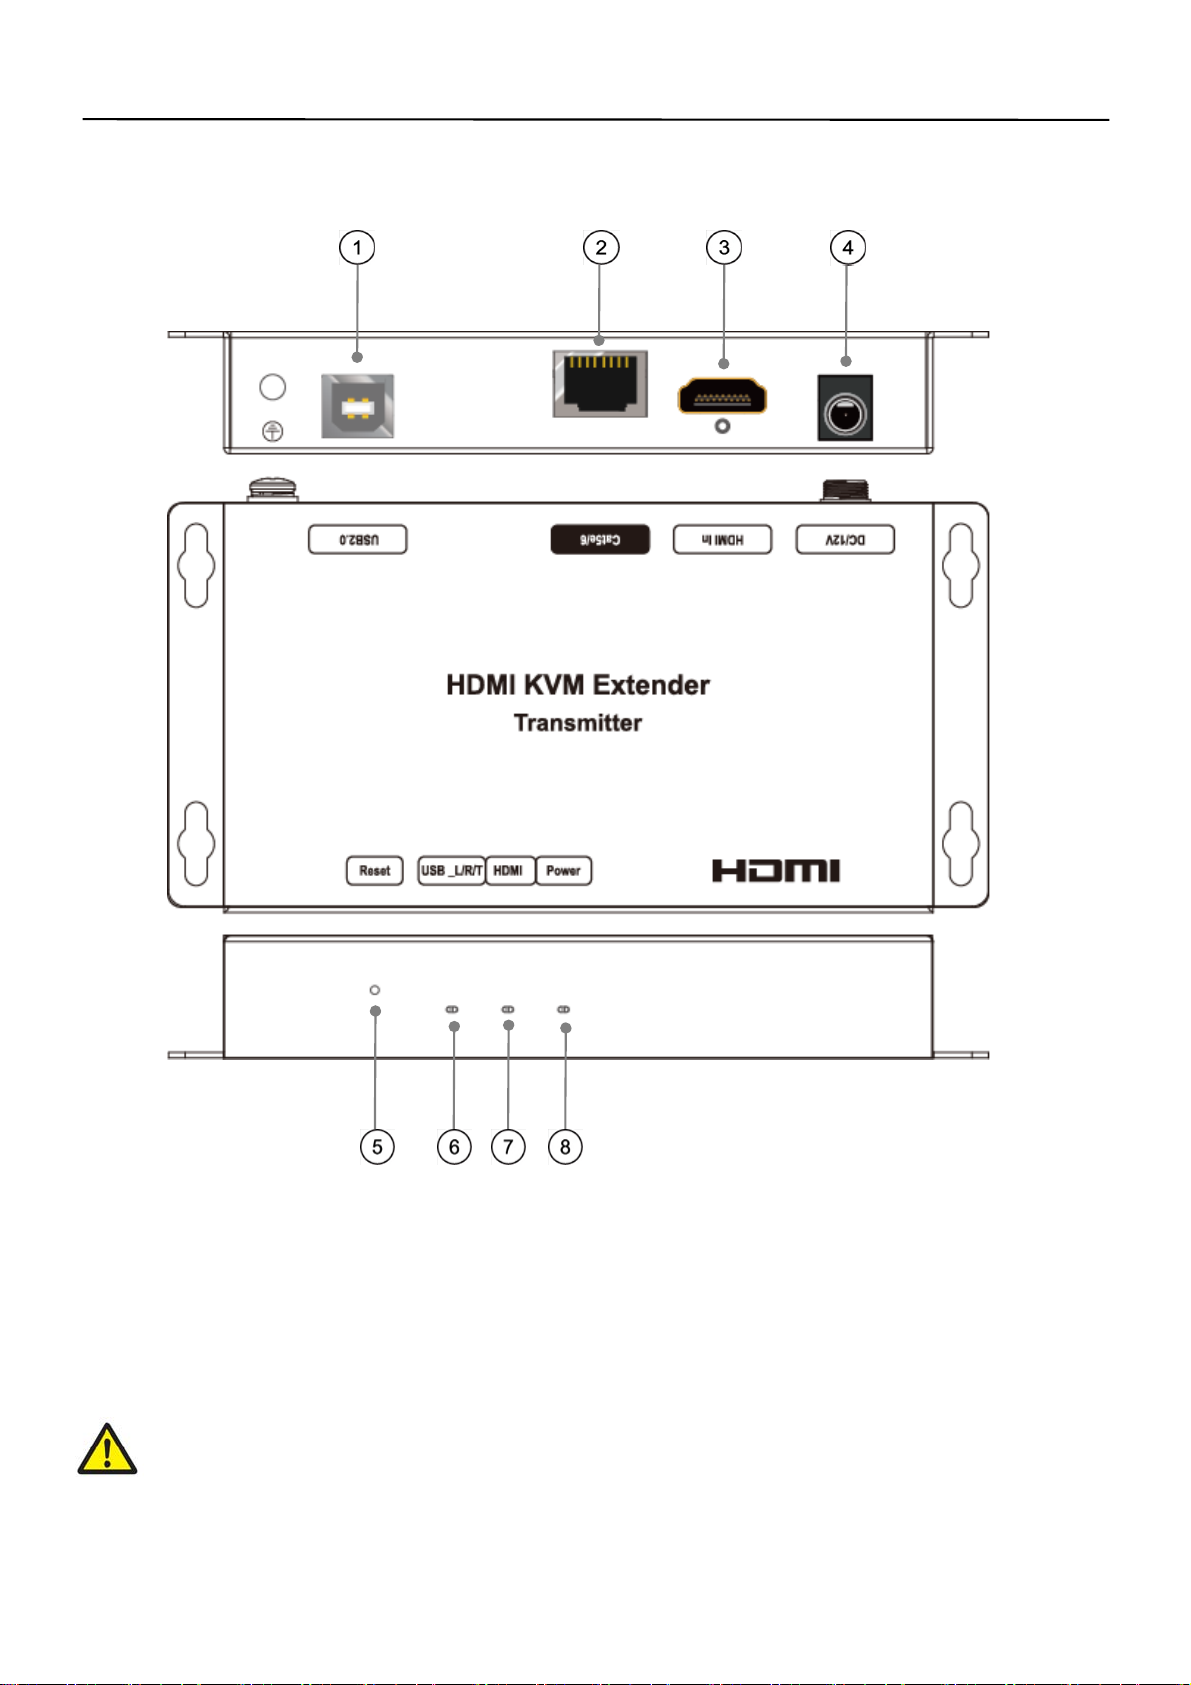
7.1 Transmitter Front and Rear Panels
①USB Type B port ②Cat5e/6 output port
③HDMI input port ④Power input port
⑤Reset key ⑥Indicator of USB input
⑦IndicatorofHDMIinput ⑧Indicator of power
Reset:IfyouwanttoresettheHDMIInput,press the Reset button 3s. If the TV black, which
means it is effective.
6

Operating Instructions
7.2 Receiver Front and Rear Panels
①USB Tpye A port ②Cat5e/6 input port
③HDMI output port ④Power input port
⑤Reset key ⑥Indicator of USB output
⑦Indicator of HDMI output ⑧Indicator of power
7

Operating Instructions
8. CONNECTION DIAGRAM
Application 1: KVM
1. Connect one HDMI Cable between the HDMI output port of source device and the HDMI input
port of Transmitter unit
2. Connect one UTP Cat5e or better cable between the RJ45 port of Transmitter unit and RJ45 port
of Receiver unit.
3. Connect one HDMI Cable between the HDMI input port of display and the HDMI output port of
Receiver unit.
4. Connect the PC to the transmitter by USB AM-USB BM cable.
5. Connect keyboard, mouse to the receiver.
6. Connect 12V DC power supply at Transmitter / Receiver.
8

Operating Instructions
Application 2:
Point to point configuration:
1. Connect one HDMI Cable between the HDMI output port of source device and the HDMI input
port of Transmitter unit
2. Connect one Cat5e/6 or better cable between the Transmitter and Receiver
3. Connect one HDMI cable between the HDMI Input of the display device and the HDMI Output
port of the Receiver unit
4. Connect 12V DC power supply at Transmitter / Receiver.
9

Operating Instructions
9.MAINTENANCE
Clean this unit with a soft, dry cloth. Never use alcohol, paint thinner of benzine to
clean this unit.
10.PRODUCT SERVICE
(1) Damage requiring service:
The unit should be serviced by qualified service personnel if:
(a) The DC power supply cord or AC adaptor has been damaged;
(b) Objects or liquids have gotten into the unit;
(c) The unit has been exposed to rain;
(d) The unit does not operate normally or exhibits a marked change in performance;
The unit has been dropped or the cabinet damaged.
(2) Servicing Personnel: Do not attempt to service the unit beyond that described in
these operating instructions. Refer all other servicing to authorized servicing
personnel.
(3) Replacement parts: When parts need replacing ensure the servicer uses parts
specified by the manufacturer or parts that have the same characteristics as the
original parts. Unauthorized substitutes may result in fire, electric shock, or other
Hazards.
(4) Safety check: After repairs or service, ask the servicer to perform safety checks
to confirm that the unit is in proper working condition.
11.WARRANTY
If your product does not work properly because of a defect in materials or
workmanship, our Company (referred to as "the warrantor" ) will, for the length of
the period indicated as below, (Parts(2)Year, Labor(90) Days) which starts with the
date of original purchase ("Limited Warranty period"), at its option either(a) repair
your product with new or refurbished parts, or (b) replace it with a new of a
refurbished product. The decision to repair or replace will be made by the warrantor.
During the "Labor" Limited Warranty period there will be no charge for labor.
During the "Parts" warranty period, there will be no charge for parts. You must
mail-in your product during the warranty period. This Limited Warranty is extended
only to the original purchaser and only covers product purchased as new. A purchase
receipt or other proof of original purchase date is required for Limited Warranty
service.
10
Table of contents
Other HDMI Extender manuals


