HEAD HD3000CI Plus User manual

USERᴗ
S MANUAL
hdSPPPci
p
Digital Satellite Receiver

Safety
1. Main supply : 90 - 240V AC 50/60 Hz
2. Please the receiver in a well-ventilated environment.
3. Directly on top of or under any another equipment.
4. Do not connect or modify cable when the STB is plugged in.
5. Service should be carried out only at a authorized service center, contact
Your local dealer for more information.
6. Clean only with a damp cloth
7. Protect the power cord from being walked on or pinched particularly at plugs,
convenience receptacles, and the point where they exit from the apparatus.
8. Use only the attachments/accessories specified by the manufacture.
9. Use only with a cart, stand, tripod, backer, or table specified by the manufacturer,
or sold with the apparatus combination to avoid injury form tip-cover.
10. To rain or intense moisture.
11. To any magnetic objects, such as loudspeakers, transformers, etc..
12. Do not use a damaged power cord, It may cause a fire or an electrical shock.
Safety
2

1. Safety
2. Controls and Functions
2.1 Front Panel
2.2 Real Panel
2.3 Remote Control Unit
3. STB Connction
4. Setting and Operations
4.1 Installation
4.2 Basic Settings
4.3 Edit
4.4 Setup
4.5 Miscellany
4.6 Hot Keys
4.7 Teletext
4.8 Sleep
4.9 History
4.10 Common Interface
Additional Information
Trouble Shooting
Technical Specfications
2
4
4
5
6
8
9
9
11
15
16
19
21
22
22
23
23
24
24
25
Contents
3
4
2. Controls and Functions
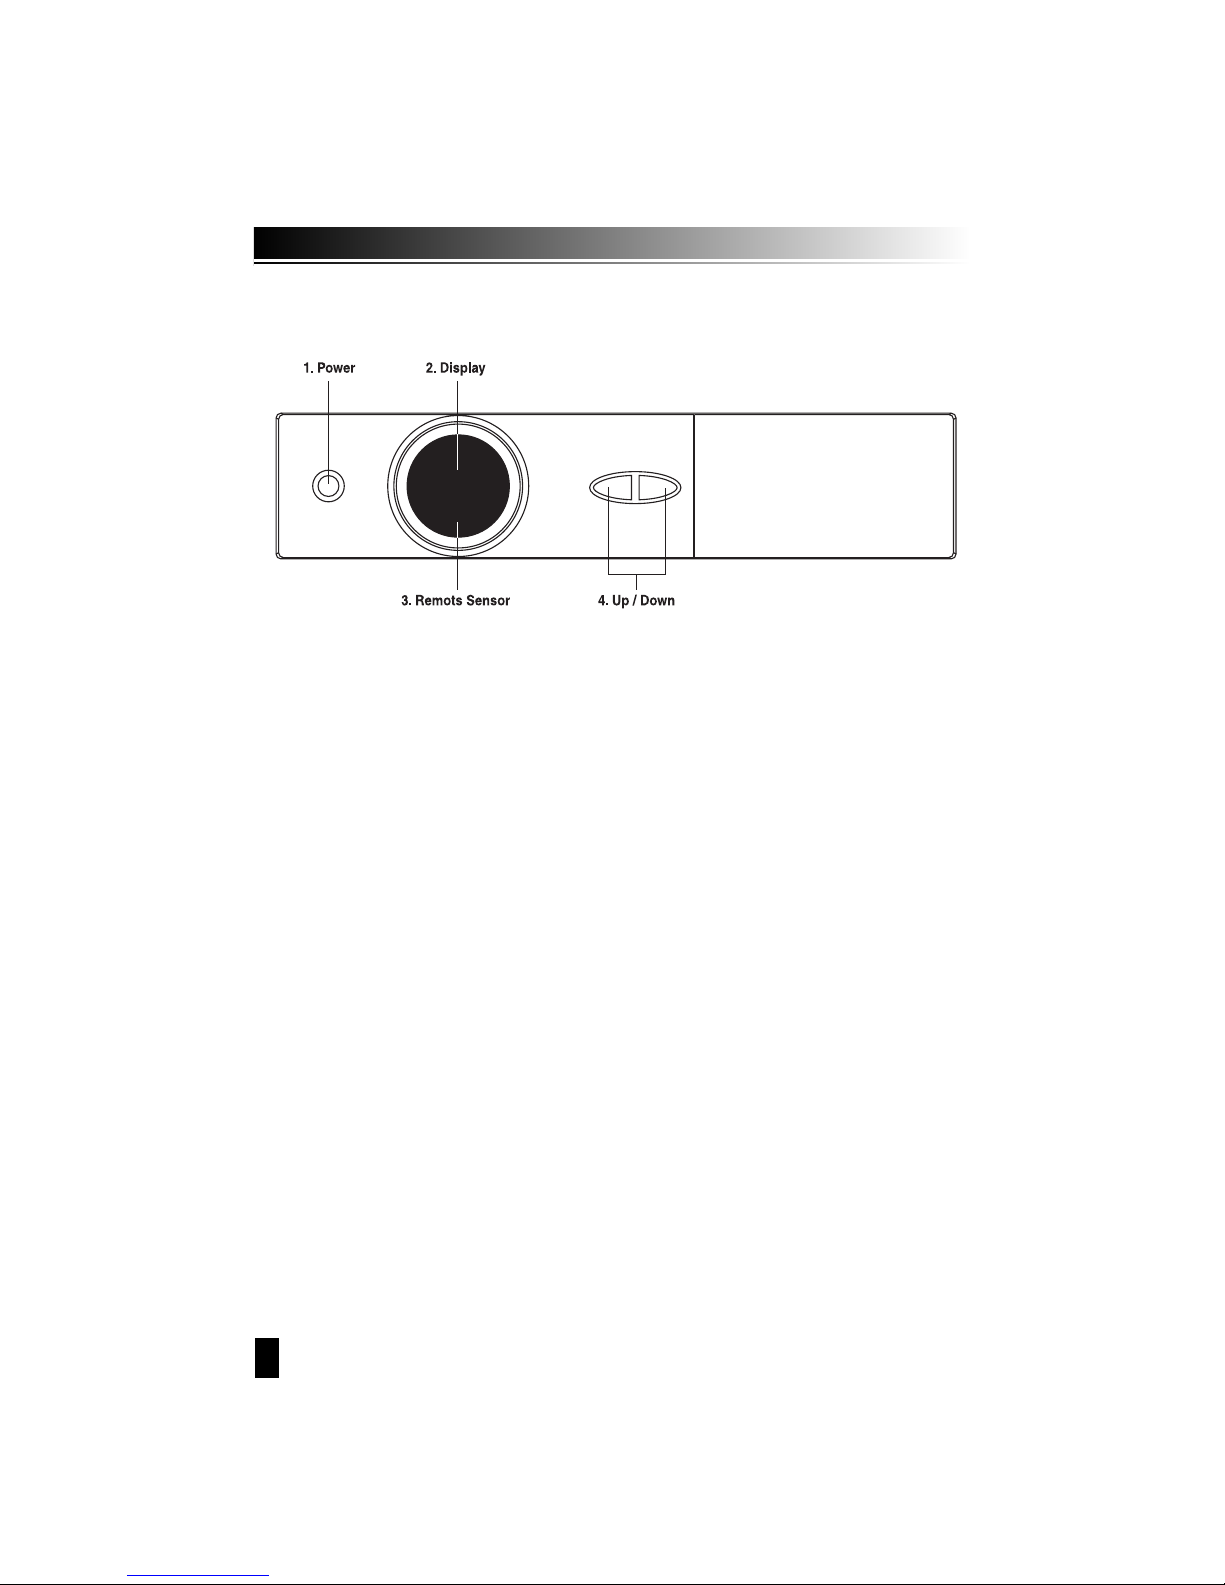
2.1 Front Panel
1. Power Button
Turn the receiver On/Off.
2. Display (4-digit/7-Segment)
The 4-digit displays channel information. In STANDBY mode, the 7-segment displays local time.
3. Remote Sensor
Detects infrared signal from Remote Control Unit.
4. Up/Down Button
Changes channels in the No-menu State and moves the cursor up/down in the Menu state.
5
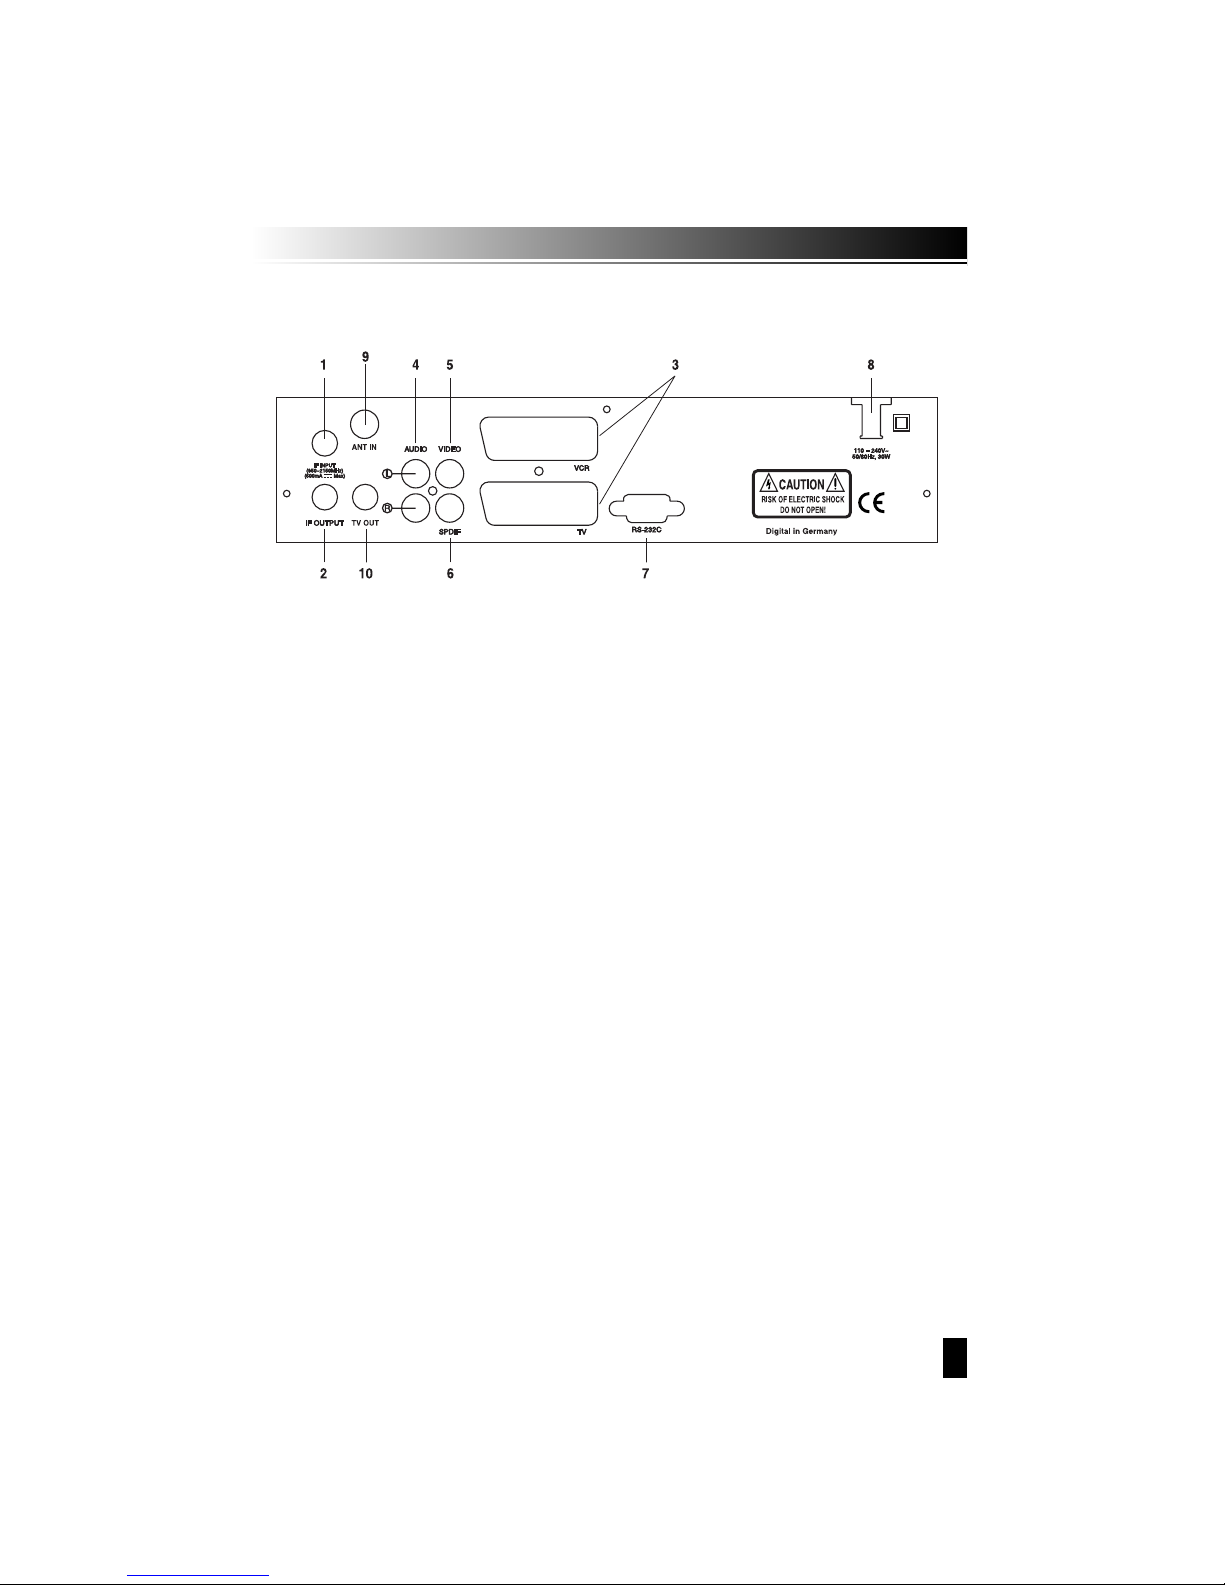
2.2 Rear Panel
1. LNB IN (13/18V 500mA MAX)
connect the coaxial cable from LNB.
2. LNB OUT
connect to other STB.
3. SCART TV, VCR
connect the TV/VCR of TV/VCR to TV/VCR with a SCART cables.
4. AUDIO
This audio sockets provide stereo audio output.
5. VIDEO (Video Output)
This video jack provides a composite video output.
6. S/PDIF
S/PDIF connects digital audio terminal for digital audio output.
7. RS-232C
Connect a PC. RS-232C transfers data to the external computer (Baud rate 115200)
8. POWER
100~240V AC(Auto-selectable), 50~60Hz+/-5%
Make sure to check the power specification.
9. ANT IN
Connects the TV antenna.
10. TV OUT
Connects the TV output.
6
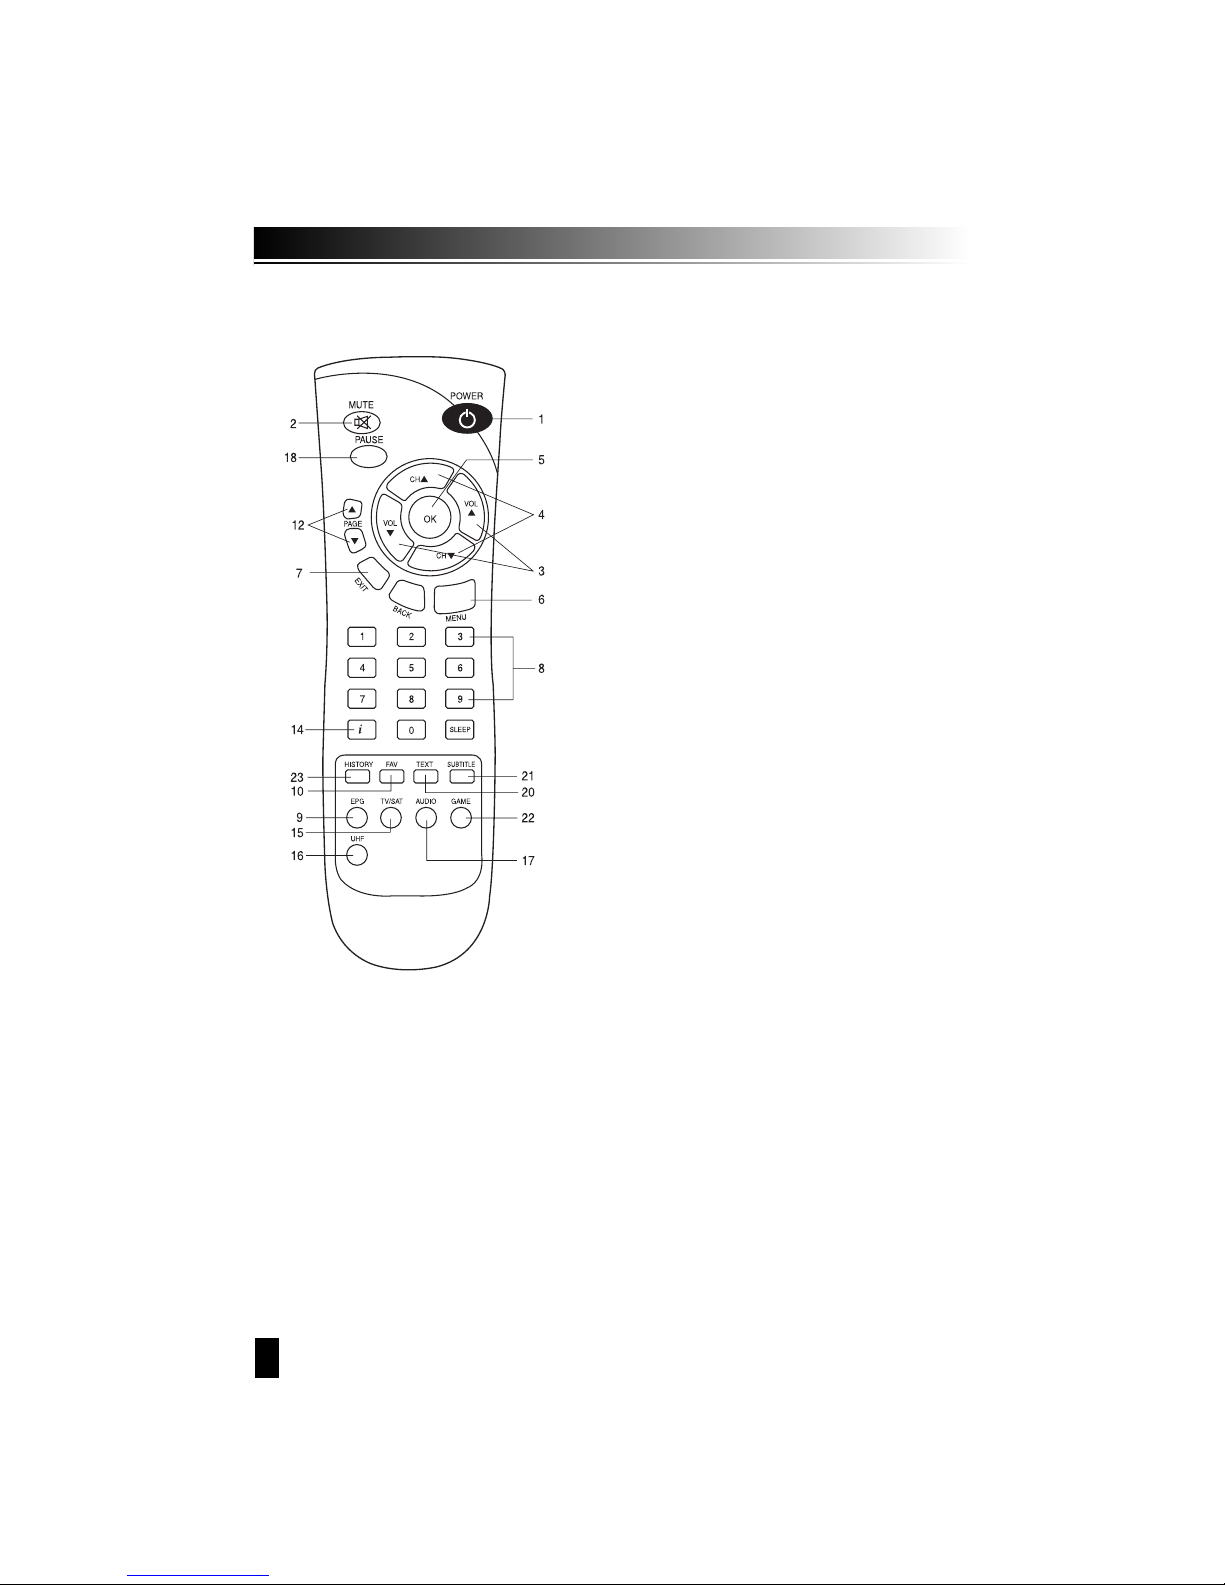
2.3 Remote Control Unit
1. STAND BY
Turns the receiver On/Off.
2. MUTE
Mutes audio output.
3. LEFT/RIGHT (ᵾᵾ/ᶀᶀ)
ῡIf you press Left/Right button while watching
channel, you can adjust Volume level.
ῢIf you press Left/Right button on the menu
status you can move to left/Right side.
4. UP/DOWN (ᵋᵋOOᵍᵍII
Changes channels in the No-menu state and
moves up/down in the menu state.
5. OK
Confirms the choice with the highlighed menu item.
When you press the OK button watching TV or
listening to Radio, the channel list will appear.
If you press the EXIT button on the final menu state,
you can move to the previous menu.
6. MENU
Shows the Main menu in No-menu and the
TV-Radio program screen in the Menu state.
7. EXIT
Exits from present menu and moves to the previous menu.
8. NUMERIC KEYS (0-9)
Control the numerical operation and especially change channels directly.
9. EPG
Display the TV/Radio Program Guide.
10. FAV
Make favorite by statellite, TV, Radio and by your Choice.

7
14. INFO
Shows the information of current program. If you press the INFO button, the channel
info box will be shown continuously even though the present time for channel info box
elapsed. If you press the INFO or EXIT button again, the channel info box will be disappeared.
15. TV/SAT
Select TV Mode and set-Top Box mode.
16. UHF
Sets UHF Menu.
17. AUDIO
Select Audio Mode as Stereo, Left or Right and Audio Language.
18. PAUSE
To pause the Video Screen.
20. TEXT
Pressing the TEXT button will open a Teletext page.
21. SUBT
Displays “Sub-title”
22. GAME
Use game
23. History
Previous channel selects.
8
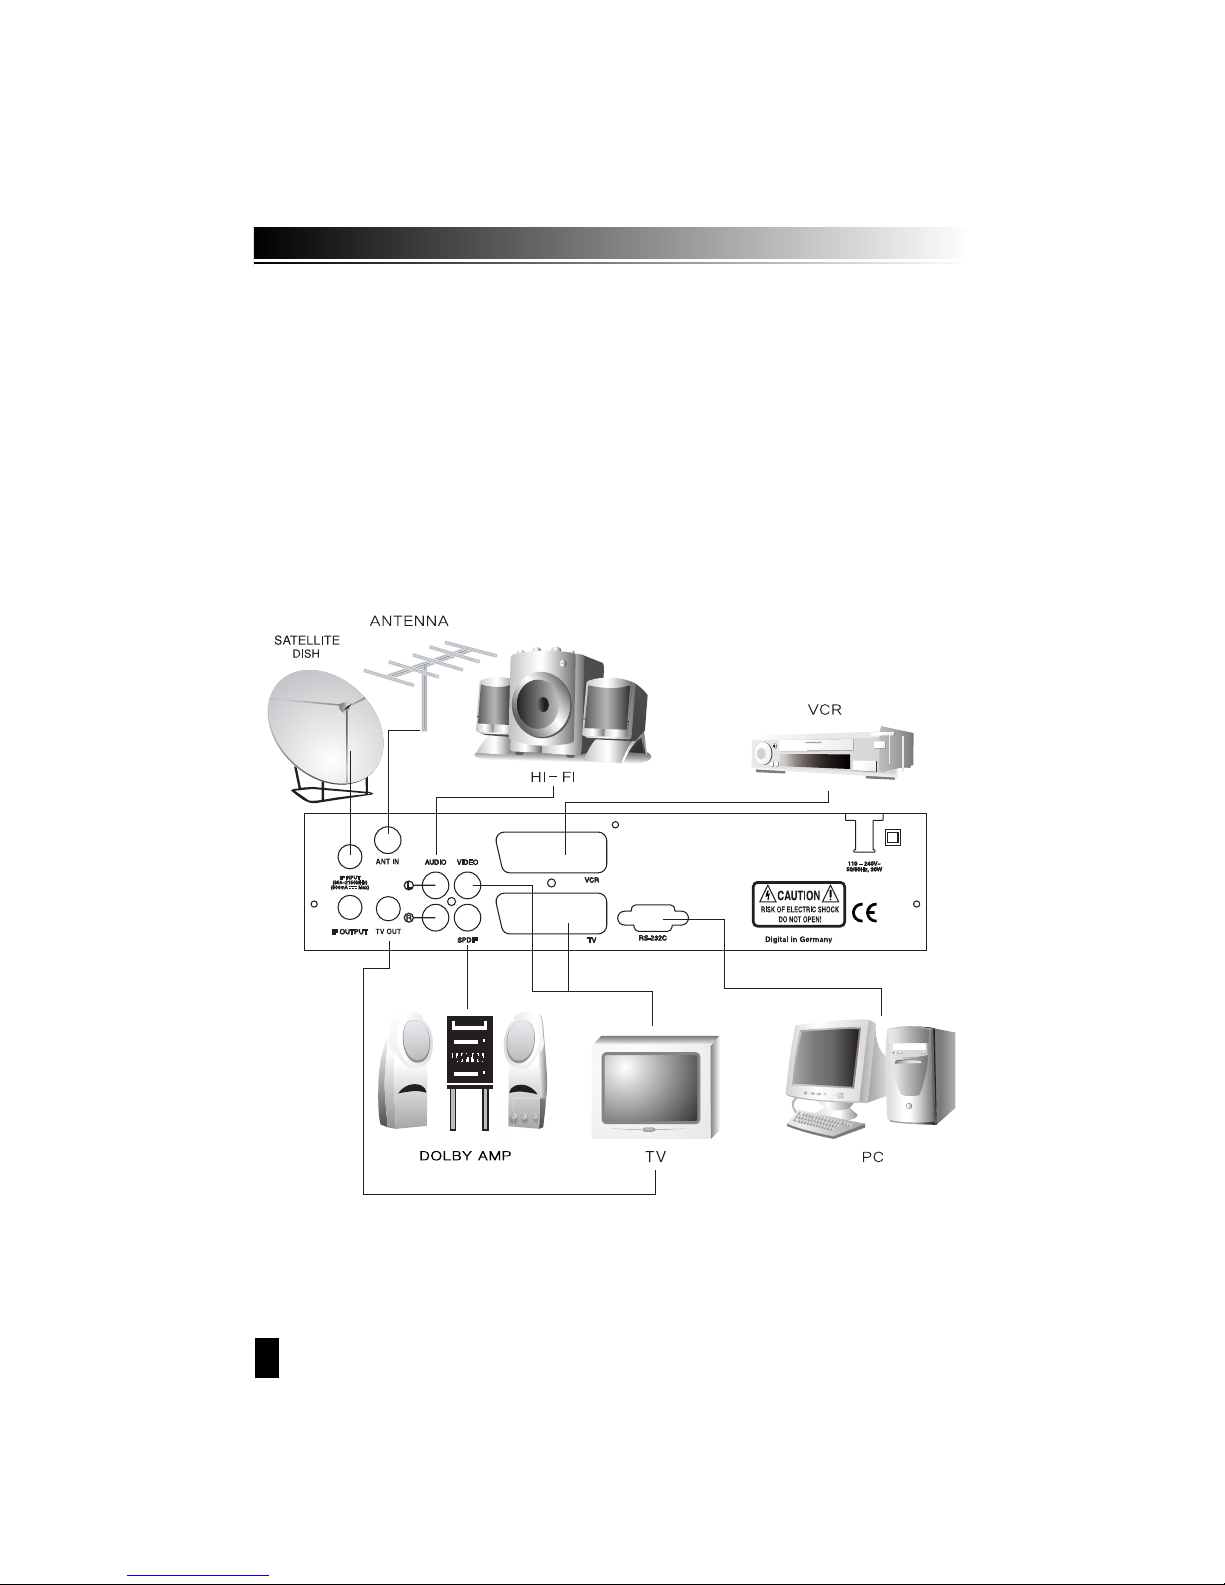
STB Connections
Connect your Digital Stallite Receiver as shower below, according to your peripheral
equipment.
You can connect several devices like VCR, DVD Player and Analog Statellite Recevier the
VCR SCATR of the unit. In standby mode your recevier switches VCR input TV SCART output.

9
4. Setting and Operations
4.1 Installation (First time Installation)
ᵉTurn on your TV and receiver.
ᵉIf it is the first time using a receiver, you should set parameters for system configuration.
Press the MENU button. Refer to the following section for detailed information about
System configuration.
1. Language setting
Choose your preferable language.

10
3. Edit Statellite
Choose your preferable satellite by OK button. If you don’t choose satellite, press OK button again.
If you want to do the next performance, press EXIT button.
4. Antenna Setting
While cursor key is on satellite, if you press OK button and right key, you can select satellite.
While cursor key is on LNB Type, if you press OK button, it will show LNB frequency.
While cursor key is on motor setting, if you select “enable” and press OK button, it will show
how to set up DisEqc 1.2.
5. Automatic Search
After antenna setting, Automatic Search can be used
for easier search.
Press ok button, it will show satellite list. You can select
satellite by RED button.
ῡPress “BACK” button
ῢSearch start
11
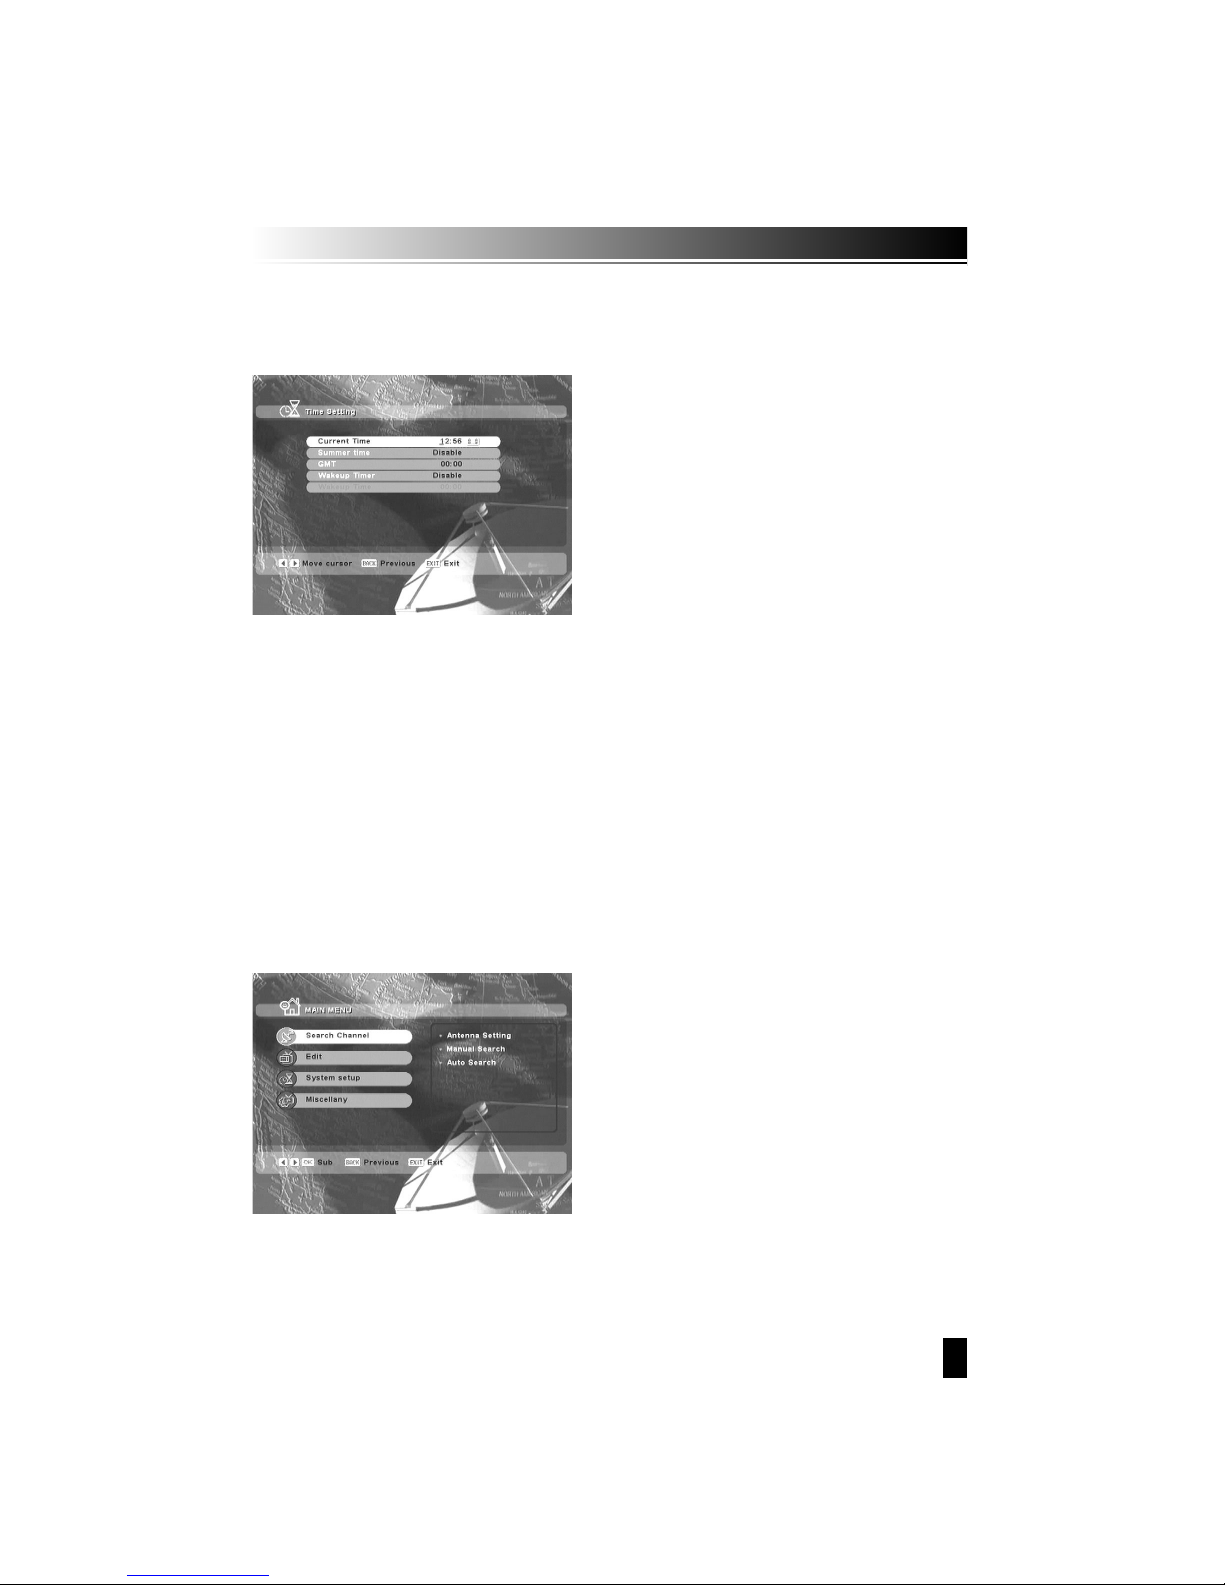
6. Time Setting
Adjust your time.
1. Search Channel
In order to install the receiver properly you have perform a Basic Settings.
When you have finished the setup procedure, you can start watching TV or listening to
Radio.
During the basic settings, a short information is displayed at the bottom of the menu
screen.
ῡTurn on your TV and receiver.
ῢPress the Menu button to display the Search channel menu.
This mode is to start the receiver finding channels.
4.2 Basic Settings

12
1-1. Antenna Setting
This mode is to make setting equipment outside. Press the OK button on the Antenna Setting of the
Search Channel. The Following window will appear. Select one the alternative satellite names,
specify the LNB frequency, set the Tone switch & the DiSEqC switch according to the installed
switch box & DiSEqC. Other parameter values are changed automatically according to satellite name.
ῡIf you press OK button, satellite list shows up, then you can select your favorite satellite.
Left or right button shows selected satellite list.
ῢWhen the Cusor is on LNB TYPE, if you press OK button, it will show LNB Low, High Frequency.
You can edit Frequency.
ΰWhen the Cursor is on motor setting, if you choose “enable” and press OK button, it will show
DiSEqC 1.2 setting.
ᵉ22KHz : Select “On” or “Off” for setting
ᵉ0/12Volt Switch (ᵀOptional) :
Select “0 Volt” or “12 Volt” for setting
ᵉLNB Power : Select “On” or “Off” for setting

13
A. DiSEqC 1.2
Select necessary parameter to use Motor.
B. Limit setting
To avoid malfunction of motor, make a limit for motor from east to west.
C. USALS
Set longitude and latitude of the present location and then adjust antenna to proper
direction.

14
1-2. Manual Search
After antenna setting, this menu can find help find particular chanels.
Make a suitable parameter on Frequency, Symbol rate, Polarization, FEC. While cursor
key is on satellite, if you press OK button and right key, you can select satellite.
While the cursor key is on Frequency, if you press OK button, satellite list shows uo, then you
can select your favorite satellite. Left or right button shows selected satellite list.
While cursor key is on search start.
1-3. Automatic search
After antenna setting, Automatic search can be used for easier search.
Press ok button, it will show satellite list. You can select
satellite by RED button.
ῡPress “BACK” button
ῢSearch start

15
After finishing setting, edit screen will show as below.
1. Edit Channel
Edit a channel by adding, lock, moving, and delecting.
2. Edit satellite
Edit a satellite by renaming, adding, and deleting
4.3 EDIT
16
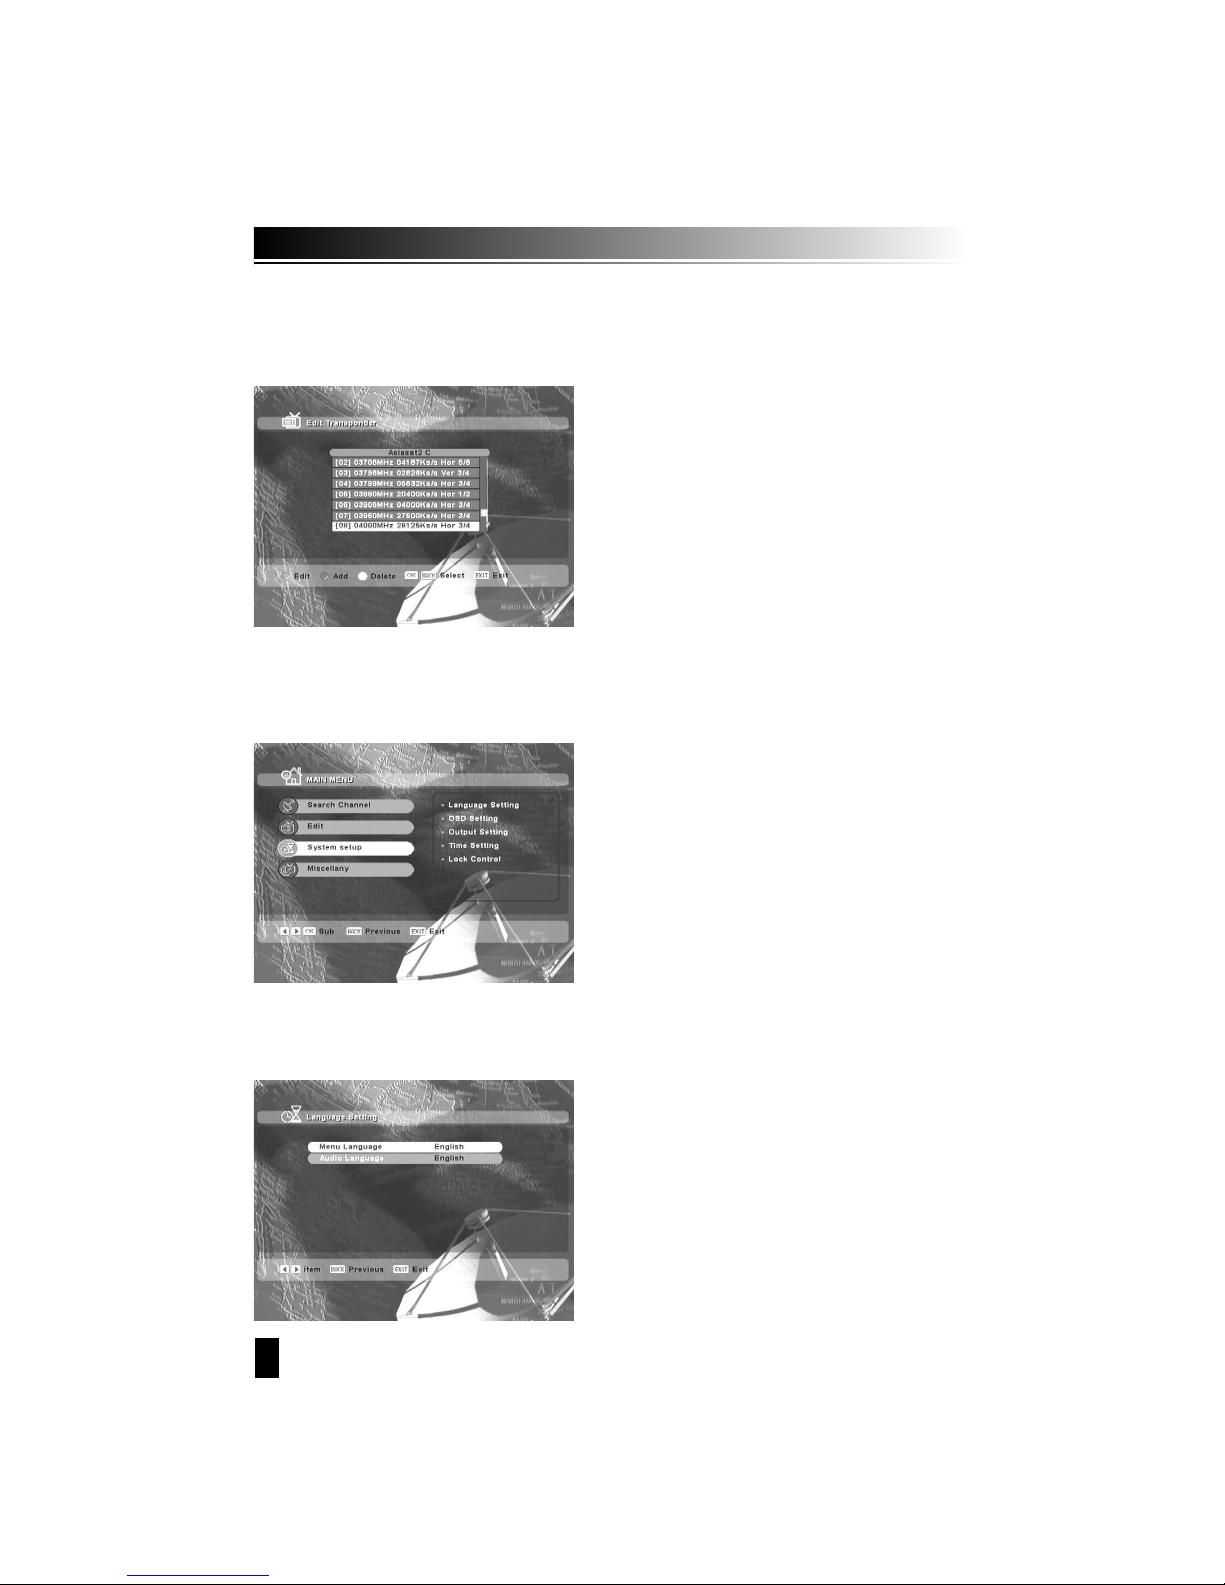
3. Edit Transponder
Edit a transponder by editing, adding, and deleting.
This helps set additional function such as language, OSD, Output, Time, lock control,
and UHF control.
1. Language Setting
Select language for menu and Audio language and Subtitle language. select “Language setting”
with ᵾOᶀ key and the press the OK button. Select a desired language as English or others.
4.4 SETUP
17
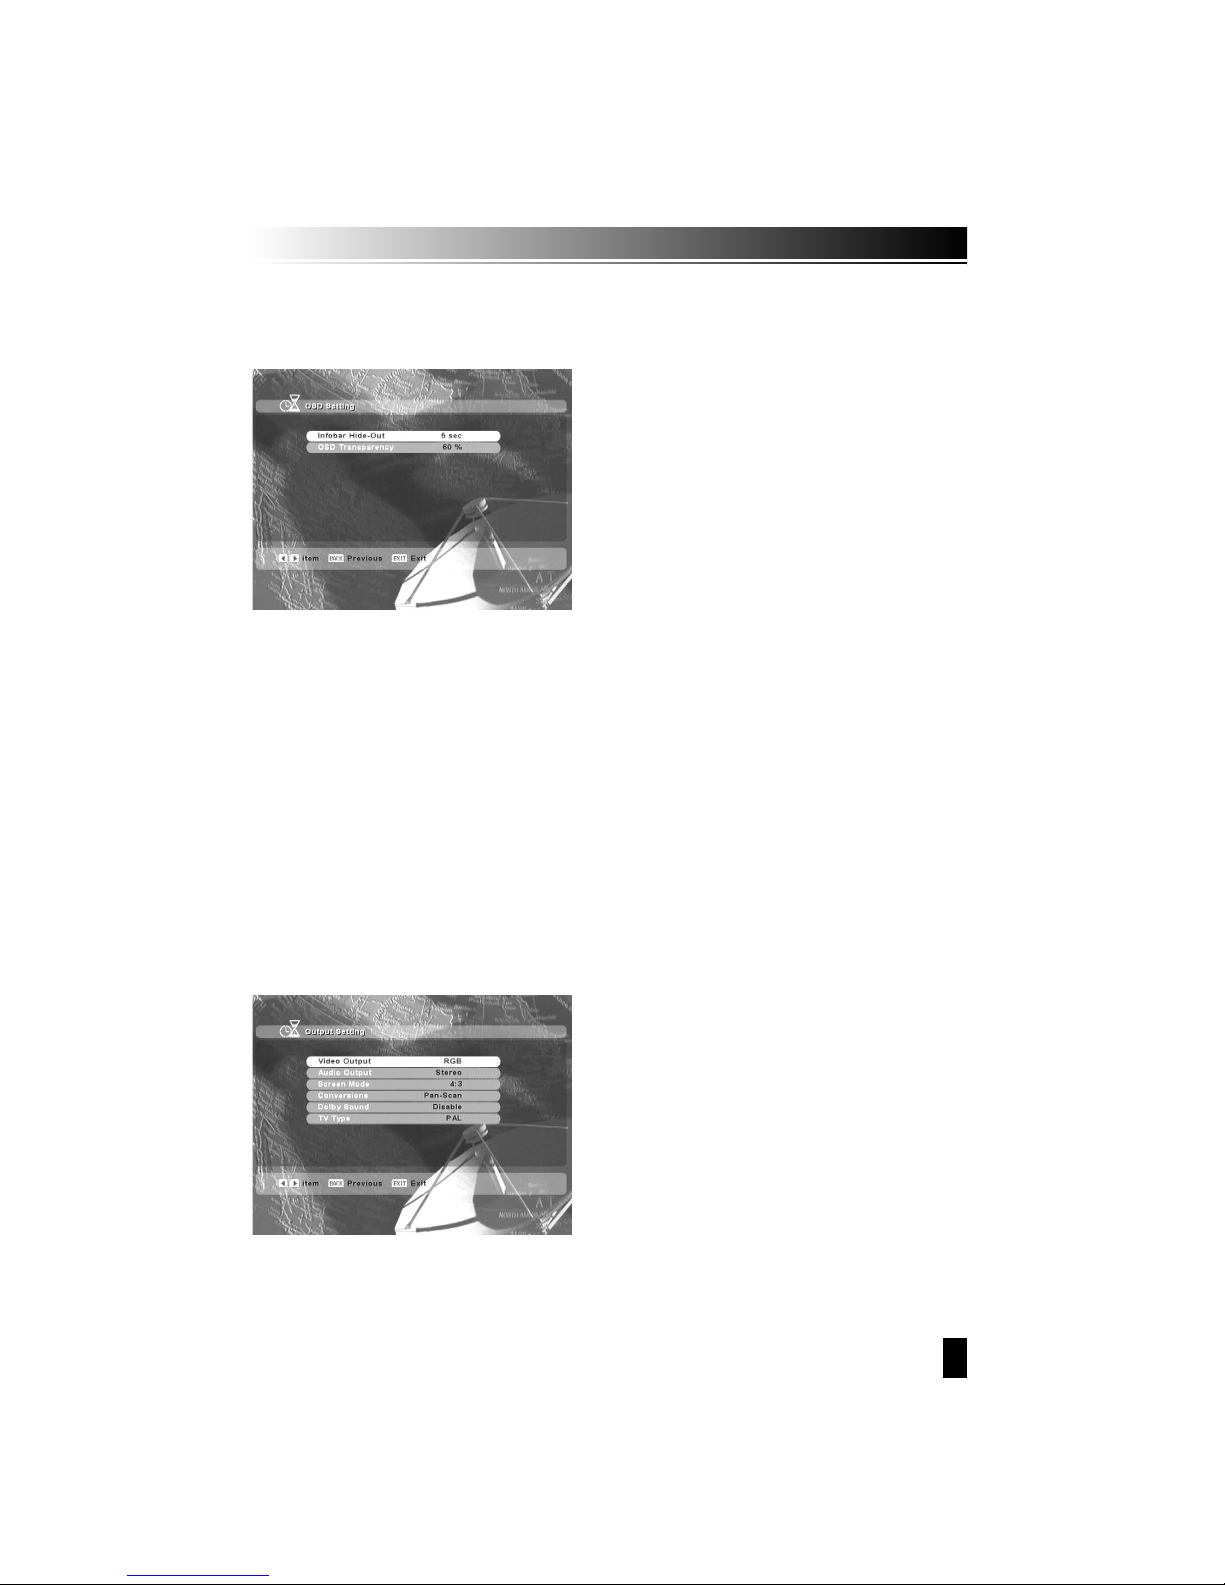
2. OSD Setting
Changes wanted mode for info bar hide-out time, Background, Sound effect, OSD
Transparency or Load default.
A. Infobar hide-out
1. Select “OSD Setting” with ᵾOᶀ key.
B. OSD Transparency
1. Change the transparency of OSD by ᵾOᶀ key.
3. Output Setting
Set suitable setting for connecting equipment such as TV .

18
4. Time Setting
Set time current time, wake up time, and sleep time.
A. Current Time
1. Press ᵾOᶀ key to select “current Time”
2. Input the local time by pressing number button.
B. Wakeup Timer
1. Press ᵾOᶀ key to select “Wakeup Timer”
2. To set Wakeup Timer in work, Select “Enable”
C. Wakeup Time
1. Press ᵾOᶀ key to select “Wakeup Time”
2. Time Enter the time in which the STB will power on.
5. lock Control
This menu helps prevent wrong usage receiver.
Use Age limit, menu lock, and password.

19
A. Age Lock
1. Press ᵾOᶀ key to select “Age Lock”
2. To block certain channels by viewer’s age, select “Yes” by using the ᵾOᶀ keys.
B. Age Limit
1. Press ᵋOᵍ key to select “Age Limit”
2. Enter desired age to be blocked to certain channel by ᵾOᶀ keys.
C. Menu Lock
1. Press ᵋOᵍ key to select “Menu Lock”
2. To restrict entry to certain menu for securing program settings or installation.
3. Select “Yes” by using the ᵾOᶀ keys.
D. Current Password
Enter current password by pressing number.
E. New Password
Enter 4 digit number, which you want as new password after entering the current one.
F. Confirm Password
To Confirm the new password, input same password.
This menu helps see information of receiver and make FACTORY SETTING on receiver.
4.5 Miscellany

20
1. Information
Shows H/W and S/W version, Database.
3. Factory Setting
This menu helps receiver make the state of first-time usage.
Table of contents
Languages:


