Headline HL-1000 Owner's manual

HEADLINE
PROGRAMMING MANUAL
FOR THE HL-1000 SERIES Radios
This manual is intended for use by qualified technicians and includes information
pertaining to the HL-10VS Software and the HL-1000 Series operation.
TecNet International inc.
11535 West 83rd Terr.
Lenexa, KS 66214
Toll Free: 800-456-2071
Phone: 913-859-9515
Fax: 913-859-9550
www.tecnetusa.com
Made in Korea

HL-1000 Series
Personality Programmer
2
TABLE OF CONTENTS
1. INTRODUCTION…………………………………………………………………….04
System requirements
2. Hardware Installing…………………………………………………………………04
3. Software Installing………………………………………………………………….04
4. HL-1000 PC Program………………………………………………………………05
5. MENU BAR……………..……………………………………………………….……05
Files………………………………………………………………………………..….05
Program……………………………………………………………………………06-12
6. TOOLS BAR…………………………………………………………………………..13
7. MODELS BAR…………………………………………………………………………13
8. COM PORT BAR………………………………………………………………………14
9. HELP BAR……………………………………………………………………………..14
10. ICON BAR…………………………………………………………………………14-15
11. USER OPTION-1…………………………………………………………………15-17
12. USER OPTION-2…………………………………………………………………17-19
13. FREQUENCY TABLE…………………………………………………………………19

HL-1000 Series
Personality Programmer
3
Hl-1000 series
PERSONALIITY PROGRAMMER LIST OF FIGURES
Pic. 1. 25-Pin to 9-Pin RS-232 Serial Communication Cable……………..04
Pic. 2. Installing HL-1000………………………………………………………....04
Pic. 3. Opening HL-1000 Program……………………………………………....05
Pic. 4. Menu Bar………………………………………………………………..……05
Pic. 5. Icon Bar……………………………………………………………………….15
Pic. 6. Frequency Input Table…………………………………………….……….19
Pic. 7. Sending……………………………………………………………………..…19
Pic. 8. Reading……………………………………………………………………..…19

HL-1000 Series
Personality Programmer
4
1. INTRODUCTION
System Requirement
HL-1000 series Program Software runs on the Window XP.
1) Hard disk space: 3.8MB
2) Disk Driver: CD
3) COM PORT: COM 1, 2, 3, 4
4) Hardware Accessories: HL-10PK Cable
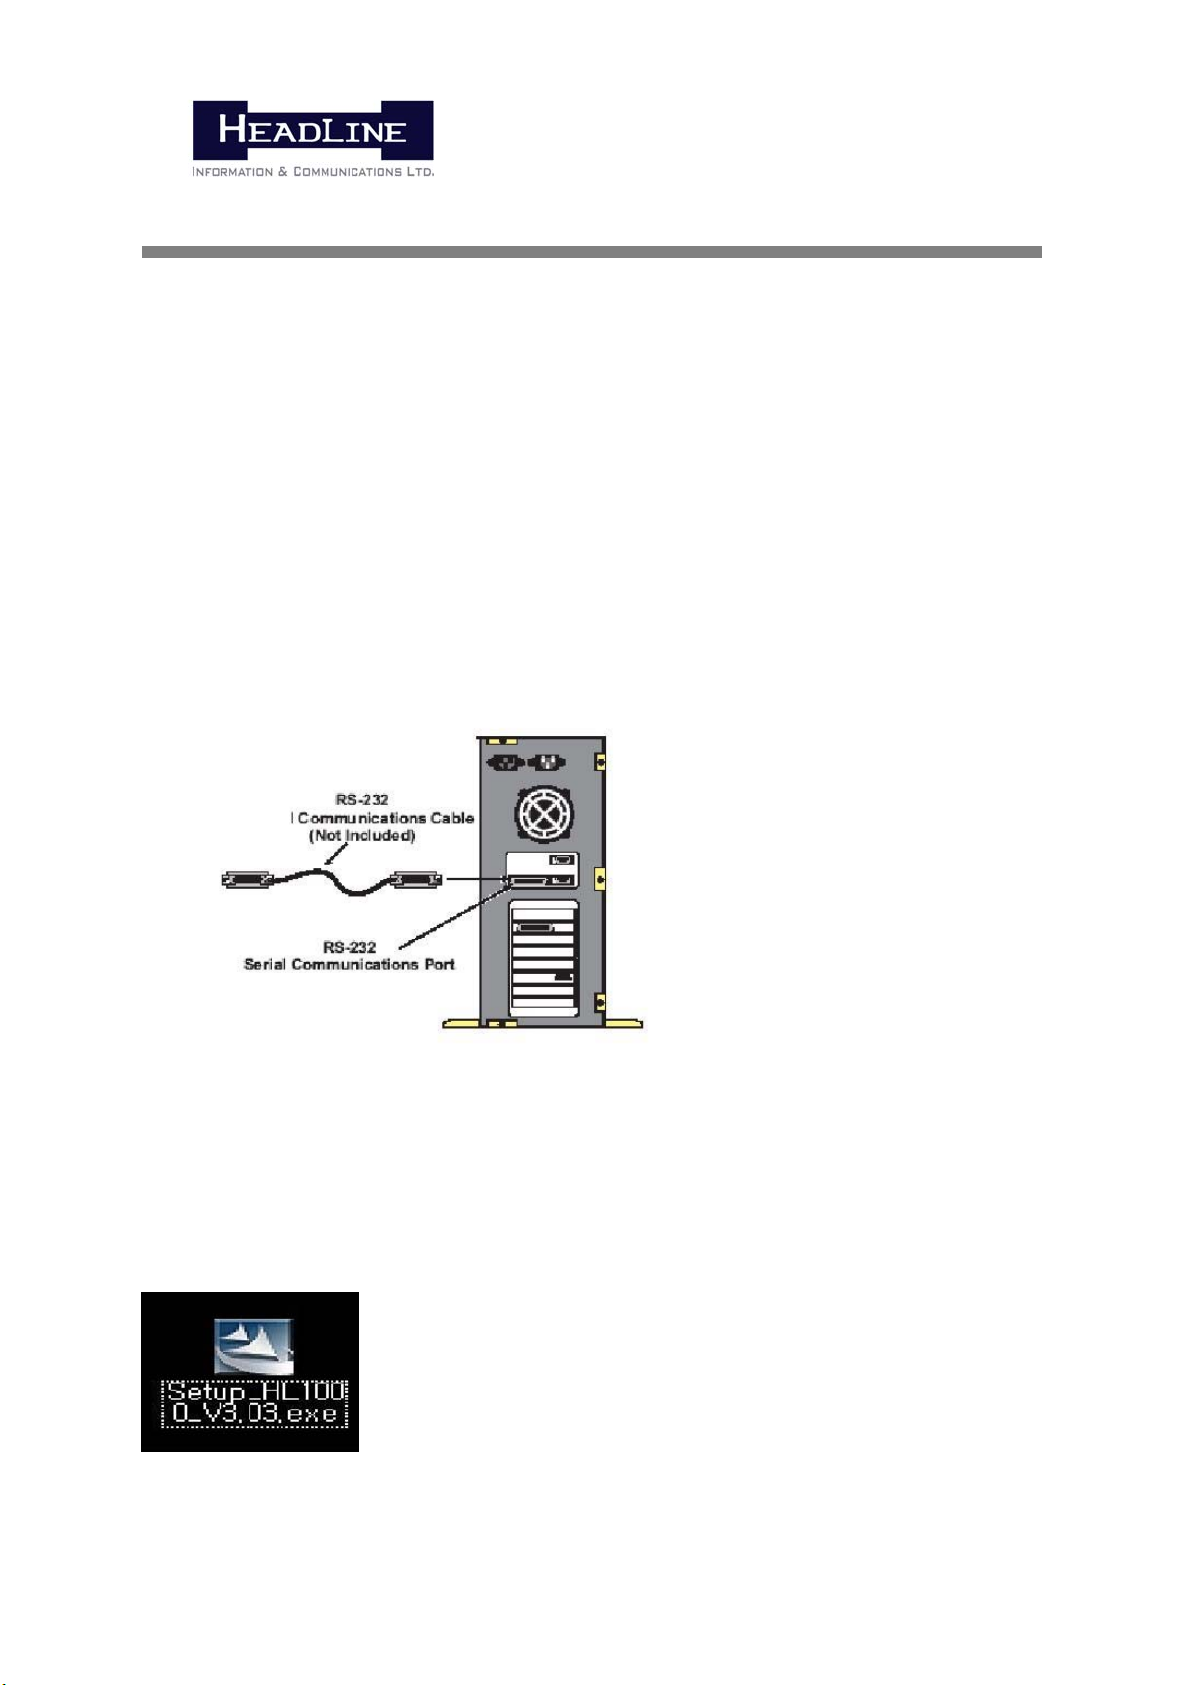
2. HARDWARE INSTALLING
Pic. 1. Connect HL-10PK의 D-SUB 9 PIN CONNECTOR that has RS-232 male to the computer
PORT.
<Pic. 1. 25-Pin to 9-Pin RS-232 Serial Communication Cable>
3. SOFTWARE INSTALLING
Pic. 2. Insert HL-1000 Series PC programmer disk in the disk drive and run HL-1000.exe
file.
<Pic.2. HL-1000 Installing>

HL-1000 Series
Personality Programmer
5
4. HL-1000 PC Program
<Pic. 3. Opening HL-1000 Program>
Once PC program is successfully installed, the opening icon will be made on the Window.
Click the icon to run the program then, you will see the window as pic.3. And choose ‘Exit’
in ‘FILE’ menu to exit the program.
To open PC program file, choose ‘Read’ in FILE menu and choose ‘Save’ to save file.
To send file from PC to Radio, select PROGRAMMING menu and click ‘SEND’ and to read DATA
from Radio, choose ‘READ’ in PROGRAMMING menu.
5. MENU
Pic.4 is showing menu bars to operate radio.

HL-1000 Series
Personality Programmer
6
<Pic.4. Menu>
1) FILES BAR
<Pic. FILES BAR>
Files bar consists of NEW, READ, SAVE, PRINT and EXIT.
NEW is to input new data, SAVE is to save currently input data, PRINT is to print set data
and EXIT is to exit program.
2) PROGRAMMING BAR
<Pic. Programming Bar>
Programming Bar is consists of READ, SEND, OPTION-1, OPTION-2, 2T/5T SET.
READ is to read data from Radio and display it on the PC screen, SEND is to input data of
the program to Radio, OPTION-1 & OPTION-2 are to select special function of the radio.
Special function will be introduced in the next chapter.

HL-1000 Series
Personality Programmer
7
○
1
PROGRAM MODE
- Use this mode to input the channel frequencies and audible tones.
- Install the programming software into the PC as per the Installation instructions.
- Connect the radio to the PC as shown.
- To enter the programming function, press and hold the “M” (Monitor) button while
powering on the radio. The software version will appear on the display screen.
○
2
CLONE MODE(COPY)
- This function allows for the duplicate programming of one radio to another. The
exclusive CLONE JACK cable is required to connect the original radio to the clone radio.
- On the original radio, press and hold the PTT button while powering on the radio.
- The “CLONE” icon will appear on the original radio’s display screen.
- Set the clone radio to the program mode by pressing and holding the “M” (Monitor) button
while powering on the radio. (See Program mode)

HL-1000 Series
Personality Programmer
8
- Clone copying is initiated by pressing the “F” button of the original radio.
- Once the “F” button of the original radio has been pressed, the “----“ icon will be
indicated on the clone radio’s display screen.
- When the copying has finished, the “SUCCESS” icon will be indicated.
- If an error occurs, the “ERROR” icon will be indicated on the clone radio’s display
screen. Verify the connections and try again.

HL-1000 Series
Personality Programmer
9
○
3
EDITING THE CHANNEL SCAN LIST
The scan
channel channel
- To confirm the status of scan channels, press and hold the Up button while powering on
the radio. If channels are already registered in channel scan list, the “”icon will be
indicated on the display screen as shown in the picture on the left. If the channel is not
registered, the “”icon will not be displayed.
- Switch channels by pressing the Up/Down buttons.
- To place a channel in scan mode, select “Register Scan Channel”. The “”icon will
appear above the channel number.
- To remove a channel from scan mode, select “Cancel Scan Channel”. The “”icon above the
channel number will disappear.
- To set a channel as a priority channel, select the desired channel and then press the
“M” (Monitor) button. The channel will become “Priority Channel 1”.
The scan
channel channel
- Choose a “priority channel 1” by pressing the Up/Down buttons.
- Choose the “Assign Priority Channel 1” (“”icon will appear) or “Cancel” (no “ ”).
- Move to the “priority channel 2” by pressing the “M” button.

HL-1000 Series
Personality Programmer
The scan
channel channel
- Choose a “priority channel 2” by pressing the Up/Down buttons.
- Choose the “Assign Priority Channel 2” (“”icon will appear) or “Cancel” (no “ ”).
- Should the “M” button be accidentally pressed, move to the step before registering scan
channel again.
- After completing the registration / deletion of scan channels, turn off the power. To
use, turn it on again.
○
4
PASSWORD MODE
- A numerical password may be assigned to the radio.
- To set/change/delete the password, press and hold the “Down” button while powering on
the radio.
- The password may be only 4 to 7 digits in length.
- Special attention must be paid to the password. If the wrong password is entered more
than 5 times, the radio will lock itself and cannot be used. Should this occur or if the
password is forgotten, please contact the original selling dealer.
10

HL-1000 Series
Personality Programmer
- Setting the Password: Press and hold the “Down” button while powering on the radio. If
the “” icon can be seen on the display, then there is no password assigned to the radio.
- Input the password twice (only 4 to 7 digits)
- If the password is less than 7 digits, press the PTT button to save.
- If the password is 7 digits in length, it is automatically saved.
- Changing the Password: Press and hold the “Down” button while powering on the radio.
Input a new password. The password may be changed only if the steps are executed according
to the process of “setting password”. Once a new password is assigned, it will have to be
inputted whenever the radio is powered on.
- Delete Password: This function cancels the established password when a user wants to use
the radio without having to input a password. Enter the established password when the icon
“” is indicated on the LCD.
- The icon “” (new password is required to input) will appear on the LCD. Do not
enter any new password. Simply press the PTT button.
11

HL-1000 Series
Personality Programmer
- The icon “” (reconfirm password) will appear on the LCD. Press the PTT button again.
- The icon “” (delete a password) will appear on the LCD.
○
5
CONFIRM SELCALL ID
- Press and hold the Function button while powering on the radio.
- 2TONE / 5TONE ID can be confirmed through the PC programming software.
- 2TONE / 5TONE ID will be indicated on the LCD, one by one, whenever the “F” button is
pressed.
12

HL-1000 Series
Personality Programmer
6. TOOLS BAR
<Pic. Tools Bar>
Tools Bar consists of Tx->Rx COPY and Rx->Tx COPY.
‘Tx->Rx COPY’ is to copy Tx value to Rx value and ‘Rx->Tx COPY’ is to copy Rx value to Tx
value.
7. MODELS BAR
<Pic. Models Bar>
Models Bar is to select radio models. Correct model should be selected for correct
operation.
13

HL-1000 Series
Personality Programmer
8. COM PORT BAR
<Pic. COM PORT BAR>
COM PORT Bar is to set PORT of personal computer. If PORT is different, Program can
not be set correctly.
9. HELP BAR
<Pic. Help Bar>
Help Bar shows the information of manufacturer’s web-site.
10. ICON BAR
The ICON BAR allows easy access to the most used functions of the Personality Programmer.
1. SHEET CLEAR: Sets all the values as default.
2. OPEN FILE: Loads saved personality.
3. SAVE TO FILE: Saves current personality.
4. READ FROM RADIO: Reads personality from the radio into PC.
5. SEND TO RADIO: Send current personality from PC to radio.
6. USER OPTION-1
7. USER OPTION-2 *These special functions are introduced separately.
14

HL-1000 Series
Personality Programmer
<Pic.5. ICON BAR>
11. USER OPTION-1
This function allows user to set the radio functions for special or professional use.
1) SQUELCH: Controls receiving sensitivities.
2) KEY BEEP: Enables or disables Key beep sounds.
3) LOW BATT BEEP: Enables or disables Low Batt. Warning beep.
4) BCLO: When signal is received on the current channel, this function prohibits Tx not
to bother other radio’s communication.
5) KEY LOCK: Locks KEY.
6) DTMF: Selects ID in Tx.
7) VOX MODE: Enables Tx & Rx without external input.
8) TOT: Limits time in Tx.
15

HL-1000 Series
Personality Programmer
<Pic. USER OPTION-1>
RESTRICTIVE FUNCTION OF TRANSMIT
This prevents lengthy transmissions and excessive waste of batteries. When this function
is activated, the user will not be able to transmit.
There are two operations: TOT (Time-Out-Time) and BCLO (Busy Channel Lock-Out)
○
1 TOT: When transmitting over regular time, the penalty time will be applied. This
function helps to continuously retransmit after the penalty time. The transmit time can be
set from 5 seconds to 200 seconds. The penalty time can be set from 2 seconds to 60
seconds. (The radios are factory assigned at 100 seconds of transmit time and 2 seconds of
penalty time.)
○
2 BCLO: This function blocks a transmission in order not to interfere with other
transmissions when the received signal appears on the channel. There are the two types:
- Carrier Type: Blocks transmission when the Carrier audible frequency of the same
channel is sensed.
16

HL-1000 Series
Personality Programmer
- Repeater Type: In the channel with the sub-tone, blocks transmission when the
Carrier audible frequency of the same channel or other sub-tone is sensed
Note: The BCLO function of the radios is factory assigned to off.
12. USER OPTION-2
This function allows user to set the radio functions for special or professional use.
(This option allows easy and quick setting of time.)
<Pic. USER OPTION-2>
DTMF ID / SELCALL TONE ID
○
1 DTMF ID: this function is to add and transmit the DTMF ID together when a call is transmitted. Up to 4
digits of DTMF ID, “1234” can be assigned. This may be chosen with the Function button.
○
2 2TONEID: Input 2TONE ID when transmitting with other radios using ANI (Automatic Number Identify).
This function is selected with the Function button. Two digits of “12” will be assigned.
17

HL-1000 Series
Personality Programmer
○
3 5TONEID: 5TONE ID will be transmitted when the radio is set for use with other person/members of group.
<Pic. 2TONE/5TONE>
* 2TONE/5TONE
This function allows user to set the radio functions for special or professional use.
(This function is to set ID)
13.FREQUENCY TABLE
18

HL-1000 Series
Personality Programmer
19
Pic.6 is showing Frequency Input Table which allows user to input frequencies. Write in
frequencies, set SUB TONE, select BAND-width and select POWER output.
<Pic.6. Frequency Input Table>
SEND
This is to send values from PC to Radio.
<Pic. 7. SEND>
READ
This is to read values from Radio to PC.
<Pic. 8. READ>
Other manuals for HL-1000
1
Table of contents