Health Care Logistics Wall Mount Service Station with Petite... User manual
Call Free 1.800.848.1633 • Fax Free 1.800.447.2923
Web: www.HealthCareLogistics.com • Email: [email protected]
ASSEMBLY INSTRUCTIONS FOR
Wall Mount Service Station with Petite Fridge™(#17976)
© Health Care Logistics, Inc. 2011
1
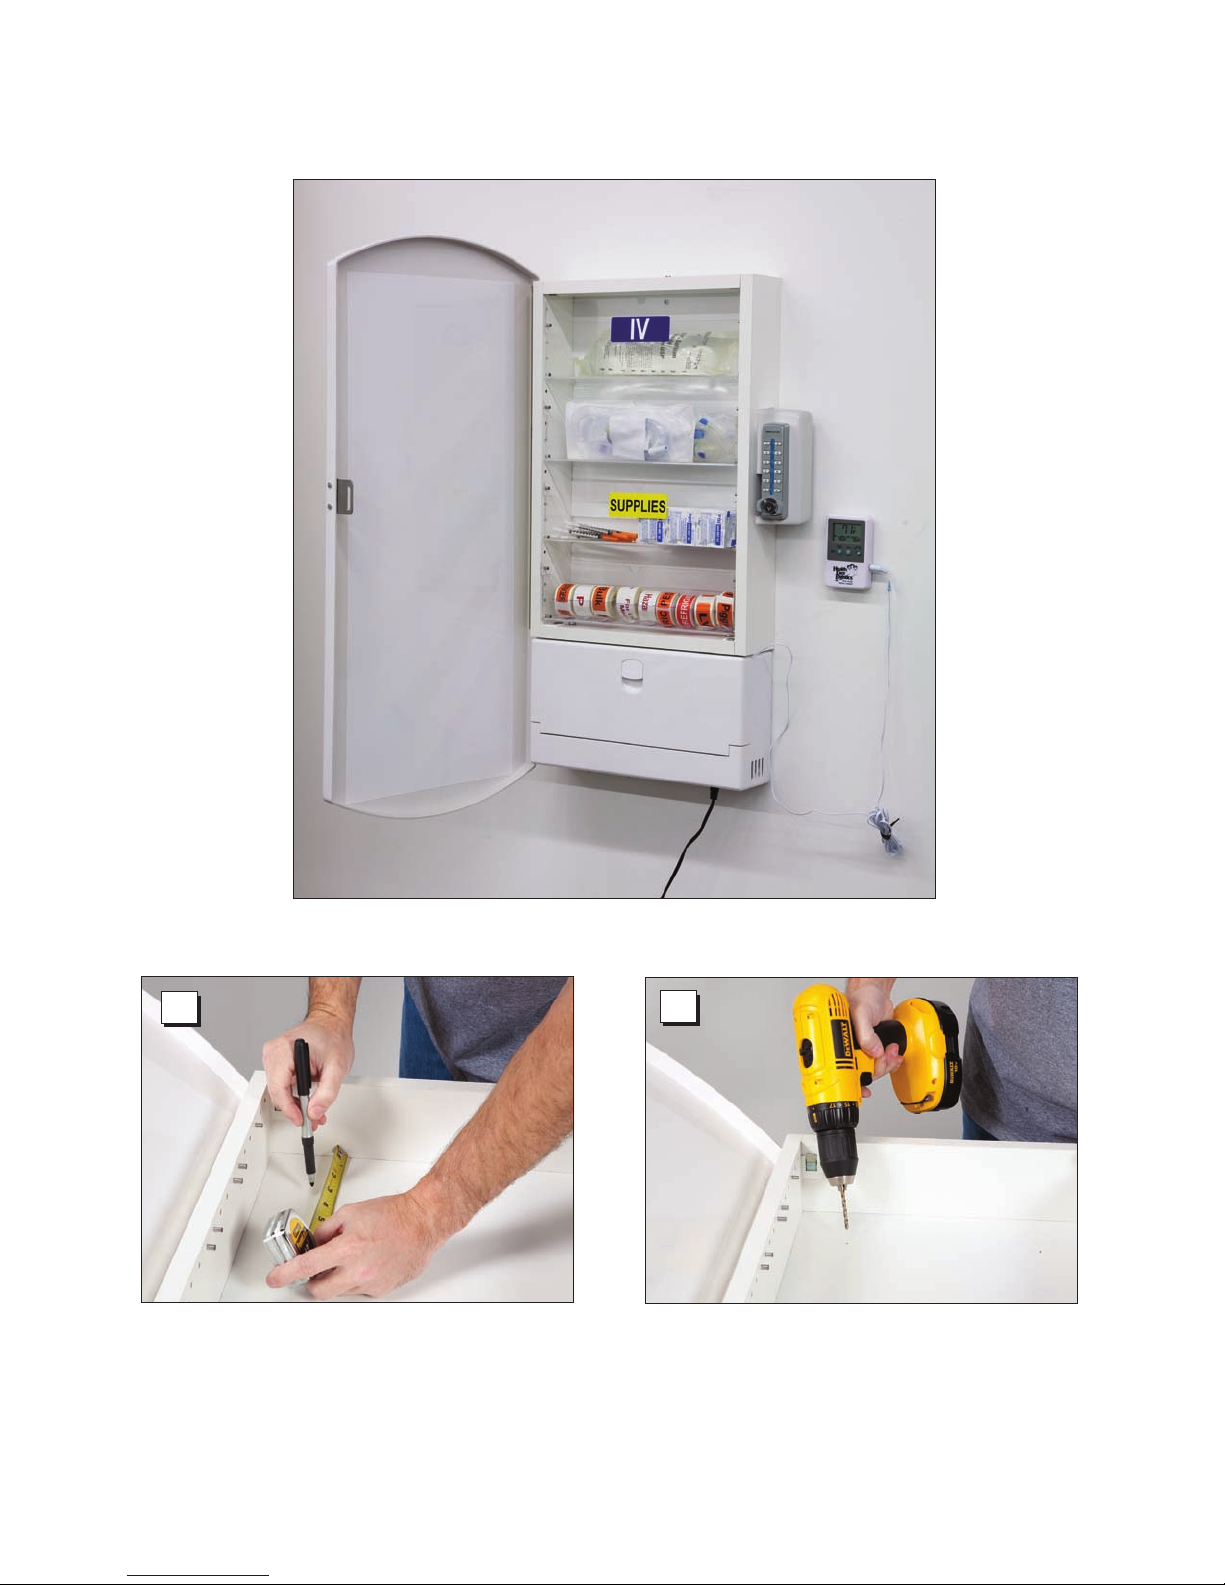
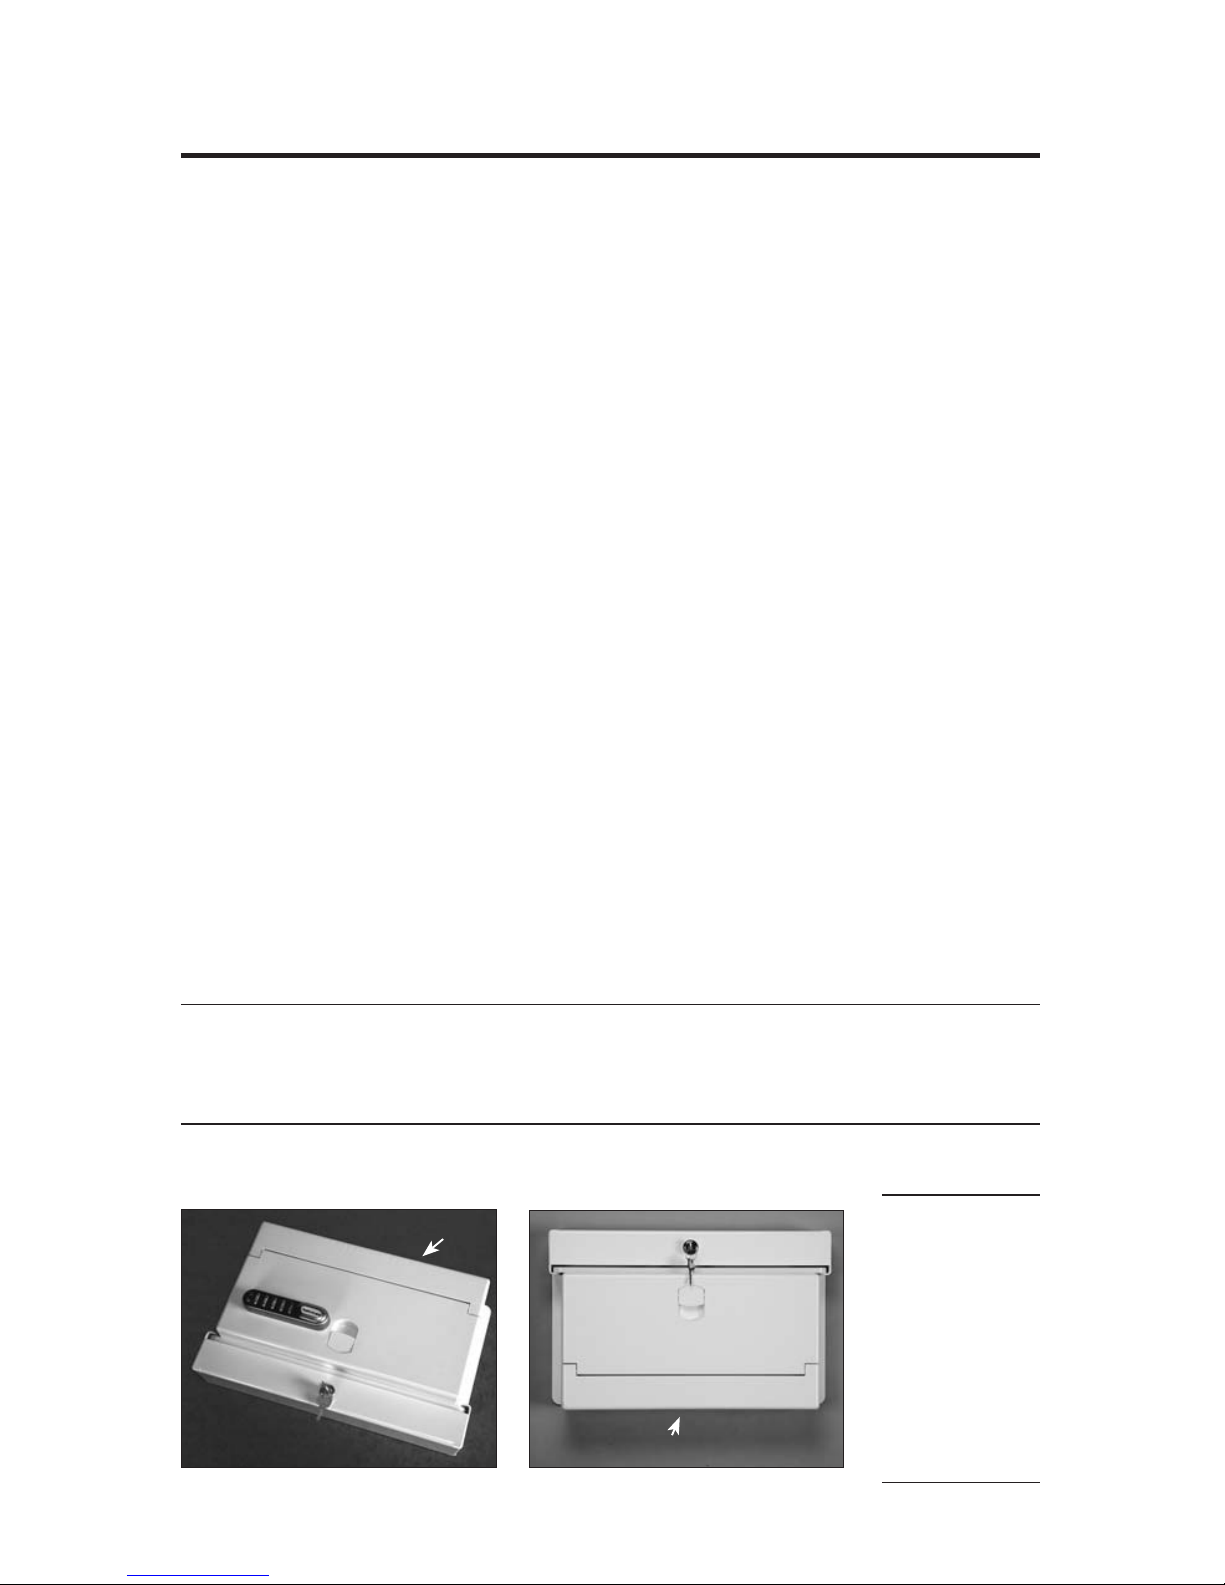
Step 1. Mark drill locations as desired (four places).
Try to hit a stud with two of the four.
2
Step 2. Drill holes to fit mount hardware – be sure to
use hardware that is flush mount (flat headed screw).
Obstructions on the back wall of the cabinet will
interfere with the tilter bin function.
Call Free 1.800.848.1633 • Fax Free 1.800.447.2923
Web: www.HealthCareLogistics.com • Email: [email protected]
ASSEMBLY INSTRUCTIONS FOR
Wall Mount Service Station with Petite Fridge™(#17976)
© Health Care Logistics, Inc. 2011
5
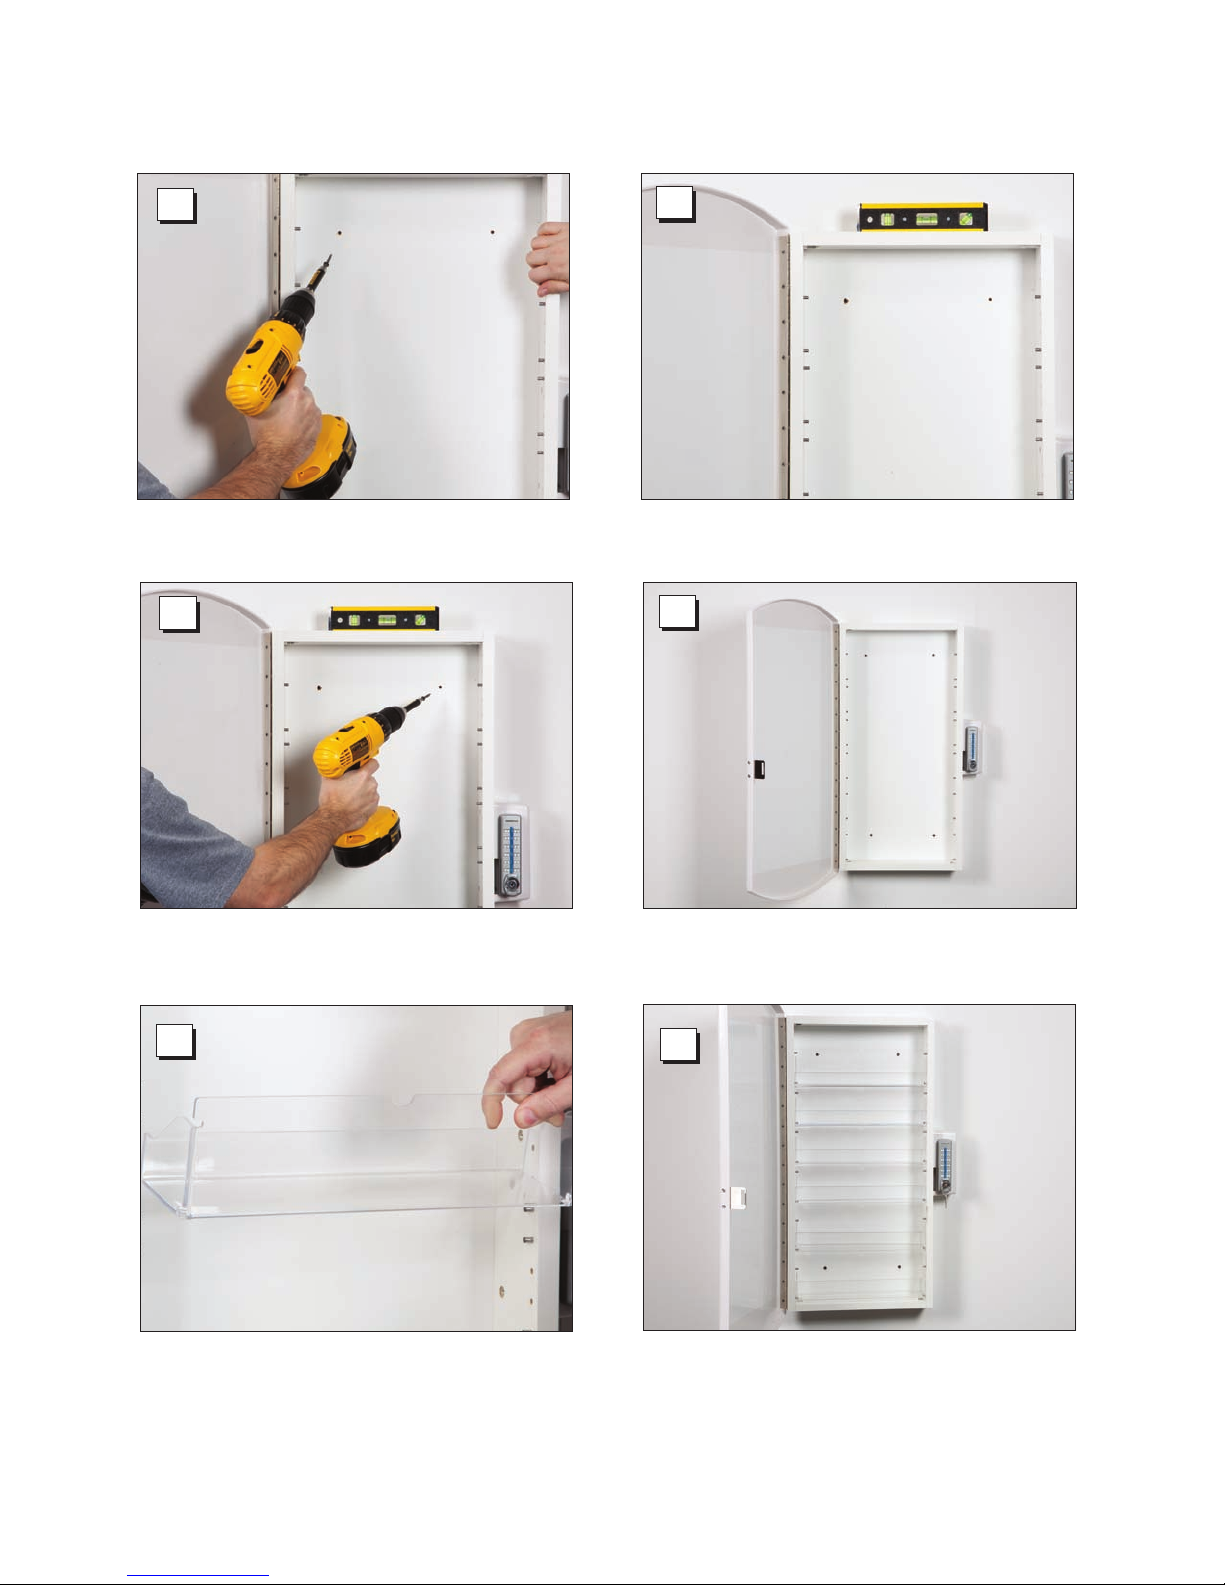
Step 5. Once level, drive the remaining screws
flush.
6
78
Step 6. Cabinet mounted.
Step 7. Place the bins back inside of the unit as they
were removed. Step 8. Unit with bins installed.
3
Step 3. Drive the first screw flush with the back.
4
Step 4. With one screw in the unit, place a level on
the top of the Service Station and straighten in place.
Call Free 1.800.848.1633 • Fax Free 1.800.447.2923
Web: www.HealthCareLogistics.com • Email: [email protected]
ASSEMBLY INSTRUCTIONS FOR
Wall Mount Service Station with Petite Fridge™(#17976)
© Health Care Logistics, Inc. 2011
9
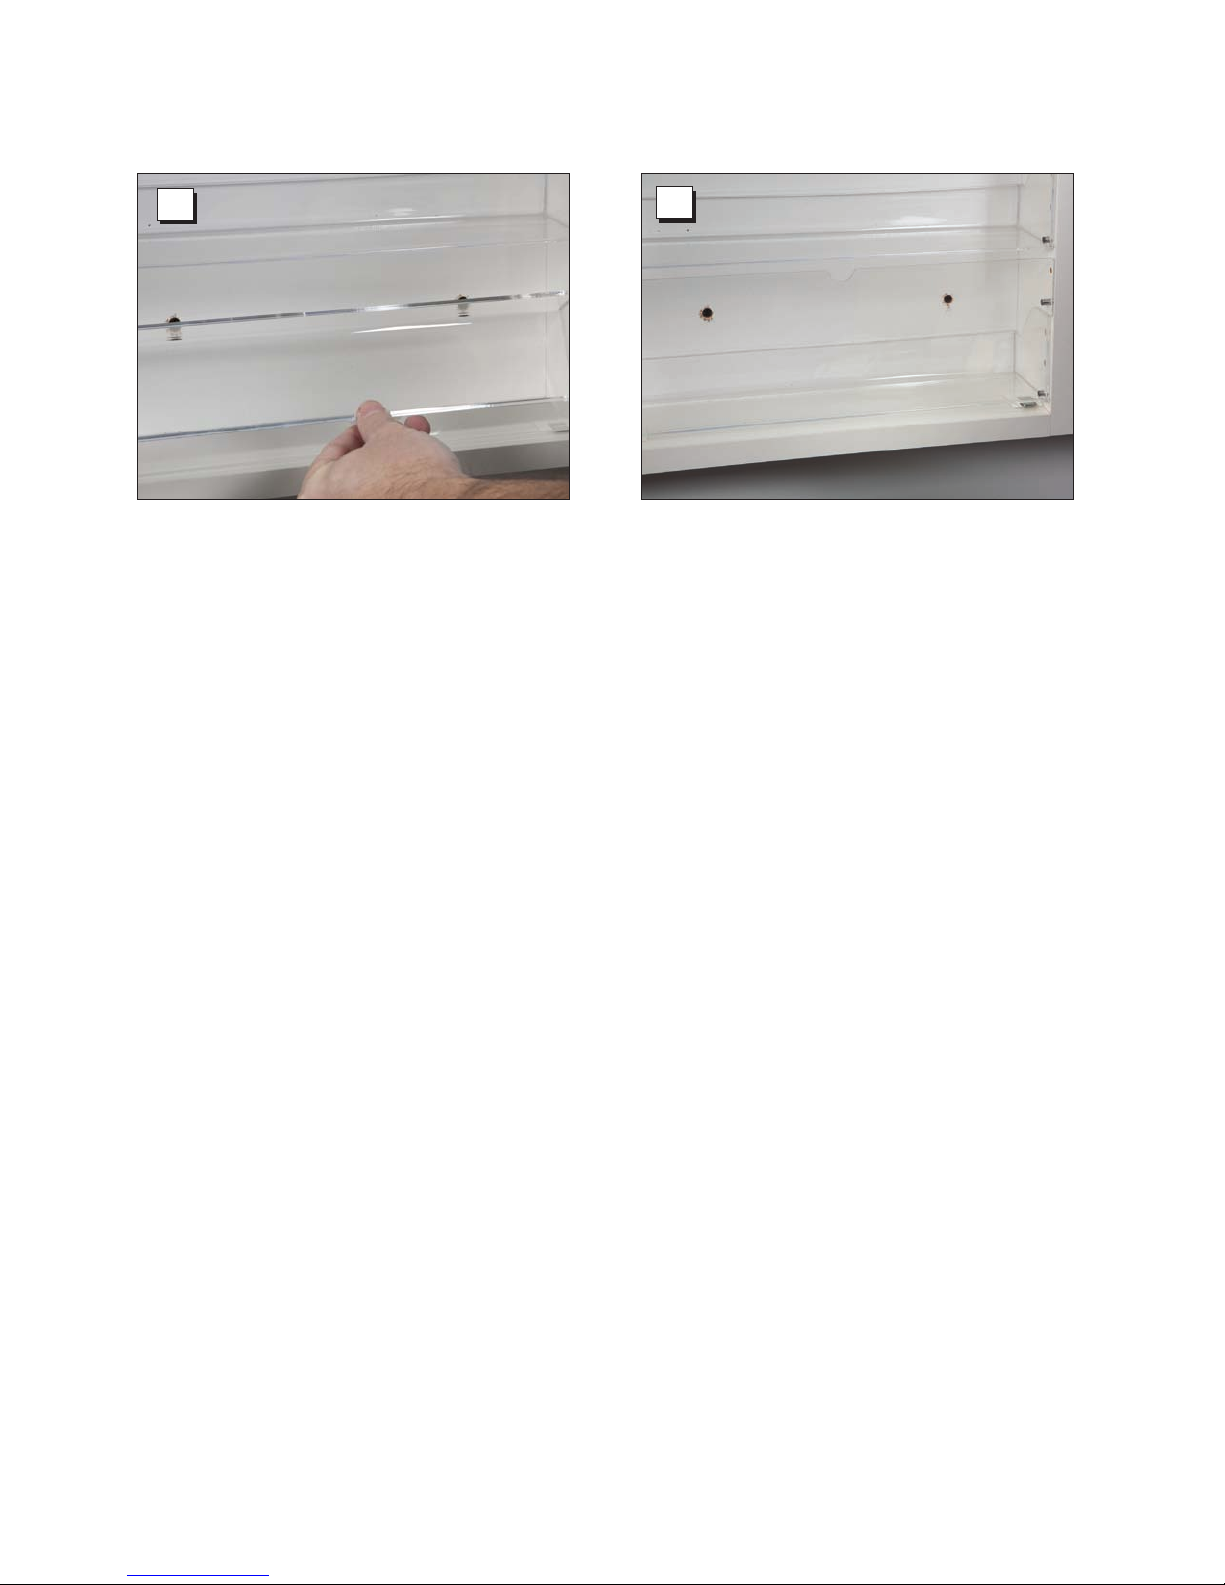
Step 9. The bin should tilt forward and rest against
the upper dowel pin.
10
Step 10. Bin is in closed position.
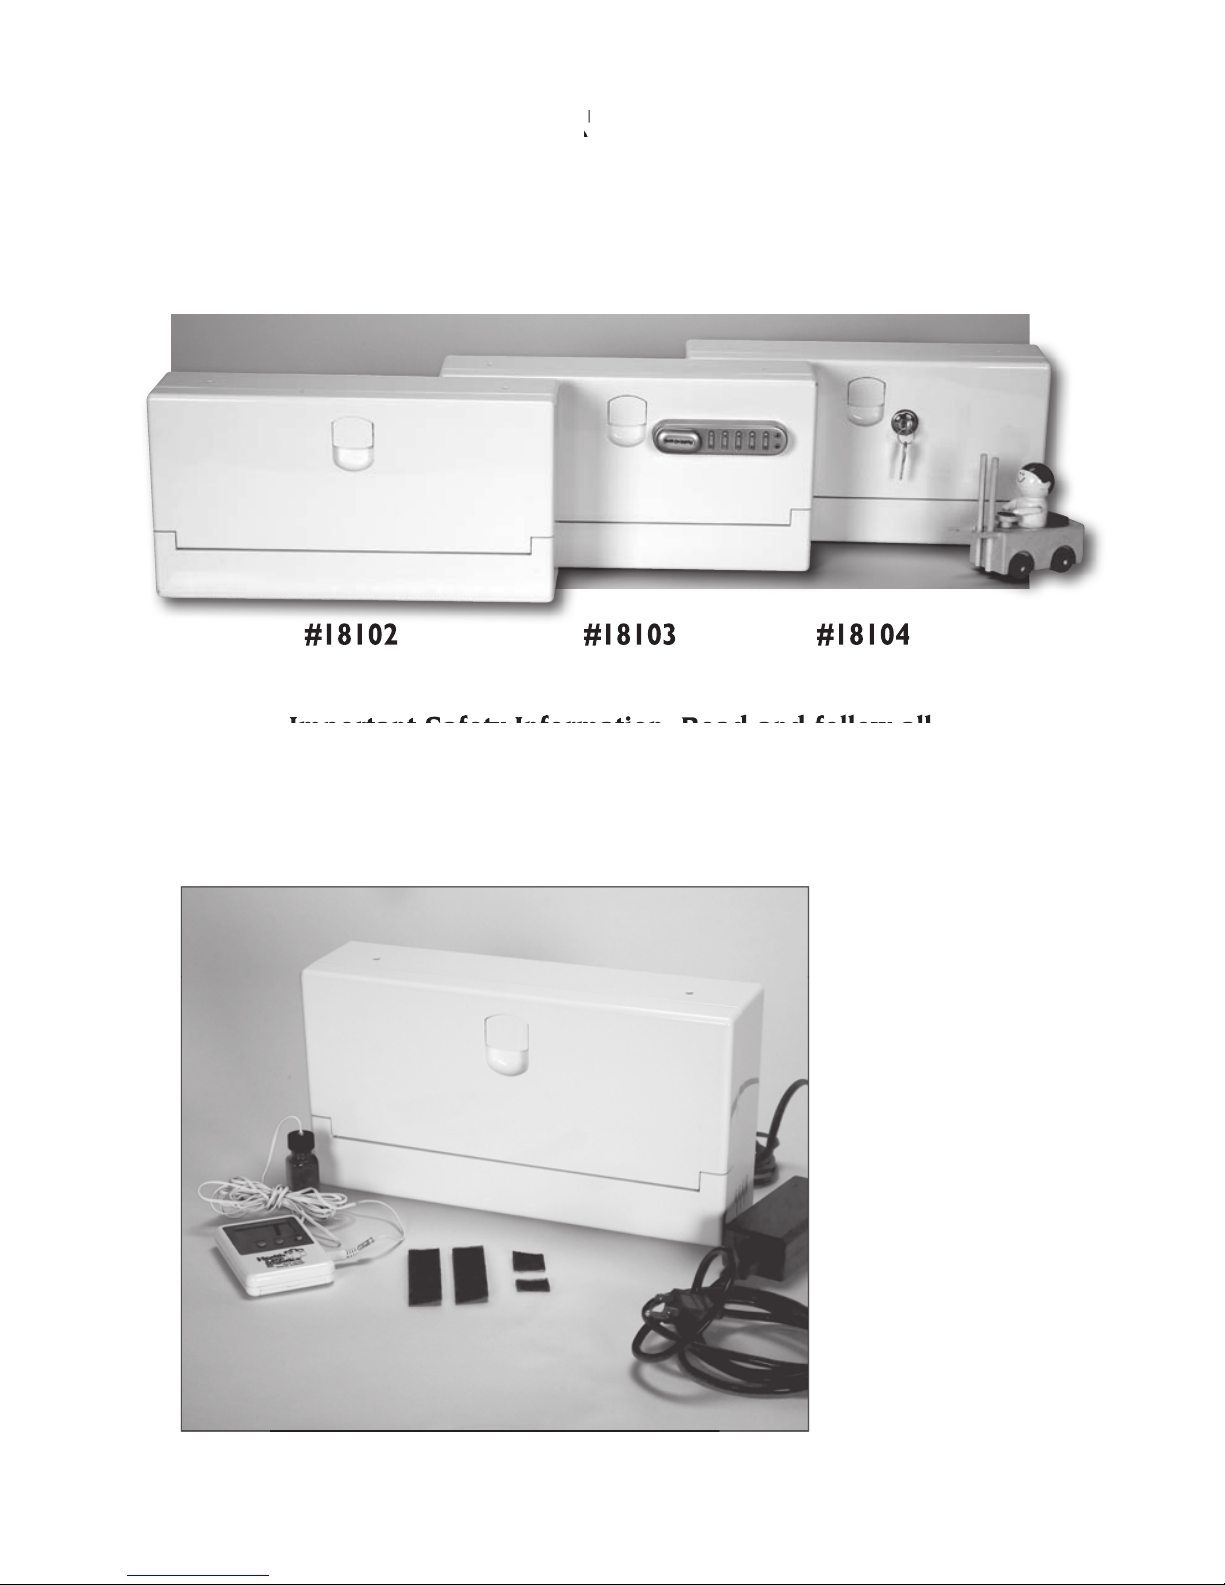
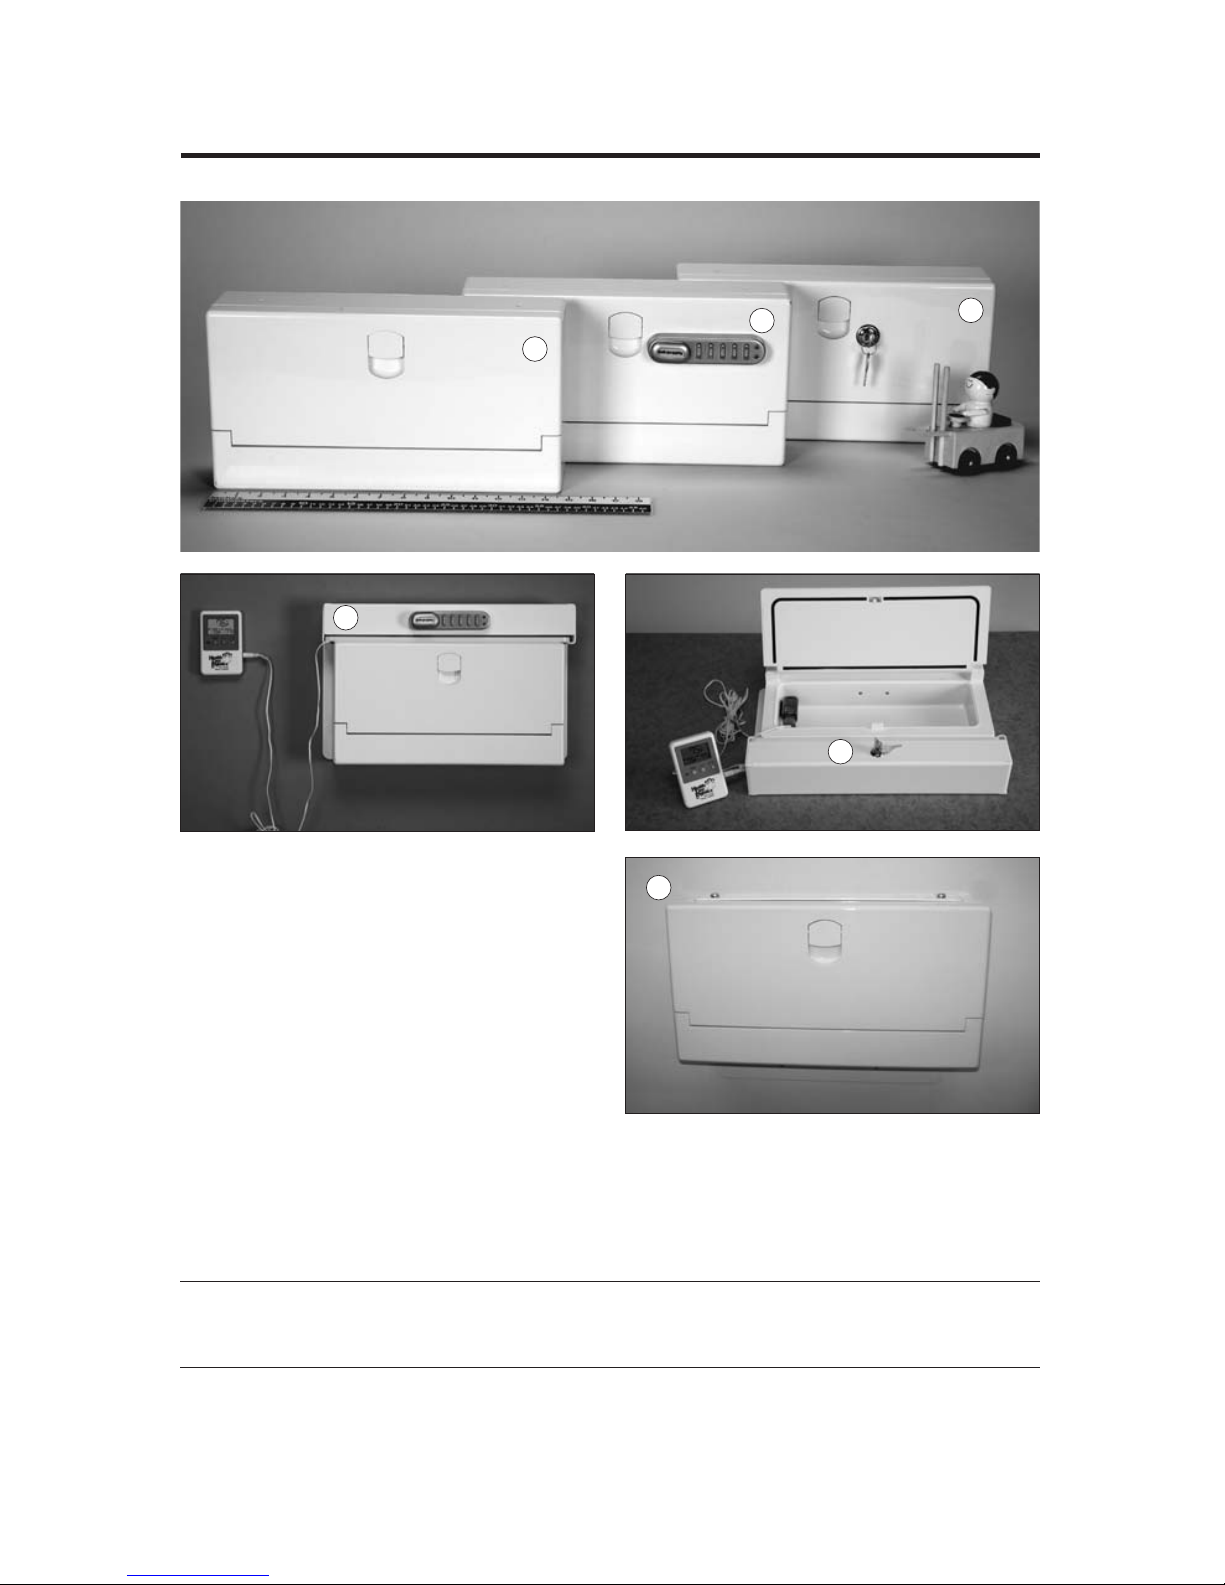
Petite Fridge
™
Petite Fridge
™
Petite Fridge
Users Manual
Thermoelectric Medication Refrigerator
(#18102, 18103, 18104)
#18102
#18103
#18104
Important Safety Information: Read and follow all
Important Safety Information: Read and follow all
instructions and warnings prior to using this product.
SAVE THESE INSTRUCTIONS.
Includes:
Refrigerator
•
Power
Supply
•
Traceable
•
Memory
Monitor
Refrigerator
Thermometer
Dual
Lock
for
•
power
supply
mounting
Dual
Lock
•
for
probe
mounting
Call Free 1.800.848.1633 or 1.888.HCL-INTL Fax Free 1.800.447.2923
Website: www.HealthCareLogistics.com • Email: [email protected]

2
Contents
Safety Instructions• ......................................................................3
Operating Instructions• ..............................................................4
Mounting Power Supply• ...........................................................5
Thermometer with Alarm• ......................................................6
Locking Options• .........................................................................6
Proper Placement & Mounting of Probe• ...........................7
Description of Product• ..............................................................8
How the Unit Works• .................................................................8
About Thermoelectric Cooling (How It Works)• ............9
Features• ....................................................................................... 10
Tips• ................................................................................................ 10
Cleaning and Maintenance• ................................................... 11
Troubleshooting• ....................................................................... 12
Product Specifications• ............................................................ 12
CapacityA.
Dimensions & WeighB. t
Power Supply/RequirementsC.
Power CorD. d
Cooling PerformancE. e
Thermostat ControlF.
Material CompositionG.
InsulatioH. n
Heat DissipationI.
Electrical EquipmentJ.
Accessories / Replacement Parts• ....................................... 14
HCL’s Hassle-Free Return Policy• ..................................... 15
3
Safety Instructions
Warning: Use this product only for its intended purpose
as described in this user’s manual. READ AND FOLLOW
THIS SAFETY INFORMATION CAREFULLY – SAVE THESE
INSTRUCTIONS.
Safety Precautions:Whenusinganyelectricalappliance,basicsafety
precautionsshouldbefollowed,includingthefollowing:
Thisrefrigeratormustbeproperlyinstalledandlocatedin•
accordancewiththeinstallationinstructionsbeforeitisused.
ThePetiteFridge• ™shouldneverbesubmergedinliquidorexposed
toexcessivemoisture.
ThePetiteFridge• ™hasairventsonthebottomandonthesides.
DONOTBLOCKTHEVENTS.Whenconnectedtoapowersource,
theseareasmustbefreetocirculateair.DonotconnectthePetite
Fridge™toapowersourcewhenitisinanenclosedareasuchasa
cabinetoradrawer.
Unplugtherefrigeratorbeforecleaningandmakingrepairs.•
Becauseofpotentialsafetyhazardsundercertainconditions,we•
stronglydiscouragetheuseofanextensioncord.However,ifyou
mustuseanextensioncord,itisabsolutelynecessarythatitbea
UL-listed(intheU.S.)orCSA-listed(inCanada),3-wiregroundingtype
applianceextensioncordhavingaground-typeplugandoutletand
theelectricalratingofthecordbe15-amp(minimum)and120V.
Cooling Vent
Wall mount /
Vertical position
Cooling Vent
Desktop mount /
Horizontal position
Note: This refrigerator may be operated in either a horizontal or vertical position.
When used in the vertical position, make sure that the cooling vent is always
positioned at the bottom and never covered.
Note: The
unit requires
a mount if
attaching to a
wall. Desktop
mounts are
for optional
security.

4
Operating Instructions
Connecttherefrigeratortoanapprovedpowersourceasdescribed1.
onpage3.
Toconnectthepowercord,insertthebarrelconnectorintothe2.
matingsocketconnectiononthebottomoftherefrigerator.
Modifyingthepowercord,orusingacordthatwasnotsuppliedby
HCL,candamagetheunitandjeopardizetheunit’seffectiveness.
Tooperate,simplyconnectthepowercordandmovetheswitch3.
tothe“ON”position.A‘green’LEDlightatthebottomoftheunit
indicatesthattheunitis“ON”.
Thisunithasalatchhandleonthefrontoftheunit.Pullthelatch4.
toopentheunit.Toclosethedoor,pressthedoorfirmlyshutand
thelatchwilllockintoplace.
Thetemperaturecontrolsarepresetintheunittothermostatically5.
maintaintheunitwithintheUSPStandardRangeforControlled
ColdTemperatureof36ºFto46ºF.Theusercannotchangeor
selectthedesiredtemperature.
Allow24hoursforthetemperaturetostabilizetopreset6.
recommendedsettings.
Thisunitwillnotchillitemsasfastasaconventionalrefrigerator.7.
Pleasedon’texpectittodoso.Anemptyrefrigeratorwillcool
downinabout3hours.Warmitemsplacedintherefrigeratorwill
slowthecoolingrate,aswilltheamountofitemsplacedinside.
Itisrecommendedthatpre-cooleditemsbeplacedintheunit(an
itemthatistransferredfromanalreadyrefrigeratedenvironment).
Coolingtimesandtherateofcoolingofanitemcouldbe
affectedbyitssize/volume(i.e.thelargerthetotalvolumeofan
itemplacedintheunit,thelongeritwouldtaketocool.)Room
temperature/warmitemsplacedinsidewillraisetheoverall
temperatureinsidetheunituntiltheystabilize.
Likeaconventionalrefrigerator,thePetiteFridge8. ™stopscooling
whenunplugged.Itwillmaintainsafetemperaturesforalimited
timeofapproximately30minuteswhenroomtemperatureisat
71ºForcooler.
5
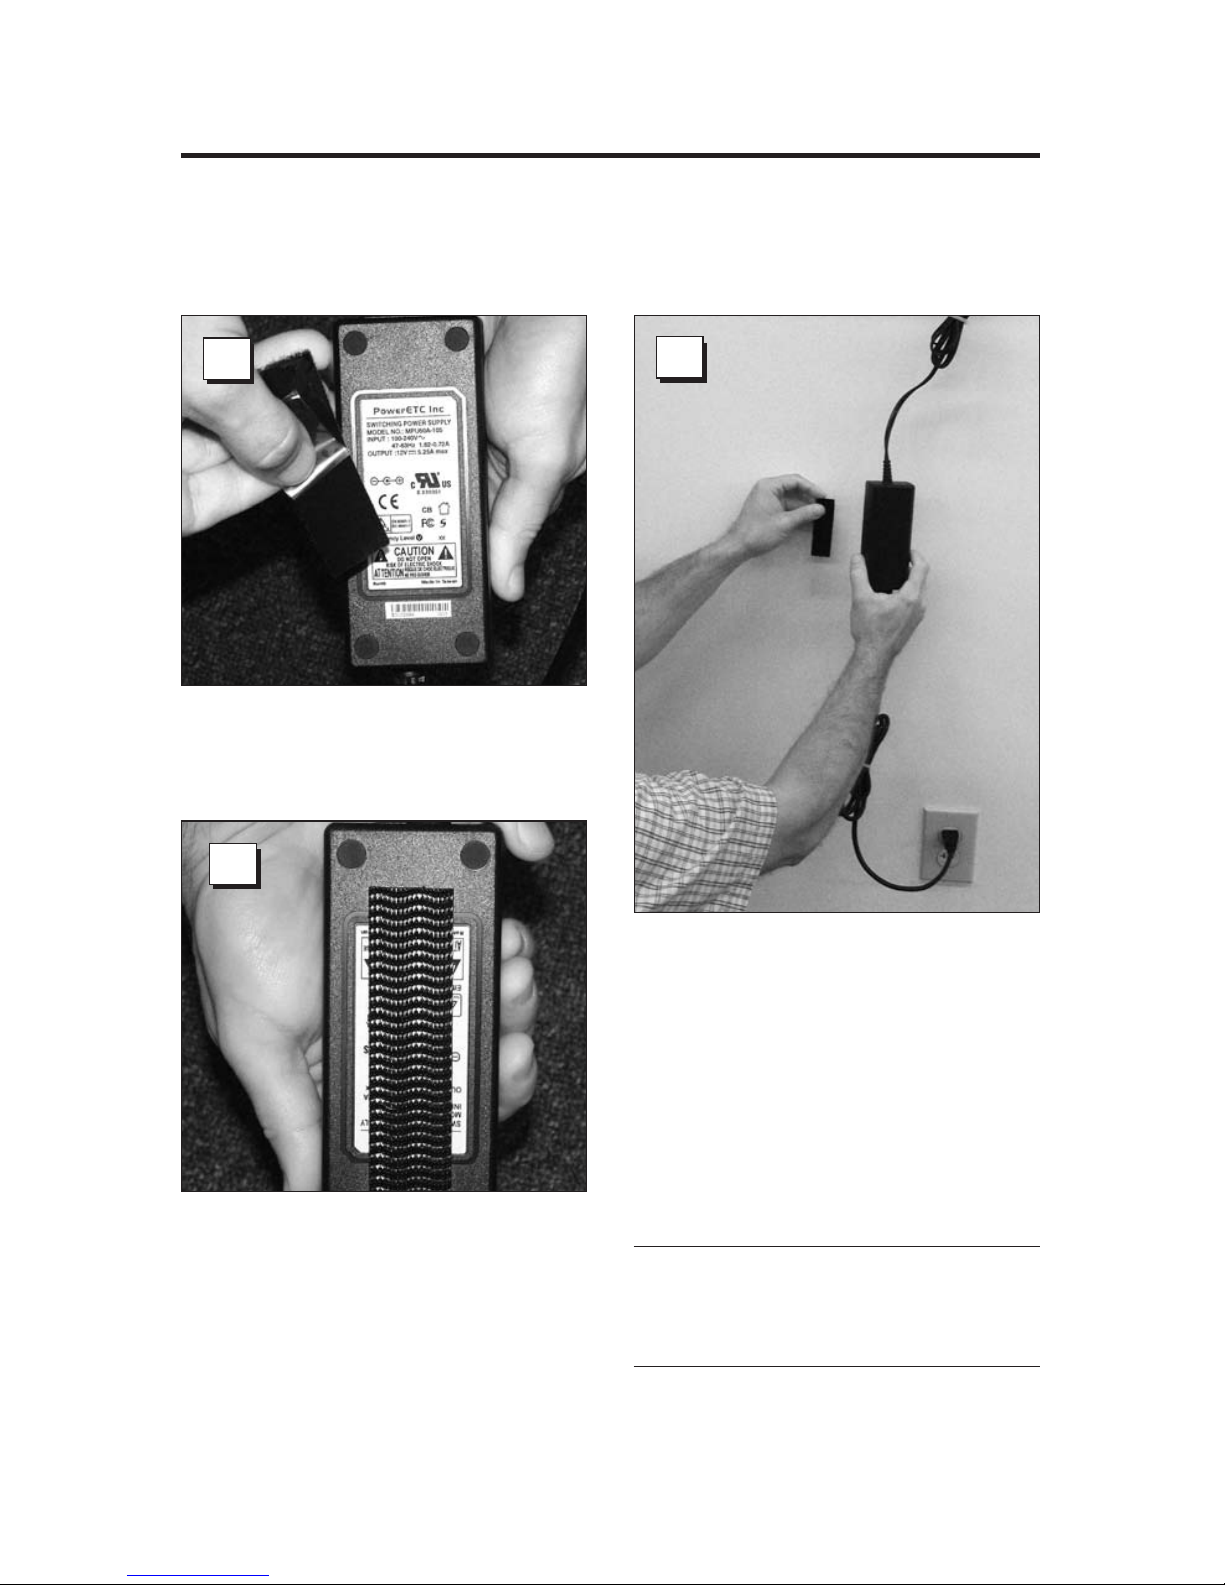
Step 2.Applythelargerpiece
ofduallocktothebackofthe
powersupply.
2
1
Step 3.Withonehandholding
thepowersupplyandtheother
holdingtheremainingpieceof
longduallock,positionbothto
allowenoughslacksoasnotpull
thebarrelconnectoroutofthe
refrigerator.
3
Step 1.Peeltheprotective
backingfromtheduallock.
Mounting Power Supply
HCLrecommendsattachingthepowersupplytothewallorasurface
withtheprovidedduallocktape.Iftheunitisnotattached,the
weightofthepowersupplycouldcausetheunittocomeunplugged.
Note: Wire tie the remaining wire
with the provided wire ties, so it is not a
trip or snag hazard.
6
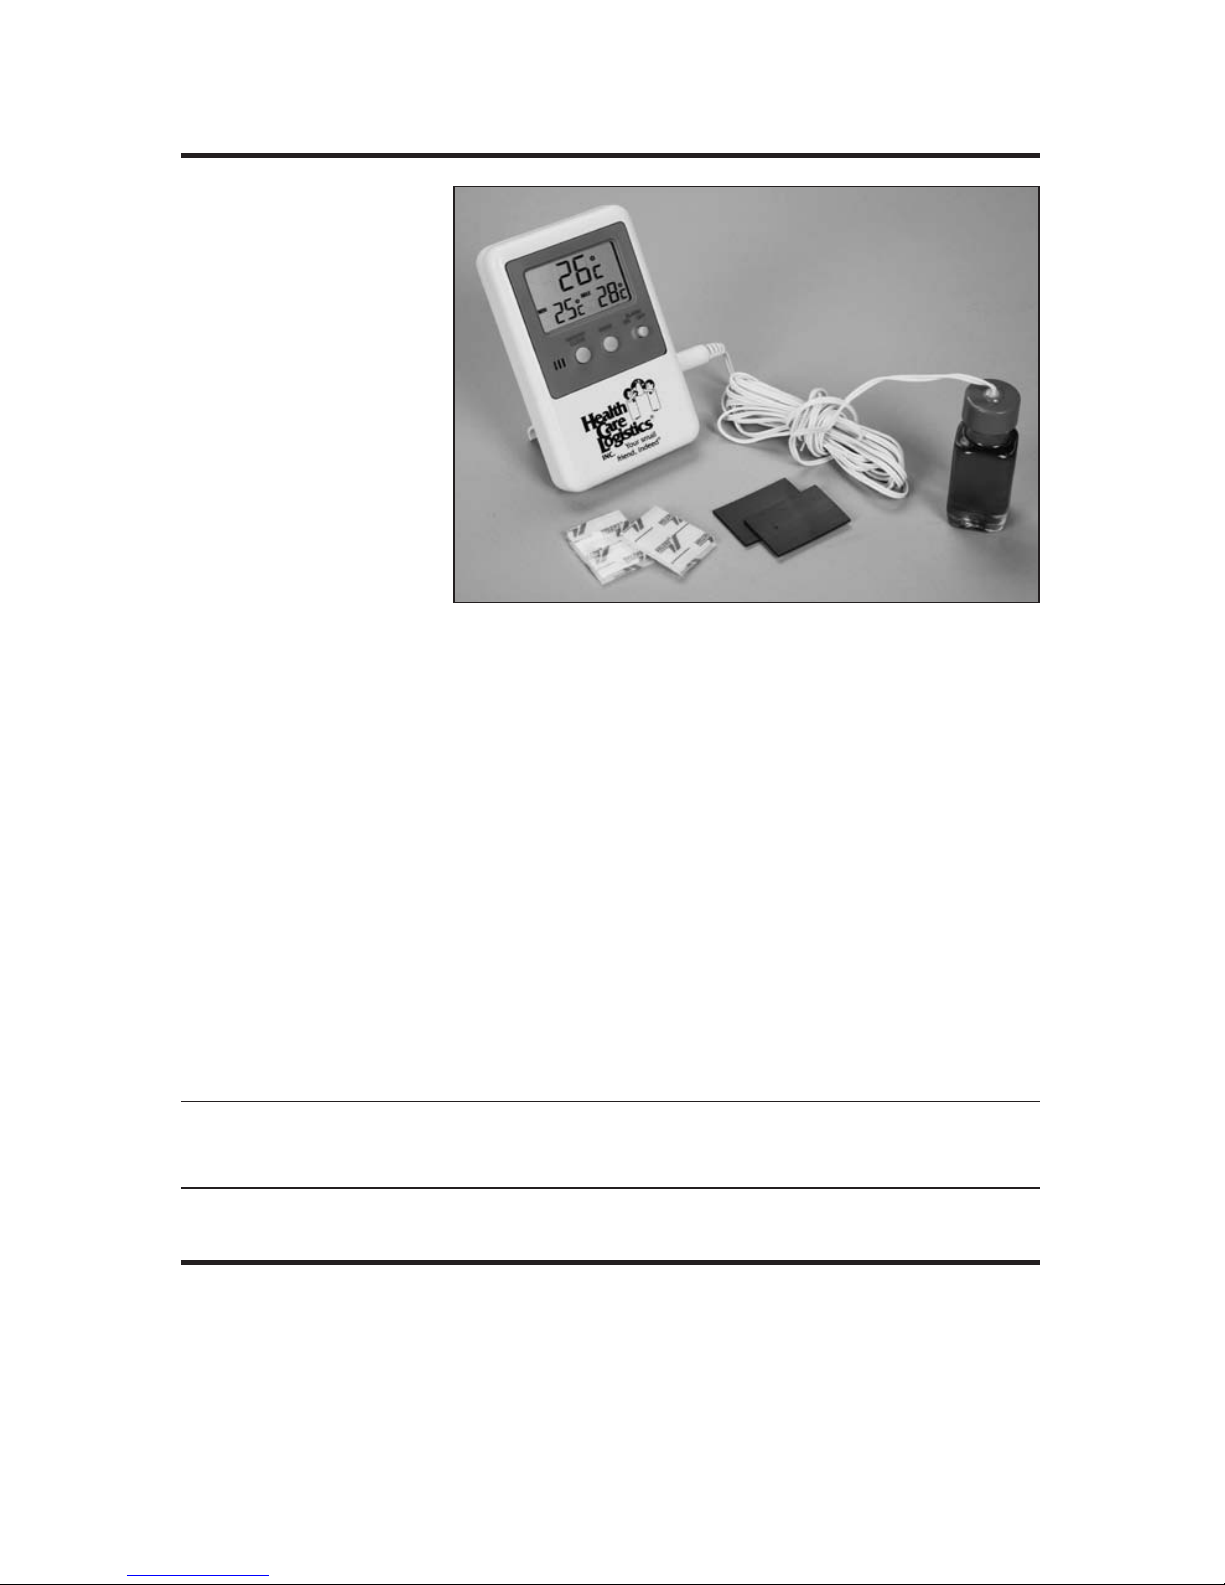
Thermometer with Alarm
ThePetiteFridge™
comeswithHCL’s
#10368Traceable
MemoryMonitor
Refrigerator
Thermometer,which
usesaprobesealed
inaminiature
bottlefilledwith
nontoxicglycol
solution.Thisglycol
solutionprovidesa
mediumthatallows
foraconsistent
measurementoftemperaturewhenusedinthisrefrigeratorand
doesn’tcausefluctuationswhenthedoorisopenedduringnormal
usage.Atripledisplaysimultaneouslyshowshigh,lowandcurrent
temperaturesoftheunit.
Thethermometerhasanalarmthatmaybesetinone-degree
increments.Analarmsoundswhenthetemperaturerisesaboveor
belowthesetpointsof36ºFto46ºFortheUSPStandardRangefor
ControlledColdTemperature.Itisimportanttoplacetheprobeinthe
refrigeratorsothatthewireexitstherefrigeratordoorinoneofthe
uppercornerstothedooradjacenttothetopoftheunit.Theunitcan
bemountedonthewallwithVelcro,duallockordouble-sidedtape.
Seenextpageforproperplacement&mountingofprobe.
Note: Operating instructions for the thermometer are included and can be found
on our website: www.healthcarelogistics.com
Locking Options
Theunitisavailableinthreevariations:Withoutalock(#18102),with
anelectronickeypadlock(#18103)andwithakeyedlock(#18104).
Theelectroniclockutilizesakeypadwithafour-digituser-defined
codeforentry.Thelockingmechanismincreasesthesecurityofdrugs
requiringcoldstorage.
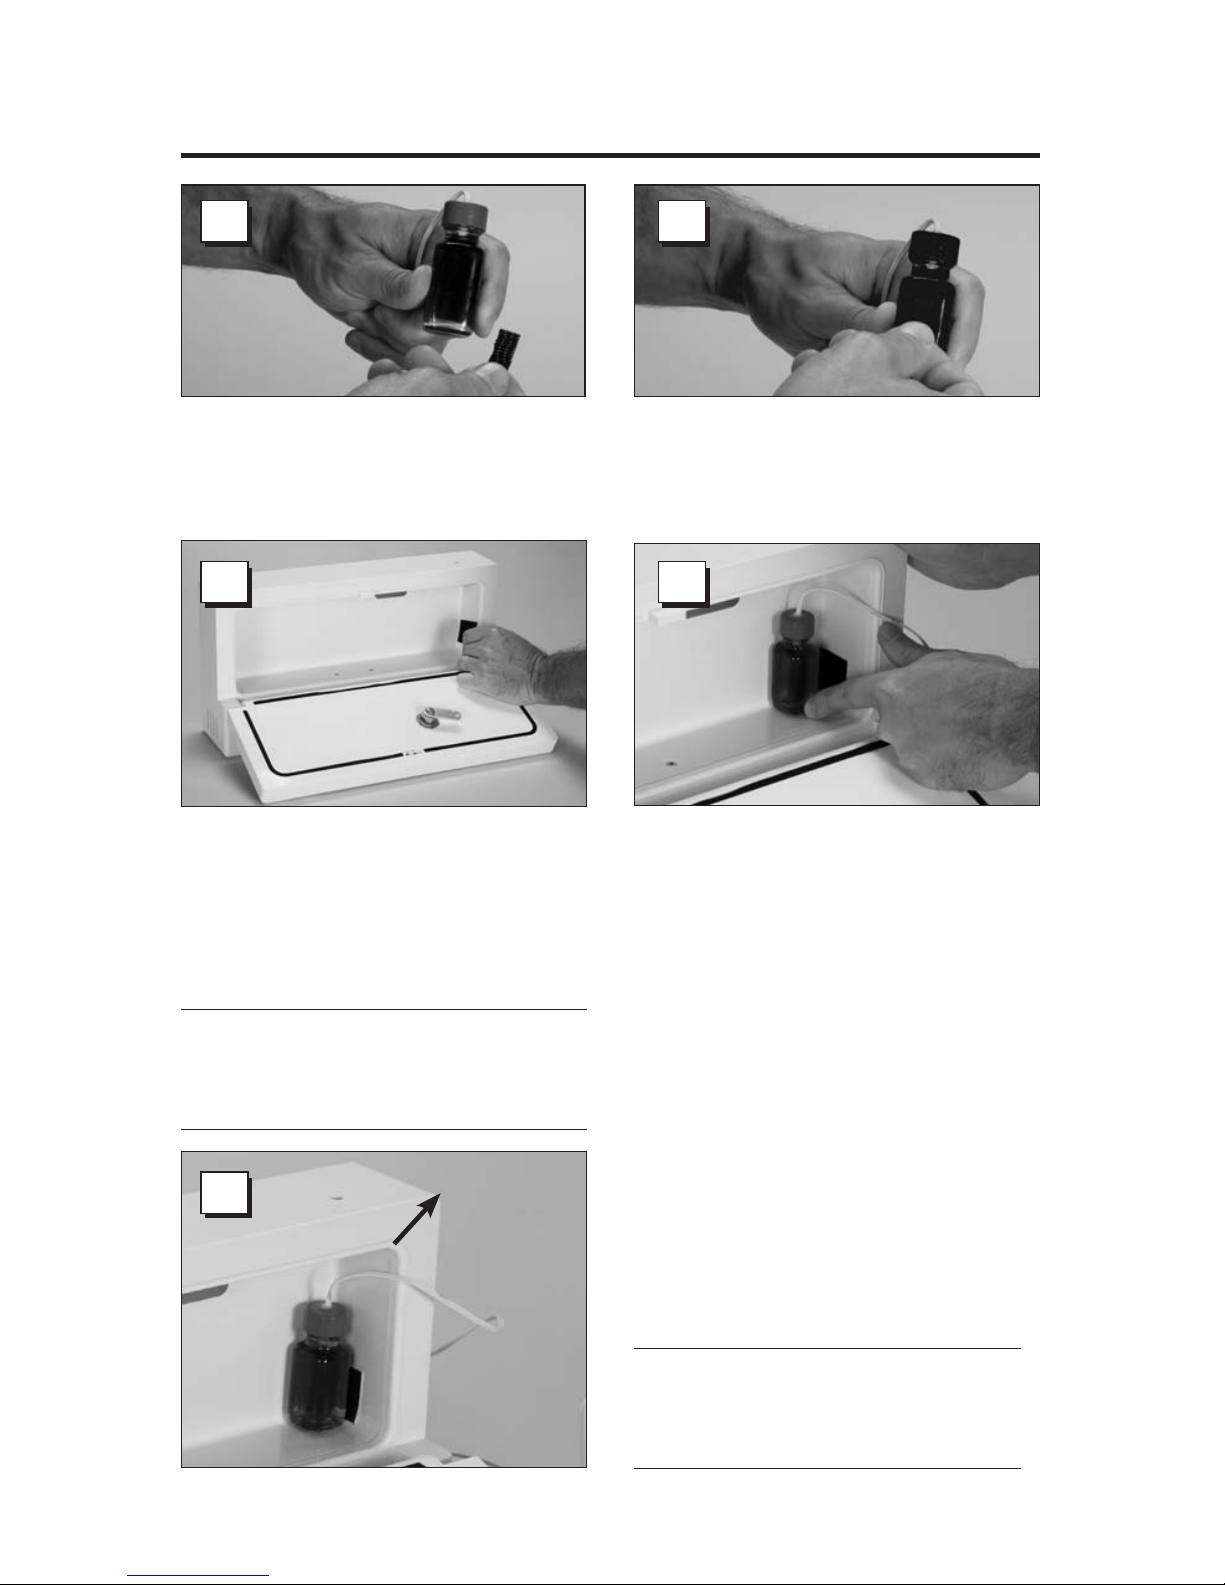
7
Step 2.Firmlypresstheduallock
ontothesideoftheprobe.
2
3 4
5
Step 3.Peeltheprotective
backingfromtheotherpieceof
duallock.Placeitontheside
wallofyourPetiteFridgetoward
thebottomandbackaspictured.
Step 4.Positiontheprobebottle
againsttheduallocksothatit’s
touchingthebackandbottomof
therefrigerator.Pressthedual
locksideoftheprobeagainst
theduallockintherefrigerator.
Step 5.WhenclosingtheFridge
door,guidethewirefromthe
thermometeroutthe toponan
angle.Makesurethecordlays
flattominimizeairleak.
1
Step 1.Gatherprobe&onepiece
ofduallock.Peeltheprotective
backingfromtheduallock.
Note: This probe location in the
photos above will be the same for wall
mount or surface mount.
Proper Placement & Mounting of Probe
Note: For the most accurate
reading, probe must make contact on
three sides with the refrigerator.

8
Description of Product
ThePetiteFridge™employsacompactdesign.Itwasdevelopedto
provideaconvenientandaffordablewaytokeepmedicinesthatneed
toberefrigeratedatUSPControlledColdTemperature.Itwasalso
designedtomeettheAmericanwithDisabilitiesActof1990(ADA)
Guidelinesforwallmountingofprotrudingobjectsinahealthfacility
specificallyinornearapatient’sroomwhereoverallsizeispara-
mount.
ThePetiteFridge™utilizesthermoelectrictechnologytoprotect
theintegrityofitscontents.Thermoelectriccoolingofferssuperior
performancein placeoflargerefrigerationunitsthatrequirea
compressorforoperation.
Theunitcanbeusedineitheradesktoporwallmountorientation.It
isvirtuallymaintenancefreeandrunsquietlybecauseithasonlyone
movingpart(anairintakefan).
ThePetiteFridge™worksthermostaticallytocontrolthetemperature
andwillcoolasmuchas35ºF(19.4ºC)belowroomtemperature.The
USPStandardRangeforControlledColdTemperatureisbetween
36ºFand46ºF.Theoptimumroomtemperaturerangeofoperation
isbetween69ºFand73ºF.Theinternalthermostatwillautomatically
activatetokeepthetemperaturewithinUSPlimitsatthelowendof
therange.Theusercannotchangeorselectthedesiredtemperature.
How the Unit Works
Theunitcoolsbysupplying12VofDCcurrentthroughamedium.
Thepositivesideofthemediumbecomeswarmwhilethenegative
sidebecomescold.Thecoldisthentransferredthroughoutthe
plasticinternalstoragespace.Ahard-wiredthermostat,located
onthebackoftheunit,controlsthetemperaturewithintheUSP
limits.Theairintakefan,onthebottomoftheunit,isusedtobring
roomtemperatureairintotheunittocooltheheatsinkwhichis
connectedtothepositivesideofthemedium.Thewarmexhaustair
exitsthroughtheventsonbothsidesoftheunit.Forthisreasonitis
importanttoallowplentyofroomfortheunittobreath,soastonot
torecirculatewarmairintotheairintake.

9
About Thermoelectric Cooling (How It Works)
ThermoelectrictechnologyusesaninstrumentcalledaPeltierdeviceor
athermoelectriccooler(TEC)tocreateaheatfluxbetweenthejunction
oftwodifferenttypesofmaterials.APeltiercoolerorthermoelectric
heatpumpisasolid-stateactiveheatpumpwhichtransfersheat
fromonesideofthedevicetotheothersideagainstthetemperature
gradientwithconsumptionofelectricalenergy.Assuch,thePeltier
deviceasemployedinthisPetiteFridge™isusedforcooling.
Perhapsyou’vealreadycomeacrossthistechnologyifyouarea
camper,astheColeman®companysellssuchadevicethatyoucan
plugintoacigarettelighterinyourvehicle.Suchunitsareactuallyset
uptobothheatandcool.
HealthCareLogisticsincorporatedthisthermoelectrictechnology
intothePetiteFridge™whichincorporatesaspecialpresetinternal
solid-statetemperatureswitchsetat37.4ºF(3ºC).Thissolid-state
temperatureswitchworksthermostaticallytomaintaintheoptimum
temperaturerangeasprescribedbytheUSPStandardforControlled
ColdTemperatureof36ºFto46ºF.Theusercannotchangeorselect
thedesiredtemperature.
Insteadofpluggingtheunitintoyourvehicle,HCLbuilttheunitto
utilizeaUL-approvedMedicalGradepowersupplythatconnectsto
a wallsocket.Theunithasonlyonemovingpartwithatrouble-free
lifeexpectancyofupto60,000workinghours,orover61⁄2yearsof
continuousoperation.
ThermoelectrictechnologyisusedbyHCLhere,becauseithasmany
advantagesoverrefrigerant-basedsystems.Itisofsolid-statedesign
withanintegratedpresetchip.Itemploysnohazardousgasesandis
virtuallysilentwhenrunning–nolouderthanacommoncomputer.
Itdoesn’tneedtoemployabulkycompressorunit,andassuch,
can beminiaturizedtofitdesktoporwallmountnurseservertype
applications.Also,withitslow-voltagedesign,ithastheadvantageof
reducedpowerconsumptionandenergysavings,andmakesapositive
contributiontogreenliving.
Note: Coleman®is a registered trademark of The Coleman Company, Inc.

10
Features
KeepsmedicationswithintheUSPStandardforControlledCold•
TemperatureUSP32–2009.
Canbeastand-alone(desktop)unitorattachedtoawallorsurface•
withawallmountbracket.HCLprovidesarangeofmounting
bracketstochoosefrom.
Compact,lightweightandperfectforpatientroomapplications.•
MeetstheAmericanwithDisabilitiesActof1990wallmount•
guidelinesof4"depth.
Solid-statedesign;integratedchipdesign;silentoperation;•
thermostaticallycontrolled.
Providesfor2-literstoragespaceor124.3cubicinches.•
OverallDimensions:15"Lx3• 13⁄16"Wx8"H(381mmx97mmx203mm)
Tips
Theunitisnotfrostfreeandwillcollectmoistureinside.Periodically
wipethebottomsurfaceoftheinsideoftheunitwithapapertowelto
absorbthemoisture.
Thermoelectriccoolingworksviathetransferofthermalenergyfrom
onesurfacetoanother.Makesurethatitemsarealwaysincontact
withthecoolingsurfaceoradjacentvials/bags,etc.–thekeyis
contact.Donotutilizeshelvesorracksthatsuspendtheproductin
theopenairinsideoftheunit.
Note: Make sure the glycol thermometer bottle is positioned in the corner per the
instruction sheet on page 7 to ensure accurate readings.
Makesurethedoorhingeareaiscleanandfreeofdebris.Large
debriscanobstructthehingeanddamagethedoor,orpreventthe
unitfromshuttingcompletely.
Makesuretheglycolthermometervialcordislayingflatandexiting
thetopcornerofthedoor.Itisimportanttominimizeanydoor
obstructiontoavoidexcesslossoftemperaturewithintheunit.See
page7.

11
Cleaning and Maintenance
Caution: Unplug refrigerator before cleaning and servicing.
Allsurfacesmaybecleanedinsideandoutwithaslightlydamp,1.
non-abrasivetowel.Donotover-saturate.Toweldryallwaterfrom
theinsideoftherefrigerator.Asimplepapertowelmaybeused.
Donotusesolvents,petroleumbasedcleanersordegreasersto2.
cleantheunit.
Dilutedbleach(sodiumhypochlorite)wipesorisopropylalcohol3.
maybeusedtosanitizetheunit.
Defrosting:Theunitisnotconsideredtobefrostfree.4.
Condensationcommonlyoccurswhenawatervaporreachesdew
point.Watervaporwillonlycondenseontoanothersurfacewhen
thetemperatureofthatsurfaceiscoolerthanthewatervapor.
Someexamplesmightincludevialsbeingremovedfromtheunit
andplacedinacontainer,whenthedoorisopenedandclosed
andthecontentsarecoolerthanthemoistairinsidetheunit,or
duringperiodsofhighhumiditywhenthereisadifferenceinvial
andairtemperature.Attimes,condensationmaybuilduponthe
contentsoftheunitwhichmayinturnbecomefrosted.Inthese
situations,theunitcanbeturnedoffandwipedout.Papertowels
canbeusedtowipeouttheunit.
Atleastonceayear,blowanylint/dustordirtfromtheairintake,5.
outflowventsandoutsidetheheatsinkwithcannedcompressed
air.Useshortburstsofair4"fromtheunit.Lintontheseparts
willreducethecoolingabilityoftherefrigerator.Powershouldbe
turnedoffduringventcleaning.Ventcleaningisrecommended
bi-monthlywhentheunitisusedcontinuously.

12
Troubleshooting
Problem Possible Causes What To Do
Unitnot
operatingor
cooling
Plugnotconnectedtounit
Unitnotpluggedintowall
Connectpowertounit
Plugunitintowalloutlet
Unitnotcooling
whenplugis
connected
Dust/debrisinventholes Cleanareabehindvents
Usecompressedair<5psi
Doorwillnot
shut
Checkhingefordebris Wipe/Cleanhingearea
Product Specifications
Capacity
Internalvolume=2litersor124.3cubicinches.
Dimensions & Weight
InsideDimensions:13"(L)x41⁄4"(H)x21⁄4"(W)
OutsideDimensions:15"(L)x8"(H)x313⁄16"(W)
ShippingDimensions:161⁄2"(L)x91⁄2"(H)x51⁄2"(W)
EmptyWeight:4lbs
ShippingWeight:6lbs
Power Supply/Requirements
Unitoperateson12VDC.Unitissuppliedwitha100-240VACadapter
forwallsockets.Theunitconsumes4.5ampsof12VDCpower.
Power Cord
TheMPU60BseriesofAC/DCswitchingmodepowersuppliesprovide
63Wattsofcontinuousoutputpower.AllsuppliesareUL94V-1min
compliantandincludeIEC-320-C14inputforworldwideapplications.
Theyareideallysuitedforuseinhospitalinstrumentsandmany
otherapplications.AllmodelsmeetFCCPart-18classBandCISPR-
11EN55011classBemissionlimitsandaredesignedtocomply
withUL/c-UL(UL60601-1),TUV/T-mark(EN60601-1),andnewCE
requirements.Powersupplycomeswith10'ofcord.

13
Cooling Performance
Theunithasapresetinternalsolid-statetemperatureswitchset
at37.4ºF(3ºC).Thesolid-statetemperatureswitchhasavariance
of+/-1.8°F(1ºC).Itcoolsfrom25ºFto35ºFbelowtheaverage
surroundingtemperature.Anemptyrefrigeratorreachesminimum
temperatureinapproximately3hours.Theusercannotchangeor
selectthedesiredtemperature.
Thermostat Control
ChipinunitautomaticallycyclesOn/OfftomaintainUSPTemperature
RangeforControlledColdTemperature.Theusercannotchangeor
selectthedesiredtemperature.
Material Composition
ABSplastichousingwithpolystyreneinsulationmaterial
Insulation
CFC-Free
Heat Dissipation
Built-infan(longlastingbrushlessmotor)
Electrical Equipment
Medicalgrade3prongUL60601-1powercord,fanmotor,high
temperaturecutoutswitch,thermoelectriccooling(Peltierelement).
14
Note: Universal Locking mounts can be used for mounting the petite fridge to the
wall or a surface such as a countertop.
Allofthepetitefridgemountshavedetailedinstructionsthatcanbe
foundonourwebsiteatwww.HealthCareLogistics.com
Accessories / Replacement Parts
A. 18102 Petite Fridge (no lock)
B. 18103 Petite Fridge with Keyless
Entry Digital Lock
C. 18104 Petite Fridge with Key Lock
D. 18105 Universal Locking Mount
for Petite Fridge™ with
Keyless Entry Digital Lock
E. 18106 Universal Locking Mount
for Petite Fridge™
with Key Lock
F. 17840 Wall Mount System for
Petite Fridge
D
E
F
A
BC

15
HCL’s Hassle-Free Return Policy
HealthCareLogistics’HassleFreeReturnPolicywarrantsits
thermoelectricmedicationrefrigeratorandpoweradaptertobefree
fromdefectsinmaterialsandworkmanshipundernormalconsumer
usage.Thispolicyisyourexclusiveremedy,andappliestothePetite
Fridge™andallaccessoriespurchased.
Wetrustthatyouwillnotabuse,misuse,alter,modifyortamperwith
theunitandyouwillassurethatitisusedasdescribedasitsnormal
usageinthisuser’smanual.
Notethatdefectsordamagecanresultfrom:(a)improperoperation,
storage,misuseorabuse,accidentorneglect,suchasphysical
damage(cracks,scratches,etc.)tothesurfaceoftheproductresulting
frommisuse;(b)contactwithharshchemicalsorsubmersioninwater
orexposuretotheelementsorextremeheat;(c)useofnon-approved
accessoriesorsubjectingtheproductoraccessorytoabnormalusage
orconditions;(d)connectingthe100-240VACpoweradaptertoa
powersourceotherthanthatwhichcomesstandardwiththisunit.
Copyright:ThePetiteFridge™logoandanyothertrademarksorservicemarksareownedby
HealthCareLogistics.Anyunauthorizeduseofthetrademarkorservicemarkisprohibited.
Nolicensesorrighttousearegrantedbyimplicationestoppelsorotherwiseinrespectofany
copyrights,patents,trademarks,servicesmarksinrelationtothisproduct.

Call Free 1.800.848.1633 or 1.888.HCL-INTL Fax Free 1.800.447.2923
Website: www.HealthCareLogistics.com • Email: [email protected]
Call Free 1.800.848.1633 • Fax Free 1.800.447.2923
Web: www.HealthCareLogistics.com • Email: [email protected]
© Health Care Logistics, Inc. 2011
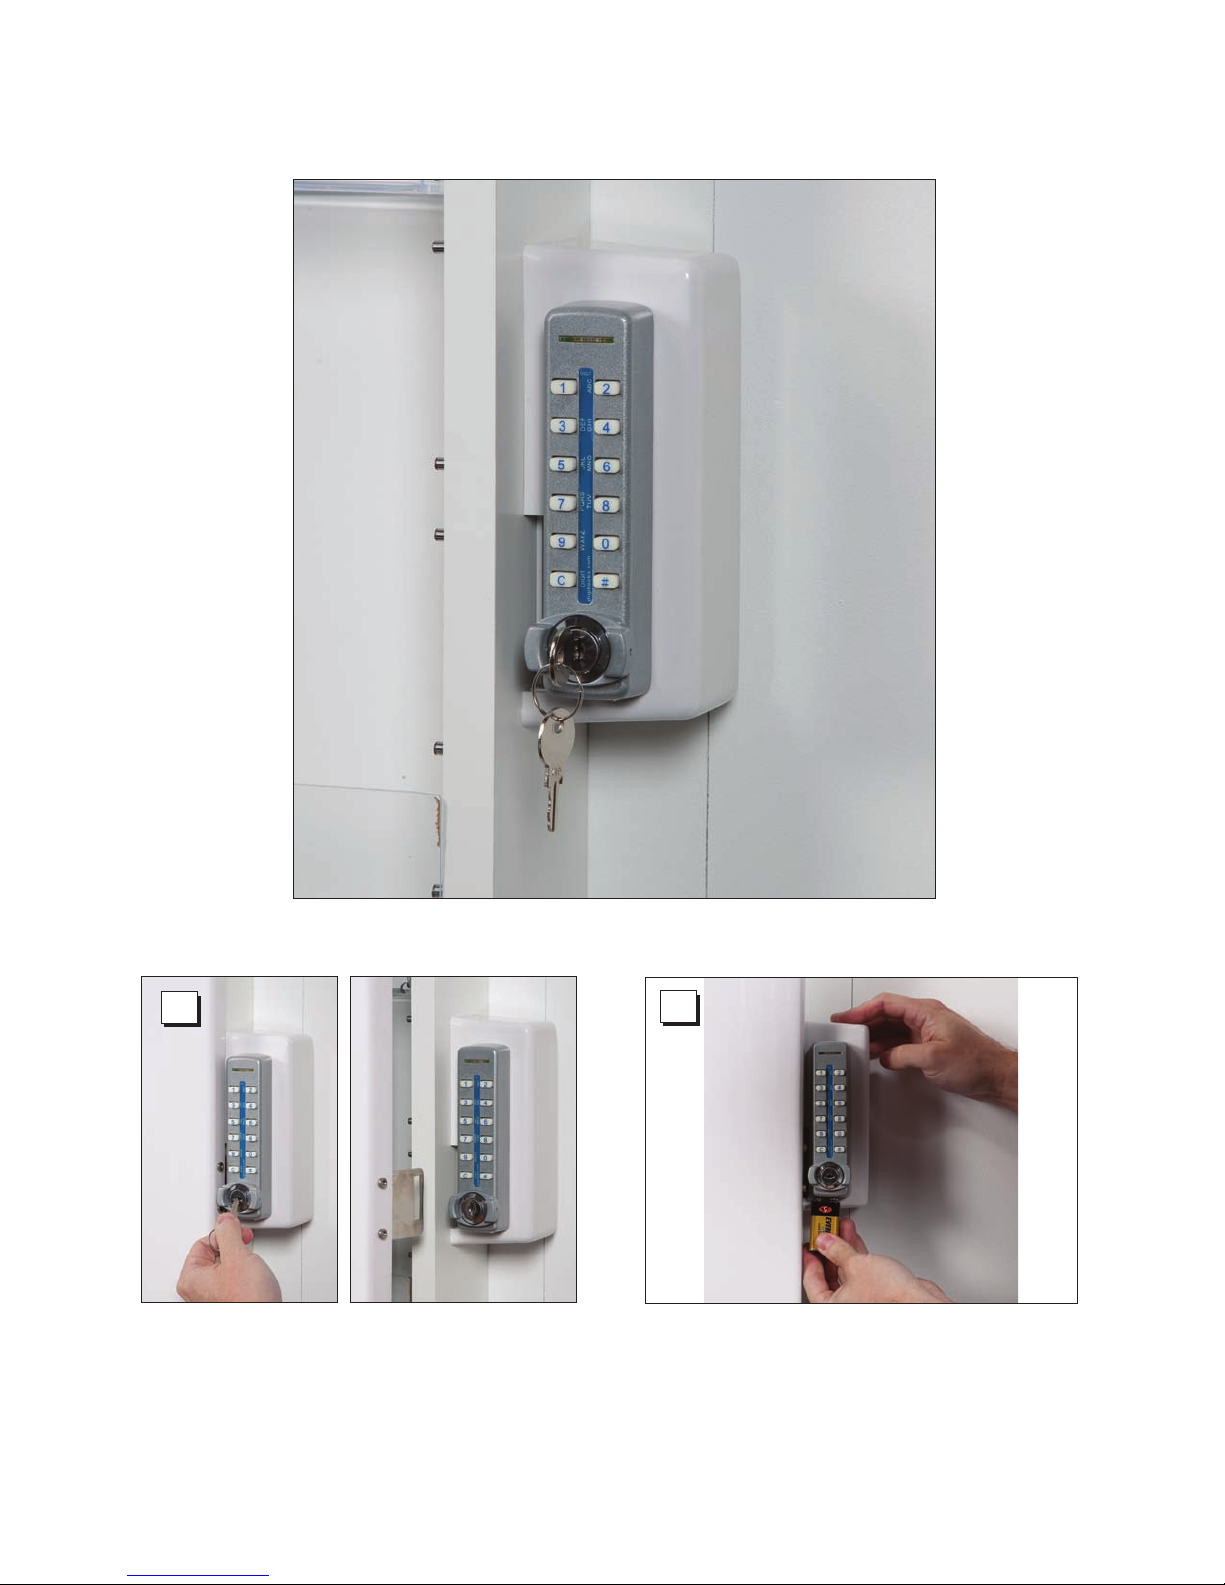
INSTRUCTIONS FOR
Battery Replacement on the Digit Lock
1
Step 1. Place the key in the lock and open the door.
2
Step 2. If the key is not available, a 9V battery can be
placed on the terminals on the underside of the lock.
This manual suits for next models
1
Table of contents


