HealthCare Information BedMate II User manual

13.3” LOW VOLTAGE
BedMate II DTV
Operations Manual
MODEL# BM13II
REVISION 2.0
TM


----------------------------------------------------------------------------------BedMate II OPERATIONS MANUAL
HealthCare Information, LLC 3
TABLE OF CONTENTS
SAFETY INSTRUCTIONS 4-6
PACKAGE CONTENTS 7
PRODUCT INTRODUCTION 8-9
IR Remote Control 8
I/O Panels 9
Keypad 9
INSTALLATION 10-12
BASIC CONNECTIONS 13
PC 13
Pillow Speaker/Sip & Puff 13
USB Port 13
RJ-12 Serial Port 13
Digital Media 13
Cable 13
Earphone/Headphone 13
SETUP AND OPERATION 14
Remote Batteries 14
Function Codes 14
Auto Scan 14
Date & Time 14
ADVANCED SETUP 15-26
Picture 15-16
Picture Settings 15
Picture Mode 15
Brightness 15
Contrast 15
Color 15
Tint 15
Sharpness 15
Screen Settings 15
Screen Size 15
Auto Wide 15
Horz/Vert Position 15
PC Settings 16
Auto Adjust 16
Horz/Vert Position 16
Clock 16
Phase 16
Color Temperature 16
Back Light 16
Advanced 16
SABC 16
Film Mode 16
Noise Reduction 16
MPEG 16
Sound 16, 17
Sound Settings 16
Sound Mode 16
Base 17
Treble 17
Balance 17
Surround Mode 17
Analog Sound 17
Digital Sound 17
Other Settings 17
AVL 17
Speaker 17
Digital Audio Output 17
Buzzer Mode 17
Equalizer 17
Channel 18, 19
Channel Settings 18
Channel Number 18
Channel Label 18
Education 18
Bank Select 18
Bank Control 18, 19
Advanced Setting 19
Channel Number 19
In Channel List 19
Virtual CH No. 19
Real Channel Display 19
Source Bank 19
Blue Back 19
Signal Type 19
Auto Channel Search 19
Channel Roll 19
Power Roll 19
Parental Control 20, 21
Password 20
VCHIP 20
US V-VHIP 20
Movie Rating 20
TV Rating 20
Canada V-CHIP 20
English 20
French 20
Block Unrated Shows 21
Change Password 21
Setup 21-26
Closed Caption 22
Panel Caption Control 21
IR/PS Caption Control 21, 22
Digital Caption Type 22
Digital CC Preset 22
Digital CC Style 22
Menu Language 23
Power On Setting 23
OSD Time 23
Timer 23
Clock Setting 23
Sleep Timer 23
Timer Enable 23
Operation On Time 23
Operation Off Time 23
Power On Setup 23-25
Input Source 23
Ch No On 24
Volume On 24
IR Band 24
Power On Mode 24
LED Control 24
KeyPad Lock 24
Pillow Speaker 24
TV Max Volume 25
PS Max Volume 25
Spk Mode 25
Input Auto Detect 25
Serial control 25
OP Password 25
Bank Switch Password 25
Media Settings 25, 26
Photo Settings 25
Slide Show Interval 25
Slideshow Effect 25
Slideshow Repeat 25
Music Settings 25. 26
Music Play Mode 25
Music Play Repeat 26
Music information 26
Music Auto Play 26
Information 26
Others 26
No Signal Power Off 26
Keypad Definition 26
USB Clone 26
All Reset 26
PILLOW SPEAKER OPERATION 27
IR BANDS 27
FUNCTIONS 28
ALARMS 28
MENU TREE 29, 30
PARENTAL CONTROL 31, 32
KEY DEFINE 33
VIRTUAL CHANNELS 34
BANKS 35
SPECIFICATIONS 36-38
WARRANTY 39

----------------------------------------------------------------------------------BedMate II OPERATIONS MANUAL
HealthCare Information, LLC 4
WARNING
To reduce the risk of fire or electric shock, do not expose this apparatus to rain or moisture and this apparatus shall not be exposed to dripping or splashing and
no objects filled with liquids, such as vases, shall be placed on the apparatus.
Do not use this LCD TV Monitor near water. For example: avoid placing it near a bathtub, washbowl, kitchen sink, or laundry tub, in a wet basement, or near a
swimming pool, etc.
This apparatus shall be connected to a mains socket outlet with a protective earthing connection.
The mains plug of this apparatus must remain readily operable.
Advertisement:
Pour réduire le risque du feu ou de décharge électrique, n’exposez pas cet appareil à la pluie ou à l’humidité. L’appareil ne sera pas exposé à l’égoutture ou
l’éclaboussement et aucun objet remplis de liquides, tels que des vases, ne seront placés sur l’appareil.
NOTE TO CABLE TV INSTALLER
This reminder is provided to call the cable TV installer’s attention to Article 820-40 of the National Electric Code (U.S.A.). This code provides guidelines for
proper grounding and, in particular, specifies that the cable ground shall be connected to the grounding system of the building as close to the point of the cable
entry as practical.
REGULATORY INFORMATION
This equipment generates, uses and can radiate radio frequency energy, and if not installed in accordance with this instruction manual, may cause harmful
interference to radio communications. However, there is no guarantee that interference will not occur in a particular installation. If this equipment does cause
harmful interference to radio or television reception, which can be determined by turning the equipment off and on, the user is encouraged to try to correct the
interference by one or more of the follow measures:
1. Increase the separation between the equipment and receiver.
2. Consult the dealer or an experienced radio/TV technician for help.
CAUTION
Do not attempt to modify this product in any way without written authorization from HealthCare Information, LLC. Unauthorized modification will void the
warranty of the product.
CAUTION
Danger of explosion if battery is incorrectly replaced. Replace only with the same or equivalent type.

----------------------------------------------------------------------------------BedMate II OPERATIONS MANUAL
HealthCare Information, LLC 5
CAUTION
Danger of explosion if battery is incorrectly replaced. Replace only with the same or equivalent type.
CAUTION
Use only the following UL Listed arms with the BedMate II Model numbers BM13II.
Model Arm X
CAUTION
Use only the following UL Listed power supplies with the BedMate II Model number BM13II.
PS10, PSI, WM-PSI-LB-ER, WM-PSI-LB, WM-PSI-SB, PSI 120/24, WM-PS-LB120/24E, WM-PS-LB120/24E, WM-PS-SB120/24E, WM-PS-SB120/24I
COMPLIANCE
The party responsible for this product’s compliance is:
HealthCare Information, LLC, 113 Commerce Blvd., Loveland, OH 45140, USA. Phone 513-271-8100

----------------------------------------------------------------------------------BedMate II OPERATIONS MANUAL
HealthCare Information, LLC 6
IMPORTANT SAFETY INSTRUCTIONS
1) Read these instructions.
2) Keep these instructions.
3) Heed all warnings.
4) Follow all instructions.
5) Do not use this apparatus near water.
6) Clean only with dry cloth.
7) Do not block any ventilation openings. Install in accordance with the manufacturer’s instructions.
8) Do not install near any heat source such as radiators, heat registers, stoves, or other apparatus (including amplifiers)
that produces heat.
9) Do not defeat the safety purpose of the polarized or grounding type plug. A polarized plug has two blades with one
wider than the other. A grounding type plug has two blades and a third grounding prong. The wide blade or third
prong is provided for your safety. If the provided plug does not fit into your outlet, consult an electrician for
replacement of the obsolete outlet.
10) Protect the power cord from being walked on or pinched particularly at plugs, convenience
receptacles, and the point where they exit from the apparatus.
11) Only use attachments/accessories specified by the manufacturer.
12) Use only with the cart, stand, tripod, bracket, or table specified by the manufacturer, or sold
with the apparatus. When a cart is used, use caution when moving the cart/apparatus
combination to avoid injury from tip-over.
13) Unplug this apparatus during lightning storms or when unused for long periods of time.
14) Refer all servicing to qualified service personnel. Servicing is required when the
apparatus has been damaged in any way, such as power-supply cord or plug is
damaged, liquid has been spilled or objects have fallen into the apparatus, the
apparatus has been exposed to rain or moisture, does not operate normally, or has
been dropped.
---------------------------------------------------------------------------------------------------------------------------------
IMPORTANT SAFEGUARDS FOR YOU AND YOUR NEW PRODUCT
YOUR NEW PRODUCT HAS BEEN MANUFACTURED AND TESTED WITH YOUR SAFETY IN MIND. HOWEVER,
IMPROPER USE CAN RESULT IN POTENTIAL ELECTRICAL SHOCK OR FIRE HAZARDS. TO AVOID DEFEATING
THE SAFEGUARDS THAT HAVE BEEN BUILT INTO YOUR NEW PRODUCT, PLEASE READ AND OBSERVE THE
FOLLOWING SAFETY POINTS WHEN INSTALLING AND USING YOUR NEW PRODUCT, AND SAVE THEM FOR
FUTURE REFERENCE. OBSERVING THE SIMPLE PRECAUTIONS DISCUSSED IN THE MANUAL CAN HELP YOU
GET MANY YEARS OF ENJOYMENT AND SAFE OPERATION THAT ARE BUILT INTO YOUR NEW PRODUCT.

----------------------------------------------------------------------------------BedMate II OPERATIONS MANUAL
HealthCare Information, LLC 7
PACKAGE CONTENTS
After opening, carefully check the package contents:
13.3” BedMate II Low Voltage LCD-TV
IR Remotes are shipped per order.
Manuals are shipped per order*
*The latest version of this manual can be downloaded from www.hci-tv.com
----------------------------------------------------------------------------------BedMate II OPERATIONS MANUAL
HealthCare Information, LLC 8
PRODUCT INTRODUCTION
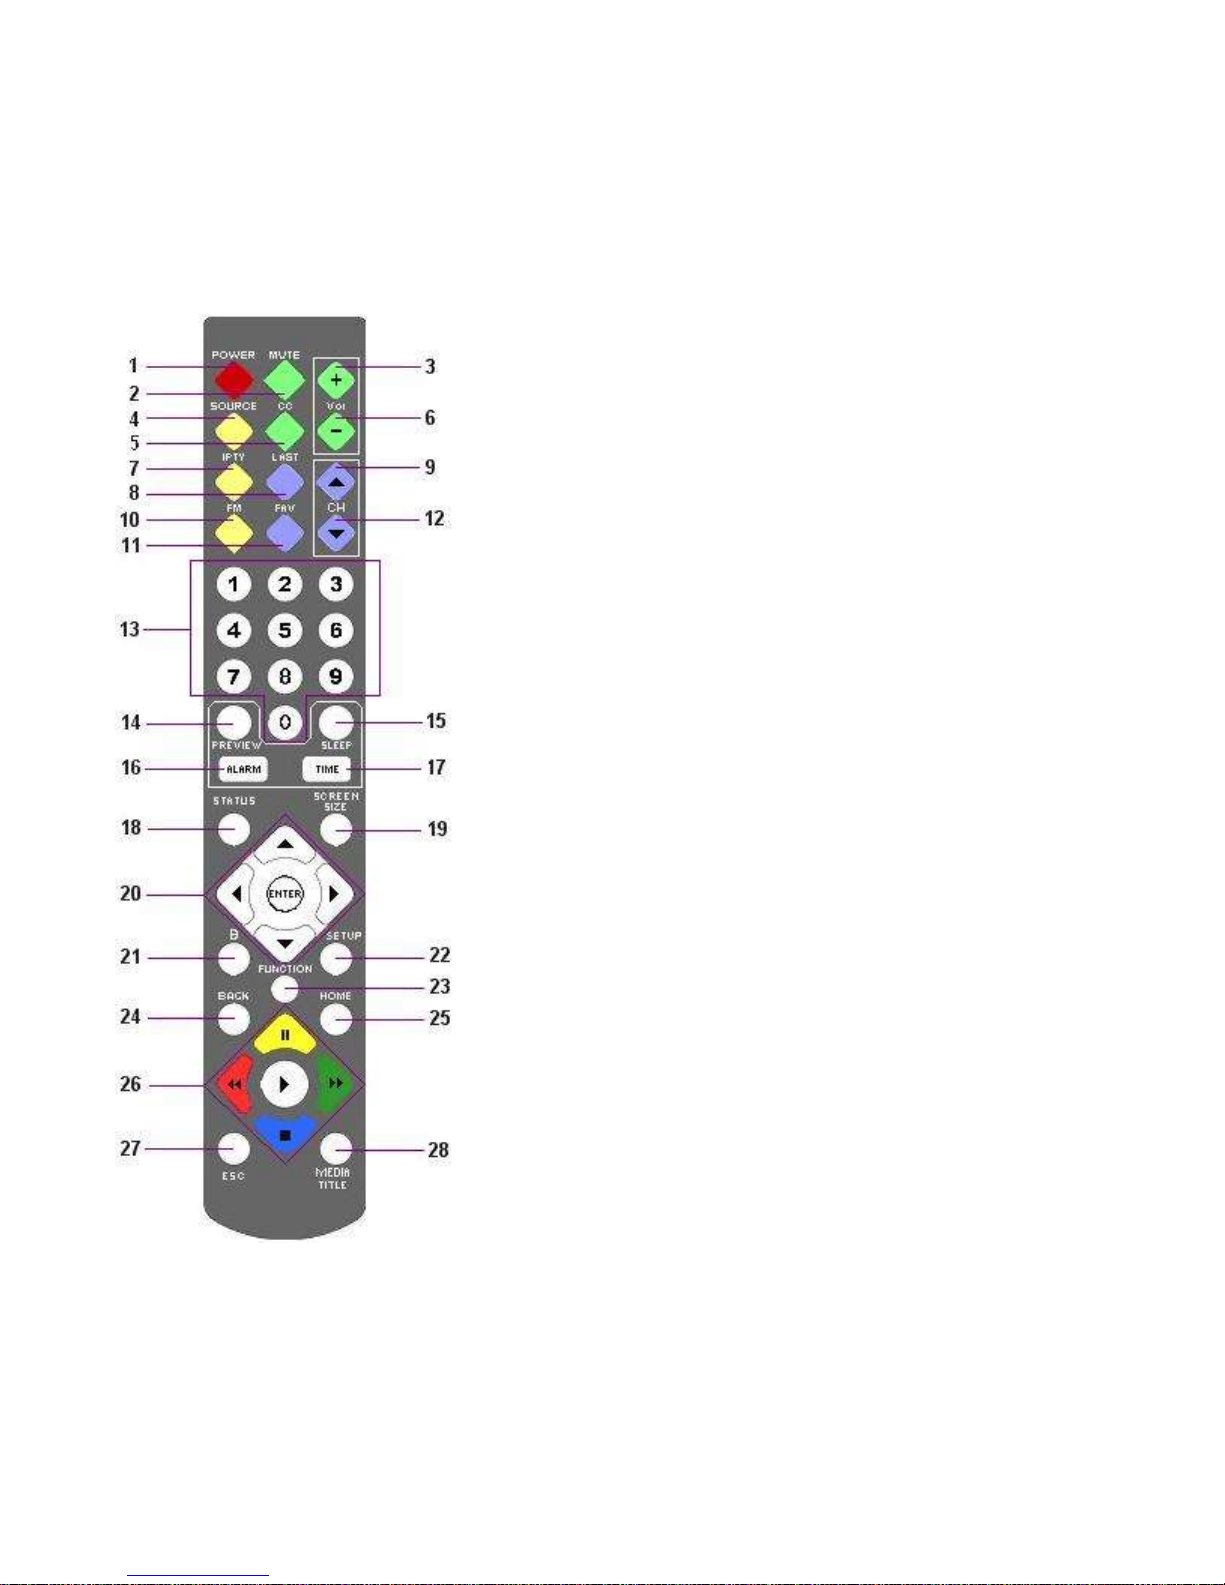
IR Remote Control
1. POWER TURNS SET ON AND OFF
2. MUTE TURNS SOUND ON AND OFF
3. VOLUME UP INCREASES SOUND LEVEL
4. SOURCE SELECTS INPUT SOURCE
5. CC TURNS CLOSED CAPTIONS ON AND OFF
6. VOLUME DOWN DECREASES SOUND LEVEL
7. IPTV NO FUNCTION
8. LAST CHANGES TO LAST CHANNEL OR SOURCE
9. CHANNEL UP CHANGES CHANNEL TO THE NEXT
HIGHER PROGRAMMED CHANNEL
10. FM SELECTS FM MODE
11. FAVORITES FAVORITES FUNCTION
12. CHANNEL DOWN CHANGES CHANNEL TO THE NEXT
LOWER PROGRAMMED CHANNEL
13. NUMBER BUTTONS DIRECT ACCESS TO CHANNELS
14. PREVIEW ENTERS PREVIEW MODE (PIP)
15. SLEEP SETS SLEEP TIMER
16. ALARM SETS ALARM(S)
17. TIME DISPLAYS DATE AND TIME
18. STATUS DISPLAYS TV STATUS
19. SCREEN SIZE SETS SCREEN SIZE (ZOOM)
20. NAVIGATION USED TO NAVIGATE SETUP MENUS
21. BANK CHANGE BANKS
22. SETUP USED TO ENTER SETUP MENU
23. FUNCTION USED ENTER FUNCTION CODES
AND USER FUNCTIONS
24. BACK PREVIOUS MUNU
25. HOME NO FUNCTION
26. MEDIA CONTROL CONTROLS MEDIA PLAYBACK
27. ESC
28. MEDIA TITLE DISPLAYS INFORMATION ABOUT
CURRENT SELECTION
NOTE: All HCI BedMate and RoomMate sets use the same IR remote control.

----------------------------------------------------------------------------------BedMate II OPERATIONS MANUAL
HealthCare Information, LLC 9
PRODUCT INTRODUCTION
NOTE: The CC button may also be used to
control the Mute function. See page
21.
REAR I/O PANEL
RIGHT SIDE PANEL
FRONT PANEL

----------------------------------------------------------------------------------BedMate II OPERATIONS MANUAL
HealthCare Information, LLC 10

----------------------------------------------------------------------------------BedMate II OPERATIONS MANUAL
HealthCare Information, LLC 11
INSTALLATION
Before installing, carefully read the “Important Safeguards” section on pages 4 and 5. These mounting
instructions cover all HCI BedMate TVs. The number of cables may vary between models. RM13II sets
will typically have only a coax cable and optional RG-6 cable.
Install this TV only on an arm that has been properly mounted according to the arm and mount
manufacturer’s instructions. Make sure the arm is locked into its retracted position. If the arm cannot be
locked into its retracted position, raise the outer arm to its highest position to install the TV. Failure to
follow these steps could result in the arm raising quickly, possibly causing bodily injury.
1. Unpack the TV from its shipping box.
2. Remove the safety retainer nut and safety retainer from the stem at the top of the TV. NOTE:
You can not pass the safety retainer and nut over the cable connectors.
3. Remove the side panels from the nose of the arm. There are two screws holding each side panel
in place.
----------------------------------------------------------------------------------BedMate II OPERATIONS MANUAL
HealthCare Information, LLC 12
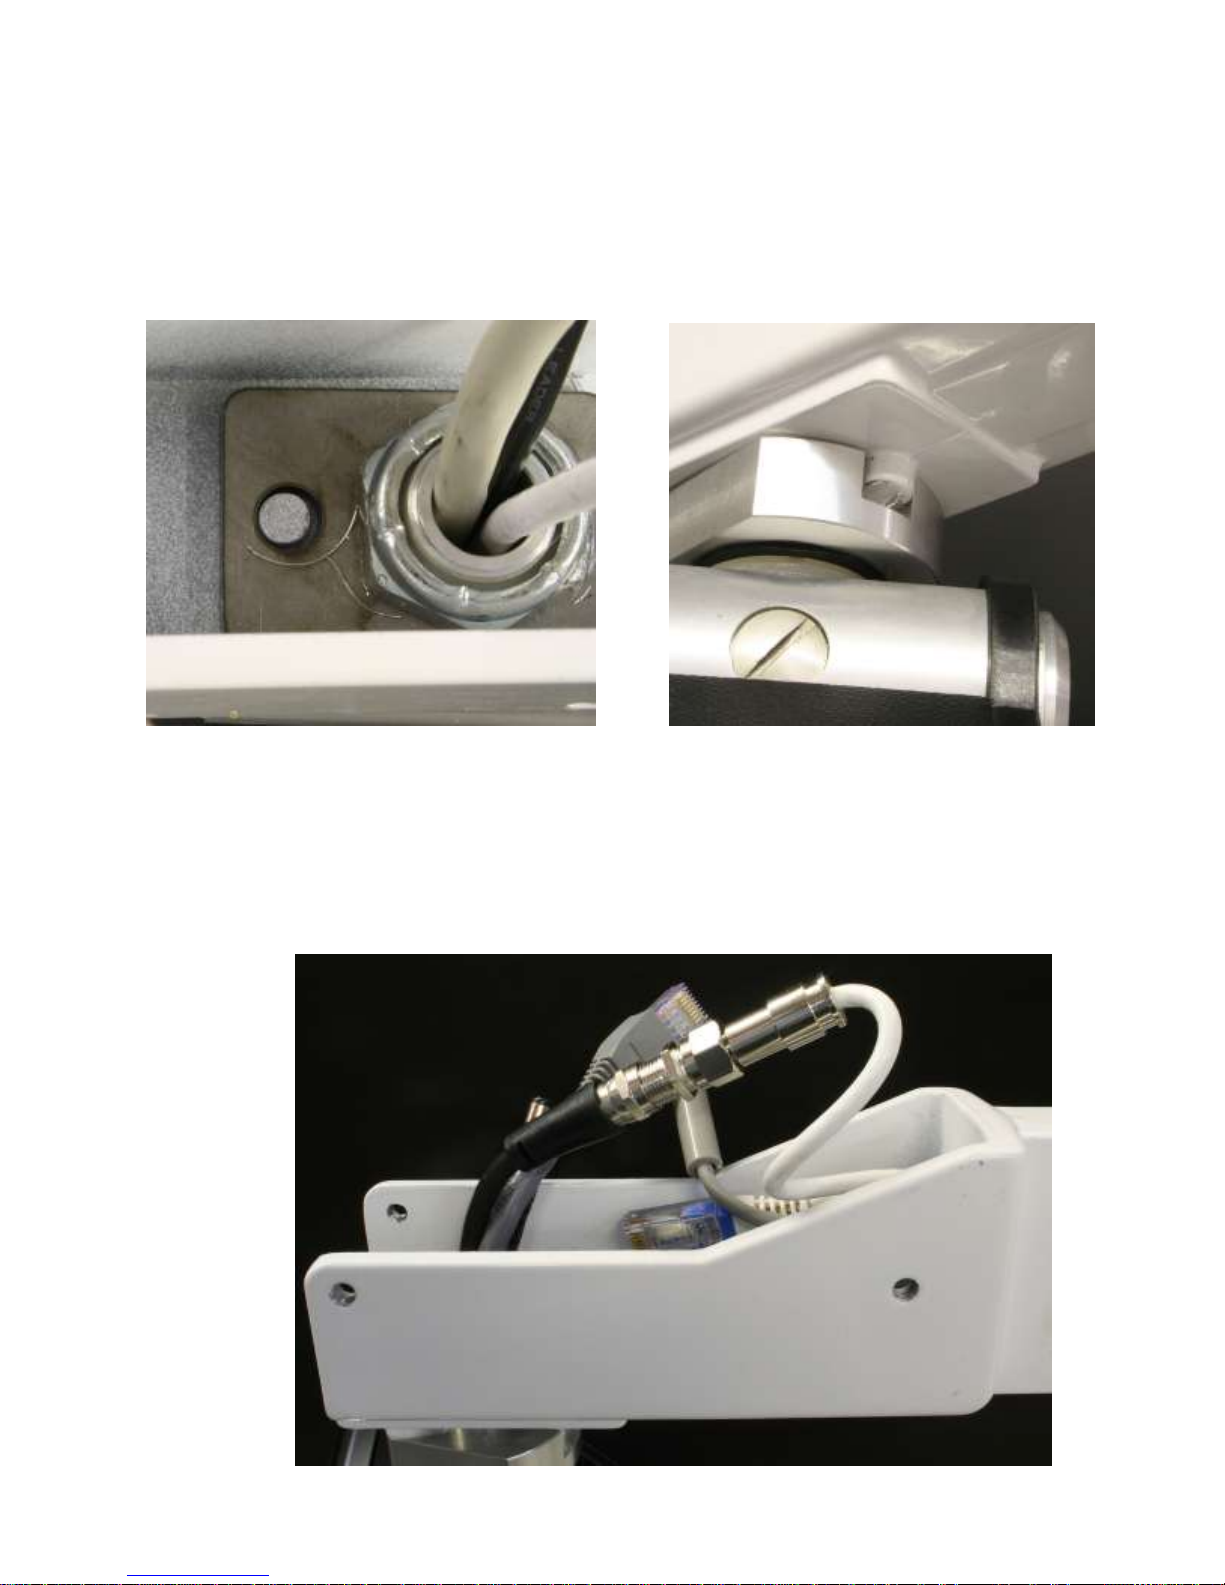
RETAINER PROPERLY INSTALLED
Slide the stem onto the nose of the arm. Make sure the notch on the stem just below the threads fits over
the rotational stop of the arm.
4. Place the retainer over the stem. Make sure the pin in the nose is in the small hole in the
retainer.
5. Thread the retainer nut onto the stem and tighten.
6. Connect the coax cable from the TV to the coax cable from the arm using the supplies coupler.
Slightly wrench tighten both coax connectors to the coupler just enough that you can not undo
the connection by hand. DO NOT OVER TIGHTEN. 1/16 TO 1/8 TURN PAST FINGER
TIGHT IS ENOUGH. The power cable and Cat5e cables are not used with the BedMate II
and do not need to be connected.
STEM PROBERLY INSTALLED ON
BOTTOM OF NOSE

----------------------------------------------------------------------------------BedMate II OPERATIONS MANUAL
HealthCare Information, LLC 13
7. If present connect the CAT5 and power cables. (BedMate III only)
8. Arrange the cable(s) into the nose.
9. Reinstall the Nose covers.
10. Plug in the power supply and proceed to setup.

----------------------------------------------------------------------------------BedMate II OPERATIONS MANUAL
HealthCare Information, LLC 14
BASIC CONNECTIONS
PC (to use TV as a monitor)
Use a male to male VGA cable to connect a computer VGA output to the PC VGA input on the back of the set. Make sure the
computer resolution is set equal to or lower than 1280 x 800. A 1/8” (3.5MM) jack is located next to the VGA input for PC
AUDIO input.
Pillow Speakers/Sip-puff device
A ¼” jack is provided on rear jack panel of the set to connect a pillow speaker or sip and puff device. See page 24 and 27.
USB Port
A USB port is provided on the rear jack panel for software updates and cloning.
RJ-12 Serial Port
An RJ-12 port is provided to allow third party devices to control the set. This port is also used for some software updates.
Digital Media Playback
A USB port and SD card slot are located on the side of the set for digital media playback.
CABLE
A standard F connector is located on the rear jack panel of the set to connect a signal coax cable to. The set is also powered from
the coax. 24VDC or 28VAC must be provided on the coax to operate the set.
Earphone/Headphone
A 1/8” (3.5MM) stereo earphone jack is located on the front lower right side of the set.

----------------------------------------------------------------------------------BedMate II OPERATIONS MANUAL
HealthCare Information, LLC 15
SETUP AND OPERATION
Installing the IR Remote Control Batteries
1. Turn the IR Remote over. Press down on the arrow and slide the battery cover off the bottom.
2. Install the two included AAA batteries. The polarity is indicated on the bottom of the battery
compartment. Make sure the batteries are installed correctly.
3. Slide the battery cover back onto the remote and snap into place.
Function Codes
Setup features are accessed using function codes. You will need an IR remote control to enter function codes. To enter a function
code using an IR remote control, press the “FUNCTION” button followed by the “0” button. Set will display “ENTER
PASSWORD” then enter the function code. The following codes are available.
CODE FUNCTION
9999 ACCESS TV OR DVD SETUP MENU
10086 TURN TV ON DURING OFF HOURS
11111 DISPLAY SOFTWARE VERSION
13218 SHOW/HIDE DATE
14568 TEST MODE
15311 SET IR BAND TO BED ONE
15322 SET IR BAND TO BED TWO
15709 RESET
15428 SERVICE MODE
Note: If you change the IR band, your IR remote will no longer function until it is set to the same IR band as the TV. To
change the IR band of the remote, point the IR remote at the TV and press and hold the power button until the set turns
off.
Press the setup button on the IR remote after entering the “9999” code to access the TV / DVD setup menu.
Enter function code “15428” to keep the setup menu active until the TV is turned off. You can also set the OSD Time to always
to keep the menu active. See page 23. Once this code is entered you will not have to enter the “9999” code until the set is turned
off. Only one button analog or digital pillow speakers set for Zenith or Philips codes may be used.
NOTE: To select menu items press the “ENTER” button. Use the up/down arrow buttons to change menu section. Use the
left/right arrow buttons to change selected menu item.
Auto Scan
Access the setup menu. Select the “CHANNEL” menu. Select “Signal Type”. Set to “Air” if signal source is from an off air
antenna. Set to “Cable” if signal source is from a cable system. Select “Auto Channel Search”. Press the “ENTER” button. Set
will scan all for all analog/digital channels and add active channel to the channel list.
Setting Date and Time
Certain features such as the “ALARM” require the proper date and time to function properly. To set the date and time:
1. Access the “Setup Menu”. Select “SETUP”, “POWER ON SETTING”, “TIMER” then “Clock Setting”
2. Set “Time Zone” to match the time zone you are in.
3. Select “Daylight Saving Time”. Set to “On” if your area uses daylight savings time. Set to “Off” if your area does not
use daylight savings time. NOTE: Time is set in 24 hour format and displayed in 12 hour format.
4. Select “Setup Time” and press the “ENTER” button. Use the left/right, up/down or number buttons to set time. Press
the “ENTER” button when finished.
5. Select “Setup Date” and press the “ENTER” button. Use the left/right, up/down or number buttons to set time. Press the
“ENTER” button when finished. NOTE: The last digit is the day of the week. Monday is day one.

----------------------------------------------------------------------------------BedMate II OPERATIONS MANUAL
HealthCare Information, LLC 16
ADVANCED SETUP
Enter function code “9999” and press the “SETUP” button on the IR remote to enter the main setup menu. See pages 29 and 30
for a full menu tree. Use the navigation buttons to select and change menu items. Press the "BACK" button to go back one menu
level, press "ENTER" or "►" button to access the next menu level.
PICTURE
Picture Adjusts standard television video settings.
Settings Picture Mode Selects the picture mode. Each mode except user is a pre-defined setting for contrast,
brightness, color, tint and sharpness. Selections are:
Standard - Movie - User –Dynamic
Standard Default factory setting
Movie Setting for viewing movies.
User Uses user settings for contrast, brightness, tint and color mode.
Brightness Adjusts brightness
Contrast Adjusts contrast
Color Adjusts color level
Tint Adjusts tint
Sharpness Adjusts sharpness
Dynamic Setting for brighter picture and more vivid colors. Good for elderly
patients or patients with poor eye sight.
Screen Adjustments for size and position of picture on screen.
Settings Screen Size Adjusts how the picture fills the screen. Selections are:
Full –Normal –WaterGlass –Cinema
Full Picture is adjusted to fill the screen.
Normal Picture is displayed as it is received.
WaterGlass Picture is stretched to fit screen. Picture is not stretched in the middle and
stretches more towards the edges. This allows people to look more natural.
Cinema Adjusts the picture to fill the screen horizontally and vertically. The edges
of the picture may be cut off.
NOTE: If Auto Wide is turned on Screen Size can not be adjusted.
Auto Wide Automatically adjusts Screen Size. Press “ENTER” to turn on/off. Check mark is on.
Horizontal Adjusts the horizontal position of the picture.
Position
Vertical Adjusts the vertical position of the picture.
Position

----------------------------------------------------------------------------------BedMate II OPERATIONS MANUAL
HealthCare Information, LLC 17
PC Adjusts screen settings for using set as a computer monitor. Input must be set to VGA to adjust these
Settings settings.
Auto Adjust Automatically adjust screen size to match VGA input.
Horizontal Adjusts the horizontal position of the picture.
Position
Vertical Adjusts the vertical position of the picture.
Position
Clock Adjusts sync timing. Should be left at factory default.
Phase Adjusts VGA phase. Should be left a factory default.
Reset Resets PC SETTINGS to factory defaults.
Color Sets how colors are displayed. Set for best color reproduction. Selections are:
Temperature
Normal –Warm –Cool
Backlight Adjusts LCD back light level.
Advanced Adjusts advanced picture settings.
SABC Adjusts dynamic luminance. Set for best picture quality. Settings are:
Off –Low –Med - High
Film Mode Detects and adjusts for videos that have a 25Hz frame rate. Allows for
smoother play back of videos with a 25Hz frame rate.
On - Off
Noise Reduction Sets level of video noise reduction. Selections are:
OFF –Low –Medium –High
Use lowest setting possible. Setting to a level higher than needed may cause a reduction in picture
quality. Low works best for analog channels.
MPEG Noise Reduction Sets level of video noise reduction when playing an MPEG file.
Use lowest setting possible for all noise reduction settings. Setting to a level higher than needed may
cause a reduction in picture quality.
SOUND
Sound Basic sound adjustments
Settings Sound Mode Selects preset or User sound modes. Selections are:
Standard –Soft –User –Dynamic
Standard Factory default setting.
Soft Provides a softer sound.
User Uses user settings for Bass, Treble and Balance settings
Dynamic Provides a more bold sound

----------------------------------------------------------------------------------BedMate II OPERATIONS MANUAL
HealthCare Information, LLC 18
Bass Set bass level when Sound Mode is set to User.
Treble Sets treble level when Sound Mode is set to User.
Balance Sets left/right balance. Only effects head phones.
Note: Bass, Treble and Balance can only be adjusted if Sound Mode is set to User.
Surround Toggles surround sound on and off. Press “ENTER” to turn on or off.
Mode
Analog Selects analog sound mode. Selections are:
Sound
Stereo –Mono –SAP
Stereo Stereo sound.
Mono Mono Sound. Try this setting if sound quality is poor.
SAP Second Audio Program. Usually a second language. SAP is not broadcast by all stations and
my not be available for some programs.
Digital Selects audio language when receiving digital channels. Selections are:
Sound
English –French –Spanish
Note: Not all programs and stations will have multiple languages available. Selecting
French or Spanish will have no effect if they are not available.
Other Miscellaneous sound settings.
Settings
AVL Automatic Volume Level –Helps maintain a constant volume level when the program
volume level changes.
Speaker Turns front panel speaker on or off. Use left/right arrow buttons to change.
Digital Selects digital audio output format. Selections Are:
Audio
Output Off –PCM –Dolby Digital(AC3)
Off –No digital audio output.
PCM –Pulse-code Modulation
Dolby Digital –AC3 Dolby Surround Sound
Buzzer Turns keypad beep on or off. When on a beep is heard when a button is pressed. Use
Mode left/right arrow keys to turn on/off.
Equalizer Settings for graphic equalizer.
Mode Preset settings based on type of music or sound. Selections are:
OFF –ROCK –POP –JAZZ –USER
When set to USER the individual frequencies can be set. After selecting user press the down arrow
button and then use the Left/Right arrow buttons to select the frequency to be adjusted and the
up/down arrow buttons to adjust. To exit, press the right arrow button until Return is highlighted.

----------------------------------------------------------------------------------BedMate II OPERATIONS MANUAL
HealthCare Information, LLC 19
CHANNEL
Channel Add channel labels and Bank (tier) setup.
Setting
Channel Current channel being edited. Channel is displayed behind menu. Use left/right arrow keys
Number to change.
Channel Sets channel label. Use left/right arrow buttons to select character to edit. Green underscore
Label indicated character being edited. Use up/down arrow buttons to edit character. Press the
“ENTER” button when finished.
Education Sets this channel as an education channel. Education channels are selected using the “EDU”
or “FAV” buttons. Press the “ENTER” button to select or un-select.
NOTE: Each time the “EDU” or “FAV” button is pressed the TV will go to the next channel setup as
an Education Channel. When the last Education Channel is showing the next press of the
“EDU” or “FAV” button will go to the first channel setup and an Education Channel.
Bank Selects the current bank. Use the left/right arrow keys to change. Selections
Select are:
Bank 1 –Bank 2 –Bank 3 –Bank 4
NOTE: See page 25 about changing the Bank using the “B” button on the IR remote control.
Bank The TV has four banks (also know as tiers) to store active channel lists. When an auto scan
Control is performed, all channels found are set to active in all BANKs. The default bank is BANK1.
Using the bank edit function, the active channels can be enabled or disabled in each bank.
Banks can also be copied from one to another. All channels in a bank can also be completely
cleared or set. The last column is used to set the virtual channel number. See page 35 for
more information on Banks and page 34 for more information on virtual channels.
1. Use the left/right and up/down arrow buttons to select the bank and channel to edit.
2. Press the “ENTER” button to select or un-select an individual channel. Un-selected
channels will be skipped when its bank is selected.
Press the RED arrow button to select all channels in the current bank the cursor is
in.
Press the GREEN arrow button un-select all channels in the current bank the cursor
is in.
To copy one bank to another:
1. Move the cursor to the bank your wish to copy and press the “YELLOW”arrow
button.
2. Move the cursor to the bank you wish to copy to and press the “BLUE” arrow
button.
Press the “BACK” button to exit bank editing
A typical use for banks would be for a simple rental system. Bank 1 could have only free and patient
education channels active. Bank 2 could have free, basic and patient channels active. Bank 3 could
have free, basic, premium and patient channels active. Bank 4 could have only staff channels active.
In this way a single distribution system can deliver all channels to each TV, but only the active
channels in the selected bank can be viewed on the TV.
To set the Virtual Channel number:
1. Use the right arrow button to move the selection to the NUM column.
2. Use the Up/Down arrow buttons to select the channel to set.

----------------------------------------------------------------------------------BedMate II OPERATIONS MANUAL
HealthCare Information, LLC 20
3. Press the “ENTER” button.
4. Enter the Virtual Channel number using the keypad then press enter.
5. To clear a Virtual Channel number select the Virtual Channel in the NUM column
and press the ENTER button twice.
NOTE: Each time you enter a Virtual Channel number the TV does a check to make sure the Virtual
Channel number has not already been used. If the Virtual Channel number has been used an error
message will be displayed and the entry cleared. Select a different Virtual Channel number if this
occurs.
Advanced Advanced channel settings
Setting
Channel Current Channel. Use the left/right arrow button to change the current channel
Number without leaving the menu screen.
In Channel When checked the current channel is in the channel list and can be tuned to.
List When un-checked current channel is not in the list and con not be tuned to.
Use this feature to add and delete channels.
Virtual CH When on the channel lineup is determined by the Virtual channel list. See page 34.
No. When off the standard channel list is used. Selections are:
On - Off
Real Channel When on, the OSD channel will show both the Virtual Channel number and the real
Display channel number. This is useful for setting up and testing the virtual channel lineup.
When set to off only the virtual channel number is displayed This feature is only
active when Virtual CH No. is set to On. Selections are:
On –Off
Source Enables or disable input sources based on the current tier setting. A check in the
Bank box indicates the source is enabled for the tier. If the box is un-checked the source is
disabled for that tier. Only enabled sources can be selected using the SOURCE or
INPUT buttons.
Blue When select displays blue back ground if no signal is present. Press the “ENTER” button to
Back select/un-select.
Signal Selects the signal source. Use the left/right arrow buttons to change. Selections are:
Type
Cable –Air
Cable Select if the signal source is from a cable company
Air Select if the signal source is from an off-air antenna.
Auto Automatically finds active channels and add them to the channel list. Non-active channels are removed
Channel form the channel list. Make sure “Signal Type” is properly set then press the “ENTER” button to begin
Search search.
CH Turns channel roll On or Off. When On the auxiliary inputs such as VGA will be included in the channel
Roll line up. The auxiliary inputs can be selected by using the channel up/down buttons between the highest
and lowest channels. Example: if you are on channel 2 and press the channel down button USB input will
be selected.
Power Turns Power Roll on or off. When on set will turn off when using the Channel Up button from the highest
Roll programmed channel and the Channel Down button when on the lowest programmed channel. Use the
Left/Right arrow buttons to change.
Table of contents
Other HealthCare Information LCD TV manuals


