HearBloom X3 Elite User manual

USER MANUAL
Model: X3 Elite
Please read these operating instructions before first time
use to help you get the best out of your hearing device.

Table of contents
2
Quick start guide
Identifying your device
Your X3 Elite hearing device
Installing the battery
Turning the device on and off
Placing the hearing device into your ear
Adjusting the volume & program modes
Using the fitting domes
Removing your hearing device
Cleaning your hearing device
Changing the wax guard
Precautions for your hearing device
Hearing device warranty & safety
Common issues & troubleshooting guide
3
4
5
6
7
8
9
1 0
1 1
1 2
1 3
1 4
1 6
1 7
Quick start guide
3
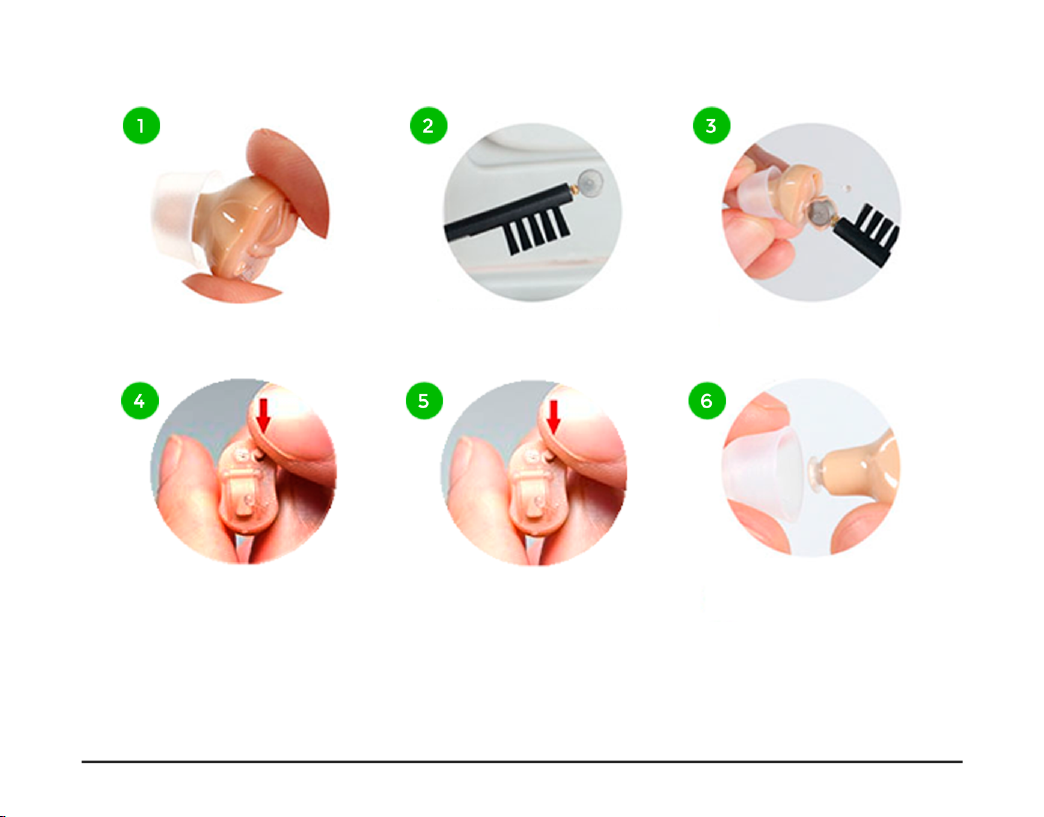
Gently open the battery compartment
door.
Use the magnetic tip of the brush
tool to pick up the battery.
Insert the battery & close the
door. The hearing aid is now on.
Select the mode by pushing and
holding the button for 3 seconds.
* 1 beep = medium frequency loss
* 2 beeps = high frequency loss
* 3 beeps = low frequency loss
* 4 beeps = tinnitus mode
Press button once quickly to
decrease the volume. There are 8
levels from highest to lowest.
Once you've reached the lowest
volume, pressing the button again
will reset to the highest volume.
Select the correct ear dome size
and insert into ear. To turn off the
hearing aid, simply open the
battery door or press and hold
the button for 5 seconds (you wil
hear a powering down sound).

How do I identify which hearing device I have? Which is left vs right?
Identifying your device
4
X3 Elite
Black Color
(Look for L & R text on the hearing device. L = left. R = right)

1) Dome
2) Volume & mode control button
3) Removable handle
4) Battery door
5) Microphone inlet
6) Sound outlet
Your X3 Elite hearing device
5

A size 10 hearing device battery is used. Remove the stick tab from the battery after the battery door is
fully opened. Close the battery door smoothly to turn on the device. Do not close the battery door with
force as it may damage the hearing device.
If you cannot close the battery door, check whether the battery is installed correctly. The flat or positive "+"
battery side should be facing up to where the tiny "+" or red/blue mark is on the battery door. Remove
the battery if the hearing device is not to be used for an extended period time.
Installing the battery
6

To turn on and off your device, simply press and hold the volume/mode push button for 5 seconds. You
should hear a powering down sound. Alternatively, the battery door also functions as the on/off switch.
The hearing device is on when the battery door is fully closed. To turn the hearing device off, pull open
and lift the battery door with your fingernail. Please remember to switch the hearing device off when it is
not in use to reduce battery consumption.
Turning the hearing device on and off
7
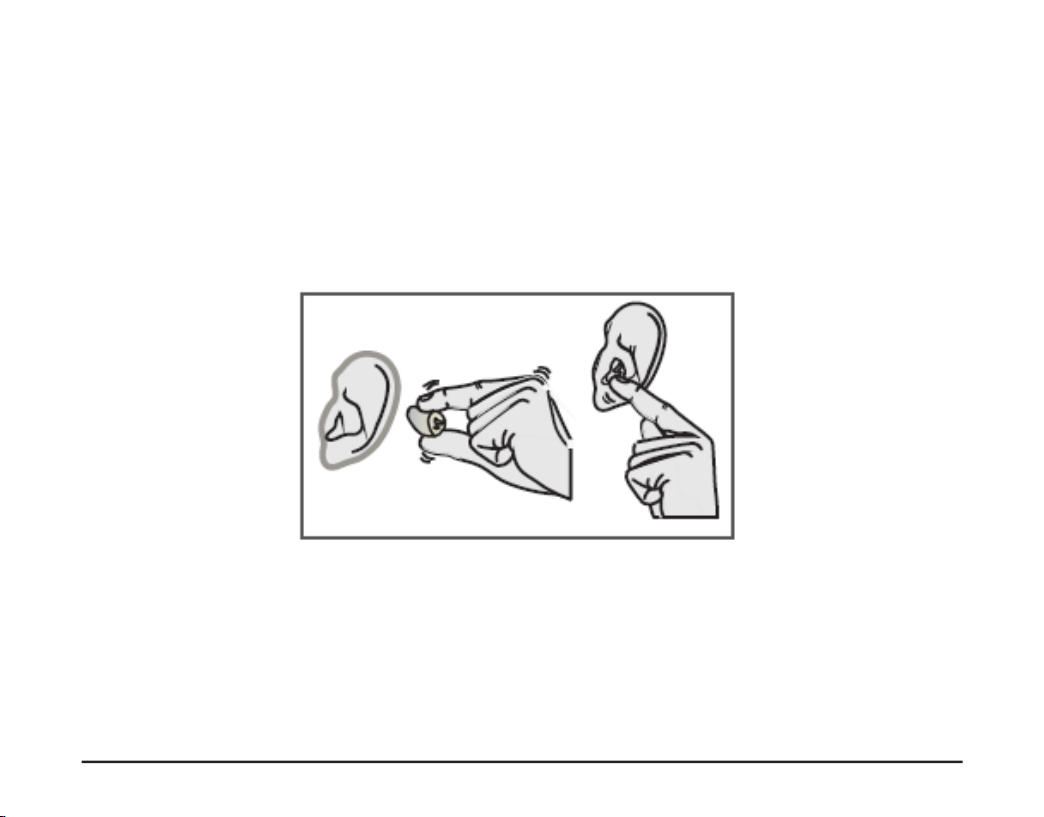
Hold your hearing device with your thumb and forefinger on the outer edges of the case. Gently insert the
canal tip of the device into your ear canal until you feel resistance. Use the tip of your forefinger to gently
push the hearing device into your ear until it feels comfortable in your canal. To help position the hearing
device you can pull the outer ear backwards and upwards with the opposite hand.
Placing the hearing device into the ear
8
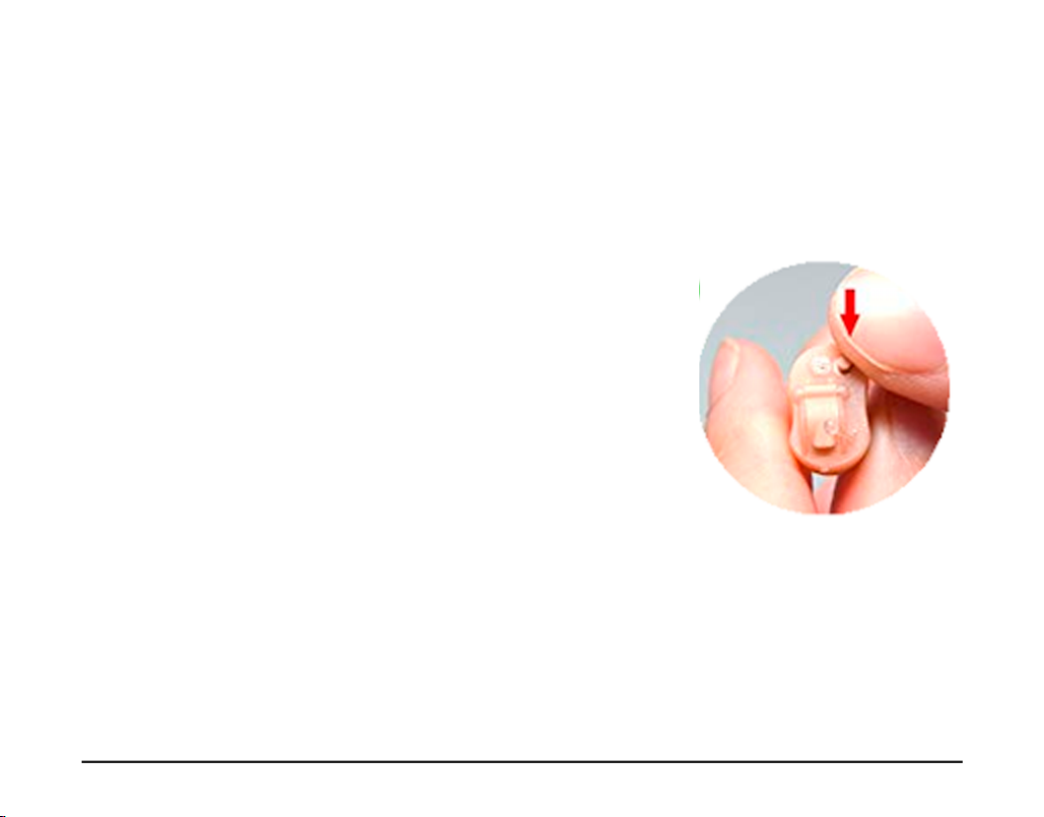
The volume control button adjusts the amount of output sound. Identify the volume button which has a
circular shape and sits below the battery door. Simply press the button once quickly to decrease the
volume. There are 8 levels of volume from highest to lowest. Once you've reached the lowest volume,
pressing the button again will reset the cycle to the highest volume again.
Adjusting the volume
9
Adjusting the program/modes
The X3 model comes pre-programmed with 4 different hearing
modes. To select the hearing mode, simply press and hold the
volume button for 3 seconds. You will hear a beeping sound
(you may need assistance from another person to listen to the
sound if you have difficulty hearing it).
* 1 beep = medium frequency loss
* 2 beeps = high frequency loss
* 3 beeps = low frequency loss
* 4 beeps = tinnitus making mode
For most users, the first (1 beep) or second programs (2 beeps)
will be suitable for the most common types of hearing loss. If
you have an audiogram, please send this to us and we can
recommend the most appropriate mode.

A select of domes has been included with your hearing device. The hearing device can also be worn
without any domes. The function of the domes is to improve fitting comfort and/or reduce whistling. To
remove a dome, pinch the dome with your fingers and pull off the end of the hearing device. To insert,
push the dome onto the end of the hearing device so that it is on securely as possible. The dome should
not pull off the hearing device when you pull on it with light pressure. Please check before each insertion
into the ear.
Using the fitting domes
10

Most people find it easiest to remove the hearing device via the removal cord. Hold the removal cord
between the thumb and forefinger and gently take the hearing device out of your ear. Never use the
battery door to pull the hearing device out. Damage may occur as it is not designed to withstand the
pressure of pulling.
Removing your hearing device
11

Use a small brush to gently brush away any accumulated earwax from the hearing device sound outlet.
Cleaning your hearing device
12

It is important to regularly check the wax guard on the end of the hearing device (white circle) for any
build up of earwax. If any accumulated wax cannot be brushed away it is time to change the wax guard.
The existing wax guard should be removed from the end of the hearing device using the orange tool
supplied with your original order. New wax guards can then be attached into the hearing device using the
other side of the tool. Further instructions can be found on the cards carrying the new wax guards. New
wax guards can also be obtained from the website.
Changing the wax guard
13

Moisture build up is a common cause of the hearing device failing and preventing it from occurring will
help extend the life of the device. We recommend placing the hearing device into a "dry kit" or humidifier
overnight which will help draw moisture out of the instruments overnight. A selection of dry kits are
available on our website.
Please do not wear the hearing device when swimming or bathing. Remove the hearing device when it is
raining and when showering. If the hearing device accidentally falls into the water, do not use a hairdryer
or microwave to attempt to dry it.
You can dry it with a soft, clean cotton cloth and put it in a ventilated environment, or in a dry kit for a few
days. Do not expose the hearing device to extreme temperatures of allow prolonged exposure to
sunlight.
Do not drop your hearing device or knock them against hard surfaces.
Precautions for your hearing device
14

The product's maximum output sound pressure level is under the product software control, which
ensures the end user cannot be exposed to sound pressure levels higher than 132 dB, even in the event
of device failure.
Do not wear your hearing device during X-ray, MR scans, CT scans, short-wave diathermy, or similar
radiation treatments.
Please take off your hearing device before you go into high electrical fields or strong magnetic fields (such
as transformer subtations or power stations) and leave your hearing device outside.
Precautions for your hearing device
15

Damage caused by incorrect use or improper operation
Damaged caused by floods, fires, earthquakes, and any other event described as "acts of God"
The warranty period is 12 months from date of purchase. Any of the following would not fall under the
manufacturer's warranty:
Safety
Operating conditions
Temperature 0~40C Humidity <80% Voltage DC 1.4V
Input power: 3.5mW Atmospheric pressure: 86kPA~106kPa
Transportation and storage conditions: Temperature -20~50C Humidity 30% - 93%
The hearing device must only be used by the intended person.
Keep small parts that can be swallowed, particularly batteries, out of reach of children. If a battery is
swallowed, consult a doctor immediately.
Discard of used batteries appropriately.
Hearing device warranty & safety
16

not turned on - ensure the battery is properly inserted and the slot is closed shut
the volume is too low - to increase the volume, use the provided tool to turn the dial clockwise
low or dead battery - please try inserting a new A10 battery
faulty - please contact us for a replacement
No sound or not working
There can be a few reasons why your hearing device may appear to be 'not working'. The most common
reasons are:
Common issues & troubleshooting guide
17

Ensure the hearing device is properly secured and fitted snugly
Choose a slightly larger ear dome that fits your entire ear
Try reducing the volume to start, and then slowly increasing the volume as needed
Make sure to get your ears professionally cleaned and check your hearing device for any clogged vents
Help with whistling feedback noise
The most common reason for hearing a whistling feedback noise is because the hearing device is not
properly seated in your ear. Wearing your hearing device too loosely can cause whistling. Furthermore, if
you have a build up of earwax, it can cause a blockage in your canal. This can interfere with your hearing
device. Your hearing device works by transmitting sound into your ear canal. If this sound has nowhere to
go, it will bounce back into your hearing device, causing a whistling feedback noise.
Tips to help alleviate whistling
Need different sized ear domes, batteries or replacement parts?
Please visit our website or contact our support team.
Common issues & troubleshooting guide
18
Table of contents
Other HearBloom Hearing Aid manuals

Popular Hearing Aid manuals by other brands


Bellman & Symfon
Bellman & Symfon BE9229 Medical device information

NHS
NHS Nathos Nova M Earmould Fittings guide

Starkey Hearing Technologies
Starkey Hearing Technologies BTE 13 manual

Siemens
Siemens Reflex M operating instructions

tweak
tweak Focus instruction manual

Kirkland Signature
Kirkland Signature KS661-DRW user guide