HEART & HEART 78TK User manual

Manual
All-in-one
Coffee and Beverage Dispenser
Intelligent mixing
and brewing solution
Brewing in 1 second
High capacity of
making beverages
Zhejiang Aidewo Electronics Technology Co., LTD.
No.88, Binhai No.5 Road, Hangzhou Bay New Area
Ningbo, Zhejiang Province
Please read the content carefully before use
About Daka Cautions
Cleaning Cleaning
Water Pipe
Decomposing
Parts
Product
Features
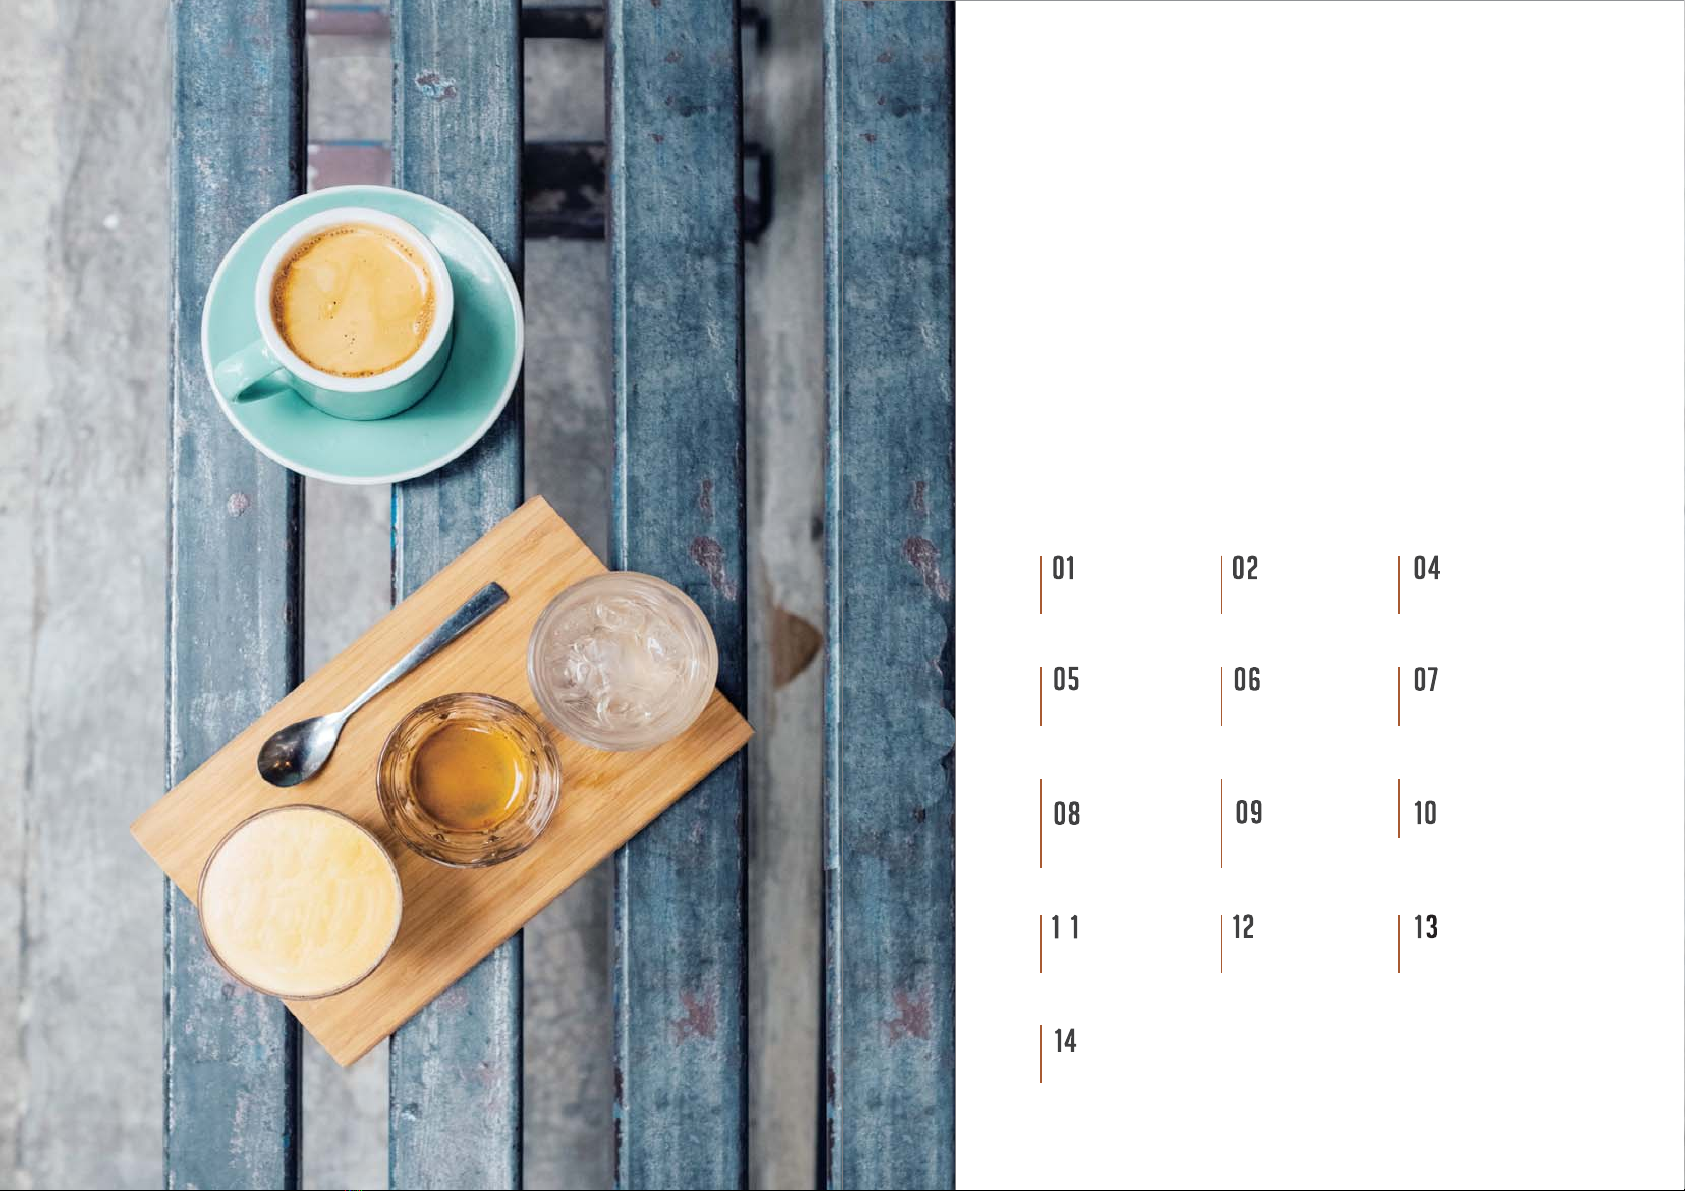
CONTENTS
Specifications
Steps of Use
Water
Supply
Loading
Material
Set Display
Setting
Query
Adjust Temp.

Cautions
3/4
1600w
37.5cm 50cm 70cm×× 35kg
180w
Touch key
Digital display
About Daka
Front
Hot beverage
selection keys
Indicating lights
Cleaning key
Cold beverage
selection keys
Back
Power
switch
Cooler
switch
Pump
switch Inlet Socket/Fuse
holder
Hot drain
outlet Cold drain
outlet
Model
Heater Power
Cooler Power
Display Mode
KeyMode
Size
78TK 7830TL
7840TK 7840TL Power supply
Quantity of barrels
Barrel capacity
Queryable parameters
Water supply
mode
Net weight
Temp. powder
water, cups
Top /bottom/pipeline
Basic information
lDo not operate this or any other appliance with a damaged cord.
lAlways unplug the appliance before performing any repair or maintenance.
lCaution and use reasonable supervision when appliance is used near children
lNever allow children to operate, play with or crawl inside the appliance , keep
the children out of reading the appliance.
lKeep packing materials away from children.
lDo not clean appliance with flammable fluids.
lDo not store or use gasoline or other Flammable vapors and liquids in the vicinity
The fumes can create a fire hazard or explosion
lTo clean, only use mild detergents or glass cleaning products.
Do not use solvent-based cleaning agents or abrasives.
lWhen disposing of refrigerated appliances, special handling is required.
lIt is the consumer's responsibility to comply with federal and local regulations
when disposing the dispenser.
lDo not attempt to repair or replace any part of your appliance unless it is
specifically recommended in this manual. All other servicing should be
referred to a qualified technician.
lLocate the unit away from direct sunlight and sources of heat (stove, heater,
radiator, etc).
lDo not use this appliance for other than its intended purpose.
lDo not place any other appliance on the top of the unit.For adult use only.
lDo not lift or carry the dispenser by the cord.
lDo not plug in to the power socket before setup is complete
lwhen placing or moving the appliance ensure that it is positioned at an angle
of more than 45, or turned upside down.
lPlace the appliance on a solid, flat surface .Allow for proper distance at
all sides of the unit.
lThe dispenser is an electrical appliance, To avoid injury or death from
electrical shock, Do not operate the unit with wet hands, while standing
on a wet floor.
lAllow unit to stand upright for 24 hours prior to first plugging in.
lThis unit is designed for indoor, household use only. Any other use will void
the warranty.
IMPORTANT SAFETY INSTRUCTIGNS
220/50Hz

lTurn off the power supply and unplug the dispenser to
avoid electric shock when replacing the fuse.
lDo not place the dispenser in a humid environment. Otherwise performance of
electrical appliances can be affected. Risk of electric shock or fire.
lAvoid water leak or drops onto the surface or into the dispenser.
Risk of electric shock or fire.
lUnplug the power supply if the dispenser is not being used for a
long time. Risk of overheating.
lDo not disassemble the dispenser. Risk of electric shock or damage.
lTurn off the power supply immediately and contact your local
distributor or after-service center if you realize abnormal sound or smell.
lStay the dispenser out of the wall to allow the smooth ventilation
and prevent powder turn into blocks.
lDo not put pressure on the control pad area in case of malfunction.
lDo not use non-powder raw materials. The connecting pipe may be blocked
if using other granular or viscous raw materials, such as kernels, tea leaves,
thick soup, etc.
lThe power cord must be plugged into a 3-prong grounding-type wall receptacle,
and according to the national safety rules must be grounded.It is the personal
responsibility of the consumer to have the proper 3-prong wall receptacle
installed by a qualified electrician
lDO NOT, UNDER ANY CIRCUMSTANCE, REMOVE THE POWER CORD
GROUNDING PRONG.
lDo not remove any grounding wires from individual components wire servicing,
Unless the component is to be removed and replaced. It is extremely important
to replace all grounding wires when components are replaced.
lWe strongly recommend against the use of an extension cord. However if you
still elect to use an extension cord, it must meet all the standards of national
safety rules, 3-wires grounding type appliance extension cord with a 3-pins
grounding plug and a 3-slots receptacle. The rating of the extension cord should
be 230V~, 10
Cautions
Specifications
Model
Picture
Size
78TK
7830TL
7840TK
7840TL
37.5cm 50cm 70cm××
37.5cm 50cm 70cm××
37.5cm 50cm 70cm××
30cm 45cm 64cm××
Product Features
3+2 intelligent mixing system enable the dispenser a
business unit.
Coffee, milk tea, fruit juice, cold and hot water are
available to make multiple choices.
The high-speed balanced stirring system makes powder
well-mixed in 1 second.
The high-speed motors operate stably to accelerate the
brewing process, which enable making the drink in 1
second.
Fully-coated compression-resistant inner cavity
structure makes the dispenser durable.
The integrated and firm structure, high strength and load
bearing prolongs the service life of the dispenser.
No wait, and continuous beverage dispensing
New type of heating, allows to continue to dispense to
meet the high-flow of people.
One-button automatic cleaning system makes cleaning
much easier.
Press one key to clean the mixer and the powder barrel
automatically. No need to clean the interior parts of the
dispenser.
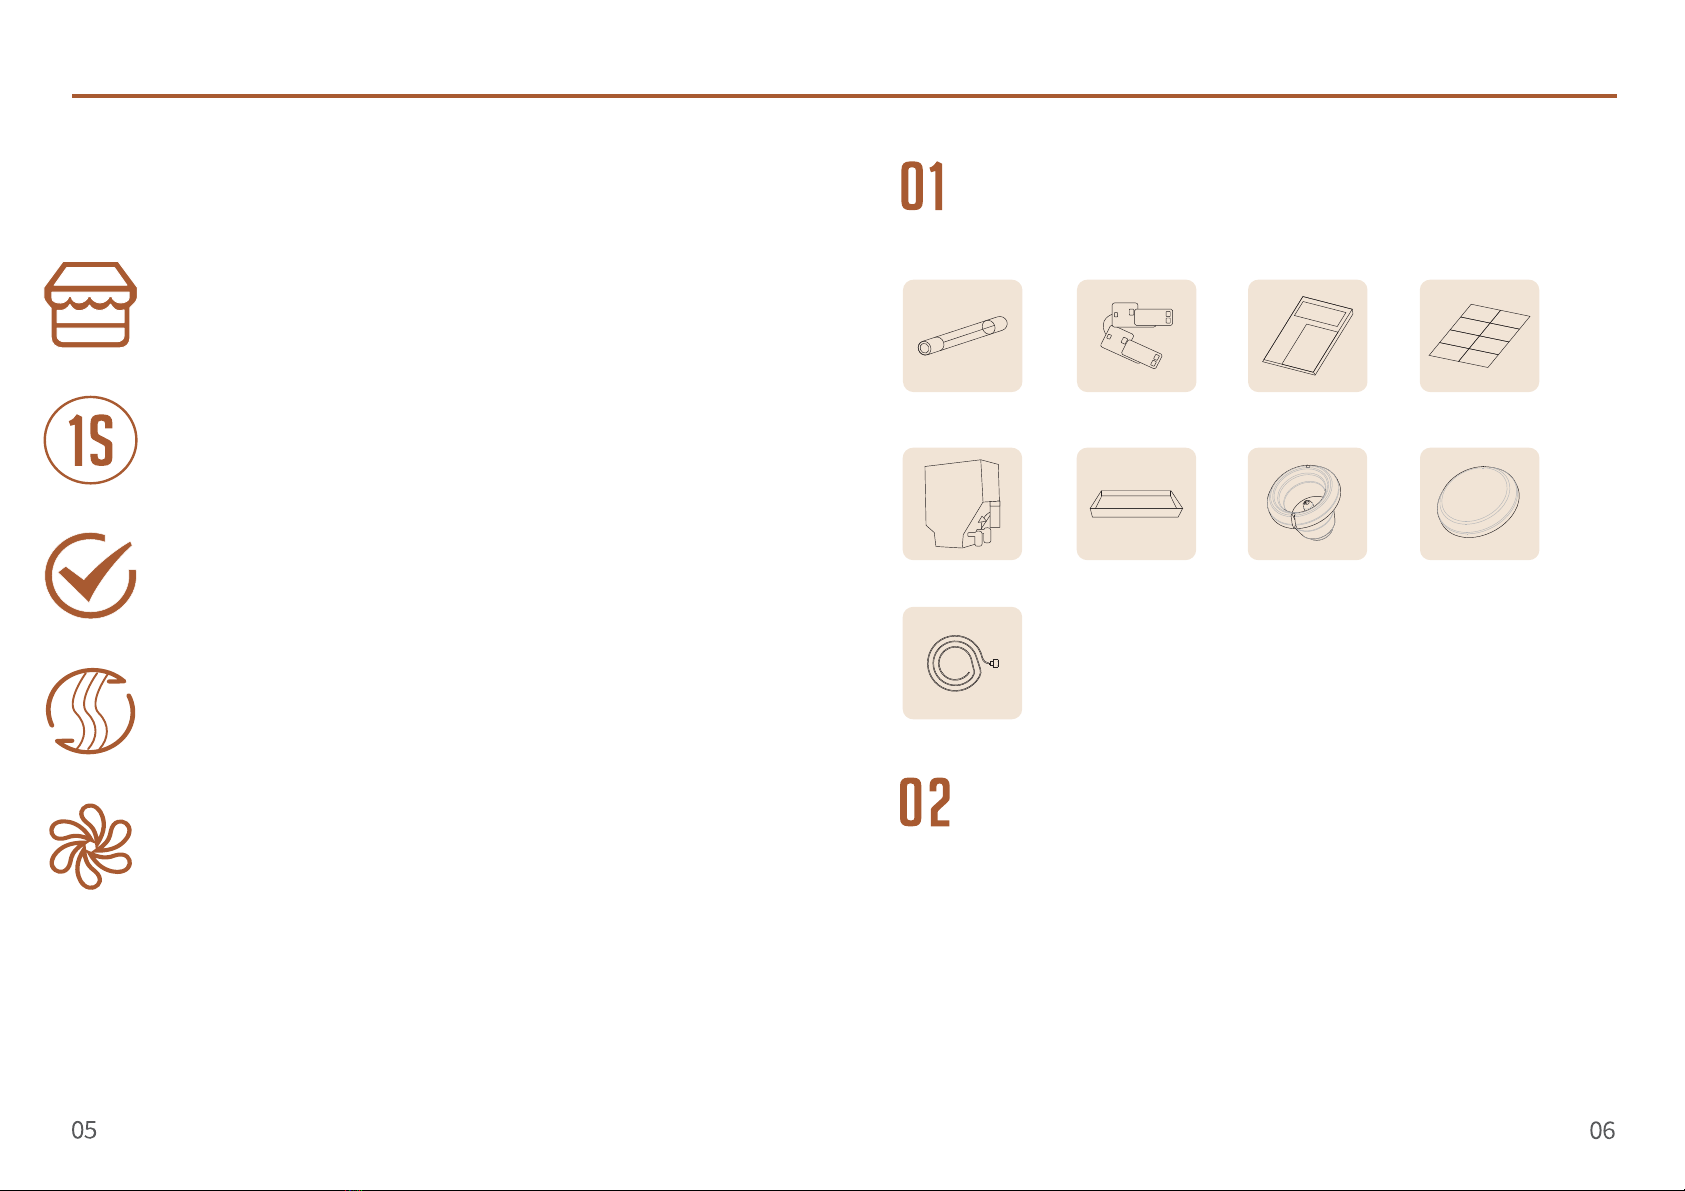
Please check the spare parts list. Please contact the local
distributor or after- service center if there are any parts
issues or missing
Fuse Key Manual warranty card
Smart seat cover
Smart seat
Drip tray
Powder barrel
Inlet pipe
After taking the dispenser out of box, please clean and
dry it before use.
(1) Please refer to "Water Supply " in page 5 for details to setup
water supply.
(2) Please refer to "Loading Material" in page 6 for details to fill
powder.
(3) Please refer to " " in page 8 for detailsAdjust Concentration
to set up the powder/water ratio.
(4) Please refer to "Adjust temperature" in page 9 for details to
set the water temperature.
Ready to enjoy the delicious coffee, as long as you turn on
the power and start the machine.
Steps of Use

Connect one end of the inlet pipe to the
pipeline joint and the other end screw the nut
onto to the dispenser .
Note: Water supply pressure range
0.05 Mpa~0.45 Mpa.
Pipeline
Water Supply
Topper Mounting
(1)Prepare a bottled water and
buckle it upside down on the smart
seat of the dispenser.
(2)Turn the pump switch to the "O" .
Lower Mounting
Load Powder
Lift the barrel upward and then gently pull it out according to the
arrow direction which is shown in the figure.
Powders options
(1) Please cover the barrel lid properly after loading the powder.
(2) When loading powders, please tilt the barrel back slightly to
prevent the powder from leaking out of the barrel.
(3) After loading the powder, please do not press the powder in case
the powder becoming lumpy.
(4) Please make sure the rotating shaft of barrel is properly fit with
the beater shaft.
(5) Please make sure the pins on the bottom of barrel should be
located in the slot of the stand.
Caution
Loading Material
Unsuitable Powders
Block or granular powders
Viscous or granular powders
Suitable Powders
Coffee powder
Ginseng tea
milk powder
Mixed powder
coffee
Other powders
(1) Place a bottle filled with water beside
the dispenser and remove the lid.
(2) Insert one end of the inlet pipe into the
bottle and the other end screw the nut
onto the dispenser.
(3) Cover the smart seat with the smart
seat cover.
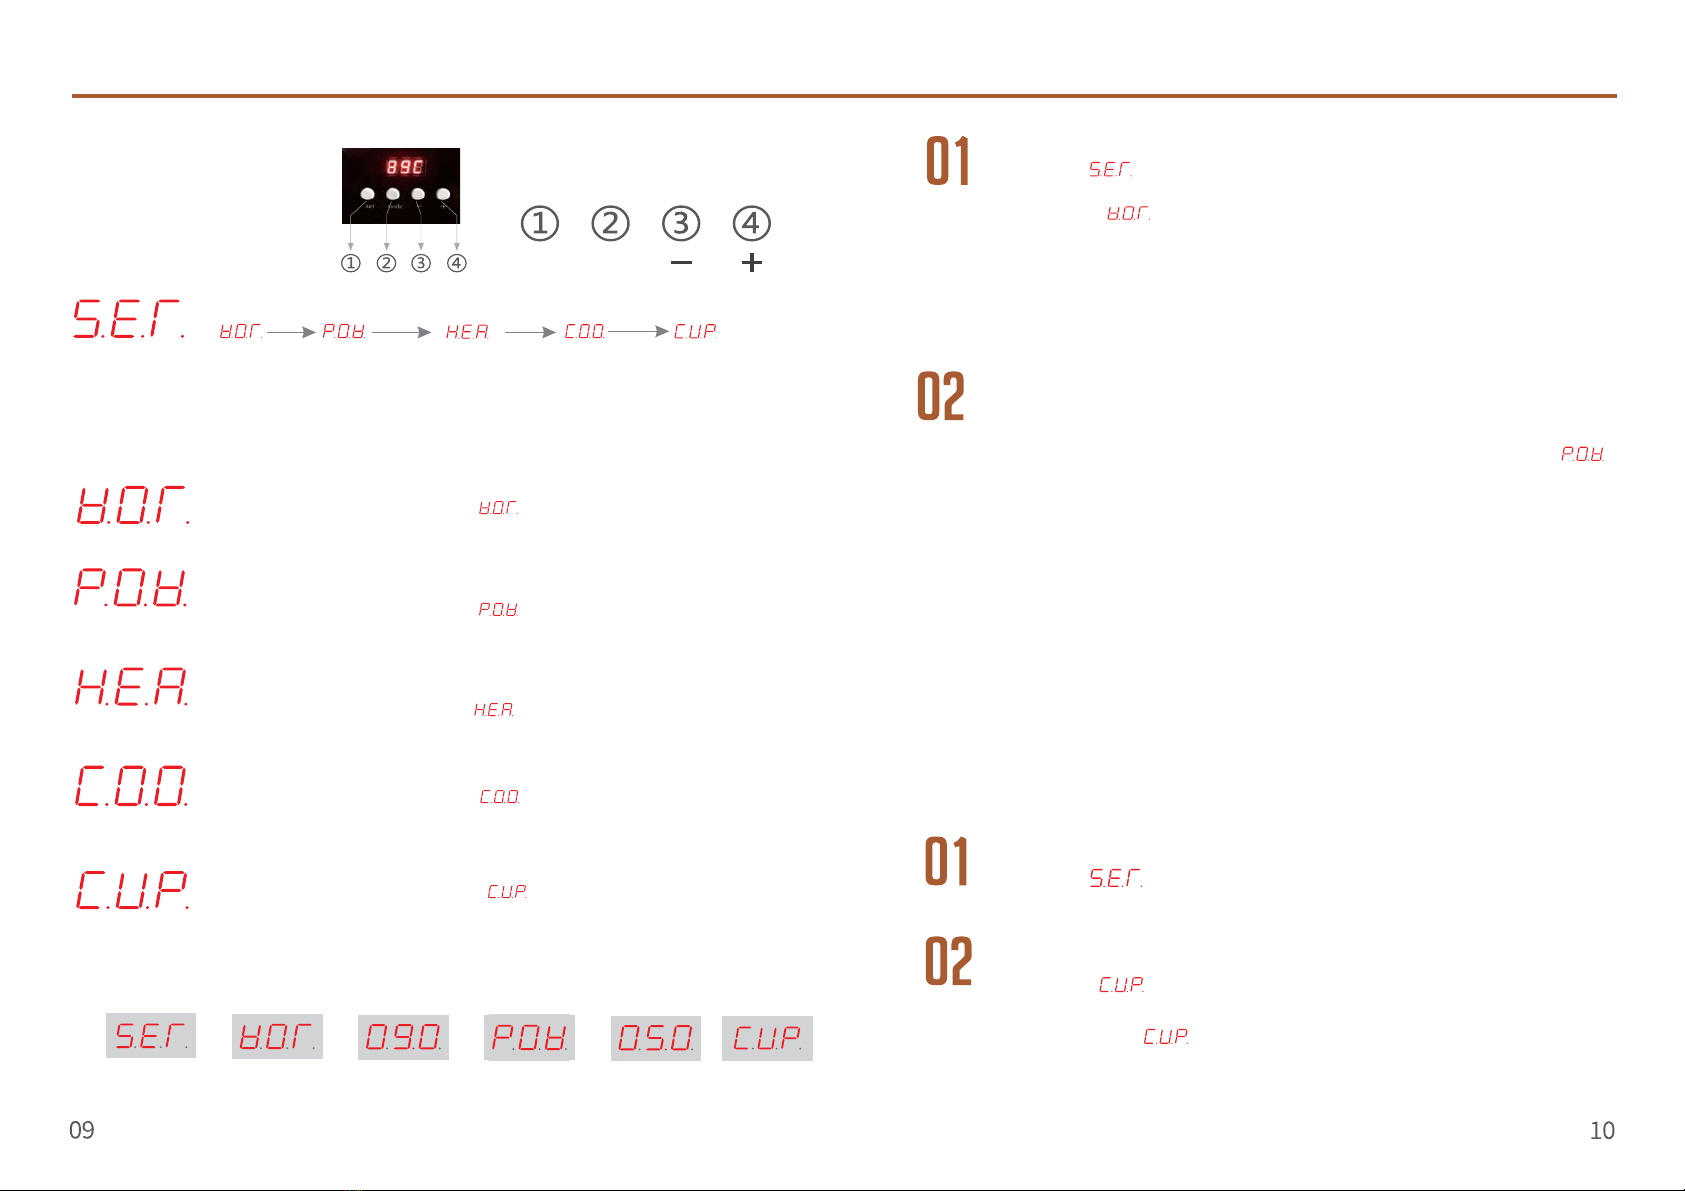
set mode
Parameter loop
Water Powder Hot water
temp.
Cold water
temp.
Cup counts
Press and hold the “Set” button for 3 seconds till the screen shows SET to set Parameters.
The “Mode” key is used to shift “WAT ”,”POW ”, “HEA ”, “COO” and “CUP ” cycle per press.
Adjust water
When the digital screen displays “ ”, At the same time, press the hot
drink key on the glass panel which needs to be adjusted the channel, then
press “-” or “+” button to adjust the water.
Adjust powder
When the digital screen displays “ ”, At the same time, press the hot
drink key on the glass panel which needs to be adjusted the channel, then
press “-” or “+” button to adjust the powder.
Adjust hot water temperature
When the digital screen displays “ ”, then press “-” or “+” button to
adjust the hot water temp. The range allowed is 20℃~96℃.
When the digital screen displays “ ”, then press “-” or “+” button to
adjust the hot water temp. The range allowed is 5℃~15℃.
Adjust cold water temperature
When the digital screen displays “ ”, then press the flavor key on
the key pad respectively to check the cup counts dispensed per flavor.
Cup dispensed count
Fig 1 Fig 2 Fig 3 Fig 4 Fig 5.. . . .
Adjust Concentration
After entering to “ ” model ,(Fig.2), and then press the flavor key
you want to adjust to change the water ratio. The screen shows 9.0
,(Fig. 3), which is the default setting. Press “-” or “+” button to reset
the water ratio. There will be 0.5 ,(Fig. 5), changes on the value by
press one time. You can also press and hold the button to adjust the
value faster. The range allowed is 0-99.
Press and hold the “Set” button for 3 seconds till the screen
shows “ ” , (Fig.1), to reset s .parameter
Follow the same steps to reset the other flavors to reset the
water of other flavors as needed.
After changing the water, press “mode” button again to enter to “ ”
mode (Fig. 4) and then press the flavor key you want to adjust to change
the powder ratio. The screen shows 5.0 (Fig. 5) which is the default
setting.Press “-” or “+” button to reset the powder ratio. There will be
0.1 changes on the value by press one time. You can also press and hold
the button to adjust the value faster. The range allowed is 0-99.
For reference only, the value changes at " 1" means the amount of
powder discharged changes at approximately 2.2g while value changes
at "1" means approximately 13ml changes of water respectively.
Fig.7
Cups Count
Press and hold the “Set” button for 3 seconds till the screen
shows “ ” , (Fig.1), to reset s .parameter
Press the “Mode” button for five times till the screen
displays “ ” (Fig.7)
After entering the “ ” mode, then press a certain flavor key
to show the count dispensed. You can delete the cup count record
thru press and hold the “-” button for seconds till a beep is heard.
Set Display
Setting & Query
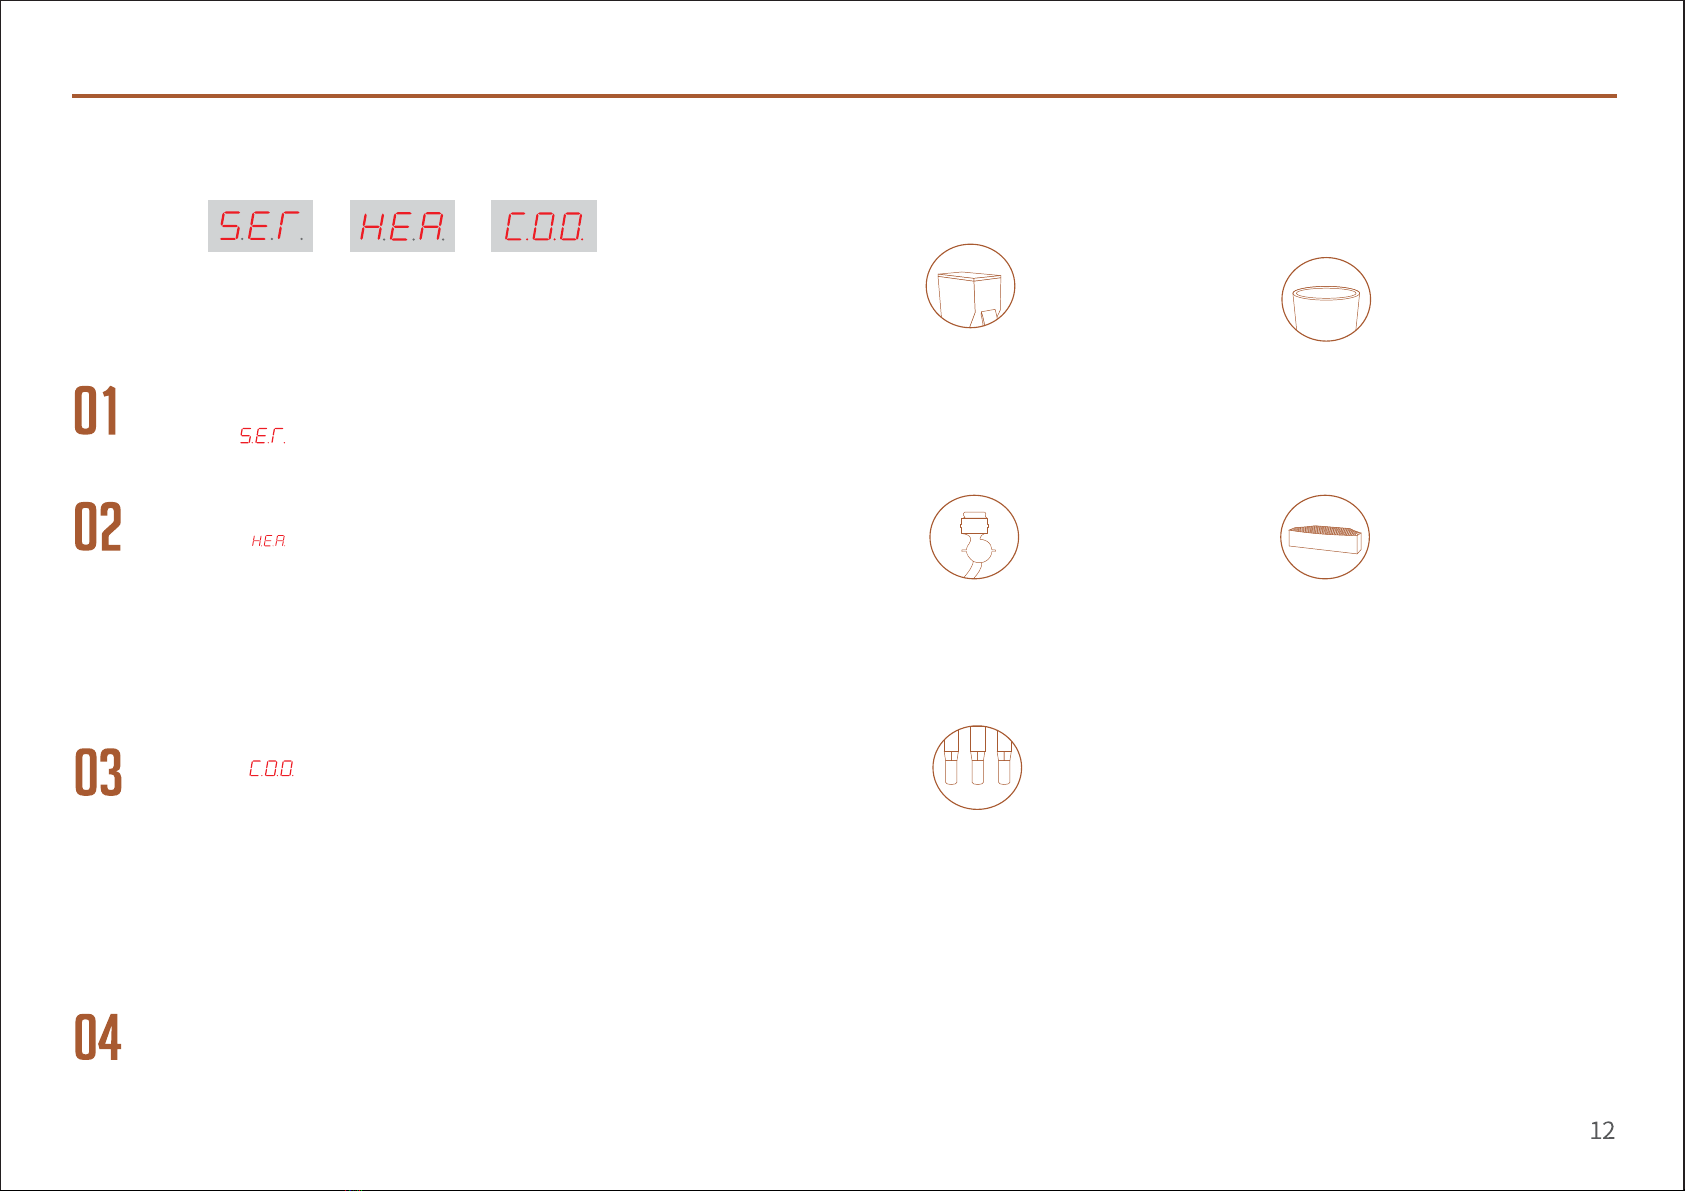
Fig 1 Fig 2 Fig 3.. .
Press and hold the “Set” button for 3 seconds till the screen
shows “ ” , (Fig.1), to reset s .parameter
Press the “mode” button for three times till the screen
displays “ ”(Fig.2) means the system is ready for
resetting hot water temperature.
Press “-“ or “+” button to adjust the desired hot water temperature.
The temperature value is confirmed by the system till the screen
stops blinking ,Hot water temperature adjustment allowed range
is 20 -96 . The default setting is 92 .℃℃ ℃
Press the “mode” button for four times till the screen
displays“ ”(Fig.3) means the system is ready for
resetting cold water temperature.
Press “-“ or “+” button to adjust the desired cold water temperature.
The temperature value is confirmed by the system till the screen stops
blinking, cold water temperature adjustment allowed range is 5~15 .℃
The default setting is 5 .℃
Press the “mode” button to turn the display mode of hot or cold
water temperature.
Press “Set” button to exit settings and then the dispenser is
ready to serve.
The Powder Barrel
Soak the barrel into water.
Wipe it with a soft cloth.
Dry it and put it back to
place. It is recommended
to clean the barrel once a
month.
Water Tank
Wipe the water tank
with a soft and clean
rag scrub the interior.
It is recommended to
clean the water tank
once a month at least.
Mixer and Stirring Cup
Take the cup apart. Soak
the parts into water. Wipe
them with a soft rag. Dry
the parts and put it back to
place. It is recommended to
clean the cup daily.
Drip Tray
Pour the water in the drip
tray from time to time as
needed and wipe it. It is
recommended to wash
the drip tray daily.
Dispensing nozzle
Wipe the nozzle with wet
wipes and then with dry
cloth. It is recommended
to clean the nozzle daily.
Adjust Temperature Cleaning
11

Power
Heating
Water
Refri
Cleaning Water Pipe
Place a cup under the dispensing nozzle.
Check if the water source meets the cleaning requirements.
Turn on the power switch. The internal water supply system will
run automatically.
Press the cleaning key on the lower panel and the water will
automatically fall into the cup after connecting the cleaning tube.
Press the “CLN” key turn the system to cleaning mode by
indicating of light on the key. Then press A/B/C to clean the hose
as required. Press “Cleaning” key again to exit from cleaning mode
and return to normal standby mode.
CLN
A. Mixer and Stirring Cup
After taking out the cup,
pull part A up to remove. Lift part B up for disassembling.
Turn the powder mixer and stirring
cup and remove it by following the
direction of arrow.
Pull the dispensing nozzle and
the connecting hose.
Decomposing Parts
13
Water Tank
Turn off the power
Pull out the drain on the back of the
dispenser and take the pipe plug out.
(Warning: Be aware of burning by hot
water when unplugging the pipe)
Drain all the water from the tank.
Open the rear cover behind the
dispenser with a cross screwdriver.
Open the tank cover and remove the
connection joint of the water level
sensor at the bottom of tank. Pull the
tank gently by following the direction
of arrow.
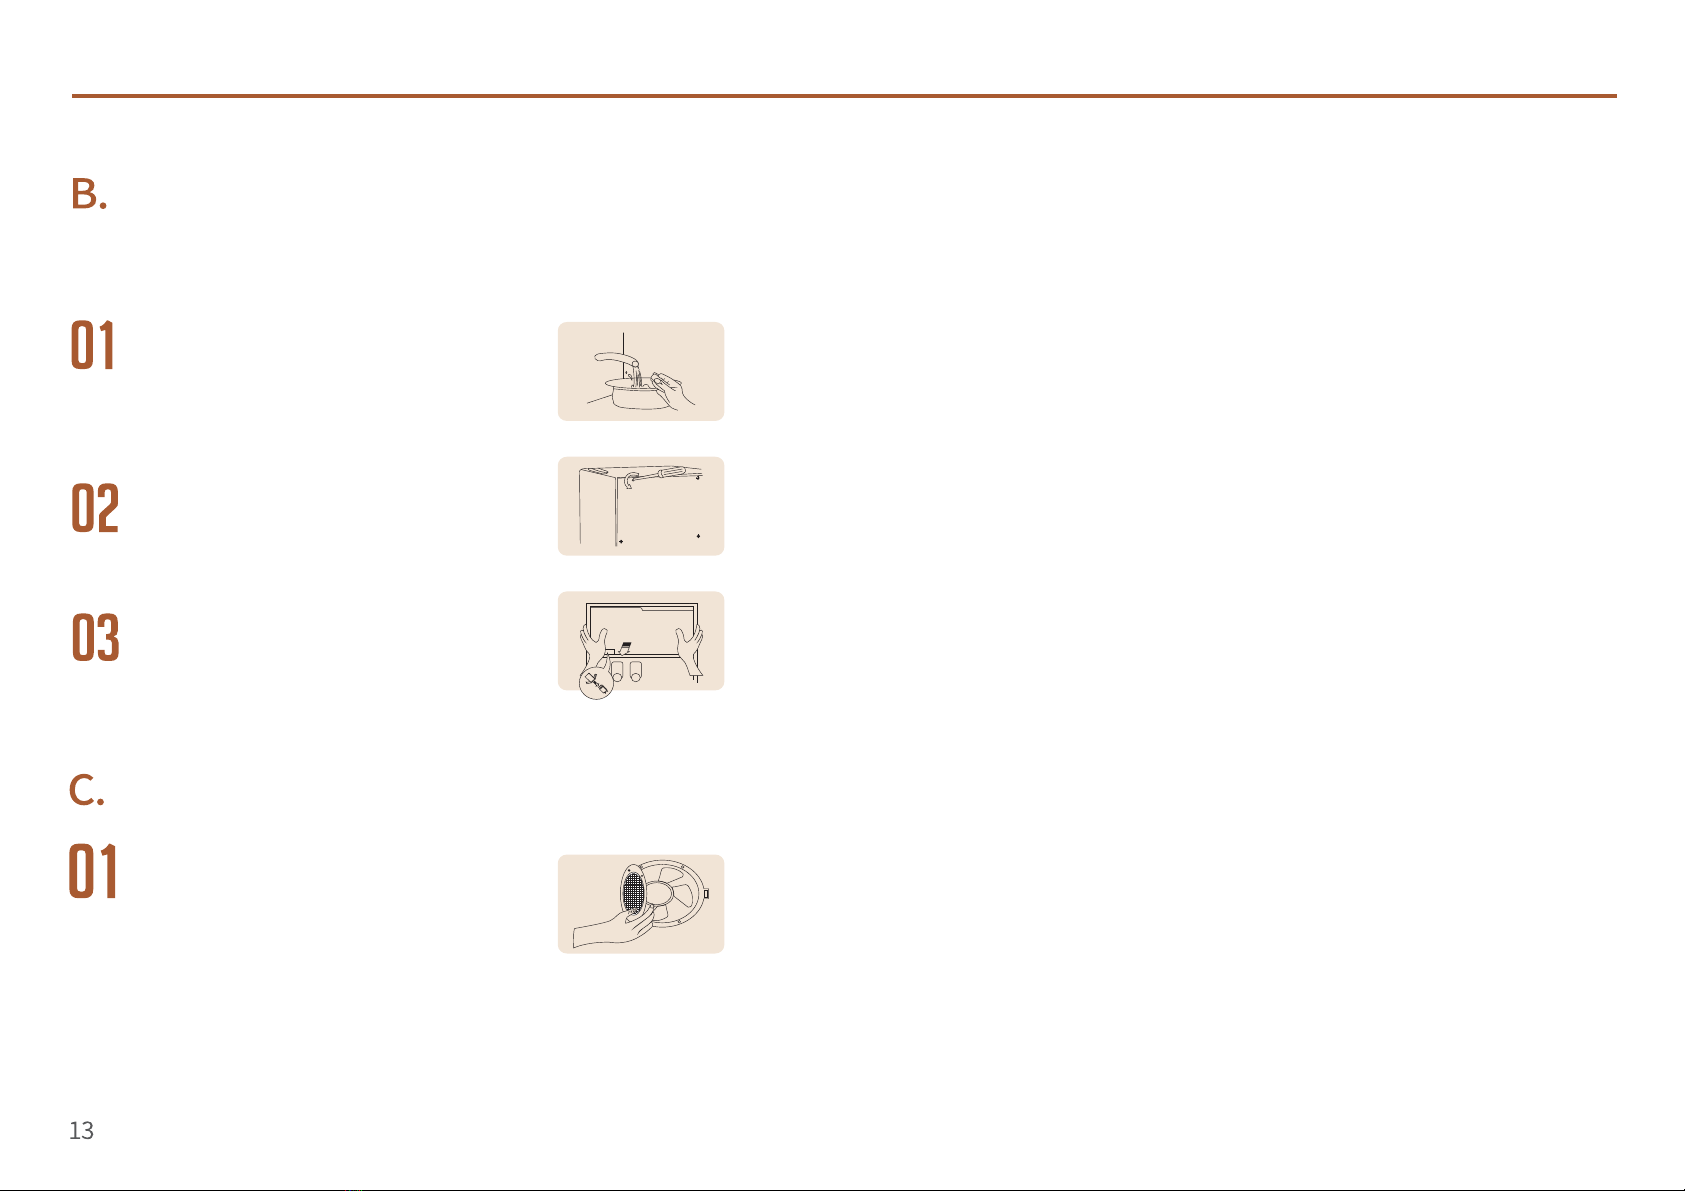
Fan Cover
Carefully remove the fan cover at the
back of the dispenser by following the
direction of the arrow shown on the
right figure.
(Moisture inside the dispenser mixed with powder,
which is easy to cause pollution. Please disassemble
and wash it in a regular basis.)
Decomposing Parts
15
This manual suits for next models
3
Table of contents
Other HEART & HEART Beverage Dispenser manuals

Popular Beverage Dispenser manuals by other brands


Krups
Krups BEERTENDER VB2158 user manual

Marco
Marco ECOSMART PB10 instructions
 2 FLAVOR manual")
Cornelius
Cornelius VIPER (E) 2 FLAVOR manual

Silver King
Silver King SKBD105P/CW Technical manual and replacement parts list

Cornelius
Cornelius Visual Display Dispenser JS7-W25 owner's manual

Klarstein
Klarstein 10026799 quick start guide

Cornelius
Cornelius IDC 255 Service manual

McDonald's
McDonald's Cornelius QLT 180/1000-1 installation manual

Grindmaster
Grindmaster Crathco 3341 user manual

Grindmaster
Grindmaster PIC-6 Brochure & specs

Cornelius
Cornelius IDC PRO 255 installation instructions

Avanti
Avanti BUILT-IN BEVERAGE CENTER BCA5102SS instruction manual