HELLER Alfresco ACC80 User manual

READ AND SAVE THESE INSTRUCTIONS
Instruction Manual
Alfresco Cooler Cart 80L
Model: ACC80

Please read and follow the instructions in this user manual even if you feel you are familiar with the product,
and find a place to keep it handy for future reference.
IMPORTANT SAFEGUARDS
When using any electrically powered product, basic safety precautions should always be followed, including the
following:
PLEASE READ ALL INSTRUCTIONS CAREFULLY BEFORE USING THIS PRODUCT!
WARNING!: - to reduce the risk of fire, electrical shock or injury to persons or property:
•Remove the unit from its packaging and check to make sure it is in good condition before using.
•Do not let children play with parts of the packaging (such as plastic bags).
•Close supervision is necessary when the product is used by or near children or infirm persons. Do not allow
children to use it as a toy. Children should be supervised to ensure that they do not play with the unit.
•Do not operate any product that is dropped or appears damaged in any way. Return the complete product
to the place of purchase for inspection, repair or replacement.
•Never install the unit where it is exposed to direct sunlight, excessive moisture/rain, dust and lack of
ventilation near any heat sources.
•Improper installation, adjustment, alteration, service or maintenance can cause injury or property
damage. Refer to this manual. For assistance or additional information, contact the manufacturer.
•Do not use mechanical devices or other means to accelerate the defrosting process, other than those
recommended by the manufacturer.
•Ensure that the unit is positioned upright on a firm flat floor, so that the cart is stable.
•The use of attachments or accessories not recommended or sold by the product distributor may cause
personal or property hazards or injuries.
•Do not use product other than its intended use.
•Use this unit as described in this manual. Any other uses, not recommended by the manufacturer, may
cause damage to property or injury to persons, may void the warranty.
•This unit is not intended for use by persons (including children) with reduced physical, sensory or mental
capabilities, or lack of experience and knowledge, unless they have been given supervision or instruction
concerning the use of the unit by a person responsible for their safety.
•WARNING: Do not store explosive substances such as aerosol cans with a flammable propellant in the unit.
•When disposal of the unit, it must be done by the manufacturer or its service agent or a similarly qualified
person in order to avoid fire and other hazard.
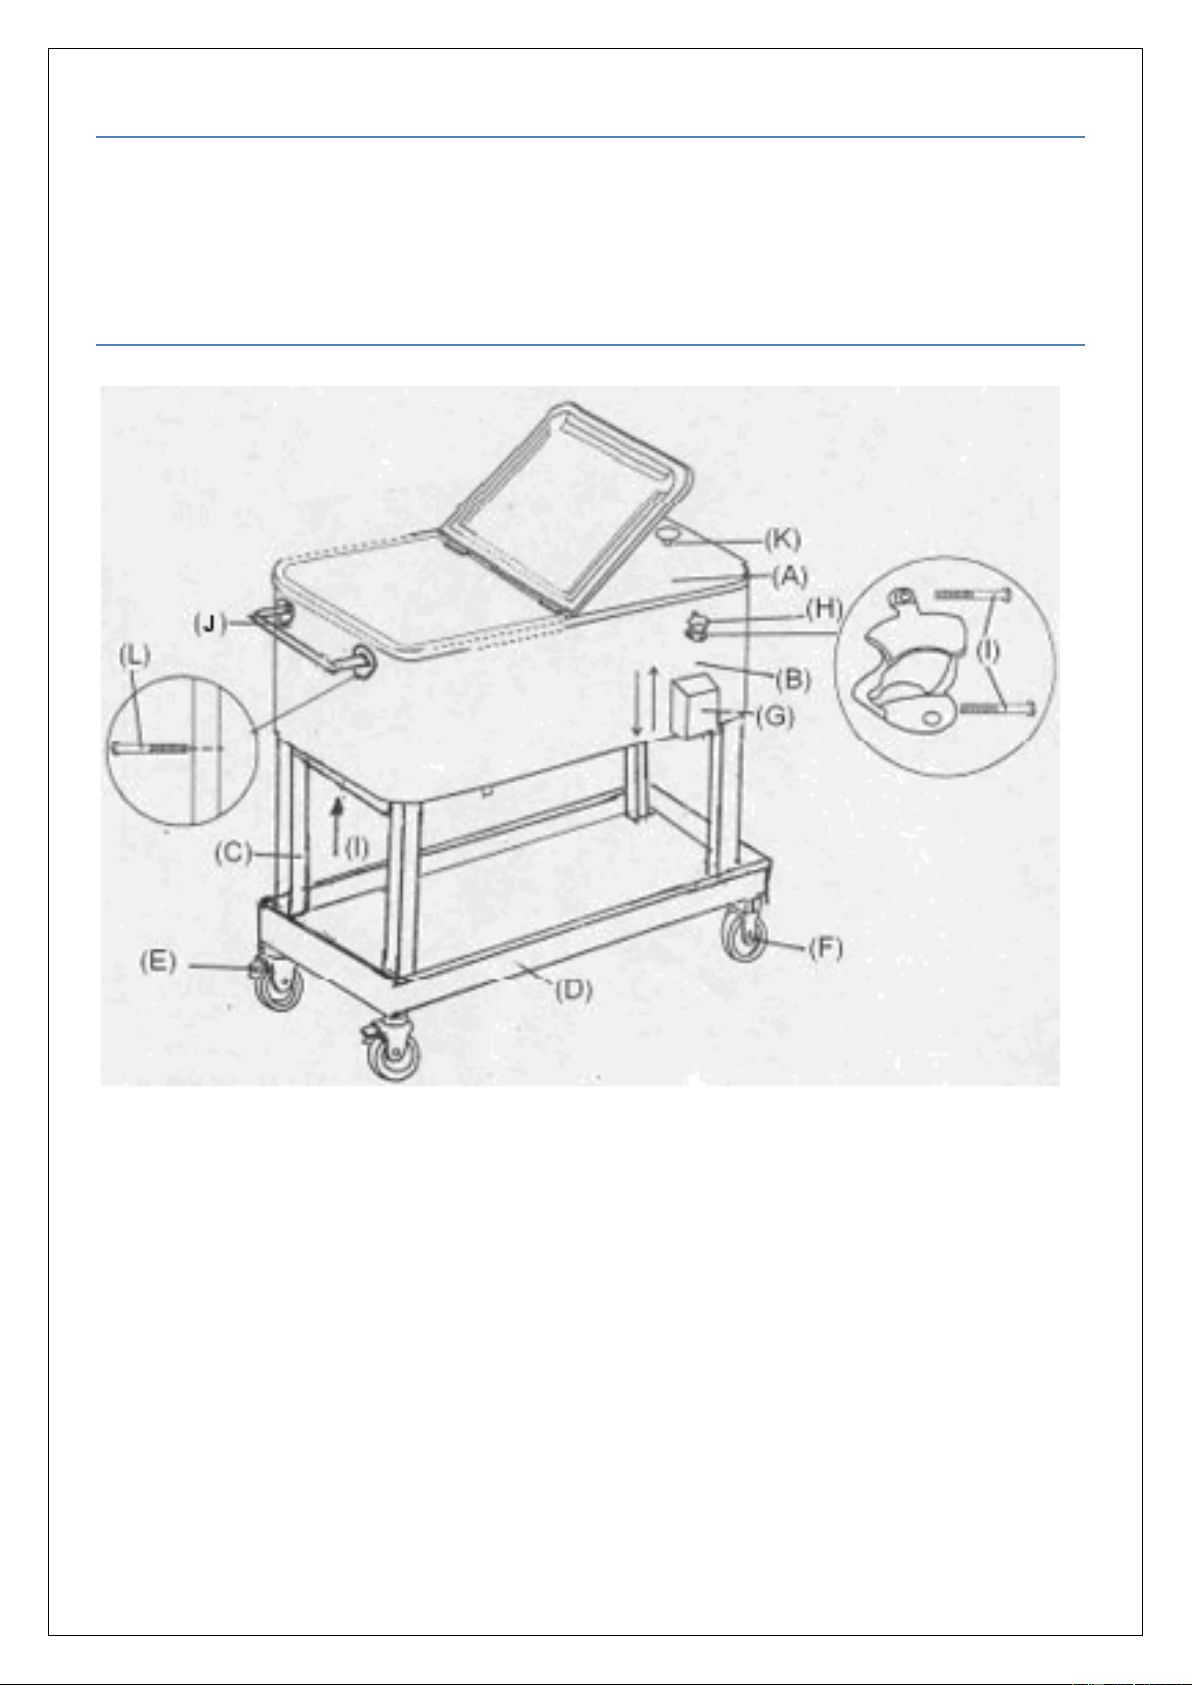
•WARNING: HEAVY! HANDLE WITH CARE! KEEP CHILDREN AWAY FROM ASSEMBLY AREA!
•TOOLS REQUIRED: adjustable wrench and screw driver.
SAVE THESE INSTRUCTIONS

BEFORE FIRST USE
Before use, remove all packaging materials and inspect the unit for any damage. If there appears to be any
damage, please take the unit back to place of purchase for a replacement.
FEATURES & PARTS
A. Cooler Lid (1)
B. Cooler Body (1)
C. Leg Assemblies (4)
D. Bottom Tray (1)
E. Caster Wheels with Locks (2)
F. Caster Wheels (2)
G. Bottle Cap Collector (1)
H. Bottle Opener (1)
I. M5 x 12 Bolts (18)
J. Pull Handle (2)
K. Lid Knobs (2)
L. M4 x 16 Bolts (12)
Drain Cap** (1)
Drain Extension Tube** (1)
Lid Nubs (2)

ASSEMBLY INSTRUCTIONS
Step 1 – Place the Cooler Body (B) upside down, so the bottom is facing up.
Step 2 – Attach the Leg Assemblies (C) by lining up the holes in the leg assemblies (C) and securing with M5x12
Bolts (I), (4) four should be used for each of the Leg Assemblies (C).
Step 3 – Next attach the Bottom Tray (D) to the Leg Assemblies (C) by lining up through the holes in the Bottom
Tray (D) with the threaded holes in the Leg Assemblies.
Step 4 – Thread the (2) two Caster Wheels with Locks (E) into the threaded holes on the left side of the Leg and
Tray Assembly. Make sure both of the Casters have locks on them. Secure them using an adjustable wrench. Do
not over tighten as the threads may strip.
Step 5 – Repeat Step 4 with the remaining Caster Wheels (F) for the right side of the Leg and Tray Assembly.
Step 6 – Carefully turn the Cooler Cart onto its wheels. Lock the Casters by pressing down on the lock pedal until it
clicks into the locked position.
Step 7 – Attach the Bottle Cap Collector (G) by slipping the tabs into the slots on the Cooler Body and then push
down, it will click into position.
Step 8 – Secure the Bottle Opener (H) using (2) Two M5 x 12 Bolts (I). Do not over tighten as the threads may strip.
Step 9 – Attach the Pull Handle (J) using (12) Twelve M4x16 Bolts (L). Do not over tighten as the threads may strip.
Step 10 – Attach the first Lid Knob (K) to the Cooler Lid. Repeat for remaining Lid Knob. Do not over tighten as the
threads may strip.
Step 11 – Place the assembled lid into position on the Cooler Body and press down to seal the Cooler. There
should be a snug fit.
Step 12 - Gently screw 2 nubs to the lid.
Step 13 - When using the Cooler Cart remember to have the Drain Extension Tube tightened onto the drain spout
then tighten the Drain Cap onto the threaded end of the Drain Extension Tube to keep water running off from the
melting ice from leaking out. When finished using the Cooler Cart remove the Drain Cap from the Drain Extension
Tube so the water from the melted ice can easily drain. ** (NOT PHOTOGRAPHED) **.
CARE & CLEANING
CAUTION: Select a suitable location for the unit. Always choose a safe location in accordance to the
safely recommendations outlined.
.
WARNING: Heavy! Handle with care! Keep children away from assembly area!
TOOLS REQUIRED: Adjustable wrench and Screwdriver!
NOTE: We suggest you assemble the unit on a soft surface to avoid damage to the finish.

When cleaning your Ice Cart use non-abrasive tools like soft clothes and plastic scouring pads. When cleaning the
scrubbing motion must be in the same direction of the manufacturer’s polishing marks. Some stainless steel
products come with visible polishing lines or “grain”. When visible lines are present, you should ALWAYS scrub in a
motion that is the same to them. When the grain cannot be seen, be safe and clean with a soft cloth or plastic
scouring pad. Many cleaners have chlorides, which are bad for stainless steel. Non-chloride cleaners will not harm
the finish. If you are not sure of your cleaner’s chloride content contact your cleaner supplier. Avoid cleaners
containing quaternary salts as they attack stainless steel & cause pitting and rusting.
DISPOSAL
Environmental Protection
Waste electrical production should not be disposed of with household waste.
Please recycle where facilities exist. Check with your Local Authority or retailer for
recycling advice.
CUSTOMER SERVICE
Australian Customer Service
GAF Control (Sales) Pty Ltd
P.O Box 19
Altona North Victoria 3025
Phone: 1300 659 489
Hours: 9am-5pm (EST) Mon-Fri
www.gafcontrol.com.au
*This product may vary slightly to the product illustrated due to ongoing product development.
Table of contents
Other HELLER Freezer manuals
Popular Freezer manuals by other brands

Culligan
Culligan 12-WL2200-CUL Installation, operation and servicing instructions

Sharp
Sharp SJ-SC41CHXIE-CH user manual

ORIGO
ORIGO TFC-1250 instruction manual

TEVA
TEVA TVAP Series Service manual

Frigidaire
Frigidaire FFU11FC2CW0 Factory parts catalog

Hotpoint
Hotpoint RZA50 Instructions for installation and use