Help Tech Activator User manual

Activator 2021
Table of Contents
Page 2
Table of Contents
1DISCOVER THE ACTIVATOR 7
1.1 What is the Activator? 7
1.2 The Activator at a glance 7
1.2.1 Top of the Unit 7
1.2.2 Left side of the device 9
1.2.3 Right side of the device 9
1.2.4 The SmartDock 9
1.3 Conventions Used in This Manual 9
2INSTALLATION 10
2.1 Package Contents 10
2.2 Software Installation 10
2.2.1 StartStick 10
2.2.2 NVDA and JAWS 12
2.3 Connecting the Power Supply 12
2.4 Connecting the Interface Cable 12
2.5 Installation of the Bluetooth Tie-In 13
2.5.1 Bluetooth-PC Tie-In 13
2.5.2 Bluetooth Apple iOS Device Tie-In 14
2.5.3 Bluetooth-Android Device Tie-In 15
2.6 Connecting the SmartDock to the Activator 15
2.6.1 The SmartDock at a glance 15
2.6.2 Connecting the iPhone to the SmartDock 16
2.6.3 Attaching the SmartDock to the Activator 16
2.6.4 Removing the SmartDock 16
2.7 Technical Specifications 17
3START UP 18
3.1 Version Information 18
3.2 Turning the Power On 18
3.3 Basic Operation 19
3.3.1 Functions of the on/off button 19
3.3.2 Chords 19
3.3.3 Signal Tones 20
3.3.4 System Messages 20
3.3.5 Checkboxes 20
3.3.6 Radio Buttons (1 of x) 21
3.3.7 System files 21
3.3.8 Energy Saving Features 21
3.3.9 The SAVE Mode 22
4QUICK START 23
4.1 The Activator as a Braille Display 23
4.2 The Activator as a note-taking device 24
4.2.1 Navigating the Menu 24
4.2.2 Context sensitive help 24
4.2.3 Writing a Note 24
4.2.4 Saving a Note 24
4.2.5 Opening a File 25

Activator 2021
Table of Contents
Page 3
4.2.6 Transferring data between the Activator and a PC 25
4.2.6.1 The file transfer program HTCom 25
4.2.6.2 Transferring a File using HTCom from the Activator to the PC 26
4.2.6.3 Transferring a File using HTCom from the PC to the Activator 26
4.3 The Activator in combination with the iPhone 26
4.3.1 The HelpTech+ app 26
4.3.1.1 Braille Monitor 27
4.3.1.2 Voice recording 27
4.3.1.3 Smart Services 27
4.3.1.4 Transferring Files between Activator and iPhone 28
4.3.2 Opening a file on the USB stick 28
4.3.3 Creating, editing and saving Word files 29
5OPERATION OF THE ACTIVATOR 30
5.1 The Menu System 30
5.1.1 menu 30
5.1.2 (E)ditor 30
5.1.2.1 Contracted Braille translation and back translation 30
5.1.2.2 New 31
5.1.2.3 Previous file 31
5.1.2.4 New directory 31
5.1.2.5 File and Folder list 31
5.1.3 iOS Apps 35
5.1.3.1 Files 35
5.1.3.2 Safari 35
5.1.3.3 Mail 36
5.1.3.4 Word 36
5.1.3.5 HelpTech+ 36
5.1.3.6 Edit 36
5.1.4 Smart Services 36
5.1.5 (C)lock 37
5.1.5.1 (D)isplay date/time 37
5.1.5.2 set (C)lock 37
5.1.5.3 (S)topwatch 37
5.1.6 (G)ames 37
5.1.6.1 BrailleHunt (B) 38
5.1.6.2 (H)angman 38
5.1.7 Mass storage 38
5.1.8 (B)raille sets 39
5.1.8.1 Creating a Braille Character Set 39
5.1.8.2 Loading Braille Character Sets 40
5.1.8.3 Selecting and Activating Braille Tables 40
5.1.8.4 (D)elete selection 41
5.1.9 (I)nfo 41
5.1.9.1 (M)emory usage 41
5.1.9.2 (B)attery stats 41
5.1.9.3 (K)eyboard layout 42
5.1.9.4 (S)erial number 42
5.1.9.5 (V)ersions 42
5.1.9.6 Maintenance info 43
5.1.9.7 System information 43

Activator 2021
Table of Contents
Page 4
5.1.10 (O)ptions 43
5.1.10.1 (6) dots braille 43
5.1.10.2 hotkeys (A)ctivate objects 43
5.1.10.3 (H)ighlight hotkeys 44
5.1.10.4 show s(Y)stem files 44
5.1.10.5 show f(O)lders first 44
5.1.10.6 (Q)uick entry 44
5.1.10.7 show file attri(B)utes 44
5.1.10.8 s(W)itch Activator auto off 44
5.1.10.9 (S)tartup mode 45
5.1.10.10 (T)one signals 45
5.1.10.11 (V)ibrations 46
5.1.10.12 (D)ate and time format 47
5.1.10.13 (I)nput indication 47
5.1.10.14 dot (F)irmness 48
5.1.10.15 atc s(E)nsitivity 48
5.1.10.16 sta(N)dby 48
5.1.10.17 Language 48
5.1.10.18 Battery charge enable 48
5.1.10.19 Use HID Braille 49
5.1.10.20 Keyboard layout for iOS Apps 49
5.1.10.21 Restore list of iOS Apps 49
5.1.10.22 (R)estore factory defaults 49
5.2 The Editor 50
5.2.1 Overview of Editor Functions 50
5.2.2 Dialogs and Confirmation of Actions 50
5.2.3 Entering and Deleting Text 51
5.2.4 Reading Text 51
5.2.5 ATC within the Editor 52
5.2.6 Moving the Cursor 52
5.2.7 Editing Modes (SPC+2 4 = Chord i) 53
5.2.8 Status Display (SPC+2 3 4 7 = Chord S) 54
5.2.9 Set Mark (N1/N4 + N3/N6) 54
5.2.10 Jump to Mark (SPC+1 3 4 = Chord m) 54
5.2.11 Delete Mark (N1/N4 + N3/N6, Select Name, SPC) 55
5.2.12 Block Functions 55
5.2.12.1 Marking the Beginning of a Block [SPC+N5] 55
5.2.12.2 Copy (SPC+1 4 = Chord c) 56
5.2.12.3 Cut (SPC+ 1 3 4 6 = Chord x) 56
5.2.12.4 Paste (SPC+1 2 3 6 = Chord v) 56
5.2.12.5 Exchange Mark and Cursor (SPC+7 8) 56
5.2.12.6 Deleting a Text Block (SPC+ 1 3 4 6 7 = Chord X, SPC+1 2 = Chord b)57
5.2.12.7 Saving a Block to a File (SPC+2 3 4 = Chord s) 57
5.2.13 Searches 57
5.2.13.1 Incremental Search (SPC+1 2 4 = Chord f) 57
5.2.13.2 Buffered Search 58
5.2.13.3 Backward Search (SPC+1 2 4 7 = Chord F) 58
5.2.14 Replace (SPC+1 2 3 5 = Chord r) 58
5.2.15 Calculator 59
5.2.16 Opening Additional Files 60

Activator 2021
Table of Contents
Page 5
5.2.17 Switching Between Open Files (SPC+5 6 8 or SPC+2 3 7) 60
5.2.18 Suspending the Editor (SPC+1 2 3 4 5 6) 61
5.2.19 Saving Files (SPC+2 3 4 = Chord s) 61
5.2.20 DirektTransfer of files or blocks of text to a connected device (SPC + 1 5 7
= Chord E) 62
5.2.21 Closing a File and Quitting the Editor (SPC+1 5 = Chord e) 62
5.2.22 Activating Terminal Mode from the Editor (SPC+2 3 4 5= Chord t) 63
5.2.23 Help (SPC+1 2 5 = Chord h) 63
5.2.24 The Editor's Setup Menu (SPC+1 3 6 = Chord u) 63
5.2.24.1 Window Scrolling (Global) 64
5.2.24.2 Scroll time (Global) 64
5.2.24.3 Indicate empty lines (Global) 64
5.2.24.4 Automatic scrolling (Global) 64
5.2.24.5 Dialog Timeout (Global) 65
5.2.24.6 Warn Timeout (Global) 65
5.2.24.7 Result Position [e] 65
5.2.24.8 Keep Expression [e] 65
5.2.24.9 Find Exact (Global) 65
5.2.24.10 Margin Action (Global) 66
5.2.24.11 Right Margin (Global) 66
5.2.24.12 Word Wrap (Global) 66
5.2.24.13 Tab Mode (Global) 66
5.2.24.14 Tab Stops (Global) 67
5.2.24.15 Tab Width (Global) 67
5.2.24.16 Line End (Individual File) 67
5.2.24.17 Insert Cursor (Global) 68
5.2.24.18 Edit Mode (Individual File) 68
5.2.24.19 Scroll Speed (Global) 68
5.2.24.20 Saved Position (Individual File) 68
5.2.24.21 Display Mode (Individual File) 68
5.2.24.22 Step Size (Global) 69
5.2.24.23 Match Column (Global) 69
5.2.25 Important Instructions Regarding the Editor 69
5.3 Braille input with the braille keys in the screen reader [SPC+1 2 7] (Chord B)70
5.3.1 Table of Key Commands for Controlling the PC 71
6THE FOLDING COMPUTER KEYBOARD 73
7THE ACTIVATOR AS A BRAILLE DISPLAY 74
7.1 Starting the Screen Reader with [SPCC]. 74
7.2 Screen readers using Windows: Example JAWS 74
7.2.1 Overview 75
7.3 VoiceOver: Screen reader for Apple iOS Devices 77
8OPERATION SETTINGS FOR HANDY TECH BRAILLE DISPLAYS 79
8.1 Connection 79
8.2 ATC 80
8.3 Status Cells 80
8.4 Key Actions 81
8.4.1 Key Lock 81
8.4.2 Fast Keys 81
8.4.3 Repeat Keys 81
8.5 Miscellaneous 82

Activator 2021
Table of Contents
Page 6
8.6 Info 82
9ACTIVE TACTILE CONTROL (ATC) 83
9.1 ATC Assistant for Reading or Learning 84
9.2 Tips for Utilizing ATC to Learn Braille 85
9.3 Tips for Utilizing ATC for the Experienced Braille Reader 85
9.4 ATC-Monitor Settings 86
10 BATTERY MANAGEMENT 87
10.1 Battery Charging 87
10.2 Battery Capacity Display 87
10.3 Automatic Recognition of Low Voltage 88
11 IMPORTANT INFORMATION 89
11.1 Start-Up Procedures 89
11.1.1 Self-check of the File System 89
11.1.2 Saving Files in Case of Fatal Errors 90
11.2 Symbols 90
11.3 Safety Information under the Standards for Medical Devices 90
11.4 General Safety Information 90
11.5 Handling the Activator 91
11.6 Warranty 92
11.7 Technical Support 92
12 LIST OF KEY COMBINATIONS 93
12.1 Navigating the Menu System 93
12.2 Editor Functions 93
12.3 Keys in Terminal Mode 94
12.4 Fixed Key Functions on Computer Keyboard 94
13 ERROR MESSAGES 96
13.1 Error Messages English only 96
13.1.1 Fatal Errors 96
13.1.2 General Errors 97
13.1.3 Warnings and Messages 98
13.2 Error Messages from the Message File 98
13.2.1 General Messages 98
13.2.2 File System Messages 98
13.2.3 Editor Messages 99
14 COPYRIGHT NOTICE 103

Activator 2021
Discover the Activator
Page 7
1 Discover the Activator
Thank you for choosing the Activator. Please take the time to study this manual. We have
tried to make the operation of the Activator as simple and intuitive as possible.
Nevertheless, this manual will help you to make even better use of your Activator.
1.1 What is the Activator?
The Activator extends the proven features of our Help-Tech Braille displays - such as the
concave Braille modules and the patented ATC technology for automatic relaying - with a
forward-looking concept of never-before-seen hardware and software solutions in a
modern design. As a result, the Activator offers the next generation Braille experience.
The Activator is a smart Braille display with a novel concept: It combines an ergonomically
optimized Braille display with the power of the iPhone as well as a compact, ultra-flat and
multifunctional 2-in-1 folding keyboard with new control elements.
The innovative SmartDock with charging function and USB port can be magnetically
connected to the Activator, creating a groundbreaking symbiosis between the iPhone and
the Activator.
Together with our specially developed iOS app - called HelpTech+ - the Activator is
enhanced with additional features and smart services.
Built-in contracted Braille translation and back translation: the Activator offers,
directly as an internal function, translation from uncontracted Braille to contracted Braille
and reverse. We have integrated the world's leading translation tool - RTFC - for English,
French and German directly into the Activator's firmware. Thanks to the Activator's
powerful hardware, contracted Braille translation is also super fast for UEB (United English
Braille).
Before using the Activator, please be sure to first read the safety instructions for proper
handling of your Activator. You will find them at the end of this manual.
The Activator has been carefully designed and tested. However, if you have any
suggestions, please contact your local customer service representative directly or write to
We hope you enjoy working with your Activator.
1.2 The Activator at a glance
The Activator is an ergonomically optimized 40-digit Braille display with a compact, ultra-
flat and multifunctional 2-in-1 folding keyboard. This section is intended to familiarize you
with the Activator and its controls. It is recommended that you have the Activator at hand
to immediately understand what you read here.
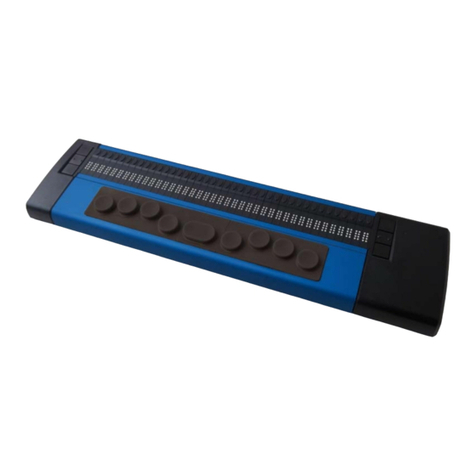
1.2.1 Top of the Unit
Please place the Activator in front of you on the table with the Braille keyboard facing up.
The two keys in the front center are the two space keys. The left space bar will be referred

Activator 2021
Discover the Activator
Page 8
to as [SPCL] and the right space bar will be referred to as [SPCR]. In the case that both
the left and the right space bar can be pressed, they are designated as [SPC].
Between the two spacebars is a small five-way function key that can be pressed to the
right, left, up, down or center. This function key enables fast and convenient navigation
both in internal mode and in connection with connected devices, such as a PC or cell
phone. In this context, it functions like the arrow keys on a keyboard.
Behind the space bar are the 40 ergonomic Braille modules with integrated cursor routing
keys. With the integrated cursor routing keys, hereafter called [CR] keys, the cursor can be
placed directly at the text position of a specific Braille module.
To the left and right of each Braille module are three independent navigation keys labelled
N followed by 1 through 6, according to the arrangement of the Braille dots. So top left N1,
below N2 and N3, right N4, N5 and N6. They are embedded in the housing in such a way
that they do not stand out from the Braille modules. The navigation keys have the following
functions:
The left resp. right upper navigation key serves as a read key to move back in the text and
will be called [N1] resp. [N4] in the following.
The lower left or right navigation key is used to read forwards and is referred to below as
[N3] or [N6].
If the left or right middle navigation key is pressed, different additional functions are
triggered. The following is an overview of the names of the navigation keys:
Upper left navigation key: [N1]
Left middle navigation key: [N2]
Left lower navigation key: [N3]
Upper right navigation key: [N4]
Right middle navigation key: [N5]
Right lower navigation key: [N6]
Above the Braille modules is the multifunctional 2-in-1 folding keyboard. This keyboard can
be used in the following two ways:
When folded down, an 8-dot Braille keyboard is available. This allows characters to be
entered using dot combinations in Braille. The keyboard is held in place by magnets, which
means it cannot accidentally flip open when the Activator is being transported. The 8-dot
Braille keyboard consists of 8 ergonomically arranged function keys. The function keys are
used for Braille input and are designated as follows:
7 3 2 1 SPCC 4 5 6 8
In the center of the function keys there is a space bar (space key), hereafter called
[SPCC]. In internal mode it functions as a space bar, in terminal mode, i.e. in connection
with a terminal and a screen reader, it functions as a control key.
A support foot is attached to the upper left and right narrow side of the folding keyboard.
By lifting both support feet and folding the keyboard backwards, a second keyboard, a
computer keyboard, can be used. This allows characters to be entered in the same way as
on a PC. Further information on the computer keyboard can be found in Chapter 6 The
folding computer keyboard.

Activator 2021
Discover the Activator
Page 9
1.2.2 Left side of the device
If you move from the front to the back on the left side of the housing, you can feel the
round on/off button. This has several functions (see chapter 3.3.1 Functions of the on/off
button). Behind it is a USB-C port for connecting the Activator to a PC or charging the
device's batteries via the wall power supply.
1.2.3 Right side of the device
On the right side of the Activator are the contact surfaces for an additional hardware
component, the so-called "SmartDock". The SmartDock is needed to connect an iPhone to
the Activator and is described in chapter 1.2.4 The SmartDock and in chapter 2.6
Connecting the SmartDock to the Activator.
1.2.4 The SmartDock
The SmartDock is an additional hardware component that allows an iPhone to extend the
functionality of the Activator many times over. Unlike a pure Bluetooth connection, where
the Activator only acts as a control element for the iPhone, it can perform many additional
functions with an iPhone connected via the SmartDock. (Only from iPhone 8 and from iOS
16). The prerequisite is that the iPhone used has been paired once via Bluetooth with the
Activator or another Braille display.
If the Activator is charged via the plug-in power supply, it passes on part of the charging
current to the iPhone, so that the iPhone is also charged. A USB stick can be connected to
the iPhone via the USB port on the SmartDock, and the Activator can also access the data
on the stick. In addition, with the help of the SmartDock, files can also be exchanged
between the iPhone and the Activator, as is possible between Braille display and PC with
the help of HTCom.
Together with our specially developed iOS app HelpTech+, the Activator is enhanced with
additional features and Smart Services, such as a Braille monitor that displays on the
iPhone what is written on the Braille display or the speech input service that allows you to
dictate texts into the Activator.
1.3 Conventions Used in This Manual
In this manual, the following conventions are used for inputs and outputs on the Activator
and on the PC:
Single keystrokes on Activator: [Key2] e.g. [N2]
Key/dot combination on Activator: [SPC + 1 2]
Display on the Activator: 'Display Text' such as 'File'
Single keystrokes on PC keyboard: {Key}, e.g. {ENTER}
Text input on PC keyboard: {input text}, e.g. {HTCom}
Text output on PC: "output text" such as "Done"

Activator 2021
Installation
Page 10
2 Installation
This section contains helpful information about how to install your Activator. Please read it
carefully to prevent difficulties while setting up.
2.1 Package Contents
Please verify that your package contains all of the items listed below. If one of the
components is missing or damaged, please contact us in order to request the missing part
or a replacement.
You should find enclosed the following:
•Activator
•SmartDock
•Carrying case
•2 USB-C connection cables (approx. 100 cm and approx. 200 cm)
•USB-A to USB-C adapter
•1 plug-in power supply 5 volt for charging the batteries with USB-C plug
•USB StartStick with quick start guide
•Software package HTCom (USB StartStick)
•Manual (USB StartStick)
•Manual for HTCom (USB StartStick)
2.2 Software Installation
To enable you to operate the different systems with your Activator, we have developed
programs for connecting the Activator. You will find these software components together
with the current manual and brief instructions on the StartStick supplied.
We are constantly developing extended and improved versions of our software
components. Therefore, we recommend that you update the StartStick from time to time.
The easiest way to do this is to select the entry "Update all components" under the menu
item "File" in the HTStart program.
2.2.1 StartStick
The StartStick with the HTStart program is a USB stick that contains all relevant software
components and documents you need to operate your Handy Tech Braille display.
Additionally, it contains the free screen reader NVDA, so that you can operate the PC
immediately, even if no screen reader (e.g. JAWS) is installed yet.
Once you have connected the StartStick to your PC, run the program start.exe in the root
directory. If a screen reader is already installed, it will be offered for use. Otherwise, the
included screen reader NVDA creates access for you via speech output and Handy Tech
Braille display.
HTStart detects which Braille display is connected to your PC and automatically preselects
all necessary software components for installation. Depending on the security settings of
your operating system, you may be asked to allow HTStart to run. Your consent is required

Activator 2021
Installation
Page 11
for HTStart to detect and display the installed screen readers. Please allow HTStart to run,
otherwise you will not be able to use the program.
After you have selected a screen reader, the HTStart window will open. All supported
Handy Tech products are listed here.
The language is preselected based on your Windows settings. However, you can select
another language in the drop-down list. After that you will find the available manuals in the
selected language under the products. If a manual in this language is not available, the
English manual will be displayed instead.
You can determine which components of the software should be installed. The choices
are:
•Activator Firmware and Documents: To update the internal functions of your Activator
and this manual.
•HTCom: Communication program for data transfer between PC and Activator.
We recommend that you keep the default settings. All required software components will
then be installed and a desktop shortcut to the HTCom program will be set up. After
completing the installation program, you will find a group called "Help Tech" in the Start
menu under Programs. In it you will find the following subgroups:
•Braille Driver: Under this you will find the Activator's key assignment for your screen
reader.
•Activator with version number appended: For version 1.0 of the software, this is e.g.
"Activator 1.0". Below you will find this manual, the uninstaller, the firmware update
program, and important notes.
•HTCom: Below you will find a description of HTCom, the program HTCom itself, as well
as the uninstallation program.
After successful installation you can connect your Activator to your computer. In the
installation directory of the Activator firmware you will find the following subdirectories
(applies to complete installation):
•Braille Tables: Contains different braille character sets for different country variants.
•Firmware: Contains four files for the internal programming of your Activator, as well as
system files
•Manuals: Contains this manual and other important information.
•KeyboardLayouts: Contains different keyboard files for different country variants.
•Uninstall: Contains the program to uninstall the software.
In addition to the Start menu, you can also launch HTCom from the shortcut on your
desktop, or by using the default key combination {Ctrl+Shift+H}.
For a detailed description of how to use HTCom, please refer to the separate manual "File
Transfer between PC and Braille System", which can be found in the subdirectory
"HTCom". Please also read chapter 4.2.6 Transferring data between the Activator and a
PC.

Activator 2021
Installation
Page 12
2.2.2 NVDA and JAWS
The current versions of the screen readers NVDA (from version 2023.2) and JAWS (from
version 2306 38 June 2023) support the Activator directly. It is not necessary to install
control programs, so-called drivers.
Only the data transfer program HTCom must be installed separately.
Connect the Activator to the PC using the USB-C cable (see chapter 2.4 Connecting the
Interface Cable). The Activator turns on and the smart power-on message appears with
the battery charge status displayed on Braille module 19. The charging animation indicates
that the Activator is now charging.
The Activator is detected immediately when JAWS is started. At the first start, a display
with the title "Handy Tech JAWS driver" and the information "Activator, interface USB-HID,
driver version 4.3.0.0" appears.
If another Braille display is connected to the PC while JAWS is running, it will also be
recognized and controlled immediately.
For information on how to use JAWS and how to assign the keys of the Activator in JAWS,
see chapter 7.2 Screen readers using Windows: Example JAWS.
To use the Activator with NVDA, it is necessary to select "HandyTech Braille display" in
the NVDA menu under Options/Settings/Braille. After accepting the settings, the Activator
will be recognized and controlled by NVDA. Currently, it is not sufficient to select the entry
"Automatic" for Braille display.
2.3 Connecting the Power Supply
The Activator is equipped with two permanently installed lithium-ion batteries, which may
only be replaced by authorized dealers or the factory. The supplied plug-in power supply
unit is used to supply power and charge the batteries via a power outlet. The Activator can
be operated without restrictions while the batteries are being charged.
To connect the power adapter, insert the small oval USB plug into the USB-C port on the
left side of the device. It doesn't matter how the cable is plugged in. Now you can connect
the power adapter to the flat end of the USB cable and plug it into an easily accessible
outlet. If the power adapter is plugged in while the Activator is powered on, a beep will
sound with a slight delay to indicate that the Activator is now in mains operation.
The Braille display shows the charging animation on module 19. (see chapter 3.2
Switching on the Activator).
Please note that while the Activator is charging via the power outlet, no USB connection to
the PC can be established.
If the Activator is connected to the PC with USB cable, the batteries will also be charged
with a smaller current. You can deselect this in the options menu, e.g. to save the laptop
battery during a trip (see chapter 5.1.10.18 Battery charge enable).
2.4 Connecting the Interface Cable
Your Activator can be connected to the PC either via a USB port or via the wireless
Bluetooth interface. If the Activator is used according to the medical device standard, the

Activator 2021
Installation
Page 13
PC to which it is connected must also comply with the medical device standard, or be
additionally grounded, or connected to an isolation transformer.
To connect the Activator to the PC via the USB port, use the supplied USB connection
cable. The USB connection cable has a small oval plug on one end. At the other end you
will find a larger flat plug. Insert the small oval USB plug into the USB-C socket on the left
side of the device. It doesn't matter which way around the cable is plugged in. Connect the
larger plug to the USB port of the PC. If your PC has USB-C ports only, use the included
adapter from the flat USB-A plug of the included USB cable to USB-C.
If both the Activator and PC are turned on, the Activator will be automatically recognized
by USB enabled operating systems. If the USB cable is plugged in while the Activator is
turned off, a message will briefly appear stating that the Activator is charging and it will
turn off again.
2.5 Installation of the Bluetooth Tie-In
Since the Activator is equipped with a Bluetooth transmission module, you can also
connect the Activator wirelessly to up to three different devices at the same time (e.g.
computer, smartphone, tablet) that also have Bluetooth wireless technology. The Activator
will automatically switch to the currently active data source, i.e. one of the up to three
Bluetooth connections that was last active, or the USB connection to the PC. When
switching, the Bluetooth device name is displayed if available. In the other case,
"Bluetooth device" followed by a number from 1 to 3 is displayed.
If no Bluetooth or USB connection is active, the Activator will automatically switch to
internal mode. If the Activator is connected to an iPhone via Bluetooth, for example, and
the iPhone switches to the lock screen, you can use the [N2] key to unlock your iPhone
and continue operating it directly with the Activator. If you want to return to the Activator's
internal functions, such as the editor, you can switch to internal menu mode by pressing
Chord m. You can also switch to the menu mode by briefly pressing the on/off button (see
chapter 3.3.1 Functions of the on/off button).
You will then be back in the same place in the internal mode from which you switched to
the Bluetooth connection, e.g. in a note.
Switching between USB port and the three Bluetooth channels can also be done manually
by pressing [SPC + 4 5 8] or by briefly pressing the on/off button. This switches in turn
between existing connections. If there is only one connection, switching is not possible.
When connecting the USB cable to a PC, the system automatically switches to the USB
connection.
Bluetooth is automatically active when you turn on the Activator. If you do not establish a
Bluetooth connection within 15 minutes, the Bluetooth interface will automatically turn off
to save battery power. When the Activator is woken up from sleep mode, Bluetooth is on
again for 15 minutes.
The wireless transmission range is about 10 meters.
2.5.1 Bluetooth-PC Tie-In
1. Please make sure that the Activator is switched on and Bluetooth is enabled. For
this purpose, it may be necessary to switch the device off and on again.

Activator 2021
Installation
Page 14
2. Select "Bluetooth Devices" from the control panel or from your system tray and
press the context menu key.
3. Select the “new device/connection” item.
4. "Add Bluetooth Device Wizard" will appear.
5. All detected Bluetooth devices will be listed. Select the Activator from the list and
press "Next".
6. The Activator will ask whether the pairing should be done with the message "Pair
y/n". Confirm the message by pressing [y] or the CR key above the y. If you reject
the pairing process, a connection to the PC can only be made after switching the
Activator off and on again.
7. Now the pairing will be done, and the needed drivers will be installed. Please wait a
moment. Please confirm by pressing "Finish". The Activator is ready to use when all
the needed drivers have been successfully installed.
Your Activator has now established a Bluetooth connection to the PC and you can utilize
all of its functions, as if it were connected via the USB cable.
Note: If you move the Activator beyond the Bluetooth connection's communication radius
(10 meters/yards), the connection to the PC will be interrupted. The connection will
automatically be re-established by Handy Tech's Braille device driver once you move back
within range.
2.5.2 Bluetooth Apple iOS Device Tie-In
Mobile devices from Apple, such as the iPhone or iPad, include the VoiceOver screen
reader, which enables blind and visually impaired people to operate the device via voice
output. If you use an iPhone, we recommend connecting using the SmartDock. A
Bluetooth connection only needs to be established once before installing the SmartDock
(see chapter 2.6.2 Connecting the iPhone to the SmartDock). Please note that the use of
our HelpTech+ app is not possible with a Bluetooth connection. Therefore, we recommend
deactivating Bluetooth on the iPhone after pairing when using the SmartDock. This
ensures that the connection is made via the Lightning cable of the SmartDock. To pair the
Activator with an Apple device, you must first enable VoiceOver. To do this, follow these
steps:
1. Please make sure that the Activator is turned on and Bluetooth is enabled. For this
purpose, it may be necessary to switch the device off and on again.
2. Open “Settings” on the home screen of your iOS device.
3. Choose Accessibility from the “Settings“ page.
4. Turn VoiceOver on.
5. Choose “Braille” on the VoiceOver page.
6. If Bluetooth is off, the iOS device will remind you and you should turn it on now.
7. The iOS device is now searching for Bluetooth Braille displays. Please choose the
Activator from the list.
8. If the Activator is asking whether the pairing should be done with the message
"Pair y/n", please confirm the message by pressing [y] or the CR key above the y.
If you reject the pairing process, a connection to the Apple device can only be made
after switching the Activator off and on again.
9. The Bluetooth connection will be established, and you can read the text from the
iOS device on the Braille display.

Activator 2021
Installation
Page 15
Note: if the Bluetooth connection was interrupted because the Activator or the Apple
device was turned off or in sleep mode, please activate the Activator first. The connection
will be re-established automatically, when turning on the Apple device.
We recommend setting the Accessibility Shortcut (3 time pressing the home key) to
VoiceOver. To define the Accessibility Shortcut, go to settings / Accessibility all the way
down to Accessibility Shortcut.
2.5.3 Bluetooth-Android Device Tie-In
Android devices, such as the Samsung Galaxy Sx, include the screen reader TalkBack by
default, which enables blind people to operate the devices by speech. This is pre-installed
on most Android devices and can be activated under Settings>Accessibility. For Braille
support an additional App, called BrailleBack, is needed which you can download and
install via Play Store. In order to connect the Activator via Bluetooth with an Android
device, please follow these steps:
1. Please make sure that the Activator is turned on and Bluetooth is enabled. For this
purpose, it may be necessary to switch the device off and on again.
2. Activate Bluetooth on the Android device and search for new devices.
3. After some seconds, the Activator will be found and listed in the device list.
4. Start the pairing process by double tapping on the Activator’s name displayed by
the Android device.
5. The Activator will ask whether the pairing should be done with the message "Pair
y/n". Confirm the message by pressing [y] or the CR key above the y. If you reject
the pairing process, a connection to the Android device can only be made after
switching the Activator off and on again.
6. If the paring was successful, you’ll hear the message “device connected”.
7. Open BrailleBack on the Android device. You can find it under
Settings>Accessibility.
8. The Bluetooth connection will be established, and you can read the text from the
Android device on the Braille display.
Note: If the connection was interrupted because you have turned off or put into sleep
mode the Activator and/or the Android device, please turn on/wake up the Activator first.
2.6 Connecting the SmartDock to the Activator
As already mentioned in chapter 1.2.4 The SmartDock, an additional hardware component
called SmartDock is supplied with the Activator. The SmartDock, in combination with the
Activator and the iPhone, enables a comfortable, user-friendly interaction between the
Activator and the iPhone. This turns the Activator into a fully comprehensive mobile
working solution. (From iPhone 8 and iOS 16)
In order to use the full functionality of the iPhone in conjunction with the Activator, please
install our free iOS app called "HelpTech+" from the App Store.
2.6.1 The SmartDock at a glance
On the right side of the SmartDock, there is a spring that can be tensioned by sliding it to
the right and is used to assist in inserting the iPhone into the SmartDock.
On the front bottom left side of the SmartDock is a Lightning cable.

Activator 2021
Installation
Page 16
On the left side of the SmartDock are six contact pins that connect to the contact strip on
the right side of the Activator. The connection is supported by magnets that automatically
pull the SmartDock into the correct position (see also chapter 2.6.3 Attaching the
SmartDock to the Activator).
A USB port is located at the top left. This allows USB sticks to be connected to and read
from the iPhone.
2.6.2 Connecting the iPhone to the SmartDock
To connect the SmartDock with the iPhone, please proceed as follows:
Position the SmartDock so that the spring points to the right and the magnetic side with the
contact pins points to the left.
Tension the spring and position the iPhone with the right long side on the spring.
Now snap the left long side of the iPhone into the SmartDock.
Now connect the Lightning cable of the SmartDock to the Lightning port of your iPhone.
After installing the HelpTech+ app, the iPhone must be paired once with the Activator via
Bluetooth in VoiceOver, as described in chapter 2.5.2 Bluetooth Apple iOS Device Tie-In.
Important: To ensure that the connection between iPhone and Activator is made via the
Lightning cable of the SmartDock, we recommend deactivating Bluetooth on the iPhone
after successful pairing.
2.6.3 Attaching the SmartDock to the Activator
The SmartDock is magnetically attached to the Activator. To attach the SmartDock to the
Activator, hold the left side of the SmartDock against the right side of the Activator. The
contact pins of the SmartDock are automatically connected to the contact surfaces of the
Activator by magnets. Please make sure that the two housing parts lie against each other
without an intermediate gap.
Important: please operate the SmartDock only on a table surface. The magnetic
connection is not strong enough to hold the SmartDock when you lift up the Activator. The
SmartDock with the inserted iPhone can then easily fall down and be damaged.
If the Activator is already turned on when the SmartDock is attached, a tone will sound to
indicate that the connection has been successfully established. If VoiceOver is enabled in
the iPhone, the iPhone's screen content is now displayed on the Braille display. The
iPhone can now be controlled using the multifunctional flip keyboard - both by using the
general Braille commands for VoiceOver, and by using the computer keyboard. Here, the
commands of a standard Bluetooth keyboard apply. For a list of Braille commands for
VoiceOver and a list of keyboard commands, see Chapter 7.3 VoiceOver: Screen reader
for Apple iOS Devices.
2.6.4 Removing the SmartDock
To remove the SmartDock, lift it upwards until the magnets release the connection.

Activator 2021
Installation
Page 17
2.7 Technical Specifications
•40 concave piezoelectric Braille cells
•40 cursor routing keys
•6 independent navigation keys
•2 space keys
•1 control stick
•Ultra slim multifunctional 2-in-1 folding keyboard:
oBraille keyboard with 8 function keys and one space bar
oComputer keyboard foldable
•2 vibrators (left and right)
•Tone generator for signal tones
•1 USB C port (for PC or charging cable)
•32 GB internal memory
•Bluetooth® wireless technology
•2 lithium-ion batteries
•Battery life approx. 30 hours
•Fast charging (4 hours)
•Measurements: 32 cm (12.6 inch) width
oKeyboard folded: 12.6 cm (5 inch) deep, 2.7 cm (1 inch) high
oKeyboard unfolded: 18.8 cm (7.4 inch) deep, 1.9 cm (0.75 inch) high
•Weight: 970 g (2.1 lbs)
•
Dimensions SmartDock
•Depth: 16.6 cm (6.5 inch)
owithout spring: 8.5 cm (3.3 inch) wide, 2.1 cm (0.8 inch) high
owith spring: 9.4 cm (3.7 inch) wide, 2.3 cm (0.9 inch) high
•Weight: 100 g (0.22 lbs)

Activator 2021
Start Up
Page 18
3 Start Up
3.1 Version Information
As of this Section, all common characteristics of the Activator will be described. This
information applies from firmware Version 1.0 of your Activator.
3.2 Turning the Power On
Press the on/off button to turn on the Activator. You can now work without a power source,
as the battery is fully charged. You will hear a sound signal and the following start up
message will be displayed on the Braille display:
’Activator F1.0 2SbMi.30.03.23 14:14 ?’
•The name of the device "Activator" (cells 1-9).
•The firmware version (cells 11-18) e.g. F1.0
•Charging indicator (cell 19): The battery charge status is displayed in the form of a
bar whose height corresponds to one of the five charging states. If no point is set,
this corresponds to the "empty" charge state. When the battery charge level is full,
all eight points are set. When loading, the charge indicator grows in steps from
below to the current charge state. When charging, the charging indicator moves
faster. After switching on the device, it takes about 10 seconds for this information
to be available.
•SmartDock status (cell 20): S is displayed if a SmartDock with iPhone is connected.
If no SmartDock is connected, no dot is set.
•Bluetooth status (cell 21): This cell indicates whether Bluetooth is switched on and,
if so, whether a Bluetooth connection exist. If Bluetooth is off, this cell is empty. A
small b indicates that Bluetooth is on. If a large B is shown, there is currently a
Bluetooth connection. If point 8 is set, two Bluetooth connections exist. If dot 6 is set
additionally, there will be three Bluetooth connections.
•Day of week (cells 22-24): For languages where a two-digit abbreviation for days of
the week is common, there is a period at the end; for three-digit abbreviations, there
is no period.
•Date (cells 25-32): day.month.year
•Time (cells 34-38): The clock of the Activator is displayed in 24-hour format and
without seconds. The colon between hours and minutes flashes every second.
•Call up the support information (cell 40): After pressing the cursor routing key above
the Braille cell 40, a compact information is displayed which can be important for
support purposes. To return to the start message, press [N2] or [N5].
The abbreviations in the support information have the following meaning:
•FW (“firmware“): version of the installed firmware
•SN (“serial number“):the Activator’s serial number

Activator 2021
Start Up
Page 19
•NSRV (“next service“): month and year of the next due maintenance
•LSRV (“last service“): month and year of last maintenance
•T (“tasks“): Performed during the last maintenance
oCPS (“caps“): caps exchanged
oPNCLN (“pins cleaned“): Pins cleaned
oPNRPL (“pins replaced“): pins exchanged
•LRPR (“last repair“): month and year of last repair
•DLV (“delivery“): month and year of delivery
If any of this information is not available, there is "N / A" ("not available") behind the colon.
A short vibration when switching on indicates that you are in normal working mode. If you
have checked the "Action confirmation" setting in the options menu under Signal
tones, a startup melody will also sound when you switch on.
You are now in the main menu of the Activator, where you can activate the various
functions.
If you get a message starting with 'FER:', 'Warning' or 'WRN:' instead of the startup
display shown above, the internal software is out of step. Detailed information and
remedies can be found in the chapters about firmware updates and error messages.
Before you can finally get started, we would like to briefly familiarize you with some basic
concepts of the Activator.
3.3 Basic Operation
3.3.1 Functions of the on/off button
The on/off button on the left side of the device has several functions:
1. to switch on or wake up the Activator from sleep mode (standby), press it briefly.
2. to switch off the Activator, press and hold it for a little longer (one second).
3. to switch between the different channels while the Activator is on, press it briefly.
Sequence starting from the menu mode (which is also considered a channel):
a. USB device
b. SmartDock
c. Then follow all Bluetooth devices (the name of the Bluetooth device will be
displayed).
d. Finally, menu mode again
4. to switch to SAVE mode, press and hold for 5 seconds. See also chapter 3.3.9 The
SAVE Mode.
5. to reset the Activator when it stops responding, press the power button for a very long
time (10 seconds).
3.3.2 Chords
The Activator's keyboard is very easy to use. The keystroke functions are not activated
until the key is released. If a character is composed of several keys, it will be created after
releasing all keys.

Activator 2021
Start Up
Page 20
In order to make functions available to you which require their own function keys on
standard keyboards, while also providing efficiency of operation, we have introduced the
so-called chord functions. Chords are letters or Braille dots that are used in combination
with the space bar. For example, in the Editor you can use Chord-i [SPC+2 4] to toggle
between insert and overwrite mode.
With Chord commands, it is enough to release one key in order to activate the function.
When entering characters, all keys need to be released.
You will find a list of all available key combinations in chapter 12.
3.3.3 Signal Tones
The Activator utilizes various signal tones to indicate its status or to alert you about
prompts or possible errors.
1. Start-up sound: This is a tone signal which sounds during start-up. When the start-
up sound is preceded by a very short, high tone followed by a pause, then the
Activator is in work mode.
2. Warning signal: This consists of a simple short sound and may sound, for example,
when you have reached the beginning or the end of a text in the Editor or when you
are cancelling a search.
3. Error signal: These are three consecutive signals with an ascending tone pitch,
which may be emitted, for example, before you delete a file.
Note: You can specify which types of acoustic signals you want the Activator to emit (see
chapter 5.1.10 and 5.1.10.10).
3.3.4 System Messages
The Activator will display messages to indicate the successful completion of an operation
or to alert you about possible operating errors. If it is an error message, or in other
important cases, the messages are accompanied by a signal tone and/or vibration. The
signal sounds and vibrations can be switched off in the Options menu (see chapter
5.1.10.10 (T)one signals and 5.1.10.11 (V)ibrations).
We recommend you to carefully review these messages before continuing with your work.
They frequently contain instructions on how to proceed.
Most error messages will be in the selected system language however, there are some
system messages that are only provided in English. Regarding these messages, all
messages beginning with 'fatal', 'fer:', 'error' or 'wrn:' should be attended to.
After you have read the message, you can exit by pressing [N2] which in most cases will
return you to the place from which the message was initiated. If the message text does not
fit on the Braille display, you can scroll through it by pressing the [N1/N4] and [N3/N6]
keys.
In chapter 13 you will find a list of the most important messages with explanations.
3.3.5 Checkboxes
Checkboxes are switches that can be in either an "on" or "off" state. A checkbox consists
of a symbol indicating its state and a designation. The symbol "[X]" indicates that the
checkbox is "on" or active, whereas "[ ]" is an inactive or "off" checkbox.
Other manuals for Activator
1
Table of contents
Other Help Tech Monitor manuals

