HELVIA OMNIS-100 User manual

OMNIS-100
Multi Media Player
Please read this manual carefully and keep it for future reference
User Manual

Dear value Customer,
First, thank you for purchasing a HELVIA® product. Our mission is to oer
solutions based on the most up-to-date technologies for all systems integration
needs in the private, commercial and corporate sectors.
We hope you are satised with this product and, if you wish to participate, we
would be very pleased to receive your feedback on the operation of this product
and possible improvements for the future. You can go to “CONTACT” section of
www.frenexport.com and send an e-mail with your opinion; this would help us
make equipment that are closer to the real needs of our customers.
Finally, please read this user manual carefully before using the product; incorrect
use could cause damages to you and the product. Take care!
The HELVIA team

TABLE OF CONTENTS
1. PRECAUTIONS ........................................................................................................................ 4
1.1. Important Safety Symbols...................................................................................................................4
1.2. Important Safety Instructions............................................................................................................4
2. UNPACKING ............................................................................................................................ 6
3. PRODUCT OVERVIEW ........................................................................................................... 6
3.1. Features:................................................................................................................................................... 7
4. FRONT PANEL ......................................................................................................................... 8
5. REAR PANEL ............................................................................................................................ 8
6. REMOTE CONTROL................................................................................................................ 9
7. GETTING STARTED............................................................................................................... 10
7.1. Connection and Preparation ........................................................................................................... 10
7.2. Connecting to the Network ............................................................................................................ 10
7.3. Connecting Audio Outputs............................................................................................................. 10
8. GENERAL DEVICE FUNCTIONS .......................................................................................... 11
8.1. Presets ..................................................................................................................................................... 11
8.2. Now playing information..................................................................................................................11
9. FIRST-TIME SETUP............................................................................................................... 12
10. MENU OPERATION.............................................................................................................. 13
10.1. Internet Radio, Podcast ................................................................................................................... 13
10.2. Spotify Connect................................................................................................................................. 14
10.3. DAB+ Radio........................................................................................................................................ 14
10.4. FM Radio ............................................................................................................................................. 15
10.5. BT Audio Streaming ......................................................................................................................... 15
10.6. USB........................................................................................................................................................ 16
10.7. Sleep ..................................................................................................................................................... 16
10.8. Auto On............................................................................................................................................... 16
10.9. UNDOK App....................................................................................................................................... 17
11. SYSTEM SETTINGS................................................................................................................17
11.1. Equaliser................................................................................................................................................ 17
11.2. Streaming Audio Quality................................................................................................................. 17
11.3. Network................................................................................................................................................ 18
11.4. Time/Date............................................................................................................................................ 19
11.5. Language ............................................................................................................................................. 19
11.6. Factory Reset ...................................................................................................................................... 19
11.7. Software Update................................................................................................................................ 19
11.8. Setup Wizard ...................................................................................................................................... 19
11.9. Info......................................................................................................................................................... 19
11.10. Privacy Policy.....................................................................................................................................20
11.11. Backlight..............................................................................................................................................20
12. 19” RACK INSTALLATION ..................................................................................................20
13. TROUBLESHOOTING ........................................................................................................... 21
14. SPECIFICATION.....................................................................................................................22
15. CONFORMITY .......................................................................................................................23
16. TRADEMARKS.......................................................................................................................23
17. WARRANTY AND SERVICE ................................................................................................23
18. WARNING..............................................................................................................................24

OMNIS-100 Multi Media Player
4
1. PRECAUTIONS
1.1. Important Safety Symbols
The above warning is located on the rear of the unit
The lightening ash with arrowhead symbol within an equi-
lateral triangle is intended to alert the user to the presence of
uninsulated “dangerous voltage” within the product’s enclosure
that may be of sucient magnitude to constitute a risk of elec-
tric shock to persons.
The exclamation point within an equilateral triangle is intended
to alert the user to the presence of important operating and
maintenance (servicing) instructions in the literature accompa-
nying the product.
1.2. Important Safety Instructions
yRead these instructions
yKeep these instructions
yHeed all warning
yFollow all instructions
Water and Moisture
The apparatus should be protected from moisture and rain and can not be used
near water; for example near a bathtub, a kitchen sink, a swimming pool, etc.
Heat
The apparatus should be located away from heat sources such as radiators, stoves
or other appliances that produce heat.

OMNIS-100
Multi Media Player
5
Ventilation
Do not block areas of ventilation opening. Failure to do could result in re. Always
install according to the manufacturer’s instructions.
Object and Liquid Entry
Objects do not fall into and liquids are not spilled into the inside of the apparatus
for safety.
Power Cord and Plug
In case of external power cord, protect it from being walked on or pinched partic-
ularly at plugs, convenience receptacles, and the point where they exit from the
apparatus. Do not defeat the safety purpose of the polarized or grounding-type
plug. A polarized plug has two poles; a grounding-type plug has two poles and a
third grounding terminal. The third prong is provided for your safety. If the pro-
vided plug does not t into your outlet, refer to an electrician for replacement.
Power Supply
In case of products with external power adapter, the unit should be connected to
power adapters only of the type as marked on the apparatus or described in the
manual. Failure to do could result in damage to the product and possibly the user.
Unplug this apparatus during lightning storms or when unused for long periods.
Noise and Interferences
Do not use the device in the nearby of a TV, radio, stereo equipment, mobile
phone, or other electric devices. Otherwise, the device, TV, or radio may generate
noise.
Electrical Connection
Improper electrical wiring may invalidate the product warranty.
Cleaning
Clean only with a dry cloth. Do not use any solvents such as benzene or alcohol.
Servicing
Do not implement any servicing other than those means described in the manual.
Refer all servicing to qualied service personnel only. Only use accessories/attach-
ments or parts recommended by the manufacturer.

OMNIS-100 Multi Media Player
6
2. UNPACKING
Thank you for purchasing your OMNI-100 Multi Media Player. All units have
been rigorously tested before leaving the factory, This product is widely used in
schools, shops, bars, pubs, parks, parking lots, railway stations, airports, villas, and
other places: it is the ideal choice for public broadcasting. In order to facilitate
your installation, commissioning and use of this product, please read this manual
before installation.
Carefully unpack the carton and check the contents to ensure that all parts are
present and in good conditions:
y1 x OMNIS-100 Multi Media Player
y1 x Remote Control
y1 x Power adaptor
y1 x Stereo RCA cable
y1 x FM/DAB+ antenna
y1 x BT/WiFi Antenna
y2 x Metal Fin with 6 screws to mount OMNI-100 on a 19” rack
yThis User manual
If anything damaged during transport, notify the shipper immediately and keep
packing material for inspection. Again, please save its carton and all packing
materials. If the unit must be returned to the manufacturer, it is important that
the unit is returned in the original manufacturer’s packing. Please do not take any
action without rst contacting us.
Our products are subject to a continuous process of further development. There-
fore modications to the technical features remain subject to change without
further notice.
3. PRODUCT OVERVIEW
The HELVIA OMNIS-100 Multi Media Player is a device that encloses the concept
of “All in One” concerning audio reproduction given the multiple connection pos-
sibilities and the functions with which it is equipped. OMNIS-100 can be connect-
ed directly to the Spotify streaming service and can also access countless Web
Radio stations. The device also features the “BT Audio Streaming” function which
allows wireless connection to smartphones, tablets or laptops and also a DAB/
DAB+/FM tuner with RDS function for additional information on radio stations.
The Wi-Fi antenna or LAN connection allows streaming audio playback in large
environments and remote control via smartphone or tablet using the UNDOK An-
droid/iOS App. Remote control for OMNIS-100 can also be done with the handy
remote control supplied. The USB port located on the front panel allows audio
playback of les in mp3 format through the use of external USB ash drives and

OMNIS-100
Multi Media Player
7
the analog and digital connections located on the rear panel such as for example
the Coaxial, Optical and RCA stereo outputs allow connection with numerous ex-
ternal devices. The 2.4” TFT color display, the elegant cabinet with laser engraved
screen printing and the 4 rubber feet make OMNIS-100 an important element for
any Hi-Fi system while the supplied metal ns allow easy mounting on racks of 19”
for professional installations in commercial activities such as Hotels, Resorts, Pubs
Bars, Etc.. HELVIA OMNIS-100 really represents the “All in One” concept.
3.1 . Features:
yDirect connection to Spotify streaming service
yAccess to countless Web Radio stations
y“BT Audio Streaming” function for wireless connection to smartphone or laptop
yDAB/DAB+/FM tuning with RDS function for additional radio station informa-
tion
yWi-Fi antenna and LAN connection for audio streaming playback in large envi-
ronmentsl
yRemote control via Smartphone or Tablet using the UNDOK Android/iOS App
yWireless control via supplied remote control
yUSB port for audio playback of les in mp3 format using external USB ash
drives
yCoaxial, Optical and stereo RCA outputs for connection to a variety of external
devices
y2.4” TFT color display
yMetal cabinet and laser engraved silkscreens
ySupplied metal ns for easy 19” rack mounting
yExternal power supply (AC 100-240V)
OMNIS-100 Multi Media Player
8
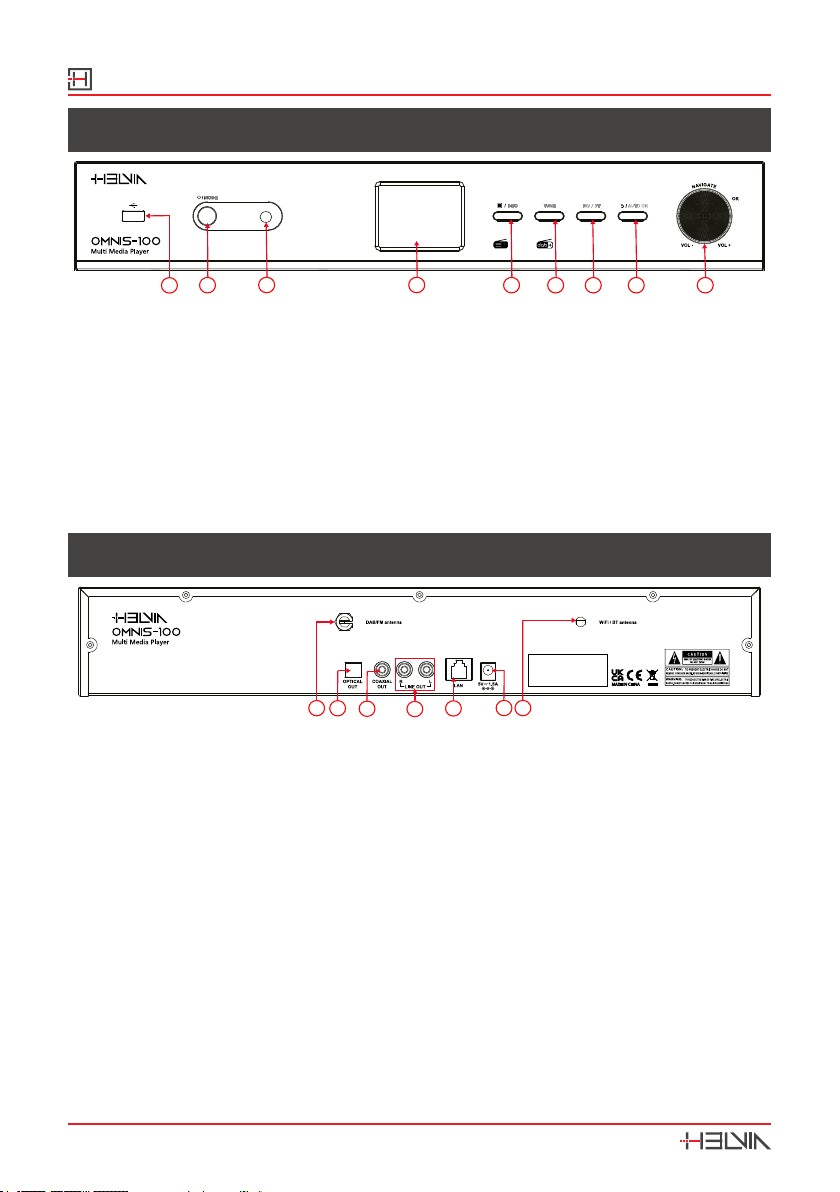
4. FRONT PANEL
TUNEINFO FAV / BT AUTO ON
BT
WirelessAudio
Streaming
Set up your solutions
1
23 4 567 8 9
1. USB port for music playback
2. On/Standby / Mode button
3. Remote control IR receiver
4. 2.4” TFT color display
5. Menu/Info button
6. Tune button
7. FAV button / BT Pairing
8. Back/AUTO ON button
9. Knob Volume/Tuning ; Short press to OK/select
5. REAR PANEL
MADE iN CHINA
Serial No.
1234567
1. DAB+/FM Antenna
2. OPTICAL Out socket
3. COAXIAL Out socket
4. RCA LINE Out-R L sockets
5. Ethernet 10/100 LAN socket
6. DC In power supply
7. WiFi / BT Antenna

OMNIS-100
Multi Media Player
9
6. REMOTE CONTROL
1
2
3
9
10
13
4
5
6
7
8
11 12
14
15
16
17
18
19
20
21
22
1. Device power on/o
2. Open, close mode selection
3. Press to open, close Menu
4. Select track, hold down to seek
5. Start playback, pause
6. Select equalizer preset
7. Move up; FM: Set frequency
8. Move left, step back
9. Conrm entry; FM: Scan;
Playing: album in full screen
10. Mute, Unmute
11. Select favourite stations
12. Display FM mode info (Name, PTY, RT,
frequency)
Display DAB mode info (Station, track,
artist etc.)
13. Number buttons: retrieve saved favorite
station, hold down to save station
14. Decrease Volume
15. Move down; FM: Set frequency
16. Move right, step next
17. Increase Volume
18. Select track, hold down to seek
19. AUTO ON setting
20. Press and hold to BT discoverable under
BT mode
21. Music: random and repeat selection
22. Sleep setting

OMNIS-100 Multi Media Player
10
7. GETTING STARTED
7.1. Connection and Preparation
1) Connect the power adaptor to the back of device and plug it into power socket.
2) Switch on the device, it starts up.
3) Install the telescopic FM/DAB+ antenna for DAB and FM reception.
4) Install the rod WiFi antenna for WiFi reception.
7.2 . Connecting to the Network
For wired Ethernet:
Use an Ethernet cable (RJ45 jack) to connect the LAN ports on OMNIS-100 and
your network device. Check if the light indicators on the network device are in
appropriate status.
For wireless WiFi:
This is a broadband connection in combination with a wireless access point, router
or similar network device.
The network device needs to support WiFi (802.11 b/g/n) wireless connection.
Make sure you have setup the wireless network and you have the WEP, WPA or
WPA2 security password (OMNIS-100) to activate the connection. You may also
use the WPS (WiFi Protected Setup) function for easy pairing between the net-
work device and OMNIS-100. Check if the light indicators on the network device
are in appropriate status.
7.3 . Connecting Audio Outputs
Connecting the RCA line Out
Use a standard RCA audio cable to connect the line out (L/R) outputs located on
the rear panel to an external device
Connecting the Coaxial Out
Use an audio Coaxial cable to connect OMNIS-100, for example, to a HiFi speaker
system to improve audio performance.
Connecting the Optical Out
Use an optical audio cable to connect OMNIS-100 to external audio devices that
have an optical audio input

OMNIS-100
Multi Media Player
11
8. GENERAL DEVICE FUNCTIONS
On the playing screen, rotate the volume knob or press / on the remote
control to adjust the volume. Switch o the sound by pressing on the remote
control. Press /MODE on the device or MODE on the remote control to select
modes. Press and hold MENU/INFO on the device or MENU on the remote
control to open the menu. Press again to close the menu and return to playing
screen.
On the menu, rotate the knob or, press / on the remote control to move
along the entries.
Press OK to conrm; press BACK ( )on the device or on the remote control to
step back.
Press and hold / MODE on the device or press on the remote control to
switch to standby mode. The time, date and any active alarm times display on the
screen. Switch on using the same button.
8.1. Presets
Presets are stored in the radio and cannot be accessed from other radios. To store
an Internet radio preset, press and hold FAV on the device or FAV on the remote
control the display shows the “Save preset” screen. Select one of the 10 presets to
save the currently playing station. Shortcut to preset store 1-10 favourite stations
by directly pressing and hold numeric buttons directly on the remote con-
trol. To select a preset, press the button FAV on the device or the button FAV on
the remote control , then select one of the listed preset stations. When a preset
station is playing, it shows n ( 1, 2, etc) at the bottom of the screen. Shortcut to
preset recall 1-10 favourite stations by directly pressing numbers directly on
the remote control.
8.2. Now playing information
During Stream/DAB/FM playback, the screen shows some information about
the station, press the MENU/INFO button on the device or the INFO button on
the remote control to view it. The device can process large amounts of data and
it may happen that, after a long period of operation and regardless of the mode,
the system may freeze or malfunction. In this case it is necessary to restart the
device

OMNIS-100 Multi Media Player
12
9. FIRST-TIME SETUP
When powering the device on for the rst time, it displays information of privacy
policy. Press OK to continue. Then a setup wizard appears for helping you setup
the main use of the device.
Select “YES” and conrm your selection and launch the setup wizard.
If you select “NO”, the next window will ask you choose if you want to start the
setup wizard again next time you power the device on.
Setup wizard helps you setup the main use of the device.
Selecting the menu language
Rotate the knob to select the menu language you want from the list and press OK
to conrm.
Setting date and time
Select “12” for 12-hour display format or “24” for 24-hour display format.
If you select the 12-hour format, the display shows “AM” in the morning or “PM”
in the afternoon.
After this, the following options are available, to dene if the time to be synchro-
nized from radios:
- Update from DAB
- Update from FM
- Update from Network
- No update
If you choose “Update from Network” you must indicate your time zone in the
next window. Next choose “ON” for Summer time, otherwise select “OFF”.
If you choose “No update”, you will have to enter the date and time manually.
“AM”/ “PM” displays only if you have chosen the 12-hour time format.
Select “AM” for the morning hours or “PM” for the afternoon hours.
Setting Network
Firstly the device asks if keep network connected. If you want to control the device
in all operating modes via the app, select “YES”. If choosing “NO”, it is not possi-
ble to control the device from the app in the (Standby, AUX IN, FM, DAB) oper-
ating modes. Note that the power consumption in standby mode will be higher
when the network connection is kept up
Any WLAN networks found are listed on the display, along with their names. For
wired Ethernet, select [Wired].
After selecting the WLAN \network, you will be asked for input a standard en-
cryption. To enter the network’s key, use the knob or direction keys on the remote
control to move the cursor through the characters and press OK to conrm.
OMNIS-100
Multi Media Player
13
As each character is selected, the key is built up near the top of the display.
There are three options accessible by tuning the navigate knob back before the
rst characters: Backspace, OK and Cancel.
[ WPS ]
There are hints for the type of network if your network device supports WPS func-
tion. Please use one of the following methods of connection:
Push button: The device prompts you to press the connect button on the router.
It then scans for a ready Push Button Connect network and con-
nects.
Pin: The device generates an 8-digit code number which you enter into the wire-
less router or access point.
Skip WPS: Enter key as for a standard encrypted network.
For more information on setting up a WPS encrypted network, see your WPS
router’s instructions.
Device attempts to connect to the selected network.
It will show connected if the setup is successful. If connecting fails, it returns to a
previous screen to try again. Once completed, press OK to quit the setup wizard.
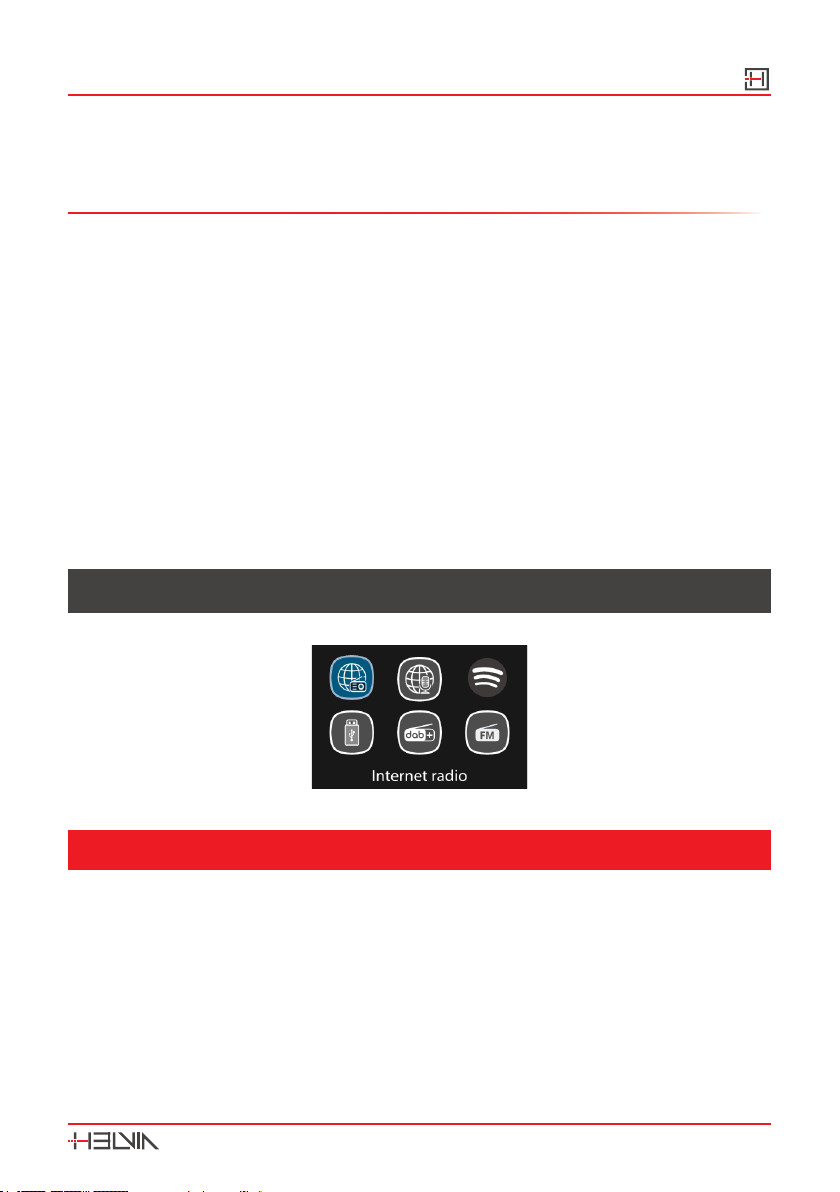
10. MENU OPERATION
1 0.1. Internet Radio, Podcast
The device can play thousands of radio stations and podcasts from around the
world though a broadband Internet connection. When you select Internet radio
or Podcasts mode, the device directly contacts a dedicated portal to get a list of
stations or podcasts. The list menu is provided from the portal, so it is only acces-
sible when the device is connected to the Internet. The contents and submenus
may change from time to time. Choose required category and search the station
or podcast to listen.

OMNIS-100 Multi Media Player
14
10.2. Spotify Connect
Use your phone, tablet or computer as a remote control for Spotify.
Go to spotify.com/connect to learn how.
The Spotify Software is subject to third party licenses found here:
http://www.spotify.com/connect/third-party-licenses
10.3. DAB+ Radio
DAB mode receives DAB/DAB+ digital radio and displays information about the
station, stream and track playing.
Scanning for stations
The rst time you select DAB radio mode, or if the station list is empty, the radio-
automatically performs a full scan to see what stations are available. You may also
need to start a scan manually to update the list of stations.
To start a scan manually, choose Full scan. To scan only stations with good signal
strength, select Local scan. Once the scan is complete, the radio shows a list of
available stations.
To remove stations that are listed but not unavailable, choose to remove the not
valid stations. Turn the navigate knob to view a list of stations and press the knob
to select the desired station. Once selected, the station plays and the screen show
information about station, track or show as broadcast.
Settings
1) Dynamic range compression (DRC)
If you are listening to music with a high dynamic range in a noisy environment,
you may wish to compress the audio dynamic range. This makes quiet sounds
louder, and loud sounds quieter. You can change DRC as o, low or high.
2) Station order
You can choose the order of the DAB station list from “Alphanumeric”, “Ensemble”
or “Valid”. Choosing the “Ensemble” option will list groups of stations that are
broadcast together on the same ensemble. Choosing the “Valid” option will list
the valid stations in alphanumeric order rst, then the o-air stations.

OMNIS-100
Multi Media Player
15
10.4. FM Radio
FM radio mode receives analogue radio from the FM band and displays RDS
(Radio Data System) information about the station and where broadcast. To nd
a station, press OK. The frequency display starts to run up as the device scans the
FM band. Alternatively, you can scan up or down by holding and pressing /
on the remote control tune manually with quick presses. For up and down adjusts,
you can press / on the remote or by press on the front panel the “TUNE”
button once and then turning the knob.
Settings
1) Scan Settings
By default, FM scans stop at any available station. This may result in a poor sig-
nal-to-noise ratio (hiss) from weak stations. To change the scan settings to stop
only at stations with good signal strength, select “YES” after choosing the option
“Strong station only?”.
2) Audio Settings
All stereo stations are reproduced in stereo. For weak stations, this may result in a
poor signal-to-noise ratio (hiss). To play weak stations in mono, select “FM weak
reception” option. After that select “Listen in mono only” and then “YES”.
10.5. BT Audio Streaming
If you select “BT Audio Streaming mode”, you should turn on this function in
OMNIS-100 device. Please access the menu and set “discoverable” the BT Audio
Streaming mode. From your BT Audio Streaming device, search the OMNIS-100
device to pairing. When it is waiting for pairing, there is a blinking BT Audio
Streaming icon at the bottom. If the pairing is successful, the BT Audio Streaming
icon becomes steady. At this point, it is possible to control the music playback
from your BT Audio Streaming device.
Press / on the remote control to go back the forward track or go to the next
track. Press on the remote control to play or pause the track.
To disconnect from the radio, press and hold “FAV/BT” on the device or “BT
PAIR” on the remote control.

OMNIS-100 Multi Media Player
16
10.6. USB
By selecting the USB option from the main menu, the tracks and/or folders con-
tained in the USB device are displayed. You can browse tracks and/or folders with
the navigation knob or direction keys on the remote control. You can set both
random playback and loop repeat of songs. The display shows folder and le
names. Once you nd a song you want to play, press OK to play it.
Notice: USB port supports playing MP3 les and USB external device size up to
128GByte
1 0.7. Sleep
To set the sleep timer, select Sleep under Main menu or press Sleep button on
the remote control to set the sleep period.
You can choose from Sleep OFF, 15, 30, 45 or 60 minutes and conrm. Once you
select the sleep period, the system returns to the now playing screen.
10.8. Auto On
There are two versatile “Auto-ON” with snooze function. Each alarm can be set to
start in a particular mode.
Select “Alarms” under Main menu to set or change an “Auto-ON”.
Alternately, press AUTO ON button on the remote control to congure.
After setup all the parameters, select “Save” to activate.
The screen shows active “Auto-ON” with an icon at the bottom left.
At the set time, the “Auto-ON” will be activated.
To temporarily silence, press any key excepted pressing / MODE or AUTO ON
buttons on the device or pressing or AUTO ON buttons on the remote control.
It is possible to change the snooze period so that the device returns to standby
for the set period, with the silenced “Auto-ON” icon ashing. Press / MODE or
AUTO ON buttons on the device or press or AUTO ON buttons on the remote
control to turn o the “Auto-ON”.
NOTE: OMNIS-100 must be connected to external speakers for audio output.

OMNIS-100
Multi Media Player
17
10.9. UNDOK App
The device gives a feature of network remote by smartphone or tablet in iOS or
Android system. By downloading the assigned app named UNDOK, you can view
all the modes the device. Search UNDOK from Google Play or Apple Store, and
install it to your smartphone or tablet.
For Android system For iOS system
(Google Play) (Apple Store)
Before using the UNDOK app, make sure the device and the smartphone / tablet
are in the same WiFi network.
After launching the app, it initializes and searches for Internet Radio on the net-
work. Tap the device to connect. When prompted, enter your current PIN code.
The default PIN is “1234”. You can view and change the current PIN on the Inter-
net radio in the Select the desired mode menu on the main page. You can then
check the selected mode on your smartphone/tablet and on the device display
simultaneously.
11. SYSTEM SETTINGS
11.1. Equaliser
Several preset EQ modes are available: Normal, Flat, Jazz, Rock, Movie, Classic,
Pop, News and My EQ.
Press “EQ” button on the remote control to select the desired equalization.
A user-dened setting is available so that you can create your own EQ with cus-
tom bass, treble settings.
11.2. Streaming Audio Quality
Set the Streaming audio quality: Low quality, Normal quality, High quality

OMNIS-100 Multi Media Player
18
11.3. Network
In this paragraph there will be hints for the type of network.
If you connect the LAN cable, it will show a network of [wired];
if the network device supports WPS function, it will be [WPS] before the SSID (the
name of the network device).
For the wireless connection, you will be asked for input encryption in the next
step.
1) Network Wizard
Enter to search AP SSID, then input the WEP / WPA key or choose Push Button/
Pin/Skip WPS to connect to the wireless network.
2) PBC Wlan Setup
Push Button Conguration, it is to connect the AP that supports WPS (Wi-Fi Pro-
tected Setup).
3) View Settings
View the information of current connected network: Active connection, MAC ad-
dress, Wlan region, DHCP, SSID, IP address, Subnet mask, Gateway address,
Primary DNS and Secondary DNS.
4) Manual Settings
Enable or disable DHCP (Dynamic Host Conguration Protocol). Input the SSID,
WEP / WPA key and/or other conguration.
5) NetRemote PIN Setup
Here you can view and edit the NetRemote PIN. The default NetRemote PIN is:
“1234”. The NetRemote PIN is required when you want to connect a smartphone
or Tablet PC to your radio using the feature mentioned in the paragraph 9 (FIRST-
TIME SETUP).
5) Network Prole
The device remembers the last four wireless networks it has connected to, and
automatically tries to connect to whichever one of them it can nd. From here you
can see the list of registered networks. You can delete unwanted networks.
6) Clear Network Settings
Select “YES” to clear all the current network settings. Select “NO” to cancel.
7) Keep Network Connected
If you choose to keep network connected, the WiFi will not disconnect even you
are in standby mode or non-network mode. This option allows the device to be
ready for UNDOK and Spotify Connect connection in any modes.

OMNIS-100
Multi Media Player
19
11.4. Time/Date
Set the time manually or auto update, time format, time zone and daylight. Pin/
Details can be referred to Setting date and time under Paragraph 9 (FIRST-TIME
SETUP)
11.5. Language
The default language is English. Change it as your preference. Available languag-
es: English, Czech, Danish, Dutch, Finnish, French, German, Italian, Norwegian,
Polish, Portuguese, Slovak, Spanish, Swedish, Turkish.
11.6. Factory Reset
Resetting all user settings to default values, so that time and date, network cong-
uration and presets are lost. However, current software version of the radio is
maintained.
11.7. Software Update
1) Auto-check setting
This option automatically checks for new updates from time to time. Automatic
updating is enabled by default.
2) Check now
Search for available updates immediately. You will be asked if you want to go
ahead with download and installation of an update. After a software upgrade, all
user settings are maintained.
WARNING: Before starting a software upgrade, ensure that the radio is plugged
into a stable main power connection. Disconnecting power during an
upgrade may permanently damage the unit..
11.8. Setup Wizard
With this function, you can start the setup wizard at any time. Any parameters or
stations entered already are not deleted. For more information, please read the
Paragraph 9 (FIRST-TIME SETUP).
11.9. Info
View the rmware version and the radio ID.
OMNIS-100 Multi Media Player
20
11.1 0. Privacy Policy
View the information of Privacy Policy.
11.11. Backlight
You may change the backlight of each environment (power on level or standby)
to High, Medium, Low or Auto, and adjust the timeout duration which the radio
turns to standby backlight level when it has not been controlled.
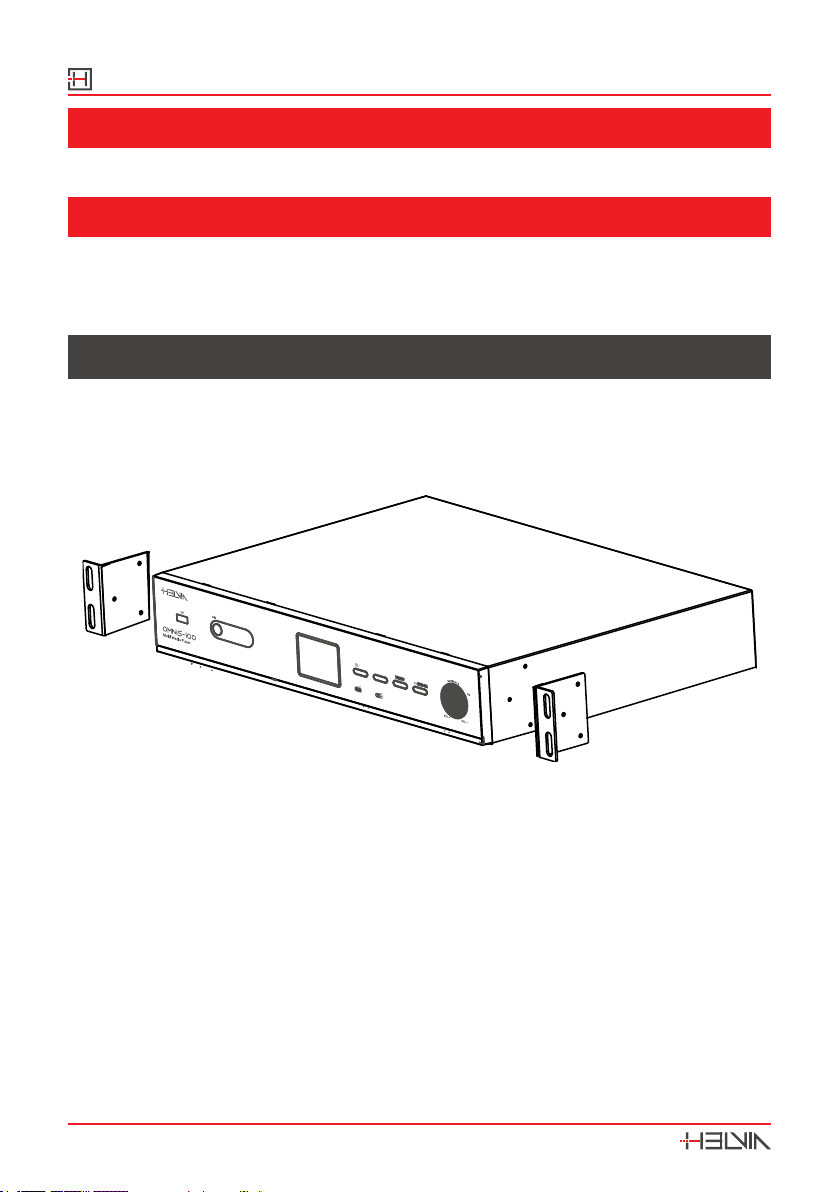
12. 19” RACK INSTALLATION
OMNIS-100 can be easily installed in a 19” Rack. For this purpose, 2 metal ns are
supplied with the relative screws. OMNIS-100 is already set up for mounting the
metal ns. It will therefore be necessary to use a cross-head/Phillips screwdriver
to x the metal ns on the side parts of OMNIS-100. Please see the drawing below
TUNEINFO FAV/ BT AUTO ON
BT
WirelessAudio
Streaming
Setup your solutions
MODE
Once the metal ns are mounted, OMNIS-100 can easily be mounted in a 19” rack.
Table of contents


