Hema 13.71.0280 User manual

Instructions for use
Electrical digital radio alarm clock
Gebruiksaanwijzing
Elektrische digitale wekkerradio
Mode d'emploi
Radio-réveil numérique électrique
Gebrauchsanleitung
Digitaler Radiowecker
Instrucciones de uso
Radio despertador digital eléctrico

2
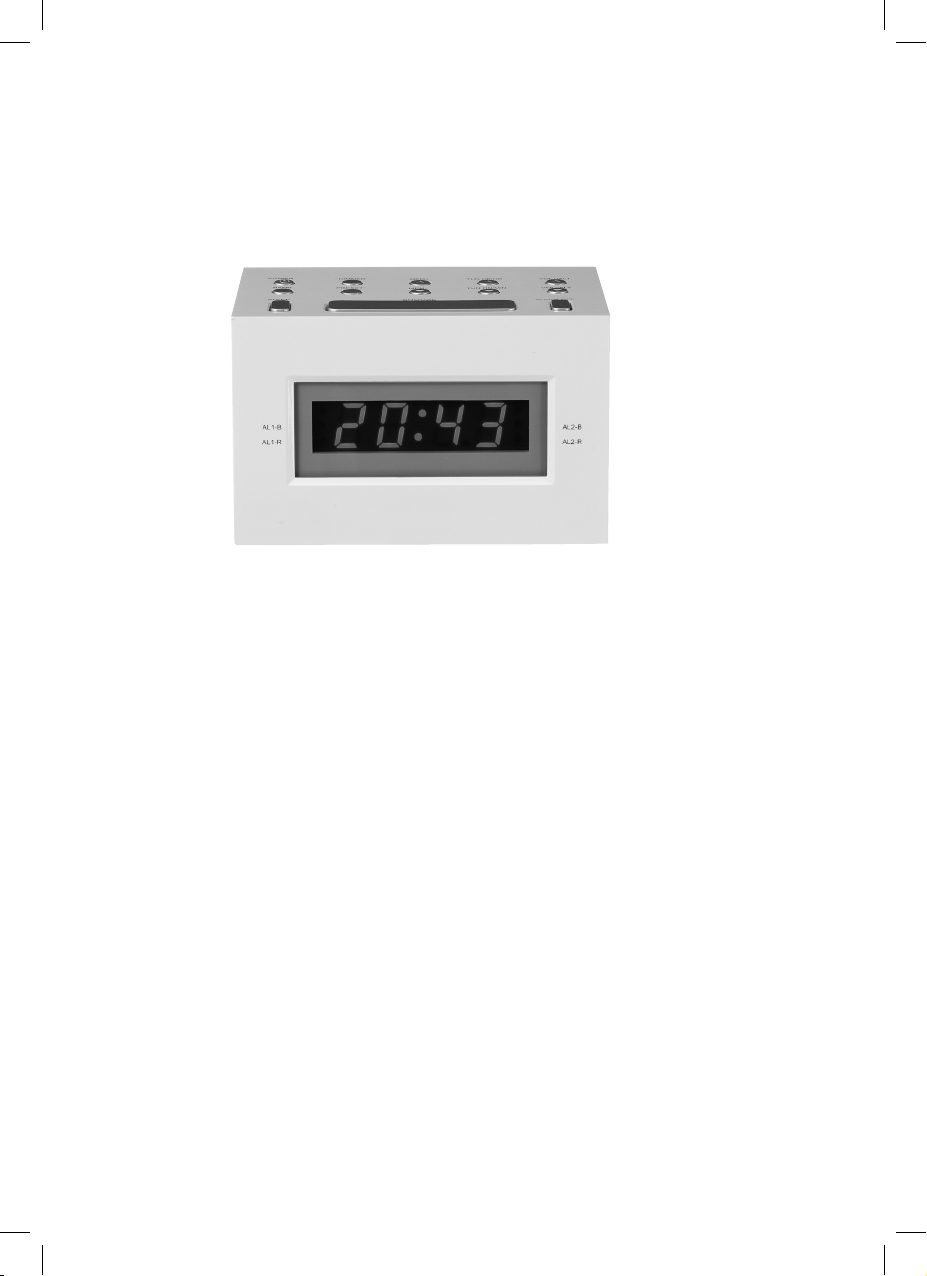
EN Electrical digital radio alarm clock
With automatic station search system and dimmer for time display
Article number 13.71.0280
Technical features:
■ Wake up with alarm (beep) or AM/FM radio
■ Automatically searches for radio stations (PLL)
■ Storage option for 20 favourite stations
■ 2 adjustable alarm times
■ Repeat function (snooze)
■ Digital clock
■ 24 hour time format
■ Adjustable brightness for time display
■ Backup when power fails, thanks to 1 x CR2032 button cell battery (included)
Warning
■ Keep the alarm clock dry, to avoid the risk of fire or electrical shock. Do not place in
front of an open window, where it might rain.
■ Never throw away empty batteries, dispose of them in the special bins available in
shops or hand them in to your local refuse collection department.

3
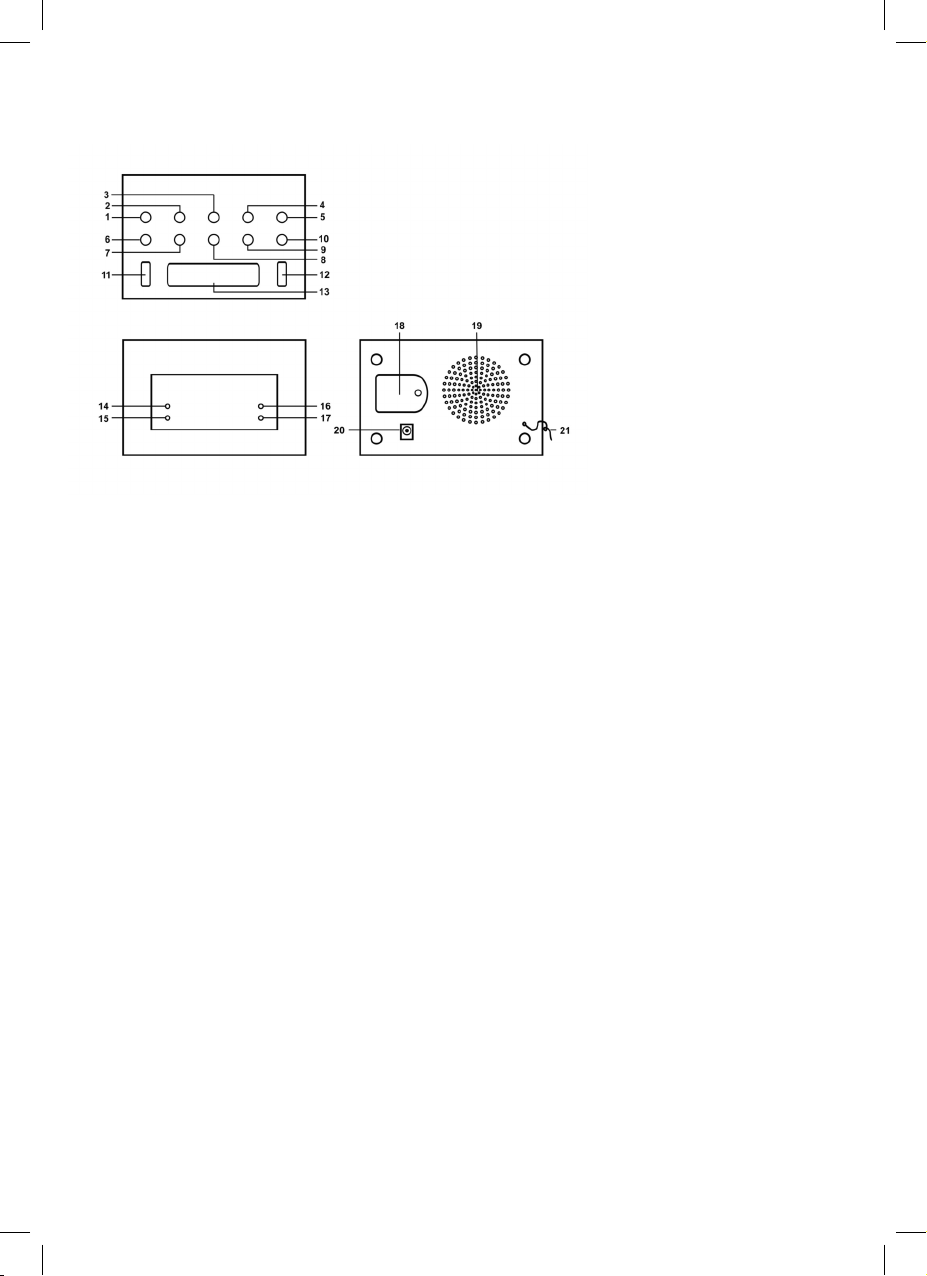
Description of components and function keys
Top:
Number Name Function
1. POWER Switches the radio on and off.
2. DIMMER Dims the brightness of the time display.
3. MEM+ Skips to the following pre-set radio station.
4. TUN UP/HR Radio: searches for the following radio station/ Alarm clock:
sets hours for (alarm) time.
5. VOL+/AL1 Radio: turns up the volume/ Alarm clock: sets AL1 alarm time.
6. BAND Switches between AM and FM.
7. PRESET Radio: sets a station / Alarm clock: sets the time.
8. MEM- Skips to the previous pre-set radio station.
9. TUN DN/MIN Radio: searches for the previous radio station/ Alarm: sets
minutes for (alarm) time.
10. VOL-/AL2 Radio: turns down the volume/ Alarm clock: sets AL2 alarm
time.
11. SLEEP Sets how long the radio stays on before you fall asleep
(between 10 and 90 minutes).
12. ALARM OFF Switches off alarm after it sounds.
13. SNOOZE Repeats alarm after 9 minutes.
Display:
Number Name The lamp is lit if:
14. AL1-B ALARM 1 (beep) is activated.
15. AL1-R ALARM 1 (radio) is activated.
16. AL2-B ALARM 2 (beep) is activated.
17. AL2-R ALARM 2 (radio) is activated.

4
Rear:
Number Function
18. Battery compartment for CR2032 button cell battery (included).
19. Speaker
20. Input for adapter plug
21. FM aerial for better FM reception
Using the radio alarm clock
Connect the radio alarm clock by plugging the end of the adapter lead into the clock
(see 20) and the adapter plug into the mains socket. When using abroad, take care that
the voltage and frequency are the same as those stated on the adapter (230V/50Hz).
Setting the time
Set the time by pressing the PRESET (7) button. Make sure the radio is switched off when
doing so (1). The time display will now flash. Use TUN UP/HR (4) to set the hours, and TUN
DN/MIN (9) to set the minutes. When you have finished setting the time, press PRESET
again to confirm.
Setting the alarm clock
Two individual alarm times can be set.
Press VOL+/AL1 (5). Make sure the radio is switched off when doing so (1). The alarm time
will now flash. Use TUN UP/HR (4) to set the hours, and TUN DN/MIN (9) to set the minutes.
When you have finished setting the time, press VOL+/AL1 again to confirm.
You will now be automatically woken up by the alarm beeping. An indicator will light
up for AL1-B (14). If you would prefer to be woken by the radio, press VOL+/AL1 once
again. The set alarm time will flash. Press VOL+/AL1 again to select the radio alarm. After
a few seconds, the alarm time will automatically return to the time display. An indicator
will now be lit for AL1-R (15). The second alarm time can be set in the same way. To do so,
press VOL+/AL2 (10).
Switching the alarm on and off
If you have set an alarm time, one of the indicators at the top of the display will be lit.
If this is not the case, use VOL+/AL1 (5) or VOL-/AL2 (10) to switch on the alarm. The alarm is
switched off in the same manner. Once the alarm sounds, you can switch it off by pres-
sing ALARM OFF (12). The alarm will sound again at the same time the next day.

5
Snooze function
When the alarm goes off, the SNOOZE button (13) can be pressed to activate the repeat
function. The alarm will be repeated at 9 minute intervals. This can be repeated 6 times.
Searching for radio stations
The radio automatically searches for stations, saving you the effort of having to do so
manually.
First switch on the radio using the POWER button (1). Press and hold the TUN UP/HR button
(4) for approximately one second: the radio will search for the following station with a
strong enough signal.
Once you have found a station you like, it can be set using the PRESET button (7). Use
MEM+ (3) and MEM- (8) to number your pre-set stations. You can set 10 AM stations and 10
FM stations in this way.
Listening to the radio
If you want to listen to the radio, switch it on using the POWER button (1). Use the BAND
button (6) to switch between AM and FM wave bands. Change stations by pressing TUN
UP/HR (next) and TUN DN/MIN (previous). Switch between pre-set stations by pressing
MEM+ (next) and MEM- (previous).
Falling asleep with the radio on
You can also set how long the radio stays on when going to sleep. The radio can stay
on from 10 to 90 minutes.
First switch on the radio using the POWER button (1). Now press the SLEEP button (11). The
display shows that the radio will stay on for 90 minutes. This time can be shortened by
intervals of 10 minutes by pressing the SLEEP button again. Keep pressing SLEEP until the
display shows the number of minutes that the radio should remain on.
Fitting backup battery
The battery compartment can be found at the back of the alarm clock. For extra child
safety, you need a small Phillips screwdriver to open this compartment. Click the bat-
tery (1 x CR2032 button cell) into the compartment. Make sure the correct side (+) faces
up. If the power fails, the battery will keep the alarm clock running on time. The display
will be switched off however. When the power is restored, the display will automati-
cally show the right time.

6
In accordance with the waste guidelines for electrical and electronic equip-
ment, this product must be disposed of separately. If you wish to dispose of this
product in the future, do NOT discard it with the household waste, but hand it in
at your local refuse collection depot.
Quality
Safety and quality is very important to . We have our own laboratory, which as-
sesses all equipment in terms of electrical safety and ease of use, before it is included
in our range. also monitors the product quality in collaboration with the manu-
facturer.
Security
This article may be fitted with a plastic anti-theft strip. You will find the strip on the
bottom of the product. This strip does not influence the quality or the operation of the
product and can be removed without a problem.
Faults and repairs
If this device needs to be repaired, you can hand it in at a branch after packing
the product securely.
Do not try to repair this product yourself.
For repairs that fall within the warranty period, you will need to show a proof of
purchase and the warranty document.
Regularly check the power cord for damage. If there is any damage to the cord set,
please return the item to a branch for repair. Do not try to replace it yourself.
For safety reasons we recommend that you do not carry out any repairs to an
electrical device yourself.

7
Warranty conditions
We guarantee the quality.
B.V. fully guarantees the product named on the warranty receipt, against all
defects caused by material and manufacturing errors.
For all domestic electrical appliances, the warranty period is 2 years from the date of
purchase.
The warranty on this article is invalidated if:
a. the defect occurs through incorrect or improper use, neglect, connection to the
wrong power voltage, or if dropped or knocked;
b. you have attempted to repair the article yourself, or have had it repaired by a
repair service other than during the warranty period.
If you wish to make a claim under the warranty terms: You will need to hand in the arti-
cle at one of our branches together the warranty receipt. Under normal circumstances
the article will be repaired free of charge within 14 workdays.
Extra certainty for the right choice
If, after purchasing the article, you are dissatisfied (because it is not exactly what you
expected or you already have this article), you can return the article within 30 days of
purchase, on condition that it is undamaged and in the original packaging.
Remember that you must always bring your sales receipt.
You can either exchange the article or request a refund.
The warranty conditions apply in all countries where there are branches.
1 November 2010
Hema BV
PO Box 37110
1030 AC Amsterdam
Netherlands
These warranty conditions apply without prejudice to the customer’s statutory rights or
any other claims by the customer.
8
NL Elektrische digitale wekkerradio
Met automatisch zenderzoeksysteem en dimmer voor tijdsaanduiding
artikelnummer 13.71.0280
Technische kenmerken:
■ Wakker worden met alarm (biep) of AM/FM-radio
■ Zoekt automatisch radiozenders (PLL)
■ Opslagmogelijkheid voor 20 favoriete zenders
■ 2 instelbare wektijden
■ Repeteerfunctie (snooze)
■ Digitaal uurwerk
■ 24-uurs aanduiding
■ Instelbare helderheid van de tijdsaanduiding
■ Back-up bij stroomuitval door 1 CR2032 knoopcel (meegeleverd)
Waarschuwing
■ Zorg dat de wekker niet nat wordt om brand of een elektrische schok te
voorkomen. Zet de wekker daarom niet voor een open raam, voor het geval het
gaat regenen.
■ Gooi lege batterijen niet weg, maar doe ze in speciale batterijbakken of lever ze in
als klein chemisch afval (kca) bij het gemeentedepot.
9
Beschrijving onderdelen en functietoetsen
Bovenzijde:
Nummer Naam Functie
1. POWER Radio aan- of uitzetten.
2. DIMMER Licht van de tijdsaanduiding dempen.
3. MEM+ Naar de volgende voorkeuze radiozender.
4. TUN UP/HR Radio: zoeken naar volgende radiostation/ Wekker: uren
(wek)tijd instellen.
5. VOL+/AL1 Radio: volume hoger zetten/ Wekker: wektijd AL1 instellen.
6. BAND Kiezen tussen AM of FM.
7. PRESET Radio: zender vastleggen / Wekker: tijd instellen.
8. MEM- Naar de vorige voorkeuze radiozender.
9. TUN DN/MIN Radio: zoeken naar vorige radiostation/ Wekker: minuten
(wek)tijd instellen.
10. VOL-/AL2 Radio: volume lager zetten/ Wekker: wektijd AL2 instellen.
11. SLEEP Instellen hoe lang de radio aanblijft voor je in slaap valt
(tussen de 10 en 90 minuten).
12. ALARM OFF Alarm uitzetten nadat die is afgegaan.
13. SNOOZE Alarm na 9 minuten opnieuw laten afgaan.
Display:
Nummer Naam Het lampje brandt als:
14. AL1-B ALARM 1 (biep) actief is.
15. AL1-R ALARM 1 (radio) actief is.
16. AL2-B ALARM 2 (biep) actief is.
17. AL2-R ALARM 2 (radio) actief is.

10
Achterzijde:
Nummer Functie
18. Batterijvak voor 1 CR2032 knoopcel (back-up) (meegeleverd)
19. Speaker
20. Ingang adapterplugje
21. FM-antenne voor betere FM-ontvangst
Wekkerradio in gebruik nemen
Sluit de wekkerradio aan door het plugje aan het eind van het adaptersnoertje achter
in het apparaat te steken (zie 20) en de adapterstekker in het stopcontact te doen. Let
er bij gebruik in het buitenland op dat de voltage en de frequentie overeenkomt met
die van de adapter (230V/50Hz).
Instellen tijd
Je kunt de tijd instellen door de knop PRESET (7) in te drukken. Zorg wel dat radio op dat
moment uitstaat (1). De tijdsaanduiding gaat nu knipperen. Met TUN UP/HR (4) stel je de
uren in, met TUN DN/MIN (9) de minuten. Ben je klaar met instellen, druk dan nog eens
op PRESET om de tijd te bevestigen.
Instellen wekker
Je kunt twee verschillende wektijden instellen.
Druk op VOL+/AL1 (5). Zorg wel dat radio op dat moment uitstaat (1). De wektijd gaat nu
knipperen. Met TUN UP/HR (4) stel je de uren in, met TUN DN/MIN (9) de minuten. Ben je
klaar met instellen, druk dan nog eens op VOL+/AL1 om de wektijd te bevestigen.
Je wordt nu automatisch door het biepsignaal gewekt. Op de display brandt een
lampje bij AL1-B (14). Als je liever door de radio gewekt wilt worden, druk je nog een
keer op VOL+/AL1. De ingestelde wektijd gaat knipperen. Door nog een keer op VOL+/
AL1 te drukken, kies je voor de radiowekker. De wektijd springt na een aantal seconden
vanzelf weer op de tijdsaanduiding. Je ziet nu een lampje branden bij AL1-R (15). Een
tweede wektijd kun je op dezelfde manier instellen. Druk hiervoor op VOL-/AL2 (10).
Alarm in- en uitschakelen
Als je een alarmtijd hebt ingeschakeld, brandt één van de lampjes bovenaan het dis-
play. Als dat niet het geval is, kun je met VOL+/AL1 (5) of VOL-/AL2 (10) het alarm inschake-
len. Op die manier kun je het alarm ook weer uitschakelen. Als de wekker is afgegaan,
zet je die uit door op ALARM OFF (12) te drukken. De wekker gaat de volgende dag op
dezelfde tijd af.

11
Repeteerfunctie (snooze)
Als het alarm afgaat (biepsignaal of radio), kun je met de knop SNOOZE (13) de repe-
teerfunctie inschakelen. Het alarm gaat dan na 9 minuten weer af. Je kunt dat 6 keer
herhalen.
Radiozenders zoeken
Het apparaat zoekt automatisch naar zenders, dus je hoeft niet eindeloos aan een
wieltje te draaien.
Zet eerst de radio aan met de POWER-knop (1). Houd dan de knop TUN UP/HR (4) onge-
veer één seconde ingedrukt: de radiowekker zoekt de volgende zender met een sterk
genoeg signaal.
Als je een zender hebt gevonden die je bevalt, kun je die vastleggen met de PRESET-
knop (7). Met MEM+ (3) en MEM- (8) kun je de voorkeurzender een nummer geven. Je kunt
10 AM-zenders en 10 FM-zenders vastleggen.
Naar de radio luisteren
Als je naar de radio wilt luisteren, kun je die met de POWER-knop (1) aanzetten. Met de
BAND-knop (6) daaronder kun je wisselen tussen AM en FM. Je verandert van zender
met TUN UP/HR (verder) en TUN DN/MIN (terug). Je wisselt tussen voorkeurzenders met
MEM+ (verder) en MEM- (terug).
In slaap vallen met de radio
Je kunt ook instellen hoe lang de radio aan moet blijven als je gaat slapen. De radio
kan aanblijven van 10 tot 90 minuten.
Zet eerst de radio aan met de POWER-knop (1). Druk dan op de SLEEP-knop (11). De dis-
play geeft aan dat de radio 90 minuten aanblijft. Je kunt die tijd telkens met 10 minuten
verkorten door nog eens op SLEEP te drukken. Druk net zo vaak op SLEEP, totdat het
display het aantal minuten aangeeft, dat de radio aan moet blijven.
Back-up batterij plaatsen
Aan de achterkant van de wekker vind je het batterijvakje. Als extra kinderbeveiliging
heb je een kleine kruiskopschroevendraaier nodig om het vakje open te maken. Klik
de batterij (1 x CR2032 knoopcel) in het batterijvak. Let erop dat je de juiste kant (+)
boven doet. Als de stroom uitvalt, zorgt de batterij ervoor dat de tijd gelijk blijft lopen.
Het display gaat wel uit. Als er weer stroom is, geeft het display automatisch de juiste
tijd aan.

12
Volgens de richtlijn afval van elektrische en elektronische apparatuur, moet dit
soort afval apart worden ingeleverd. Indien u in de toekomst van dit
product af wilt, plaats het dan NIET bij het huishoudafval, maar lever het in bij
het KCA depot van uw gemeente.
Kwaliteit
hecht grote waarde aan veiligheid en kwaliteit. We beschikken over een eigen
laboratorium. Dit laboratorium beoordeelt vóór opname in het assortiment, alle
apparaten op elektrische veiligheid en gebruikseigenschappen. Daarnaast bewaakt
samen met de fabrikant de productkwaliteit.
Beveiliging
Het is mogelijk dat dit artikel voorzien is van een kunststof beveiligingsstrip. U
vindt de strip dan aan de onderzijde van het apparaat. Deze strip heeft geen invloed
op de kwaliteit of werkwijze van het artikel en kan zonder problemen worden
verwijderd.
Storingen en reparatie
Bij een defect toestel, het apparaat ter reparatie aanbieden bij een Hema-vestiging.
Voer zelf geen reparaties uit aan het toestel.
Ingeval reparatie nodig is, kunt u het apparaat goed verpakt, bij voorkeur in de
originele verpakking, inleveren bij een Hema-vestiging. Indien binnen de
garantietermijn, de garantiebon meebrengen.

13
Garantiebepalingen
Wij garanderen de kwaliteit
Hema B.V. garandeert het op de garantiebewijsbon vermelde artikel volledig tegen
gebreken als gevolg van materiaal- en fabricagefouten.
Voor alle elektrisch huishoudelijke apparaten is de garantietermijn 2 jaar na de datum
van aankoop.
De garantie op het artikel vervalt indien
a. het defect is ontstaan door ondeskundig of oneigenlijk gebruik, verwaarlozing,
aansluiten op de verkeerde netspanning of door vallen of stoten;
b. u, gedurende de garantieperiode, het artikel zelf of door een niet- reparateur
heeft geprobeerd te herstellen.
Als u aanspraak kunt en wilt maken op garantie
Dient het artikel, vergezeld van de garantiebewijsbon, te worden aangeboden in één
van onze vestigingen. In het algemeen zal, behoudens bijzondere omstandigheden,
de reparatie binnen 14 werkdagen geheel gratis worden uitgevoerd.
Extra zekerheid voor een goede keus
Als u met de aankoop van het artikel achteraf toch niet gelukkig bent (bijvoorbeeld
omdat de uitvoering tegenvalt of een dubbele aankoop heeft plaatsgevonden),
kunt u binnen 30 dagen na aankoop, mits onbeschadigd en in originele verpakking,
het artikel terugbrengen. Neem dan wel altijd de kassabon mee.
U kunt het artikel dan ruilen of desgewenst uw geld terug krijgen.
Deze garantiebepalingen zijn van toepassing in alle landen waar Hema
vestigingen heeft.
1 november 2010
Hema B.V.
Postbus 37110
1030 AC Amsterdam
Nederland
Deze garantiebepalingen gelden onverminderd de wettelijke rechten of vorderingen
van de klant.

14
FR Radio-réveil numérique électrique
Avec système automatique de recherche des émetteurs et atténuateur de la
luminosité de l’indication de l’heure
numéro d'article 13.71.2080
Caractéristiques techniques :
■ Réveil avec alarme (bip) ou radio AM/FM
■ Recherche automatique des émetteurs de radio (PLL)
■ Capacité de stockage de 20 émetteurs radio favoris
■ 2 heures de réveil réglables
■ Fonction de répétition alarme (snooze)
■ Mécanisme numérique
■ Indication de l’heure 24 h sur 24
■ Luminosité réglable de l’indication de l’heure
■ Back-up en cas de panne de courant avec pile ronde 1 CR2032 (comprise)
Avertissement
■ Veillez à ce que le réveil ne soit pas mouillé pour éviter les risques d’incendie ou une
décharge électrique. Ne mettez pas le réveil devant une fenêtre ouverte au cas où il
pleuvrait.
■ Ne jetez pas les piles vides mais déposez-les dans des conteneurs à piles ou les
déchets chimiques (kca) du dépôt municipal.

15
Description des parties et des touches fonctions
Partie supérieure :
Numéro Nom Fonction
1. POWER Allumer ou éteindre la radio.
2. DIMMER Atténuer la luminosité de l’indication de l’heure.
3. MEM+ Vers la présélection suivante de l’émetteur radio.
4. TUN UP/HR Radio : chercher la station radio suivante / Réveil : régler
l’heure de réveil.
5. VOL+/AL1 Radio : augmenter le volume / Réveil : régler l’heure de
réveil AL1.
6. BAND Choisir entre AM ou FM.
7. PRESET Radio : enregistrer l’émetteur choisi / Réveil : régler l’heure.
8. MEM- Vers la présélection précédente de l’émetteur radio.
9. TUN DN/MIN Radio : Chercher la station radio précédente / Réveil : rég
ler les minutes (de l’heure) de réveil.
10. VOL-/AL2 Radio : baisser le volume / Réveil : Régler l’heure de réveil
AL2.
11. SLEEP Régler la durée de la radio avant de s’endormir (entre 10 et
90 minutes).
12. ALARM OFF Déclencher l’alarme après qu’elle a retenti.
13. SNOOZE Faire sonner à nouveau l’alarme après 9 minutes.
Écran d’affichage :
Numéro Nom Le voyant lumineux s’allume quand :
14. AL1-B ALARM 1 (bip) est active.
15. AL1-R ALARM 1 (radio) est active.
16. AL2-B ALARM 2 (bip) est active.
17. AL2-R ALARM 2 (radio) est active.

16
Dos :
Numéro Fonction
18. Compartiment pile ronde 1 CR2032 (back-up) (comprise)
19. Speaker
20. Entrée fiche adaptateur
21. Antenne FM pour meilleure réception FM
Mode d’emploi du radio-réveil
Raccordez le radio-réveil en enfonçant la fiche qui se trouve à l’extrémité du cordon
de l’adaptateur derrière l’appareil (voir 20) et en mettant la fiche de l’adaptateur dans
la prise de courant. Veillez, à l’étranger, à ce que le voltage et la fréquence correspon-
dent à ceux de l’adaptateur (230V/50Hz).
Réglage de l’heure
Vous pouvez régler l’heure en appuyant sur le bouton PRESET (7). Veillez à ce que la
radio soit éteinte à ce moment-là (1). L’indication de l’heure va maintenant clignoter.
Réglez les heures avec TUN UP/HR (4), les minutes avec TUN DN/MIN (9). Une fois le
réglage terminé, appuyez encore une fois sur PRESET pour confirmer l’heure.
Réglage du réveil
Vous pouvez régler deux heures de réveil différentes.
Appuyez sur VOL+/AL1 (5). Veillez à ce que la radio soit éteinte à ce moment-là (1).
L’heure de réveil va maintenant clignoter. Vous réglez les heures avec TUN UP/HR (4),
et les minutes avec TUN DN/MIN (9). Une fois le réglage terminé, appuyez encore une
fois sur VOL+/AL1 pour confirmer l’heure de réveil.
Le signal bip vous réveillera maintenant automatiquement. Un voyant lumineux
s’allumera sur l’écran d’affichage pour AL1-B (14). Si vous préférez être réveillé par la
radio, appuyez encore une fois sur VOL+/AL1. L’heure de réveil réglée va clignoter. Si
vous appuyez encore une fois sur VOL+/AL1, choisissez la radio réveil. L’heure de réveil
passera au bout de quelques secondes à l’indication de l’heure. Vous voyez mainte-
nant un voyant lumineux s’allumer pour AL1-R (15). Vous pouvez régler une deuxième
heure de réveil de la même façon. Appuyez pour cela sur VOL-/AL2 (10).
Enclencher et déclencher l’alarme
Si vous avez enclenché une heure d’alarme, l’un des voyants lumineux s’allumera au-
dessus de l’écran d’affichage. Si ce n’est pas le cas, vous pourrez enclencher l’alarme
avec VOL+/AL1 (5) ou VOL-/AL2 (10). Vous pouvez déclencher l’alarme de la même façon.
Une fois que le réveil aura retenti, vous pourrez le déclencher en appuyant sur ALARM
OFF (12). Le réveil sonnera à la même heure le jour suivant.

17
Fonction répétition (snooze)
Lorsque l’alarme sonne (signal bip ou radio), vous pourrez enclencher la fonction
répétition avec le bouton SNOOZE (13). L’alarme sonnera alors encore une fois au bout
de 9 minutes. Vous pouvez répéter l’alarme 6 fois.
Recherche des émetteurs radio
L’appareil recherche automatiquement les émetteurs, de sorte que vous n’avez pas
besoin de tourner le bouton sans arrêt.
Allumez d’abord la radio avec le bouton POWER (1). Appuyez environ une seconde sur
le bouton TUN UP/HR (4) : le radio-réveil recherche l’émetteur suivant avec un signal suf-
fisamment fort. Une fois que vous avez trouvé un émetteur qui vous plaît, vous pourrez
l’enregistrer avec le bouton PRESET (7). Avec MEM+ (3) et MEM- (8), vous pouvez donner
un numéro à votre émetteur préféré. Vous pouvez enregistrer 10 émetteurs AM et 10
émetteurs FM.
Écouter la radio
Si vous voulez écouter la radio, vous pourrez l’allumer avec le bouton POWER (1). Vous
pouvez passer d’AM à FM et inversement avec le bouton BAND (6) qui se trouve au-des-
sous du bouton POWER. Vous pouvez changer d’émetteur avec TUN UP/HR (vers l’avant)
et TUN DN/MIN (vers l’arrière). Vous pouvez changer d’émetteurs favoris avec MEM+
(vers l’avant) et MEM- (vers l’arrière).
S’endormir avec la radio
Vous pouvez régler le temps que vous estimez nécessaire pour vous endormir à
l’écoute de la radio. Ce temps peut varier de 10 à 90 minutes de radio.
Allumez d’abord la radio avec le bouton POWER (1). Appuyez ensuite sur le bouton
SLEEP (11). L’écran d’affichage indique que la radio reste allumée pendant 90 minutes.
Vous pouvez diminuer ce laps de temps chaque fois de 10 minutes en appuyant en-
core une fois sur SLEEP. Appuyez sur SLEEP autant de fois qu’il vous plaît jusqu’à ce que
l’écran d’affichage indique le nombre de minutes souhaitées d’écoute de la radio.
Placer une pile back-up
Un compartiment pile se trouve au dos du réveil. Il vous faut un tournevis cruciforme
pour ouvrir le compartiment (à titre de sécurité enfant supplémentaire). Cliquez la pile
(1 x pile ronde CR2032) dans le compartiment pile. Vérifiez si la pile est bien placée
avec le signe (+) vers le haut. En cas de panne de courant, la pile permet au réveil de
fonctionner. L’écran d’affichage s’éteindra. Il s’allumera à nouveau avec l’heure exacte
lorsque le courant sera rétabli.

18
D’après la directive relative aux déchets d’appareils électriques et électroni-
ques, ce type de déchets doit être fourni séparément. Si vous désirez vous
débarrasser de ce produit dans l’avenir, NE le placez PAS dans la poubelle
mais déposez-le au dépôt des déchets chimiques de votre municipalité.
Qualité
attache une grande importance à la sécurité et à la qualité. Nous disposons de
notre propre laboratoire. Ce laboratoire évalue la sécurité électrique et les propriétés
d’utilisation de tous les appareils avant leur insertion dans l’assortiment. En outre,
contrôle la qualité du produit en collaboration avec le fabricant.
Sécurité
Il est possible que cet article soit pourvu d’une bande de protection en plasti-
que. Cette bande se trouve en dessous de l’appareil. Elle n’a aucune influence sur la
qualité ou le fonctionnement de l'article et peut être enlevée sans problème.
Réparation
Si une réparation est nécessaire, vous pouvez rapporter l’appareil, bien emballé, dans
un magasin . S’il est toujours sous garantie, il doit être accompagné du bon de
garantie et du bon d’achat. Vous pouvez porter votre appareil à réparer dans tous
les magasins . Vérifiez régulièrement si le cordon n’est pas abîmé. Lorsque le
cordon est abîmé, faites réparer l’appareil dans un magasin Hema. Ne pas remplacer
le cordon soi-même. Pour des raisons de sécurité, il est conseillé de ne pas réparer soi -
même des appareils électriques.

19
Conditions de garantie
Nous vous garantissons la qualité
Hema B.V. offre une garantie totale sur l'article mentionné sur le bon de garantie en
cas de défauts occasionnés par des vices de fabrication ou de matériel. Pour tous
les appareils ménagers électriques, le délai de garantie est de 2 ans après la date
d'achat.
La garantie est annulée dans le cas suivants :
a. le défaut est causé par une utilisation incompétente ou abusive, par négligence, par
un mauvais branchement ou suite à une chute ou un choc ;
b. vous avez tenté, durant la période de garantie, de réparer vous-même l'article ou
de le faire réparer par un réparateur autre que .
Si vous voulez et pouvez faire usage de la garantie
L'article, accompagné du ticket de caisse, doit être apporté en réparation dans l'un de
nos magasins. En règle générale la réparation est effectuée dans un délai de 15 jours -
sauf en cas de circonstances exceptionnelles - et entièrement gratuitement.
Une sécurité supplémentaire pour être sûr de votre choix
Si toutefois vous n'étiez pas satisfait de l'article (par exemple, si le modèle ne vous plaît
pas ou que vous avez fait un achat double), vous pouvez ramener l'article intact et
dans son emballage d'origine dans les 30 jours qui suivent son achat. N'oubliez pas
le ticket de caisse. Vous pouvez échanger l'article ou, si vous le souhaitez, être rem-
boursé.
Ces conditions de garantie s'appliquent dans tous les pays où possède des
magasins.
1er novembre 2010
# B.V.
Postbus 37110
1030 AC Amsterdam
Pays-Bas
Ces conditions de garantie sont valables sans préjudice des droits légaux du client ou
des actions intentées par lui.

20
DE Digitaler Radiowecker
Mit automatischer Sendersuche und Dimmer für Zeitanzeige
Artikelnummer 13.71.0280
Technische Details:
■ Mit Alarm (Weckton) oder AM/FM-Radio
■ Sucht automatisch Radiosender (PLL)
■ Speichermöglichkeit für 20 Lieblingssender
■ 2 einstellbare Weckzeiten
■ Wiederholungsfunktion (Snooze)
■ Digitales Uhrwerk
■ 24-Stunden-Anzeige
■ Einstellbare Anzeigenhelligkeit
■ Back-up bei Stromausfall durch 1 CR2032 Knopfzellenbatterie (im Lieferumfang
enthalten)
Hinweis
■ Darauf achten, dass der Wecker nicht nass wird, um Brand oder einen elektrischen
Schlag zu vermeiden. Den Wecker daher nicht an einem offenen Fenster aufstellen,
wenn Regen vorhergesagt ist.
■ Verbrauchte Batterien nicht wegwerfen, sondern als Sondermüll in dazu
vorgesehene Behälter werfen oder bei Sammelstellen abgeben.
Table of contents
Languages:
Other Hema Clock Radio manuals


