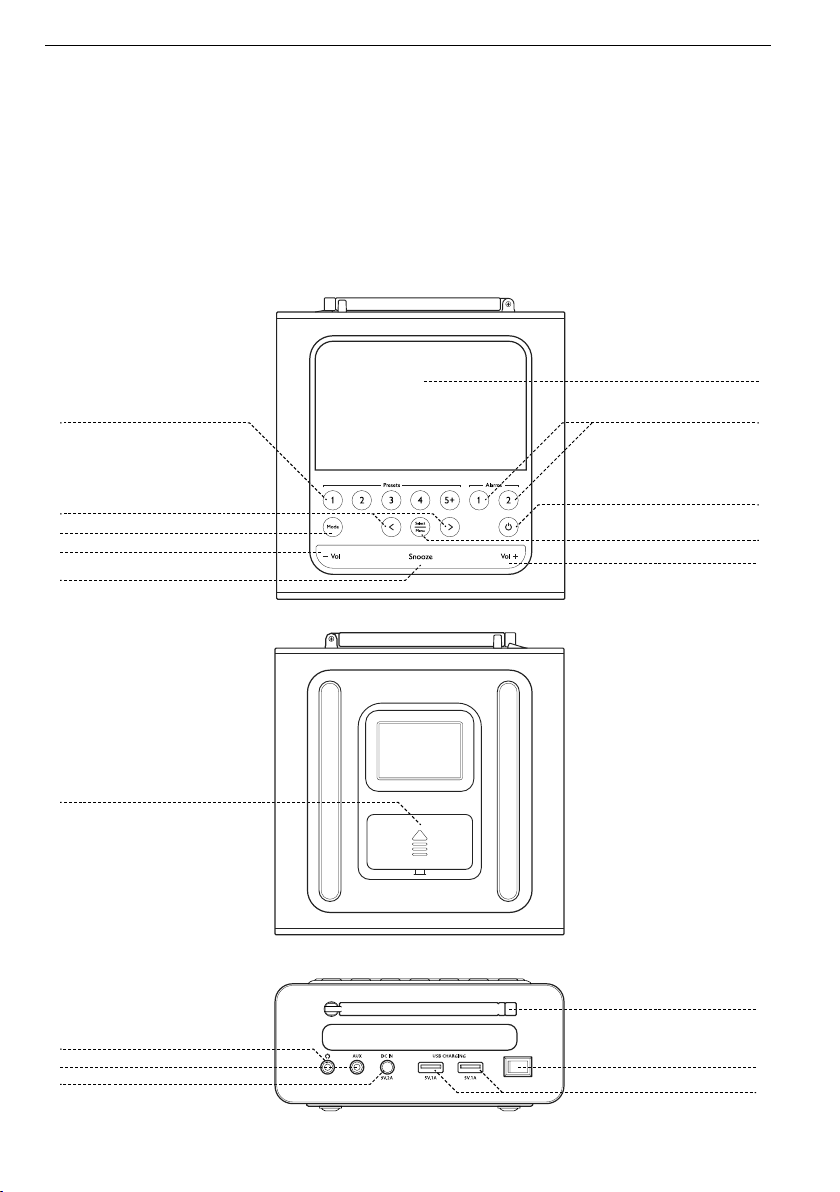
John Lewis PRELUDE User manual

PRELUDE ALARM CLOCK RADIO
INSTRUCTION MANUAL

2
3 Important safety information
6 Your alarm clock radio diagram
7 Quick start guide
8 Accessing menu options
10 Care instructions
10 Troubleshooting
11 Technicalspecications
11 Servicing and disposal
12 Guarantee
Contents

3
Important safety information
Thank you for purchasing this John Lewis & Partners
radio alarm clock.
Hereby, John Lewis & Partners declares that the
radio device Prelude is in compliance with Directive
2014/53/EU.
The full text of the EU declaration of conformity is
available at the following internet address: https://
www.johnlewis.com/content/declaration-of-conformity
Please read the instructions and warnings carefully
to ensure a long life for your product and safe usage.
Thisinstructionleaetmustberetainedwiththe
product for future reference. These warnings have
been provided in the interest of safety. You MUST
read them carefully before using the appliance.
If you are unsure of the meaning of any of these
warnings, please contact your nearest John Lewis &
Partners shop or John Lewis & Partners Technical
Support on 03301 230106
Close supervision is necessary when your appliance is
beingusednearchildrenorinrmpeople.This
appliance can be used by children aged from 8 years
and above and persons with reduced physical, sensory

4
or mental capabilities or lack of experience and
knowledge if they have been given supervision or
instruction concerning the use of the appliance in a
safe way and understand the hazards involved.
Cleaning and maintenance should not be carried
out by children.
- Children must not play with the appliance.
- Do not immerse the cord, plug, or any part of
the appliance in water or other liquids.
- Unplug from the mains when not in use, when
removing or attaching accessories and before
cleaning any part of the appliance.
- Do not operate any appliance with a damaged cord
or plug. Should the item malfunction, or if it is
damaged in any manner, please stop using it
and return it to your nearest
John Lewis & Partners branch.
- Do not attempt to repair it yourself. Do not
modify the appliance plug.
- Do not let the power cord overhang the edge of
the surface on which it stands, or touch anything hot.

5
- Nonakedamesources,suchaslightedcandles,
should be placed on the apparatus
- For use with the recommended battery only
- When unplugging the device, hold the plug itself,
not the power cord.
- Do not use the appliance for any purpose other
than its intended use.
- This appliance is for indoor use only. Do not use
it outdoors.
- Do not use accessories or attachments that are
not recommended by the manufacturer.
- This product is intended for household and light
commercial use.
!
WARNING: Polythene bags over the product or
within packaging may be dangerous. To avoid the risk
of suffocation, please keep away from pets, babies
and children.

6
1 Presets 1-5+
2 Previous/Next
3 Mode
4 Volume decrease
5 Snooze
6 Speaker
7 Alarms 1 & 2
8 Power on / Standby (off)
9 Select/Menu
10 Volume increase
11 Battery compartment
12 (2x AAA)
13 Headphone jack
14 Aux input
15 Mains Power input
16 Ariel
17 On / Off switch
18 2x USB output
Your Alarm clock radio – diagram
1
11
12
14
13
7
8
9
10
15
16
17
6
2
4
5
3

7
To get started
For FM
For Bluetooth
Aux-in
For DAB
Setting the dual alarm
Snooze or stop a sounding alarm
1 Connect to the mains with the supplied plug.
2 The time and date will be visible when there is a mains connection.
3 Press the power button to turn on (and off).
4 The back up function will ensure your chosen settings remain saved.
The time will not be displayed.
1 Thersttimeyouturnontheradio,itwillcompleteanautomatic
scan for all available DAB stations.
2 Use the arrow keys to navigate between stations.
3 Should you wish to perform a full scan, long press “Select/Menu”
andnavigateto“FullScan”.Shortpress“Select/Menu”toconrm.
1 Short press “Mode” to switch to FM mode.
2 UsethearrowkeystondthecorrectFMfrequency.
3 Longpressforanauto-scanorshortpressforneadjustment.
1 Short press “Mode” to switch to Bluetooth mode.
2 To connect, search on your phone, tablet or other device for
“Prelude”.
3 Long press “Mode” to disconnect your Bluetooth device.
Aux mode plays audio from an external source plugged into the 3.5mm
aux-in jack.
1 Short press “Mode” to switch to aux mode.
2 Plug your phone, tablet or other audio device into the aux-in
3.5mm stereo socket at the back of your Prelude.
3 Adjust the volume of the Prelude (and, if necessary, the audio
device) as required.
1 Short press “Alarm 1” or “Alarm 2” to turn the function on or off.
2 Long Press “Alarm 1” or “Alarm 2” to enter the set-up menu.
3 Use arrow keys and “Select/Menu” buttons to complete an alarm
set-up by frequency, time, type and volume.
1 Press “Snooze” to pause a sounding alarm.
2 Press “Alarm 1” or “Alarm 2” to stop a sounding alarm.

8
Presets
Accessing menu options
Language
Prelude has 30 presets.
Presets 1-4 have dedicated physical buttons
Presets 5-30 are accessed using the 5+ preset button and the digital
preset menu.
Using presets 1-4
To save a preset, tune into your preferred station on DAB or FM
and long press preset button 1, 2, 3 or 4.
The number of the presets and the word ‘STORED’ will appear on the
digital display.
To recall a preset, short press button 1, 2,3 or 4 and the stored station
will play.
Using presets 5-30
To save a preset, tune in you preferred station on DAB or FM and long
press preset button 5+, this brings up the digital preset menu. By using
the PREVIOUS/NEXT navigation buttons you can navigate to any of
the 5-30 presets, use the SELECT button to save the current station to
your chosen preset.
To recall a preset, short press button 5+ to bring up the digital preset
menu, by using the PREVIOUS/NEXT navigation buttons you can nav-
igate to any of the 5-30 presets, use the SELECT button to select and
play your chosen preset.
1 Long press “Select/Menu” and use the arrow keys to navigate to
Language.
2 Short press “Select/Menu” to access the set-up menu.
3 Use the arrow keys to choose either English, German, Norwegian
orFrench.Shortpress“Select/Menu”toconrmyourlanguage
choice.

9
Countdown timer
Backlight
Setting the sleep timer
Adjust the EQ (sound equalisation)
Factory reset
Clock/Date setup 1 Long press “Select/Menu” and use the arrow keys to navigate to
“Clock/Date Setup”.
2 Short press “Select/Menu” to access the set-up menu.
3 Use the arrow keys to choose between “Radio” or “Manual”,
thenshortpress“Select/Menu”toconrm.(“Radio”willsetthe
time from the radio frequency and will thus auto-adjust for daylight
savings time.)
4 Choose between 12hr or 24hr time format. Short press “Select/
Menu”toconrm.
5 Choose between dd-mm-yy or mm-dd-yy date format. Short press
“Select/Menu”toconrm.
1 Long press “Select/Menu” and use the arrow keys to navigate to
“Countdown Timer”.
2 Short press “Select/Menu” to access the set-up menu.
3 Use the arrow keys to select Off/On, followed by the desired time
(in hours, minutes and seconds). Short press “Select/Menu” to start
the countdown timer.
1 The screen will auto-dim by default, based on ambient light.
2 To set the screen to a particular brightness level, long press “Select/
Menu” and navigate to “Backlight”.
3 Screen brightness can be set at levels from 1 to 5 or on auto mode.
Shortpress“Select/Menu”toconrm.
1 Long press “Select/Menu” and use the arrow keys to navigate to
“Sleep”.
2 Short press “Select/Menu” to access the set-up menu.
3 Use the arrow keys to choose your duration, then short press
“Select/Menu”toconrm.
1 To adjust the sound, long press “Select/Menu”.
2 Navigate to “EQ Setup” and short press “Select/Menu” to gain
access to sound level adjustments.
3 Set the EQ to a genre preset or manually adjust the bass and treble.
1 Long press “Select/Menu” and use arrow keys to navigate to
“Reset”.
2 Short press “Select/Menu” to access the set-up menu.
3 To perform a factory reset, use the arrow keys to choose “Yes”.
Shortpress“Select/Menu”toconrm.

10
Care instructions
Troubleshooting
Do not get the device wet. Avoid using harsh
chemical cleaners. Wipe with a soft, damp cloth.
Problem Cause Solution
Ican’tndthe
station I want to
listen to.
The station may not
broadcast in your
local area. There may
be local interference.
Check the station
is available in your
area (if DAB use
getdigitalradio.com),
extend the cable
antenna for best
reception, perform
a full scan.
I can’t connect via
Bluetooth.
Bluetooth mode
is not selected.
Another device is
already connected.
Ensure Bluetooth
mode is selected on
Prelude and on your
device. Long press
“Mode” to discon-
nect any
other devices.
The screen is too
bright.
The menu settings
need to be adjusted
or auto-dim turned
off.
Manually set the
brightness to a
lower level or, if using
auto-dim, avoid bright
lights shining on the
screen.

11
Technical specications
Servicing and disposal
Model name: Prelude
Adapter output: 9V 2A
Speaker output: 2x 3W
USB output: 2x 5V 1A
Class: II
This product should only be repaired or serviced by an authorised
service engineer. Only genuine, approved spare parts should be used.
This symbol indicates that this product should not be treated as
normal household waste and should be recycled. John Lewis & Partners
does not operate in-store take back, but as a member of the Distributor
Take Back scheme has funded the development and upgrade of
recycling facilities across the UK.
Please take your old appliance to your nearest collection facility. For further
details, contact your local council or visit: www.recycle-more.co.uk

12
John Lewis Partnership
171 Victoria Street
London SW1E 5NN
johnlewis.com
This item is guaranteed for two years in respect of defects found to be
due to faulty workmanship or materials. Proof of purchase is required
for the validity of the guarantee. This guarantee is no longer valid in
the case of accidental damage, alteration, repair by any unauthorised
persons or poor maintenance. This guarantee in no way affects your
statutory rights.
Please retain these instructions for future use.
Guarantee
Table of contents